1
Nicholas R. | all galleries >> CCD / CMOS Cleaning > Introduction
previous | next
Introduction
Hi! Thanks for stopping by.
Please visit our other website when you get the chance - http://www.copperhillimages.com
•We are very happy to have our products distributed by HeadshotsRentals in Canada.
•Here's our latest partner in Norway: http://www.tylerolsonphotography.com/nettbutikk/ .
Thanks go to Dave Etchells of http://www.imaging-resource.com for the following comments. As far
as digital cameras go, you will not find a more knowledgeable guy on the internet along with a great
"imaging resource" in his website.
Nicholas:
I just wanted to say a hearty "thanks" for your excellent SensorSwipe sensor-cleaning product, and
your incredibly detailed and useful website detailing the "Copper Hill" cleaning method. In a market
dominated by absurdly overpriced products and ludicrous advertising claims, it was such a relief to
find your simple, elegant, cost-effective method and products. The SensorSwipe kit worked exactly as
advertised, the first time, and the excellent tutorial material you provide made the whole process
straightforward and worry-free. I don't often make unqualified recommendations regarding a product,
but I'm happy to do so for SensorSwipe: Literally every digital SLR owner should have a SensorSwipe
kit and learn to use it. Congratulations on a great product, and thanks for your dedication in making it
available at an affordable price. Dave Etchells, Imaging Resource.
• Many thanks go to Bob Johnson for including this tutorial in his article about sensor cleaning:
http://www.earthboundlight.com/phototips/where-is-that-dust.html?search=ccd+cleaning&bool=and .
While you're there, you can see some of the best Pacific Northwest images on the internet today Bob's a very talented photographer, and a heck of a nice guy.
•I'd also like to thank Steve Sanders for including this tutorial in his page of resources:
http://www.steves-digicams.com/digresources.html . Steve's site is still one of the best places to go
for information about digital cameras.
NOTE: At several junctures ahead, I have gone very off-topic for totally unknown reasons. You will
get fair warning of these chaotic and superfluous detours.
IMPORTANT NOTE: Although it is not quite as difficult as tensor calculus, ballroom dancing or
making a really light, poofey meringue, hands-on sensor cleaning is definitely NOT for everyone. If
you have one or more of these traits, I seriously recommend passing on cleaning your own sensor: 1)
if you are, without a doubt, "all thumbs" or a certified "klutz" with anything mechanical; 2) if you have
unsteady or trembling hands, especially under pressure; 3) if you are the least bit far-sighted and
blurry-eyed at close-up range; or 4) if you pass out at the mere thought of sensor cleaning. Otherwise,
let's get to it.
Before moving to the D200, the D1X was my pride and joy, and in the first couple of months with it, I
went through a parade of devices and techniques which purported to get rid of the "dust bunnies". If
you are reading this now, you probably know that the Nikon CCD is a fabulous dust magnet which
needs to be cleaned regularly. I don't own a Canon, but the filter on the CMOS is of similar material
and it too collects dust when the sensor is charged. These filters (anti-aliasing or low pass on a CCD,
IR dichroic on a CMOS) are mounted on top of the actual sensor chip with a small gap of airspace
between the two. When people refer to "sensor" cleaning or swabbing, it is these filters that will be
wiped with a swab, and not the actual CCD or CMOS.
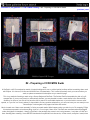
A sensor swab is wrapped with a special lint-free cloth and the tip is moistened with a few drops of
methanol. This liquid makes the dust particles STICK to the cloth for removal; a dry cloth will only
push the dust around the sensor. Other than making your light background images look like a case of
chicken pox, a moderate to severe accumulation of dust particles will cause a noticeable loss of
contrast in your images. That's why keeping your sensor dust-free is so critical and necessary to DSLR photography.
There are two kinds of dust particles you'll have to deal with: loose specks that will just move around
on the sensor, and "super-stuck" particles, which have the same characteristics as dried-up bug-splat
on a car windshield. There are many theories as to how they become this way (the dust specks, not
the bugs), including internal condensation along with temperature and humidity changes.
What......EVER! Let's leave that to the R&D people out there, because we have to deal with it, no
matter what the cause may be.
The major D-SLR manufacturers are notorious for selling brand spanking new cameras, pre-loaded
with dust. You must try to stay calm, though, because if you send it back and get a second one, the
odds are overwhelming that it too will be just as dusty. OK, so let's go to the user manuals. The
recommended procedures in the Nikon user's guide are actually humorous in how ineffective they
are. After doing exactly what was specified, including the oh-so-elegant-and-ever-so-dainty "POOF"
from a bulb blower, I still had spots in my images. So I waved the white flag and sent it back to Nikon
for cleaning. When it returned, it had the exact same number of dust specks as before, 28, to be
precise, but they were nice enough to have rearranged all 28 for me.
Hearing from others who had the same results with Nikon, Canon, et. al., I realized that this would get
me nowhere fast, so I set out to find a good working method of self-cleaning the sensor.
I ratcheted up the bulb-blower a couple of notches and went for more power with canned air and then
compressed air. All of these blowers stirred up the loose dust particles - some of the dust escaped the
chamber, but MOST of it just moved around on the sensor. All of them were no match for the stuck
specks. I tried several types of vacuums, including various computer-vacs and a 2.25 horsepower
Shop-Vac (yes, I was a wee bit desperate at that point). They performed as poorly as the blowers.
Not until later did I find out how risky it is using any of the high-powered blowers and vacuums (more
on this in the next page). I was very lucky I didn't ruin my camera. Anyone who promises you fantastic
results from either a vacuum or a blower, cannot possibly own and clean a D-SLR.
Then, when I was just about to give up, I came across a method which utilized home-made or premade sensor swabs, along with methanol - I tried both. The homemade swabs were cut out from hard
plastic and this gave me a real uneasy feeling in the pit of my stomach when I brought them down on
the sensor (this traumatic event lead me to look for an alternative). But even through my
apprehension I could tell that I was onto something, a method and tool that needed a little tweaking.
As you work your way through this tutorial, what I've already touched on will be explained and
illustrated in great detail, so don't worry if this is all new to you right now. The important point to keep
in mind is that your D-SLR, along with all of your lenses and accessories, are quite a sizeable
investment. Sensor maintenance will require you to choose the tools and method necessary to protect
the performance of your camera and the integrity of your images - it's a VERY IMPORTANT
DECISION.
BUT FIRST.....
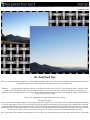
Check how much dust you really have by shooting the sky stopped at 22, run auto-levels (optional),
then view the image at actual pixels. If you would like another way to check for dust, try this. Make
your LCD monitor display a white or light gray screen (how about sky-blue - duh!). The easiest way to
do this is to create a new page in Photoshop and fill the screen up with it. Manually focus your lens to
infinity, place the camera a couple of feet away, take the shot of the monitor at 22 and view it at
100%. Just control your exposure compensation to prevent blowing out the highlights. This is every
bit as reliable as shooting the sky, and you can do it anytime of the day, even right now. It shouldn't
take more than 5 minutes, we'll hold your place.
Once you get up close and personal with the infamous "super-stuck dust-bunnies", you'll realize that
anything but the precise amount of pressure from a perfectly designed swab is going to leave you
totally frustrated. Most of the veteran sensor swabbers can attest to the need of occassionally
applying a more than normal amount of pressure with a swab on the sensor to dislodge these gluedon particles. With this working knowledge of the physics involved here, some of the alternative
methods and devices that have been introduced into the dust removal discussion are simply
ABSURD in their claims of easily handling these specks - you'll be lead to believe they're selling a
SENSOR WAND.
IMPORTANT
I think there are a certain percentage of D-SLR users who really want to believe in these other
devices and methods, mainly because they are extremely unsure of their abilities to tackle sensor
swabbing. This is quite understandable. However, there are literally hundreds of guest comments
contained in this tutorial from people all over the world who dreaded the thought of swabbing; but they
hung in there, did a ton of research, then got up the nerve to swab for the first time. Some of their
disaster stories about using items like Q-tips (lint-free?), isopropyl alcohol (purity?), or crude jerryrigged swabs ("now what have I gone and done?")
http://forums.dpreview.com/forums/read.asp?forum=1019&message=11912831
should also help you decide which way to go.
THE FACTS OF LIFE No matter how careful and meticulous you are with your D-SLR, you WILL get
dust particles on your sensor. Some of these specks will make you want to use a jackhammer to get
rid of them.
Look, if you really don't mind having some dust-bunnies in your images and feel that using a little
blower every once in a while is good enough for your own needs, that is perfectly fine with me. It's a
very diverse world out there and what a mountain is to one person might be a mole-hill to someone
else. Casual hobby-photographers will probably not have a need to rid their skies of dots and
blemishes caused by dust. But both the professional photographer and the serious amateur alike
cannot take the chance that their images will not be corrupted by dust specks. In photos with light
backgrounds, I can start to see dust-bunnies at F10 or F11, so the argument that most of us will never
see dust specks in our images because we rarely stop down to 22 shows little understanding of how
invasive dust-bunnies can be. Once you get familiar with spotting these varmints, you may be
surprised at how prevalent they are (read on to see examples of this).
I hope you enjoy your visit and pick up one or two tips to help clean your CCD or CMOS.
In this tutorial, I have tried my absolute best to give you crystal clear evidence that supports my
opinions, bringing all sides of the story before you, both the promises and the, sometimes, outright
lies. At the end, I hope you will be much better able to decide which tools and method to use when
you're ready to clean your sensor.
*You may send your comments and questions to me at [email protected] .
other sizes: small medium original
previous | next
Copper Hill Images
post a comment
15-May-2005 21:40
Jeff Bryce
Thank you for the prompt delivery of the SensorSwipe tool, 100 PecPads & 2-ounce
Eclipse.
Before trying your solution, I tried Sensor Swabs because other websites cautioned about
using "cut-down butter knives" (the SensorSwipe?). The Sensor Swabs came in a 3-pack
with a 1/2 ounce dropper of Eclipse for $30 Canadian. After the first swab, my test revealed
countless specks & smears, especially in the corners & edges. I had thought I had
scratched or damaged the sensor! The second swab removed major smears but many
specks remained. After the third swab there were about 20 specks near the edges and
corners. The 3-pack was used up and my D70 was dirtier than when I started!
Thankfully, I just used your SensorSwipe system and the sensor is completely clean! Your
instructions and tips are very helpful and comforting. It took me 7 attempts and I know that
I'll get better with practice. And I still have plenty of Eclipse and 93 more PecPads for future
cleaning!
Jennifer Zimmerman
05-Apr-2005 02:47
thank you SOOOO much! wonderful item I HIGHLY recommend to anyone with a digital
SLR camera. My 20D is cleaner than the day I bought it.....detailed instructions are
wonderful! again thank you!
29-Oct-2004 20:04
David Ceremuga
Got the kit today because I had several "dusties" on my new D70 that a bulb wouldn't blow
away. It took 8 tries but now have a completely dust free sensor. What a great product. I
was about to return the camera. Now it is perfect. BTW, It is very easy to do and as you
say, the pressure needed is about the same as writing with a pen. Also I found the a nice
slow and even stroke works the best.
08-Aug-2004 23:33
yvette cardozo
Nick,
it's a long story but i wound up with a defective canon 10D and figured, ah ha! a sacrificial
camera to practice on. your system worked like a charm. i then went on to clean my other
digital camera, a rebel, with equal results. i wanted to send you examples but you no longer
seem to have your aol address. anywhere i can send them? meanwhile,thanks, truly.
Nicholas R. | all galleries >> CCD / CMOS Cleaning > #2 - Preparing a CCD/CMOS Swab
previous | next
#2 - Preparing a CCD/CMOS Swab
Note:
A PecPad is a 4"X4" non-abrasive swatch of material designed for use on critical optical surfaces without scratching when used
with Eclipse. It is ultra soft, lint-free and 99.999% free of contaminates. This is what will actually touch your sensor when you
swab, so please remember this description as you read this page.
This is my method of making a swab using a SensorSwipe and PecPads. The finished PecPad resembles the side of a giftwrapped box. If you are very handy or mechanically inclined, you may be able to make a swab similar to the SensorSwipe.
However, for those of you who do not have the time to search for a workable implement, or just don't wish to carve a small
spatula, or if you live in a country where it's impossible to find any spatulas whatsoever, you can now have your own ready-to-use
SensorSwipe. Just navigate to the pages that follow this tutorial.
Much is made over "clean-room assembly" of other pre-made swabs. What happens when you take it out of it's wrapping? Right,
it's now been exposed to air and everything in the air - it's no longer "clean room". PecPads are manufactured and packaged
under the highest of standards. I keep my PecPads in the package they came in and, using tweezers, I only take out ONE at a
time. Handling them carefully, I have NEVER introduced more particles onto the sensor; in other words, everytime I swab, there
are LESS dust specks then before. Again, this is a personal preference, if "clean-room" is important to you, I wholeheartedly
recommend PSI's Sensor Swabs. In my experience, however, just using common sense in all aspects of this task will give you a
clean, sanitary and "contaminant-free" swab to work with!
I must address the obvious, which is the need to have a CLEAN and STILL work area for this task.
NO frisbee, NO dogs, NO cats, NO rug-rats, NO jet engines, NO dandruff, and OF COURSE NO powdery contraband allowed! OK?
IMPORTANT NOTE:
You MUST try to do all of your sensor swabbing in a completely still and quiet room. There should be no drafts of any kind, even
from a heater or air conditioner. The amount of airborne dust, dirt and miscellaneous particles in the ambient air is unbelievable,
to say the least. So to achieve a workable, sanitary environment, you have to go the extra yard here, even to the point of
"obsessive compulsive" behavior.
Also, DO NOT TOUCH the wiping area of the PecPad because the oils from your skin are easily transferred to the sensor. If you
are totally new to this procedure, I recommend using powder-free latex gloves to work with the PecPad, at least in the beginning.
They are extremely cheap and can be found in any pharmacy. When wearing them, you'll be able to touch any part of the pad,
even the area that will contact the sensor, without worrying about contamination. They will also give you more freedom to wrap
the PecPad tightly around the swab.
OK, LET'S GET STARTED
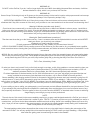
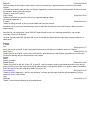
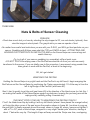
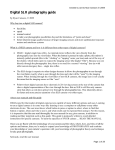
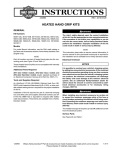
Holding the SensorSwipe in my right hand and the PecPad in my left hand, I begin wrapping the PecPad around the SensorSwipe
by positioning the 'Swipe approximately 1/3 of the way in from the left or right edge of the PecPad (see frame #2). Try
experimenting with this placement and you should see that somewhere off-center is most advantageous. Using this positioning all
but eliminates the "bunching up" of the PecPad material, thereby making it very contoured and streamlined.
Next, I start to gently tug at the pad (see frame #3) in the direction of the black arrow (as I do this, I am resting the handle of the
SensorSwipe against my abdomen, keeping the pad snug around the wiping end by carefully pulling it towards me).
*THIS NEXT STEP IS THE KEY TO WRAPPING THE PECPAD TIGHTLY*
I "tuck" the folded-over flap by holding it with my left thumb (where I have placed the orange button) as I bring the other corner of
the pad across the swab as shown in frame #4. I continue to snug up the pad until it is finally wrapped around the swab, shown in
frame #5, where I secure and tighten it with a 2" to 2½" piece of scotch tape, wrapped in a very slight "barber-pole" direction,
starting at about 1" below the very tip. This length of tape will wrap around the 'Swipe one time, overlapping and adhering to itself.
To remove the used pad, I use a razor, scissors or an X-Acto knife to cut the tape, then I just peel the pad away from the 'Swipe.
QUICK TIP: Practice with a 4" X 4" (10 cm. X 10 cm.) piece of paper on a butter knife.
DO THE BEST YOU CAN AT FIRST. Getting the PecPad perfect on your SensorSwipe may take some practice, so don't obsess
on it too much in the beginning. The idea is to have it snug at the tip - using additional pieces of tape to help you accomplish this
is fine.
NOTE: Here in the U.S., you can get 1" X 3" permanent white labels made by Z-International. I've started using them to secure
my PecPad to the 'Swipe instead of scotch tape - they just happen to be the perfect size for this job. You can find them at any
Staples, WalMart or online office supply store.
*This method of wrapping the PecPad will work ONLY with a chiseled tip; the angled folds allow it to take the exact shape of the
SensorSwipe's A-tip. There is NO benefit from using this method with a blunt tipped swab.
From here you hook up the AC-adapter and lock up the mirror. Next put 2 drops of Eclipse (maximum) onto the wiping edge and
you're good to go. I've placed two arrows in frame #6 to show where to place the 2 drops of Eclipse. Before you know it, you'll
only need one drop, placed right in the middle of the same two arrows.
The BIGGEST risk you will take self-swabbing is if specks of dirt or debris somehow enter the CCD or CMOS chamber, or are on
your swab. When you remove the lens, your first thoughts may be that tons of dust particles will invade the chamber. When
changing lenses in the field, this is certainly applicable, so your speed IS important. However, once you get a handle on the
swabbing basics, you'll probably take from 10 to 25 seconds to swab and then return the lens. Going as fast as you can is NOT
necessary to get a dust-free sensor, so please don't make that a goal. If your controlled work area is as clean and still as possible,
your airborne dust should be MINIMAL, so you will have much more leeway in swabbing slowly and methodically. A gifted
surgeon is incredibly steady and precise with every movement of his instruments, and that's not a bad image to keep in mind.
Handle your PecPad-wrapped swab like it's sterile. After I've carefully removed the PecPad from it's wrapping and covered the
SensorSwipe, I lay it on the side of the tape dispenser; this allows the tip to sort of "float" untouched in the air until I'm ready to
apply the Eclipse. Again, the wiping area of the PecPad MUST NOT TOUCH ANYTHING on it's way to wipe your sensor.
If you handle the PecPad exactly the way I've just described, the possibility of damaging your sensor is negligible.
WARNING #1:
DO NOT cut the PecPad; if you do, it will no longer be lint-free and it WILL leave behind loosened fibers and motes; it will then
become identical to a Q-tip, which is, as you know, NOT lint-free.
WARNING #2:
Sensor Scope? If shooting the sky at 22 shows you the precise amount of dust and its location, what purpose would a microscope
serve? Redundant, perhaps? Yes. Expensive, perhaps? Very.
INTERESTING OBSERVATION: Isn't it funny that so many of the tools that are sold as sensor cleaning devices have the
disclaimer that if they fail to remove all of the dust, you'll just have to use a wet method such as the one we are showcasing here?
Warning #3: Windex (and other such liquids)?
From time to time, someone will go on the forums and say that Canon or Nikon uses Windex to clean a sensor. I would like to
invite you to bring your camera to my studio; I'll provide the Windex and watch you swab your sensor with it. If we then test the
results and do not see smearing up the wazzoo, I'll give you a hundred dollar bill. I'm perfectly serious about this. I'll be even more
serious when I tell you may need to buy a new CCD or CMOS.
Warning #4: Retail establishment procedures?
Then there are those that go on the forums and say: "I was in a camera store and the fellow behind the counter said to NEVER
swab your sensor; you should only use a blower."
(Gadzooks, my head is starting to throb!)
So we're supposed to read that and say: "Boy, thanks; you just saved me a fortune!"
HELLO! IS ANYBODY HOME? Just by reading as much of this tutorial as you have read so far, you probably know a gazillion
times more about sensor cleaning than your friendly camera salesman, who thinks he knows it all because he read about it in the
user manual.
MORAL: Be very careful surfing the digital photography forums; there are quite a few grenade throwers who want nothing better
than to see you succumb to your FUD. These people are paralyzed by their own fear of doing anything in the D-SLR chamber,
and by transfusing their FUD into your mind, they become giddy with joy knowing that they're not alone. Don't fall for it.
FUD = Fear, Uncertainty, Doubt
So, what you have to ask yourself is do you feel lucky enough to use tape, a stick, thing grabbers or vacuum wands to clean your
sensor, only to develope a more urgent need to swab with methanol? The ONLY thing that has ever touched my CCD is a
methanol-moistened PecPad on a SensorSwipe, the ONLY time-tested perfectly safe materials.
First-hand experience IS the best teacher, but if a 100% dust-free sensor is your goal, why would you expend the time and
money, and take the unnecessary risks that these tools introduce, only to remove SOME of the dust particles?
Sensor swabbing is the cleaning method of choice for thousands of digi-photogs because we're not interested in going from 20
specks down to 12; we're VERY interested in going from 20 down to ZERO. If your attitude is - "Who cares if my images have
spots in them, no big deal.", then, BY ALL MEANS, use a blower, tape, the healing brush, RPGs, WMDs or the kitchen sink. If this
applies to you, please read the next page to see the actual process of sensor swabbing; it just might change your opinion.
If you are selling or plan on selling your photographs, you will encounter a whole different threshold for dust-spot tolerance. Those
of you already at this point know that the competition is unbelievably fierce and that there is no room for technical errors of any
kind, especially dust-bunnies. This also applies to those of you who have the HIGHEST of standards when it comes to achieving
image-integrity, even though you may not be a professional.
NOTE:
The main thrust of this tutorial is that sensor swabbing requires you to wrap a well designed swab with a PecPad, put a drop of
methanol on it and wipe a small surface that is similar to glass. THAT'S IT! I promise you that once you've swabbed your sensor a
number times, you'll never look at these alternative methods and tools as being "easier" than swabbing! Please trust me on this.
Also, I hope you will see a pattern in the guest comments, one that has the newbie-swabber actually feeling a bit "embarassed"
when it finally dawns on him how easy this really is.
The swab making method shown above allows the corners to be very crisp which helps in cleaning the outer edges of the
recessed CCD filter. You will very rapidly find out how small an opening a D-SLR is when you begin swabbing - it will probably
take some time getting used to maneuvering the swab in the chamber.
DON'T GET DISCOURAGED!
YOU ARE NOT TOTALLY INEPT!
This is really a simple procedure, but you'll have to keep swabbing to learn how much pressure to apply and how to get all the
dust in one "double-swipe".
Let's roll!
IMPORTANT NOTE:
If you continue researching the materials used in sensor swabbing, you'll probably encounter the manufacturer's web-site where it
is stated: "PecPads are not recommended for sensor cleaning, but (pre-made) SensorSwabs are." The reason behind this is that
Kodak sponsored the development and approved the "clean room" assembly of the SensorSwabs. The PecPad does have a
slightly more abrasive texture when viewed under a microscope, but, at the same time, the lithium niobate anti-aliasing filter has a
glass-hardness rating of 5 on a scale of 1 to 10. The manufacturer is just being very cautious here because no camera company
has taken it upon themselves to test whether PecPads and Eclipse may damage a CCD or CMOS when used with a swab and
method such as mine. More significantly, there is no guarantee that the general public will follow specific guidelines such as the
ones I am presenting here. Again, digital photographers have been using PecPads and Eclipse for years with NO image
degradation whatsoever. Don't you think that if this cleaning method was damaging the sensor in any way, shape or form, we'd
have gone out of business a long time ago? The numbers of SensorSwipes and PecPads we have sold in 5 years and the virtual
absence of complaints about these tools proves to us that this is actually one of the safest methods you can choose to clean your
sensor. There are a whole host of Canon 1Ds shooters who use PecPads and Eclipse in their $8,000 cameras, so the fear,
uncertainty and dread that you may read about on this topic is a state of mind for "weenies" only. Sensor cleaning demands a
certain level of common sense, no matter what tools you use, and if you are lacking that, then you'd be well-advised to send the
camera to the manufacturer for maintenance.
OUR GUARANTEE:
The "Copperhill" method uses PecPads, whereas the traditional method uses Sensor Swabs. If you can prove to us through a
reputable 3rd party that the PecPad material was the sole cause of any damage to your AA-filter, we will have it replaced at our
expense.
Throughout this tutorial, I address how crucial it is to take on a whole different mind-set in handling and caring for a digital-SLR as
compared to a film-SLR. When someone tells me in an e-mail that he's left a fingerprint on his sensor (yes, I said fingerprint), I
emphatically urge him to either sell or incinerate his D-SLR immediately! But right before giving him this piece of advice, I'll make
it a point to mosey on down into the woods, with the sound and smell of pine needles all around me; I'll encounter a tranquil mosscovered rock, surrounded by sun-dappled ferns, gently dancing with the soft breeze; I'll assume the lotus position; I'll take about
10 deep, slow cleansing breaths, and then I'll let loose a
BLOOD-CURDLING SCREAM! ! ! !
(Do NOT touch your sensor.)
NEXT: The Dirty Deed
On-line sources of PecPads and Eclipse:
Source in Australia and New Zealand - The whole line of CopperHill D-SLR cleaning products is now available here:
http://www.qualitycamera.com.au/index.php?cPath=33&osCsid=76c4a5d527ce80474d8cc6c3d33698c1 .
Sources in the U.K. - http://www.warehouseexpress.com/
or http://www.crown-digital.co.uk/ishop/883
Source in Germany - http://www.monochrome.de
Source in Holland - http://www.kamera-express.nl/shop.asp?shop=&categorie=23&merk=107
Source in Japan - http://www.ginichi.com/shop/
Source in France - http://www.reidlimaging.com/photographicsolutions.htm
Source in Portugal - http://potassioquatro.com
other sizes: small medium original
previous | next
Copper Hill Images
post a comment
awstyle
27-May-2005 10:53
It really does help to restore your faith in human nature when you find someone who is prepared to go to such great
lengths to provide such a detailed tutorial for the benefit of others. I also like the humouristic style in which it is written.
I shall be obtaining the necessary 'gear' shortly and then my 10D will get the clean of its life!
13-May-2005 04:05
Sam Bala
I was absolutley stressing deluxe over the 19 dust specs that set up camp, 3 swipes later i am down to 5!!! One of
which is only prominent. I am way to nerve wracked to do it 4 times in 5 mins, need that stiff drink.
Either way this is a godsend for my D70
Sam Bala.
Sydney, Australia
beachwalker
03-May-2005 22:53
I just finished cleaning my 20D for the first time. I did just llike I was told and it is now absolutely spotless.
Thanks,
Al Schlegel, Del Mar, CA
02-Apr-2005 18:20
Jakub Serych
Thanks for your great describtion of the great cleaning method.
I made just one change in the preparing cleaning swab. I'm not taping the PecPad, but I'm using so called "Fast Clips"
with the clipping tool, which you can buy in Office Supplies shops. It is very fast, safe and reusable.
Rudy Trindade
24-Feb-2005 13:04
Spectacular the attendance, I received SensorSwipe in Brazil in little time.
Excuse for having complained previously of the delay because I forgot that in Brazil the times the customs puts back.
The product is excellent and I am very satisfied.
I write in a translating program because I don't write in English, excuse the mistakes.
18-Feb-2005 13:39
Nigel from OZ
Thank you so much for your thorough, camera saving guide. I recently purcased an EOS20D to find that there was
dust on the sensor from the factory. Going on holidays i did not favour waiting for canon to clean so I gave it a go with
a blower and a brush ...
To anyone reading this... DO NOT ATTEMPT TO CLEAN CMOS OR CCD WITH A BRUSH!!!!!
I had made it so much worse that i was afraid i had damaged the cmos... After a very stressful few days, i acquired
some pec pads, eclipse and a rubber spatula, and gave it a go....
Thank You , Thank You, Thank You
ps: It works really well :)
Use a Clean Roll of Tape!
30-Aug-2004 06:45
Thanks for the folding and wrapping directions. I learned this fast: get a clean roll of Scotch brand tape that comes
sealed, e.g. in a green box. If you're like me, that old roll of tape that has been kicking around your office has edges
are probably covered with dust, and the tape will be used on the Swipe that enters your camera chamber. Avoid
bringing dust into the chamber via dirty tape - use clean tape and store it in a ZipLoc bag until next time! -Paul
22-Dec-2003 20:15
NJP
Thank You very much on your fantastic tutorial. I followed it and voila my Nikon D 100 sensor is clean. In Canada (
Toronto) Pac Pads and Eclipse are available at Haedshots Rental 290 Shuter St. NJP
10-Nov-2003 16:56
mrbobco
with much trepidation i entered this foray into cleaning. i was experienced in all things technical...but not entirely
prepared for this one. my 1ds had collected an INTENSE about of pesky dust bunnies...so much so, even shots at
f/2.0 were looking filthy. your clear, concise directions (and what NOT to do) really helped keep me from wasting too
many sensor swabs (although i purchased them before i read this article...i'll be using the spat-u-swab i just made for
cleaning in the future).
thanks for all your time and effort...perhaps there's a karmic payoff for you somewhere :)
bob
22-Oct-2003 02:31
Candace
I just cleaned the sensor on my 1D, and I'm so impressed! The tutorial is outstanding-- I probably wouldn't have
attempted this if I didn't feel confident that I knew exactly what I was doing. I have a suggestion that some might find
helpful: I took a fresh sheet from the center of a stack of printer paper, and used that clean surface to lay the PecPad
and spatula on while I wrapped and taped them.
29-Sep-2003 21:51
Mike
I can't express how much I appreciate the effort that you put into this tutorial. It took me three attempts to get all of the
dust out but the proceedure is excellent and very easy to follow.
Thank you so much!
Regards,
Mike
08-Jun-2003 13:21
Tom Lloyd
Having recently purchsed a Canon 1Ds I was surprised at its ability to attract dust compared to my 1D. The blower
option only made matters worse - much worse.
The dire warnings in the handbook re. touching the sensor and the instruction to return to Canon Service Dept were
very explicit. Not an easy choice with such an expensive piece of kit.
Your tutorial gave me added confidence that the process was not beyond the capabilities of most "normal" users. My
only modification was to trim down the handle so that it was thinner. This improved access and any additional pressure
translates to bending the handle rather than increased pressure on the sensor.
I just wanted to express my gratitude for your efforts with this web tutorial. The system works (at least it does with my
1Ds) and I shall now finish each shoot with a stopped down image of the sky - confident that I can deal with any new
"dust bunnies" that have accumulated.
Many thanks
Donlad Race
13-Apr-2003 00:39
Nick,
Thanks for the great description of this cleaning process. Just got a Canon 10D and was using alot of bracketed
exposures and voila I had three or four spots on the sensor. After reading your article went to Walmart to get the
spatula and to a photo shop for the pecpads and eclipse. Followed instructions to a tee and was a lil nervous about
seeing the sensor face to face for the first time but plunged in and followed your technique just once and after taking a
few shots the sensor was clean as a whistle.... Thanks again.
Nicholas R. | all galleries >> CCD / CMOS Cleaning > #3 - Swabbing Illustration
previous | next
#3 - Swabbing Illustration
My personal thanks must go to Mr. Chuck Westfall of Canon USA for his very kind words regarding this tutorial http://dpreview.com/forums/read.asp?forum=1019&message=5602180 . His remarks were basically a personal observation of this
tool and method as compared to all of the others; however, it is not in any way to be construed as a corporate Canon stance
regarding consumer sensor cleaning.
NOTE: Please read this beautifully written story of this lady's mission to clean her sensor. It's a great prelude to the material on this
page.
http://just.shelleypowers.com/juststuff/biting-the-bullet/
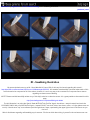
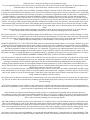
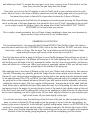
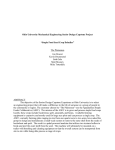
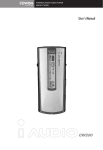
For this illustration I am using the Spat-U-Swab WITHOUT the PecPad. Again, the obvious - wrap the utensil and touch the
CCD/CMOS ONLY with a lint-free PecPad. Again, I repeat DO NOT use cloth, tissue, lens tissue, cotton, or Q-tips (please trust me
on this). Use the word "top" as a reference point through these 6 steps, representing the upper right corner of the sensor as you
look at it.
Nikon's disclaimers regarding self-swabbing say in essence: "Don't even think about doing it yourself or the universe as we now
know it will come to a screeching halt!" They are naturally covering their butts because they would have NO control of the
implements and techniques the general public might use.
MY DISCLAIMER:
Although it is uncommon, the very expensive imaging sensors CAN be damaged by improper swabbing. I cannot guarantee 100%
success for everyone, every swabbing, and, just like Nikon, how could I possibly guarantee you will not damage your sensor? I am
SUPREMELY confident, however, that my regimen and tools described in this tutorial are the SAFEST way to self-clean your CCD
or CMOS! And, with a little patience and practice, your "white knuckles" will be replaced by confidence, sooner than you might
expect. If for ANY REASON you don't feel comfortable self-swabbing, then, BY ALL MEANS, send your camera to the
manufacturer for cleaning.
IMPORTANT NOTE:
Your first step here will be to apply the Eclipse to your PecPad-wrapped SensorSwipe. The Eclipse will come out of it's bottle
lightning fast. So fast, in fact, that the last thing you will need to do is to squeeze the bottle. Just tip it over very gradually, and the
two drops will come out on their own. When you become a seasoned veteran at this, you will only need one drop, placed right in the
middle of the wiping tip.
After applying one or two drops of Eclipse on the tip of your 'Swipe, lock up the mirror, then remove the lens. Proceeding very
carefully, guide the 'Swipe into the corner where you've chosen to start (frame #1), and, using pressure maybe equal to writing with
a pen, gently drag the moistened swab to the opposite end of the CCD or CMOS. Use light steady pressure and try to complete the
stroke by going as far as the sidewall will permit (those of you with sensors without sidewalls, just barely overlap the sensor's
edge). This may require a little practice - bringing the tip of the swab (with the dust) all the way to where the low pass filter meets
the wall. If you are getting the center clean but are leaving dust at the edges, try moving the pivot point of the swab to get a better
angle at the end of the floor (you'll see what I'm talking about once you've swabbed a couple of times). In other words, as you are
completing your left to right stroke, tilt your hand slightly to the left; as you complete your right to left stroke, tilt your hand slightly to
the right.
You should now have some dust adhering to the first side of the pad, so after completing the first pass, as shown in frame #3, lift
the swab up just far enough to move it into the next position, as shown by the arrow in frame #4. In this left/right, right/left
configuration, there is no ROTATION of the swab as it is positioned for the second swipe; it is simply lowered to the bottom right
corner of the sensor. Here, you'll use the opposite side of the swab and go as far as you can again in the opposite direction of the
first swipe (going lengthwise, you will be overlapping your first stroke).
NOTE:
Please try other configurations which may suit your own style better than the one pictured above, such as: #1) upper right to upper
left, ROTATE the swab 180°, then lower right to lower left, or #2) lower left to lower right, ROTATE the swab 180°, then upper left to
upper right. I've found that the right to left swabbing direction is a little easier for me, maybe because I'm right-handed.
The swab functions EXACTLY like the action of a WINDSHIELD WIPER in that it uses one side of the blade to wipe on it's first
pass, then uses the opposite side on it's return pass.
I suggest starting very gently, and then increase the force as you get more experienced. It doesn't matter if you go up/down,
down/up, left/right or right/left, as long as you DO NOT use the PecPad more than once a side. If you do, you will be depositing the
dust right back onto the CCD (please trust me on this).
You can now test your results by shooting the sky stopped at 22, run auto-levels (optional) then view it at actual pixels. If you've
started with, perhaps, 10 to 20 individual specks of dust, and now you have 2 to 5 and they're mainly on the edges, you might very
well be content with that. My personal goal is ZERO DUST and world peace (in that order).
As a rule, I will clean the CCD once a week. I also try to shoot the sky on my last shot of the day to keep a daily check for dust. The
swabbing procedure takes me about 5 minutes to set everything up, then 15 to 20 seconds to apply the Eclipse, swab and return
the lens. I try to keep to a bare minimum the time that the chamber is open. As you keep swabbing you will undoubtedly get faster
and more efficient.
I think the main key to cleaning your CCD or CMOS is to relax, work quickly, but proceed methodically. I feel very confident that my
SensorSwipe would have to be pressed tremendously hard to damage the sensor. The rubber's FIRM but YIELDING texture makes
it PERFECT for the job at hand. After getting a little experience dealing with super-stuck dust, you'll better understand the absolute
necessity of a tool that enables you to use EXTRA pressure in order to dislodge these stubborn specks without harming the sensor
whatsoever.
There is a tidal wave of new D-SLR owners who are searching for the safest and easiest ways to maintain their cameras. I would
like to offer you here, the benefit of my learning curve. If I can save you some time, money and a lot of "DUST ANGST", I will be
very, very happy.
POST SCRIPT:
Thanks go to the many digital photographers who have given me such positive feedback on this tutorial, and, especially to those
who've told me of their own success with the SensorSwipe and my cleaning method. Even if you use your own implement, I hope to
have taken out some of the mystique and unfounded paranoia about sensor swabbing.
POST POST SCRIPT:
At last count, the SensorSwipe is being used today in over 50 countries around the world; from places like Australia, New Zealand,
Malaysia, Finland, Hong Kong, Japan, The Yukon, Hawaii, Canada, Chile, Brazil, Israel, Croatia, Poland, South Africa, Saudi
Arabia, Turkey and every other country in Europe. I hope it's not too presumptuous to feel that these fellow sensor swabbers are
my new friends and colleagues in the D-SLR battle against dust.
NOTE: If you plan to browse through my product pages, I invite you to read this excellent article comparing most of the sensor
cleaning tools you will have to choose from:
http://www.dmcphoto.com/Articles/SensorBrushes/
NOTE: And again, a big thanks to Dave Etchells: http://www.imaging-resource.com/PRODS/E20D/E20DA6.HTM
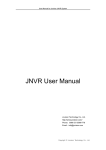
Nikon D1x
other sizes: small medium original
previous | next
Copper Hill Images
post a comment
13-Aug-2004 12:36
Paul Hodgson
Just carried out my first clean. It took a lot of building up for what is quite an easy task - only thanks to this great tutorial.
Ordered a SensorSwipe, eclipse and pec pads and followed procedure very carefully. After a couple of attempts I ended
up with a clean image. Slow but steady is my advise. Thanks for hosting all this info, I think I would have given up on DSLR if I hadn't read this. Also thanks to the people that posted their experiences, very important in bolstering the
confidence.
paul yung
05-Mar-2004 03:44
Thank you very much for your article. I sincerely appreciate it. I have a Canon 1ds and it is just terribly with dust. I
bought a blower from a sporting good store that blow out a stream of gentle air to inflat boats to clean the sensor, and it
does not work. It does work in cleaning out dust inside the chamber of the camera, but not the CMOS sensor. I believe
your method is the best. Thanks again!
Paul at: pbase.com/paul
21-Nov-2003 18:10
Guest
great
Paul Casi
09-Aug-2003 01:59
It's been a year and the good old turkey baster didn't work any more. Used your technique and even thought I went thru
8 pec pads --lots of trial and error--it came out fine.
THANK YOU
Paul
Daniel Yang
25-May-2003 02:11
Thanks for the help. Couldn't have done it without your web pages. I posted a message to describe my experience.
http://forums.dpreview.com/forums/read.asp?forum=1020&message=5189106
Hope my comments contribute the furthering of this craft.
19-May-2003 02:47
Dolores Neilson
Thank you for the informative and assuring way you teach this cleaning tutorial. I have had my dSLR for a month and
have not attempted CCD cleaning yet. There is definitely some anxiety but I will follow your excellent tutorial step by
step after I create the tools and purchase the pads. Thank you for trying to educate us and save us money too!
17-May-2003 20:28
Robyn B
I am just waiting for the shops to open now so I can rush out and buy a spatula and some of those lint-free swab
thingies.
I feel tons better having read your site, as Fuji also suggest the universe will come to an abrupt end if an owner so much
as considers cleaning their own sensors...
Thanks so much for the advice.
John's Gallery
23-Apr-2003 23:36
Thanks for all of the time and effort that you've expended helping others!
We all really appreciate it.
03-Apr-2003 02:23
E. Martin
Thanks for taking the time to post your well-written and humorous tutorial!
Somehow I got to your site a few weeks ago, found it useful the first time but lost the link because I didn't yet have a
digital camera.
Now that I've just acquired the Canon EOS-10D, panic started to set in as I frantically searched for your site but
eventually found it on DP Review.
Oh yeah, my brand-new 10D did come with a *ton* of dust specks. Maybe they don't put these cameras together in a
clean room?
Regards,
E. Martin
wfr2
27-Mar-2003 21:37
Wow, that is quite a tutorial. I have not purchased a dslr yet but will keep your steps for the future. Thanks!
Sheila Smart
20-Mar-2003 01:14
Thanks Nick for the tutorial. I have a Canon D60 which I have cleaned once with Eclipse and pads but its in dire need
for another cleaning and your instructions are very helpful.
Cheers
Sheila
Sydney, Australia
04-Mar-2003 14:50
kendall leonard
Thanks very much for this info. I have a D-1x and a D-1 and I'm always needing a good cleaning which I never had (A
good one that is) Isn't it OK to just use a locking cable release to lock open the shutter ? I'm going to have to reread this
to find out where to buy the eclips fluid. thanks very much...KL
Fred Gunnerson
28-Feb-2003 21:20
Thanks for all you hard work. I will try it next cleaning. I too was going through big bucks with the swabs so you just
saved me a ton of cash, thanks.
Fred
26-Jan-2003 13:17
RRRoger
Thanks, The pictures are better than a thousand words.
Nicholas R. | all galleries >> CCD / CMOS Cleaning > #4 - Important Points Before Your First Swabbing
previous | next
#4 - Important Points Before Your First Swabbing
NOTE:
Congratulations are in order if you have read this entire tutorial up to here. Let's continue.........
*Here is a real-world account of someone who did the homework, obtained the proper cleaning tools, and finally had at it, with great
success http://www.paintedstork.com/digiblog/blog.html . It just takes a few minutes to read, but it will show you the importance of the tips on
this page and the next page (thanks so much, Arun).
These are a few points I would like to emphasize before you swab for the first time:
#1) Take your time, DON'T RUSH! There is no need to make a mad dash into the chamber with your moistened swab. It is MUCH
more important for you to see exactly what you are doing, rather than worrying about dust getting into your camera. Your speed will
naturally increase as you go on.
NOTE: I recommend waiting about 5 or 10 seconds after applying the Eclipse to begin swabbing. This will allow a good majority of
the liquid to migrate away from the tip, making it less likely to streak. I used to remove the lens and then apply the Eclipse to my
'Swipe, but now, it works out perfectly to reverse these two steps.
So, your sequence will be: 1) lock up the mirror; 2) put the one or two drops of Eclipse on the 'Swipe's tip; 3) remove the lens; 4)
swab the sensor; and, finally, 5) remount the lens, unlock the mirror, and turn the camera off.
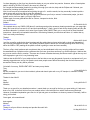
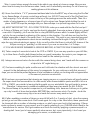
#2) VISIBILITY is the key word in sensor swabbing. The highly reflective "mirrored" surface of the sensor makes it a real challenge
to guide your SensorSwipe into the starting corner. This is just as difficult as trying to poke a fish in a pond with a stick. A good light
is mandatory and be extra aware of the extremely small space you will have to negotiate the swab onto the sensor. Looking back on
my first swabbing, I now realize I could have established a better orientation of where my head, my hand and the light were,
BEFORE I went in to swab for the first time. This is why I strongly recommend doing a dry run with the lens off, just like you were
going to swab. Experiment with the amount and position of your light source until you have the best view of the sensor possible. At
present, I am using a 150W halogen drafting light ($40 at Staples); the ability to move and position it precisely where I want it (just
like a dentist's light), and the true nature of the halogen gives me the best view of the sensor out of all the light set-ups I've tried.
When I swab now, I know exactly where to position the light, off on a slight angle, soas my head and hand do not interfere with the
light.
*Also, I cannot stress enough the need to be able to see clearly at close-up range. My eyes are about 8" to 12" away from the
sensor when I swab, and it's absolutely necessary for me to wear my reading glasses at this distance.
#3) I have found that a 1" X 3" permanent address label to be the BEST way of securing the PecPad to my SensorSwipe; of course,
scotch tape will work, too. DO NOT remove all of the PecPads from their wrapping. Cut a slit with a razor in the top of the package
across the entire width. Then it's a matter of using tweezers or a forceps type of tool to extract one Pecpad while holding the rest in
place. ALWAYS keep the package and your SensorSwipe in a zip-lock bag when not in use.
#4) MOST IMPORTANT TIP - DO A PRACTICE RUN: make your swab with the PecPad and put 1 or 2 drops of Eclipse on it just to
see how the liquid is absorbed, then wipe a piece of glass or a jewel case with it. Hopefully, you'll see that this is a very BENIGN
process which is made slightly difficult only by the very awkward positioning of the sensor in the chamber. You will also see how fast
the Eclipse evaporates in back of the swab (from 1 to 3 seconds). This point is very important because I think a lot of the
apprehension about sensor swabbing involves the thought of using a LIQUID to wipe the very intricate electronic sensor. A dry run
will confirm that there is virtually NO chance of the Eclipse running or "puddling" on the sensor if you use no more than 2 or 3 drops.
IF YOU HAVE NEVER SWABBED A SENSOR BEFORE, A PRACTICE RUN IS MANDATORY!
#5) Take a couple of seconds to look at the CCD or CMOS. If you see any specks on your AA filter, try to blow them off with a bulb
blower before you swab (remember, the spots in your images are actually dust particles too small for the naked eye to see). Once
you begin to develope a D-SLR mindset, which stems from the fundamental differences between film and an imaging sensor,
keeping foreign objects and dust out of the digital chamber becomes paramount. A CCD or CMOS does not have the luxury of a
strip of fine brush hairs to collect the dust the way film does as it marches before the shutter curtain. In over two years now, I have
NEVER seen a speck of any kind on my CCD.
NOTE: If you don't make the proper, substantial changes in how to care for your D-SLR, and remain disappointed, and even angry
at the manufacturer for not having a solution to the dust situation at the present time, I suggest you bail out, sell your D-SLR and go
back to film, where I'm sure you'll be very happy. There WILL come a day when we won't have to deal with dust, but for the time
being, methanol swabbing is the best solution.
#6) I always remove and return the lens with the camera facing down, and I swab with the camera on a tripod at a 45° angle facing
up. There is no need to be a contortionist by swabbing with the camera facing down (unless you're the kind of person who enjoys
that sort of thing).
#7) I've been swabbing for quite a while now and I still enter the chamber with the utmost care and respect for the delicateness of
the sensor's components. As you continue on with this process, I hope you can strike the perfect balance of total confidence in what
you're doing with an appreciation of the sensor's precision construction.
#8) It has been my experience that cleaning an imaging sensor on a regular basis will greatly reduce the super-stuck dust
accumulation. In other words, when these stubborn specks are left to sit on a CCD or CMOS, very similar to leaving that bug-splat
on your windshield, they get harder to remove. Therefore, I recommend a methanol swabbing at least every two weeks for ALL DSLRs. I also recommend washing your car once per season.
#9) If after swabbing a number of times you are still left with 2 or 3 specks of dust, close the camera up and go out and take some
shots. Don't swab again for a day or two. Most often, these specks will be loosened after a number of cleaning sessions, so don't
press your luck in the beginning. If these spots continue to remain on your sensor, and it is really upsetting to you, PLEASE send it
back to the manufacturer for service. Don't get careless and force the issue by applying a pressure equal to a bowling ball. I want
you to have a perfectly clean sensor, but, more importantly, I don't want you damaging your sensor, no matter what.
#10) After your first very successful swabbing, you may be like most people and say: "Is that all there is to sensor swabbing? That
was so easy, I don't know why I waited this long to swab! Piece-O-Cake!" This dawning should tell you how simple this really is, but,
more importantly, it should prove conclusively how ESSENTIAL it is to do the research, to assemble the proper tools and materials
and to practice a number of times before you do the real thing. People who take this preparation for granted will most likely have a
hard time. But if you continue swabbing with excellent results, be very aware of the dangers ahead of you . . . . . .
*WARNING*
Becoming proficient at this procedure may lead to an unusual phenomenon - an ADDICTION to sensor swabbing. It's accompanied
by a relentless determination to maintain ZERO dust on your sensor. This stage I call - "Crossing Over". By the way, once you do
cross over, you will NEVER need to revisit this tutorial again, except maybe to say hello. Seriously, though, please check back here
from time to time, as I am constantly updating the information contained within.
#11) After crossing over, I don't want to hear any excuses from you - get out there and use the heck out of your D-SLR.
There are two common mistakes that many first-timers make:
#1) Using too much Eclipse, which may cause smearing or dark streaks in your images. Try to use no more than 2 drops at first.
After you get some swabbings under your belt, you will eventually need only 1 drop (1Ds swabbers may need 2 drops on your 18
mm. 'Swipe).
#2) Not getting the swab "squarely" and "firmly" on the sensor's surface. This may be caused by some nervousness, trying to go too
quickly or not being able to see what you're doing. What actually happens is that one corner of the swab will be lifted upwards and,
consequently, will not be resting flush on the CCD or CMOS. If this happens, you may only remove half of the dust, which is still
VERY good for the first time.
NOTE: The good thing about these mistakes is that they will be corrected with a successful swabbing.
And last, but not least, go have yourself a nice stiff drink, preferably, but not necessarily, after you swab.
Good luck everyone!
Nicholas
Nikon D1x
other sizes: small medium original
previous | next
Copper Hill Images
post a comment
11-Dec-2004 20:28
Joel
I just sent my Mark II in for an intermittent contact problem, and told them to do a cleaning while it was there. Nice job
they did in NJ... there's only about 20 or 30 pieces of dust left!
So I just ordered my kit and look forward to becoming a swabbie. Arrg me hearties!
18-Nov-2004 20:16
Ryzom
I have just removed a very stubborn dust-particle on my otherwise excellent 20D. Thanks for a very good and helpfull
tutorial.
Rich Terrell
18-Sep-2004 00:08
Your sensor swabbing tool and instructions could not have been better. My sensor is all the better for it :-) Thanks for the
fast service, too.
06-Jun-2004 21:54
Stefano
I've been dragging my feet for a long time before daring to put your advice into practice. However, after a 2-week photo
safari in Africa my D100's CCD was in dire need of a clean up!
So I bought the Sensorswipe (thanks for providing it through your web site, btw) and the Eclipse and I followed your
instructions (including the stiff drink advice!).
Well, it took me quite a few swipes before getting the grip of it... and the results, but hey eventually I ended up with a
clean sensor and much less fear to enter the chamber!!!
So, if you are a first time user and you don't get good results at your first (or second, for that matter) swipe, just don't
despair and do it all over again: you'll get it right soon!
Thanks again for some great advice and for a clever, inexpensive device, Nick.
You are the Man,
Stefano
Sudhakar Kommini
22-Feb-2004 22:58
I first noticed dust on my CMOS (10D) about 2 months ago and got the necessary cleaning materials per your page right
away. But I was still too nervous to do it and just kept delaying it - finally I gave in and did my cleaning today and boy the
results are fantastic. I just had to do it twice to get a super clean CMOS! Thank you so very much for these excellent
instructions - these are just invaluable instructions. After having followed your directions and done it, I realize that my
"fear" was totally unnecessary!
Thanks!
Terry Bass
08-Nov-2003 19:48
I am like yourself a perfectionist when it matters and this subject that you have tackled will no doudt put thousands of
very nervous photographers at ease. This actually included myself of which I am currently deciding which EOS to buy,
either the 300D or 10D (reading all the pitfalls on both is getting me more and more worried).
The time, effort, detail, patience and commitment that you have dedicated to this very worrying subject will now make
thousands/millions of people use the confidence that you have given them and have a go at this technique. I believe that
as you even took the time to mention "There are two common mistakes that many first-timers make" right at the very end
will help people to get rid of a very frustrating issue.
I believe that the WHOLE of your subject refers to the fact that we can pay thousands of pounds on equipment but if your
cleaning suggestions are not put into practice, and some people cannot afford Photoshop, then the best camera and
accessories money can buy will be pointless.
On behalf of so many, EXCELLENT HELP and many many thanks.
Terry
13-Oct-2003 00:54
Gerry
My only complaint is your text in the tutorials is yellow and doesn't print well on my HP Laserjet 4, otherwise a totally
awesome tutorial.
Thanks for the effort!!!!
Gerry
Manuel
Nicholas,
13-Aug-2003 00:27
Thank you so much for your detailed procedure. I cannot thank you enough for the time you spent writing it. I had some
dust on my 10D. In the end I did not use your method, rather I used a blower from which I had removed the brush.
However yourdetailed explanation gave me a lot of tips and gave me confidence to clean my camera. Eventually I will be
using your method.
Once again, a thousand thank!
best regards,
Manuel
Karl Gohl
Thanks for all your efforts to develop and provide this useful info.
Dave Fowler
09-Jul-2003 23:14
21-May-2003 00:24
Great information...your covered everything except where to get the Pec Pads. I've been unsuccessfully using the highpriced swabs for the past year but don't know where to get the 4x4 pads. Any help would be appreciated.
fowler
Mike Eckstein
Thanks for the effort you took to make this very useful tutorial.
Lawry Playle
A great help. Many thanks for taking the time and effort to make this helpful guide.
All I need do now is find a "Rubber Maid" spatula in the UK.
Lawry
06-May-2003 01:15
17-Apr-2003 08:39
Nicholas R. | all galleries >> CCD / CMOS Cleaning > #5 - Dust Pix & Tips
previous | next
#5 - Dust Pix & Tips
This is an e-mail I received on February 13, 2004. Matt's experience will show you that even reading this tutorial many times over does
not replace the process of learning by doing. His letter hits on a lot of excellent points.
"Nicholas. . . . .I just bought all the stuff the other day, and didn't even have dust on my CCD. I just figured I'd need it "someday". Well,
someday came this afternoon when I got two huge dust spots on my camera. I sat down, cleared off my desk, and followed your
directions. The first attempt yielded me no change (which meant I didn't hurt anything), but the second got me 100% success!! Wow, it
worked so great, and so easily.
Here's a few suggestions you might want to add to your tutorial:
The Practice swipes:
To get a good idea of doing the swipes I found a great trial/practice method. Use a clear-plastic CD case with no front jacket. Preferably
do it in the same light; or even put it on your tripod at the same angle you'll be doing your camera gives you a GREAT idea of how the
angles and light reflections work with the real thing. The hardest thing about getting flush against the CCD in the camera is the wierd
depth/where's-that-surface-again reflections off the CCD glass. By practicing under the same light with clear plastic CD case, you'll get
an idea of how to line up, how much pressure, and how to run it across a hard-to-see reflective/transparent surface.
Also, I found this out by accident but it was great too. Just a drop or two of the cleaning fluid on the surface of the CD case. Then swipe
over it as you would on the CCD, That way you'll see streaks where part of the swab isn't flush against the surface of the plastic or your
technique isn't quite right. Also, since CD plastic scratches far more easily than glass, you can also see if you're putting too much
pressure on the surface. You can then hold this up to the light and see if you left streaks, dust or other things. Do this about 5-10 times
and you'll have a great feel for it.
Things that were helpful reminders/gives peace of mind:
•DO use the gloves the first time or two.
•DO use tweezers to get the PecPad out.
•DO avoid the urge to breathe or blow on anything. You can't see the dust specks that are making the specks already; you'll just add
more by blowing your particle-filled breath on it.
•DO try to blow off the dust particles with a blower first. I got a big one off just by doing this first. Helps reduce the chances you'll
scratch the surface by dragging big, easily removed particles across it.
•If you accidentally bump the tip of the PecPad/spatula against the inside or outside of the camera before touching the sensor *stop*,
take it off, throw it away and get another one. A 4¢ PecPad is worth tossing just in case it picked up something nasty from what you
bumped against. A $1,000 CCD is worth 25,000 pecPads. Keep things in perspective, and if you're bumping into things, you were
probably pretty nervous anyway.
•PecPads are springy, they flex like cloth when you pull on them. This is helpful to know as you pull on them to get a tight fit on the
spatula.
•Holding the spatula/SensorSwipe:
The best way I found was when you feel the bend not in the flexible spatula part; but in the handle flexing. This requires you hold out
towards the end of the handle; but it's how you know you're getting the right pressure. Just the slightest give in the handle as the tip
touches the surface.
•Say a quick prayer before you start:
No joke, all the help in the world isn't as much help as help from the divine! Calms the nerves too."
Matt F.
Thanks again, Matt. . . . . . .Nicholas
*BROOMING*
NOTE:
A prerequisite to talk about "brooming" is the proper terminology. There is an unlimited supply of confusion out there as to locating
where the dust is on your sensor as compared to where it appears in your images. In other words, if the dust is in the upper right of a
photograph, where exactly is it sitting on your sensor? I want you to forget all about putting names and locations on your sensor as you
are in the shooting position. It will make this orientation much, much easier to understand.
#1) The image you see on your computer monitor will have four corners we will refer to as upper left; lower left; upper right; and lower
right. Pretty easy so far, right?
#2) When you raise the mirror and remove the lens from your D-SLR, you will be looking squarely at the sensor. FROM THIS
POSITION, the sensor will have corners refered to as upper left; lower left; upper right; and lower right. I don't care what names these
points were called before you rotated the camera the 180° to look into the chamber - it's irrelevant. What is of primary importance is
that you realize what "as you look at it" means. It means "as you look at it", or, "from your own perspective", NOT from the position the
sensor had while you were in the shooting position behind the camera. If you follow the directions that follow with these points in mind,
you will be able to locate the exact position of the dust on your sensor. I promise.
If you get to the point where you've done everything contained in this tutorial to get rid of your dust, and you're left with one or two
specks that act like "kryptonite", you might want to try "brooming" the sensor.
•First, determine exactly where the speck(s) is located by using the "up/down" or "one vertical flip" alignment. This means that if your
speck is in the upper left of your image, it is actually sitting on the lower left of your sensor AS YOU LOOK AT IT from the front of the
camera. Similarly, if it's in the lower right of your image, it's actually sitting on the upper right of your sensor AS YOU LOOK AT IT.
Upper center of the image, lower center of the sensor, etc., etc. One vertical flip.
•Next, prepare your camera and SensorSwipe in the usual swabbing manner. Remove the lens, then place one drop of Eclipse on one
corner of the PecPad. Start swabbing just in the area you determined in the previous step, using only the moistened corner of the pad.
Go back and forth here several times (3, 4 or 5). What this does is to concentrate your force right where that little rascule has taken up
residence.
•Now prepare another SensorSwipe and do a normal swabbing as shown in this tutorial. This is necessary because the brooming will
probably move the dust to another area of the sensor.
•Check your results and have another stiff drink.
•This would probably be considered an advanced tip, only to be attempted after you've acquired quite a bit of experience.
•Because of the focused pressure, I strongly recommend starting with a light to moderate force with your swab. I think the *most*
pressure I've used brooming would be maybe equal to rubbing with a pencil's eraser. Again, this method should only be used as a lastditch effort when all else hasn't worked.
•If brooming STILL doesn't dislodge the speck(s), it's definitely time to send the camera in for servicing.
NOTE: Please see this page for more information about this:
http://www.copperhillimages.com/index.php?pr=Tutorials5 .
SWEEPING A SENSOR
Brushing a sensor is, in many ways, a lot trickier than swabbing it. In other words, there are a couple of key mistakes you can make
when swabbing that will give you poor results, but brushing opens up many possibilities that hinder the dust pick-up abilities of a sensor
brush.
Let me list some of them:
• Washing and preparing the 'Sweep for use is critical for success..
• Experiment beforehand to make sure you're getting a good charge on the brush. Here again, each person may interpret directions
very differently. What is brisk for one person may actually be too fast or too slow to create a charge. If the brush does not have a good
charge, you will only move the dust specks around.
• If you use an undue amount of pressure with the brush, you will only move the dust around. The charged filaments should "float" over
the sensor's surface; if you are making the tip of the brush bend inordinately, you will just push the dust around.
• Remember, sensor brushes will have a very difficult time dislodging super-stuck dust particles, that's why it is strongly recommended
to swab the sensor clean first, and then use the brush periodically for maintenance. This is especially true if your sensor has never
been cleaned.
other sizes: small original
previous | next
Copper Hill Images
post a comment
zmanosh
09-Jun-2005 06:09
Another excellent place to practice with the swabbing is on a blank CD-R. This is because this surface is almost identical to
that of the sensor. It scratches easily and will show you if you leave streaks or not. Plus it gets dust on easily!
02-Jun-2005 21:36
Larry Pepper
Larry Pepper
I got your kit today, thanks for the speedy service.
With a run to the Drugstore for gloves, practice on the CD case, reread your tutorial and a total of 2 hours, five pecs and
presto the sensor is cleaner than new.
The most trouble I had was getting the gloves on, oh oh I shouldn't have said that I havn't taken them off yet. Need a tutorial
for the gloves. :)
Thanks for the "Prize inside" your kit
Tony Bennardo
29-Jun-2004 03:21
Read your instructions twice. Then I got enough nerve to try it for the first time. And what do you think ?????? 100%
sucess. I can't believe it. Hope the next time will give me the same results. Thanks much for your knowledge and supplies.
Tony Bennardo ( [email protected])
25-Apr-2004 20:46
Bob Smith
Followed your advice and instructions to the letter and after a few practice runs with the Sensor Swipe on a glass filter I
progressed to my EOS 300D with great results-I'm so happy!!! Many thanks.
Nicholas R. | all galleries >> CCD / CMOS Cleaning > Nuts & Bolts of Sensor Cleaning
previous | next
17-DEC-2006
Nuts & Bolts of Sensor Cleaning
PRELUDE:
•Check how much dust you have by shooting the sky stopped at 22, run auto-levels (optional), then
view the image at actual pixels. The grayish dots you see are specks of dust.
•No matter how careful and meticulous you are with your D-SLR, you WILL get dust particles on your
sensor. Swabbing with Eclipse uses what the CCD and CMOS do best - ATTRACTING AND
HOLDING DUST PARTICLES IN ONE FLAT PLANE so the SensorSwipe can come along and
snatch them up.
•Try to do all of your sensor swabbing in a completely still and quiet room.
•DO NOT TOUCH the wiping area of the PecPad because the oils from your skin are easily
transferred to the sensor. If you are totally new to this procedure, I recommend using powder-free
latex gloves to work with the PecPad, at least in the beginning.
OK, let's get started.
WRAPPING THE PECPAD
Holding the SensorSwipe in my right hand and the PecPad in my left hand, I begin wrapping the
PecPad around the SensorSwipe by positioning the 'Swipe approximately 1/3 of the way in from the
left or right edge of the PecPad (see frame #2).
Next, I start to gently tug at the pad (see frame #3) in the direction of the black arrow (as I do this, I
am resting the handle of the SensorSwipe against my abdomen, keeping the pad snug around the
wiping end by carefully pulling it towards me).
THIS NEXT STEP IS THE KEY TO WRAPPING THE PECPAD TIGHTLY
I "tuck" the folded-over flap by holding it with my left thumb (where I have placed the orange button)
as I bring the other corner of the pad across the swab as shown in frame #4. I continue to snug up
the pad until it is finally wrapped around the swab, shown in frame #5, where I secure and tighten it
with a 2" to 2½" piece of scotch tape, wrapped in a very slight "barber-pole" direction, starting at
about 1" below the very tip. This length of tape will wrap around the 'Swipe one time, overlapping
and adhering to itself. To remove the used pad, use a razor, scissors or an X-Acto knife to cut the
tape, then, just peel the pad away from the 'Swipe.
From here you hook up the AC-adapter or use the "bulb" mode in your camera and lock up the
mirror. Next put one or two drops of Eclipse (maximum) onto the wiping edge and you're good to go.
I've placed two arrows in frame #6 to show where to place the 2 drops of Eclipse.
After carefully removing the PecPad from it's wrapping and covering and securing the SensorSwipe,
rest it on the side of the tape dispenser; this allows the tip to sort of "float" untouched in the air until
you're ready to apply the Eclipse. Again, the wiping area of the PecPad MUST NOT TOUCH
ANYTHING on it's way to wipe your sensor.
This is really a simple procedure, but you'll have to keep swabbing to learn how much pressure to
apply and how to get all the dust in one "double-swipe".
SWABBING ILLUSTRATION
For this demonstration, I am using the Spat-U-Swab WITHOUT the PecPad. Again, the obvious wrap the utensil and touch the CCD/CMOS ONLY with a lint-free PecPad. DO NOT use cloth, tissue,
lens tissue, cotton, or Q-tips. Use the word "top" as a reference point through these 6 steps,
representing the upper right corner of the sensor as you look at it.
Your first step here will be to apply the Eclipse to your PecPad-wrapped SensorSwipe as shown in
frame #6 of the top picture. The Eclipse will come out of it's bottle lightning fast. So fast, in fact, that
the last thing you will need to do is to squeeze the bottle. Just tip it over very gradually, and the two
drops will come out on their own. When you become a seasoned veteran at this, you will only need
one drop, placed right in the middle of the wiping tip.
After applying one or two drops of Eclipse on the tip of your 'Swipe, lock up the mirror, then remove
the lens. Proceeding very carefully, guide the 'Swipe into the corner where you've chosen to start
(frame #1), and, using pressure maybe equal to writing with a pen, gently drag the moistened swab
to the opposite end of the CCD or CMOS. Use light steady pressure and try to complete the stroke
by going as far as the sidewall will permit (those of you with sensors without sidewalls, just barely
overlap the sensor's edge). This may require a little practice - bringing the tip of the swab (with the
dust) all the way to where the low pass filter meets the wall. If you are getting the center clean but
are leaving dust at the edges, try moving the pivot point of the swab to get a better angle at the end
of the floor (you'll see what I'm talking about once you've swabbed a couple of times). In other words,
as you are completing your left to right stroke, tilt your hand slightly to the left; as you complete your
right to left stroke, tilt your hand slightly to the right.
You should now have some dust adhering to the first side of the pad, so after completing the first
pass, as shown in frame #3, lift the swab up just far enough to move it into the next position, as
shown by the arrow in frame #4. In this left/right, right/left configuration, there is no ROTATION of the
swab as it is positioned for the second swipe; it is simply lowered to the bottom right corner of the
sensor. Here, you'll use the opposite side of the swab and go as far as you can again in the opposite
direction of the first swipe (going lengthwise, you will be overlapping your first stroke).
The swab functions exactly like the action of a WINDSHIELD WIPER in that it uses one side of the
blade to wipe on it's first pass, then uses the opposite side on it's return pass.
I suggest starting very gently, and then increase the force as you get more experienced. It doesn't
matter if you go up/down, down/up, left/right or right/left, as long as you DO NOT use the PecPad
more than once a side. If you do, you will be depositing the dust right back onto the CCD.
See how you've done.
You can now test your results by shooting the sky stopped at 22, run auto-levels (optional) then view
it at actual pixels. If you've started with, perhaps, 10 to 20 individual specks of dust, and now you
have 2 to 5 and they're mainly on the edges, you might very well be content with that type of result.
In time, you will be able to get your sensor immaculate.
I think the main key to cleaning your CCD or CMOS is to relax, work quickly, but proceed
methodically. I feel very confident that a SensorSwipe would have to be pressed tremendously hard
to damage the sensor. The rubber's FIRM but YIELDING texture makes it perfect for the job at hand.
After getting a little experience dealing with super-stuck dust, you'll better understand the absolute
necessity of a tool that enables you to use extra pressure in order to dislodge these stubborn specks
without harming the sensor whatsoever.
IMPORTANT POINTS
#1) Take your time, DON'T RUSH! There is no need to make a mad dash into the chamber with your
moistened swab. It is MUCH more important for you to see exactly what you are doing, rather than
worrying about dust getting into your camera. Your speed will naturally increase as you go on.
NOTE: I recommend waiting about 5 or 10 seconds after applying the Eclipse to begin swabbing.
This will allow a good majority of the liquid to migrate away from the tip, making it less likely to
streak. I used to remove the lens and then apply the Eclipse to my 'Swipe, but now, it works out
perfectly to reverse these two steps.
So, your sequence will be: 1) lock up the mirror; 2) put the one or two drops of Eclipse on the
'Swipe's tip; 3) remove the lens; 4) swab the sensor; and, finally, 5) remount the lens, unlock the
mirror, and turn the camera off.
#2) VISIBILITY is the key word in sensor swabbing. The highly reflective "mirrored" surface of the
sensor makes it a real challenge to guide your SensorSwipe into the starting corner. This is just as
difficult as trying to poke a fish in a pond with a stick. A good light is mandatory and be extra aware
of the extremely small space you will have to negotiate the swab onto the sensor. I strongly
recommend doing a dry run with the lens off, just like you were going to swab. Experiment with the
amount and position of your light source until you have the best view of the sensor possible. At
present, I am using a 150W halogen drafting light ($40 at Staples); the ability to move and position it
precisely where I want it (just like a dentist's light), and the true nature of the halogen gives me the
best view of the sensor out of all the light set-ups I've tried. When I swab now, I know exactly where
to position the light, off on a slight angle, soas my head and hand do not interfere with the light.
*Also, I cannot stress enough the need to be able to see clearly at close-up range. My eyes are
about one foot away from the sensor when I swab, and it's absolutely necessary for me to wear my
reading glasses at this distance.
#3) I have found that a 1" X 3" permanent address label to be the BEST way of securing the PecPad
to my SensorSwipe; of course, scotch tape will work, too. DO NOT remove all of the PecPads from
their wrapping. Cut a slit with a razor in the top of the package across the entire width. Then it's a
matter of using tweezers or a forceps type of tool to extract one Pecpad while holding the rest in
place. ALWAYS keep the package and your SensorSwipe in a zip-lock bag when not in use.
#4) MOST IMPORTANT TIP - DO A PRACTICE RUN: make your swab with the PecPad and put 1
or 2 drops of Eclipse on it just to see how the liquid is absorbed, then wipe a piece of glass or a jewel
case with it. Hopefully, you'll see that this is a very BENIGN process which is made slightly difficult
only by the very awkward positioning of the sensor in the chamber. You will also see how fast the
Eclipse evaporates in back of the swab (from 1 to 3 seconds). This point is very important because I
think a lot of the apprehension about sensor swabbing involves the thought of using a LIQUID to
wipe the very intricate electronic sensor. A dry run will confirm that there is virtually NO chance of the
Eclipse running or "puddling" on the sensor if you use no more than 1 or 2 drops.
IF YOU HAVE NEVER SWABBED A SENSOR BEFORE, A PRACTICE RUN IS MANDATORY!
#5) Take a couple of seconds to look at the CCD or CMOS. If you see any specks on your AA filter,
try to blow them off with a bulb blower before you swab (remember, the spots in your images are
actually dust particles too small for the naked eye to see).
#6) I always remove and return the lens with the camera facing down, and I swab with the camera on
a tripod at a 45° angle facing up.
#7) I've been swabbing for quite a while now and I still enter the chamber with the utmost care and
respect for the delicateness of the sensor's components. As you continue on with this process, I
hope you can strike the perfect balance of total confidence in what you're doing with an appreciation
of the sensor's precision construction.
#8) It has been my experience that cleaning an imaging sensor on a regular basis will greatly reduce
the super-stuck dust accumulation. In other words, when these stubborn specks are left to sit on a
CCD or CMOS, very similar to leaving that bug-splat on your windshield, they get harder to remove.
Therefore, I recommend a methanol swabbing at least every two weeks for ALL D-SLRs.
The SensorSweep is the perfect companion to your swabbing tools, because it allows you to gather
up a day's worth of loose dust particles BEFORE they can become stuck. It's simple - brush the
sensor every day or two and swab the sensor every week or two.
#9) If after swabbing a number of times you are still left with 2 or 3 specks of dust, close the camera
up and go out and take some shots. Don't swab again for a day or two. Most often, these specks will
be loosened after a number of cleaning sessions, so don't press your luck in the beginning. If these
spots continue to remain on your sensor, and it is really upsetting to you, PLEASE send it back to the
manufacturer for service. Don't get careless and force the issue by applying a pressure equal to a
bowling ball. I want you to have a perfectly clean sensor, but, more importantly, I don't want you
damaging your sensor, no matter what.
#10) After your first very successful swabbing, you may be like most people and say: "Is that all there
is to sensor swabbing? That was so easy, I don't know why I waited this long to swab! Piece-OCake!" This dawning should tell you how simple this really is, but, more importantly, it should prove
conclusively how ESSENTIAL it is to do the research, to assemble the proper tools and materials
and to practice a number of times before you do the real thing. People who take this preparation for
granted will most likely have a hard time.
2 COMMON MISTAKES MANY FIRST-TIMERS MAKE
#1) Using too much Eclipse, which may cause smearing or dark streaks in your images. Try to use
no more than 2 drops at first. After you get some swabbings under your belt, you will eventually need
only 1 drop (full-frame swabbers may need 2 drops on your 18 mm. 'Swipe).
#2) Not getting the swab "squarely" and "firmly" on the sensor's surface. This may be caused by
some nervousness, trying to go too quickly or not being able to see what you're doing. What actually
happens is that one corner of the swab will be lifted upwards and, consequently, will not be resting
flush on the CCD or CMOS. If this happens, you may only remove half of the dust, which is still
VERY good for the first time.
NOTE: The good thing about these mistakes is that they will be corrected with a successful
swabbing.
BROOMING
A prerequisite to talk about "brooming" is the proper terminology. There is an unlimited supply of
confusion out there as to locating where the dust is on your sensor as compared to where it appears
in your images. In other words, if the dust is in the upper right of a photograph, where exactly is it
sitting on your sensor? I want you to forget all about putting names and locations on your sensor as
you are in the shooting position. It will make this orientation much, much easier to understand.
#1) The image you see on your computer monitor will have four corners we will refer to as upper left;
lower left; upper right; and lower right. Pretty easy so far, right?
#2) When you raise the mirror and remove the lens from your D-SLR, you will be looking into the
camera's chamber with the sensor affixed to the back wall. FROM THIS VANTAGE POINT, the
sensor will have corners refered to as upper left; lower left; upper right; and lower right. I don't care
what names these points were called before you rotated the camera the 180° to look into the
chamber - it's irrelevant. What is of primary importance is that you realize what "as you look at it"
means. It means "as you look at it", or, "from your own perspective", NOT from the position the
sensor had while you were in the shooting position behind the camera. If you follow the directions
that follow with these points in mind, you will be able to locate the exact position of the dust on your
sensor. I promise. Example: The dust-bunny that is in the upper right of this image is sitting on the
lower right of the sensor as you look into the chamber.
If you get to the point where you've done everything contained in this tutorial to get rid of your dust,
and you're left with one or two specks that act like "kryptonite", you might want to try "brooming" the
sensor.
First, determine exactly where the speck(s) is located by using the "up/down" or "one vertical flip"
alignment. This means that if your speck is in the upper left of your image, it is actually sitting on the
lower left of your sensor AS YOU LOOK AT IT from the front of the camera. Similarly, if it's in the
lower right of your image, it's actually sitting on the upper right of your sensor AS YOU LOOK AT IT.
Upper center of the image, lower center of the sensor, etc., etc. One vertical flip.
Next, prepare your camera and SensorSwipe in the usual swabbing manner. Remove the lens, then
place one drop of Eclipse on one corner of the PecPad. Start swabbing just in the area you
determined in the previous step, using only the moistened corner of the pad. Go back and forth here
several times (3, 4 or 5). What this does is to concentrate your force right where that little rascule has
taken up residence.
Now prepare another SensorSwipe and do a normal swabbing as shown in this tutorial. This is
necessary because the brooming will probably move the dust to another area of the sensor.
Because of the focused pressure, I strongly recommend starting with a light to moderate force with
your swab. I think the *most* pressure I've used brooming would be maybe equal to rubbing with a
pencil's eraser. Again, this method should only be used as a last-ditch effort when all else hasn't
worked.
If brooming STILL doesn't dislodge the speck(s), it's definitely time to send the camera in for
servicing.
Sensor Sweeping Tips
Brushing a sensor is, in many ways, a lot trickier than swabbing it. In other words, there are a couple
of key mistakes you can make when swabbing that will give you poor results, but brushing opens up
many possibilities that hinder the dust pick-up abilities of a sensor brush.
Let me list some of them:
• Washing and preparing the 'Sweep for use is critical for success..
• Experiment beforehand to make sure you're getting a good charge on the brush. Here again, each
person may interpret directions very differently. What is brisk for one person may actually be too fast
or too slow to create a charge. If the brush does not have a good charge, you will only move the dust
specks around.
• If you use an undue amount of pressure with the brush, you will only move the dust around. The
charged filaments should "float" over the sensor's surface; if you are making the tip of the brush bend
inordinately, you will just push the dust around.
• Remember, sensor brushes will have a very difficult time dislodging super-stuck dust particles,
that's why it is strongly recommended to swab the sensor clean first, and then use the brush
periodically for maintenance. This is especially true if your sensor has never been cleaned.
NOTE: Please visit our other website for further insights into sensor cleaning and to browse our line
of sensor cleaning tools - http://www.copperhillimages.com/index.php?pr=products
other sizes: small medium large original
previous | next
Copper Hill Images
post a comment