1
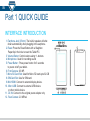
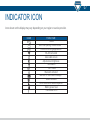
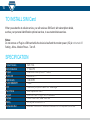
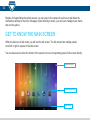
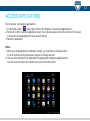
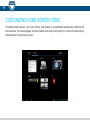
This user manual has been specially designed
to guide you through the functions and
features of your device.
MEDIA PAD
MANUAL
Using this manual
02
Thank you for purchasing this tablet PC device. This device will provide you with high quality tablet
PC communication and entertainment, based on exceptional technology and high standards.
This user manual has been specially designed to guide you through the functions and features of
your device.
Saphir Media Technologies GmbH
Management Office
Schönemoorer Strasse 154 E
27777 Ganderkesee - Heide II
Germany
Saphir Media Technologies GmbH
Technical & Sales Office
Römergasse 9
65199 Wiesbaden
Germany
[email protected]
03
Read me first
This user manual includes important safety precautions and operation guide.
To avoid accidents, please read this manual carefully before operating your tablet.
• Keep your tablet away from high temperature, high humidity and dusty environments.
• Do not leave your tablet in car with windows closed in hot summer.
• Do not turn the volume up too high. If you feel tinnitus, please turn down the volume.
• Please charge when you find the conditions below.
1. Battery icon indicates low power.
2. Tablet power off automatically and power off again soon after reboot.
• Do not disconnect your tablet while uploading, downloading or formatting to avoid a program error.
• Do not disassemble your tablet by yourself. Do not use alcohol, diluents or Benzene to clean its surface.
• Do not use your tablet in areas where electronic devices are forbidden, such as on flights.
• Do not operate your tablet when driving or walking at the street.
• USB port is for data transmission only. (Please use the original USB cable).
• Do not turn off your tablet when it is connecting to PC or other device.
• This tablet is not waterproof.
04
CONTENTS
Part 1 QUICK GUIDE
INTERFACE INTRODUCTION
INDICATOR ICON
PREPARATION
TURN ON/OFF THE TABLET PC
CHARGE THE BATTERY
INSERT A MEMORY CARD
REMOVE THE MEMORY CARD
TO INSTALL SIM
SPECIFICATION
Part 2 INSTRUCTION
ANDROID 4.1 BRIEF
LOCKING/UNLOCKING SCREEN
GET TO KNOW THE MAIN SCREEN
ACCESS APPLICATIONS
CUSTOMIZING HOME SCREEN ITEMS
6
6
7
8
8
8
9
9
9
10
11
11
11
12
13
14
05
SETTINGS
SYSTEM SETTINGS
WIRELESS & NETWORK
DEVICE
PERSONAL
SYSTEM
QUICK ACTION
ENTERTAINMENT
CAMERA
CAPTURE A PHOTO
RECORD A VIDEO
MUSIC
VIDEO
GAME HUB
TROUBLE SHOOT
POWER OFF
SAFETY PRECAUTIONS
15
15
15
16
16
17
18
19
19
19
20
21
22
22
23
24
25
06
Part 1 QUICK GUIDE
INTERFACE INTRODUCTION
1. Earphone Jack (3,5mm): The built-in speaker will shut
down automatically when plugging in the earphone.
2. Reset: Press the Reset Button with a Staighten
Paperclip in the hole to reset the Tablet PC.
3. Volume Button: Control volume using +/- buttons.
4. Microphone: Used for recording sound
5. Power Button : Press power button for 3 seconds
to power on/off your tablet.
6. Front Camera: 0.3 MP.
7. Micro SD Card Slot: Used for Micro SD card upto 32 GB
8. SIM Card Slot: Use for SIM card.
9. Mini HDMI: Connect to external display device.
10. Micro USB: Connect to external USB device
or other mobile device.
11. DC IN: Connect to the original power adapter only.
12. Rear Camera: 2.0 MPixel
07
INDICATOR ICON
Icons shown on the display may vary depending on your region or service provider.
ICON
FUNCTION
Return
Go to the opening HOME-Screen
Check the running applications
WLAN connected
Auto-rotate screen
Adjust screen brightness
Notification
SETTINGS
Bluetooth activated
New text or multimedia message
Alarm activated
Error occurred or caution required
Battery power level
Connected to PC
08
PREPARATION
TURN ON/OFF THE Tablet PC
Press the “power button” for 3 seconds, you will see the loading screen and then the opening screen.
Press the “power button” for 3 seconds, you will see a power-off option notice.
Tap “OK” to turn off your tablet.
Notes: Follow all warnings and directions from official personal when in areas where the use of
wireless devices is restricted, such as airplanes and hospitals.
CHARGE THE BATTERY
Before using the device for the first time, you must charge the battery.
Give it a deep charge for minimum 5 hours. You can charge the device with the adapter.
Notes:
1. When your battery is low, the device will emit a warning tone and display a low battery message,
the battery icon will also be empty. If the battery level becomes too low the device will automatically
power off. Recharge your battery to continue using your device.
2. If the battery is completely discharged, you can not turn on the device, even with the Power adapter
connected. Allow a depleted battery to charge for 30 minutes before you try to turn on the device.
Allow a depleted battery to charge for a few minutes before you try to turn on the device.
09
INSERT A MEMORY CARD
To store additional multimedia files, you can insert a memory card.
Your device accept microSDHC memory card with maximum capacities of 32GB
(depending on memory card manufacturer and type).
REMOVE THE MEMORY CARD
Before removing a memory card, use following instruction:
1. In idle mode, select Applications - Settings - Storage - Uninstall SD card - OK.
2. Remove the memory card.
Notes:
Do not remove a memory card while the device is transferring or accessing information,
as this could result in loss of data or damage to the memory card or device.
10
TO INSTALL SIM Card
When you subscribe to cellular service, you will receive a SIM Card, with subscription details,
such as your personal identification optional services, to use network data services.
Notes:
Do not remove or Plug-In a SIM card while the device’s itself and the modem power (3G) is not turned off.
Setting - More - Modem Power - Turn off.
SPECIFICATION
Product Module
Brief Introduction
Chipset
Built-In OS
RAM Density
FLASH MEMORY
LCD
Touch Panel
Support
Camera
Battery
Connection Slot
SMT-7-3G
7”Tablet PC
Dual-core Rockchip 3066 - 1.6GHz
Android 4.1.1
1GB DDR3
16GB
1024*600 (16:9) LED Panel 160° View Angle
Multi Capacitive Touch
3G / Wi-Fi 802.11 b/g/n / GPS / Bluetooth
Front: 0.3M Pixel ; Rear: 2M Pixel
Li-Polymer 3000mAh/3.7V
SIM Card / microSDHC / microUSB / miniHDMI / DC IN / Earphone 3,5mm Jack
11
Part 2 INSTRUCTION
ANDROID 4.1 BRIEF
On this Tablet PC is Android 4.0.4 pre-installed. You can enjoy more Apps with ICS than with Jelly Bean,
if you want to upgrade go to our Website www.saphir-media.de and download the Jelly Bean Firmware
on the device. Android 4.1 (Jelly Bean) is the latest version of the android platform for tablets, it builds on
the things people love most about Android easy multitasking, rich notification, customizable home screen,
resizable widgets, and deep interactivity and adds powerfull new ways of communication and sharing.
Besides, Android 4.1 provides a more convenient access to hardware, software decoder, inherits the basic
characteristics of Android 4.0, and improves the user experience. So Android 4.1 provides a new vitality.
LOCKING / UNLOCKING SCREEN
When switch on the tablet PC, you must slide the locking screen,
then the interface has more operation procedures.
12
Besides, through sliding the locking screen, you can jump to the camera for a picture or pull down the
notifications window to check for messages, when listening to music, you can even manage music tracks
and see the gallery.
GET TO KNOW THE MAIN SCREEN
When the device is in idle mode, you will see the idle screen. The idle screen has multiple panels,
scroll left or right to a panel of the idle screen.
You can also select a dot at the bottom of the screen to move corresponding panel of idle screen directly.
Application screen
Operation procedures
Quick setting
13
ACCESS APPLICATIONS
How to access your device’s applications.
” upper right corner of the Display to access the application list.
1. In idle mode, select “
2. Scroll left or right to another application screen. You can also select a dot at the bottom of the screen
to move the corresponding main menu screen directly.
3. Select an application.
Notes:
1. When you use applications provided by Google, you must have a Google account.
If you do not have a Google account, sign up for Google account.
2. You can add a shortcut to an application by tapping and holding the application list.
You can move the icon to the location you want on the idle screen.
14
CUSTOMIZING HOME SCREEN ITEMS
On smaller screen devices, the home screen now includes a customizable favorites tray visible from all
home screens. You can drag apps, shortcuts, folders, and other priority items in or out the favorites tray for
instant access from any home screen.
15
SETTINGS
SYSTEM SETTINGS
Tap the settings icon to enter system settings.
WIRELESS & NETWORKS
Wi-Fi
It is for setting up the wireless device and turning it on/off.
Bluetooth
It is for setting bluetooth device and turn it on /off.
Data usage
Measured by your tablet, your carrier’s data usage accounting may differ.
More
It includes two parts about VPN settings and Mobile networks settings.
16
DEVICE
Sound
It is for setting volume, notice ring, default notification etc.
Display
It is for setting brightness, wallpaper, auto-rotate screen, sleep and front size.
Storage
Is for checking the memory capacity and memory usage status.
Battery
It is for checking battery Status.
Apps
Is for management the applications.
PERSONAL
Accounts and Synchronization
It is for adding, deleting accounts and synchronization.
Location & Security
It is for setting up Google’s location service and Google search.
Security
It is for setting Screen lock, owner info, encrypt tablet etc.
Language & input
It is for setting language, default language, personal dictionary , etc.
Backup & reset
It is for restoring factory settings
17
SYSTEM
Date & time
It is for setting date and time.
Accessibility
It is for setting touch & hold delay etc.
Developer options
It is for setting USB debugging, stay awake etc.
About tablet
It is for showing the information about tablet.
18
QUICK ACTION
Tap “
”to enter primary menu, you can access:
battery power indicator, turn on/off Wi- Fi setting, Auto-rotate screen, screen brightness, enter main menu.
19
ENTERTAINMENT
CAMERA
Learn how to capture and view photos and videos.
Notes:
1. The camera automatically turns off when you do not use it for a specified period.
2. The memory capacity may differ depending on the shooting scene or shooting conditions.
CAPTURE A PHOTO
1. In idle mode, open the application list and
select Camera to turn on the camera.
2. Aim the lens at the subject and make any
necessary adjustments.
”to take a photo.
3. Select “
The photo is saved automatically.
4. After taking photos, select the image viewer
icon to view the taken photos.
20
RECORD A VIDEO
1. In idle mode, open the application list and select Camera“
”to turn on the camera.
2. Aim the lens at the subject and make any necessary adjustments.
3. Select “
”to record a video. The video is saved automatically.
Notes:
The camcorder may not be able to properly record videos to memory card with a slow transfer speed.
21
MUSIC
Listen to your favorite music with the music player.
The music player supports various formats.
Add music files to your device
1. Download from the web.
2. Receive via Bluetooth.
3. Copy from your memory card.
Play music
1. In idle mode, open the application list
and select Music.
2. Select a music category→a music file.
3. Control playback with following icons.
4. Tap “
”icon, select sound effects,
you can set sound effects, Bass boost,
3D effect, etc.
22
VIDEO
With the video player you can play various kinds of videos. The video player supports various formats.
GAME HUB
• In idle mode, open the application list and select Game Hub.
• Select and install a game.
Notes:
1. Available games may vary depending on your region or service provider.
2. Control and options of games may vary.
23
TROUBLE SHOOT
Your device displays network or service error messages.
When you are in areas with weak signals or poor reception, move to another area and try again.
You cannot access some optional without a subscription, contact your service provider for more details.
If touch screen is not responding properly, try the following:
1. Remove any protective covers from touch screen, protective covers may prevent the
device from recognizing your inputs and are not recommended for your Tablet PC.
2. Ensure that your hands are clean and dry when tapping the touch screen.
3. Restart your device to clear any temporary software bugs.
4. Ensure that your device software is upgraded to the latest version.
5. If the touch screen is scratched or damaged, take it to your service center.
Your device is to hot to touch.
When you use applications that require more power or use applications on your device for an extended
period of time, your device may feel to hot to touch, this is normal and should not affect your device’s
lifespan or performance.
A connection is not established when you connect the device to a PC.
1. Ensure that the USB cable you are using is compatible with your device.
2. Ensure that you have the proper drivers installed and updated on your PC.
24
POWER OFF
When you do not use the tablet PC, you can press the power button to switch it off.
25
SAFETY PRECAUTIONS
To prevent injury to yourself and others or damage to your device,
read all of the following information before using your device.
Warnings:
• Prevent electric shock, fire, and explosion.
• Do not use damaged power cords or plugs, or loose electrical sockets.
• Do not touch the power cord with wet hands, or disconnect the charger by pulling on the cord.
• Do not bend or damage the power cord.
• Do not use device while charging or touch your device with wet hand.
• Do not short circuit the charger or the battery.
• Proper care and use of your tablet PC device.
• Keep your device dry.
• Do not use or store your device in dusty, dirty areas.
• Do not store your device in hot or cold areas, use your device at -20C° to 50C°.
• Some of the contents in this manual may differ from your device depending on the software
of the device or your service provider.