1
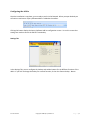
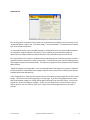
Print On Demand
User’s Manual
Welcome ................................................................................................................................................. 2
Configuring the Add-in ............................................................................................................................ 3
Settings Tab............................................................................................................................................. 3
Advanced Tab .......................................................................................................................................... 4
Troubleshooting ...................................................................................................................................... 5
Print On Demand
Copyright © 2008 Sperry Software Inc.
P a g e |1
Welcome
Thank you for choosing the Print On Demand add-in, created by Sperry Software. This add-in allows you
to print selected Outlook items like emails, contacts or appointments and/or attachments with the click
of a button, or by using a key command, without needing to open the message(s) or attachment(s).
To set up to print items or attachments using Print On Demand
In the “Invoking Print on Demand” area of the configuration window, enable the method(s) you want to
use to activate printing. You can use a toolbar button and/or a Hotkey to print messages, and another
toolbar button and/or Hotkey to print attachments.
If you do not want to print the full recipient list when you print messages, you can cut the list short, or
“clip” it by specifying the number of characters to clip. For example, to limit the recipient list to a single
line, you might want to allow only 30 or so characters of the full recipient list to print. Enter your choice
in the “Clip recipients at * + characters” field. If you don’t care how many recipient names are printed
you can ignore this option.
To print Outlook items
Select the items that you want to print, then click the Print Item button on the Sperry Software toolbar,
or press the Print Item Hotkey that you specified.
To print attachments
Select the messages containing the attachments that you want to print, then click the Print Attachments
button on the Sperry Software toolbar, or press the designated Print Attachments Hotkey.
Print On Demand
Copyright © 2008 Sperry Software Inc.
P a g e |2
Configuring the Add-in
Once the installation is complete, you are ready to use Print On Demand. When you open Outlook you
will notice a new button “Sperry Software Add-ins” added to the toolbar.
Clicking this button displays the Sperry Software Add-ins configuration screen. It is on this screen that
settings are made to control the add-in’s functionality.
Settings Tab
In the Settings Tab, you can configure the hotkeys and toolbar buttons for the different functions of the
add-in. If you wish to change the hotkey for a certain function, click on the Choose Hotkey… Button.
Print On Demand
Copyright © 2008 Sperry Software Inc.
P a g e |3
Advanced Tab
The “Invoking Print On Demand” frame allows you to specify what method(s) to use to invoke the Print
on Demand feature. Options are: “Print Item Hotkey”, “Print Item Button”, “Print Attachments Hotkey”,
and “Print Attachments Button.”
To use a toolbar button to print selected messages or attachments you first need to enable the button
on the toolbar, using the options in this section. To use a Hotkey to print selected messages or
attachments you need to enable this option and then choose the Hotkey that you want to use.
The “Clip Recipients List” option is an advanced feature allowing you to cut off the recipients list after a
specified number of characters in order to save paper. A value of 0 (zero) turns off the clipping feature
(the complete recipient list will be printed). This option only applies to emails (and post items located in
public folders).
“Optional Temporary Printing Folder” is also an advanced feature that allows you to specify a folder for
the temporary files created when the message or attachment is printed. This is handy if you encounter
problems with automated printing.
In the “Image Options” frame are four options that are useful when printing images such as TIFF or eFax
images. The first one resizes the image to print on the page. If you are printing pages and you notice
that the attachment images are “falling off the edge of the page” then check this option. You can also
choose the “Center the image on the page”. Finally, you can choose to print more than one copy by
default, and if so, you can “Collate” them, that is, print out all of the pages before the next copy is
printed.
Print On Demand
Copyright © 2008 Sperry Software Inc.
P a g e |4
Troubleshooting
Q. The “Sperry Software Add-ins” button is not visible.
A. The add-in may have become disabled.
For Outlook 2002, 2003 users:
On the Outlook Menu, click Help…About Microsoft Outlook
Click the “Disabled Items” button
If “Sperry Software” is listed, enable it and restart Outlook
For Outlook 2007 users:
On the Outlook Menu, click Help…Disabled Items
If “Sperry Software” is listed, enable it and restart Outlook
The Sperry Software toolbar may not be set to “Visible”
On the Outlook Menu, click View…Toolbars and make sure that Sperry Software is checked.
Q. The “Sperry Software Add-ins” button does not respond.
A. Run the add-in Reset tool.
The add-in reset tool can be downloaded from
http://www.sperrysoftware.com/outlook/tools.asp
Q. How can we contact you for more help?
A. For help on more in-depth issues, check out our Knowledge Base.
Print On Demand
Copyright © 2008 Sperry Software Inc.
P a g e |5