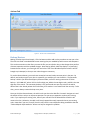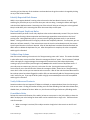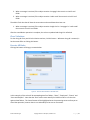
1
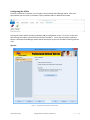
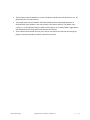
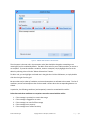
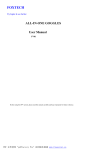
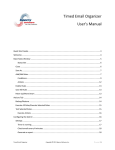
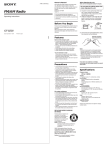
Power Rules Manager User’s Manual Welcome ................................................................................................................................................. 3 Configuring the Add-in ............................................................................................................................ 4 Main Rules Window ................................................................................................................................ 6 Close ................................................................................................................................................... 6 Save As ................................................................................................................................................ 6 Print Rules ........................................................................................................................................... 6 Save All Rules ...................................................................................................................................... 6 View By Folders ................................................................................................................................... 7 View By Contacts ................................................................................................................................. 7 Add/Edit Rules ..................................................................................................................................... 7 Delete Rules ........................................................................................................................................ 9 Move Up/Move Down/Set Execution Order ......................................................................................... 9 Find/Find Next ................................................................................................................................... 10 Replace.............................................................................................................................................. 10 Actions Tab ........................................................................................................................................... 11 Backup/Restore ................................................................................................................................. 11 Identify Repeated Rule Names ........................................................................................................... 13 Find and Repair Duplicate Rules ......................................................................................................... 13 Validate Stop Actions ......................................................................................................................... 13 Verify Folders and Contacts ............................................................................................................... 13 Consolidate Rules .............................................................................................................................. 13 Clear Violations ................................................................................................................................. 14 Power Rules Manager Copyright © 2012 - 2014 Sperry Software Inc. P a g e |1 Execute All Rules ............................................................................................................................... 14 Execute Selected Rules ...................................................................................................................... 15 Status Bar .............................................................................................................................................. 16 Troubleshooting .................................................................................................................................... 17 Power Rules Manager Copyright © 2012 - 2014 Sperry Software Inc. P a g e |2 Welcome Thank you for choosing the Power Rules Manager add-in, created by Sperry Software. This add-in allows you to easily manage your rules in Outlook by displaying them all at once in a flexible grid. You can get to the grid by clicking on the Power Rules Manager toolbar icon in Outlook. Like most grids, clicking on a column header causes the grid to sort by that column. In addition, you can start typing a few keys to quickly go to the row (or rule) that contains the keys you started typing. One of the first things that should be done is to save a copy of your rules in the case of an error. There are three ways to do this, either via the “Backup” button in the toolbar, the “Save As” button in the toolbar, or via the traditional method of using Outlook Rules and Alerts to save an RWZ file. Using the “Save As” allows you to see and read all the rules, but it cannot be used to restore your rules (other than manually typing them back in). Using the RWZ technique does not allow you to see the rules however it can be used to restore your rules so that you can effectively start over. Using the “Backup” button allows you to both see the rules (the rules are written to an XML file) and to be able to restore them (using the “Restore” button). One of these techniques (or all of them!) should be used to backup your rules before starting. When the grid is first displayed, it shows all the rules in the order of their execution. In addition, at the bottom it shows the status of the program, which mailbox’s rules are being examined, and how many rules you have. You can double click on any row to edit a rule. Note that the entire window is resizable, so that more of the rules can be shown in the window. You can resize the window by sliding the mouse to the lower right hand corner, then clicking the mouse down (to “grab” the window edge), then slide the mouse to resize the window. The add-in works with your existing Outlook rules. To that end, some functions of Outlook must still be used in conjunction with the add-in. For instance, to create and edit certain rules you can still use the Outlook Rules and Alerts tool. However, the add-in can be used for the most common rule operations. Note that the Power Rules Manager window needs to be closed and reopened to see the changes you make to any rules using Outlook’s Rules and Alerts tool. Power Rules Manager Copyright © 2012 - 2014 Sperry Software Inc. P a g e |3 Configuring the Add-in Once the installation is complete, you are ready to use the Power Rules Manager add-in. When you open Outlook you will notice a new button “Sperry Software Add-ins” added to the toolbar. Figure 1 - Toolbar on Outlook 2013 Clicking this button displays the Sperry Software Add-ins configuration screen. It is on this screen that basic settings are made to control the functionality of the add-in. To the right of the Sperry Software button is the Power Rules Manager toolbar button which pulls up the main window for working with the rules. Options Figure 2 - Configuration Window on Outlook 2013 Power Rules Manager Copyright © 2012 - 2014 Sperry Software Inc. P a g e |4 The first option controls whether or not the Find button searches are case sensitive or not. By default they are not case sensitive. The second option controls whether full Outlook folder paths are displayed whenever an Outlook folder name appears in the rules (usually in the Actions column). By default, short names (i.e., no full Outlook paths) are used since clicking on the “View By Folder” toggle button will show both the full (long) path names and the short names. The Fix Broken Rules button will scan your rules for any broken ones that may be causing the plugin to not operate properly. Broken rules will be removed. Power Rules Manager Copyright © 2012 - 2014 Sperry Software Inc. P a g e |5 Main Rules Window Figure 3 - Main Rules Window - Outlook 2013 Version This is a screenshot of the main Power Rules Manager window. Close The Close button saves your grid size (assuming you resized it) and closes the program. It is the same as clicking the red X in the upper right corner of the window. Save As The Save As button saves your rules to a file in either plain text, comma delimited or Microsoft Excel format. It is important to save your Outlook rules in case of error. Once the file has been saved, depending on which format was selected, it can be opened in Notepad or Excel. Print Rules The Print Rules button presents a print preview display of your rules. While you can click the Print button from there to get a hard copy of your rules, you can also choose to save the preview to a file – in several different formats as well. Save All Rules When editing multiple rules from within the Power Rules Manager, you can use the Save All Rules button to save all of your changes at once. The button is disabled by default, but will become active when you have made at least one change. If you try to close the Power Rules Manager window without having saved your changes, you will receive a warning asking if you would like to save before closing. Power Rules Manager Copyright © 2012 - 2014 Sperry Software Inc. P a g e |6 View By Folders This button will open two new columns in the grid. One of the columns will be just the name of any Outlook folder in the rule (Short Folder Names), and the other will be the full pathname of the Outlook folder (Long Folder Names). The latter is useful for resolving any ambiguity when it comes to folder names, especially when two folders are allowed to have the same name in Outlook. The Short Folder Names column is useful because if you sort on that column (by clicking on the column header), you can quickly see which rules involve that Outlook folder. This can be handy when you are viewing an email and wondering how that email came to be in that folder. This view can also be useful to manually consolidate your rules involving the same folders…if there are several rules that move emails to a given folder they can usually be combined (since the conditions of Outlook rules are OR’ed together). However, note that there is a button on the Actions tab called “Consolidate Rules” which will perform this action for you. View By Contacts This button is similar to the View By Folders except that when clicked it will reveal a new column that displays any contacts associated with the rule. By clicking on the header, you can sort by the list to see which rules involve particular people. This can be useful for cleaning up your rules if the person is no longer employed at your firm or otherwise involved in your daily email operations. You can also see if there are multiple rules involving the same contacts, so that those rules can be coalesced into a single rule, saving space. Add/Edit Rules The Power Rules Manager add-in allows you to create and/or edit rules. To add a new rule, simply click the Add button. You will be asked if the rule you want to create applies to incoming emails or to outgoing emails. Once you answer that question, you will be presented with a window that looks similar to this: Power Rules Manager Copyright © 2012 - 2014 Sperry Software Inc. P a g e |7 Figure 4 - Add/Edit Rule Window on Outlook 2013 The rule name is the next rule in the execution order (but should be changed to something more meaningful) and it is enabled by default. The add-in then waits for you to add a condition, an action or an exception. If you wish to delete a condition, action or exception, simply highlight that line in the editor by selecting it then click the “Delete Selected Line” button. To edit a rule, you can highlight a selected row in the grid then click the Edit button, or simply double click the rule right from the grid. Be aware that only a subset of conditions, actions and exceptions are allowed to be created. The list of conditions, actions and exceptions that can be created is shown when the corresponding buttons are clicked. In particular, the following conditions (and exceptions) cannot be created with the add-in: Rules that need these conditions or exceptions cannot be created with the add-in: 1. 2. 3. 4. 5. If the message is received in a certain date range If the message is flagged for an action If the message is an out of office message If the message has a property If the message has a certain sensitivity Power Rules Manager Copyright © 2012 - 2014 Sperry Software Inc. P a g e |8 6. If the message is within a certain size range Rules that need these actions cannot be created with the add-in: 1. 2. 3. 4. 5. 6. 7. 8. 9. 10. 11. 12. 13. If the rule runs a custom action If the rule defers delivery for a number of minutes If the rule clears the message flag If the rule flags the message for follow up If the rule marks the message with a specified importance If the rule marks the message as read If the rule prints the message If the rule runs a script If the rule marks the message with a specified sensitivity If the rule has the server reply with a specified message If the rule starts an application If the rule runs a script If the rule replies using a template Keep in mind that rules can still be created (or edited) using the Outlook Rules and Alerts wizard, then closing and reopening the Power Rules Manager will reflect the newly created rules. Delete Rules There are actually two ways to delete rules. One method of deleting rules is to simply select the rule, then click the delete key on the keyboard. A confirmation window will appear, then depending on your answer the rule will be deleted and the server will be updated. A second method involves using the Delete Rules button. You first select one rule (or more rules by holding down the Ctrl key while you click on the rules you no longer want). Then you click the Delete Rules button. A confirmation window will appear (you did make backups, right?) and once confirmed the rules will be deleted. This method has the advantage that you are only asked to confirm once for a number of rules, and the server is only update one time; this can be quicker than individually deleting rules. Before making changes to rules, it is advisable to make backups using the Backup button (see below). Move Up/Move Down/Set Execution Order Changing the order of rules processing is simple with these two buttons. Simply select a row, and then click on the button to move it up or down in the execution order. Moving a rule up in the execution order makes the rule run before any of the rules that appear below it. Once the rule order is set, the Set Execution Order needs to be clicked in order to update the server with the new rule order. Power Rules Manager Copyright © 2012 - 2014 Sperry Software Inc. P a g e |9 Similar to the Delete Rules button above, changing the rule order can also be done by simply double clicking on any row to edit the rule. The execution order can be changed in the rule edit window. This can be handy for example, if you have dozens of rules and a client side rule that is near the top of the execution order and you want to move it near the bottom…it would take too long to repeatedly click the Move Down button. The Set Execution Order button can be used to change to change the order of execution for all your rules at once. For instance, to run your rules in alphabetical order, simply click on the “Name” column header to sort your rules alphabetically then click on the Set Execution Order. Once you click on the button, the server is updated and the grid refreshes with all your rules in the new order. One note about this powerful feature: as documented in our tips article on the website, you probably want to make sure that all your server side rules run first and reorder your Outlook rules to make the client side rules run last. While this tip doesn't help you to save space, it does help to make sure all your rules run. This is to allow the server side rules to all run first; if the client rules ran first, then some of the server side rules might not be given a chance to run, making it look like the rules are only running sometimes. Find/Find Next Using these two buttons allows you find all occurrences of the text you type into the box to the right of the Find button. After you type in the text, move off the field using the tab key or the Enter key. If any rule contains your text, it will be highlighted. If there are no matches, a popup window lets you know. The fields that are searched in the grid are Order, Name, Conditions, Actions, and Exceptions. In addition, the hidden columns of the “View By Folders” and “View By Contacts” buttons are also searched on, even if they are not visible. The “Select All Found” checkbox is used to automatically select all rules that have the text in the Find button. Selecting rules in this way is useful for say, quickly disabling all rules that have a particular folder or selecting rules that involve a particular contact for the “Execute Some Rules” button (see below). Replace The Replace button allows you to perform a bulk replace of folders. This function makes it easy to replace invalid folders quickly. You may find the need to use this function after importing Outlook rules from another machine, as Outlook does not build the folder structure on your behalf. For more information on importing Outlook rules, see our article at http://www.SperrySoftware.com/Outlook/How-to-import-Outlook-rules.asp. Power Rules Manager Copyright © 2012 - 2014 Sperry Software Inc. P a g e | 10 Actions Tab Figure 5 - Actions Tab on Outlook 2013 Backup/Restore Making a backup is quick and simple. Click the button and the add-in asks you where to save your rules. The rules are saved in standard XML format meaning they are readable by both humans and computers. This can be convenient so that after you save the file you can edit the rules, make changes then perform a Restore operation with the updated changes. Note that by default, XML files display in a (read only) browser but to edit one, you must right click and select “Edit” from Windows Explorer where it will be brought up in Notepad, so that you can make changes as necessary. To use the Restore button, you must have created at least one backup at some point in the past. By default, one backup copy of your rules is created for you each day you run the add-in. The automatic backup is held in your Documents\Sperry Software folder, and has a naming convention of “Rules Backup – YYYY-MM-DD”, where YYYY is the four digit year, MM is the two digit month, and DD is the two digit day of the month. This automatic backup is only performed once per day so that if the add-in detects that it has already written the file that day, then another is not created until the next day. To be clear, you can always create a backup at any time. Once you click the Restore button, the add-in asks you where the XML file is located. Navigate to it and the add-in will then ask you an important question: Do you want to append or replace your existing rules. If you replace your existing rules, then all your rules will first be deleted then the add-in will restore the rules. Otherwise, the add-in will simply append the newly imported rules to your existing rules. Note that if you aren’t careful, that this may result in some duplicates being created but that the “Find and Repair Duplicate Rules” button can help to mitigate this problem. Power Rules Manager Copyright © 2012 - 2014 Sperry Software Inc. P a g e | 11 During the Restore operation, Outlook folders that are not found are automatically created on your behalf. One final important note about the Restore operation: Although all rules can be backed up, not all rules can be restored. This is because Outlook limits the types of rules that can be programmatically created. Rules that are found in the XML file during a Restore operation that cannot be restored are written to a file (“FailedRules.xml”) so that you can enter them back in manually using the original Outlook Rules and Alerts wizard. The rule types that cannot be restored are broken down into two groups, listed below: Rules that have these conditions or exceptions cannot be restored: 1. 2. 3. 4. 5. 6. If the message is received in a certain date range If the message is flagged for an action If the message is an out of office message If the message has a property If the message has a certain sensitivity If the message is within a certain size range Rules that have these actions specified cannot be restored: 1. 2. 3. 4. 5. 6. 7. 8. 9. 10. 11. 12. 13. If the rule runs a custom action If the rule defers delivery for a number of minutes If the rule clears the message flag If the rule flags the message for follow up If the rule marks the message with a specified importance If the rule marks the message as read If the rule prints the message If the rule runs a script If the rule marks the message with a specified sensitivity If the rule has the server reply with a specified message If the rule starts an application If the rule runs a script If the rule replies using a template Check Rules Integrity Group The Check Rules Integrity group contains five buttons that can be used to validate your rules. When any of the buttons is clicked, if there is an offending rule found then the rule is flagged using a red circular exclamation mark. If the mouse hovers over this exclamation mark a tooltip reveals more information about the particular rule violation. Note that you can click the “Clear Violations” button at any time to Power Rules Manager Copyright © 2012 - 2014 Sperry Software Inc. P a g e | 12 reset the grid, and that any of the violations are cleared when the grid sort order is changed by clicking on any of the column headers. Identify Repeated Rule Names While it is not against Outlook’s naming rules to have rules that have identical names, it can be confusing for you while you try to sort out what your rules are doing. Pressing this button will flag all rules that have duplicate names. Renaming one of the rules will help you to keep your rules organized. Keep in mind while you’re renaming that short rule names help to save space. Find and Repair Duplicate Rules Sometimes when you have a lot of rules, duplicate rules can be inadvertently created. They can also be created by performing a Restore operation and choosing to append the restored rules to the list of existing rules. Having duplicate rules is a primary cause of getting duplicate emails in your Outlook folders. Clicking this button will first flag any rows that are completely identical. To save space, you can delete one of them manually. If the mouse hovers over the circular red exclamation mark, the mouse tip will reveal the other rule that is identical. After all the duplicates have been found and marked, the add-in offers to delete the duplicates for you. After the operation is complete, the rules are updated and the grid is refreshed. Validate Stop Actions One of the most confusing rule actions is the “Stop processing more rules” action. This action should be in place after every occurrence of the “Move this message to folder X” action. This is because if multiple move rules apply to a single message, the message will be moved out of the inbox multiple times, creating a copy in each folder (even though it says move) and is another cause of duplicate emails. If you really want to create a copy, there is a rule action for that. Pressing this button will flag all occurrences of your rules that have the “Move this message to folder” action but no “Stop processing more rules” action so that you can examine each occurrence. After all the rules that have Move actions but no Stop actions have been flagged, the add-in offers to automatically add the “Stop processing more rules” action for you. If you opt to do this (which is highly recommended) then the rules are updated and the grid is refreshed. Verify Folders and Contacts Sometimes when rules are imported, if folders are deleted, or contacts deleted, then the rules can get into an error state. Clicking this button will help you to find the offending rules and either delete them, disable them, or otherwise fix them. When run, this function will flag and select any offending emails. Consolidate Rules Perhaps the most useful function of the add-in (at least to save space in rules) is the ability to have the add-in analyze your rules looking for those which can be combined into a single rule. Take these three rules for example: 1. When a message is received, if the subject contains ‘weight loss’ then move it to Junk E-mail folder Power Rules Manager Copyright © 2012 - 2014 Sperry Software Inc. P a g e | 13 2. When a message is received, if the subject contains ‘mortgage’ then move it to Junk E-mail folder 3. When a message is received, if the subject contains ‘credit cards’ then move it to Junk E-mail folder The add-in finds rules that all have the same action and consolidates them into one: 1. When a message is received, if the subject contains ‘weight loss’ or ‘mortgage’ or ‘credit cards’ then move it to Junk E-mail folder After the consolidation operation is complete, the rules are updated and the grid is refreshed. Clear Violations To clear the grid of any and all rule violation markers, click this button. Whenever the grid is resorted, it has the same effect as clicking this button. Execute All Rules Clicking this button will bring up a new window: Figure 6 - Execute Rules Window on Outlook 2013 In this example, all the rules will be executed against four folders, “Inbox”, “Employees”, “Events” and “Icons and Graphics”. Note that the “Run” button must actually be clicked in order to run the rules against these folders. The Cancel button will be highlighted once the processing starts to allow you to cancel the operation, however there is no Undo ability so be sure to use caution. Power Rules Manager Copyright © 2012 - 2014 Sperry Software Inc. P a g e | 14 Execute Selected Rules This button performs the same function as the “Execute All Rules” button except it only executes the rules that are currently selected. You can select them by clicking them one at a time manually (holding down the Ctrl key while clicking allows you to select multiple rules) or by using the Find/Find Next buttons (being sure to click the “Select All Found” checkbox first). Power Rules Manager Copyright © 2012 - 2014 Sperry Software Inc. P a g e | 15 Status Bar The status bar area is at the bottom of the grid. It displays three items: 1) The current status of the add-in. Because some operations take a long time (backup, restore, or saving the rules when there are many of them) this status area will indicate what the add-in is doing and when it is ready for the next action. 2) The current mailbox (more on this in a moment). 3) The number of rules. The current mailbox has a small pull down arrow next to it. This is useful if you have more than one account configured in your Outlook profile. Selecting a new mailbox results in the current set of rules being discarded and the new set of rules from that mailbox read in. Power Rules Manager Copyright © 2012 - 2014 Sperry Software Inc. P a g e | 16 Troubleshooting Q. I’m having trouble, and need to start over with installing. What can I do? A. Follow these instructions: http://www.sperrysoftware.com/kb/questions/98/I%27m+having+problems%2C+and+I+need+ to+reinstall+my+add-ins+from+a+clean+start.+How+do+I+do+this%3F+ Q. The “Sperry Software Add-ins” button is not visible. A. Run the add-in Reset tool. The add-in reset tool (among others) can be downloaded from http://www.sperrysoftware.com/outlook/tools.asp Q. How can we contact you for more help? A. For help on more in-depth issues, check out our Knowledge Base. Power Rules Manager Copyright © 2012 - 2014 Sperry Software Inc. P a g e | 17