1
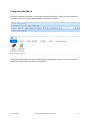
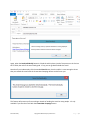
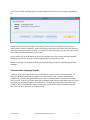
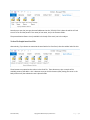
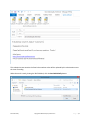
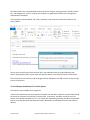
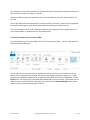
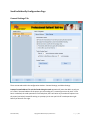
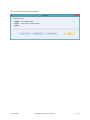
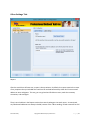
Send Individually
User’s Manual
Contents
Welcome ................................................................................................................................................. 2
Configuring the Add-in ............................................................................................................................ 3
Using Send Individually ............................................................................................................................ 4
To Start a New Campaign..................................................................................................................... 4
To Personalize Campaign Emails .......................................................................................................... 6
To Send To People in an Excel File .................................................................................................... 7
To Send Unique Attachments To Each Recipient .............................................................................. 9
To Send To People in Your Contacts Folder .................................................................................... 10
Send Individually Configuration Page ..................................................................................................... 11
General Settings Tab.......................................................................................................................... 11
Other Settings Tab: ............................................................................................................................ 14
Troubleshooting .................................................................................................................................... 16
Send Individually
Copyright © 2008-2014 Sperry Software Inc.
P a g e |1
Welcome
Thank you for choosing the Send Individually add-in, created by Sperry Software. This add-in sends an
email that you create to each recipient you specify, one at a time. It’s perfect for sending out
newsletters, announcements, and other marketing materials.
How it works:
1) You create an email newsletter or other announcement.
2) Add your recipients to the "To" field.
3) You click the "Send Individually" toolbar button.
That's it! Each of your recipients will get an email addressed just to them, in the "To" field, and they will
not see any other email addresses, because it's been sent just to them.
Alternatively you can choose contacts from any of your contacts folders, click the Send Individually To
Contacts button, compose your email the way you normally would, then click on the Send Individually
button. It will prompt you for approval of the final review, then begin sending the email to all the
contacts you selected. This topic is discussed in more detail below in the Using Send Individually
section.
You can also compose your email the way you normally would except leaving the To field blank, then
click on the Send Individually button. It will prompt you for a list of email addresses (from an Excel file
or a tab delimited plain text file with one address per line) and it will then send one copy of the email to
each recipient, individually addressed. This topic is discussed in more detail below in the Import From
File section.
Note: You may want to practice using just a few names at first, until you get the hang of it. Also, you’ll
probably find it helpful to take Outlook offline so that no emails actually get sent while you’re practicing.
If you do this, you’ll need to delete any “practice” emails you may have in your Drafts folder or your
Outbox folder before going back online. To go offline, go to (in Outlook) File…Work Offline and click it.
To go back online, click it again (so the checkmark disappears). You can tell if you are offline by looking
in the lower right hand corner of the main Outlook window (where it says “Offline”). Just in case, the
add-in displays the first email exactly the way it’s going to go out. If you’re happy with it, just answer
Yes to the question of whether you want to send them all out. If you’re not happy with it, choose No to
the question of whether you want to send them out of not. You can then make any necessary alterations
and try it again.
Send Individually
Copyright © 2008-2014 Sperry Software Inc.
P a g e |2
Configuring the Add-in
Once the installation is complete, you are ready to use Send Individually. When you open Outlook you
will notice a new button “Sperry Software Add-ins” added to the toolbar.
Outlook 2007
Outlook 2013
Clicking this button displays the Sperry Software Add-ins configuration screen. It is on this screen that
settings are made to control the add-in’s functionality.
Send Individually
Copyright © 2008-2014 Sperry Software Inc.
P a g e |3
Using Send Individually
To Start a New Campaign
A campaign is an email combined with a set of recipients, whether they are in Outlook, Excel, a text file,
etc. To start a new campaign click on the Create New Campaign button:
Outlook 2013
Once you do, you will immediately be asked where you will be getting your contacts from. There are
two possibilities here, either they are in Outlook (say, your Contacts folder, or your Address Book, or you
can just start typing the email addresses into the To field just like normal). The other is in an Excel file
(or any file that Excel is capable of reading, like a tab delimited text file or a CSV file):
For purposes of this example, let’s choose the Outlook Contacts option. A new email ready for your
customization is displayed. Fill it out like normal then click back on the Message tab, and click the Send
Individually button:
Send Individually
Copyright © 2008-2014 Sperry Software Inc.
P a g e |4
Again, when the Send Individually button is clicked the add-in places just the first person on the list into
the To field, then asks if the email looks good. If not, you can go back and edit the email.
Note that if you inadvertently click the standard Send button, that the add-in is smart enough to know
that you started this email with the Create New Campaign button and will warn you:
This feature will prevent you from making a mistake of sending the email to many people. It’s only
available if you start the email with the Create New Campaign button.
Send Individually
Copyright © 2008-2014 Sperry Software Inc.
P a g e |5
If you elect to send the message after it has been displayed, then you will see a progress window pop
up:
Progress window (shown after successfully finishing the campaign)
Note that while the email campaign is under way, you can Pause the campaign (or Resume from a
Pause) and also Cancel it altogether. When cancelling, be aware that some emails may have been sent
while others may not have been sent out. It is important to check the report (or your Sent Items folder)
to see which recipients have been sent the email.
You can safely click on the Ok button to dismiss this window so you can continue working in Outlook.
You also just minimize it or leave it in the background while you continue to work.
When the campaign has finished you will get an email notifying you of the completed status for that
campaign.
To Personalize Campaign Emails
In order to really raise response rates of your newsletters, announcements and other material, it’s
better to individually address each recipient in the body of your email. Doing so also lowers the
probability of your email being classified as spam since it’s no different than if you were to craft the
email yourself. To do this, you can use the Sperry Software toolbar buttons that appear once you select
to send to your Outlook Contacts or use an Excel file. The options to personalize vary based on your
recipients. When using Outlook Contacts for instance, you can choose from the contact’s title (Mr.,
Mrs., etc), first name, last name, or company name:
Send Individually
Copyright © 2008-2014 Sperry Software Inc.
P a g e |6
Note that you can also just type the email addresses into the To field; if this is done the add-in will look
to see if it can find the person’s first name (or last name, etc) in the Contacts folder.
The personalization feature is only available in the body of the email, not in the subject.
To Send To People in an Excel File
Alternatively, if you choose to customize the email with a list from Excel, then the toolbar looks like this:
These buttons correspond to the column in the Excel file. These buttons are just a sample of the
available power of the add-in…this is because once you click the button (after placing the cursor in the
body of the email) the substitution text is placed inside:
Send Individually
Copyright © 2008-2014 Sperry Software Inc.
P a g e |7
Example campaign email with personalization – note the blank To field
This substitution text contains the Excel column whose value will be replaced by this substitution text at
the time of sending.
When the email is ready, leaving the To field blank, click the Send Individually button:
Send Individually
Copyright © 2008-2014 Sperry Software Inc.
P a g e |8
The add-in detects the missing To field recipients and kicks into gear, asking you where to find the Excel
file. You navigate to it, select it, and then the recipients are gathered up and the first message (with
substitutions) is displayed.
In the example screenshot below, the value in column B in the excel file contains the recipient’s first
name (“Mike”):
You can use any valid column from the Excel file in the substitution text by simply editing the text;
there’s nothing special about it (just make sure that the column in the Excel file contains valid values).
The rest of the process continues and the progress will be displayed as the add-in works its way through
your list of recipients.
To Send Unique Attachments To Each Recipient
This feature is only available when using Excel.
If you use the substitution text to personalize the email, then the add-in performs a special check behind
the scenes as it processes the columns in the excel file. In particular, the add-in checks to see if the
column value specifies the path to a file. If so, rather than substituting anything, the add-in instead adds
that file as an attachment for that particular email. Meanwhile the substitution text for that column is
deleted.
Send Individually
Copyright © 2008-2014 Sperry Software Inc.
P a g e |9
So in summary to send unique attachments, simply use any of the substitution text buttons making sure
that the column chosen has a path to a valid file.
If there is no file found then the substitution text is still removed from the email, and the email is still
sent out.
You can just add the keyword ‘[Substitute: First Name, Default: “Customer”]’ (without the single quotes,
but with the double quotes) and it will be substituted with each person’s name on the fly.
There are two ways to do this, and it depends on whether you are going to send to people that are in
your Contacts folder, or people that are in your address book.
To Send To People in Your Contacts Folder
To send to people in your Contacts folder, start in any of your contact folders. The first thing you want
to do is to select the List view:
List View is on the right (Outlook 2013 shown)
You can then select the contacts that you would like to send to, or press Ctrl-A to select them all (or
better, view by Categories, then select all the contacts that belong to particular category, etc – using
Categories as a method of organizing lists is highly recommended). Once they are highlighted, click the
Email button. This will bring up a new email that is addressed to all your Contacts. At this point you can
safely fill out the email like normal, then when you’re ready click the Send Individually button and the
process continues just like when using an Excel file.
Send Individually
Copyright © 2008-2014 Sperry Software Inc.
P a g e | 10
Send Individually Configuration Page
General Settings Tab
There are two tabs within the configuration window – General Settings, and Other Settings.
Prompt for email address if it can’t be found during the send operation will cause the add-in to ask you
to “resolve” the email address of the person you are sending to if it cannot figure it out by itself. If this
box is unchecked, the send operation will still take place, but it will write any unresolved recipients into
the report (see below) instead of waiting on a prompt just in case you kick off a send operation right
before you leave for the night.
Send Individually
Copyright © 2008-2014 Sperry Software Inc.
P a g e | 11
Display first message so that it can be reviewed before sending causes the first message to be
displayed in front of you the way it’s going to go out. This gives you a chance to correct any mistakes,
and make sure that all substitutions are occurring as expected. Once the email is displayed in front of
you, and you are happy with it, just click Yes to send out all the copies, including the one you just
reviewed. If you need to make changes, just click no and the emails will not be sent. You will then have
a chance to correct the email.
Send an email to myself when the campaign ends will generate a message that is sent to your inbox
when the campaign is finished. This is useful if you do not want to monitor the emails as they go out
and you choose to delete the sent campaign emails.
Permanently delete the sent copies after sending them will erase all copies of the sent emails after
they have been sent out.
Send a BCC copy of each email to allows you to designate an email address that will receive a BCC of
each sent email. This is useful if you want a copy to be sent to a CRM system; it’s important because if
you put a BCC in the campaign email itself, it will be erased before being sent out because the add-in
normally removes all recipients (except for one) each time it sends a campaign email.
Throttle Sending
If you are sending to many contacts, it may be necessary to throttle how quickly the messages are being
sent out. If a value of zero is specified, the feature is effectively turned off, and the messages go out as
they normally would. If any other value is specified, that is the number of seconds that passes between
each send that is performed by the add-in. This allows Outlook a chance to get the message out before
being overwritten by the next.
Note that there are other factors that affect the sending – for instance, your email provider (ISP) may
limit the number of messages that you can send in a day, or the number of messages that can be sent in
an hour. You’ll need to contact your ISP to get the exact details.
Sending Progress
The Show Progress button will allow you to view the progress of any campaigns that are currently in
progress. The Reset button provides you with a means of stopping the campaign in progress, which will
need to be manually restarted.
Send Individually
Copyright © 2008-2014 Sperry Software Inc.
P a g e | 12
This is an example of the progress window:
Progress window (shown after successfully finishing the campaign)
Send Individually
Copyright © 2008-2014 Sperry Software Inc.
P a g e | 13
Other Settings Tab:
Reports
After the emails have all been sent, a report is always written. By default, the report contains the names
of any recipients that you included who could not be resolved because they either don’t have an email
address or were ambiguous. This way, you can go back and find those names, make the necessary
corrections, and send again.
There is one checkbox in the Reports section that controls what goes into each report. As mentioned,
any failed email addresses are always included, however if the “When sending, include successful as well
Send Individually
Copyright © 2008-2014 Sperry Software Inc.
P a g e | 14
as unsuccessful recipients in the report” checkbox is checked (which it is by default) then all the names
and email addresses that are sent to will be included in the report.
To view the report, just go to the configuration window and click “View Reports Folder”. This report
gets overwritten each time you send so if you need to keep the report for any reason, it will be
necessary to copy the file to another location.
Default Text
For personalization, when the person’s first name, last name, or company name cannot be found the
text entered in this field will be substituted.
Send Individually
Copyright © 2008-2014 Sperry Software Inc.
P a g e | 15
Troubleshooting
Q. I’m having trouble, and need to start over with installing. What can I do?
A. Follow these instructions:
http://www.sperrysoftware.com/kb/questions/98/I%27m+having+problems%2C+and+I+need+
to+reinstall+my+add-ins+from+a+clean+start.+How+do+I+do+this%3F+
Q. The “Sperry Software Add-ins” button is not visible.
A. Run the Add-ins Reset tool.
The add-in reset tool (among others) can be downloaded from
http://www.sperrysoftware.com/outlook/tools.asp
Q. How can we contact you for more help?
A. For help on more in-depth issues, check out our Knowledge Base.
Send Individually
Copyright © 2008-2014 Sperry Software Inc.
P a g e | 16