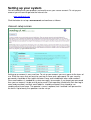
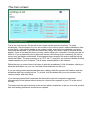
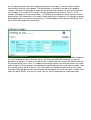
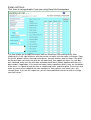
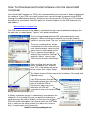
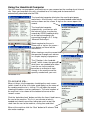
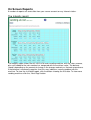
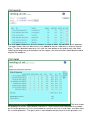
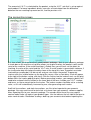
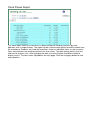
1
vending.uk.net
User Manual
email: [email protected]
Copyright © CM Software 2008
The vending.uk.net daily process…
Manage your operators
with maximum efficiency.
Scheduled calls are
downloaded to the handheld computers
automatically.
Save hours each week by
automating invoicing, stock
control and accounts. Print
invoices directly from meter
readings, machine rental and
products sold. Update you
accounts and stock control
program automatically,
saving time and eliminating
errors.
vending.uk.net
Internet Server
Total accountability
checks cashbox values
against products sold in
each machine. The onscreen ‘integrity report’
from your secure
account pinpoints theft
to a machine or
operator.
On-screen pick-lists ensure
the operator has the stock he
needs on the van.
Arrival stock, meter readings
and cash entered are
automatically uploaded to
vending.uk.net for analysis.
Knowing what stock is in your vending
machines (even before you leave the
warehouse and without using telemetry!),
vending.uk.net recommends minimum fill
quantities to last until the next scheduled
visit. Filling machines to the right level
reduces waste and keeps your cash flow
healthy.
The two ways of working…
1. Worksheet based, using forms printed free on your printer giving the zero
cost solution while maintaining all of the powerful features of the
vending.uk.net system.
2. Using low-cost hand-held iPAQ computers for ultimate
productivity. Eliminating printed worksheets and
automatically updating the server, without the need to
key-in figures at the end of the day, the hand-held computer simplifies
the operator’s task even further!
About worksheets….
Worksheets are printed forms that the operator takes with
him when stocking a vending machine. The form shows
the products that should be stocked in each column, with
the recommended quantity on exit. This number is
calculated, based on previous sales from this machine,
and on the number of days until the next visit, so that the
machine is not over stocked. When arriving at site, an
estimate of the number of items needed are shown in the
column called, from van. On arrival at the vending
machine, the operator writes on the worksheet the actual
number of items in each column. The operator also writes
the actual number of items placed. The product price is
also shown on the worksheet. The operator should check
the prices shown on the worksheet are correct for the
machine, and update the worksheet if this is not the case.
For in cup drinks, the cup counter figures should be entered onto the worksheet before
resetting the counters. The non re-setable counter, on loose component machines, should be
read, and the number entered onto the worksheet. Any cash added to the coin mechanism,
refunds, and money entered in test vends should also be recorded on the worksheet. When
returning to the office, or at home, the information entered onto the worksheet is copied into
vending.uk.net.
The ‘Worksheet’
Products for
each column are
shown here.
Cash values and
meter readings are
written here.
The quantity
needed from the
van is shown here.
The item price is
shown here
Column meters for
in-cup products
are written here
The recommended quantity
of stock for this column on
exit is shown here. This is
the minimum to last until
the next scheduled visit.
The operator writes
actual quantities on
arrival and actual quantity
placed here
Setting up your system
You will need to enter your products and machines on your secure account. To set up your
account you will need to go onto the Internet site:
www.vending.uk.net
Click the button to set up a new account and continue as follows:
Account setup screen
Setting up an account is easy and free. To set up your account you must agree to the terms of
use. Enter the name that you want for your log-in name and a password. For your security,
passwords should be at least eight characters long, and include both letters and numbers.
Your email address is needed for system messages, for example, if you forget your password
then you can request it to be sent to you by email. Each operator should have their own log-in
name and password, and their email address should be entered if they intend to use
vending.uk.net from home. The operator’s name is optional, but if entered it will personalise
the forms. Up to twenty-five operators can be set up.
The main screen
This is the main screen. On the left of the screen are the operator functions. To make
worksheets, click the button for your van number in the column called, make worksheets. After
a short delay, a link should appear in the column called, print today’s worksheets, and print
tomorrows worksheets. If you click the link where it says, click here, a pop up window should
appear. If you do not see this, then you may need to allow your computer to accept pop-ups for
this site. If you accidentally click on the main screen, while the pop-up is showing, the pop-up
screen may get hidden underneath. If this happens then minimize the screen and the pop-up
should be visible. The pop-up screen is a P.D.F. file. To read this, you will need Adobe Acrobat
reader installed on your computer. This is freely downloadable on the Internet.
Within the pop-up screen there is a button to print the worksheets. Click this button, check you
have the stock items on your van, and take the worksheets out with you.
If you are using printed worksheets then after making visits the operator will need to enter the
worksheet data into vending.uk.net. To do this, click the button with your van number in the
column named, after visit forms.
If you are using hand-held computers the information from the computer is uploaded
automatically to the Internet server when you connect the computer to your PC at the end of
the day.
The buttons on the right hand side of the screen allow a supervisor to set up, accounts, product
lists and vending machines, as well as run reports.
Product setup screen
Vending.uk.net allows you to set up ten product lists, with each list having up to 800 different
products. To set the name of the list simply write over the list name. Products are entered in
the table to the right of the screen. The column, F.O.C, are items that are not individually
priced. These can be, for example, loose ingredients such as coffee powder, sugar and cups.
The product name should be entered. It can be helpful to add the word, sleeve, after the
product name if this is for a sleeve of cups. If you want to export data to a stock control or
accounts program, then the stock I.D. should match the product I.D. used in this. The pack
name is the package type that the operator would load into the van, and the quantity in pack is
the number of items that are contained in the pack. The V.A.T. rate is used when generating
invoices and when exporting data to an accounts program. If a product has been discontinued
then it should be shown as, not active. Products should remain on the system so that reports
showing previous visit work correctly. This screen will show active products. To show all
products, tick the show all, check box above the table. The screen shows 20 products. To view
or add more products click the, Next Page button.
Machine set-up screen
When entering a new machine first enter the site name and address. After this you can enter
the location of the machine at the site, the customers account number should be the same as
is used by your accounts software if you intend to export vending.uk.net records to this. If the
vending machine makes drinks from loose components, tick the, has loose components check
box. You should then fill in the V.A.T. rate on drinks. If the customer is to be invoiced for items
sold from this machine, or if the machine is being rented, then tick the invoicing check boxes. If
rental invoices are selected then enter the rental value, the V.A.T. rate and the dates that
invoices are to be made. Enter the day of the month, and tick the invoiceable months. If for
example you need to invoice on the 15th of each month, enter, 15, on the rent due day, and
tick every month. Invoices are printed within the accounting section on the main screen.
At the top of the right hand section of the screen is a check box to say that the machine is
active. If a vending machine is removed from site the check box should have the tick removed.
Machines should not be deleted from vending.uk.net because information from the machine
may appear in reports of past visits. Each machine can be entered in the call cycle. The not
used days, are days of the week when the machine is not used, for example, days when the
site is closed. This information is needed so that vending.uk.net can accurately estimate stock
levels. Vending.uk.net uses a four-week call cycle. To enter the machine on to the call cycle
simply put the operator number, or van number, into the relevant days on the cycle. If operator
one is to visit every Thursday for example, put a, one, in the Thursday column for week one,
week two, week three and week four. If operator two is to visit fortnightly on Tuesdays then put
a, two, in Tuesday of week one and Tuesday of week three. To set up the columns, click the
drop down list, and select a product. To the right of the name you should enter the maximum
number of items that you can enter into the column. If the column contains sleeves of cups,
then enter the number of sleeves and not the number of cups in this case. If the column is, in
cup, drinks then tick the, cup, check box. This will require the operator to enter the re-setable
cup count, onto the worksheet. The item price may be shown in the last column. Prices are
read from the vending machine and are entered by the operator into vending.uk.net. The
screen will show 25 columns. Use the, next page button to show the next 25 columns and so
on. To speed up entering a new vending machine you can copy all columns from another
machine by using the, clone button. The clone button is situated at the top of the product
section. To the left of the button is a box for you to enter the machine I.D. of the machine you
want to copy. The machine I.D. can be seen by going to the search form. The I.D. is the
number that appears in the select button. The buttons at the top of the form allow the user to
directly enter visit information, or to make a worksheet, for this machine. On clicking the button,
Make Worksheets, and after a few moments, a link will appear to the right of the button. Click
the link to view and print the worksheet.
Cashbox screen
The value of the cash box is entered into vending.uk.net, to highlight theft, by checking against
the value of products sold. Cash box values are also exported to the accounts system, as
payments on account. To enter cash box values, simply write the value on the correct row into
the column called, cash value. It is important to find the correct row, with the correct site name,
and visit date. If the cash boxes are numbered, and the operator has entered the number, then
this should show in the first column. The rows shown are vending machines that have had a
cash box collected, but no value yet entered into vending.uk.net. If the cash box is empty, then
enter the word, NONE, as the cash value. Use the, Next Page button to show more rows.
Searching for a machine
This screen allows you to find a vending machine. Use the, next page button to view more
machines, and click the select button to view. The screen shows active machines. To view all
machines click the, show all, button.
After visit form
This form is not applicable if you are using Hand-Held computers
This form allows you to copy the information on the worksheet into vending.uk.net. The form
shows worksheets that need to be entered, and lists the site and location of the vending
machine, with the date the visit was due. You should find the machine which matches the
worksheet, and then enter the worksheet key in the column called ‘worksheet key’. The key is
printed in the top right hand corner of the sheet. After entering the key, click the button in the
select column. Use the next page button, to view more rows. When all worksheets have been
entered into vending.uk.net, then you are up to date, and this form should not show any rows.
Enter visit form
This form is not applicable if you are using Hand-Held computers
This form allows you to copy information from the worksheet into vending.uk.net. After
checking this is the right machine, with the correct visit date, click the make visit button. Copy
the arrival, placed, returns and cup count figures, for each column, onto the form. If the price
on the form does not match the price on the worksheet, then update the form. If a cash box
was collected, make sure the cash box collected check box is ticked, together with the cash
box number, if applicable. If this machine makes loose-ingredients-drinks, then, on the bottom
of the form, is a space to enter the non re-setable cup count, and drink price. Ensure you also
enter any cash values added to the coin mechanism, cash spent in test vends, plus any
refunds given. If you are the supervisor, you will have additional controls to enter or change
cash box values.
How To Download and Install software onto the Hand-Held
Computer
Your Hand-Held Computer (or ‘PDA’) will need connection to the Internet in order to download
the software. If your PDA has a built-in phone then you will be able to connect using GPRS
(through the mobile phone directly), otherwise you can connect the PDA to your PC and allow
ActiveSync to synchronise. After this point run ‘Internet Explorer’ on the PDA and enter the
web address:
www.vending.uk.net/pda.cab
The PDA should connect to the address and check that you want to download and open the
file ‘pda.cab’ as shown below. Tap the ‘Yes’ button to continue.
The file will download onto the PDA and automatically install
programs. When installing the software you may be asked to
confirm a security check. Tap ‘yes’ to continue with the installation.
The entry ‘vending.uk.net’ will be
inserted into the start menu but you
may need to remove some unused
menu items to allow space for this.
This is normally accessible by
clicking ‘Start’ and then ‘Settings’
and then ‘Menus’ (consult your
PDA manual for more information).
After installing, click on the start
menu ‘vending.uk.net’ and then
click ‘File’ in the bottom left corner
of the screen, then select ‘Setup’.
The Setup screen will allow you to the UserName, Password and
Operator name.
If the PDA connects through an inbuilt mobile phone then you may
want to allow the PDA to
Synchronise after every visit,
otherwise the PDA will
synchronise once at the end of the
day by connecting through a PC.
A 30 day evaluation licence is automatically entered when the
software is first installed. Ensure you purchase and enter a
working licence key within 30 days so that your use of the
PDA will not be interrupted. You need to email the ‘S/N’ code
that is shown on the setup screen (just above the ‘Licence
Key’) in order to get your licence key.
email to: [email protected]
Using the Hand-Held Computer
You first need to set-up products and machines on your account on the vending.uk.net Internet
site. Once you have done this calls scheduled for a visit today and for tomorrow will
automatically download onto the PDA.
The hand-held computer eliminates the need to print paper
worksheets. All of the day’s calls are downloaded automatically
and are shown on the screen. A ‘tap’ on the screen opens the
record.
The hand-held computer
automatically synchronises with
the Internet server, transferring
records by GPRS (mobile phone)
or for low cost computers by
connecting through a P.C. using
‘Microsoft ActiveSync’.
Stock required on the van is
shown with a ‘tap’ on the screen –
even before you have left the
warehouse.
When viewing a machine record clicking the ‘Start’ button takes
the operator through each column
in a simple step-by-step process.
The [?] button is the ‘kerbside
check’, which shows the operator
what items are needed to be taken
from the van to the machine based on an estimate of stock
already in the machine and the
quantity needed until your next
scheduled visit.
On arrival at site…
When visiting a site the operator should tap the main screen
(which shows all of the visits to be made today) on the name of
the vending machine he is visiting. This will open the record
showing the address and any comments. The serial number of
the machine is also shown on the bottom left corner of the
‘record’ screen.
Click the ‘kerbside check’ button and take the items listed from
the van to the machine. This list is an estimate of what is
needed and should save either taking too much or too little
stock from the van to the machine, saving time and effort.
When at the machine click the ‘Start’ button to fill columns and
take meter readings.
After pressing ‘Start’ (filling each column)…
Record the actual quantity of stock in the column on arrival. Tap
the box to place the number and then tap the number keys at the
bottom of the screen. The ‘C’ button will clear the box to allow you
to start again.
Record any quantity returned (such as out of stock items) and the
actual quantity placed into the column The computer will
recommend the quantity needed on exit in the column.
Check the item price matches the price on the machine an update
the screen if this is not so.
For columns loaded with cups the quantities are for sleeves (not
individual cups).
If the column has a resetable cup counter enter the meter
reading on the screen.
When all columns have been filled the screen will allow you to
record any cash entered into the coin-mechanism, plus any
money given in refunds or test vends.
If the cashbox is emptied tap the ‘Cashbox collected’ box and
record the number of the cash bag. If cash bags are numbered it
helps the office staff trace the money collected.
The non-resetable meter (if the machine sells loose ingredients
drinks) should be recorded at each visit and the price per cup
checked.
When returning to the office the hand-held computer is synchronised with the Internet server
by connecting the PDA to a PC. The updated records are sent to the server and scheduled
calls for today and tomorrow are downloaded automatically.
On Screen Reports
A number of reports are accessible from your secure account on any Internet station.
The Integrity report
The integrity report shows the last 10 visits to each vending machine, with the sales revenue,
plus cash added to the coin mechanism, compared with the cash box value. The balance
should, depending on the amount of change in the change mechanism, fluctuate around zero.
If the balance is continually negative, then this may indicate a security problem with this
machine. To view the visit-detail-report, click the button showing the visit date. To view more
vending machines click the, ‘Next Page’ button.
Visit reports
The visit report summarizes all visits between a range of dates, by individual, or all operators.
The report shows the cash box values, cash added to the coin mechanism, and any refunds
given. To see a detailed report of a visit, click the view button on the end of each row. After
selecting the beginning and end dates for the reports, the refresh button should be pressed to
analyze the database.
Visit detail
This form shows
the products on arrival, items placed, and returns. Items sold are calculated from the number
on exit at the previous visit, less the number on arrival at this visit. In cup sales, are taken from
the re-setting counters. The gross price is calculated based on the price at the previous visit.
The amount of V.A.T. is calculated for the product, using the V.A.T. rate that is set up against
each product. For loose ingredients drinks, cup sales are calculated from the difference
between the non-resetting cup count on this, and the previous visit.
The accounting screen
This form allows you to automatically print invoices, and export data to your accounts package.
A check box on the machine set up form allows you to print invoices for products sold, and for
rental of the machine. If the rental check box is ticked, then you will have set the dates for
invoicing, the value of the rental and the V.A.T rate. A rental invoice is generated in advance, if
the invoice due date falls before the date shown at the top of this form. If products are to be
invoiced then vending dot U K dot net will analyze sales within the period. To generate
invoices click the, invoice button on the top of the screen. After a short delay a link will appear
to the right of the button saying, click here. Click the link to view the invoices and, use the print
button within the invoice pop-up to print. Before generating invoices, your company details will
need to be entered into the section on the lower part of the form. Include your V.A.T. number,
and terms, as these are printed on the invoice. The invoice number should be set to a starting
value, as this will automatically increment by one, after generating each invoice.
Audit trail transactions, and stock transactions, are files to be imported to your accounts
package. You may need to ask for technical assistance from your accounts software supplier,
when importing files to your accounts package. The records within these files may require
nominal codes to be set against your product types. Use the table on the left side of the form to
enter nominal codes. Remember to always back up your accounts data before importing files.
Stock Placed Report
The stock report shows the stock that has been placed into vending machines by each
operator, over a range of dates. The report can be used to check against quantities drawn from
the warehouse. Products are listed with quantities shown as individual items, as well as packs.
Items returned from the vending machines are also shown. The date setting, defines the start
and end, to analyze visits. After changing the date, the refresh button should be clicked to
display results. The form shows 20 products on each page. Click the next page button to view
more products.