1
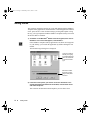
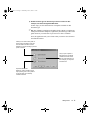
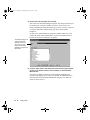
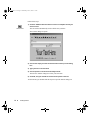
Galario Quick Start2 7/2/01 9:50 AM Page 1 Quick Start Guide www.variquest.com www.varitronicsystems.com Front matter.fm Page i Monday, July 2, 2001 1:59 PM © 2001 Brady Worldwide, Inc. All Rights Reserved. GalaRio™ Template Gallery Templates and Graphics Guide This manual is proprietary to Brady Worldwide, Inc., and may be revised from time to time without notice. Brady disclaims any understanding to provide you with such revisions, if any. All brand or product names referenced in this manual are trademarks or registered trademarks of their respective companies or organizations. Digital font outline data licensed from Weatherly Systems, Inc., © 1993-2000, All Rights Reserved. Clip art library licensed from Nova Development Corporation © 2000 Nova Development Corporation and its licensors, including © 1999 Software Syndicate; © 1997-98 Seattle Support Group; © 1995 Expressions Computer Software; © 1995-98 Multi-Ad Services; © 1996-98 Focus Designs, Inc.; © Bitfolio, Ltd.; © 1990-96 Innovation Advertising & Design; © 1995 Silicon 4 Multimedia; © 1995-96 Studio Advertising Art; © 1996-99 Cliptoart; © 1994 Bruce Jones Design, Inc.; © 1996-99 GraphiCorp, a division of Corel Corporation, and Corel Corporation Limited. Rights of all parties reserved. Protected by U.S. Patent 5,823,689. Written and designed at Varitronics®, 6835 Winnetka Circle, Brooklyn Park, Minnesota 55428, USA Printed in the U.S.A. Front matter.fm Page ii Monday, July 2, 2001 1:59 PM Brady Worldwide, Inc. YOU SHOULD CAREFULLY READ THE FOLLOWING TERMS AND CONDITIONS OF THIS LICENSE AGREEMENT BEFORE OPENING THIS PACKAGE. IF YOU DO NOT AGREE WITH THESE TERMS AND CONDITIONS, PLEASE PROMPTLY RETURN THIS PACKAGE FOR A FULL REFUND. LICENSE AGREEMENT Brady Worldwide, Inc. (hereafter “Brady”) hereby grants you a non-exclusive, nontransferable license to use this software and the accompanying documentation according to the following terms: 1. LICENSE GRANT: You may 1) install the software on only one computer at a time, and 2) make one (1) copy of the software in machine readable form solely for backup purposes. 2. LICENSE RESTRICTIONS: You may not: 1) transmit the software over a network without an additional license; 2) modify, adapt, translate, reverse engineer, decompile, disassemble, create derivative works based on, or copy (except for the backup copy) this software or the accompanying documentation; 3) rent, transfer or grant any rights in the software or accompanying documentation without the prior, express written consent of Brady; or 4) remove any proprietary notices, labels, or marks on the software and accompanying documentation. This software contains a clip art library (hereafter the “Graphics”) which is licensed from Nova Development Corporation. You may modify, publish and distribute the Graphics in print; create presentations which incorporate the Graphics; and use the Graphics in developing pages for the World Wide Web and Intranet systems; all provided you are not marketing any of these works as clip art, photographs or other content. In no case may you distribute any of the Graphics by any other electronic means, including without limitation distributing the images on disk or CD-ROM. In no case may the files or printed images be rented, lent or sublicensed. Your own good judgment should guide you in the responsible use of the Graphics. You are completely responsible for the results of your use of the images. You may not use the images to create work that would be considered obscene or libelous. Images depicting people may not be used for commercial purposes nor in a manner suggesting endorsement of any product or service. In addition, images depicting people may not be used in any manner which might be deemed pornographic. In addition, certain images may contain logos or other matter that are the trademarks, services marks or trade names of third parties. They are provided for convenience only to those users of the software who are authorized by those third parties to reproduce their trademarks in print. Know your rights and always seek direct permission from the work’s owner if you intend to use a third party’s trademark. Front matter.fm Page iii Monday, July 2, 2001 1:59 PM 3. NATURE OF THIS AGREEMENT: This license is not a sale. Title and copyrights to the software, accompanying documentation, and any copy made by you, remain the property of Brady. Unauthorized copying of the software or the accompanying documentation, or failure to comply with the above restrictions, shall automatically terminate this license, without further notice, and terminate your rights to use the software, and Brady shall, in addition to its other legal remedies, be entitled to its reasonable attorney fees. 4. LIMITED WARRANTY: Brady warrants that, for a period of ninety (90) days from the date of delivery to you as evidenced by a copy of your receipt, the software, as furnished, under normal use, will perform without significant errors that make it unusable. Brady's entire liability and your exclusive remedy under this warranty (which is subject to you returning the software to Brady) will be, at the option of Brady, to attempt to correct or help you around errors, to replace the software with functionally equivalent software or diskettes, or to refund the license fee of the software and terminate this Agreement. EXCEPT FOR THE ABOVE EXPRESS LIMITED WARRANTY, BRADY MAKES AND YOU RECEIVE NO WARRANTIES, EXPRESS, IMPLIED, STATUTORY OR IN ANY COMMUNICATION WITH YOU, AND BRADY SPECIFICALLY DISCLAIMS ANY IMPLIED WARRANTY OF MERCHANTABILITY OR FITNESS FOR A PARTICULAR PURPOSE. BRADY DOES NOT WARRANT THAT THE OPERATION OF THE PROGRAM WILL BE UNINTERRUPTED OR ERROR FREE. Some states do not allow the exclusion of implied warranties so the above exclusions may not apply to you. This warranty gives you specific legal rights. You may also have other rights which vary from state to state. 5. LIMITATION OF LIABILITY: IN NO EVENT WILL BRADY BE LIABLE FOR ANY DAMAGES, INCLUDING LOSS OF DATA, WHEN LOADING THIS SOFTWARE OR OTHERWISE, OR LOST PROFITS, COST OF COVER OR OTHER SPECIAL, INCIDENTAL, CONSEQUENTIAL OR INDIRECT DAMAGES ARISING FROM THE USE OF THE PROGRAM OR ACCOMPANYING DOCUMENTATION, HOWEVER CAUSED AND ON ANY THEORY OF LIABILITY. THIS LIMITATION WILL APPLY EVEN IF BRADY HAS BEEN ADVISED OF THE POSSIBILITY OF SUCH DAMAGE. YOU ACKNOWLEDGE THAT THE LICENSE FEE REFLECTS THIS ALLOCATION OF RISK. Some states do not allow the limitation or exclusion of liability for incidental, or consequential damages, so the above limitation may not apply to you. 6. GENERAL: This Agreement shall be governed by, and interpreted under, the laws of the State of Wisconsin, USA. This Agreement is the entire agreement between the parties and supersedes any other communications or advertising with respect to the software and accompanying documentation. If any provision of this Agreement is held invalid, the remainder of this Agreement shall continue in full force and effect. Contents Welcome . . . . . . . . . . . . . . . . . . . . . . . . . . . . . . . . . . . . . . . . . . . . . . . . . . . . 1 Installing the application and print driver . . . . . . . . . . . . . . . . . . . . . . . . . 2 Installation requirements. . . . . . . . . . . . . . . . . . . . . . . . . . . . . . . . . . . . . . . . . . 2 Print driver and computer interface requirements. . . . . . . . . . . . . . . . . . . . . . . 3 Installing the GalaRio™ Template Gallery application . . . . . . . . . . . . . . . . . . . 4 Removing the GalaRio™ Template Gallery application . . . . . . . . . . . . . . . . . 11 Getting started . . . . . . . . . . . . . . . . . . . . . . . . . . . . . . . . . . . . . . . . . . . . . . 12 Using the online help. . . . . . . . . . . . . . . . . . . . . . . . . . . . . . . . . . . . . . . . . 23 Working with templates. . . . . . . . . . . . . . . . . . . . . . . . . . . . . . . . . . . . . . . 24 Template group types . . . . . . . . . . . . . . . . . . . . . . . . . . . . . . . . . . . . . . . . . . . 24 Changing content . . . . . . . . . . . . . . . . . . . . . . . . . . . . . . . . . . . . . . . . . . . . . . 26 Sizing templates . . . . . . . . . . . . . . . . . . . . . . . . . . . . . . . . . . . . . . . . . . . . . . . 26 Designing your own poster or banner. . . . . . . . . . . . . . . . . . . . . . . . . . . . . . .28 Designing your own templates . . . . . . . . . . . . . . . . . . . . . . . . . . . . . . . . . . . . 29 Working with text . . . . . . . . . . . . . . . . . . . . . . . . . . . . . . . . . . . . . . . . . . . . 30 Changing font and font size . . . . . . . . . . . . . . . . . . . . . . . . . . . . . . . . . . . . . . 31 Using TextArt . . . . . . . . . . . . . . . . . . . . . . . . . . . . . . . . . . . . . . . . . . . . . . . . . 31 Using Text on a Circle . . . . . . . . . . . . . . . . . . . . . . . . . . . . . . . . . . . . . . . . . . 33 Creating vertical text . . . . . . . . . . . . . . . . . . . . . . . . . . . . . . . . . . . . . . . . . . . . 34 Reversing text and background colors . . . . . . . . . . . . . . . . . . . . . . . . . . . . . .35 Working with graphics . . . . . . . . . . . . . . . . . . . . . . . . . . . . . . . . . . . . . . . 37 Using the preinstalled graphics. . . . . . . . . . . . . . . . . . . . . . . . . . . . . . . . . . . . 37 Using graphics created in other applications . . . . . . . . . . . . . . . . . . . . . . . . .38 Using line art tools . . . . . . . . . . . . . . . . . . . . . . . . . . . . . . . . . . . . . . . . . . . . . 41 Working with objects. . . . . . . . . . . . . . . . . . . . . . . . . . . . . . . . . . . . . . . . . 42 Rotating objects . . . . . . . . . . . . . . . . . . . . . . . . . . . . . . . . . . . . . . . . . . . . . . . 42 Moving objects to the front or back. . . . . . . . . . . . . . . . . . . . . . . . . . . . . . . . . 42 ¡ i Centering objects . . . . . . . . . . . . . . . . . . . . . . . . . . . . . . . . . . . . . . . . . . . . . . 43 Aligning objects. . . . . . . . . . . . . . . . . . . . . . . . . . . . . . . . . . . . . . . . . . . . . . . . 43 Scaling objects . . . . . . . . . . . . . . . . . . . . . . . . . . . . . . . . . . . . . . . . . . . . . . . . 43 Setting line width and fill pattern. . . . . . . . . . . . . . . . . . . . . . . . . . . . . . . . . . . 44 Selecting object foreground/background color (monochrome printers) . . . . . . . . . . . . . . . . . . . . . . . . . . . . . . . . . . . . . . . . . . . 44 Selecting object color (Pro36 Color PosterPrinter‰) . . . . . . . . . . . . . . . . . . . 46 Printing . . . . . . . . . . . . . . . . . . . . . . . . . . . . . . . . . . . . . . . . . . . . . . . . . . . . 50 Working with files . . . . . . . . . . . . . . . . . . . . . . . . . . . . . . . . . . . . . . . . . . . 52 ii ¡ GalaRio 1.1.fm Page 1 Wednesday, June 27, 2001 2:17 PM Welcome Thank you for deciding to use the Varitronics GalaRio Template Gallery application. This application allows you to create any type of poster or banner you need and then print it using a Varitronics® PosterPrinter System or your laser or inkjet printer. (Note that, throughout this guide, the word “printer” refers to either a PosterPrinter System or your laser or inkjet printer.) The GalaRio Template Gallery application is easy-to-use, flexible, and powerful. A wizard guides you through the process of creating a variety of document types. The application provides pre-designed templates for the posters and banners you need to create most often—calendars, teaching tools, recognition/motivation banners, event posters, and more. These templates allow you to create great-looking posters and banners in just three easy steps. All you need to do is choose a template, type your text, and print! For those times when you want to design a unique layout or add your own creative touches to the pre-designed templates, the GalaRio application provides all the tools you need. Customize your posters and banners as much as you like using the application’s complete set of editing and drawing tools and ready-to-use graphics. You can even import graphics and photos created in other applications. This guide provides a brief overview of the GalaRio™ Template Gallery application, describes how to install it, and teaches you how to start the application and use some basic features. For more information, use the extensive on-line help system which provides complete details and instructions on all application features. (Refer to “Using the online help” on page 23.) To see all of the templates, graphics and fonts that are included with the application, refer to the GalaRio Templates & Graphics Guide. Welcome ¡ 1 GalaRio 1.1.fm Page 2 Wednesday, June 27, 2001 2:17 PM Installing the application and print driver This section explains how to install the GalaRio Template Gallery application on your PC. Installation requirements Be sure that your computer and printer meet the following minimum requirements for running the GalaRio Template Gallery software: IBM or IBM-compatible with a 486 DX/33 MHz or better PC (Pentium recommended) running Microsoft® Windows® 95, 98, NT 4.0, or 2000 Note: Support for Windows® 2000 is available only on the ProImage® XL 3000 and the ProImage® Plus 3000 printers. 12 MB RAM (16 MB recommended) CD-ROM drive 75 MB available hard disk space for Pro36 Color PosterPrinter, 65 MB for other PosterPrinter Systems Display size of 640 x 480 at 256 colors (800 x 600 recommended) Available IEEE1284 compliant parallel port, plus cabling for the desired printer Print drivers installed for all PosterPrinter Systems you want to use, as described on the next page Computer interface for PosterPrinter System, as described on the next page Note: In addition to the hard disk space listed above, you need additional free space to run the application. The amount of space needed depends on the size of the files you create. If the GalaRio Template Gallery application closes down unexpectedly, check that your PC meets the above memory and hard disk space requirements. If it does, try clearing some additional hard disk space on the system. 2 ¡ Installing the application and print driver GalaRio 1.1.fm Page 3 Wednesday, June 27, 2001 2:17 PM Print driver and computer interface requirements Documents created with the GalaRio Template Gallery application can be printed to various PosterPrinter Systems. To print successfully, install the print driver for each PosterPrinter System you want to use before installing the GalaRio application; the PosterPrinter System must also have the appropriate computer interface connection. Refer to the tables below. Drivers are shipped with the PosterPrinter System. Be sure to install the correct version of the print driver depending on which version of Windows® you are using, as shown below. PosterPrinter Windows version Driver version required ProImage Plus PosterPrinter Windows® 95, 98 1.14 ProImage XL PosterPrinter Windows® 95, 98 1.14 PosterPrinter 2000P Windows ® 95, 98 1.14 ProImage Plus PosterPrinter Windows® NT 4.0 2.01 ProImage XL PosterPrinter Windows® NT 4.0 2.01 PosterPrinter 2000P Windows® NT 4.0 2.01 ® Pro36 Color PosterPrinter Windows 95, 98 1.2v1 Pro36 Color PosterPrinter Windows® NT (domestic) 1.0v1 Pro36 Color PosterPrinter Windows® NT (int’l) 1.0v1 ® ProImage XL3000 PosterPrinter Windows 95, 98 1.06 Prolmage Plus3000 PosterPrinter Windows® 95, 98 1.06 ProImage XL3000 PosterPrinter Windows® NT 4.0, 2000 1.0 ProImage Plus3000 PosterPrinter Windows® NT 4.0, 2000 1.0 Installing the application and print driver ¡ 3 GalaRio 1.1.fm Page 4 Wednesday, June 27, 2001 2:17 PM PosterPrinter ProImage Plus PosterPrinter Computer interface version required ProLynx II version 2.0 ProImage XL PosterPrinter ProLynx II version 2.0 PosterPrinter 2000P ProLynx II version 2.0 ProImage XL3000 PosterPrinter Separately orderable interface required Pro36 Color PosterPrinter N/A; printer includes integrated computer interface ProImage Plus3000 Separately orderable interface required Please contact your PosterPrinter System dealer if you need a driver or computer interface. Refer to your PosterPrinter System’s user manual for instructions on installing the driver and interface. Installing the GalaRio™ Template Gallery application The GalaRio Template Gallery software is shipped on one CD-ROM. A standard Windows® setup wizard guides you through the installation procedure. Follow these steps: 1) Install the driver for each PosterPrinter™ System you want to use with the GalaRio™ application. Refer to your PosterPrinter System’s user guide for installation information. Please be sure to install the drivers before installing the GalaRio application or they may not work properly. Note: If you have a Pro36 Color PosterPrinter that you’ve been using with other PC software and now you’ve purchased the GalaRio application, you must uninstall your existing Pro36 Color PosterPrinter print driver, download the new driver from the Web (www.varitronicsystems.com), install the new driver, and then install the GalaRio application. 2) Turn ON your computer and start Microsoft® Windows®. Shut down any other programs that are running on your PC. Also disable any virus protection programs that are running. 4 ¡ Installing the application and print driver GalaRio 1.1.fm Page 5 Wednesday, June 27, 2001 2:17 PM 3) Insert the installation CD in your PC’s CD-ROM drive. If your PC does not automatically launch the installation wizard, click Start on the Windows® taskbar, choose Run, type D:\Setup.exe, and click OK. (Substitute the letter corresponding to your CD-ROM drive if it is not labeled D.) The Main Setup Menu screen displays. Installing the application and print driver ¡ 5 GalaRio 1.1.fm Page 6 Wednesday, June 27, 2001 2:17 PM 4) Click the Install GalaRio Template Gallery button to start the installation. 5) On the Welcome screen, click Next. The next window indicates where the application will be installed. 6 ¡ Installing the application and print driver GalaRio 1.1.fm Page 7 Wednesday, June 27, 2001 2:17 PM 6) Click Next to accept the specified drive and folder location or click the Browse button to navigate to a different folder, then click Next. The next window asks you to specify where the documents you create with the GalaRio Template Gallery application will be saved. When you save a document within the application, it will automatically be stored here unless you choose a different location when you save. Installing the application and print driver ¡ 7 GalaRio 1.1.fm Page 8 Wednesday, June 27, 2001 2:17 PM 7) Click Next to accept the specified drive and folder location or click the Browse button to navigate to a different folder, then click Next. The next window lets you choose which files you want to install. We recommend that you use the Typical option, which installs application, graphics, and template files. The Custom option allows you to install the template design capability. This is a separate application that lets you create customized templates that contain your own prompts, default text, and so on—just like the templates that are provided with the GalaRio application. Since the pre-designed templates will most likely meet your needs in most cases, you probably don’t need to install the template design capability. 8) Select an installation option, then click Next. If you selected Typical, go on to step 10. If you selected Custom, the next window allows you to choose the components you want to install. Continue with step 9. 9) Select the components you want to install, then click Next. A check mark in the box means a component is selected. To enable the template design capability, check all of the options listed. 8 ¡ Installing the application and print driver GalaRio 1.1.fm Page 9 Wednesday, June 27, 2001 2:17 PM 10) Select the PosterPrinter™ System you will be using with the GalaRio™ application and click Next. This selection determines which templates and graphics will be installed. For example, color graphics are installed only if you choose the Pro36 Color PosterPrinter. You must select a printer. Note that this option does not install the drivers for the PosterPrinter Systems, which you should have already installed. The next window lets you choose the program folder for the GalaRio Template Gallery application. The folder name you enter here appears on the Programs menu (accessed by clicking Start on the Windows® taskbar). This folder will contain the menu item you’ll select to start the GalaRio application. 11) To accept the folder name shown, click Next. To change the folder name, select a different folder name from the Existing Folders list, or type a new folder name in the Program Folders field, and then click Next. The system begins installing the application. When the process is finished, you’re asked if you want to add the GalaRio Template Gallery application icon to your Windows® desktop. Installing the application and print driver ¡ 9 GalaRio 1.1.fm Page 10 Wednesday, June 27, 2001 2:17 PM 12) Click Yes or No. You return to the Main Setup Menu screen shown in step 3. 13) Click Exit Setup to complete the installation and exit the installation program. Note: If you need to install a new print driver after you’ve installed the GalaRio Template Gallery application, you first need to uninstall the application as described on the next page. Then install the driver and reinstall the GalaRio application. 10 ¡ Installing the application and print driver GalaRio 1.1.fm Page 11 Wednesday, June 27, 2001 2:17 PM Removing the GalaRio™ Template Gallery application To remove the GalaRio Template Gallery application from your computer, use the standard Windows® uninstall program. Follow these steps: 1) Click Start on the Windows® taskbar. Choose Settings, then choose Control Panel. 2) Double-click the Add/Remove Programs icon. 3) Select GalaRio™, then click the Add/Remove button. 4) In the message box that appears, click Yes to delete the application. 5) Click OK to close the window that’s displayed. Click OK to exit the uninstall program. You will no longer be able to run the GalaRio Template Gallery application on your computer. Note: This procedure does not remove print drivers. Installing the application and print driver ¡ 11 GalaRio 1.1.fm Page 12 Wednesday, June 27, 2001 2:17 PM Getting started This section is designed to quickly get you up and running with the GalaRio Template Gallery application. You’ll learn how to start the application and then create, print, and save a new document using a pre-designed template. Along the way, you’ll get acquainted with the GalaRio Template Gallery screen and all the tools that are available. 1) Click Start on the Windows® taskbar. Choose Programs, then choose GalaRio™. In the menu that appears, click GalaRio™. If the GalaRio Template Gallery application icon (shown at left) appears on your desktop, you can start the application by double-clicking the icon instead. The Document Type dialog box is displayed. The type of poster or banner you’re going to create is displayed here. This is referred to as the document type. Click here to select the printer you’ll be using for this poster or banner. 2) If the name of the printer you want to use for this document is not already displayed at the bottom of the window, click the down arrow and select the printer. This selection will determine which templates you can choose from. 12 ¡ Getting started GalaRio 1.1.fm Page 13 Wednesday, June 27, 2001 2:17 PM 3) Double-click the type of document you want to create. For this example, we chose Recognition Motivation. In later steps, you’ll be shown the list of templates available for this document type. ) Tip: The GalaRio Templates & Graphics Guide contains a complete list of all poster and banner templates, organized by document type. Browse the guide whenever you need ideas or just want to see what’s available. Next, the application asks you to choose what you want to do as shown in the illustration below. Allows you to create a new poster or banner using a template. You’ll also have the chance to select a blank template, if you want to design your own poster or banner. Lets you open a poster or banner that you’ve already created and saved so that you can make changes to it. For example, you may want to edit the text. Opens the Batch Print dialog box, which provides a quick way of printing one or more posters or banners that you’ve already created and saved. Getting started ¡ 13 GalaRio 1.1.fm Page 14 Wednesday, June 27, 2001 2:17 PM 4) Click Create new document, then click OK. The Create New Document dialog box appears. The Group list at the top of the window lets you choose whether you want to create a poster or a banner; depending on which document type you chose, you may or may not see banner options here (all document types don’t include banner templates). In most cases, only Monochrome groups are available. However, if you selected the Pro36 Color PosterPrinter you also can choose posters or banners from the Color and Spot Color groups. This field lists the types of posters and banners available for the document type you chose earlier. The templates available in that group are listed below. 5) Click the down arrow in the Group box and choose the type of poster or banner you want to create. For this example, we chose Posters Monochrome. The Select a template list shows all of the templates available for the document type and group you chose. For example, the illustration above shows the list for the Recognition Motivation category, since that’s the option we chose in step 3. 14 ¡ Getting started GalaRio 1.1.fm Page 15 Wednesday, June 27, 2001 2:17 PM 6) In the Select a template list, click the name of the template you want to use for this poster or banner. For this example, we chose the Helping Hands template. When you select a template in the list, it is displayed on the right side of the dialog box. This makes it easy to browse the list to find the template you want. 7) Click OK. Now you can start entering information for your poster or banner, if the template you chose uses prompts. (Some templates don’t present you with prompts.) Getting started ¡ 15 GalaRio 1.1.fm Page 16 Wednesday, June 27, 2001 2:17 PM In the Helping Hands template we’ve selected here, the template prompts you to enter the name of the first student helper that will appear on the poster. The window shown below appears, prompting you to type text. The line above the area in which you can type tells you what you need to enter. This line tells you what you need to enter. Type in this area. Some templates may ask you to select a graphic here. 8) Type your text in the box provided, then click the appropriate button. • Next—If there are additional prompts to respond to, click Next to continue to the next prompt. • Back—Click Back to page back through previous prompts and change the information you entered. • Finish—After you’ve responded to the last prompt, click Finish. ) Tip: If you don’t want to enter text for the current prompt, just click Next or Finish without entering anything. You can also click Cancel to stop the prompting process for the template. 16 ¡ Getting started GalaRio 1.1.fm Page 17 Wednesday, June 27, 2001 2:17 PM Once you click Finish, your document displays in the GalaRio Template Gallery application window. Getting started ¡ 17 GalaRio 1.1.fm Page 18 Wednesday, June 27, 2001 2:17 PM 9) To print your poster or banner, you need to first select the size of the document you are printing. To do this, choose Print Setup from the File menu and click the Properties button. A Properties dialog box for the printer you previously selected is displayed. The example below is for the Pro36 Color PosterPrinter. 10) Choose the Roll Width of the paper installed in the printer and choose the size of the poster or banner you’re going to print. Then click OK to close the dialog boxes. Refer to the online help or documentation you received with the print driver if you need help with this dialog box. 11) Choose Print from the File menu, then click OK. Your poster or banner is printed on the specified printer. 18 ¡ Getting started GalaRio 1.1.fm Page 19 Wednesday, June 27, 2001 2:17 PM 12) To save your document, choose Save or Save As from the File menu. The following window is displayed. Type a name for your poster or banner here in order to save it. 13) Type a name for your document in the Document name field, and click OK to save it. When you click OK, the document is automatically saved in the GalaRio Template Gallery application’s pre-determined directory structure. (Refer to the description of the Save command under “Working with files” on page 52 for more information.) GalaRio application files are automatically saved with the file extension GLR, as in myposter.glr. ) Tip: A quick way to create another poster or banner using the same Change Document Type button document type and printer that you already selected is to choose New from the File menu. To quickly choose a new document type or printer, click the Change Document Type button on the standard toolbar. The button is shown at left. Getting started ¡ 19 GalaRio 1.1.fm Page 20 Wednesday, June 27, 2001 2:17 PM Before you start creating other documents, you’ll want to get familiar with the GalaRio Template Gallery screen. The illustration below points out some important features. The next two pages show the buttons available on the toolbars. Menu bar—Includes commands for all toolbar buttons. Also lets you change various viewing options and default settings. Title bar—The name of the open file appears here. Format toolbar—Allows you to quickly choose text options such as the font and font size, character style, and alignment. Standard toolbar— Provides buttons for common tasks such as saving files and printing. Also allows you to change the document type. Draw toolbar— Contains all the tools you need for inserting text and graphics. Also includes special tools such as the TextArt and Text on a Circle tools. Status bar—Displays brief help messages when you move the cursor over buttons and menu items. Object toolbar—Allows you to rotate, group and ungroup, and layer objects. Selected object—When you click an object, it is surrounded by handles. Drag the object to reposition it, or drag one of the handles to resize it. An extra handle outside of the other handles allows you to rotate the object. To edit text or replace a graphic, just double-click the text or graphic object. 20 ¡ Getting started GalaRio 1.1.fm Page 21 Wednesday, June 27, 2001 2:17 PM Format toolbar Bold Font Font Size Italics Underline Increase Font Size Decrease Font Size Automatically Size Font Draw toolbar Selector Text Bar Code Rectangle Circle Line HotShapes Lines TextArt Text On a Circle Insert Picture Edit Data Draw Attributes toolbar Drawing Color Line Width Fill Pattern Getting started ¡ 21 GalaRio 1.1.fm Page 22 Wednesday, June 27, 2001 2:17 PM Object toolbar Group/Ungroup Move to Front Bar Code Symbology Move to Back Reverse Rotate Properties Standard toolbar Print About GalaRio™ Change Document Type 22 ¡ Undo Help New Paste Open Copy Save Cut Getting started GalaRio 1.1.fm Page 23 Wednesday, June 27, 2001 2:17 PM Using the online help The online help provided with the GalaRio Template Gallery application provides detailed information on all aspects of the software. While this guide is designed to get you started and to highlight features you may want to try, the online help includes detailed steps on using each feature along with helpful tips. To launch the main help window shown below, choose Help Topics from the Help menu. ) Tip: You can also display help information by clicking the Help button available in most dialog boxes and property sheets. In addition, you can click the Help button on the standard toolbar and then click anywhere on the screen to display help for an item. Using the online help ¡ 23 GalaRio 1.1.fm Page 24 Wednesday, June 27, 2001 2:17 PM Working with templates You’ll probably find that the templates provided in the GalaRio application’s collection will meet most of your poster and banner needs. (For your convenience, we illustrate each template in the GalaRio Templates & Graphics Guide which you received with the software.) This section covers the types of templates available and describes how to set up the software for the size of the poster or banner you’re creating. It also provides information on creating a poster or banner by starting with a blank template. Template group types The Create New Document dialog box may contain the following types of template groups, based on the installed printer: Monochrome printers—If you’ve installed templates for a monochrome printer, the Create New Document dialog box lists Monochrome template groups. Monochrome templates are designed to work with all monochrome printers. All templates used with monochrome printers display on the screen in grayscale. The color of the paper loaded in your PosterPrinter System determines the print color. See “Selecting object foreground/ background color (monochrome printers)” on page 44 for more information. Note: Monochrome printers include the ProImage Plus, ProImage XL, PosterPrinter 2000P and ProImage XL 3000 PosterPrinters, plus your laser or inkjet printer. Note that if you want to print to a laser or inkjet printer, you need to select that printer when you choose a document type. Refer to the description of the Scan to Print feature under “Printing” on page 50. 24 ¡ Working with templates GalaRio 1.1.fm Page 25 Wednesday, June 27, 2001 2:17 PM Pro36 Color PosterPrinter—If you’ve installed templates for the Pro36 Color PosterPrinter, the Create New Document dialog box lists Monochrome, Spot Color and Color template groups. Since this printer provides full-color capabilities and allows you to print with spot-color and process color (CMY) ribbons, we’ve provided versions of the templates that allow you to incorporate color. Use the Monochrome templates when you are not going to print with multiple colors. The Spot Color templates are best to use when you need to use just one or two different ribbon colors to highlight objects. Use the Color templates when you plan to print using the CMY ribbon (possibly in addition to another ribbon for adding spot color). Template Group Supplies Used Monochrome Paper only Spot Color (Pro36 Color PosterPrinter only) Paper and one or two spot color ribbons Color (Pro36 Color PosterPrinter only) Paper and CMY ribbons or one CMY and one spot color ribbon All printers—All printers provide a Blank group type for both posters and banners (if banners are available for the selected document type). The templates in these groups allow you to design a poster or banner using a completely blank page. For posters, you just need to choose whether you want to use a landscape or portrait orientation. For banners, you need to select the banner size in addition to the orientation. Working with templates ¡ 25 GalaRio 1.1.fm Page 26 Wednesday, June 27, 2001 2:17 PM Changing content Once a template is displayed on your screen, you may decide to change some things about it. For example, you may want to change text you entered for a prompt, delete some objects and insert new objects. You can edit most objects by simply double-clicking them and can delete objects by clicking them and pressing the Delete key on your keyboard. Refer to the remaining sections in this guide and to the online help for details on adding objects such as text, graphics and TextArt. ) Tip: If the template displayed prompts asking you to enter information Edit Data button when you created the document, you can easily rerun those prompts and change the information. Just click the Edit Data button on the Draw toolbar, as shown at left. Sizing templates Size is an important consideration when designing any poster or banner. Fortunately, the GalaRio Template Gallery application makes it easy to create just the size you need. When you’re working in the application screen you are, of course, working on a much smaller scale than the printed banner or template. Here’s how the scaling works: Posters—When you design a poster, you don’t need to decide what size you want it to be until you print. That’s because, when you choose a size in the print driver as described on the next page and then print, the poster’s content automatically scales to that size. The poster templates don’t have size options, since you can print them at any size you want just by selecting the size in the driver. Banners—When you design a banner, its content will also be scaled to fit the banner size you choose. However, you need to choose a banner size before creating the banner. You’ll notice that when you choose a banner template in the Create New Document dialog box, the banner size is listed next to the template name. If you create a blank banner, you are given a list of sizes from which to choose. In either case, you then need to set the size in the print driver before you print as described on the next page. 26 ¡ Working with templates GalaRio 1.1.fm Page 27 Wednesday, June 27, 2001 2:17 PM Note: If you want to print to a laser or inkjet printer to produce an 8-½" x 11" document, you need to select that printer when you choose a document type. (Refer to the description of the Scan to Print feature under “Printing” on page 50.) You do not need to choose a size when using these printers—8-½" x 11" is always used. Use the following procedure to set the size of your poster or banner in the print driver before you print through the GalaRio Template Gallery application. By default, the document size is set to a standard 23" x 31" poster. 1) Choose Print Setup from the File menu, then click the Properties button in the Print Setup dialog box. 2) On the property sheet, choose the roll width of the paper installed in the printer. Then choose the length of the poster or banner you are going to print. The property sheet will look slightly different than the one shown below, depending on which printer you are using. If you are printing a banner, be sure to choose the same size as the template you used to create the banner. 3) Click OK to close the dialog boxes, then print your poster or banner. Working with templates ¡ 27 GalaRio 1.1.fm Page 28 Wednesday, June 27, 2001 2:17 PM Designing your own poster or banner While the pre-designed posters and banners will meet many of your needs, sometimes you’ll want to come up with a totally unique design. Keep in mind that you can always use a pre-designed document as a starting point and then change it any way you’d like. In addition, you can use the templates in the Basic Template document type category. These can provide you with a layout but let you select all of the text and graphics, or allow you to start completely from scratch and create a design of your very own. To use the basic templates, follow these steps: 1) Choose Basic Template from the Document Type dialog box and create a new document. Refer to “Getting started” on page 12. 2) In the Create New Document dialog box, select an option in the Group box. 3) Choose options in the Subcategory box. • Poster—Choose Blank if you want to start with a completely blank document. Choose Pre-formatted Layouts if you want to start with a basic layout. • Banner—Choose a size for the banner. 4) Choose a template from the Select a template list. The template you select is shown on the right side of the dialog box. 5) Click OK, and design your poster or banner. • If you chose a layout, respond to the prompts just as you would if you were using any other type of template. You’ll be asked to enter text and to select graphics. (Refer to “Working with graphics” on page 37 for details on selecting graphics.) • If you chose a blank template, you can begin designing your poster or banner using all the tools the GalaRio application provides. Refer to “Working with text” on page 30 and “Working with graphics” on page 37 for more information. 28 ¡ Working with templates GalaRio 1.1.fm Page 29 Wednesday, June 27, 2001 2:17 PM ) Tip: Be sure to save your poster or banner so you can use your design again! Designing your own templates The GalaRio Template Gallery application comes with a special template creation application that lets you create customized templates that contain your own prompts, default text, and so on—just like the templates that are provided with the GalaRio application. Most users find that the pre-designed templates meet all their needs, and they don’t need to use this application. If you decide to use this feature, you need to choose the Custom option during installation as described in “Installing the GalaRio™ Template Gallery application” on page 4. For information on using the template design capability, refer to the “Creating Templates” topic in the online help. Working with templates ¡ 29 GalaRio 1.1.fm Page 30 Wednesday, June 27, 2001 2:17 PM Working with text You can easily change the text you entered when you responded to the prompts for a pre-designed template, or add text for prompts for which you didn’t enter text. You can also insert new blocks of text anywhere on a poster or banner. Just follow these steps: Text button 1) To change existing text, double-click it. To insert a new block of text, click the Text button on the Draw toolbar (or choose Text from the Draw menu) and click where you’d like the text to appear. To insert text for a template prompt that you didn’t fill in before, just double-click the “Empty Text” area. A cursor appears in an empty text area, or at the end of the text if you’re editing existing text. Handles surround the text block. 2) Type your text as you would in any word processing program. Press Enter to start a new line, and use the Backspace key to delete what you just typed (or to delete existing text). Use the mouse to highlight text you want to change, then either press the Delete key or just type over the existing text. 3) When you’re done typing, click elsewhere in the window. The new text is surrounded by handles. 4) Click and drag to move the text block anywhere in the window. ) Tip: You’ll want to experiment with the many text options that the GalaRio application offers. Refer to the following sections and to the “Working with Text” topic in the online help. 30 ¡ Working with text GalaRio 1.1.fm Page 31 Wednesday, June 27, 2001 2:17 PM Changing font and font size You can quickly change the font and the font size used in your text by clicking items on the Format toolbar, as shown below. To change options for all text in a text block, click the text block and select options. To change just some of the text, highlight the text before selecting options. The GalaRio Template Gallery application comes with a variety of fonts you can use to add interest to your posters and banners. Refer to the GalaRio Templates & Graphics Guide for a complete list. Click here to choose a different font. Click here to choose a different font size from the list of sizes. Click here to increase or decrease the font size. Click these buttons to make text bold or to italicize or underline it. Using TextArt Use the TextArt button on the Draw toolbar to format text that follows a shape, as in the example below. Working with text ¡ 31 GalaRio 1.1.fm Page 32 Wednesday, June 27, 2001 2:17 PM Follow these steps: 1) Click the TextArt button and draw an area to encompass the text you want to insert. The text will be automatically sized to fill the area you draw. TextArt button The TextArt dialog box opens. 2) Choose the shape you want the text to follow at the top of the dialog box. 3) Type your text in the Text field. 4) Choose options in the Font and Font Style fields. The Preview window changes to reflect your selections. 5) Click OK, and your TextArt is inserted on the poster or banner. To edit TextArt, just double-click the object to open the TextArt dialog box. 32 ¡ Working with text GalaRio 1.1.fm Page 33 Wednesday, June 27, 2001 2:17 PM Using Text on a Circle Use the Text on a Circle button on the Draw toolbar to format text so that it follows the shape of an imaginary circle, as in the example below. (In this example, the outside circle was added using the Circle tool.) Follow these steps: 1) Click the Text on a Circle button and drag to draw a circle around which the text will fit. Text on a Circle button The Text Data dialog box opens. 2) Type the text you want to appear on the top of the imaginary circle. Click the Font button next to the field to select a font, font size, and font style for the text. 3) Type the text you want to appear on the bottom of the imaginary circle. Click the Font button next to the field to select a font, font size, and font style for the text. 4) Click OK, and your Text on a Circle object is inserted on the poster or banner. To edit Text on a Circle, just double-click the object to open the Text Data dialog box. Working with text ¡ 33 GalaRio 1.1.fm Page 34 Wednesday, June 27, 2001 2:17 PM Creating vertical text The Vertical text option lets you arrange a text object vertically, as in the example below. Follow these steps: 1) Create a text object, type the text you want it to contain, and select the object. For best results, create a free form text object. (Click to create the text object rather than drawing a box to encompass the text.) 34 ¡ Working with text GalaRio 1.1.fm Page 35 Wednesday, June 27, 2001 2:17 PM 2) Choose Properties from the Object menu and click the Format tab. 3) Click the Vertical text option so that a check mark appears in the box next to it. Then click OK. The text displays vertically. ) Tip: Refer to the “Vertical text” topic in the online help for some hints on creating vertical text. Reversing text and background colors Use the Reverse function to print the text in the background color and the area behind the text in the foreground color. For example, you can create white-onblack text as shown below. Working with text ¡ 35 GalaRio 1.1.fm Page 36 Wednesday, June 27, 2001 2:17 PM Follow these steps: 1) Create a text object, type the text you want it to contain, and select the object. 2) Click the Reverse button on the Object toolbar. The foreground and background colors reverse. 36 ¡ Working with text GalaRio 1.1.fm Page 37 Wednesday, June 27, 2001 2:17 PM Working with graphics Many of the pre-designed poster and banner templates use special graphics that are installed with the GalaRio Template Gallery application. You can easily select a different graphic from the installed set, or you can use graphics created in other applications. In addition, you can use the drawing tools the application provides to create simple graphics. Refer to the “Working with Pictures” and “Using the Drawing Tools” topics in the online help for additional information. Using the preinstalled graphics The GalaRio Template Gallery application comes with a variety of graphics in many different categories that you can place on your posters and banners. Refer to the GalaRio Templates & Graphics Guide for a complete list. Follow these steps to quickly change an existing graphic, or add a graphic to your document, by selecting from the graphics installed with the application. Insert Picture button 1) To change an existing graphic, double-click it. To add a graphic, click the Insert Picture button on the Draw toolbar or choose Insert Picture from the Draw menu. The Insert Picture dialog box displays. Working with graphics ¡ 37 GalaRio 1.1.fm Page 38 Wednesday, June 27, 2001 2:17 PM 2) Click the down arrow in the Picture category box and select a category. Also select an option in the Subcategory box (if available). ) Tip: If you are using the Pro36 Color PosterPrinter, check the Use color graphics option if you want to insert a color version of a graphic. 3) Click the name of the graphic you want to use in the Graphics list. The selected graphic is displayed on the right side of the dialog box. 4) Click OK to insert the graphic into your document. 5) If necessary, click the graphic and drag it to a new location. To resize the graphic, click it and drag one of the selection handles that surround it. Using graphics created in other applications You can add graphics created in any of the following file formats to your posters and banners. Filenames must use one of the file extensions listed below, as in “logo.EPS”. Windows® MetaFile (*.WMF) Bitmaps (*.BMP, *.DIB) TIFF (*.TIF) Encapsulated PostScript (*.EPS) JPEG (*.JPG) Portable Network Graphics (*.PNG) PCX (*.PCX) Macintosh PICT (*.PCT) Sun RASTER (*.RAS) You’ll find that you’ll get the best results with Windows® MetaFile (.WMF) graphics, and with monochrome graphics. Once you’ve imported the graphic, you can resize it in the GalaRio application. The higher the quality of the original image, the better it will look on your printed poster or banner. 38 ¡ Working with graphics GalaRio 1.1.fm Page 39 Wednesday, June 27, 2001 2:17 PM Note: For imported .WMF graphics that are in the required format, you can also change the colors used in the graphics as described in “Selecting object color (Pro36 Color PosterPrinter)” on page 43. If a .WMF graphic is not in the required format, the Customize Color command on the Object menu will be unavailable. Follow these steps to quickly change an existing graphic, or add a graphic to your document, by selecting any graphic you have available from one of the formats listed above. 1) To change an existing graphic, double-click it. To add a graphic, choose Insert Picture from the Draw menu. The Insert Picture dialog box displays, as shown below. Working with graphics ¡ 39 GalaRio 1.1.fm Page 40 Wednesday, June 27, 2001 2:17 PM 2) Click the Browse button The Get Picture dialog box displays. 3) Click the Files of type box and choose the type of files you want to display in the dialog box. You can choose All Files to display all filenames, but you can only insert graphics created in one of the formats noted on the previous page. 4) Open folders to locate the graphic you want to use. When the graphic’s filename is displayed, click the name and click Open to insert the graphic in your document. 5) If necessary, click the graphic and drag it to a new location. To resize the graphic, click it and drag one of the selection handles that surround it. 40 ¡ Working with graphics GalaRio 1.1.fm Page 41 Wednesday, June 27, 2001 2:17 PM Using line art tools The GalaRio Template Gallery application includes several line art tools that do the job when all you need is some simple line art. Click one of the tools shown below, then click and drag to draw an object. Rectangle tool HotShapes tool—Clicking this tool displays another toolbar that contains a variety of other shapes you can draw such as diamonds, stars, and arrows. Circle tool Line tool Lines tool—Clicking this tool displays another toolbar that allows you to draw arcs and lines that consist of multiple parts. When drawing multi-part lines, click to draw each part and then double-click to finish the shape. Working with graphics ¡ 41 GalaRio 1.1.fm Page 42 Wednesday, June 27, 2001 2:17 PM Working with objects This section highlights some of the ways in which you can manipulate objects. For detailed information, refer to the “Working with Objects” topic in the online help. Rotating objects Follow these steps to rotate an object: 1) Select the object. 2) Click the Rotate button on the Object toolbar. 3) In the Rotate dialog box, either select one of the degrees of rotation that are listed or enter a value in the Degrees field. 4) Click OK. The object is rotated to the specified angle. Refer to the online help for additional information about rotating an object, including rotating using the mouse. Moving objects to the front or back To move objects on top of or behind other objects, just select the object and click the Move to Front or Move to Back button on the Object toolbar. 42 ¡ Working with objects GalaRio 1.1.fm Page 43 Wednesday, June 27, 2001 2:17 PM Centering objects You can center objects either horizontally or vertically on the document. If you center horizontally, objects are centered between the left and right document edges. If you center vertically, objects are centered between the top and bottom document edges. To center objects, select the objects and choose Center Horizontally or Center Vertically from the Object menu. Aligning objects The alignment options allow you to align objects in relation to each other. For example, you can choose left alignment to align objects along the left edge of the leftmost object that is selected. To align objects, select the objects to be aligned, choose Align Objects from the Objects menu and do one of the following: To align objects along a vertical line, choose Left, Center or Right. To align objects along a horizontal line, choose Top, Middle or Bottom. To align objects on the center point of the selection, choose Center Point. Scaling objects Use the Scale option to scale an object proportionally to a specific percentage. For example, scaling to 75 percent means that the object is 75 percent of its previous size. To scale objects, select one or more objects and choose Scale from the Object menu. Then either select one of the percentages from the submenu or click Custom and enter a percentage value. Working with objects ¡ 43 GalaRio 1.1.fm Page 44 Wednesday, June 27, 2001 2:17 PM Setting line width and fill pattern Setting the line width allows you to change the thickness of the lines used to create an object. For example, you can change the thickness of the lines used to draw a square. Setting the fill pattern allows you to fill an object with a solid color or a specific pattern. To change these settings, select the object and click the Properties button on the Object toolbar. On the General tab, increase or decrease the value in the Line width field or click the Fill pattern field and select an option. Selecting object foreground/background color (monochrome printers) With monochrome printers, objects print using the paper print color, regardless of which color appears on your screen. You can use the Object Color dialog box to select the foreground or background color as described below. The Customize Color command is not available for any type of object. The shades of gray in the monochrome graphics have already been optimized for you and cannot be changed, since that would result in lower print quality. Note: Monochrome printers include the ProImage Plus, ProImage XL, PosterPrinter 2000P and ProImage XL 3000 PosterPrinters, plus your laser or inkjet printer. On some posters or banners, you may want to print objects in reverse foreground and background colors. An easy way to do this for text objects is to use the Reverse feature, as described in “Reversing text and background colors” on page 35. 44 ¡ Working with objects GalaRio 1.1.fm Page 45 Wednesday, June 27, 2001 2:17 PM For other types of objects, such as TextArt, Text on a Circle, and line art (including HotShapes) you can achieve this effect by setting the object to print in the foreground color (black) or background color (white). Select the object and choose Color from the Object menu. Choose a color and click OK. If you set the object to the background color, when you click OK the object won’t be displayed (because it is white). To make the object display, draw a rectangle over the object, fill it with a solid pattern and move the rectangle to the back. The object will show through the solid pattern. In the example below, we did that with a TextArt object. Working with objects ¡ 45 GalaRio 1.1.fm Page 46 Wednesday, June 27, 2001 2:17 PM Selecting object color (Pro36 Color PosterPrinter) When using the Pro36 Color PosterPrinter, you can use these methods to select the colors in which objects should print: Use the Color command on the Object menu to choose colors for text, TextArt, Text on a Circle, and line art (including HotShapes). You can apply spot color by selecting one of the ribbon colors displayed in the Object Color dialog box, or you can click the Use full color palette button in that dialog box to choose from the complete Windows color palette. Use the full color option when you plan to print using a CMY ribbon. (Both dialog boxes are shown in the discussion on the following pages.) For Windows® MetaFile (.WMF) graphics that are black and white (including some of the graphics that are shipped with the GalaRio application), you can use the Object Color command on the Object menu to change the color as described above. The colors in black and white graphics cannot be changed using the Customize Color command. For Windows® MetaFile (.WMF) graphics that are grayscale or full color (such as the most of the graphics that are shipped with the GalaRio application), you can use the Customize Color command on the Object menu to change the colors used in a graphic. Again, you can apply spot color by selecting one of the ribbon colors displayed in the Object Color dialog box, or you can click the Use full color palette button in that dialog box to choose from the complete Windows® color palette. Use the full color option when you plan to print using a CMY ribbon. 46 ¡ Working with objects GalaRio 1.1.fm Page 47 Wednesday, June 27, 2001 2:17 PM Follow these steps to customize the colors in a .WMF graphic: 1) Select the graphic and choose Customize Color from the Object menu. The Customize Colors dialog box displays. The squares on the left represent all colors used in the graphic. 2) Click the square on the left corresponding to the color you want to replace. When you select a color, a crosshatch pattern displays on the graphic at right to indicate where that color is used. Working with objects ¡ 47 GalaRio 1.1.fm Page 48 Wednesday, June 27, 2001 2:17 PM 3) Click the Change Color button. The Object Color dialog box displays. This dialog box shows the custom color palette that contains all of the ribbon colors available for the Pro36 Color PosterPrinter. This area indicates which ribbon color is currently mapped to the selected color, if any. 4) Choose the color you want to use, and click OK. • Spot color ribbon—To use a spot color ribbon, click a color in the dialog box shown in the previous step. • CMY ribbon—If you are going to print with a CMY ribbon, click the Use full-color palette button and select a color from the dialog box shown below. You can select from the full Windows® color palette. Click OK after choosing a color. 48 ¡ Working with objects GalaRio 1.1.fm Page 49 Wednesday, June 27, 2001 2:17 PM The Customize Colors dialog box shows where the selected color will be used on the graphic. 5) Click OK to apply the color change. Working with objects ¡ 49 GalaRio 1.1.fm Page 50 Wednesday, June 27, 2001 2:17 PM Printing “Getting started” on page 12 explains how to print a poster or banner and how to set the document size in the print driver before printing. Listed below are some other printing features you’ll want to try. Refer to the “Printing” topic in the online help for more information. Batch Print—Use this function, available on the File menu, when you need to print a set of posters or banners. You can set up a list of the documents you want to print, and then print them all at once. Print Preview—Choose this command from the File menu to view your poster or banner on-screen just the way it will be printed. Proof Print—This File menu command allows you to print a draft copy of your poster or banner on a printer other than a PosterPrinter System, such as your laser printer. You can check that the document is set up just the way you want it before printing the full-size version. Scan to Print—There may be times when you want to print an 8-½" x 11" copy of a poster or banner and then use the Scan to Print feature on your PosterPrinter System to enlarge it and print a full-size copy. You may want to do this if your computer isn’t directly connected to the PosterPrinter System or if you are working at home, for example. To use this capability, you need to do the following: • In the Document Type dialog box, choose your laser or inkjet printer rather than your PosterPrinter System. • In the Create New Document dialog box, choose a template as you normally would. Although the templates don’t look any different on the screen, when you choose a laser or inkjet printer the templates are scaled to fit on letter-size paper. 50 ¡ Printing GalaRio 1.1.fm Page 51 Wednesday, June 27, 2001 2:17 PM • Print the document using the Print command on the File menu, and you’ll have a copy suitable for scanning. Note: These versions of the templates are designed expressly for a lettersize page. To use the version of a template intended for poster/banner printing, choose your PosterPrinter System in the Document Type dialog box and then select the template. If you’ve created a banner or poster from a template and want to print it on letter-size paper, use the Proof Print command. Test print (Pro36 Color PosterPrinter only)—When using color on documents to be printed on the Pro36 Color PosterPrinter, you may want to check the colors before printing full-size posters or banners. You can print small (thumbnail size) versions of your documents by choosing Print Setup from the File menu, choosing the Pro36 Color PosterPrinter, and clicking the Properties button. On the Paper tab, check the Print test output option and click OK. Then print the document using the Print command on the File menu. Printing ¡ 51 GalaRio 1.1.fm Page 52 Wednesday, June 27, 2001 2:17 PM Working with files Use the following commands on the File menu for file management. As shown below, some of these commands have corresponding buttons on the standard toolbar. Change Document Type New Open Save New—Provides a quick way of creating a new document using the document type and printer you previously selected. The Create New Document dialog box appears, asking you to select a Group option, such as Posters - Monochrome or Banners - Color, along with a template. The available options depend on the selected document type and printer. Open—Lets you open a document that you’ve previously saved within the application. You can then edit or print the poster or banner and save it again, or save it under a different filename. The Open command is equivalent to choosing the Open saved document option after you first start the GalaRio Template Gallery application (or after you click the Change Document Type button). Delete—Provides a way of deleting documents that you’ve previously saved within the application. Use this feature carefully, since you can’t retrieve the document again once you delete it. Save and Save As—Allow you to save the displayed document under its existing filename, if it was already saved, or to save it under a new filename. GalaRio application files are automatically saved with the file extension GLR, as in myposter.glr. When you save, the document is automatically saved in the application’s pre-determined directory structure. This structure includes subfolders for each of the document types you can create. Within these subfolders are additional folders for each group type (Monochrome, Color and Spot 52 ¡ Working with files GalaRio 1.1.fm Page 53 Wednesday, June 27, 2001 2:17 PM Color). During installation, you chose where you wanted this directory structure to be placed; by default, it is stored in Program Files\VSI\GalaRio\Documents. For example, if you are working with a Monochrome template from the Borders document type category, your file will be saved in the following location: Program Files\VSI\GalaRio\Documents\Borders\Monochrome To save a document in a different location or on an external disk, click the Browse button. Change Document Type—Redisplays the set of screens that appears when you first start the GalaRio Template Gallery application. You can then choose a new document type, printer and template. Working with files ¡ 53 © 2010 Varitronics, A Brady Business. Brady Worldwide, Inc. All Rights Reserved. www.variquest.com