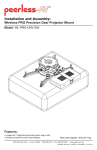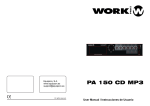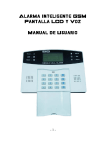
1
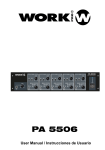
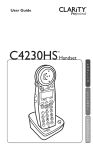
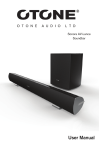
PA 90 CD
SIREN SW
MIC1
MIC2
PROFESSIONAL PA. AMPLIFIER
AUX
COMPACT
DIGITAL AUDIO
DIRECT CD OPERATION
PUSH OFF ON
STOP
B.SKIP/REW F.SKIP/FF
LEVEL
PL
PLAY/PAUSE PROG
POWER
Equipson, S.A.
www.equipson.es
[email protected]
REPEAT
15
MUTE
PA 90 CD
User Manual / Instrucciones de Usuario
OPEN/CLOSE
7. EJEMPLO DE POSIBLE CONEXIONADO
SAFETY RELATED SYMBOLS
CAUTION
RISK OF ELECTRIC SHOCK
DO NOT OPEN
This symbol, wherever it appears,
alerts you to the presence of
uninsu lated dangerous voltage
inside the enclosure-voltage that
may be sufficient to constitute a
risk of shock.
This symbol ,wherever it appears ,
alerts you to important operating
and maintenance instructions in
the accompanyin g literature .
Read the manual .
Protec tive groun ding termi nal .
Alterna ting curren t /voltage .
Hazardous live termi nal .
ON: Denotes the apparatus turns on .
OFF: Denotes the apparatus turns off ,
because of using the single pole switch ,
be sure to unplug the AC power to
External Connection
The external wiring connected to the
output hazardous live terminals requires
installation by an instructed person, or the
use of ready-made leads or cords.
Do not Remove any Cover
There are maybe some areas with high
voltages inside, to reduce the risk of electric
shock, do not remove any cover if the power
supply is connected.
The cover should be removed by the
qualified personnel only.
No user serviceable parts inside.
Protective Grounding
Make sure to connect the protective
WARNING: Describes precautions
that should be observed to prevent the
danger of injury or death to the user .
grounding to prevent any electric
shock before turning ON the apparatus.
CAUTION: Describes precautions that
should be observed to prevent danger
of the apparatus .
protective grounding wire or disconnect the wiring of protective
grounding te rminal.
Power Supply
Ensure the source voltage matches
the voltage of the power supply before
turning ON the apparatus.
Unplug this apparatus during lightning
storms or when unused for long periods
of time .
MIC1
MIC2
PROFESSIONAL PA. AMPLIFIER
AUX
COMPACT
DIGITAL AUDIO
DIRECT CD OPERATION
PUSH OFF ON
STOP
B.SKIP/REW F.SKIP/FF
LEVEL
PL
PLAY/PAUSE PROG
POWER
15
REPEAT
OPEN/CLOSE
MUTE
Fuse
To prevent a fire, make sure to use fuses
with specified standard (current, voltage,
type). Do not use a different fuse or short
circuit the fuse holder.
Before replacing the fuse, turn OFF the
apparatus and disconnected the power
source.
prevent any electric shock before you
proceed your service .
WARNING
PA 90 CD
SIREN SW
CAUTION
RISK OF ELECTRIC SHOCK
DO NOT OPEN
!
FUSE
FUSE
CAUTION: SHOCK HAZARD-DO NOT OPEN
RISK OF FIRE-REPLACE FUSE AS MARKED.
DC FUSE
T6.3A 250V
! WARNING
TO R EDUCE TH E RISK OF FIRE OR ELECTRIC SHOCK.
DO NOT EXPOSE THIS APPARATUS TO RAIN OR MOISTURE.
RISK OF HAZARDOUS ENERGY! MAKE PROPER SPEAKER
CONNECTION. SEE INSTRUCTION BEFORE USING!
+
AC FUSE
110-120~T1A 250V
220-240V~T800mA 250V
-
+
2-16
AC IN
GND
-
+
Never cut off the internal or external
Operating Conditions
This apparatus shall not be exposed
to dripping or splashing an d that no
+
objects filled with li quids, such as
vases, shall be placed on this apparatus.
-
DC 12V
To reduce the r isk of fire o r electr ic
shock, do not expose this apparatus
to rain or moisture.
Do not use this apparatus near water.
14
6. ESPECIFICACIONES
Tipo
Amplificador
i
PA profesional
Potencia de Salida
Rated: 90W(2ohm)
Respuesta de frecuencia
30~25,000Hz
Distorsión Armónica
Menos de 1.0 % at 1KHz,
Relación Señal/Ruido
Micrófono:
27W(4ohm)
Mejor
AUX :
de 55dB
Mejor de 63dB
Install in accordance with the manufacturer's
instructions. Do not install near any heat
sources such as radiators, heat registers,
stoves, or other apparatus (including amplifiers) that produce heat. Do not block
any ventilation openings.
No naked flame sources, such as lighted
candles, should be placed on the apparatus.
IMPORTANT SAFETY INSTRUCTIONS
Read these instructions.
Entradas
MIC 1: -45dB 10k ohm
MIC 2: -45dB 10k ohm
AUX: -20dB
Controles
20k ohm
Contro de volumen MIC1
Contro de volumen MIC2
ControL de volumen AUX
Control de volumen CD
Indicadores
Indicador de red (LED)
Display
(Reproductor CD)
Alimentación AC
110-120V o 220-240V
Alimentación DC
12-18V
Consumo AC
110 W
Consumo DC
40W
50/60Hz
a 2ohm
Follow all instructi ons.
Keep these instruct ions.
Heed all warnings.
Only us e attach ments/accessor ies
specifie d by the manufacturer.
Power Cord and Plug
Do not defea t the safety purp ose of
the polarized or grounding type plug.
A polarized plug has two blades with
one wider than the other. A groundin g
type plug has two blades and a third
grounding pron g. The wide blade or
the third prong are provided for your
safety. If the provided plug does not
fit into yo ur outl et, con sult an e lec-
DC
12V a 2ohm
trician for replacement of the obsolete
outlet.
Protect the power cord from being
Dimensiones
280mm(An)x 92mm(Al)x 285mm(Pr)
Peso
5.55kg (12.24lbs)
walked on or pinched partic ularly at
plugs, conve nience recep tacles, and
Negro
the point where they exit from the
Color
PRECAUCION
:
El selector AC sólo debe ser cambiado por el fabricante
NOTA Las especificaciones, diseño y apariencia están sujetos a cambio sin previo
aviso.
apparatus.
Cleaning
When the apparatus needs a cleaning,
you can blow off dust from the apparatus
with a blower or cl
ean with ra g etc.
Don't use so lvents such as ben
zol,
alcohol, or other fluids with very strong
volatility and flammability for cleaning
13
the apparatus body.
Clean only with dry cloth.
Servicing
Refer all servicing to qualified personnel.
To reduce the risk of electric shock, do not
perform any servicing other than that
contained in the operating instructions
unless you are qualified to do so .
Servicing is required when the apparatus
has been damaged in any way ,such as
power supply cord or plug is damaged ,
liquid has been spilled or objects have fallen
into the apparatus, the apparatus has been
exposed to rain or moisture, does not operate
normally, or has been dropped.
1. Front Panel controls......................................................................1
STOP: Cuando lo presione se detendrá la reproducción
B.SKIP/REW: Cuando lo presione irá a la pista previa
F.SKIP/FF: Cuando lo presione irá a la pista siguiente
REPEAT: Cuando lo pesione el CD repetirá la misma pista, presione otra vez
para repetir el disco entero, otra presión hará que el disco vuelva al estado
normal de reproducción.
2. Rear Panel controls.......................................................................2
PROG: Cuando lo presione, puede ejecutar el disco de acuerdo a sus preferencias
TABLE OF CONTENTS
3. Install and connections..................................................................3
4. Operation.......................................................................................4
5. Trouble shooting.............................................................................5
6. Specifications.................................................................................6
7. Example of possible
Connections...............................................7
NOTA: Antes de presionar la tecla de encendido, asegúrese que todos los controles de
volumen están al mínimo.
5. RESOLUCION DE PROBLEMAS
La unidad está diseñada para su uso sin problemas. Dado que el usuario puede encontrar
algunos problemas, compruebe la siguiente lista con sus soluciones. Si el problema
persiste, no trate de repararlo Vd. mismo y contacte con un servicio técnico especializado.
SI EL PROBLEMA ES
ASEGURESE QUE
No se ilumina nada
La unidad está desconectada
El botón de red está encendido
El fusible Ac o el DC están abiertos
No se escucha sonido
Volumen apagado
Altavoces conectados adecuadamente
Salida intermitente
Compruebe si la alimentación AC o DC
Zumbido contínuo
es la adecuada
No hay salida en uno o más
canales
Los cables están bien
Compruebe o reemplace los altavoces
Hay señal
No se enciende la pantalla del CD
Compruebe el interruptor " "
No hay salida de CD
Compruebe el disco y limpielo
Limpie el lector
12
1. FRONT PANEL CONTROLS
5
Prioridad:
El amplificador incorpora un circuito transistorizado que elimina automáticamente
todo la señal del amplificador y permite hablar por em micrófono 1 para
anuncios de emergencia
7
6
PA 90 CD
SIREN SW
MIC1
MIC2
PROFESSIONAL PA. AMPLIFIER
AUX
COMPACT
DIGITAL AUDIO
DIRECT CD OPERATION
PUSH OFF ON
(3 ) Conexión de Salida
Precaucion:
STOP
B.SKIP/REW F.SKIP/FF
LEVEL
PL
Línea de baja impedancia constante.
La impedancia total de los altavoz conectados debe corresponder a la salida
en los terminales del amplificador.
La suma de la potencia de los altavoces debe ser menor que la potencia de
salida del amplificador.
La longitud de los cables debe ser la menor posible, igual a un cableado de
clase II.
PLAY/PAUSE PROG
POWER
15
REPEAT
OPEN/CLOSE
MUTE
1
2
3
4
4. FUNCIONAMIENTO
FUNCIONAMIENTO BASICO
1 "POWER" SWITCH
(1) Presione el interruptor de red, el LED power se enciende, presione otra vez
para apagarlo, el LED se apagará.
(2) Las entradas MIC 1, MIC 2, CD, AUX disponen de control de volumen independiente
MIC 1 tiene prioridad sobre el resto de entradas, apagando la señal presente en ellas
Gire el control de volumen en sentido horario para incrementar el volumen y antihorario
para reducirlo.
(3) Puesta ren marcha del reproductor de CD
Cuando presione la tecla de encendido del CD, la pantalla se ilumina, mostrando el
estado actual del reproductor.
A. Presione la tecla opne/close para abrir la bandeja de inserción de CD. Presione la tecla
otra vez y pasado unos segundo pulse PLAY, el reproductor comenzará a funcionar en
condiciones normales.
B. Botones de función del CD
: Interruptor de encendio/apagado del reproductor, antes de presionarlo, reduzca
al mínimo el volumen
OPEN/CLOSE: Presione esta tecla para abrir la bandeja del CD. Otra pulsación
la cierra
PLAY/PAUSE: Cuando lo presione, el reproductor comienza a ejecutar el disco,
otra pulsación pausa la reproducción.
Using the POWER switch lets you turn the amplifier on or off .The power is on
When the switch is turn up, and it is off when the switch is turn down.
2 MIC INPUTS
This MIC input jacks is a 6.3mm (1/4") unbalanced jack input, specifically
designed for a dynamic microphone.
3 AUX INPUT
The AUX input jack is a 6.3mm (1/4") unbalanced jack.You can connect audio
From HiFi-VCRs, cassette and reel-to-reel tape decks, DAT machines, CD players,
Laser discs, tuners, even synthesizers or other mixing consoles
4 CD player
5 SIREN switch
It is used to switch the SIREN on or off
6 MIC volume control
This knob are used to adjust the microphone
7 AUX volume control
The knob is used to adjust the aux volume output
LEVEL: Controla el nivel de ganancia de la reprodsucción
11
volume output level
1
level
3. INSTALACION Y CONEXIONADO
Precaucion:
2. REAR PANEL CONTROLS
CAUTION
RISK OF ELECTRIC SHOCK
DO NOT OPEN
!
FUSE
FUSE
CAUTION: SHOCK HAZARD-DO NOT OPEN
RISK OF FIRE-REPLACE FUSE AS MARKED.
DC FUSE
T6.3A 250V
! WARNING
TO R EDUCE TH E RISK OF FIRE OR ELECTRIC SHOCK.
DO NOT EXPOSE THIS APPARATUS TO RAIN OR MOISTURE.
RISK OF HAZARDOUS ENERGY! MAKE PROPER SPEAKER
CONNECTION. SEE INSTRUCTION BEFORE USING!
+
AC FUSE
110-120~T1A 250V
220-240V~T800mA 250V
-
Antes de usar esta unidad por vez primera, asegúrese que el voltaje de la
unidad es el mismo que el de la toma. Conecte la unidad a fuentes con toma
de tierra.
+
2-16
AC IN
GND
-
+
8
9
10
+
(1 ) Conexionado DC o Batería supletoria
-
DC 12V
11
12
13
8 SP OUTPUT
La unidad puede operar desde una batería externa de 12V u otras fuentes DC
con el polo negativo a masa. El conexionado se realiza en los terminales del
panel trasero.
Si la alimentación AC falla, se transfiere instantáneamente la alimentación
DC de manera automática y silenciosa.
La alimentación opera con el interruptor de red
El amplificador no es capaz de recargar la batería conectada. Así le
recomendamos que tenga otro dispositivo de reserva. Cuando el amplificador
opera con alimentación DC, la capacidad de potencia nominal, se reduce
aproximadamente en un 20%
Connect to speakers.
+
2-16
-
9 DC FUSE
The fuse holder contains DC fuse. When fuse in blown out, it should be replaced
with the same and rated type .If it continues to blow out, stop replacing fuse and
refer servicing to qualified personnel.
+
DC 12V
10 "GND" screw
In case the used mains outlet does not provide a ground conductor, this screw
offers the possibility to ground the amplifiers metal parts. Nevertheless, you
should leave this procedure to the experenced, qualified electrician.
11 DC INPUT
Please note the +,- polarity, when connection DC 12V terminal in case of using
emergency power for unexpected AC power failure
12 AC INPUT
Connect AC power main supply and unit via the AC power cord.
Caution: Before connecting this unit to the AC supply, be sure that the voltage of
appliance is in accordance with your mains supply.
(2 ) Conexiones de Entrada
Micrófonos
Dispone de 2 tomas de micro desbalanceado de baja impedancia ( 10K-15K).
Los micrófonos desbalanceados con un cable de conexión de 10 a 20 m deben
ser usados dependiendo de sus características.
MIC-1, MIC-2
Estas dos entradas de micrófono son desbalanceadas y dotadas de jack de
2 polos.
Micrófono desbalanceado de baja impedancia
Debe conectar el micrófono con un cable de 1 conductor apantallado
13 AC FUSE
This fuse holder contains AC fuse. When fuse in blown out, it should be replaced
with the same and rated type .If it continues to blow out, stop replacing fuse and
refer servicing to qualified personnel.
AC110-120V : T1AL /250V
AC220-240V: T800mAL /250V
2
MIC
Micrófono desbalanceado
Conector unipolar
10
3. INSTALL AND CONNECTIONS
Caution:
2. CONTROLES DEL PANEL TRASERO
CAUTION
RISK OF ELECTRIC SHOCK
DO NOT OPEN
!
FUSE
FUSE
CAUTION: SHOCK HAZARD-DO NOT OPEN
RISK OF FIRE-REPLACE FUSE AS MARKED.
DC FUSE
T6.3A 250V
! WARNING
TO R EDUCE TH E RISK OF FIRE OR ELECTRIC SHOCK.
DO NOT EXPOSE THIS APPARATUS TO RAIN OR MOISTURE.
RISK OF HAZARDOUS ENERGY! MAKE PROPER SPEAKER
CONNECTION. SEE INSTRUCTION BEFORE USING!
+
AC FUSE
110-120~T1A 250V
220-240V~T800mA 250V
-
+
2-16
AC IN
GND
-
+
8
9
Before using this unit for the first time, be sure that the appliance's voltage is
must accords with to your mains supply.Connecting this unit only to grounded
mains outlet.
Surface with a minimum distance of 1 M from the back or sideplate to the wall.
10
+
(1.) DC power or battery supply's connection
-
DC 12V
11
12
13
8 SALIDA DE ALTAVOCES
Conecte los altavoces
+
2-16
-
The unit will also operate from an external 12V battery or other direct current
sou rce with negative (-) as ground. Power conne ction are made at the
DC terminal strip on the real panel.
If AC power supply fails, transfer to DC power is instantaneous,
automatic and silent.
The battery power supply is operated by the primary switch.
The amplifier is not capable of recharging the connected battery. Thus,
it is recommended to have a suitable device at hand.When the amplifier is
operated on the DC power source, the nominal power handling capacity
drops by approximately 20%.
9 FUSIBLE DC
El portafusible contiene un fusible DC. Cuando se funda debe ser sustituido por
otro del mismo tipo y valor. Si se continúa fundiendo, deje de sustituirlos y
diríjase a un técnico especializado para su reparación.
10 Tornillo "GND"
En caso de que la toma de red no tenga terminal de masa, este tornillo ofrece
la posibilidad de conectar a masa las partes metálicas de la unidad. Sin embargo
debe dejar esta tarea a un electricista experto.
11 ENTRADA DC
Tenga presente la polaridad + , - del terminal D C 12 V en caso de usar la
alimentación de emergencia ante fallos en la alimentación AC.
12 ENTRADA AC
Conecte la unidad a una toma adecuada de AC mediante el cable de red.
PRECAUCION Antes de conectar la unidad a la red, asegúrese que el voltaje
de la unidad y la toma es el mismo.
13 FUSIBLE AC
El portafusible contiene un fusible DC. Cuando se funda debe ser sustituido por
otro del mismo tipo y valor. Si se continúa fundiendo, deje de sustituirlos y
diríjase a un técnico especializado para su reparación.
AC110-120V : T1AL /250V
AC220-240V: T800mAL /250V
9
+
DC 12V
(2.) Input connection
Microphones
Three microphone inputs are provided. They used with unbalanced low impedance
(10k-15k ohms) microphone. the microphone with the unbalanced connection
cable of 10-20m may be used depending on the microphone and its characteristic.
MIC-1, MIC-2
These two microphone inputs are unbalanced type and are provided with a
double pole phone jack.
Unbalanced LO Z Microphone
May also be connected to the single conductor shielded cable of unbalanced LO Z
microphone.
MIC
Unbalanced microphone
Single pole phone plug
3
1. CONTROLES DEL PANEL FRONTAL
Priority paging:
The amplifier features a transistorized circuit which automatically removes
all program material for the amplifier and permits microphone #1 to talk
over for special or emergency announcements. This electronic switch is
operated from the microphone which must contain a single-pole switch,
normally open for actuating this circuit.
5
7
6
PA 90 CD
SIREN SW
MIC1
MIC2
PROFESSIONAL PA. AMPLIFIER
AUX
COMPACT
DIGITAL AUDIO
DIRECT CD OPERATION
PUSH OFF ON
(3.Output
)
connection
Caution:
STOP
B.SKIP/REW F.SKIP/FF
LEVEL
PL
Constant the low impedance lines.
The total impedance of the speakers connected must correspond to
the amplifier's output terminals.
The sum of the power capacities of the speakers must be no lower than
the amplifier's power capacity.
The length of the connecting cables must be short as possible;with equal
of line that CLASS
wire.
PLAY/PAUSE PROG
POWER
1
REPEAT
15
OPEN/CLOSE
MUTE
2
3
4
4. OPERATION
BASIC OPERATION
(1). Press the POWER button to ON, then the power lamp lights up; press
again to turn the power off, then the power lights extinct.
(2). CD, MIC1,MIC2,AUX, all have independent volume control, and MIC1
has priority in them. When the signal input the MIC1, the playing signal
of MIC2, AUX, CD should be muting, the MIC1 signal will play prior. Turn the
VOLUME clockwise to increase the volume and counter clockwise to
decrease it.
(3). Play the CD tape.
When you press the CD power switch's button , then the compact disc
player will display, at the same time, tell you that the CD player at the
state of ready work.
a. Press the open/close button, the CD widows will push out, then take a CD
Ta p e i n i t . N e x t , p r e s s t h e s a m e b u t t o n a g a i n a n d a f t e r a l i t t l e t i m e
press the play/pause button, at this time, the CD player was working
at the normal conditions.
b. CD function buttons
" ":CD power switch with two-position for ON-OFF mode, before pr ess it,
please turn off the volume knob.
"OPEN/CLOSE": press the open/close button, the CD window will push
out; press the same button again the CD window will push in.
"PLAY/PAUSE": when press it, the CD player will playing; press the same
button again, the CD player will pause play.
"LEVEL": the VR is CD volume control with
adjust gain of CD volume.
4
1 INTERRUPTOR DE ENCENDIDO
Usando el interruptor le permite encender o apagar el amplificador. La unidad
está encendida con el interruptor arriba, y apagado hacia abajo.
2 ENTRADAS DE MICRO
El conector de entrada MIC es un conector jack de 1/4” desbalanceado y
específicamente diseñado para micrófonos dinámicos.
3 ENTRADA AUX
El conector de entrada AUX es un jack de 1/4” desbalanceado para la conexión
de VCR, pletinas de cassette, DAT, Reproductores de CD, Sintonizadores, etc
4 Reproductor de CD
5 Interruptor SIREN
Se utiliza para encender o apagar la sirena
6 Control de volumen MIC
7 Control de volumen AUX
Este mando se usa para ajustar el nivel de salida de volumen aux
8
TABLA DE CONTENIDOS
1. Controles del Panel Frontal .......................................................................8
2. Controles del Panel Trasero.......................................................................9
3. Instalación y Conexionado ........................................................................10
4. Funcionamiento .........................................................................................11
5. Solución de problemas ...............................................................................12
6. Especificaciones .......................................................................................13
7. Ejemplo de posibles conexiones ...............................................................14
"STOP": when press it, the CD player will stop playing.
" B.SKIP/REW": when press it, the CD player will backward skip.
"F.SKIP/FF": when press it, the CD player will forward skip.
"REPEAT": when press it, the CD player will repeat to play the same song,
press it again the CD player will repeat to play all;if press it again, the CD
player will return to normal condition of playing.
"PROG": when press it, the CD player can setup in accordance
with you favoured
selections.
NOTE: Before you press power button to on, be sure to the all volume VR
to minimum.
5. TROUBLE SHOOTING
This unit is designed for trouble-free operation. That is users may encounter most
problem errors. So, if you have a problem, first check this list for a possible
solution. If the problem persists, do not attempt to service this unit by yourself,
consult yo ur authoriz ed service centers o r a highly qua lified pers onnel.
IF THE PROBLEM IS
MAKE SURE THAT THE
No lights illuminate
Unit is plugged into a live outlet,
POWER button is pressed.
was the AC fuse or DC fuse opened.
No sound is heard.
Volume is turned up
Speaker are connected properly
Unit output is intermittent
Check the AC power or DC power
or continuously buzzing
supply is proper
or screech
No output from one or
Cables are not defective
more channels.
Check/replace speaker
or line:
cables or line
The signal source is operating and.
Providing proper signal output to this unit.
No display of compact discplaye
Check the " " CD power switch
is normal.
No output of compact disc
Check the CD tape cleaning or
player
damage. Clear the laser-head
5
6. SPECIFICATIONS
Type
Professonal
i
PA amplifier
Power output
Rated: 90W(2ohm)
Frequency response
30~25,000Hz
Total harmonic distortion
Less than 1.0 % at 1KHz, rated power
Signal to noise ratio
Microphone:
27W(4ohm)
INSTRUCCIONES DE SEGURIDAD
Better
than 55dB
Rated output
AUX :
Better than 63dB
rated output
Inputs
Cable de red y Enchufe
El terminal de tierra de la clavija está
diseñado para su seguridad. Si su toma
de corriente no dispone de un terminal
de este tipo, consulte a un electricista
para que lo reemplace.
Proteja el able de red de pisadas o cortes
particularmente en las clavijas y el punto
de salida del aparato.
MIC 1: -45dB 10k ohm
MIC 2: -45dB 10k ohm
AUX: -20dB
Controls
20k ohm
MIC1 volume control
MIC2 volume control
AUX volume control
CD volume control
Indicator
Power indicator(LED)
Digital display (CD player)
AC power supply
110-120V or 220-240V
DC power supply
12-18V
AC power consumption
110 W
DC power consumption
40W
- Lea estas instrucciones
- Sigalas al pie de la letra
- Conserve estas instrucciones
- Tenga presente todos los avisos
- Use únicamente accesorios marcados
por el fabricante.
50/60Hz
Limpieza
Cuando la unidad necesite ser
limpiada, elimine el polvo con un
aspirador. NO use disolventes químicos
alcoholes u otro fluidos con fuerte
volatilidad para la limpieza.
Use en su lugar un paño seco.
rated output at 2ohm
DC
Funcionamiento
12V rated output at 2ohm
Dimensions
280mm(W)x 92mm(H)x
Weight
5.55kg (12.24lbs)
Color
285mm(D)
Black
CAUTION:
The AC selector changed only by manufacturer.
NOTE : Specifications, design and appearance subject to change without
prior notice.
6
Diríjase para cualquier operación de
manejo a personal cualificado. Para
reducir el riesgo de descarga
eléctrica, no realice ningún manejo
u operación que no estén contenidos
en este manual si no es una
persona cualificada para ello.
La reparación será necesaria
cuando la unidad haya sido dañada
de alguna forma, el cable de red o
la clavija, se haya derramado
líquido sobre la unidad o ésta haya
sido expuesta a la lluvia o la humedad
o bien no funciona de forma normal
7. EXAMPLE OF POSSIBLE CONNECTIONS
PA 90 CD
SIMBOLOS DE SEGURIDAD
SIREN SW
MIC1
MIC2
PROFESSIONAL PA. AMPLIFIER
AUX
COMPACT
DIGITAL AUDIO
DIRECT CD OPERATION
PUSH OFF ON
STOP
CAUTION
LEVEL
RISK OF ELECTRIC SHOCK
DO NOT OPEN
PLAY/PAUSE PROG
POWER
Cuando aparece este símbolo
le alerta de la presencia de una
tensión de red peligrosa que
puede ser suficiente para
constituir un riesgo de shock.
Este símbolo, le alerta de una
instrucción importante de
funcionamiento o mantenimiento
diríjase al manual para referencias
Terminal de toma de tierra
Tensión alterna
Punto de riesgo eléctrico
ON: Denota que el aparato debe
encenderse
OFF: Denota que la unidad se apaga
Debido al uso de un sólo polo en el
interruptor, asegúrese de desconectar
la red antes de proceder a su reparación
para prevenir descargas eléctricas.
WARNING: Describe las precauciones
que deben ser observadas para prevenir
el peligro de daños en el usuario.
CAUT ION:
Describe las precauciones
que deben ser observadas para prevenir
daños en el aparato.
WARNING
Alimentación
Asegúrese que la fuente de tensión es
la marcada antes de encender la unidad
Desconecte la unidad durante tormentas
eléctricas o en periodos largos de
desuso.
B.SKIP/REW F.SKIP/FF
PL
15
REPEAT
OPEN/CLOSE
MUTE
Conexión externa
El cableado externo conectado a la
salida, requiere su instalación por parte
de un técnico especializado.
No retire ninguna tapa
Hay áreas en el interior de alta tensión
para reducir el riesgo de descargas, no
retire ninguna tapa con la red conectada
Las cubiertas deben ser retiradas sólo
por personal especializado.
Fusible
Para prevenir incendios, asegúrese de
usar fusibles específicos en tensión
y corriente. NO use fusibles de distinto
tipo. Antes de sustituir el fusible, apague
la unidad y desconéctela de la red.
CAUTION
RISK OF ELECTRIC SHOCK
DO NOT OPEN
!
FUSE
DC FUSE
T6.3A 250V
! WARNING
Toma de tierra
Conecte la toma de tierra para prevenir
descargas eléctricas antes de encender
la unidad.
Nunca corte o desconecte el cable de
toma de tierra.
FUSE
CAUTION: SHOCK HAZARD-DO NOT OPEN
RISK OF FIRE-REPLACE FUSE AS MARKED.
TO R EDUCE TH E RISK OF FIRE OR ELECTRIC SHOCK.
DO NOT EXPOSE THIS APPARATUS TO RAIN OR MOISTURE.
RISK OF HAZARDOUS ENERGY! MAKE PROPER SPEAKER
CONNECTION. SEE INSTRUCTION BEFORE USING!
+
AC FUSE
110-120~T1A 250V
220-240V~T800mA 250V
-
+
2-16
AC IN
GND
-
+
Condiciones de Funcionamiento
Este aparato no debe ser expuesto a
salpicaduras o entrada de líquidos
dentro de la unidad. Para reducir el
riesgo de descargas eléctricas, no
exponga la unidad a la lluvia o humedad
No use este aparato cerca del agua.
Instálelo de acuerdo a las instrucciones
del fabricante. NO lo instale cerca de
fuentes de calor como radiadores, estufas
u otros aparatos, incluidos amplificadores
que generen calor. No bloquee ninguna
apertura de ventilación.
+
-
DC 12V
7