1
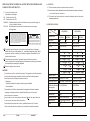
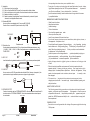
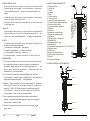
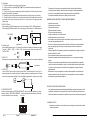
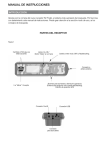
Equipson, S.A.
www.equipson.es
[email protected]
CSV 640
User Manual / Instrucciones de Uso
THE FOLLOWING GRAPHICAL SAFETY RELATED SYMBOLS ARE
USED ON THIS APPARATUS :
4. ATENCION
4.1 Evite usar este producto en aplicaciones en exterior.
4.2 Cuando use el sistema inalámbrico, extender totalmente la antena, contribuye a
G Protective earth terminal.
~ Alternating current/voltage
ON Denotes the unit is ON
OFF Denotes this unit is OFF
WARNING Describes precautions that should be observed to prevent the danger of
of injury or death to the user.
CAUTION Describes precautions that should be observed to pre vent danger
una mejor distancia de recepción.
4.3 En caso de mal funcionamiento, no abra la unidad para evitar el riesgo de
descargas eléctricas.
5. ESPECIFICACIONES
of the apparatus.
This symbol on the product or on its packaging indicates that this product
shall not be trated as household waste. Instead it shall be handed over to
the applicable collection point for the recycling of electrical an electronic
equipment. By ensuring this product is disposed of correctly, you will help
prevent potential negative consequences for the environment and human
health, which could otherwise be caused by inappropriate waste handling
of this product. The recycling of amterials will help to conserve natural
resources. For more detailed information sabout recycling of this product,
please contact your local city office, your household waste disposal service
or the shop where you purchased the product.
Tipo
CAUTION
RISK OF ELECTRIC SHOCK
DO NOT OPEN
CAUTION : SHOCK HAZARD - DO NOT OPEN
RISK OF FIRE-REPLACE FUSE AS MARKED
REPLACE WITH SAME LAMP RATED 5W 12V
SEE INSTRUCTION MANUAL BEFORE USING.
The lighting flash with arrowed symbol within an equilateral triangle is intended
nded to alert the user to the presence of uninsulated "dangerous voltage" within
the product´s enclosure, that may be of sufficient magnitude to constitute a risk of
electric shock to persons.
T
0.5A 250V
40W(800MHz)
40W(200MHz)
Item
Alimentación
120V/60Hz
230V/50Hz
Consumo
100W
90W
Resp. de frecuencia 100Hz~16,000Hz
100W
90W
T.H.D
Potencia de salida
0.5%(a AUX 1W)
0.5%(a AUX 1W)
40W
40W
Sensib. de entrada
MIC1: -50dB 2dB / 680
MIC1: -50dB 2dB / 680
MIC2: -55dB 2dB / 600
MIC2: -55dB 2dB / 600
LINE: -20dB 2dB / 50K
LINE: -20dB 2dB / 50K
AUX: 1. -20dB 2dB / 10K
AUX: 1. -20dB 2dB / 10K
2. -15dB 2dB / 30K
2. -15dB 2dB / 30K
3. -10dB 2dB / 50K
3. -10dB 2dB / 50K
The exclamation point within an equilateral triangle is intended to alert the
user to the presence of important operating and maintenance (servicing) instructions
In the literature accompanying the appliance
Risk of fire replace fuse as marked
CAUTION
Do not block any of the ventilation openings. The apparatus should be placed on
a solid surface with a minimum dist ance of 1m from the back or side top plate to
the wall and not in the following environment of cas es:
Moist place
Under direct radiation of sunlight or other strong heat radiation
No air ventilation .
120V/60Hz
230V/50Hz
4. -3dB 2dB / 80K
Sobre 45dB
100Hz~16,000Hz
4. -3dB 2dB / 80K
Sobre 45dB
Relación (S/N)
Salida de grabación 1V / 0dB(at AUX -20dB)
1V / 0dB(at AUX -20dB)
Control de Tonos
Graves 20dB / Agudos 20dB
Graves 20dB / Agudos 20dB
Unidad inalámbrica WTU-221(200MHz)
de recepción
801RU(800MHz)
Recepción
Cuarzo
Cuarzo
shall be placed on the apparatus.
Modulación
FM(3E)
FM(3E)
Please read the notes proceeded by the symbol ! with the special attention,
Distancia recep.
15~25m(Sin obstáculos)
15~25m(Sin obstáculos)
as they provide important safety information.
Dimensiones
580(L) 420(An) 1314.5(A)mm
580(L) 420(An) 1314.5(A)mm
These servicing instructions are for use by qualified personnel only. To reduce
Peso
19Kg
19Kg
To prevent the risk of fire or electrical shock, the apparatus shall not be exposed
to dripping or splashing and that no objects filled with liquids, such as vases,
the risk of electric shock do not perform any servicing other than that contained
Page 1
CSV 640
User Manual
Manual de Uso
CSV 640
Página 12
in the operating instructions unless you are qualified to do so.
To prevent a fire, make sure to replace fuse with specified standard (current, voltage,
type), Before replacing the fuse, turn OFF the power and disconnect
the power source. Do not use a different fuse or short-circuit the fuse holder .
To add the mechanical stability ,fasten the bottom base to the ground with the screws
by a qualified installer .
3.1 Instalación
3.1.1 Fije la base al suelo con tornillos
3.1.2 Use los 3 tornillos M6x16x0.7PH para fijar el cuerpo de la unidad a la base
3.1.3 Use los tornillos para unir el pupitre a la columna antes de realizar las conexiones
3.1.4 Instale el micrófono y luz de flexo
3.1.5 Instale las antenas y despliéguelas. Conecte la alimentación y encienda. Ajuste el
volumen al nivel apropiado antes de usarlo.
IMPORTANT SAFETY INSTRUCTIONS
Read these instructions.
Keep these instructions.
Heed all warnings.
3.2 Entradas MIC/LINE
Use un micrófono con adaptador jack 6.3 mm para MIC 2 (-55 dB).
Cuando utilice un conector XLR para la toma auxiliar (-20 dB)
XLR
MIC2/LINE
~
~
1
2
3
~
Balanceada
Desbalanceada
o
3.3 Entrada Auxiliar
Cuando adopte la entrada auxiliar L/R, hay 4 tipos de sensibilidad para seleccionar y usar:
1. -20 dB, 2. -15 dB, 3. -10 dB, 4. -3 dB, el cual puede operar con entradas de volumen CD/
TUNER / TAPE.
L
AUX
4
1 2 3
R
3.4 REC OUT
La señal de salida de grabación standard es de 0 dB 1V, cuyo volumen puede ser ajustado
REC
OUT
TO RECORDER
3.5 LINE OUT
Use un conector mini 4P XLR para señales de salida de 400 mV (volumen de recepción). Uno
puede conectar el equipo inalámbrico para usar en lugares de gran amplitud.
Follow all instructions.
Do not use this apparatus near water.
Clean only with a damp cloth.
Install in accordance with these instructions.
Do not install near any heat sources such as radiators, heat registers, stoves, or
other apparatus that produce heat.
Do not defeat the safety purpose of the grounding-type
plug. A grounding type plug
has two blades and a third grounding prong. The third prong are provided for your
safety. When the provided plug does not
fit into your outlet, consult an electrician
for replacement of the obsolete outlet.
Protect the power cord form being walked on
or pinched particularly at plugs, convenience receptacles, and the point where they exit from the apparatus.
Only use attachments / accessories specified by the manufacturer.
Unplu g this appar atus duri ng lightn ing storm s or when unus ed for long per iods
of time.
Refer all servicing to qualified service personnel. Servicing is required when the
apparatus has bee n damag ed in any way, such as p ower- supply cord or plug is
damaged, liquid has been spilled or objects have fallen into the apparatus, the apparatu s has been exposed to rain or moisture, does not opera
te normally, or has
been dropped.
This manual is an
3
2
~
3.6 SPEAKER OUTPUT
Cuando el conmutador está en “INTERNAL SPEAKER”, utiliza los altavoces del amplificador. Si
el selector está en “EXTERNAL SPEAKER”, utilice los terminales de altavoz externo para la
el conexionado.
INTERNAL SPEAKER
integral part of the product and must accompany it when
changing owner,to allow the
safety instructions.
new owner to get to know installation, operating, and
SAFETY PRECAUTIONS
The following general safety precautions must be observed during all phases of
operation , service and repair of this apparatus.
If this apparatus is used in a manner
not specified in this manual,
the protection provided by this
apparatus may be impaired. Also, WORK® assumes no liability for the
customer's failure to comply with
these requirement.
POWER SUPPLY
Ensure the source voltage matches the voltage of the power supply before turning
ON the power.
EXTERNAL SPEAKER
EXTERNAL SPEAKER
RATED LOAD IMPEDANCE 4
Página 11
CSV 640
Manual de Uso
User Manual
CSV 640
Page 2
2. INSTRUCCIONES DEL PRODUCTO
POWER CORD AND PLUG
To prevent an electric shock or fire, be sure to use the power cord supplied by WORK®.
The main power plug must be plugged in an outlet with protective grounding termnal. Do not invalidate protection by
using an extension cord without protective grounding.
You shall hold the plug firmly to aviod the pull-out of power cord and risk occurring
when you pull the power cord out from AC outlet.
If the apparatus is not to be used for long periods of time. turn it off and disconnect
the power supply cord.
CLEANING
When the apparatus needs a cleaning, you can blow off dust from the apparatus with
a blower of clean with rag etc. Don't use solvents such as benzol,alcohol, or
other
fluids with very strong volatility and flammability
for cleaning the apparartus body.
OTHER
If the apparatus gives off any strange odor or smoke, switch it off immediately and
disconnect the power from the supply cable.
Do not obstruct the ventilation grilles of the apparatus.
Avoid having the apparatus work
on overload for a long time.
Do not force command parts (buttons, controls, etc.)
If connecting interference takes place in source circuit, THD will be more than 10%.
1. INTRODUCTION
1.1 This wireless lectern amplifier is movable and contains an internal power amplifier. It
can be used at anytime in a speech, a teaching, a conference, etc. Its assembled str ucture facilitates separate wherever you are. It is not limited to the installation lines.
Only
interactiv e main AC power will be enough for function
. To facilita te your usage, it has
been attached with a wire less microphone.
1
2.1 Micrófono con flexo.
2.2 Luz de flexo.
2.3 Pupitre.
2.4 Altavoces.
2.5 Base.
2.6 Control de agudos.
6
2.7 Control de Graves.
2.8 Control de volumen de micro de flexo.
12
2.9 Control de volumen del micro inalámbrico.
7
2.10 Control de volumen auxiliar.
8
2.11 Control de volumen de micrófono 2.
14
2.12 Antena A.
2.13 FAntena B.
15
2.14 Indicador de recepción antena A.
17
2.15 Indicador de recepción antena B.
2.16 Indicador AC.
21
2.17 Entrada de micro 2 / entrada line 2.
2.18 Salida Mini XLR.
2.19 Salida de grabación 6.3 mm
2.20 Entrada Auxiliar.
2.21 Conmutador de entrada auxiliar AUX / TAPE / TUNER / CD.
2.22 Interruptor de red.
2.23 Toma de red.
24
2.24 Selector de salida de altavoces.
25
2.25 Terminal para altavoces de salida.
26
2.26 Soporte.
2.27 Interruptor de la lámpara.
2
3
27
9
13
10
11
16
18
19
20
4
22
23
5
3. INSTRUCCIONES DE FUNCIONAMIENTO
Instalación 3.1.4
1.2 The unit is one kind of diversity wireless microphones(200MHz system) while the unit
is that of no diversity wireless microphone s(800MHz system). Both of them can be
equipped with one handhold microphone
or tie clip microphone.
Instalación 3.1.3
1.3 Additionally , there is a microphone 2 input set (can be changed into balanced line
auxiliary input), an auxiliary input set (can select four kinds of i nput sensibi lity t o
Instalación 3.1.5
cope with CD / TUNER / TAPE or other signal sources), a recording output base (0dB /
1V) that can be used in recorder input, and a line out base (a mini one: 4PXLR) that
can use the wireless system to work with the origimal amplifiers.
1.4 There is a separate goose-necked high sensitivity microphone for the lectern desk
equipment and a separate goose-necked reading light to make your script reading in a
dark environment possible and easier.
1.5 The switch control can select built-in speaker output or external speaker (4
istance) output.
Page 3
CSV 640
User Manual
Instalación 3.1.2
resInstalación 3.1.1
Manual de Uso
CSV 640
Página 10
2. PRODUCT STRUCTURE INSTRUCTION
CABLE DE RED Y ENCHUFE
- Para prevenir el riesgo de descargas eléctricas, utilice el cable suministrado por
WORK®.
- La clavija debe insertarse en una toma con conexión de protección de masa.
No elimine esta protección usando un prolongador sin esta toma.
- Fije la clavija firmemente para evitar la mala conexión en la toma y el riesgo de
descarga al desconectar.
- Si la unidad no va a usarse durante un largo periodo de tiempo, apague la unidad
y desconéctela de la red.
LIMPIEZA
- Cuando la unidad necesite ser limpiada, use un aspirador para eliminar el polvo.
No use disolventes como alcoholes, benceno u otros fluidos volátiles e
inflamables para la limpieza del chasis.
OTROS
- Si el aparato despide un fuerte olor o humo, apáguelo inmediatamente y
desconecte el cable de red.
- No obstruya las rejillas de ventilación de la unidad.
- Evite hacer funcionar la unidad en sobrecarga durante mucho tiempo.
- No fuerce los comandos tales como botones , controles o clavijas.
1. INTRODUCCION
1.1 El pupitre inalámbrico es portátil y dispone de un amplificador de potencia.
Puede ser usado en conferencias, enseñanza, etc. Para facilitar su uso,
dispone de micrófono inalámbrico.
2.1 Goose neck microphone.
2.2 Goose neck light.
2.3 Desk.
2.4 Speakers.
2.5 Bottom base.
2.6 Treble control.
2.7 Bass control.
2.8 Goose neck microphone volume control.
2.9 Wireless microphone volume control.
2.10 Auxiliary volume control.
2.11 Microphone 2 volume control.
2.12 Flexible antenna A.
2.13 Flexible antenna B.
2.14 A antenna receiving indicator.
2.15 B antenna receiving indicator.
2.16 AC power instruction light.
2.17 Microphone 2 input / balanced line input.
2.18 Mini XLR output.
2.19 6.3 recording output.
2.20 Auxiliary input.
2.21 AUX / TAPE / TUNER / CD switch of auxiliary input.
2.22 Power switch.
2.23 AC power input.
2.24 Selection switch of speaker output.
2.25 Wiring terminal of speaker output.
2.26 Mounting.
2.27 Lamp power switch.
1
2
3
27
6
12
9
13
10
7
11
8
16
14
18
15
19
17
20
21
4
22
24
25
23
5
26
3. OPERATION INSTRUCTION
Installation 3.1.4
1.2 La unidad utiliza un tipo de micrófono inalámbrico de 800 MHz (No Diversity)
o 200 MHz (Diversity), pudiendo conectar un micrófono de mano o de solapa.
Installation 3.1.3
1.3 Adicionalmente, dispone de 2 entradas de micrófono (que pueden ser
cambiadas en entradas de línea balanceadas) y de entrada auxiliar (pueden
seleccionar 4 tipos de sensibilidades de entrada CD/TUNER/TAPE y otras
fuentes de señal), una toma de grabación ( 0 dB/ 1V), puede usarse como
entrada de grabación y una base de línea para que el sistema inalámbrico
opere con el amplificador.
Installation 3.1.5
1.4 La unidad dispone de una toma de micrófono de flexo en el pupitre y toma
de luz de flexo para hacer más fácil la lectura.
Installation 3.1.2
1.5 Dispone de conmutador para seleccionar salida de altavoz interno o toma
externa de 4 ohms.
Pagina 9
CSV 640
Manual de Uso
Installation 3.1.1
User Manual
CSV 640
Page 4
3.1 Installation
3.1.1 Fasten the bottom base to the ground with screws.
3.1.2 Use the butterfly screws (M6 16 0.7PH 3PCS) to assemble and settle the speaker with
the bottom base.
3.1.3 Use the butterfly screws to assemble and settle the speakers with the desk before connecting with the connection lines spirally.
3.1.4 Install the joints of the gooseneck microphone and light onto the desk in a spiral way.
3.1.5 Install the fixed join of the antenna into the speakers and pull the flexible antenna to its maxmum length. Connect with the power line and turn it on. Adjust volume to the appropriate level
before usage.
3.2 MIC / LINE input
When adopting 6.3 MIC receptacle input, it is for the usage of MIC2. (-55dB unbalanced)
When adopting XLR terminal input, it is for the usage of auxiliary input line. (-20dB balanced)
XLR
MIC2/LINE
~
~
1
2
3
~
Balanced
Unbalanced
or
3.3 Auxiliary input
When adopting auxiliary input L / R, there are four kinds of sensitivity for selection and usage.
They are 1. -20dB 2. -15dB 3. -10dB 4. -3dB , which can work with the volume input of CD /
TUNER / TAPE.
L
AUX
4
1 2 3
R
3.4 REC OUT
Recording output signal standard is 0dB 1V output, whose volume can be controlled and adjusted.
REC
OUT
TO RECORDER
3.5 LINE OUT
Use mini 4PXLR base to output signals that are 400mV (volume reception and control).It is
especially preferred to be used along with the wireless system in expanding equipment. One can
connect the wireless lectern amplifier to the cable amplifying equipment for usage in a wider place.
- Para prevenir el riesgo de fuego, asegúrese de utilizar el mismo tipo de fusible al
sustituirlo (corriente, tamaño). Antes de sustituirlo, apague la unidad y desconéctela
de la red. No use fusibles diferentes o haga cortocircuitos en el portafusible.
- Para añadir estabilidad mecánica a la unidad, fije la base al suelo.
IMPORTANTES INSTRUCCIONES DE SEGURIDAD
- Lea estas instrucciones.
- Conserve estas instrucciones.
- Sigua estas instrucciones.
- Haga caso de todos los avisos.
- No use la unidad cerca del agua.
- Limpie la unidad sólo con un paño húmedo.
- Instálela de acuerdo a las instrucciones
- No lo instale cerca de fuentes de calor colo radiadores, registros de calor, estufas y
otros aparatos generadores de calor.
- No elimine el polo de toma de tierra del enchufe de red. Este tercer polo está diseñado
para su propia seguridad. Si la toma no dispone de esta conexión, consulte con un
electricista.
- Proteja el cable de red de pisadas o pinzamientos, especialmente en clavijas o desde los
puntos de salida de la unidad.
- Use únicamente accesorios especificados por el fabricante.
- Desconecte el aparato durante tormentas eléctricas o si no va a usarse durante largo
tiempo.
- Diríjase a un servicio técnico especializado ante cualquier problema. Esto es requerido
cuando la unidad ha sido dañada, su cable, o han caído objetos sólidos o líquidos sobre
la unidad, o ha sido expuesta a la humedad, ha sido golpeado o no parece funcionar
adecuadamente.
‘ Este manual es una parte integral de la unidad y debe acompañar a la unidad durante
cualquier cambio de dueño, para permitir a su nuevo propietario, conocer la instalación,
funcionamiento y precauciones necesarias.
3
2
~
PRECAUCIONES DE SEGURIDAD
3.6 SPEAKER OUTPUT
When the selection switch is "INTERNAL SPEAKER", using the amplifier speaker input. If the
selection switch is "EXTERNAL SPEAKER", using the speaker external terminal to externally
connect the speaker to have an output.
INTERNAL SPEAKER
Las siguiente precauciones generales de seguridad deben ser observadas durante todas
las fases de funcionamiento o reparación de la unidad. Si la unidad es usada de manera
distinta a la descrita en esta unidad, sus posibles averías no serán cubiertas por la garantía.
ALIMENTACION
EXTERNAL SPEAKER
- Asegúrese que la toma de red suministra el mismo voltaje que el marcado en la unidad
antes de encenderla.
EXTERNAL SPEAKER
RATED LOAD IMPEDANCE 4
Page 5
CSV 640
User Manual
Manual de Uso
CSV 640
Página 8
LOS SIGUIENTES SIMBOLES DE SEGURIDAD SON USADOS
EN ESTE APARATO :
G Terminal de protección de tierra.
~ Corriente alterna
ON Denota que la unidad está encendida
OFF Denota que la unidad está apagada
WARNING Describe las precauciones que deben ser observadas para prevenir
daños al usuario.
CAUTION Describe las precauciones que deben ser observadas para
prevenir daños en la unidad
Este símbolo en su equipo o embalaje, indica que el presente producto
no puede ser tratado como residuos domésticos normales, sino que deben
entregarse en el correspondiente punto de recogida de equipos electrónicos
y eléctricos. Asegurándose de que este producto es desechado
correctamente, Ud. está ayudando a prevenir las consecuencias negativas
para el medio ambiente y la salud humana que podrían derivarse de la
incorrecta manipulación de este producto. EL reciclaje de materiales
ayuda a conservar las reservas naturales. Para recibir más información,
sobre el reciclaje de este producto, contacte con su ayuntamiento, su
punto de recogida más cercano o el distribuidor donde adquirió el producto.
4. ATTENTION
4.1 Avoid this product from rain as applied outdoors.
4.2 When using wireless microphone, a full extension of the antenna will contribute
to a better reception distance.
4.3 In case of malfunction, please do not open the product without adequate in order
to avoid electric shock hazard.
5. SPECIFICATIONS
Type NO
CAUTION
RISK OF ELECTRIC SHOCK
DO NOT OPEN
CAUTION : SHOCK HAZARD - DO NOT OPEN
RISK OF FIRE-REPLACE FUSE AS MARKED
REPLACE WITH SAME LAMP RATED 5W 12V
SEE INSTRUCTION MANUAL BEFORE USING.
El símbolo del rayo dentro de un triángulo equilátero, alertará al usuario de la
presencia de un voltaje peligroso de suficiente magnitud como para constituir
un riesgo de descargas eléctricas.
AC power source
120V/60Hz
230V/50Hz
Consumption power 100W
90W
Frequency response 100Hz~16,000Hz
100W
90W
T.H.D rate
Output power
Below 0.5%(at AUX 1W)
Below 0.5%(at AUX 1W)
40W
40W
Input sensitivity
MIC1: -50dB 2dB / 680
MIC1: -50dB 2dB / 680
MIC2: -55dB 2dB / 600
MIC2: -55dB 2dB / 600
LINE: -20dB 2dB / 50K
LINE: -20dB 2dB / 50K
AUX: 1. -20dB 2dB / 10K
AUX: 1. -20dB 2dB / 10K
2. -15dB 2dB / 30K
2. -15dB 2dB / 30K
3. -10dB 2dB / 50K
3. -10dB 2dB / 50K
El símbolo de exclamación dentro de un triángulo equilátero, previene al usuario
de la presencia de una instrucción importante de mantenimiento en la literatura
que acompaña a la unidad.
T
0.5A 250V
120V/60Hz
Riesgo de fuego, sustituya el fusible
PRECAUCION
- No bloquee ninguna salida de ventilación. La unidad debe ser situada en una
superficie sólida con una distancia mínima de 1 metro en la parte trasera y
laterales y no colocarse en los siguientes ambientes:
- Lugares húmedos
- Bajo la radiación directa del sol o altas temperaturas
- Lugares no ventilados
- Para prevenir el riesgo de descargas eléctricas, el aparato no debe ser expuesto
a salpicaduras o cerca de objetos con líquido como jarrones, etc.
- Por favor, lea las notas precedidas del símbolo
con especial atención
ya que le suministran importante información de seguridad.
- Estas instrucciones de seguridad deben ser utilizadas por un técnico especializado
Para reducir el riesgo de descargas, no utilice esta unidad más allá de lo
indicado en el presente manual y no trate de repararlo por si mismo.
Pagina 7
CSV 640
40W(800MHz)
40W(200MHz)
Item
Manual de Uso
230V/50Hz
4. -3dB 2dB / 80K
(S/N)signal noise ratioAbove 45dB
100Hz~16,000Hz
4. -3dB 2dB / 80K
Above 45dB
Recording output
1V / 0dB(at AUX -20dB)
1V / 0dB(at AUX -20dB)
Tone control
Bass 20dB / Treble 20dB
Bass 20dB / Treble 20dB
Wireless receiving
module unit
WTU-221(200MHz)
801RU(800MHz)
Receiving
Quartz locking
Quartz locking
Modrlation
FM(3E)
FM(3E)
Receiving
15~25m(Non-obstacle)
15~25m(Non-obstacle)
Dimension
580(L) 420(W) 1314.5(H)mm
580(L) 420(W) 1314.5(H)mm
Weight
19Kg
19Kg
User Manual
CSV 640
Page 6