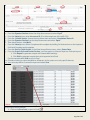
1
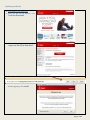
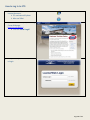
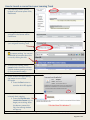
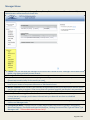
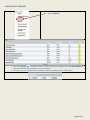
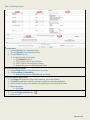
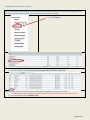
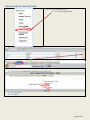
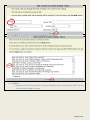
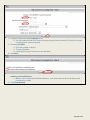
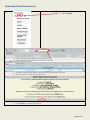
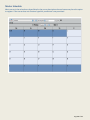
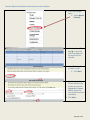
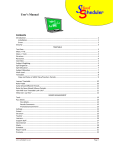
User Manual Employee Training Center [email protected] (760) 750‐4383 Page 1 of 32 Contents Introduction to ETC: ......................................................................................................................................................................... 3 Dashboard Overview: ...................................................................................................................................................................... 3 Left Plane: ........................................................................................................................................................................................ 3 Center Plane: .................................................................................................................................................................................. 3 Key Terms: ........................................................................................................................................................................................... 4 My Menu: .............................................................................................................................................................................................. 4 LearnerWeb Icons:............................................................................................................................................................................ 5 Requirements and Tips ................................................................................................................................................................... 6 Disable Pop-up blockers ............................................................................................................................................................ 6 Running JavaScript....................................................................................................................................................................... 6 Updating JavaScript ..................................................................................................................................................................... 7 How to Log In to ETC: ....................................................................................................................................................................10 How to launch a course from your Learning Track ...........................................................................................................11 Manager Menu:.................................................................................................................................................................................12 How to Run a Report:.....................................................................................................................................................................13 Edit an existing Report: ............................................................................................................................................................14 Example on how to pull a Report: ........................................................................................................................................15 Create a Flexi-group: ......................................................................................................................................................................17 Creating a Learning Track: ..........................................................................................................................................................19 Add Course(s) to Learning Track:.............................................................................................................................................21 Add Learners to a Learning Track Automatically Using ..................................................................................................24 Add Learners to a Learning Track Manually: .......................................................................................................................25 Removing a Learning Track from a Learner:........................................................................................................................28 Removing Course from Learner: ...............................................................................................................................................29 Master Schedule: .............................................................................................................................................................................30 Use the Master Schedule to add courses to the calendar:...........................................................................................31 Page 2 of 32 Introduction to ETC: Your ETC (Employee Training Center) provides the ability to deliver, manage, track, and market learning content. All of your learning needs, whether online, instructor led, or outside of the organization, can be coordinated in one easy to use location keeping you up to date and on target. Additionally, you can manage compliance requirements; keep up to date on certifications, run reports, and more. ETC is highly configurable allowing you to create the learning system you need with the look and feel you want. Dashboard Overview: The home screen is referred to as the dashboard. You may access the dashboard by clicking on ‘My Dashboard’. The dashboard is visually divided up into two sections: the left and center pane. Left Plane: Within the navigation bar on the left hand side of the page there are two menus: My Menu & Manager Menu My Menu: All learners will see this on their dashboard. This contains links that all learners have access to. The links in this area will allow the learner to navigate through the Employee Training Center. Manager Menu: Managers Menu provides navigation to all of the managers, system administrator needs within LearnerWeb. Only people with certain access levels will see this menu on their dashboard. Center Plane: The center pane gives the learner a quick snapshot of their training. It consists of three sections: My Learning Track, My Current Enrollments and Completed Training. MyLearningTracks: This section contains a listing of all the learning tracks that you (person who is signed in) are responsible for completing. Some people may not have any. This depends on job requirements and supervisor preferences. My Current Enrollments: This is a snapshot of what classes you are currently enrolled in. This is not a complete list of all the classes that you are currently enrolled in. For a complete list you will need to click on the My Enrollments link in the My Menu bar. Completed Training: This is a snapshot of the last 5 classes completed. For a full list of your completed training you can click on the My Reports link and run a Transcript of completed training Page 3 of 32 Key Terms: Course Catalog: Click on the yellow folder icon to open a catalog. You can see additional information about the course by clicking the title. Course: This is the description of the class My Learning Track: These are the courses assigned specifically to you. The list includes courses you have completed and courses that still need you to take actions, such as launch, to complete. Days Valid: This is the amount of time that the class is available for (set by the instructor or department’s Preferences) Employee Training Center: This is the name of the website that hosts training and training activities Event: This is an occurrence/instance of the course LearnerWeb: This is the name of the software that the Employee Training Center uses Location: This refers to the name of the building (Example: Academic Hall) Manager: This is the MPP of a department on campus. Security Profile: This is the access that you have within the Employee Training Center system. Venue: This is the room location of the training (Example: Room. 204) My Menu: All learners will see this on their dashboard. Links in this area will allow the learner to navigate through the Employee Training Center. My Dashboard: This link will navigate you back to the ETC home page. My Transcript: My Transcript: Lists all of the courses you have started, finished, cancelled, or courses that are In Progress. My Enrollments: Lists on-line courses you are currently enrolled in and instructor led courses you are signed up to attend. Page 4 of 32 My Requirements: Includes all required courses based on individual position, company requirements, and compliance requirements. Course Catalog: Shows all of the courses that are offered through the Employee Training Center. All online classes are found and registered through this link. Search Course Catalog: This is a search feature that allows you to search for a class using the catalog or a keyword. Schedule: Opens a calendar of upcoming events. Hover over an event for description, location, etc. Contact Information: ETC Administrator Contact Information Logout: You can logout from two locations: My Menu, or click Logout in the upper right hand corner of the Dashboard. Failing to log out properly will temporarily disable you from logging into the Employee Training Center from another computer. If this occurs you will be timed out for about 20 minutes. After that time you should be able to log back into the Employee Training Center from any computer. LearnerWeb Icons: Page 5 of 32 Requirements and Tips Recommended Internet browsers for online courses: Internet Explorer for PC Safari for MAC **Make sure all pop-up blockers are disabled (see instructions below) Disable Pop-up blockers Internet Explorer 9 or higher: Go to Tools, Internet Options Privacy Tab Select or clear “Turn on Pop up Blocker” check box Click ok. Internet Explorer 8 or below: Go to Tools Pop-up Blocker Turn off Pop-up blocker Safari: From the Safari Menu make sure Block Pop-up window is unchecked Running JavaScript Launch desired training course Launch page will open and should remain open through out the training. A java application window will appear Click Run. Click on Click Here to Launch the Course on the Launch Page. The training course should load and begin. Page 6 of 32 Updating JavaScript Click Here to visit Java.com Once you are on the website, click “Free Java Download” When this page appears, click “Agree and Start Free Download” Once you see this bar on the bottom of the screen, click Run When the “Welcome to window appears, click Install Java” Page 7 of 32 Proceed to click Next to continue installing Java Be sure to save any data and opened windows before closing them Click Ok when you are finished and to proceed installing Java Java will begin to download After Java has finished downloading, this window will pop up Click Close Page 8 of 32 When this page appears, click “Verify Java Version” A new browser window will open asking to run a JAVA Detection Press the run button to start the JAVA Detection After the verification process is over, and all other necessary actions are taken the course should launch successfully Page 9 of 32 How to Log In to ETC: 1. Please use one of the recommended internet browsers: PC use Internet Explorer Mac use Safari 2. Go to the CSUSM Employee Training Center Webpage: http://csusm.edu/etc/ Click on “Portal Login” 3. Use your Campus ID and Password to login Page 10 of 32 How to launch a course from your Learning Track 1. “My Learning Tracks” can be located in the center plane of My Dashboard 2. Learning Tracks that have been assigned to the learner will be found here. 3. Click on the Track name to open your assigned Learning Track 4. Click on the Yellow Folder Icon to open a catalog. You can see additional information about the course by clicking the title 5. To start your training, select Launch under the action column. If JAVA window opens go to step 6, if not proceed to step 7. ***Please disable all Pop up blockers prior to launching a course*** 6. A new window will open asking the learner to run a JAVA ROApplet Press the Run button to start the JAVA RO Applet. 7. From here the learner will be able to launch their training. Press the Click Here to Launch the Course Link to begin your training. After the learner presses the link, the training window will pop up. **Do Not Close This Window ** * Closing pop-up windows after launching a course will terminate your training and your progress will be lost* Page 11 of 32 Manager Menu: Access levels such as: Managers, Manager/Trainer, Trainer, Trainer Assistant and Power Users and System Administrators will have access to these links. People: This link will allow the manager to view all current Learner records. Managers will be able to add, delete, view history and edit Learner records. Manager To-Do List: List of any actions that the manager needs to complete Reports: Standard reports to make compiling and tracking information easier. These reports can be filtered and sorted to tailor for the results you need. Courses: Lists a variety of courses in your catalog. This allows you to create the training environment that best fits your needs to incorporate classroom or web based courses. Master Schedule: Most courses in the calendar are hyperlinked to the course description where a learner may have the option to register. If the course does not contain a hyperlink, enrollment is not permitted. Catalog Manager: Catalogs are groupings of courses, often grouped by topic or role. Communication Manager: This feature allows the manager to customize emails for their specific needs to keep learners, managers, and trainers informed and up to date with one time or scheduled communications. Administration Menu: Manager will be allowed to use administrator functions through Security Set Up, Utilities and Managers tabs. Configuration Menu: Through this link System Administrators will access to System Configuration, Menus and Reports, Enrollment and Approval Workflow, Catalog Course and Class Type and Other Type Managers tabs. **LearnerWeb Administrator Only** Page 12 of 32 How to Run a Report: From Manager Menu Select Reports Click the Eye Icon to view the Report without filtering or editing or click the Report Name to view the available filtered reports or to edit a report. From here you can choose from a number of options including Select, Edit, Delete. Page 13 of 32 Edit an Existing Report: To add Filters: 1. Choose Column from drop down menu 2. Choose Operator from drop down menu 3. Choose Value from List To select more than one value Click Multiple and use: CRTL+click to choose several values SHIFT+click to choose group of values Repeat this process to add additional filters You can also Sort by Fields: 4. Choose Data Item from drop down menu to sort by 5. Click Ascending or Descending Repeat this process to add additional sort fields You can choose Output Style: Click Report to generate a report with headings, etc in LearnerWeb Click Grid to generate a report in a format to export to an excel spreadsheet Specify whom the report is available to by selecting from the drop down menu Name the report Click Save To Export the Report Data to Excel Click the Output to Excel Icon Open in Excel Page 14 of 32 Example on how to Run a Report: We will show how to pull a report from the LearnerWeb system using HR-COI course as an example to find learners that have completed the course and learners that are incomplete. From the Manager Menu Select Reports The following screen will provide the report names available in Learnerweb From this window select Learning Track progress by Track then by Person The following screen shows previously created reports available to view, edit or delete. ** Please do not edit or delete a report from a different Learner without their permission** For this example select Add New Filter Page 15 of 32 1. 2. 3. 4. 5. 6. 7. From the Column Section choose the drop down menu and select: Catalog ID From the Operator Section choose the drop down menu and select: Equal From the Value(s) menu enter the course ID. (For this example we will use HR-COI) From the Column Section choose the drop down menu and select: Completion Status ID From the Operator Section from the drop down menu and select: Equal Then check the box titled Multi From the Value(s) menu Select Complete and Incomplete by holding Ctrl button down on the keyboard click both Complete and Incomplete 8. From the Sort by Fields Section, In the Data Item pull down menu, select: Status Date 9. From the Output Style and Format Section, you have option to choose a Report or Grid style report. Click Report to generate a report with LearnerWeb headings Click Grid to generate a report that can be exported into Excel For this example select Grid to view in Excel 10. Choose to have your report available to all learners in the system or to only specific learners 11. Your next step will be to name the report and select Save *Note: The blacked out portion of the image above is to protect learner information. A new report will be created Click on the Excel Icon, to open in Excel Page 16 of 32 Create a Flexi-Group: From the Manager Menu Select Administration Choose the type of Flexi-group you want to work with. Course Learner Catalog Click the Green Plus Icon 1. 2. 3. 4. to open the Add a Flexi-group Wizard. Choose the parameter to filter from the Data Item drop down menu. Choose the Operator from the drop down menu. Choose the specific Value from the drop down menu. Click Multi to choose more than one value for that parameter. Add another filter or Click Next. Page 17 of 32 Click Name and Create this Flexi-group Click Next Choose Domain Key from the drop down menu Name the Flexi-group Click Next Choose Test the Flexi-group Click Next Page 18 of 32 Creating a Learning Track: From the Manager Menu Select Catalog Manager Click the Green plus sign to open the Add a Catalog Wizard Click Learning Track Click Next Items with an * are required Page 19 of 32 For a Catalog or Learner Track, required items include: 1. 2. 3. 4. 5. Catalog ID – Alpha numeric Catalog Name – Alpha numeric Catalog Type – Confirm this is a Learning Track Status – Choose Active, Inactive, or Pending from the drop down menu. * Default is Active Permanent Assignment – click Yes or No. *Default is No Items that are not required include Training Area – Choose from drop down menu Number of Credits – Can be left blank Effective from Date Effective to Date Click Save and Close Window Page 20 of 32 Add Course(s) to Learning Track: From the Manager Menu Select Catalog Manager Find the Learner Track to add to the course to Click the Green Info Icon in the action column Click on the Courses Tab Then click on the Green Plus Icon to open the wizard Choose Course Click Next Page 21 of 32 Click Next (for all choices) , or enter the Course ID if you know it Click the Course you want to add to this Learning Track Click Next Hold down the CRTL key and click to choose individual courses. Hold down the SHIFT key and click to choose a range of courses Page 22 of 32 Choose to make the courses Required or not You can make the Learning Track not required and go into the Learning Track list of courses to make specific courses required Choose a Due Date Fill in the number of days or Choose a due date Leave blank if you do not want to set a due date Click Next Choose whether or not to send e-mail notifications. Default should be to “Exit wizard without sending e-mail notifications” When in test mode, click Exit Wizard Without... (you do not want to fill e-mail boxes with unnecessary e-mails) Click Close Window Page 23 of 32 Add Learners to a Learning Track Automatically Using Flexi-Groups: From the Manager Menu Select Catalog Manager Choose the Learning Track you want to assign and click the Green Circle Icon Click the Assignment Criteria tab to assign Flexi-group Click the Green Plus Icon Choose the Flexi-group(s) you wish to add Click Next Click Close Window The Flexi-group is now assigned to that Learning Track Click the Wand Icon to execute assignment, or the changes you made will not take affect Page 24 of 32 Add Learners to a Learning Track Manually: From the Manager Menu Select Catalog Manager Choose the Learning Track Click the Green Circle Icon to select the Learning Track you wish to modify Click the People Tab to manually assign learners. Click the Green Plus Icon to assign people to Learning Track Page 25 of 32 This window allows you to narrow the choices of people to add. You can type in an individual’s LearnerID or Last Name. You can also search by partial LearnerID or Last Name (For example, you can enter “Smi” and the system will return all Last Names that contain “Smi”. If you want all learners in the system, leave the Last Name box empty. Search for any Learner using the criterion above to assign them to the learning track Click Next You can choose Multiple Learners Hold CTRL + Shift and click first and last Learner for blocks of Learners Hold CTRL and click specific Learners Click Select All box to select all Learners listed Click Next Page 26 of 32 If you need to add additional Learners, click Add More People Otherwise, click Update Learning Track Click Next, to update the Learning Track From this window, you will have the option to use the default due date, which is the date the track was created, or you can click the calendar icon to select a new due date. Select “Do not send e-mail…” this feature is still under development Click Next This screen will show how many learners have been added successfully added to the learning track Click Next Page 27 of 32 Removing a Learning Track from a Learner: From the Manager Menu Select Catalog Manager Your Catalog Manager will display all current Learning Tracks available in your LMS Catalog Select the Learning Track you plan to change Enter the name of the learner in the search bar that you wish to remove from the learning track Click the red “X” located under the action column Verify that the information located on the Remove a Learner from a Catalog screen is correct. Click Delete to complete this action Page 28 of 32 Removing Course from Learner: From the Manager Menu Select People Enter the name of the learner in the search bar Select the learner profile that needs to be modified Locate the course that needs to be removed from the learner profile Click the red “X” under the action column Verify that all the information on the Delete a History record for a Learner screen is correct Click Delete to complete the action Page 29 of 32 Master Schedule: Most courses in the calendar are hyperlinked to the course description where a learner may have the option to register. If the course does not contain a hyperlink, enrollment is not permitted. Page 30 of 32 Use the Master Schedule to add courses to the calendar: From the Manager Menu Select Master Schedule Click the Green Plus Icon to open the Add Class Wizard at the top left of the calendar Select Training Event to add a Course Click Next Add Scheduled Event Wizard will allow the learner to enter the Course Id or Course Title to select the course that need to be scheduled. Click Next Page 31 of 32 1. Select the Course you wish to schedule 2. Choose the Start Date by clicking the Calendar Icon 3. Enter a Start time(with am or pm) 4. Choose Time Zone 5. Choose Delivery (Instructor Led, Webinar, etc) 6. Choose Location 7. You have the option to select Trainers 8. Select Venue and add Directions if needed 9. Click Next After your course information has been entered the final screen will prompt the learner to Save the class and exit the wizard. Click Next Page 32 of 32