1
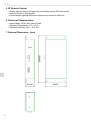
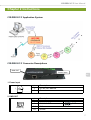
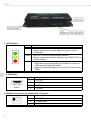
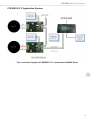
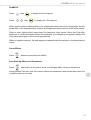
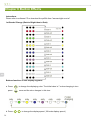
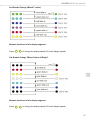
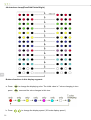
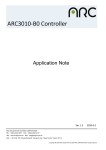
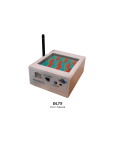
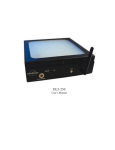
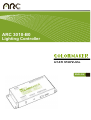
ARC 3010-B0
Lighting Controller
USER MANUAL
ENGLISH
38
Contents
Chapter 1 Features of COLORMAKER
Specifications and Features........................................................................ 5
Chapter 2 Instructions
COLORMAKER Application System........................................................... 7
COLORMAKER Connector Descriptions.................................................... 7
Basic Application Connection Diagram....................................................... 9
Chapter 3 Installation
Basic Requirement of Computer................................................................. 10
Installation of LightShow Pixel.................................................................. 10
Chapter 4 First Running
Entering LightShow Pixel.......................................................................... 14
Language Setting........................................................................................ 14
System Setting............................................................................................ 14
New Project Wizard Creating for the Effect Edit and Download................. 15
Basic Effect Edit and Download.................................................................. 18
EN
Chapter 5 Remote Control
Instructions.................................................................................................. 22
Turn on/off Effects....................................................................................... 22
Choose Effects(40 segments)..................................................................... 22
Pause Effects.............................................................................................. 23
Save Start-Up Effects and Parameters....................................................... 23
2
COLORMAKER User Manual
Contents
Chapter 6 Built-In Effects
Instructions................................................................................................ 24
1st Graded Change(Dark to Bright then to Dark)...................................... 24
2nd Graded Change(Mixed 7 Colors)....................................................... 25
3th Graded Change(Mixed Colors all Bright)............................................ 25
4th Interleave Jump(Even/Odd Points Bright)........................................... 26
5th Forward Gray Colors(Bright to Dark).................................................. 27
6th Forward Gray Colors(Dark to Bright).................................................. 28
7th Forward 7 Fade in & out Colors.......................................................... 29
8th Forward Rainbow Colors.................................................................... 30
9th Forward Mixed 7 Colors...................................................................... 30
10th Interleave Jump between 7 Basic Colors.......................................... 31
11th Interleave Jump in Rainbow Colors................................................... 31
12th Throw Out Colors.............................................................................. 32
13th Light Colors In Scanning................................................................... 33
14th Forward & Fold Colors...................................................................... 34
15th Fixed Colors(One Point Only)........................................................... 35
16th Fixed Colors(All Points)..................................................................... 35
Chapter 7 Troubleshooting
EN
Troubleshooting......................................................................................... 36
3
Before Installation
List of Consumables or Assembly Components
Please make sure the following items are included.
Remote
Control
USB
Adaptor
RJ-45
Connector
EN
Terminal
Blocks
4
COLORMAKER User Manual
Chapter 1 Features of COLORMAKER
Specifications and Features
Applying standard DMX512 protocol, COLORMAKER creates various color and brightness for
DMX512(or ARC unique
)-like lighting fixtures. Together with COLORMAKER, a userfriendly application interface called LightShow Pixel is included. With LightShow Pixel, user
may easily design or edit their own lighting effects in the computer, and then download the
effects to the controller through USB port. To show different lighting effects, users may simply
use IR remote control to choose. COLORMAKER is suitable for the applications like LED walls,
advertising signage, and architecture lighting.
1. System
• 32 bit ARM CPU, 20MHz
• Flash Memory 2048K Bytes
• USB To UART IC
2. I/O Port
•
•
•
•
IR Remote Control (≦8 m)
USB-A Adapter (USB2.0 compatible)
RS485 Synchronize Connector (RS485 output signals)
RJ-45 Network Adapter (DMX512 /
output signals)
EN
3. Display-Control Capability
• DMX512 : Control a maximum of 170 pixels RBG LED light
•
: Control a maximum of 256 pixels RBG LED light
4. Lighting Effects
•
•
•
•
Built-In : 16 segments
User-defined : 16 user-defined display segments (edited with software)
Compound : 8 segments from 1 to 32 compound segments (edited with software)
Memory space of the controller is about 2M Bytes, which can be divided into 16+8 display
content segments.
• Display lighting effects are stored with ARC self-developed technology, which can decide
the size of the display segments according to the change ratio and refresh frequency.
• Enable to set the display schedule in compound lighting effects.
5
5. IR Remote Control
• Display lighting effects (40 segments) and display speed (20 levels speed)
• Select to Pause or Stop display
• Current display lighting effects and speed can be stored for Start-Up.
6. Electrical Characteristics
• Input Voltage: DC8V~24V/ about 1Watt.
• Operating Temperature: 0°C ~ 60°C
• Operating Humidity: 20% ~ 90% RH
7. External Dimension : (mm)
162.6±0.2
EN
30±0.01
6
68±0.2
COLORMAKER User Manual
Chapter 2 Instructions
COLORMAKER Application System
COLORMAKER Connector Descriptions
DMX OUT
Power Input
EN
1. Power Input
pin
1
2
Description
1
DC 8V~24V abot1W
2
Ground
2. DMX OUT
pin
1
RJ45(母)
Description
1
DMX512 OUT+
OUT+
2
DMX512 OUT-
OUT -
3-6
N/A
7-8
Gound
7
3. LED Indicator
Color
Description
Green
DC Power Indicator :
Being extinguished indicates bad wire or power input is
unavailable.
DMX OUT RS-485Communication Indicator :
Being extinguished indicates malfunctions in DMX OUT line
of the controller.
Communication Status Indicator :
1.Flash when receiving signals from IR Remote Control or
USB communication instructions.
2.Lighting consistently when the controller is in slave mode.
(ID≠0)
Yellow
Red
EN
4. USB Input
pin
USB-A
Description
1
DC +5V
2
USB Data : -
3
USB Data : +
4
Ground
5. RS485 Synchronizing Communication Connector
pin
8
Description
1
RS485 Data : +
2
RS485 Data : -
3
Ground
COLORMAKER User Manual
COLORMAKER Application System
The connection diagram of COLORMAKER connected to DA3600 Driver
EN
9
Chapter 3 Installation
Basic Requirement of Computer
•
•
•
•
•
•
IBM PC Pentium III 500Hz or above compatible
Memory Capability : 256MB SDRAM or more
Free Space on hard disk : 15MB or more
Video Card : SVGA (Minimum resolution 1024x768)
P/S 2 Mouse
Windows 2000, 2003, Windows XP Vista or Windows 7
Installation of LightShow Pixel
1. Execute Setup.exe and the Welcome page appears
EN
10
COLORMAKER User Manual
2. Click (Next) and the License page appears
3. Click"I accept.."and then click(Next)to set Install directory
(The default dir is C:\Program Files\ARC-Controller)
EN
11
4. After changing the install directory, click(Next)to show the(Ready to Install the
Program)and (user information page)
5. Click(Install)to begin installation
EN
12
COLORMAKER User Manual
6. After the installation, the following page appears
7. Click(Finish)to complete the installation and users are able to find the following
icon on the desktop.
EN
and shortcut in the (Programs)
13
Chapter 4 First Running
Entering LightShow Pixel
1. Double click the icon
on the desktop.
2. Click the shortcut (LightShow-Pixel Editor)entering the program.
Language Setting
When the software is used for the first time, user may choose suitable language environment
to operate. Through GUI language setting in the system, user may switch from one language to
the other. Currently, LightShow Pixel only supports three types of languages : English, Chinese
Traditional, and Chinese Simplified. And default setting is English.
System Setting
The system setting of LightShow Pixel consists of two items : "Communication Port" setting
of the controller, and "GUI Language" setting. "GUI Language" setting has been discussed in
the above : user may use it to select desired operating language. While for "Communication
Port" setting, user is suggested to select "AUTO", which means that users does not need to
change this item. The controller, when connecting, shall decide automatically which type of
communication port is to be used.
EN
14
COLORMAKER User Manual
New Project Wizard Creating for the Effect Edit and Download
1. Enter item and click “Create a new project by wizard” to add new project.
2. Enter basic data of item and go into fixture layout page by pressing next step
EN
15
3. Enter fixture data. LightShow Pixel provides five fixtures of different types for newly added
selection. When fixture data is entered, go into edit page of lighting effect by clicking next step.
4. Edit lighting effect data. LightShow Pixel provides built-in lighting effect for newly added
selection. When edit of lighting effect finishes, execute simulation by clicking next step and
create display file page.
EN
16
COLORMAKER User Manual
5. Simulation and Create display file. When lighting effect display file finishes,
go into data download page by clicking next step.
6. Lighting effect is downloading into the controller and this segment is set up and
shown. The whole project is completely edited.
EN
17
Basic Effect Edit and Download
1. Enter and click"Create a new project"
2. Add new fixture by dragging.
EN
18
COLORMAKER User Manual
3. Picture of newly added lighting effect is shown by dragging
4. Simulation and Create Display file
EN
19
After saved in files, simulated display is shown in following graph:
5. Click "download program to controller"
EN
20
COLORMAKER User Manual
When download function is executed, the communication status will be shown in the
following graph.
4. Execute and set "Display setting"
EN
21
Chapter 5 Remote Control
Instructions
The COLORMAKER controller can support a maximum up to 170 pixels or RGB lighting
fixtures. Within COLOR MAKER, there are 32 segments of individual lighting effects, 8
compound segments, and 20 levels display speed selections. In some of these segments,
colors, locations and brightness may be changeable. Of the 40 segments of lighting effects, the
1st~16th segments are built in, and cannot be changed, while the 17th ~40th segments can be
changed with software Edit and Download.
The Remote Control instructions :
EN
Turn on/off Effects
Press button
to turn on/off lighting effects.
Choose Effects(40 segments)
Press number keys
and then press
22
COLORMAKER User Manual
EXAMPLE
Press
then
Press
to display the 2nd segment.
then
to display the 17th segment.
When switch between lighting effects, the speed parameters will not be changeable, but the
parameters of the displayed color, location and brightness will be restored to the initial values.
Refer to each lighting effect instructions for respective initial values. When the 33rd~40th
segments of compound lighting effects are employed, the changes in the speed, location and
color parameters apply to the current segment only.
When in segment carousel, the next segment parameters will be restored to the download set
values.
Pause Effects
Press
button to pause/stop the effects
Save Start-Up Effects and Parameters
Press
and hold for 3 seconds or more, until all lights blink 3 times to indicate the
saving finishes.This can save the current effects and parameters and reload them when the
controller starts up next time.
EN
23
Chapter 6 Built-In Effects
Instructions
Please refer to software CD or download the pdf file from "www.arclight.com.tw"
1st Graded Change (Dark to Bright then to Dark)
EN
Buttons functions in this display segment :
a. Press
press
b. Press
24
to change the displaying color. The initial value is 7 colors changing in turn.
once and the color changes in this turn :
to change the display speed ( 20 levels display speed )
COLORMAKER User Manual
2nd Graded Change (Mixed 7 colors)
Buttons functions in this display segment :
Press
to change the display speed (20 levels display speed)
3rd Graded Change "Mixed Colors all Bright"
EN
Buttons functions in this display segment :
Press
to change the display speed (20 levels display speed)
25
4th Interleave Jump(Even/Odd Points Bright)
EN
Buttons functions in this display segment :
a. Press
press
b. Press
26
to change the displaying color. The initial value is 7 colors changing in turn.
once and the color changes in this turn :
to change the display speed ( 20 levels display speed )
COLORMAKER User Manual
5th Forward Gray Colors (Bright to Dark)
16 gray colors of red forward
16 gray colors of green forward
16 gray colors of yellow forward
16 gray colors of blue forward
16 gray colors of purple forward
16 gray colors of indigo forward
16 gray colors of white forward
EN
Buttons functions in this display segment:
a. Press
press
b. Press
to change the displaying color. The initial value is 7 colors changing in turn.
once and the color changes in this turn :
to change the display speed ( 20 levels display speed )
27
6th Forward Gray Colors(Dark to Bright)
16 gray colors of red forward
16 gray colors of green forward
16 gray colors of yellow forward
16 gray colors of blue forward
16 gray colors of purple forward
16 gray colors of indigo forward
16 gray colors of white forward
EN
Buttons functions in this display segment:
a. Press
press
b. Press
28
to change the displaying color. The initial value is 7 colors changing in turn.
once and the color changes in this turn :
to change the display speed ( 20 levels display speed )
COLORMAKER User Manual
7th Forward 7 Fade in & out Colors
Buttons functions in this display segment:
a. Press
press
b. Press
EN
to change the displaying color. The initial value is 7 colors changing in turn.
once and the color changes in this turn :
to change the display speed ( 20 levels display speed )
29
8th Forward Rainbow Colors
selected colors forward
max.170
selected colors forward
selected colors forward
selected colors forward
Buttons functions in this display segment:
Press
to change the display speed ( 20 levels display speed )
9th Forward Mixed 7 Colors
EN
red forward to green
green forward to blue
blue forward to red
Buttons functions in this display segment:
Press
30
to change the display speed ( 20 levels display speed )
max.170
COLORMAKER User Manual
10th Interleave Jump between 7 Basic Colors
Buttons functions in this display segment:
Press
to change the display speed ( 20 levels display speed )
11th Interleave Jump in Rainbow Colors
EN
uttons functions in this display segment:
Press
to change the display speed ( 20 levels display speed )
31
12th Throw Out Colors
locate red color
locate red color
locate red color
locate red color
stop for 3sec
locate red color
locate red color
locate red color
locate red color
locate red color
locate green color
locate green color
locate green color
locate green color
EN
Buttons functions in this display segment:
a. Press
press
to change the displaying color. The initial value is 7 colors changing in turn.
once and the color changes in this turn :
b. Press
to change the display speed ( 20 levels display speed )
c. Press
to change the display width. The initial value is 4(fixtures).
32
COLORMAKER User Manual
13th Light Colors In Scanning
Buttons functions in this display segment:
a. Press
press
EN
to change the displaying color. The initial value is 7 colors changing in turn.
once and the color changes in this turn :
b. Press
to change the display speed ( 20 levels display speed )
c. Press
to change the display width. The initial value is 4(fixtures).
33
14th Forward & Fold Colors
locate red color
locate red color
locate red color
locate red color
stop for 3sec
locate red color
locate red color
locate red color
locate red color
locate red color
locate green color
locate green color
locate green color
locate green color
EN
Buttons functions in this display segment:
a. Press
press
to change the displaying color. The initial value is 7 colors changing in turn.
once and the color changes in this turn :
b. Press
to change the display speed ( 20 levels display speed )
c. Press
to change the display width. The initial value is 4(fixtures).
34
COLORMAKER User Manual
15th Fixed Colors(One Point Only)
Entering this segment, the first point displays the brightest Red
all black.Buttons functions in this display segment:
a. Press
,while the other points are
to change the displaying color, and the displaying color will blink once to
remind the user. The initial color is red. Press once
and the color changes in this turn :
b. Press
to change the brightness of the colors (256 brightness levels altogether )
c. Press
to change the displaying the light points. The first point is initial.
(range from 1~170 point).
16th Fixed Colors(All Points)
Entering this segment, the first point displays the brightest Red
all black.Buttons functions in this display segment:
,while the other points are
EN
a. Press
to change the displaying color, and the displaying color will blink once to
remind the user. The initial color is red. Press once
and the color changes in this turn :
b. Press
to change the brightness of the colors (256 brightness levels altogether )
c. Press
to change the displaying the light points. The first point is initial.
(range from 1~170 point).
35
Chapter 7 Troubleshooting
Troubleshooting
Please refer to the following problem causes and solutions before sending the controller for
repairing. If the problems remain, contact the local dealers or service center.
Problems
Power Indicator (green) off.
Other lights off.
Cause
AC to DC 12V adaptor
damaged
Constant voltage line of the
controller damaged.
Power indicator (green) on
DMX OUT controlling signal
DMX OUT indicator (yellow) on units in the controller damaged
Solution
Change AC to DC 12V Adaptor
When changing to non-OEM
Adaptor, pay attention to +/poles.
Send back to service center.
Send back to service center.
Connection error
Recheck DMX+ and DMX
connection
Contact failure
Recheck DMX+- contact status
Switched to “Display OFF”
mode
Press the power button of the
controller.
Switched to “Display Pause”
mode
Press the “Pause” button of the
controller to continue display.
Choose fixed color segment
15 or segment 16
Choose other segments to see if
they display normally.
Current displayed segment is
empty
Switch to segments with content
DMX OUT switched to
Open the controller case to
remove JP3 JUMP
Battery failure
Replace batteries
IR receiver of the controller is
blocked
Move the controller to where
signals can be received.
IR receiver of the controller is
damaged.
Send back to service center.
USB communication failed
USB connection error
Use common USB A-USBA
cable
Windows didn’t find
USB to Serial drivers
USB to Serial controlling line
in the controller damaged
Send back to service center.
USB Driver can be found but
can not communicate with
controller to download or
control
Software communication ports
setting error
Refer to the instructions and
reset the communication ports
DMX OUT indicator (yellow)
on.
But the lights don’t display or
display abnormally
EN
IR Remote Control failed
36
COLORMAKER User Manual
Problems
Cause
Solution
The controller can not save
start-up status
Memory circuit in the controller
damaged
Send back to the service center.
The controller doesn’t
display the downloaded
effects
Not switch to the download -ed
user-defined segments
Use the controller to switch to
the downloaded segments
Display the user-defined
segments too fast / slowly
The use-defined segments
shall be displayed at the speed
of 9
Use the controller to switch the
speed to 9.
Compound effects cannot
display by schedule
Time IC damage
Send back to the service center.
Low battery or damage
Replace battery
EN
ARC SOLID-STATE LIGHTING CORPORATION
Tel : +886-2-8227-8217
Web : www.arclight.com.tw
Fax : +886-2-8227-3747
E-mail : [email protected]
Address : 14F-2 NO.700,Chung-Cheng Rd.,Chung-Ho City,Taipei County 235,Taiwan,R.O.C
37