1
Documentation
Cigre
17/10/2011
Kaliop
Ez Publish 4.x
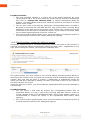
User guide
CIGRE
« www.cigre.org »
website redesign
October 17 2011
Level: Editor / Webmaster /
Editor: Sophie Imbach
Documentation
Cigre
17/10/2011
Summary
1 General principles of content management...................................................4
1.1 Login to the administration........................................................................................ 4
1.2 "Dashboard" tour....................................................................................................... 5
1.3 Contents.................................................................................................................. 10
1.4 Add and edit a content............................................................................................ 13
1.4.1 Add a content.................................................................................................... 13
1.4.2 Edit a content.................................................................................................... 13
1.4.3 Version management........................................................................................16
1.4.4 Editing conflicts management...........................................................................17
1.4.5 Publishing a content to multiple locations - management of secondary locations
(or multi positioning).................................................................................................. 20
1.5 Copy a content........................................................................................................ 22
1.6 Move a content........................................................................................................ 24
1.7 Remove a content.................................................................................................... 24
1.8 Managing the trash.................................................................................................. 26
1.9 Hide / unhide a content (or principle of validation)..................................................27
1.9.1 Hide a content................................................................................................... 27
1.9.2 Unhide a content............................................................................................... 28
1.9.3 Check the visibility status of contents...............................................................28
1.10 Media library management...................................................................................29
1.10.2 How to create a folder ?...................................................................................31
1.10.3 How to add an image to a folder?....................................................................32
1.10.4 How to add a file to a folder?...........................................................................34
2 CIGRE specific contents.............................................................................36
2.1 Management of the top and footer of page.............................................................36
2.1.1 What can you edit ? .......................................................................................... 36
2.1.2 Top of the page................................................................................................. 37
2.1.3 Footer................................................................................................................ 37
2.2 Management of the homepage ...............................................................................37
2.2.1 What can you edit ? .......................................................................................... 37
2.2.2 Slideshow and events: .....................................................................................38
2.2.3 "National Committee and Study Committee" text.............................................38
2.3 How to create blocks ?............................................................................................. 39
2.3.1 Block types........................................................................................................ 39
2.3.2 Create a free block............................................................................................ 39
2.3.3 Manage blocks in a page...................................................................................40
2.3.4 Characteristic of the blocks : ............................................................................41
2.4 Articles management............................................................................................... 42
2.5 Event management................................................................................................. 42
2.6 News management.................................................................................................. 42
2.7 User accounts (for webmasters)..............................................................................43
2.7.1 How to manage site users?...............................................................................43
Documentation
Cigre
17/10/2011
Documentation
Cigre
17/10/2011
1 General principles of content management
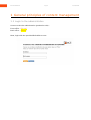
1.1 Login to the administration
Access to the site administration (production site) :
Front office : [fill out]
Back office : [fill out]
Next, login with the provided Ez Publish access.
Documentation
Cigre
17/10/2011
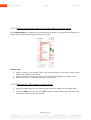
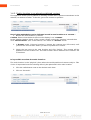
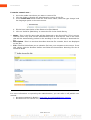
1.2 "Dashboard" tour
Once connected, you will reach the Dashboard screen which gives you an overview of
your latest activities (drafts, created and modified items...), and latest publications from
other users.
You can click on the title of the item you want to reach, or directly on the icon
to edit
it. By clicking on the title, you can preview the content as a whole, ie see all the fields
filled out.
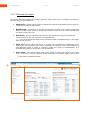
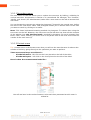
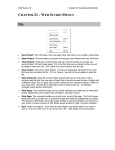
Presentation of the different areas of the "Dashboard" screen :
Main menu
Central interface : quick access to the latest articles, items posted on the site,
drafts. Note that the window layout can be customized using a drag and drop
system
Personalized menu : quickly reach the different features of your space
(password, profile, drafts, bookmarks, notification, etc)
Documentation
Cigre
17/10/2011
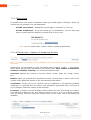
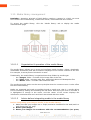
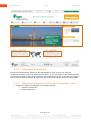
1.2.1.1 Organization of the administration site
The main menu (1) has two main tabs.
These tabs provide access to different parts of the administration interface.
Contents
The "Content" tab displays the structure of the site and the items associated with each
level of this structure. It contains a set of folders and subfolders. Some refer to front
office sections of the website. Others are folders that are only used for the administration
of the site (and operation). They are not visible on the FO.
This tab makes it possible to create the public website's general tree with all its
categories, sections and web pages.
For ergonomic purpose, only the first levels are represented in this tree. Other
existing contents appear in the main area under "sub items".
The current item is distinguished by a bold and orange text.
Media library
The "Media" tab will display all the media stored on the website (files, images, videos).
This is reflected in the left menu by a tree similar to the "content" tab covered above. A
folder and subfolder scheme can simply store your media.
Note : the term "Media" is a misnomer. This is only a simple storage grouping media
that are related to web contents of a site. This area does not offer advanced features
such as those proposed by a media management tool (e.g. Ajaris).
For administrators, a third tab allows you to manage all user accounts :
User accounts :
The "User Accounts" tab allows administrators to view and access users informations. It is
possible to access the various groups that have been created and allows administrators
to create, edit or delete a user account.
Documentation
Cigre
17/10/2011
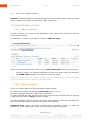
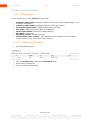
1.2.1.2 General principles
The areas described below are always present. They allow you to smoothly navigate to
perform any kind of operation.
1. Main menu : allows you to quickly change the interface depending on the type of
content you want to administer.
2. Breadcrumb : allows you to quickly identify the location of a content (especially
when you are using "search" to look for a content). You can trace each parent item
to reach it with one click.
3. Sub-menu : Once in the desired interface, the sub-menu lets you browse the
various trees on the site (content or media library).
Tip : you can enlarge the width of the sub-menu with a navigation bar on the right
side of the column.
4. Main area : every time you reach a content, its information is displayed in the
main area. The top part allows you to manage this content, "sub items" shows you
the different types of items it contains. Under the rules of management, it is
possible that several "sub items" are intertwined.
5. User panel : This panel opens and closes easily to make the most of the main
area. To do this, click the double arrows located in the upper right of the screen
. This panel is detailed below.
Documentation
Cigre
17/10/2011
Documentation
Cigre
17/10/2011
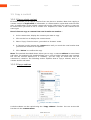
1.2.1.3 The user panel
The user panel allows each user to manage their user profile. The proposed features are :
Change information : change identity (name, password, email address)
Change password : directly change the password
Bookmarks : adds the current page to "favorites". This can be useful if you repeatedly
perform the same operations. Bookmarks are presented in § 1.3.1.2.
Locations : enables the management of locations to place a content in several places.
The module must be "activated" if you manage news, events.
View tab : shows the content preview when this panel is "activated" (see example
below). Note that disabling this panel will decrease the loading time of the page.
Tip : In general, it is recommended to reduce the user panel when not needed. To do this,
click the double arrow at the top left of this panel.
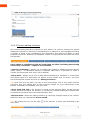
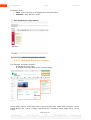
1.2.1.4 Search area / alternative browsing
The search interface allows a simple or advanced search on all items of the website. This
is also another way to browse the site.
You can enter a word or set of words to perform the search. By default, eZ Publish will
search in the current tree, ie "content" or "media library" (which is called "same location"
in the search filter).
By selecting "all", eZ Publish will search all trees on the site (content and media library).
The search engine goes through all the informations entered (ie: name, main text, image
captions, image names, etc.)
Advanced search :
The advanced search allows you to select a class (ie a type of content) and / or a date of
publication on a free search ("Search for all of the following words") or exact search
("search for an exact phrase"). Other details will not be of any use to you.
Page 9 sur 43
Documentation
Cigre
17/10/2011
1.3 Contents
The "content" tab shows the structure of the website, sorted by folders. Thanks to
management rules, storing content in a folder automatically places it in the right place on
the public website.
Below the structure you can find :
Page 10 sur 43
Documentation
Cigre
17/10/2011
1.3.1.1 Secondary menu
The tree menu on the left allows you to explore the structure by folding / unfolding its
various branches. Its operation is similar to a conventional file manager. The "Content",
"Media" and "Users" (for administrators) tabs offer a tree menu on the left to browse their
own items.
You can browse the content tree using the pictogram located in the central area, before
the title of the "sub items" table. This pictogram allows you to browse back to the item
you want to reach by clicking on its name.
Note : This latter backwards browsing method via pictogram is slower than using the
tree menu on the left. However, the tree menu on the left does not show all the contents
of the website, but only the first levels required for browsing. To reach contents (free
block, news, event, article), you must click on its parent item in the tree and locate the
content in the main area (2).
1.3.1.2 Context menu
Tip : Context menu is the browse menu that you will use the most because it reduces the
number of clicks by going directly to the operation you want to perform.
There are several ways to achieve it :
- Via the left menu : left click on the icons placed on the left of the titles,
- Via the main part : left click on the icons placed on the left of the titles.
Here is what the context menu looks like :
You will see later in the various features, what each item presented on this menu is
related to.
Page 11 sur 43
Documentation
Cigre
17/10/2011
1.3.1.3 Bookmarks
As stated in the "User Panel", bookmarks allow you to add pages to favorites. There are
several ways to manage your own bookmarks:
-
Via the "User Panel" : adding the current page to "favorites" (cf 1.2.1.3)
-
Via the "Dashboard" : in the left column via "my bookmarks", you can click "add
items" to place desired contents or media close to your clicks.
Note : you can either add a content, media, or folder to bookmarks
1.3.1.4 Central area - Options for displaying an item
Note : by default informations are not displayed. You must click the "+" button to activate
this panel
Informations are associated to each eZ Publish items (content, media ...). The display
option block groups these informations into several tabs: View, details, translations,
locations, relations, ordering. You can browse between tabs.
Overview: displays the content of an item (folder, section, page, file, image, article,
etc.).
Details: allows you to know who created the content, on what date, in which section. The
number of the published version is also an interesting information.
Translation : allows you to see contents that are published in the different provided
languages. It is possible here to create a new translation (presented later), and most of
all, to change a particular version of the language.
Locations: a content can have multiple locations within the site. This allows you to place
it at different locations on the site without having to copy it. You can edit this content
from its various locations using the content tree, but the main source will always be
modified.
Page 12 sur 43
Documentation
Cigre
17/10/2011
Note : see § 1.4.5 to "Add locations"
Relations : relations simply and automatically point to the various objects that are linked
to the content (e.g. image, file, free block, news, events, etc.).
1.4 Add and edit a content
1.4.1 Add a content
To add a content, you must first be positioned in the content tree where you want to
create a new content.
For example, in "Sudoc" if you want to create an editorial page.
Then, in the central part of the screen, in the "Create New Item" area, you must select:
-
a type of content (or editorial template) from the drop down menu. For example,
the CIGRE news template if you want to create an article.
Help: To know the "type" of existing content, click the "Table Options" button and check
"type" to make this item to appear in the table above
1.4.2 Edit a content
There are several options to edit an already created content:
The fastest edit mode is to use the context menu (see § 1.4.2.1).
It locates / displays the item to edit in the content tree.
To select and edit the item, simply click on the icon to the left of the item title to bring up
a new menu and select "edit in" (French, English ...).
It is also possible to reach it via the central part of the page by clicking on the page title,
then click the "Edit" button when you are on the page preview
Important note : when you reach a content and the buttons "create" or "edit" are
grayed out, it just means that you do not have enough rights to take part.
Page 13 sur 43
Documentation
Cigre
17/10/2011
1.4.2.1 Editing via the tree menu on the left and the context menu
The context menu is shown on the screen below. It allows you to perform operations on
items, more quickly by limiting the number of clicks.
How to use :
1. Under "Content" and "Media" tabs, use the tree menu on the left to search and
display the content to be edited.
2. Click on the icon in front of the title of the content to display the context menu
3. Select the "Edit in" command from the context menu.
1.4.2.2 Edit via the "Edit" button (central part)
1. Use the context menu on the left to select an item to display in the central part,
2. Click the View tab and click the "Edit" button located under the view area. The
system then edits the item to modify.
Page 14 sur 43
Documentation
Cigre
17/10/2011
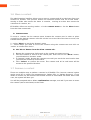
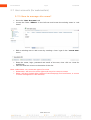
1.4.2.3 Content editing interface
The content editing interface is specific to each feature. To create a content, the system
displays an interface or edit form corresponding to an editorial or class template including
a number of fields to be completed by the contributor. The fields to fill differ on each
template (and form). However, all templates contain a single edit bar that offers the same
functionality.
Once editing is complete and all the form fields are filled (including those being
necessarily "required"), 4 options are available:
"Send for publishing" : Allows you to publish the created or updated content directly
online, that is, no validation process is required. Note that it is possible to "hide" a
content for the Internet user (see § 1.9 for details)
"Store draft" : Allows you to save a draft without publishing it. Attention, a content that
have been saved as a draft does not appear in the content tree. To find it, you must
reach the desired content and click on "Manage versions".
Tip: when you save the draft, you stay on the current page. This is very useful because
you won't lose your editing work in case of power outage. So if you edit directly on Ez
Publish, remember to frequently save your work.
"Store draft and exit" : the process is similar to the previous point, except that the
content will then be closed. For instance, if you want to continue editing this content later
and go back to another part of the administration area.
"Discard draft" : Exits the editing interface by canceling changes made to the content.
Attention: what you changed will not be saved.
Tip : By clicking the icon on the right
entry form.
in the edit bar, it tracks your browsing in the
Page 15 sur 43
Documentation
Cigre
17/10/2011
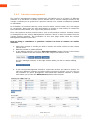
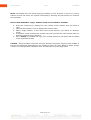
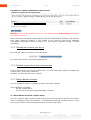
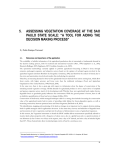
1.4.3 Version management
The version management system proposed by eZ Publish acts as a history of different
statuses of a document. It allows you to discard one or several changes made to the
content. It allows you to go back to a previous version of a content created and updated
on eZ Publish.
In eZ Publish, all contents (articles, news, but also home, section index, etc.) are subject
to "versioning". Each time you edit (and update) a content, a new version is created for
that content (called draft), as a copy of the previous version.
Thus, the previous version remains intact, such as all previous versions. Content version
is managed from the Version Management interface, which is itself accessible from the
content editing interface. The illustration on the next page shows what the Version
Management interface looks like.
How to bring a content to a previous version? Or how to restore an earlier
version?
1. Select the content or media you wish to restore an earlier version to the current
version from,
2. Edit the content or media affected
3. In the editing interface, click the "Manage versions" button (shown in the screen
below) located in the left column and in the "object information" area,
Or click "manage versions" in the right column when you are in content editing
mode.
4. In the Version Management interface, locate the version you want to restore. To
view the different versions and select which version to restore, you can click on
the numbers (or pencil pictograms) associated with different versions. A button
also allows you to view the differences between two versions.
Page 16 sur 43
Documentation
Cigre
17/10/2011
5. Click the "Create a copy of the version" button next to the selected version. A new
item is added to the list of versions in the "Draft" status with a number
(indentation).
6. Edit this new version, made by copying, by clicking the edit button next to it. You
will return to the editing interface of the content. Tip : give a new title to the
content to easily locate it in the list of published contents.
7. At last, click on the "Send for publishing" button. The system will publish this
version and archive the previous versions.
Published version : This table shows which version is currently published. You can
make a copy by clicking on the icon to the right of the line
New drafts : This table shows new drafts that were recently created. It allows you to find
the author and the date of creation or modification.
1.4.4 Editing conflicts management
Due to the collaborative nature of eZ Publish, conflicts in the content editing may occur.
This usually happens when two people edit the same content. Another case of conflict
often occurs when a person leaves the editing interface without publishing the content.
Whatever the cause, it is an issue that will sooner or later occur in the life of the website
and needs to be dealt with.
Note : when you are on a content, always choose between the different options proposed
by Ez Publish : Send for publishing, store draft, store draft and exit, discard draft.
UNDER NO CIRCUMSTANCES should you use the menu "previous" / "next" of
your Internet browser (Internet Explorer, Firefox, Chrome) when you are on the
form of content.
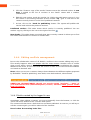
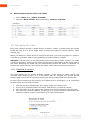
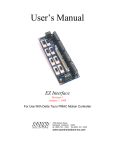
1.4.4.1 Drafts created by the logged in user
Sometimes, when editing a content, you may accidentally close the browser, or click the
"Save and Close" button of the "Current draft" panel.
The content will then have a draft that has not been published. As soon as you will try to
edit the content again, you will be alerted of the situation.
Here is what the warning looks like :
Page 17 sur 43
Documentation
Cigre
17/10/2011
The system informs you that you have already started editing the content, but have yet
to publish it. In this example, only one draft is spotted, but there may be several.
Page 18 sur 43
Documentation
Cigre
17/10/2011
Possible solutions :
• The most standard solution is to select one of the drafts (generally the most
recent) and to edit it. To do this, select the desired version from the conflict page
then click on "Change the selected item". If several unpublished drafts are
present, you should delete them first to avoid the conflict to come back in a future
edition of the content
• You can also create a new draft by clicking the corresponding button, and edit it.
But keep in mind that the new draft will be a copy of the version currently being
published, so the draft open to the source of the conflict may contain more recent
information and texts than the published version. If you create a new draft, make
sure to delete open drafts that cause the conflict too
• The "Cancel" button simply allows you to cancel the editing, leaving the system as
it stands and the conflict on the content editing still ongoing.
1.4.4.2 Draft problem created by different people
Sometimes another person is currently editing the content you want to edit yourself, or
someone has left the editing unexpectedly, leaving his draft "open", unpublished. In any
case, when editing the content, you will get the following alert:
The system advise you to be careful in the content editing, because another person is
working on this content. First, note that there may be several unpublished drafts for this
content. Also note that the date of creation / modification of unpublished drafts can
inform you that this is perhaps an editing "accident" (if the date is old) or a real conflict if
the date and time are recent.
Unlike the previous scenario, you cannot edit the unpublished draft, because it belongs to
someone else.
Possible solutions
• You can create a new draft by clicking the corresponding button. But, as
mentioned above, it is only a copy of the currently published version. It will not
include changes made to the unpublished draft, source of the editing conflict. It is
recommended to contact the owner of the unpublished draft before doing
anything
• The "Cancel" button simply allows you to cancel the editing, leaving the system as
it stands and the conflict on the editing still ongoing.
Page 19 sur 43
Documentation
Cigre
17/10/2011
1.4.4.3 Problems with drafts created by several people, including yourself
This case corresponds to the accumulation of two problems mentioned above. The
system informs you as follows:
This is the most critical case. You should consult with others involved in the conflict
before continuing editing. Furthermore, you must get rid of your own unpublished drafts.
Note that this case is to be resolved as quickly as possible because it tends to generate a
vicious cycle that adds even more unpublished drafts to the conflict.
1.4.5 Publishing a content to multiple locations management of secondary locations (or multi
positioning)
EZ Publish allows you to publish a same content in various locations in the content tree.
For example, you can display a news in several places on your website.
It is essential to understand that publishing a content in many places, does not copy this
content in multiple places. Each selected location points to the same content. In other
words, if you change the content from one of its locations, changes will be visible from
all the locations defined for the content. Two solutions are possible: add a location
to a content that was published, or publish a new content to multiple locations
simultaneously (this shall be done when editing the content in question). Here are the
details of these two solutions.
Page 20 sur 43
Documentation
Cigre
17/10/2011
1.4.5.1 Add a location to an already published content
This approach allows you to publish an existing content that is present somewhere in the
website, to another location. To do this, go to the content in question.
Here is the methodology to be followed to add a new location to a content :
1. Browse the tree to select a content.
Caution: Ensure that the back-office's main display is on "content".
In the "Display Options" block of the current content, select the "location" tab and then
click "Add locations" (see screen above). You switch to "browse" mode.
2. In browse mode ("Choose locations"), browse the content tree (left menu) until
you find the new location where you want to publish the content.
3. Check the box next to the new location and click "Select". The content will be
published on this location too. The new location will be added to the content's list
of locations.
It is possible to select the main location :
The main location is the "physical" place where the multi-positioned content really is. This
choice is important because indexing will only be optimized in this main location.
1. Click the radio button next to the desired main item
2. Click on "Set main"
Page 21 sur 43
Documentation
Cigre
17/10/2011
1.5 Copy a content
1.5.1.1 Copy a single content
EZ Publish allows you to copy a content from one place to another. Note that copying a
content creates a duplication of information. A content and its copies both exist on their
own. A modification of the original content will not be reflected in its copies. A copy can
be useful when you want to use a content as a template to create a new content of the
same type.
Here is how to copy a content from one location to another :
1. In the content tree, display the content you want to copy.
2. Click on the icon to display the context menu
3. Select "Copy" from the menu, you switch to "browse" mode
4. In "browse" mode, browse the content tree until you reach the new location that
you want the content to be copied to
5. Click "Select" to confirm the copy.
Note: The method described above allows you to copy a content without its associated
sub items. For example, this method allows you to copy a folder (container type content)
but not the articles attached to it. Similarly, you can copy an article but not the
comments it contains. The following section explains how to copy a subtree, that is, a
content and its sub items.
1.5.1.2 Copy a subtree
A whole subtree can be copied using the "Copy subtree" function. You can access this
function via the context menu
Page 22 sur 43
Documentation
Cigre
17/10/2011
Note : eZ Publish does not allow copying a subtree of over 30 items. If you try to copy a
subtree of over 30 items, the system will display a warning and will decline to continue
the operation.
Here is the method to copy a subtree from one location to another:
1. From the content tree, display the root content of the subtree that you want to
copy
2. Click on the content's icon to display the context menu
3. Select "Copy subtree" in the menu (see screen above), you switch to "browse"
mode
4. In "browse" mode, browse the content tree until you find the new location that you
want the content to be copied to.
5. Click "Select" to validate the copy. The content and all its sub items will be copied
to the specified location.
Caution : This procedure is delicate and your browser may abort copying in the middle of
the process (timeout) depending on the number of items to copy. When in doubt, please
contact us if the operation should be over 30 sub items or if the copy failed.
Page 23 sur 43
Documentation
Cigre
17/10/2011
1.6 Move a content
The administration interface allows you to move a content and all its sub items from one
location to another. This process moves the selected content and all its sub items :
moving a folder also moves the items it contains, moving an article also moves the
comments it contains, etc..
EZ Publish offers two moving modes : via the context menu or via the Move button
from the View content tab.
A. Context menu
To move a content via the context menu, browse the content tree in order to place
yourself on the desired content. Left-click on the icon to the left of the item to move, the
context menu appears.
1 – select "Move" to reach the "browse" menu
2 – locate where you want to move this content using the content tree and click on
"select" to confirm this choice.
B. the "Move" button from the View content tab.
1. Browse the content tree (left menu) to the content you want to move
2. Click the content to view it in the central part. Then click on the " Move" button,
you will switch to "browse" mode
3. In "browse" mode, browse the content tree until you reach the new location that
you want the content to be moved to
4. Click "Select" to confirm the move. The content and all its sub items will be
moved to the specified location.
1.7 Remove a content
There are multiple ways to delete a content in eZ Publish. The "remove content" option
works much like a classic file management's "Delete File" or "Delete directory". If you
delete a content, eZ will remove the content and all its associated sub items. But in this
case, the system will alert you.
You will be prompted with a delete confirmation message, and ask if you want to move
the content (and its sub items) to the Trash.
Page 24 sur 43
Documentation
Cigre
17/10/2011
Example of a delete confirmation alert screen :
Warning : If you uncheck "Move to Trash", the content will be permanently deleted and
you cannot recover it.
Note: you should not delete large subtrees from the administration interface. The browser
may abort (timeout) deletion in the middle of the process, leaving the database
inconsistent information. Please contact us if you need to perform "heavy" removal
operations.
1.7.1.1 Delete the content you are in
Just click the "Remove" button in the view panel.
You reach the remove confirmation page above.
1.7.1.2 Delete content from the context menu
Click on the content icon in the content tree, or in the "Sub items" panel, to display the
context menu, then select "Remove".
Similarly, an alert will ask you to confirm.
1.7.1.3 Batch delete contents
You can remove a batch of contents located in the same "parent".
Two methods are possible :
- via the context menu
- via the list of sub items associated with a content.
A - Batch Delete from the context menu
Once the "parent" item is reached, left click on the icon to the left of the title, the context
menu is displayed. Then click "Delete". A confirmation message will then ask you if you
are sure you want to remove this parent item and all its sub items.
Page 25 sur 43
Documentation
Cigre
17/10/2011
B - Batch delete from the list of sub items
•
•
Click "select" then "Select all visible"
Click the "More actions" button and select "Remove selected"
1.8 Managing the trash
Each tree (content structure, media library) includes a "trash", located in the left column
below the tree. It is in fact a single trash containing all types of content (folders, news,
images, etc).
When you delete a content and it is moved to the trash, you have the option to "restore"
it on the very location where it was published (or select another location).
Attention : all the items in the trash being at the same level (folder, article), if a folder
containing articles is removed, the folder and the articles will appear at the same level in
the trash. Restoring the folder will not automatically restore the items it contained. To
restore the entire sub-tree, first restore the folder, then restore the items one by one.
1.8.1.1 Restore a content
The trash allows you to restore deleted contents, if the "Move to Trash" option was
checked when deleting (see § 1.7). If the option was not checked, the content will be
permanently lost. Access the trash by clicking the link provided under the content tree.
An item can be restored to the location it occupied prior to its deletion, or at a specified
location. Here are the steps to follow :
1.
2.
3.
4.
View the trash by following the link "Trash" under the content tree
In the list of contents found in the trash, find the one you want to restore
Click the edit icon to the right of the content (see the screen above with the pen)
You reach the restore interface, allowing you to choose between restoring to the
content's original location (if possible) or at a specified location.
Page 26 sur 43
Documentation
Cigre
17/10/2011
5. Click "OK" to confirm restore. If you chose to define a location, you switch to
"browse" mode. Once in "browse" mode, browse the content tree until you reach
the new location that you want to restore the content to.
1.9 Hide / unhide a content (or principle of validation)
On eZ publish it is possible to hide a content so that it no longer appears on the public
site.
It is also a way to handle an intermediate step in validating the content before
publication. The content will be published but not visible ("draft 1" status) while
unhiding a content will change its status to "validated" and its status will be published
and visible.
When a content is hidden, it disappears from the front office but is accessible / visible in
the back office. When you hide a content, all the items it contains are automatically
hidden too. For example, if you hide a folder containing articles, all the articles inside the
folder will be hidden.
1.9.1 Hide a content
The easiest way to hide a content (or a content subtree) is to click on the context menu
icon and select "Hide / Unhide" in the "Advanced" sub-menu. The system will change the
visibility status of the target content.
Page 27 sur 43
Documentation
Cigre
17/10/2011
1.9.2 Unhide a content
A hidden content (or a subtree) can be revealed using the same process as that
described above. You can click on its icon in the content tree, then select "Hide / Unhide"
in the "Advanced" sub-menu. This process will make the content visible (and all the items
it contains).
1.9.3 Check the visibility status of contents
In the content tree (left column), the visibility status is shown by a particular style to the
content's wording : the wording of a visible content is on a white background, while the
wording of a hidden content is on a gray background .
In the central part, it is clearly specified in column "visibility" that the object is "hidden".
To check the visibility of a content, you can also mouse over the wording for a brief
moment (e.g. in the list of "sub items" : this will display a tool tip indicating the content's
visibility status).
A third way to check the status of a content is to display its "Locations" tab. This tab
provides detailed information (including visibility status) for all locations of the same
content. And makes it possible to reveal or hide a content on each location.
Note : a content is hidden to the location where this rule was applied. If the content is
placed in several locations (visible on the "locations" tab), then it will probably be
necessary to hide it in other parts of the content tree.
Page 28 sur 43
Documentation
Cigre
17/10/2011
1.10 Media library management
Reminder : Operation principle of CMS: Before creating a content in a CMS, you must
first create in the media library, media to be linked / associated with this content.
To access the media library, click the "Media library" tab to display the media
administration page.
1.10.1.1
Organization & operation of the media library
The media library allows you to store and configure media (images, videos, downloads,
multimedia animations) that will be linked or displayed in the various contents of the site.
For example, it stores photos included in a news.
Traditionally, the media library is organized into three folders by media type:
- the "Images" folder : includes all the image files of the site,
- the "Files" folder : includes other files, particularly Word and Powerpoint files
- the "Media" folder : includes video and Flash files.
The media generally works on the same principles that the content screen. It also offers
the same functionality.
Media are managed and made accessible through a media tree, that is, a media object
tree accessible by folding and unfolding the left menu. Each time you click on a media, it
is highlighted in orange in the menu, and the center of the screen displays the
information, administration tools and items associated with this media.
1.10.1.2
Advice before integrating media in the media library
Before integrating your images media in the media library:
1. Make sure that your images are in 72dpi (resolution intended for the web) and in a
web format (jpg, gif, png)
2. Resize your images
3. Name your images in accordance with the recommendations (no space,
Page 29 sur 43
Documentation
Cigre
no accent, put dashes as separator)
Page 30 sur 43
17/10/2011
Documentation
Cigre
1.10.2 How to create a folder ?
Two methods are possible :
From the left context menu
1.
2.
3.
4.
5.
6.
Go to the media tree where you want to create a folder
Click on the selected folder to display the context menu eZ publish
From the menu, select the option Create here and the type "folder"
The input form then opens
Fill out the form fields
Click on "Send for publishing" to create the folder
Page 31 sur 43
17/10/2011
Documentation
Cigre
17/10/2011
From the central area
1. Browse the tree and go to the media tree where you want to create a folder.
2. Locate "sub items" then in the "create new" drop down list, select the type
"folder"
3. Input form then opens
4. Fill out the form fields
5. Click on "Send for publishing" to create the folder
Tip : the system allows you to create as many folders and subfolders as you want. To
facilitate the overall management of the media library, it is recommended to avoid this
process and only create folders in consultation with the administrator of the site in charge
of the overall supervision of the site.
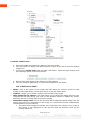
1.10.3 How to add an image to a folder?
There are two possible methods :
From the left context menu
1.
2.
3.
4.
5.
6.
Go to the media tree where you want to create an image
Click on the selected folder to display the context menu eZ publish
From the menu, select Create new and select the type "Image".
The input form then opens
Fill out the form fields
Click on "Send for publishing" to create the folder and display it in the left menu of
the media tree
Page 32 sur 43
Documentation
Cigre
17/10/2011
From the central area :
1. Go to the media tree where you want to create an image.
2. Click the folder to display the administration screen of this file to link the desired
image to it,
3. In the menu Create new under the table "Sub items", select the type "Image" and
the language option on the next screen.
4. Fill the form (description of the fields to be filled below)
5. Click on "Send for publishing" to create the image file in the folder.
List of fields to be filled :
•
•
•
•
Name : This is the name of the image that will mainly be used to search for this
media in the media library (via full text search or via the media tree).
Caption : Allows you to enter a caption (and credits) of an image
New image file for upload : this field allows you to upload an image file from your
computer to the web server. Just click on the "Browse" button to upload the image.
Warning: the size of image files is limited to 20 MB
Alternative image text : This is the text that will be displayed when rolling over the
image. This text is an alternative to the image. It is used and must be completed by
the webmasters for two reasons:
o The alternative image text allows you to describe the content of an image if
this image is not displayed on the site but read by browsers used by the
visually impaired.
Page 33 sur 43
Documentation
o
o
Cigre
The alternative image text is also important for the natural indexing of the site
in all major search engines. Also, it must include both a description and
keywords.
This text should not exceed 80 characters including spaces and must be
written (no list of successive keywords).
1.10.4 How to add a file to a folder?
There are two possible methods :
From the left context menu
1.
2.
3.
4.
5.
6.
17/10/2011
Go to the media tree where you want to create a file.
Click the selected folder to display the eZ Publish context menu
In the menu, select the Create here option, and the type "file".
The input form then opens
Fill out the form fields
Click on "Send for publishing" to create the file in the media library
Page 34 sur 43
Documentation
Cigre
17/10/2011
From the central area :
1. Go to the media tree where you want to create a file
2. Click the folder to display the administration screen of this file
3. In the Create new menu under the "Sub items" table, select the type "Image" and
the language option on the next screen.
4. Fill the form (description of the fields to be filled below)
5. Click on "Send for publishing" to create the file in the media library
•
•
•
Name : This is the file name that will be displayed on the front office. This is not an
internal name only used on the administration site to find the file. This is the name
that will be automatically pushed in the wording of the link offering to download the
file.
Description : This is a text that describes what the file contains, but is not displayed
on the site.
File : The File field allows you to upload a file from your computer to the server. To do
this, simply click the "Browse" button and follow the instructions. Warning: file size is
limited to 8 MB
For more information on operating the administration, you can refer to eZ publish user
manual :
• Document updated in English : http://doc.ez.no/eZ-Publish/User-manual
• Document for the version 4.x (Community Project 2011.5)
Page 35 sur 43
Documentation
Cigre
17/10/2011
2 CIGRE specific contents
The second part of the tutorial is specific to the site www.cigre.org. It includes sitespecific editorial structures.
2.1 Management of the top and footer of page
2.1.1 What can you edit ?
Page 36 sur 43
Documentation
Cigre
2.1.2 Top of the page
•
•
Change the object "homepage" to change the logo or the website title
Change the main sections' order
2.1.3 Footer
•
Change the object "homepage" to change :
o footer logo
o useful links
o social networks
o links "information"
"Social networks" are stored here : Objects / Social Networks
2.2 Management of the homepage
2.2.1 What can you edit ?
Page 37 sur 43
17/10/2011
Documentation
2.2.2
Cigre
17/10/2011
Slideshow and events:
Events are automatically pushed to the homepage as soon as they are entered
Slideshow includes news. Two ways to push them : If you put news in the slideshow node
under the homepage, they will be pushed to the slideshow. If you do not put any news in
the slideshow node, the latest N news from the news folder will be automatically pushed.
2.2.3 "National Committee and Study Committee" text
•
Change the object "homepage" to change the fields :
o national committees
o study committees
Page 38 sur 43
Documentation
Cigre
17/10/2011
2.3 How to create blocks ?
2.3.1 Block types
You can create one or more blocks on each page :
•
•
•
•
•
•
•
•
summary center page : displays children in the footer (intermediate pages - use
a specific view type)
summary right column : displays children in the right column
navigation right column : displays brothers on the right
last news : displays the latest N news (rubriques)
on the same theme : search for related articles
free block : free block
upcoming events : upcoming events
events in the same country : only applied to events (apply to each of them
except if there is only one event in the country)
2.3.2 Create a free block
•
Go to the desired page
•
•
•
Click on "Create new", and select "free block" type
Fill the form (see below)
Click on "Send for publishing"
Page 39 sur 43
Documentation
Cigre
17/10/2011
Free block form :
• Title : select the title to be displayed in the back office
• Content : enter block's content
2.3.3 Manage blocks in a page
For example, this page includes :
- A free block on the right
- A children summary block in the central column
In the fields "layout" of the back office, there are two tabs, under which 2 blocks can be
found. Below, the "center of page" tab where the "summary center page" block can be
found :
Page 40 sur 43
Documentation
Cigre
17/10/2011
To add a block, simply do as follows :
- Select where on the page you want to display it, by clicking on the tab
- In "block type", select the desired block type
- Click on "add block"
- Then follow the instructions specific for each block.
You will notice, to the right of the block's name, the possibility to order the blocks using
the arrows, or place it in the trash.
2.3.4 Characteristic of the blocks :
Block name
•
summary
center page
•
summary
right column
navigation
Right column
last news
•
•
•
•
•
•
on the same
theme
free bloc
upcoming
events
events in the
same country
What is it intended to do?
shows children in the footer
(intermediate pages - use a
specific view type)
Shows children in the right
column
Shows brothers on the right
Shows
le
latest
N
(rubriques)
Search related articles
news
Free block
Upcoming events
Only applied to events (apply to
each of them except if there is
only one event in the country)
Page 41 sur 43
Handling in the back
office
Just add the block, the rest
is automatic
Just add the block,
is automatic
Just add the block,
is automatic
Just add the block,
is automatic
Just add the block,
is automatic
Bring the block by
on "add objects"
Just add the block,
is automatic
Just add the block,
is automatic
the rest
the rest
the rest
the rest
clicking
the rest
the rest
Documentation
Cigre
17/10/2011
2.4 Articles management
Articles specific items :
- Long title : shows a longer title when the internet user displays the page
- Image : allows you to add an illustrative image of the article that will be included
in the summary view
- Slideshow: search for images
- Introduction : will appear next to the reference image
2.5 Event management
Attention, position the "CIGRE evt" in one of the themes [CIGRE rubrique evt]
Events specific items :
- Start date / End: required in order to save
- Location / organization : to be specified
- Country : enter in order to display the news of the country in question in the right
column
2.6 News management
Attention, position the "CIGRE evt" in one of the themes [CIGRE rubrique evt]
News specific items :
- Date: mandatory in order to save
Page 42 sur 43
Documentation
Cigre
17/10/2011
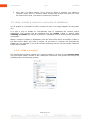
2.7 User accounts (for webmasters)
2.7.1 How to manage site users?
•
•
Go to the "User Accounts" tab
Locate the folder "Editors" in the left tree and locate the existing users in "sub
items"
•
Edit an existing user or add a user by creating a "user" type in the "create new"
menu
•
Enter the name, login, password and email of the user, then click on "Send for
publishing".
The user now has access to the admin of the site.
•
Note: webmasters can create two types of account
• Webmaster: will have the same rights and may also create accounts
• Editor: will have limited rights (edition of the homepage, first level items, or access
to users management is not allowed)
Page 43 sur 43