1
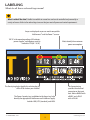
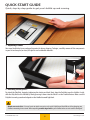
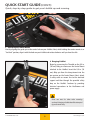
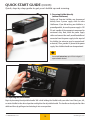
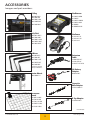
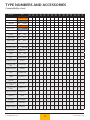
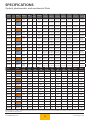
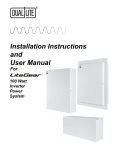
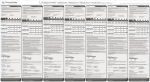
Handbook and Quick-Start Guide
LED LITEMAT
Introduction
USER MANUAL FOR LITEMAT 1, LITEMAT 2, LITEMAT 2L, LITEMAT 3, LITEMAT 4
Congratulations on the purchase of your new LiteMat!
LiteMat is a unique and lightweight LED lighting fixture system designed for cinema, television,
and HD video. Born out of the need for a color-correct light source that is lightweight yet durable,
high quality yet economical, and simple yet cleverly fashioned, LiteMat takes a unique approach
to lighting. By providing evenly spaced, color-correct LEDs spread out over a large area, LiteMat
creates soft light without requiring diffusion. This “soft-through-pixelization” method allows
the unit to achieve surprisingly bright light levels while remaining under 1” (25mm) thick in size
and just 2.2 lb (1 kg) in weight.
We sincerely thank you for joining the LiteGear community by purchasing LiteMat. Since 2006
we have been working closely with filmmakers worldwide to help simplify cinema lighting by
empowering users to create their own DIY lighting fixtures. Your new LiteMat is deeply rooted
in this effort. We hope you enjoy using LiteMat, and be sure to try the sample LED LiteRibbon
included with your purchase.
© LITEGEAR INC. 2015
2
www.litegear.com
TECHNICAL INFORMATION
There are five sizes of LED LiteMat in Tungsten, Daylite, and Hybrid CCT.
2573 lumens
2923 lumens
11.5 x 21 in. (291 x 531 mm)
46 Watts
How to reach us?
Info: [email protected] (or your local dealer)
Customer Service: +1 (818) 358-8542
Help (phone): Call or SMS-Text +1 (818) 495-0600
Help (eMail): [email protected]
Help (online): www.litegear.com/help
2784 lumens
5146 lumens
Tungsten
5846 lumens
21 x 21 in. (531 x 531 mm)
92 Watts
Daylite
5496 lumens
Hybrid
5146 lumens
5846 lumens
11.5 x 40 in. (291 x 1010 mm)
92 Watts
5496 lumens
7718 lumens
8770 lumens
21 x 30 in. (531 x 770 mm)
138 Watts
8244 lumens
10291 lumens
11693 lumens
21 x 40 in. (531 x 1010 mm)
184 Watts
© LITEGEAR INC. 2015
10992 lumens
3
www.litegear.com
GETTING TO KNOW LITEMAT
Get familiar with your new LED luminaire.
Velcro®, Loop Fastener.
CCT (Kelvin Temperature) ID.
Safety Loop. For use when
hanging LiteMat overhead.
Cable Nook.
Input Lead.
Accessory Mounting Points.
Unique Poly Composite Material.
It keeps the weight down while
remaining strong.
Center Mount. For use when
mounting to a 5/8-in. (16 mm)
Baby stand.
Velcro®, Loop Fastener.
LiteMat PCB.
Genuine VHO Pro LEDs.
Color-Correct and 95 CRI.
© LITEGEAR INC. 2015
4
www.litegear.com
LABELING
What do all those colored tags mean?
What’s with all the data? LiteMat is available in several sizes and can be controlled and powered by a
variety of sources. Refer to the colored tags to ensure that you meet all power and control requirements.
Amps are displayed so you can match compatible
LiteDimmers™ and LitePower™ sources.
12V DC is the operating voltage. All batteries,
power supplies, and adapters must be
limited to 12V (8V~13.5V).
Watts identify the maximum
power consumption.
The Density tag helps identify the relative density
of the PCBs used on your LiteMat.
The Power Capacity tag, in addition to the Amps tag, helps
identify the appropriate LiteDimmer and LitePower supply.
Look for LOW, STD (standard), and HIGH.
© LITEGEAR INC. 2015
5
The Connector tag
specifies the electrical
connector on the input
lead. Mate a BAR.M with
a BAR.F and a PH3.F
with a PH3.M.
www.litegear.com
QUICK START GUIDE
Quick, step-by-step guide to get your LiteMat up and running.
1. Unpacking LiteMat
Your new LiteMat has been packaged to protect it during shipping. To begin, carefully remove all the components
in your kit and recycle (or reuse) the plastic and cardboard materials.
2. Attaching the PolySkirt™
To attach the PolySkirt, begin by tightening the elastic cord lock. Next, align the PolySkirt over the LiteMat. Lastly,
affix the PolySkirt to the LiteMat by firmly pressing it down into the Velcro® on the LiteMat fixture. Make sure the
PolySkirt is evenly spaced and aligned on the LiteMat to avoid light leak.
Attach accessories first. It is much easier to attach accessories such as the PolySkirt and the diffusers before hanging your
LiteMat or mounting it into a stand. When unpacking, avoid using a knife as your LiteMat and accessories could be damaged!
© LITEGEAR INC. 2015
6
www.litegear.com
QUICK START GUIDE (CONT.)
Quick, step-by-step guide to get your LiteMat up and running.
3. Installing a diffuser
After securing the PolySkirt to the LiteMat, select the diffuser you would like to use, and ensure that the Velcro®
fastener is positioned on the outside edge. Then, noting orientation, attach the Velcro® fastener section to the
inside of the PolySkirt on its upper Velcro® perimeter.
4. Attaching the Parasquare® Louver
After attaching both the PolySkirt and the
diffuser, position the Parasquare® Louver in front
of the diffused LiteMat with the small squares
toward the LiteMat and the larger squares facing
outward. Next, securely fasten all provided
Velcro® straps to the PolySkirt and LiteMat.
Finish by ensuring that the Parasquare® Louver is
securely fastened.
Using the Parasquare® Louver without a diffuser
may create irregular results and is not recommended.
© LITEGEAR INC. 2015
7
www.litegear.com
QUICK START GUIDE (CONT.)
Quick, step-by-step guide to get your LiteMat up and running.
5. Attaching the Center Mount
Start by aligning the guide-pin to the center hole on your LiteMat. Next, while holding the center mount at an
“8 o’clock” position, align it with the holes on your LiteMat and rotate clockwise until you hear the click.
6. Hanging LiteMat
Begin by unscrewing the T-handle on the 5/8 in.
(16 mm) Baby pin receiver on the Center Mount
attached to the LiteMat. Insert the 5/8-in. (16
mm) Baby pin from the clamp/mount into the
pin receiver on the Center Mount. Next, attach
a safety cable or mason line to the overhead
support and then through the provided safety
loop on the LiteMat. Continue by providing
electrical connections to the LiteDimmer and
power supply.
Great care must be taken when mounting
overhead. Hanging a LiteMat should be attempted
by professionals only.
© LITEGEAR INC. 2015
8
www.litegear.com
QUICK START GUIDE (CONT.)
Quick, step-by-step guide to get your LiteMat up and running.
7. Mounting LiteMat on a stand
Be sure the stand is equipped with a 5/8 inch (16 mm) pin, and then setup the stand. Next, unscrew the 5/8 nch
(16 mm) pin receiver on the Center Mount attached to the LiteMat until it is clear to accept the stand pin. Follow
by tightening the 5/8 inch (16 mm) pin receiver around the stand pin until snug.
8. Powering LiteMat with LiteDimmer
To control your LiteMat, begin by preparing your
power supply. If you did not buy your LiteMat in
a preconfigured kit, be sure the power supply is
12V DC and capable of the appropriate amperage
for continuous duty. Next, untie the power supply
cables and connect the small, round female
Barrel connector from the power supply to the
LiteDimmer power input connector. Continue by
connecting the LED output of the LiteDimmer to
the input of the LiteMat (an extension may be
required and/or desired). Then, ensure that the
LiteDimmer power switch is set to OFF and provide
AC power to the power supply. On the LiteDimmer,
move the power switch to either the ON or LOW/
ALT position (depending on the LiteDimmer you
are using) and adjust the control(s) to the desired
level(s). Your LiteMat should now be operational.
© LITEGEAR INC. 2015
9
www.litegear.com
QUICK START GUIDE (CONT.)
Quick, step-by-step guide to get your LiteMat up and running.
9. Powering LiteMat directly
(without LiteDimmer)
Daylite and Tungsten LiteMats may be powered
directly from a power supply with no inline
LiteDimmer. If you did not buy your LiteMat in a
preconfigured kit, be sure the power supply is 12V
DC and capable of the appropriate amperage for
continuous duty. Next, untie the power supply
cables and connect the small, round female Barrel
connector from the power supply to the input of
the LiteMat (an extension may be required and/
or desired). Then, provide AC power to the power
supply. Your LiteMat should now be operational.
You can add extensions up to 24 feet in length, if
required and/or desired.
10. Adjusting the Center Mount
Begin by loosening the adjustable handle 180º while holding the LiteMat with your other hand. Next, pan, tilt,
or rotate LiteMat to the desired position and tighten the adjustable handle. The handle can be adjusted to allow
additional force by pulling out and rotating it into a new position.
© LITEGEAR INC. 2015
10
www.litegear.com
QUICK START GUIDE (CONT.)
Quick, step-by-step guide to get your LiteMat up and running.
11. Storing LiteMat with optional KitBag
LiteMat is designed for dry, indoor use only.
After use, start by disassembling each LiteMat
accessory. Next, place the LiteMat and each
accessory into the KitBag - LiteMat on its own and
the PolySkirt and ParaSquare® Louver together in
the adjoining compartment. The set of diffusers
are to be stored in the upper outside pouches; start
by folding each diffuser to minimize wrinkling.
Then, stow the LiteDimmer, power supply,
Center Mount, and cables in the lower pouch.
The LiteMat KitBag is provided with additional
copy of the product label inserted into the clear
window on the KitBag for easy identification of
its contents. This bag is specifically designed to
protect your gear from “everyday” damage due to
environmental conditions.
12. What’s Next?
Be sure to activate your warranty by logging on to http://www.litemat.com.
Along with warranty information, we can keep you updated on what’s new with LiteMat!
© LITEGEAR INC. 2015
11
www.litegear.com
ACCESSORIES
Images and part numbers.
KitBag
LiteDimmer
LMA-ONE-BAG *
LMA-TWO-BAG
LMA-TWO-L-BAG
LMA-THREE-BAG
LMA-FOUR-BAG
LD-SINGLE-MICRO
LD-SINGLE*
LD-SINGLE-HYBRID
LD-SINGLE-HICAP
LD-HYBRID
LD-HYBRID-HICAP
PolySkirt
LitePower
LMA-ONE-SKIRT *
LMA-TWO-SKIRT
LMA-TWO-L-SKIRT
LMA-THREE-SKIRT
LMA-FOUR-SKIRT
PS-12V-4A-F-UL
PS-12V-8A-F-UL*
PS-12V-15A-F
Diffuser
Extension
Cable
LMA-ONE-DIFF*
LMA-TWO-DIFF
LMA-TWO-L-DIFF
LMA-THREE-DIFF
LMA-FOUR-DIFF
CA-BAR-EXT-12F*
CA-PH2-EXT-12F
CA-HY-EXT-12F-FLAT-B
Available in Full, Half
and Quarter Diffusion
AA Battery
Adapter
Center Mount
BA-BAA-ENC*
LMA-MOUNT-S *
Cigarette
Auto Adapter
CA-CIG-M-BAR-F*
Parasquare
Louver
LMA-ONE-LC-GRID*
LMA-TWO-LC-GRID
LMA-TWO-L-LC-GRID
LMA-THREE-LC-GRID
LMA-FOUR-LC-GRID
D-Tap Adapter
CA-DTAP-BAR-F*
* Item Pictured
© LITEGEAR INC. 2015
12
www.litegear.com
TYPE NUMBERS AND ACCESSORIES
Compatibility chart.
Description
Type #
ONE
(TUN)
Tungsten Kit
LMK-___-TUN-COMP
√
Daylite Kit
LMK-___-DAY-COMP
Hybrid Kit
LMK-___-HY-COMP
Tungsten LiteMat
LM-___-TUN-HEAD
Daylite LiteMat
LM-___-DAY-HEAD
Hybrid LiteMat
LM-___HY-HEAD
PolySkirt
LMA-___-SKIRT
√
√
√
√
√
√
√
√
√
√
√
√
√
√
√
Diffuser (Full)
LMA-___-DIFF-F
√
√
√
√
√
√
√
√
√
√
√
√
√
√
√
Diffuser (Half)
LMA-___-DIFF-H
√
√
√
√
√
√
√
√
√
√
√
√
√
√
√
Diffuser (Qtr)
LMA-___-DIFF-Q
√
√
√
√
√
√
√
√
√
√
√
√
√
√
√
Parasquare Louver
LMA-___-PARASQUARE
√
√
√
√
√
√
√
√
√
√
√
√
√
√
√
Center Mount
LMA-MOUNT-S
√
√
√
√
√
√
√
√
√
√
√
√
√
√
√
KitBag
LMA-___-BAG
√
√
√
√
√
√
√
√
√
√
√
√
√
√
√
LiteDimmer Single
Micro
LD-SINGLE-MICRO
√∆
√∆
LiteDimmer Single
LD-SINGLE
√
√
√
√
√
√
LiteDimmer Single
HiCap
LD-SINGLE-HICAP
√∆
√∆
√∆
√∆
√∆
√∆
√∆
√∆
√∆
√∆
LiteDimmer Hybrid
LD-HYBRID
√
√
√
√*
√*
LiteDimmer Hybrid
HiCap
LD-HYBRID-HICAP
√
√
√
√
√
Power Supply Low
Cap 4A
PS-12V-4A-F-UL
√
√
√
Power Supply Std
Cap PS 8A
PS-12V-8A-F-UL
√
√
√
√
√
√
√
√
√
√*
√*
Power Supply Hi Cap
PS 15A
PS-12V-15A-F
√
√
√
√
√
√
√
√
√
Single Ext 12’ Low/
Std Cap
CA-BAR-EXT 12F
√
√
√
√
√
√
Single Ext 12’ Hi Cap
CA-PH2-EXT-12F
Hybrid Ext 12’ Low/
Std/Hi Cap
CA-HY-EXT-12FFLAT-B
Cigarette
Auto Adapter
CA-CIG.M-BAR.F
√
√
√
√
√
√
√
√
√
D-Tap Adapter
CA-DTAP-BAR.F
√
√
√
√
√
√
√
√
√
AA Battery Adapter
BA-8AA-ENC
√
√
√
√
√
√
√
√
√
√ = Available.
ONE
(DAY)
TWO
(TUN)
TWO
(DAY)
TWO
(HY)
√
√
TWO-L
(TUN)
√
√
TWO-L
(DAY)
√
√
√
FOUR
(TUN)
FOUR
(DAY)
√
√
√
√
√
√
√
√
√
√
√√
√
√
√ √ = Two cables required for operation.
FOUR
(HY)
√
√
√
√
13
THREE
(HY)
√
√
√
THREE
(DAY)
√
√
√
THREE
(TUN)
√
√
√
TWO-L
(HY)
√
√
√* = In Hybrid Mode only.
© LITEGEAR INC. 2015
ONE
(HY)
√
√
√
√
√√
√√
√√
√
√
√
√
√
√
√∆ = Available in 2015.
www.litegear.com
SPECIFICATIONS
Optical, photometric, and mechanical Data.
Series
Kelvin
CCT (K)
CRI
TLCI
(2012)
Lumens
@ 12” (Size)
@ 24” (Size)
@ 36” (Size)
@ 48” (Size)
F.C. /Lux
F.C. /Lux
F.C. /Lux
F.C. /Lux
205 / 2211
(32” x 34”)
100 / 1080
(48” x 48”)
60 / 646
(66” x 64”)
41 / 444
(80” x 78”)
30 / 319
(100” x 96”)
19 / 206
(131” x 124”)
F.C. /Lux
F.C. /Lux
F.C. /Lux
@ 5’ (Size)
@ 6’ (Size)
@ 8’ (Size)
LiteMat
1
Tungsten
3200
95
89
2573
599 / 6442
(18” x 22”)
LiteMat
1
Daylite
6000
95
95
2923
666 / 7168
(18” x 22”)
229 / 2460
(32” x 34”)
112 / 1202
(48” x 48”)
67 / 719
(66” x 64”)
46 / 494
(80” x 78”)
33 / 355
(100” x 96”)
21 / 229
(131” x 124”)
LiteMat
1
Hybrid
32006000
95
92
2784
632 / 6805
(18” x 22”)
217 / 2336
(32” x 34”)
106 / 1141
(48” x 48”)
63 / 683
(66” x 64”)
44 / 469
(80” x 78”)
31 / 337
(100” x 96”)
20 / 217
(131” x 124”)
LiteMat
2
Tungsten
3200
95
89
5146
1080 / 11622
(22” x 22”)
376 / 4042
(36” x 36”)
188 / 2021
(50” x 48”)
113 / 1213
(70” x 64”)
75 / 808
(86” x 80”)
55 / 596
(106” x 98”)
35 / 382
(138” x 126”)
LiteMat
2
Daylite
6000
95
95
5846
1201 / 12930
(22” x 22”)
418 / 4498
(36” x 36”)
209 / 2249
(50” x 48”)
125 / 1349
(70” x 64”)
84 / 900
(86” x 80”)
62 / 663
(106” x 98”)
39 / 424
(138” x 126”)
LiteMat
2
Hybrid
32006000
95
92
5496
1140 / 12276
(22” x 22”)
397 / 4270
(36” x 36”)
198 / 2135
(50” x 48”)
119 / 1281
(70” x 64”)
79 / 854
(86” x 80”)
59 / 630
(106” x 98”)
37 / 403
(138” x 126”)
LiteMat
2L
Tungsten
3200
95
89
5146
764 / 8227
(20” x 38”)
315 / 3392
(34” x 46”)
170 / 1828
(50” x 58”)
108 / 1158
(68” x 72”)
75 / 813
(84” x 88”)
59 / 630
35 / 374
(104” x 108”) (135” x 132”)
LiteMat
2L
Daylite
6000
95
95
5846
850 / 9153
(20” x 38”)
351 / 3774
(34” x 46”)
189 / 2034
(50” x 58”)
120 / 1288
(68” x 72”)
84 / 904
(84” x 88”)
65 / 701
39 / 417
(104” x 108”) (135” x 132”)
LiteMat
2L
Hybrid
32006000
95
92
5496
807 / 8690
(20” x 38”)
333 / 3583
(34” x 46”)
179 / 1931
(50” x 58”)
114 / 1223
(68” x 72”)
80 / 858
(84” x 88”)
62 / 665
37 / 396
(104” x 108”) (135” x 132”)
LiteMat
3
Tungsten
3200
95
89
7718
1253 / 13485
(24” x 30”)
490 / 5271
(36” x 40”)
252 / 2707
(52” x 54”)
154 / 1655
(70” x 70”)
106 / 1144
(86” x 86”)
79 / 848
51 / 545
(106” x 106”) (137” x 133”)
LiteMat
3
Daylite
6000
95
95
8770
1394 / 15005
(24” x 30”)
545 / 5865
(36” x 40”)
280 / 3012
(52” x 54”)
171 / 1841
(70” x 70”)
118 / 1273
(86” x 86”)
88 / 943
56 / 607
(106” x 106”) (137” x 133”)
LiteMat
3
Hybrid
32006000
95
92
8244
1323 / 14244
(24” x 30”)
517 / 5568
(36” x 40”)
266 / 2860
(52” x 54”)
162 / 1748
(70” x 70”)
112 / 1209
(86” x 86”)
83 / 896
54 / 576
(106” x 106”) (137” x 133”)
LiteMat
4
Tungsten
3200
95
89
10291
1382 / 14875
(24” x 38”)
591 / 6366
(38” x 46”)
329 / 3544
(52” x 58”)
208 / 2242
(72” x 74”)
146 / 1575
(88” x 88”)
109 / 1170
65 / 701
(110” x 108”) (141” x 132”)
LiteMat
4
Daylite
6000
95
95
11693
1538 / 16550
(24” x 38”)
658 / 7082
(38” x 46”)
366 / 3943
(52” x 58”)
232 / 2495
(72” x 74”)
163 / 1752
(88” x 88”)
121 / 1302
72 / 780
(110” x 108”) (141” x 132”)
LiteMat
4
Hybrid
32006000
95
92
10992
1460 / 15713
(24” x 38”)
625 / 6724
(38” x 46”)
348 / 3743
(52” x 58”)
220 / 2368
(72” x 74”)
155 / 1664
(88” x 88”)
115 / 1236
69 / 740
(110” x 108”) (141” x 132”)
Kelvin
Height
(inch)
Height
(mm)
Width
(inch)
Width
(mm)
Depth
(inch)
Depth
(mm)
Weight
(lbs)
Voltage
(V DC)
Current
(Amps)
Watts
LED Qty
Series
LiteMat
1
Tungsten
21
533
11.5
292
0.9
23
2.3
12
3.8
46
288
LiteMat
1
Daylite
21
533
11.5
292
0.9
23
2.3
12
3.8
46
288
LiteMat
1
Hybrid
21
533
11.5
292
0.9
23
2.3
12
3.8
46
288
LiteMat
2
Tungsten
21
533
21
533
0.9
23
3.5
12
7.7
92
576
LiteMat
2
Daylite
21
533
21
533
0.9
23
3.5
12
7.7
92
576
LiteMat
2
Hybrid
21
533
21
533
0.9
23
3.5
12
7.7
92
576
LiteMat
2L
Tungsten
40
1016
11.5
292
0.9
23
3.5
12
7.7
92
576
LiteMat
2L
Daylite
40
1016
11.5
292
0.9
23
3.5
12
7.7
92
576
LiteMat
2L
Hybrid
40
1016
11.5
292
0.9
23
3.5
12
7.7
92
576
LiteMat
3
Tungsten
30.5
775
21
533
0.9
23
4.7
12
11.5
138
864
LiteMat
3
Daylite
30.5
775
21
533
0.9
23
4.7
12
11.5
138
864
LiteMat
3
Hybrid
30.5
775
21
533
0.9
23
4.7
12
11.5
138
864
LiteMat
4
Tungsten
40
1016
21
533
0.9
23
5.7
12
15.4
184
1152
LiteMat
4
Daylite
40
1016
21
533
0.9
23
5.7
12
15.4
184
1152
LiteMat
4
Hybrid
40
1016
21
533
0.9
23
5.7
12
15.4
184
1152
All LiteMat units feature a 120 degree beam angle and 50,000 hours of operation under typical conditions. Test equipment used for collecting specifications:
Optical Equipment: UPR Tech MK350D and Spectra Cine IV “A” model. Power Equipment: Meanwell GS220A12-R7B at 12.0V DC. Camera Strobing: Proprietary CineHZ Frequency Meter.
© LITEGEAR INC. 2015
14
www.litegear.com
TROUBLESHOOTING AND MAINTENANCE
Tips to get you back to work.
Troubleshooting
My LiteMat is plugged into a LiteDimmer that is being supplied with 12V DC power, but it is not turning on. What should I do?
If you have multiple LiteMat setups, try swapping power supplies, LiteDimmers, and cables one at a time until operation is restored.
1. Verify that your LiteDimmer is working properly. Using the sample LiteRibbon provided with your LiteMat or other LiteRibbon that
is known to be working, plug the LiteRibbon into your LiteDimmer along with 12V DC power, and turn the LiteDimmer on.
a. The LiteDimmer works! Proceed to Step #3.
b. The indicator light on my LiteDimmer is not turning on even though I turned the LiteDimmer on. (Proceed to Step #2.)
c. The indicator light on my LiteDimmer is on but is not a steady color. (Proceed to Step #4.)
2. Verify that your power supply is working properly. Using the sample LiteRibbon provided with your LiteMat or other LiteRibbon
that is known to be working, plug the LiteRibbon directly into your power supply, using the power adapter provided with your LiteDimmer
if applicable.
a. The power supply works! Proceed to Step #4.
b. The power supply does not work. Replace the power supply, and repeat Step #1.
3. Your LiteDimmer and power supply are working. Checking the colored tags on your LiteMat (see “Labeling” on page 5 for more
information on the colored tags), verify that you are using the appropriate LiteDimmer and power supply.
a. I am using the correct LiteDimmer and power supply. Check the input connector on the LiteMat to ensure that there is no damage. If it
appears to be acceptable, contact the LiteGear Repair Department.
b. I am not using the correct LiteDimmer and/or power supply. One component at a time, replace the LiteDimmer and/or the power supply,
depending on which one did not meet minimum operational requirements. Repeat Step #1 if you replaced the LiteDimmer or Step #2 if you
replace the power supply.
4. Your LiteDimmer is not working properly. Please refer to the “Troubleshooting” section of the LiteDimmer User’s Guide provided
with your LiteDimmer, or visit http://www.litegear.com/support/document/, and find the appropriate LiteDimmer User’s Guide online.
5. Still not working? Contact the LiteGear Customer Service Department to provide a detailed explanation of the problem(s) with your LiteMat
and to obtain a Return Materials Authorization (RMA) number.
Maintenance
As you use your LiteMat, you should keep a few things in mind to help maintain the quality of your LiteMat.
1. Keep your LiteMat clean!
Be sure to unplug all components before cleaning. Using glass or plastic cleaner, or simply a damp cloth, maintain the cleanliness of the
surfaces of your LiteMat, paying particular attention to the protective clear plastic covering. Dirt and debris could impair light output and
light quality.
2. Check the wire and connectors!
Especially after repeated use, the integrity of the wire and connectors could become compromised. Check the wire to ensure there are no
cuts in the insulation and that there is no exposed copper wire. If there is any exposed copper, insulate the affected area with electrical tape
or heat shrink, or contact the LiteGear Repair Department for other suggestions. Also, inspect the connector on your LiteMat’s input lead for
any physical damage. If a connector needs to be replaced, contact the LiteGear Repair Department.
3. Be careful with Velcro®!
The Velcro® fastener used to make your LiteMat so versatile and lightweight may lose some of its strength over time with repeated use. To
minimize this wear, try to keep dirt and debris from being caught in the hook or loop fastener of the Velcro®. Also, be mindful of the force
applied to the Velcro® when adding or removing various accessories. Too much force could compromise the integrity of the adhesive that
keeps the Velcro® cleanly attached to your LiteMat or other accessories.
4. Make sure to properly store your LiteMat!
We have designed the LiteMat KitBag to be the perfect vessel for your LiteMat when it is not lighting your next commercial, television
show, or feature film. Be sure to keep the LiteMat from being crushed, stepped on, or otherwise damaged, as the LEDs themselves are very
sensitive electronic components.
© LITEGEAR INC. 2015
15
www.litegear.com
SPECIALTY LIGHTING GEAR FOR CINEMA, TV, AND HD VIDEO
LITEGEAR INC.
An IATSE Local 728 Member-Owned Company
4406 W. Vanowen Street
Burbank, California 91505, USA
+1 (818) 358-8542
[email protected]
www.litegear.com
261-39
Please place your
LiteMat serial label here.
© 2015 LITEGEAR Inc. All rights reserved. LiteRibbon® is a registered trademarks of LiteGear Inc.
© 2015 LITEGEAR Inc. All rights reserved. LiteGear , LiteMat , LiteDimmer , FauxFlo , KitBag and PolySkirt are trademarks of LiteGear Inc.
VELCRO® is a registered trademark of VelcroIndustries B. V.
Parasquare® is a registered trademark of SLP Lighting.
TM
TM
TM
TM
TM
TM