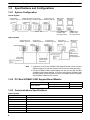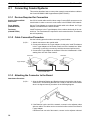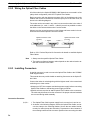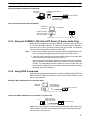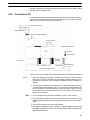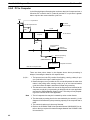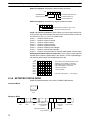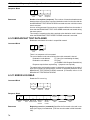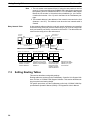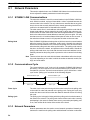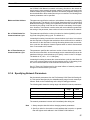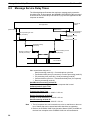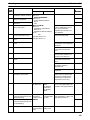
1
Cat. No. W390-E1-1 SYSMAC 3G8F7-SLK11-E (Optical Fiber Cable) 3G8F7-SLK21-E (Coaxial Cable) SYSMAC LINK PCI Support Boards 3G8F7-SLK11-E (Optical Fiber Cable) 3G8F7-SLK21-E (Coaxial Cable) SYSMAC LINK PCI Support Boards Operation Manual Produced March 2001 iv Notice: OMRON products are manufactured for use according to proper procedures by a qualified operator and only for the purposes described in this manual. The following conventions are used to indicate and classify precautions in this manual. Always heed the information provided with them. Failure to heed precautions can result in injury to people or damage to property. DANGER Indicates an imminently hazardous situation which, if not avoided, will result in death or serious injury. ! WARNING Indicates a potentially hazardous situation which, if not avoided, could result in death or serious injury. ! Caution Indicates a potentially hazardous situation which, if not avoided, may result in minor or moderate injury, or property damage. ! OMRON Product References All OMRON products are capitalized in this manual. The word “Unit” is also capitalized when it refers to an OMRON product, regardless of whether or not it appears in the proper name of the product. The abbreviation “Ch,” which appears in some displays and on some OMRON products, often means “word” and is abbreviated “Wd” in documentation in this sense. The abbreviation “PC” means Programmable Controller and is not used as an abbreviation for anything else. Visual Aids The following headings appear in the left column of the manual to help you locate different types of information. Note Indicates information of particular interest for efficient and convenient operation of the product. Reference Indicates supplementary information on related topics that may be of interest to the user. 1, 2, 3... 1. Indicates lists of one sort or another, such as procedures, checklists, etc. OMRON, 2001 All rights reserved. No part of this publication may be reproduced, stored in a retrieval system, or transmitted, in any form, or by any means, mechanical, electronic, photocopying, recording, or otherwise, without the prior written permission of OMRON. No patent liability is assumed with respect to the use of the information contained herein. Moreover, because OMRON is constantly striving to improve its high-quality products, the information contained in this manual is subject to change without notice. Every precaution has been taken in the preparation of this manual. Nevertheless, OMRON assumes no responsibility for errors or omissions. Neither is any liability assumed for damages resulting from the use of the information contained in this publication. v vi TABLE OF CONTENTS PRECAUTIONS . . . . . . . . . . . . . . . . . . . . . . . . . . . . . . . . . 1 Intended Audience . . . . . . . . . . . . . . . . . . . . . . . . . . . . . . . . . . . . . . . . . . . . . . . . . . . . . . . . . . . 2 General Precautions . . . . . . . . . . . . . . . . . . . . . . . . . . . . . . . . . . . . . . . . . . . . . . . . . . . . . . . . . . 3 Safety Precautions . . . . . . . . . . . . . . . . . . . . . . . . . . . . . . . . . . . . . . . . . . . . . . . . . . . . . . . . . . . 4 Operating Environment Precautions . . . . . . . . . . . . . . . . . . . . . . . . . . . . . . . . . . . . . . . . . . . . . 5 Application Precautions . . . . . . . . . . . . . . . . . . . . . . . . . . . . . . . . . . . . . . . . . . . . . . . . . . . . . . SECTION 1 Outline of Functions . . . . . . . . . . . . . . . . . . . . . . . . . . . . . 1-1 1-2 1-3 1-4 Overview . . . . . . . . . . . . . . . . . . . . . . . . . . . . . . . . . . . . . . . . . . . . . . . . . . . . . . . . . . . . . . Specifications and Configurations . . . . . . . . . . . . . . . . . . . . . . . . . . . . . . . . . . . . . . . . . . . Basic Procedures . . . . . . . . . . . . . . . . . . . . . . . . . . . . . . . . . . . . . . . . . . . . . . . . . . . . . . . . Applications Precautions . . . . . . . . . . . . . . . . . . . . . . . . . . . . . . . . . . . . . . . . . . . . . . . . . . SECTION 2 Wiring . . . . . . . . . . . . . . . . . . . . . . . . . . . . . . . . . . . . . . . . . 2-1 2-2 2-3 Connecting Coaxial Systems . . . . . . . . . . . . . . . . . . . . . . . . . . . . . . . . . . . . . . . . . . . . . . . Connecting Optical Systems (H-PCF Cable) . . . . . . . . . . . . . . . . . . . . . . . . . . . . . . . . . . . Backup Power Supply Wiring (Optical Systems Only) . . . . . . . . . . . . . . . . . . . . . . . . . . . SECTION 3 Creating Applications Using the C Library . . . . . . . . . . . 3-1 3-2 Basic Flow . . . . . . . . . . . . . . . . . . . . . . . . . . . . . . . . . . . . . . . . . . . . . . . . . . . . . . . . . . . . . Using the C Library . . . . . . . . . . . . . . . . . . . . . . . . . . . . . . . . . . . . . . . . . . . . . . . . . . . . . . SECTION 4 C Language Function Reference . . . . . . . . . . . . . . . . . . . . 4-1 4-2 4-3 Library Functions . . . . . . . . . . . . . . . . . . . . . . . . . . . . . . . . . . . . . . . . . . . . . . . . . . . . . . . . Structure Descriptions . . . . . . . . . . . . . . . . . . . . . . . . . . . . . . . . . . . . . . . . . . . . . . . . . . . . Detailed Error Information . . . . . . . . . . . . . . . . . . . . . . . . . . . . . . . . . . . . . . . . . . . . . . . . . SECTION 5 Data Links . . . . . . . . . . . . . . . . . . . . . . . . . . . . . . . . . . . . . 5-1 5-2 5-3 5-4 5-5 5-6 What Are Data Links? . . . . . . . . . . . . . . . . . . . . . . . . . . . . . . . . . . . . . . . . . . . . . . . . . . . . Setting Data Links . . . . . . . . . . . . . . . . . . . . . . . . . . . . . . . . . . . . . . . . . . . . . . . . . . . . . . . Starting and Stopping Data Links . . . . . . . . . . . . . . . . . . . . . . . . . . . . . . . . . . . . . . . . . . . Checking Data Link Status . . . . . . . . . . . . . . . . . . . . . . . . . . . . . . . . . . . . . . . . . . . . . . . . Data Link Performance . . . . . . . . . . . . . . . . . . . . . . . . . . . . . . . . . . . . . . . . . . . . . . . . . . . Data Link I/O Response Time . . . . . . . . . . . . . . . . . . . . . . . . . . . . . . . . . . . . . . . . . . . . . . SECTION 6 Message Service . . . . . . . . . . . . . . . . . . . . . . . . . . . . . . . . . 6-1 6-2 6-3 6-4 Introduction . . . . . . . . . . . . . . . . . . . . . . . . . . . . . . . . . . . . . . . . . . . . . . . . . . . . . . . . . . . . FINS Command/Response Format . . . . . . . . . . . . . . . . . . . . . . . . . . . . . . . . . . . . . . . . . . . Commands and Responses for the Support Board . . . . . . . . . . . . . . . . . . . . . . . . . . . . . . . Response Codes . . . . . . . . . . . . . . . . . . . . . . . . . . . . . . . . . . . . . . . . . . . . . . . . . . . . . . . . . SECTION 7 Network Interconnections . . . . . . . . . . . . . . . . . . . . . . . . . 7-1 7-2 7-3 What is Network Interconnection? . . . . . . . . . . . . . . . . . . . . . . . . . . . . . . . . . . . . . . . . . . Routing Tables . . . . . . . . . . . . . . . . . . . . . . . . . . . . . . . . . . . . . . . . . . . . . . . . . . . . . . . . . . Setting Routing Tables . . . . . . . . . . . . . . . . . . . . . . . . . . . . . . . . . . . . . . . . . . . . . . . . . . . . vii TABLE OF CONTENTS SECTION 8 Communications Timing . . . . . . . . . . . . . . . . . . . . . . . . . . 8-1 8-2 Network Parameters . . . . . . . . . . . . . . . . . . . . . . . . . . . . . . . . . . . . . . . . . . . . . . . . . . . . . . Message Service Delay Times . . . . . . . . . . . . . . . . . . . . . . . . . . . . . . . . . . . . . . . . . . . . . . SECTION 9 Troubleshooting and Maintenance . . . . . . . . . . . . . . . . . . 9-1 9-2 9-3 9-4 9-5 Troubleshooting Using Indicators . . . . . . . . . . . . . . . . . . . . . . . . . . . . . . . . . . . . . . . . . . . Status Information and Troubleshooting . . . . . . . . . . . . . . . . . . . . . . . . . . . . . . . . . . . . . . Error Log . . . . . . . . . . . . . . . . . . . . . . . . . . . . . . . . . . . . . . . . . . . . . . . . . . . . . . . . . . . . . . Cleaning and Inspection . . . . . . . . . . . . . . . . . . . . . . . . . . . . . . . . . . . . . . . . . . . . . . . . . . . Handling Precautions . . . . . . . . . . . . . . . . . . . . . . . . . . . . . . . . . . . . . . . . . . . . . . . . . . . . . Appendix Standard Models . . . . . . . . . . . . . . . . . . . . . . . . . . . . . . . . . . . . . . . . . . . . . . . . . . . . . . . . . . . . . . Index . . . . . . . . . . . . . . . . . . . . . . . . . . . . . . . . . . . . . . . . . . Revision History . . . . . . . . . . . . . . . . . . . . . . . . . . . . . . . . . viii About this Manual: This manual describes the operation of the 3G8F7-SLK11-E and 3G8F7-SLK21-E SYSMAC LINK PCI Support Boards and includes the sections described below. SYSMAC LINK Support Boards are used to connect IBM PC/AT or compatible computers to a SYSMAC LINK Network. The following three manuals are directly related to application of the SYSMAC LINK Network. Name 3G8F7-SLK11-E/SLK21-E SYSMAC LINK PCI Support Boards Operation Manual (this manual) 3G8F7-SLK11-E/SLK21-E SYSMAC LINK PCI Support Board Installation Guide Contents Cat. No. (suffixes omitted) Operating procedures for SYSMAC LINK PCI Support Board connections. SYSMAC LINK Support Boards are used to connect IBM PC/ATs or compatibles to a SYSMAC LINK Network. Installation and setup procedures for SYSMAC LINK PCI Support Board connections. SYSMAC LINK Support Boards are used to connect IBM PC/ATs or compatibles to a SYSMAC LINK Network. Installation, setup, and operating procedures for SYSMAC LINK Support Boards for ISA bus connections. SYSMAC LINK Support Boards are used to connect IBM PC/ATs or compatibles to a SYSMAC LINK Network. W390 CV500, SLK11/21 SYSMAC LINK Units Operation Manual Installation, setup, and operating procedures for the SYSMAC LINK Units are used to connect CV-series PCs to a SYSMAC LINK Network. W202 CS1W-SLK11/21 SYSMAC LINK Units Operation Manual Installation, setup, and operating procedures for the Optical Ring SYSMAC LINK Units. SYSMAC LINK Units are used to connect CS1-series PCs to a SYSMAC LINK Network. W367 3G8F5-SLK21-E SYSMAC LINK ISA Support Board Operation Manual W389 W220 Depending on the system, you may also need the SYSMAC or CV Support Software or a Programming Console. Please read this manual and related manuals carefully and be sure you understand the information provided before attempting to install and operate a SYSMAC LINK Support Board. Section 1 outlines the functions of the SYSMAC LINK Support Board, including applications, and the differences between the SYSMAC LINK Support Board and the SYSMAC LINK Unit. Section 2 describes how to wire the power supply cables and communications cables to the SYSMAC LINK Support Board. Section 3 describes creating applications (user programs) that control the SYSMAC LINK Support Board. Section 4 details the C-language library functions supported by the SYSMAC LINK Support Board. Section 5 describes how to use data links in a SYSMAC LINK Network. Section 6 explains how to use the message service provided by a SYSMAC LINK Support Board. Section 7 describes the method used to connect multiple networks. Section 8 explains details on SYSMAC LINK Network communications. Refer to this section for network communications that require accurate communications timing. Section 9 provides information on troubleshooting errors that occur during SYSMAC LINK Support Board operation, as well as daily inspection, cleaning, and other maintenance procedures. The Appendix provides a list of standard models. ! WARNING Failure to read and understand the information provided in this manual may result in personal injury or death, damage to the product, or product failure. Please read each section in its entirety and be sure you understand the information provided in the section and related sections before attempting any of the procedures or operations given. ix PRECAUTIONS This section provides general precautions for using the SYSMAC LINK PCI Support Board and related devices. The information contained in this section is important for the safe and reliable application of the SYSMAC LINK PCI Support Board. You must read this section and understand the information contained before attempting to set up or operate a SYSMAC LINK PCI Support Board. 1 Intended Audience . . . . . . . . . . . . . . . . . . . . . . . . . . . . . . . . . . . . . . . . . . . . . . . . . . . . . . . . . . . . 2 General Precautions . . . . . . . . . . . . . . . . . . . . . . . . . . . . . . . . . . . . . . . . . . . . . . . . . . . . . . . . . . . 3 Safety Precautions . . . . . . . . . . . . . . . . . . . . . . . . . . . . . . . . . . . . . . . . . . . . . . . . . . . . . . . . . . . . 4 Operating Environment Precautions . . . . . . . . . . . . . . . . . . . . . . . . . . . . . . . . . . . . . . . . . . . . . . 5 Application Precautions . . . . . . . . . . . . . . . . . . . . . . . . . . . . . . . . . . . . . . . . . . . . . . . . . . . . . . . . xi 3 Safety Precautions 1 Intended Audience This manual is intended for the following personnel, who must also have knowledge of electrical systems (an electrical engineer or the equivalent). • Personnel in charge of installing FA systems. • Personnel in charge of designing FA systems. • Personnel in charge of managing FA systems and facilities. 2 General Precautions The user must operate the product according to the performance specifications described in the operation manuals. Before using the product under conditions which are not described in the manual or applying the product to nuclear control systems, railroad systems, aviation systems, vehicles, combustion systems, medical equipment, amusement machines, safety equipment, and other systems, machines, and equipment that may have a serious influence on lives and property if used improperly, consult your OMRON representative. Make sure that the ratings and performance characteristics of the product are sufficient for the systems, machines, and equipment, and be sure to provide the systems, machines, and equipment with double safety mechanisms. This manual provides information for programming and operating the SYSMAC LINK PCI Support Board and related devices. Be sure to read this manual before attempting to use the software and keep this manual close at hand for reference during operation. ! WARNING It is extremely important that a SYSMAC LINK PCI Support Board and all related devices be used for the specified purpose and under the specified conditions, especially in applications that can directly or indirectly affect human life. You must consult with your OMRON representative before applying a SYSMAC LINK PCI Support Board to the above mentioned applications. 3 Safety Precautions ! WARNING Never attempt to disassemble any SYSMAC LINK PCI Support Board while power is being supplied. Doing so may result in serious electrical shock or electrocution. ! WARNING Never touch any of the terminals while power is being supplied. Doing so may result in serious electrical shock or electrocution. ! WARNING Provide safety measures in external circuits, i.e., not in the Programmable Controller (CPU Unit including associated Units; referred to as “PC”), in order to ensure safety in the system if an abnormality occurs due to malfunction of the PC or another external factor affecting the PC operation. Not doing so may result in serious accidents. • Emergency stop circuits, interlock circuits, limit circuits, and similar safety measures must be provided in external control circuits. • The PC will turn OFF all outputs when its self-diagnosis function detects any error or when a severe failure alarm (FALS) instruction is executed. As a countermeasure for such errors, external safety measures must be provided to ensure safety in the system. xii Operating Environment Precautions 4 • The PC outputs may remain ON or OFF due to deposition or burning of the output relays or destruction of the output transistors. As a countermeasure for such problems, external safety measures must be provided to ensure safety in the system. • When the 24-VDC output (service power supply to the PC) is overloaded or short-circuited, the voltage may drop and result in the outputs being turned OFF. As a countermeasure for such problems, external safety measures must be provided to ensure safety in the system. 4 ! Caution Execute online edit only after confirming that no adverse effects will be caused by extending the cycle time. Otherwise, the input signals may not be readable. ! Caution Confirm safety at the destination node before transferring a program to another node or changing contents of the I/O memory area. Doing either of these without confirming safety may result in injury. ! Caution Tighten the connector screws for the backup power supply to the torque specified in this manual. The loose screws may result in burning or malfunction. Operating Environment Precautions ! Caution Do not operate the control system in the following locations: • Locations subject to direct sunlight. • Locations subject to temperatures or humidity outside the range specified in the specifications. • Locations subject to condensation as the result of severe changes in temperature. • Locations subject to corrosive or flammable gases. • Locations subject to dust (especially iron dust) or salts. • Locations subject to exposure to water, oil, or chemicals. • Locations subject to shock or vibration. ! Caution Take appropriate and sufficient countermeasures when installing systems in the following locations: • Locations subject to static electricity or other forms of noise. • Locations subject to strong electromagnetic fields. • Locations subject to possible exposure to radioactivity. • Locations close to power supplies. ! Caution The operating environment of the SYSMAC LINK PCI Support Board or the computer can have a large effect on the longevity and reliability of the system. Improper operating environments can lead to malfunction, failure, and other unforeseeable problems with the SYSMAC LINK PCI Support Board or the computer. Be sure that the operating environment is within the specified conditions at installation and remains within the specified conditions during the life of the system. xiii 5 Application Precautions 5 Application Precautions Observe the following precautions when using the SYSMAC LINK PCI Support Board or the computer into which it is installed. Note Refer also to 1-4 Application Precautions for further information and additional precautions. ! WARNING Failure to abide by the following precautions could lead to serious or possibly fatal injury. Always heed these precautions. • Always ground the system to 100 Ω or less when installing the system to protect against electrical shock. • Always turn OFF the power of the computer before attempting any of the following. Performing any of the following with the power supply turned on may lead to electrical shock: • Installing or removing the Support Board. • Assembling the Units. • Setting DIP switches or short-circuiting pins. • Connecting or disconnecting any cables or connectors. ! Caution Failure to abide by the following precautions could lead to faulty operation of the computer or the system or could damage the SYSMAC LINK PCI Support Board or related devices. Always heed these precautions. • Fail-safe measures must be taken by the customer to ensure safety in the event of incorrect, missing, or abnormal signals caused by broken signal lines, momentary power interruptions, or other causes. • Always use the power supply voltage specified in the operation manuals. An incorrect voltage may result in malfunction or burning. • Take appropriate measures to ensure that the specified power with the rated voltage and frequency is supplied. Be particularly careful in places where the power supply is unstable. An incorrect power supply may result in malfunction. • Install external breakers and take other safety measures against short-circuiting in external wiring. Insufficient safety measures against short-circuiting may result in burning. • Disconnect the functional ground terminal when performing withstand voltage tests. Not disconnecting the functional ground terminal may result in burning. • Do not attempt to take the Boards apart, to repair the Boards, or to modify the Boards in any way. • Be sure that all the mounting screws, terminal screws, and cable connector screws are tightened to the torque specified in this manual. Incorrect tightening torque may result in malfunction. • Use crimp terminals for wiring. Do not connect bare stranded wires directly to terminals. Connection of bare stranded wires may result in burning. • Double-check all the wiring before turning ON the power supply. Incorrect wiring may result in burning. • Wire correctly. • Double-check all the connectors before mounting the Board. • Be sure that the communications cable connectors and other items with locking devices are properly locked into place. Improper locking may result in malfunction. • Use a special packing box when transporting the Board. Handle the product carefully so that no excessive vibration or impact is applied to the product during transportation. xiv Application Precautions 5 • Check the user program for proper execution before actually running it on the Unit. Not checking the program may result in an unexpected operation. • Observe the following precautions when wiring the communications cable or backup power supply cables. • Separate the cables from power lines or high-tension lines. • Do not bend the cables. • Do not pull on the cables. • Do not place heavy objects on top of the cables. • Route cables inside conduits. • Before touching the Unit, be sure to first touch a grounded metallic object in order to discharge any static built-up. Not doing so may result in malfunction or damage. • Do not touch the Board surfaces or parts. • Install the Board according to instructions in the operation manuals. Improper installation may cause faulty operation. • When using the Optical Ring SYSMAC LINK Support Board for public utilities systems, such as electricity, gas, or water supply, use the Optical Ring mode and provide appropriate fail-safe measures. xv SECTION 1 Outline of Functions This section outlines the functions of the SYSMAC LINK Support Board, including the applications of the SYSMAC LINK Support Board and the differences between the SYSMAC LINK Support Board and the SYSMAC LINK Unit. 1-1 1-2 1-3 1-4 Overview . . . . . . . . . . . . . . . . . . . . . . . . . . . . . . . . . . . . . . . . . . . . . . . . . . . . . . . . . . . . . . . 1-1-1 What Is the SYSMAC LINK? . . . . . . . . . . . . . . . . . . . . . . . . . . . . . . . . . . . . . . . . 1-1-2 Features . . . . . . . . . . . . . . . . . . . . . . . . . . . . . . . . . . . . . . . . . . . . . . . . . . . . . . . . . 1-1-3 What Is a SYSMAC LINK Support Board? . . . . . . . . . . . . . . . . . . . . . . . . . . . . . 1-1-4 Features of SYSMAC LINK PCI Support Boards . . . . . . . . . . . . . . . . . . . . . . . . 1-1-5 Outline of PCI Bus SYSMAC LINK Support Board Functions . . . . . . . . . . . . . . Specifications and Configurations . . . . . . . . . . . . . . . . . . . . . . . . . . . . . . . . . . . . . . . . . . . . 1-2-1 System Configuration . . . . . . . . . . . . . . . . . . . . . . . . . . . . . . . . . . . . . . . . . . . . . . 1-2-2 PCI Bus SYSMAC LINK Support Board Models . . . . . . . . . . . . . . . . . . . . . . . . . 1-2-3 Communications Specifications . . . . . . . . . . . . . . . . . . . . . . . . . . . . . . . . . . . . . . 1-2-4 General Specifications . . . . . . . . . . . . . . . . . . . . . . . . . . . . . . . . . . . . . . . . . . . . . . 1-2-5 Dimensions . . . . . . . . . . . . . . . . . . . . . . . . . . . . . . . . . . . . . . . . . . . . . . . . . . . . . . 1-2-6 Indicators . . . . . . . . . . . . . . . . . . . . . . . . . . . . . . . . . . . . . . . . . . . . . . . . . . . . . . . . 1-2-7 Product Components . . . . . . . . . . . . . . . . . . . . . . . . . . . . . . . . . . . . . . . . . . . . . . . 1-2-8 Software Configuration . . . . . . . . . . . . . . . . . . . . . . . . . . . . . . . . . . . . . . . . . . . . . 1-2-9 Compatible Computers, Operating Systems, and Libraries . . . . . . . . . . . . . . . . . . Basic Procedures . . . . . . . . . . . . . . . . . . . . . . . . . . . . . . . . . . . . . . . . . . . . . . . . . . . . . . . . . Applications Precautions . . . . . . . . . . . . . . . . . . . . . . . . . . . . . . . . . . . . . . . . . . . . . . . . . . . 1 Section Overview 1-1 1-1 Overview 1-1-1 What Is the SYSMAC LINK? The SYSMAC LINK is an FA network that can send and receive large data packets flexibly and easily among advanced OMRON Programmable Controllers (CS-series, C200HX/HG/HE-series, C-series, CVM1, and CV-series PCs) and IBM PC/AT or compatible computers. The SYSMAC LINK supports data links that continuously share certain ranges of data and a message service that can be used to send and receive specific data when required. Data link areas can be freely set to create a flexible data link system and effectively use data areas. The network is connected using either coaxial cable or optical fiber cable, and high-volume data transmissions at high speed allow construction of a wide range of networks, from low-level systems to highly complex systems. Coaxial System IBM PC/AT or compatible CVM1-SLK21 C1000H-SLK21-V1 CS1W-SLK21 C200HW-SLK21 SYSMAC LINK Unit SYSMAC LINK Unit SYSMAC LINK Unit SYSMAC LINK Unit C1000H or C2000H PC CS1-series PC C200HX/HG/ HE PC IBM PC/AT or compatible CVM1 or CV-series PC Twisted-pair cable 3G8F5-SLK21-E SYSMAC LINK ISA Support Board 3G8F7-SLK21-E SYSMAC LINK PCI Support Board Optical System C200HW-SLK13/14 SYSMAC LINK Unit C200HX/HG/HE PC CV500-SLK11 SYSMAC LINK Unit CVM1 or CV-series PC C1000H-SLK11 SYSMAC LINK Unit C1000H or C2000H PC CS1W-SLK11 SYSMAC LINK Unit CS-series PC H-PCF Optical Fiber Cable (Daisy-chain connection) C200H-APS03 Auxiliary Power Backup power Supply Unit supply (100 VAC) 2 C1000H-APS01 Auxiliary Power Supply Units IBM PC/AT or compatible Backup power supply (24 VDC) 3G8F7-SLK11-E SYSMAC LINK PCI Support Board Section Overview 1-1 The functions of a SYSMAC LINK Network are outlined below. SYSMAC LINK Data link Manual settings Automatic settings Message service RAS functions Error log function Data link status display Polling node backup Node bypass function (See note.) Note Optical System only. 1-1-2 Features The SYSMAC LINK FA Network has the following features to meet the various requirements of FA sites. Data Links Flexible and efficient data links can be created to automatically transfer large amounts of data as listed below. Item Number of send words per node Number of send and receive words per node Specifications 508 words max. (254 words max. in the CIO/LR Area and 254 words max. in the DM Area) Coaxial or Optical SYSMAC LINK PCI Support Board: 2,966 words max. Data links can be configured automatically, or they can be configured by the user to freely change the sizes of the data areas used. A data link can also receive only part of the data sent from another node. This function enables nodes to receive only the required data, thereby increasing data link efficiency. Message Service The message service can send and receive up to 552 bytes of data (including the FINS header), allowing large volumes of data to be sent and received without having to be split up. Coaxial Cable or Optical Fiber Cable Connection The SYSMAC LINK Units can be connected to the network using either coaxial cable or optical fiber cables. Optical fiber cable (H-PCF cable) has superior noise resistance, so the system can provide highly reliable communications even in very noisy conditions. With H-PCF cable, the total communications distance can be up to 20 km (1 km max. between nodes when using the adhesive polishing method), which allows long-distance and large-scale networks. Communications between Different Models of PCs The following SYSMAC LINK Units are available for communications between different PCs. Wired Units and Optical Units, however, cannot be used together in the same SYSMAC LINK Network. Coaxial System • SYSMAC LINK Unit for CS-series Programmable Controllers 3 Section Overview 1-1 • SYSMAC LINK Units for C200HX/HG/HE Programmable Controllers • SYSMAC LINK Units for CVM1 and CV-series Programmable Controllers • SYSMAC LINK Units for C1000H and C2000H Programmable Controllers • SYSMAC LINK ISA Support Board for IBM PC/AT or compatibles • SYSMAC LINK PCI Support Board for IBM PC/AT or compatibles Optical System with H-PCF Cables • SYSMAC LINK Unit for CS-series Programmable Controllers • SYSMAC LINK Units for C200HX/HG/HE Programmable Controllers • SYSMAC LINK Unit for CVM1 and CV-series Programmable Controllers • SYSMAC LINK Unit for C1000H and C2000H Programmable Controllers • SYSMAC LINK PCI Support Board for IBM PC/AT or compatibles Flexible Inter-network Connections The SYSMAC LINK Network can be connected to another network (Ethernet, SYSMAC NET Link, SYSMAC LINK, or Controller Link network) through a CSseries or CV-series PC. By installing Ethernet, SYSMAC NET Link*, or SYSMAC LINK, or SYSMAC LINK Communications Units on the same CS-series PC or CV-series PC, a message service can be created with nodes in the interconnected networks through that PC. Up to three network levels are possible. Note *A SYSMAC NET Link Unit cannot be mounted in a CS-series PC. Improved Error Handling (RAS Functions) Error Log and Data Link Status Display An error log enables quick handling of errors by recording the time the error occurred and error details. The current SYSMAC LINK Unit and Support Board status are also available, as are the data link and network status. Polling Node Backup When an error occurs in the polling node that controls the SYSMAC LINK Network, another node automatically becomes the polling node. This prevents an error at a single node from influencing other nodes on the network, achieving a highly reliable system. Node Bypass Function In an Optical SYSMAC LINK Network, data communications can be continued by bypassing the node, even when a node in the communications line malfunctions or the PC or computer power supply is turned OFF. This prevents the whole network system from being affected by a node malfunction or power interruption. To use the bypass node function, backup power must be supplied to the SYSMAC LINK Units/Support Boards. Optical transmission path Bypass SLK SLK SLK PC PC PC SLK Power interruption IBM PC/AT or compatible 24-VDC or 100-VAC Backup Power Supply 1-1-3 What Is a SYSMAC LINK Support Board? A SYSMAC LINK Support Board is used to directly connect an IBM PC/AT or compatible with an ISA or PCI slot to a SYSMAC LINK Network. A SYSMAC LINK Support Board supports data links, a message service, and RAS functions in the same way as a SYSMAC LINK Unit. 4 Section Overview 1-1 The Support Board is mounted in an expansion slot in the computer. The following Support Boards are available depending on the type of connection cable. Coaxial System IBM PC/AT or compatible 3G8F7-SLK21-E (for PCI slot) or 3G8F5-SLK21-E (for ISA slot) SYSMAC LINK Support Board SYSMAC LINK Unit PC Coaxial SYSMAC LINK Network Optical System (H-PCF Cable) IBM PC/AT or compatible 3G8F7-SLK11-E (for PCI slot) SYSMAC LINK Support Board (An ISA Board is not available.) SYSMAC LINK Unit PC Optical (H-PCF Cable) SYSMAC LINK Network 5 Section Overview 1-1 1-1-4 Features of SYSMAC LINK PCI Support Boards The SYSMAC LINK PCI Support Board can be used to configure various communications applications using FinsGateway SYSMAC LINK (PCI) Embedded Edition. User application C library PLC Reporter 32, DataFlowNavi for Access, AIMAX-FA, etc. Compolet FinsGateway SYSMAC LINK (PCI) Embedded Edition PCI Bus SYSMAC LINK Support Board The Board is equipped with the FinsGateway SYSMAC LINK (PCI) Embedded Edition and C library (Win32 DLL) as standard features. With just the Board itself, user applications can be created using the C language (Microsoft Visual C++ Ver. 6.0). An overview of how to use the C library is described later in this manual. SYSMAC Compolet Version 2 provides ActiveX controls for PC communications. User applications can be created more easily using Microsoft Visual Basic. PLC Reporter 32, DataFlowNavi for Access, and AIMAX-FA are software packages of communications middleware. These software packages must be purchased separately. For details, refer to the manual for the appropriate software. 1-1-5 Outline of PCI Bus SYSMAC LINK Support Board Functions Data Links SYSMAC LINK Support Board data link data is stored in the event memory in the computer. Event memory is shared memory with names such as DM or CIO, and is stored in the computer memory. Event memory recreates virtually the DM Area and CIO Area of an OMRON PC. Event memory can be written or read by executing the C library data link data read/write functions SlkWriteDatalink( ) and SlkReadDatalink( ) from the user program. Computer User application SlkWriteDatalink( ) CIO Event memory FinsGateway SlkReadDatalink( ) DM Data link SYSMAC LINK Support Board SYSMAC LINK Network 6 PC Section Overview Message Service 1-1 FINS commands and FINS responses can be sent and received for specified nodes on the network by executing FINS message send/receive functions SlkSendFins( ) and SlkRecvFins( ) from the user program. Computer User application SlkSendFins( ) SlkRecvFins( ) FinsGateway SYSMAC LINK (PCI) Embedded Edition SYSMAC LINK Support Board PC SYSMAC LINK Network A maximum of 4 PCI Bus SYSMAC LINK Support Boards can be mounted to one computer. Consequently, multiple user applications can be executed simultaneously. Computer User application User application FinsGateway SYSMAC LINK (PCI) Embedded Edition SYSMAC LINK Support Board SYSMAC LINK Support Board PC SYSMAC LINK Network 7 Section Specifications and Configurations 1-2 1-2 Specifications and Configurations 1-2-1 System Configuration Coaxial System CS1W-SLK21 SYSMAC LINK Unit CS-series PC IBM PC/AT or compatible C1000H-SLK21-V1 C200HW-SLK23/24 CV500-SLK21 SYSMAC LINK Unit SYSMAC LINK Unit SYSMAC LINK Unit C200HX/HG/ HE PC CVM1 or CV-series PC IBM PC/AT or compatible C1000H or C2000H PC Coaxial cable 3G8F5-SLK21-E SYSMAC LINK ISA Support Board 3G8F7-SLK21-E SYSMAC LINK PCI Support Board Optical System C200HW-SLK13/14 SYSMAC LINK Unit CV500-SLK11 SYSMAC LINK Unit CVM1 or CV-series PC C200HX/HG/HE PC C1000H-SLK11 SYSMAC LINK Unit CS1W-SLK11 SYSMAC LINK Unit CS-series PC C1000H or C2000H PC H-PCF Optical Fiber Cable (Daisy-chain connection) C200H-APS03 Auxiliary Power Backup power Supply Unit C1000H-APS01 Auxiliary Power Supply Units supply (100 VAC) Note IBM PC/AT or compatible Backup power supply (24 VDC) 3G8F7-SLK11-E SYSMAC LINK PCI Support Board 1. A maximum of 4 PCI Bus SYSMAC LINK Support Boards can be mounted. (Different types of connection systems can be mounted simultaneously.) 2. PCI Bus SYSMAC LINK Support Boards can also be used with ISA Bus SYSMAC LINK Support Boards. If PCI Bus and ISA Bus SYSMAC LINK Support Boards are used together, however, a separate ISA Bus FinsGateway SYSMAC LINK Driver is required. 1-2-2 PCI Bus SYSMAC LINK Support Board Models Product SYSMAC LINK PCI S B d Support Board System Optical (H-PCF Cable) Coaxial (Coaxial Cable) 1-2-3 Communications Specifications Optical System Items Specifications Type Optical (H-PCF cable) Model 3G8F7-SLK11 Communications method N:N token-bus method Code Manchester code Modulation Baseband code Synchronization Flag synchronization (conforms to HDLC frames) Transmission path format Daisy-chain method 8 Model 3G8F7-SLK11 3G8F7-SLK21 Section Specifications and Configurations Items 1-2 Specifications Transmission speed 2 Mbps Maximum transmission distance Maximum distance between nodes Transmission media 20 km Node connection method Connected via a special (full-lock connector) connector. (A half-lock connector can also be used.) 62 nodes Maximum number of nodes Applicable Programming Devices Communications functions Number of data link words Crimp cut: 800 m Adhesive: 1 km (See note 1.) H-PCF cable (optical two-core cable) FinsGateway’s SLK data link setting utility (See note 2.) Data links and message service Transmission area per node: 508 words max. (254 words in the CIO/LR Area and 254 words in the DM Area) Number of data link words that can be used with one PCI Board (total transmission): 2,966 words max. Data link areas FinsGateway Event Memory Message length 552 bytes max. (including the header) RAS functions Polling node backup function Self-diagnosis function (hardware checking at startup) Echoback test and broadcast test (using FINS commands) Watchdog timer Error log function Error control Node bypass function Manchester code check CRC check (CCITT X16 + X12 + X5 + 1) Note 1. The maximum distance between nodes depends on the connector and cable processing methods. 2. The Board’s data link tables can be set using CX-Net in CX-Programmer. Use the FinsGateway’s SLK data link setting utility, or the SYSMAC LINK Support Software. 9 Section Specifications and Configurations 1-2 Coaxial System Items Specifications Type Coaxial Model 3G8F7-SLK21 Communications method N:N token bus Code Manchester code Modulation Baseband code Synchronization Flag synchronization (conforms to HDLC frames) Transmission path form Multi-drop bus Transmission speed 2 Mbps Maximum transmission distance Transmission media 1 km Node connection method BNC connectors Applicable Programming Devices Maximum number of nodes Communications functions FinsGateway’s SLK data link setting utility (See note 1.) Number of data link words Transmission area per node: 508 words max. (254 words in the CIO/LR Area and 254 words in the DM Area) Coaxial cable (5C-2V) 62 nodes Data links and message service Number of data link words that can be used with one PCI Board (total transmission): 2,966 words max. Data link areas FinsGateway’s event memory Message length 552 bytes max. (including the header) RAS functions Polling node backup function Self-diagnosis function (hardware checking at startup) Echoback test and broadcast test (using FINS commands) Watchdog timer Error log function Error control Manchester code check CRC check (CCITT X16 + X12 + X5 + 1) Note The Board’s data link tables can be set using CX-Net in CX-Programmer. Use the FinsGateway’s SLK data link setting utility, or the SYSMAC LINK Support Software. 1-2-4 General Specifications SYSMAC LINK PCI Support Board Items Coaxial system: 3G8F7-SLK21 Optical system (H-PCF cable): 3G8F7-SLK11 External dimensions 106 x 140 mm (W x L) Weight 109 g (excluding mounting bracket) 120 g (excluding mounting bracket) Current consumption 0.45 A max. at 5 VDC Without power supply: 0.52 A max. at 5 VDC With power supply: 0.33 A max. at 5 VDC Installation environment conditions 10 Same as for computer. Specifications and Configurations Section 1-2 1-2-5 Dimensions Coaxial Model (3G8F7-SLK21-E) (Unit: mm) 11 Specifications and Configurations Section Optical Model, H-PCF Cable (3G8F7-SLK11-E) (Unit: mm) 12 1-2 Section Specifications and Configurations 1-2 1-2-6 Indicators Optical System (H-PCF Cable) RUN Name Operating g ERR Error Color Green Status Red INS Participating g i network k in Yellow LNK Sending g data li k link Yellow PS (S note.)) (See Power supplyy ON Green Coaxial System Explanation Lit Not lit Lit The Board is operating normally. A Board operating error (watchdog timer error) has occurred. One of the following errors has occurred. Not lit Lit Not lit Lit Flashing Not lit Lit Not lit Communications error Node address setting error (duplicate setting) Optical system connection error EEPROM error Hardware error Data link table error Routing table error Network parameter error Operating normally (no errors in the setting tables). Participating in network. Not participating in network. Sending data link (participating in data link) Error in the data link table settings. Data link is stopped or Unit is not participating in data link. Backup power supply is ON. Backup power supply is OFF. Note Only Optical Units are equipped with the P/S indicator. 1-2-7 Product Components System Model Contents Coaxial system 3G8F7-SLK21 SYSMAC LINK Support Board x 1 CD-ROM x 1 Installation guide x 1 F-type connector x 1 Insulating cover x 1 Cable mounting bracket x 1 Board ID switch number/indicator label x 1 User registration card (software license agreement) x 1 Optical system, H-PCF cable 3G8F7-SLK11 SYSMAC LINK Support Board x 1 CD-ROM x 1 Installation guide x 1 Optical cable bracket x 1 Power supply connector x 1 Board ID switch number/indicator label x 1 User registration card (software license agreement) x 1 Note 1. The following software is supplied on the CD-ROM. • SYSMAC LINK (PCI) Driver • FinsGateway SYSMAC LINK (PCI) Embedded Edition • Setup Diagnostic Utility • C library 2. The computer’s operating system is not provided with the Support Board. The operating system must be acquired separately. 13 Section Basic Procedures 1-3 1-2-8 Software Configuration User application Software FinsGateway utilities C library FinsGateWay Hardware SYSMAC LINK Support Board Note An SLK data link setting utility is included in the FinsGateway utilities. Make the data link table settings for the Board using this utility. For details, refer to FinsGateway online help. 1-2-9 Compatible Computers, Operating Systems, and Libraries SYSMAC LINK Support Board All models Compatible computer Compatible operating system IBM PC/AT or compatible Windows 98 CPU: Intel Celeron 400 MHz or faster Windows 2000 Main memory: 32 MB min. Windows NT4.0 (Service Pack 3 or later) One PCI bus slot must be available. Compatible language Microsoft Visual C++ Ver 6.0 (Service Pack 3) Available hard disk space: 70 Mbytes min. (not including space for user applications) CD-ROM drive: Required for software installation Display: VGA (640 x 480 pixels) or better display functionality (Other conditions conform to those of the OS.) Note 1-3 1. Operation of the SYSMAC LINK Board can be guaranteed only under the computer and operating system specifications outlined above. Use a computer and operating system that meet these minimum specifications. 2. The SYSMAC LINK Support Board cannot be used in a computer running Windows 95, Windows NT3.51, or other older operating systems. Basic Procedures Initial Procedure Refer to the SYSMAC LINK Support Board Installation Guide for information on the first three steps in the following procedure. 1, 2, 3... Data Link Procedure 1, 2, 3... 1. 2. 3. 4. 5. Set the Board ID on the Board switch. Install the Board into the computer. Install the software. Wire and connect the cables. Perform the following data link and/or message service procedure. 1. Create data link tables using the FinsGateway utilities and transfer the data to the Board. Note When the data link tables and routing tables are transferred to the SYSMAC LINK Support Board, they are saved in backup memory (EEPROM) on the Board. It is not necessary to set the data again when the power is turned OFF and ON. 14 Section Applications Precautions 1-4 2. Read and write to the data link area using the utility applications that use the C library. Note The data links can also be started by sending the data link activation command with the FINS message service, or by using a PC software switch operation. Message Service Procedure 1, 2, 3... 1. Create routing tables using the SYSMAC LINK Support Software or the FinsGateway utilities, and transfer the tables to the Board. Note When the data link tables and routing tables are transferred to the SYSMAC LINK Support Board, they are saved in backup memory (EEPROM) on the Board. It is not necessary to set the data again when the power is turned OFF and ON. 2. Send and receive FINS messages using the utility applications that use the C library. 1-4 Applications Precautions Board ID Switch If more than one SYSMAC LINK Support Board is mounted to a computer, set a unique Board ID on each Board. Up to 4 Boards can be mounted. Note Refer to the SYSMAC LINK PCI Support Board Installation Guide (W389). Cables Turn OFF the power of all the nodes on the network before connecting or disconnecting a cable. Note Refer to Section 2 Wiring. Use the specified cable only. Note Refer to 1-2 Specifications and Configurations. Routing Tables Set routing tables at all the nodes in all the networks when multiple networks are connected to one PC. Note Refer to Section 7 Network Interconnections. When a routing table is transferred (written) to a PC, all CPU Bus and Communications Units are reset. The routing tables must not be transferred to a PC while the system is running. Data Links When using a manually set data link, delete the data link tables from all nodes not participating in the data link. The polling node must not be restarted or reset during data link operation. If the SYSMAC LINK Support Board is the polling node and data links are operating on the network, wait at least three seconds after closing the Board before opening the Board again. If the SYSMAC LINK Support Board is the polling node and data links are operating on the network, wait at least three seconds after removing the Board from the network before adding Board to the network again. Other Precautions Observe the following precautions. • The SYSMAC LINK Support Board can be used only with the specified computer operating systems. Note Refer to 1-2 Specifications and Configurations. • Set the IRQ (interrupt request) of the SYSMAC LINK Support Board so that it does not conflict with other resources. 15 Applications Precautions Section 1-4 Note Refer to the SYSMAC LINK PCI Support Board Installation Guide (W389). • If using the SEND, RECV, and CMND instructions with a PC on which the routing tables have been set, be sure to specify the network address set in the routing tables. • Coaxial SYSMAC LINK Units/Boards cannot be combined with Optical SYSMAC LINK Units/Boards in the same network. • SYSMAC LINK Units/Boards cannot be combined with Controller Link Units/ Boards in the same network. 16 SECTION 2 Wiring This section describes how to wire the power supply cables and communications cables to the SYSMAC LINK Support Board. 2-1 2-2 2-3 Connecting Coaxial Systems . . . . . . . . . . . . . . . . . . . . . . . . . . . . . . . . . . . . . . . . . . . . . . . . 2-1-1 Devices Required for Connection . . . . . . . . . . . . . . . . . . . . . . . . . . . . . . . . . . . . . 2-1-2 Cable Connection Procedure . . . . . . . . . . . . . . . . . . . . . . . . . . . . . . . . . . . . . . . . . 2-1-3 Attaching the Connector to the Board . . . . . . . . . . . . . . . . . . . . . . . . . . . . . . . . . . 2-1-4 Attaching Connectors to the Coaxial Cable . . . . . . . . . . . . . . . . . . . . . . . . . . . . . . Connecting Optical Systems (H-PCF Cable) . . . . . . . . . . . . . . . . . . . . . . . . . . . . . . . . . . . . 2-2-1 Devices Required for Connection . . . . . . . . . . . . . . . . . . . . . . . . . . . . . . . . . . . . . 2-2-2 Wiring the Optical Fiber Cables . . . . . . . . . . . . . . . . . . . . . . . . . . . . . . . . . . . . . . 2-2-3 Installing Connectors . . . . . . . . . . . . . . . . . . . . . . . . . . . . . . . . . . . . . . . . . . . . . . . Backup Power Supply Wiring (Optical Systems Only) . . . . . . . . . . . . . . . . . . . . . . . . . . . . 2-3-1 Backup Power Supply Specifications . . . . . . . . . . . . . . . . . . . . . . . . . . . . . . . . . . 2-3-2 Connecting the Backup Power Supply . . . . . . . . . . . . . . . . . . . . . . . . . . . . . . . . . 17 Section Connecting Coaxial Systems 2-1 2-1 Connecting Coaxial Systems This section describes how to connect the network communications cables to the Coaxial SYSMAC LINK Support Board (3G8F7-SLK21). 2-1-1 Devices Required for Connection Coaxial Cable and BNC Connectors Use 5C-2V coaxial cable rated for indoor usage. Connect BNC connectors to the coaxial cable in order to connect it to the nodes in the SYSMAC LINK network. F-type Adapter (C1000H-CE002) Use an F-type Adapter to connect the coaxial cable to the Board. An F-type Adapter is included with the SLK21 Boards. Terminator (C1000H-TER01) Install Terminators in the F-type Adapters of the nodes at both ends of the network bus. Two Terminators are required for each network and the Terminators are sold separately. 2-1-2 Cable Connection Procedure Use the following procedure when connecting coaxial cables. 1, 2, 3... 1. Attach connectors to the coaxial cable. 2. Connect the cables to the F-type Adapters. At this point, install Terminators in the F-type Adapters of the nodes at each end of the network bus. When connecting or removing a connector, hold the connector itself securely. 3. Connect the F-type Adapter to the Board. Wire the Units/Boards in order starting from one end of the network. Terminator Terminator F-type Adapter Connector 5C-2V Coaxial cable 2-1-3 Attaching the Connector to the Board Attachment Procedure 1, 2, 3... 1. Align the Mounting Bracket and Board and attach the bracket with the provided screw. The Mounting Bracket has a small pin that fits into the Board when it is aligned correctly, as shown in the following diagram. 2. If the Board isn’t at the end of the network, connect it to the adjacent nodes with two cables. The cables can be connected to either socket in the Board’s F-type Adapter. If the Board is at one end of the network, connect it to the adjacent node and 18 Section Connecting Coaxial Systems 2-1 install a Terminator in the other socket. The Terminator can be connected to either socket in the Board’s F-type Adapter. Boards in the middle of the network Boards at the ends of the network Terminator 3. Push the F-type Adapter into the Board’s BNC connector and turn the fitting clockwise until it locks. Turn clockwise. 4. Align the Mounting Bracket and clamp to secure the cable(s) and attach the clamp with the provided screw. The clamp has a small pin that fits into the Mounting Bracket when it is aligned correctly, as shown in the following diagram. 5. Cover the F-type Adapter with the insulating cover provided. Insulating cover 6. Do not bend the cable too sharply when handling it. The minimum bending radius is about 45 mm (about 6× the coaxial cable radius). 19 Section Connecting Coaxial Systems 2-1 Provide wider turns for the permanent installation. The minimum bending radius for the permanent installation is about 110 mm (about 15× the coaxial cable radius). Precautions Observe the following precautions regarding the communications cables: • Always use the specified coaxial cable. • Install the coaxial cable separately from power lines and high-voltage lines to prevent noise. • Always install Terminators in the nodes at the ends of the network bus. • Do not install the coaxial cable outdoors. If the cable must be installed outdoors, provide protection from lightning by installing the cable underground or inside conduit. • The minimum cable length between nodes is 1 m. Do not assemble communications cables shorter than 1 m. • Use the F-type connectors to connect nodes and use the multi-drop method. • Before removing a coaxial cable, touch a grounded metal object to discharge any static electricity. • Always turn OFF the computer before connecting the coaxial cable to the Board. • Fully insert the cable’s connector into the Board’s BNC jack. Also, check that the connections are locked securely before starting operation. 2-1-4 Attaching Connectors to the Coaxial Cable The following diagram shows the parts that make up the BNC connector. Body Sleeve Contact crimp Ferrule Contact Approx. 24.3 mm A hand crimp tool (CR-H-1130 by Dai-ichi Denshi Kogyo) must be used to crimp the connector onto the cable. 1, 2, 3... 1. Cut the coaxial cable to the desired length. LA mm = L mm – 12 mm Approx. 24.5 mm Approx. 24.5 mm L Cable LA 20 Section Connecting Coaxial Systems 2-1 2. Strip 15 mm of the cable sheathing. Strip the cable carefully so that the wire mesh shield is not cut or otherwise damaged. 15 mm 3. Place the ferrule on the cable in the proper direction, as shown in the following diagram. Ferrule Cable 4. Spread out the wire mesh shield at the end of the cable and insert the sleeve. Use the stripping tool to firmly push the sleeve until the flange fits snugly against the wire mesh shield. Ferrule Shield Sleeve Ferrule Sleeve 5. At this stage, the polyethylene core and center conductor will be slightly long. Cut off the portion (A in the diagram) that protrudes past the stripping tool so that the polyethylene core is flush with the outer surface of the stripping tool. Blade Ferrule Stripping tool Conductor Shield Sleeve 6. Press the stripping tool’s blade (B in the diagram) so that the blade cuts into the polyethylene core and rotate the tool several times. Hold the blade down and pull the tool off of the cable (direction D), as shown in the diagram. Conductor 21 Section Connecting Coaxial Systems 2-1 7. Use a pair of scissors to trim off the excess wire mesh shield, as shown in the diagram. 8. Insert the contact into the contact crimp adapter and set it in the Crimp Tool’s die. Slide the contact onto the central conductor until the contact touches the polyethylene core. Squeeze the Crimp Tool’s handle strongly to crimp the contact. 9. Insert the completed contact subassembly into the body of the connector. Push the contact into the connector until the flared part of the contact enters the connector’s insulator so that the tip of the contact is about even with the tip of the insulator. After the flared part of the contact has been inserted into the insulator, do not rotate the connector body on the cable before crimping the connector body. Connector body Contact subassembly Insulator 10. Open the Crimp Tool’s handle and place the connector into the Tool so that the tip of the connector touches the body stopper. Close the handle until the rachet catches. Align the connector body’s hole with the hexagonal sides of the die. If the connector has been crimped correctly, it will look like the connector on the right in the following diagram. Body stopper Crimp height Cable Connector body Checking the Connector Installation Check that the connector body has been crimped onto the cable correctly. If the connector body wasn’t pushed up against the body stopper, the middle of the connector body will be crimped, as shown in the example on the right. Correctly crimped 22 Incorrectly crimped Section Connecting Coaxial Systems 2-1 Check that the tip of the contact is even with the front edge of the connector body. Connector body Use a multimeter to check for electrical continuity at the following points. 1, 2, 3... 1. There should be no continuity between the central conductor and wire mesh shield in the connector’s plug shell. 2. There should be continuity between the plug shells of the connectors at the ends of the cable. 3. There should be continuity between the central conductors of the connectors at the ends of the cable. Note Install the coaxial cable separately from power lines and high-voltage lines to prevent noise. 23 Section Connecting Optical Systems (H-PCF Cable) 2-2 2-2 Connecting Optical Systems (H-PCF Cable) This section describes how to connect the communications cable to a 3G8F7-SLK11 SYSMAC LINK Support Board in an H-PCF Cable Optical System. 2-2-1 Devices Required for Connection The following devices are required for the Optical (H-PCF Cable) SYSMAC LINK Network. Use the following Optical Fiber Cables (Hard Plastic-clad Fiber: H-PCF). Optical Fiber Cables (Indoor Use Only) Name H-PCF cables Specifications Black Model 10 m 50 m 100 m 500 m 1,000 m 10 m 50 m 100 m 500 m 1,000 m Orange g S3200-HCCB101 S3200-HCCB501 S3200-HCCB102 S3200-HCCB502 S3200-HCCB103 S3200-HCCO101 S3200-HCCO501 S3200-HCCO102 S3200-HCCO502 S3200-HCCO103 Note The Optical Fiber Cable model numbers are as follows: S3200-Hjjjjjjj Tensioner option None: Standard (with tension member) N: Without tension member Cable length jjj A B (A/10) x 10B m Cable color B: Black O: Orange Cable specification L: With power supply line C: Without power supply line Type B: C: Cord Cable Connectors Name Connector Inline Adapter Note 24 Model Specifications S3200-COCF2011 Use to connect a cable to a node. (Full-lock connector for crimp-cut cable.) S3200-COCF2511 Use to connect a cable to a node. (Half-lock connector for crimp-cut cable.) S3200-COIAT2000 Use to connect or extend cables. (Use one adapter for each connection.) 1. Either full-lock or half-lock connectors can be used in a SYSMAC LINK Network, but we recommend full-lock connectors to prevent accidental disconnections during operation. 2. The maximum distance between nodes is slightly shorter for connectors with crimp-cut cables compared to connectors assembled with adhesive. Section Connecting Optical Systems (H-PCF Cable) 2-2 Also, the maximum distance is reduced due to extension loss when Inline Adapters are used to extend cables. Optical Fiber Cables with Connectors (Indoor Use Only) The following Optical Fiber Cables are available with Connectors already attached. Specifications Length Optical Fiber Cable Connectors: 2 m 5m S3200-COCF2011 S3200 COCF2011 ⇓ 10 m S3200 COCF2011 S3200-COCF2011 15 m 20 m Over 20 m Note Model S3200-CN201-20-20 S3200-CN501-20-20 S3200-CN102-20-20 S3200-CN152-20-20 S3200-CN202-20-20 S3200-CN-20-20 (Specify length (m) when ordering.) Optical Fiber Cable Connectors: 2 m 5m S3200-COCF2011 S3200 COCF2011 ⇓ 10 m S3200 COCF2511 S3200-COCF2511 15 m 20 m Over 20 m S3200-CN201-20-25 S3200-CN501-20-25 S3200-CN102-20-25 S3200-CN152-20-25 S3200-CN202-20-25 S3200-CN-20-25 (Specify length (m) when ordering.) Optical Fiber Cable Connectors: 2 m 5m S3200-COCF2511 S3200 COCF2511 ⇓ 10 m S3200 COCF2511 S3200-COCF2511 15 m 20 m Over 20 m S3200-CN201-25-25 S3200-CN501-25-25 S3200-CN102-25-25 S3200-CN152-25-25 S3200-CN202-25-25 S3200-CN-25-25 (Specify length (m) when ordering.) 1. Consult an electrician if cables with outdoor specifications are required. The cable must be protected from lightning by special installation such as installation within a conduit or underground. 2. The cables listed above are black and have power supply lines and tension members, although the power supply lines aren’t used in the SYSMAC LINK Network. 3. All of the cables listed above are attached to the connectors with adhesive. 4. Special training is required to assemble Optical Fiber Cables and connectors with adhesive. Optical Fiber Cable Accessories Use the following accessories to assemble and test Optical Fiber Cables. Name Model Specifications Optical Fiber Assembly Tool S3200-CAK1062 Crimp-cut tool for the S3200-COCF2011/2511 Connectors Optical Power Tester S3200-CAT2700 With S3200-CAT2702 Head Unit and adapter for the S3200-COCF2011/2511 Connectors Master Fiber Set S3200-CAT2001H One meter cable for use with the S3200-CAT2702 Head Unit This manual does not provide details on Optical Fiber Cable preparation. For details, refer to the instructions provided with the S3200-CAK1062 Assembly Tool. 25 Section Connecting Optical Systems (H-PCF Cable) 2-2 2-2-2 Wiring the Optical Fiber Cables All of the nodes in the Optical SYSMAC LINK Network are connected in a line (daisy-chain configuration) with H-PCF Optical Fiber Cables. Begin connection with the rightmost connector (SL1) of the highest node in the network and connect to the leftmost connector (SL2) in the next lower node, as shown in the following diagram. The nodes can be connected in any order, but connect the nodes in the order of node addresses (i.e., node 1, node 2... node 62) as much as possible to reduce the effect on the communications time if a wire breaks. Always cover the unused connectors on the highest and lowest nodes in the network with the enclosed Optical Connector Covers. Optical Connector Cover Optical Connector Cover (Included) ← Higher Lower → (Included) Refer to 2-2-1 Devices Required for Connection for details on available Optical Fiber Cables. Note 1. Always use the specified Optical Fiber Cables. 2. The maximum distance between nodes depends on the method used to attach the connector to the cable. 2-2-3 Installing Connectors A special connector is used to connect the Optical Fiber Cable to the SYSMAC LINK Support Board. This manual does not provide details on attaching Connectors to the Optical Fiber Cable. Connect the nodes in order beginning with the highest node in the network and continuing on to lower nodes. • Always turn OFF the computer and backup power supply before connecting Optical Fiber Cables or the backup power supply connector. • Special tools are required to attach Optical Fiber Cables to the connectors. The cable may disconnect from the connector if the proper tools and methods are not used during cable assembly. Connection Procedure 1, 2, 3... 1. The Optical Fiber Cable’s power supply line is not used, so it can be cut. 2. As shown in the following diagram, secure the Optical Fiber Cable, and secure the clamp to the mounting bracket. Secure the two cables simultaneously for nodes (except the end nodes). Pay attention to the orientation of the mounting bracket and the connector position when connecting the cable 26 Section Connecting Optical Systems (H-PCF Cable) 2-2 from the highest node in the network to the rightmost connector (SL1), and the cable from the next lower node to the leftmost connector (SL2). Cable connects to connector SL1 Cable connects to connector SL2 3. Install the mounting bracket on the Board with the screws provided. Insert the tip of the mounting bracket with the grooves into the hole on the Board surface until it locks firmly (a), and then secure the other end of the mounting bracket using the screw (b). Take care not to bend or pull the Optical Fiber Cable forcefully. (The cable was omitted from the diagram to make the connector more visible.) 4. Remove the Optical Connector Cover from the Board again. If there are covers on the end connectors of the Optical Fiber Cable, remove them. 5. Double-check the direction of the cables. The cable from the node higher in the network connects to the Board’s right connector and the cable to the node lower in the network connects to the Board’s left connector. Insert the cable’s connectors fully into the Board’s connectors. Connection Precautions • Insert the connectors completely and check that the connectors are locked before starting operation. 27 Section Connecting Optical Systems (H-PCF Cable) 2-2 • If a connector becomes disconnected, the node will be unable to communicate with other nodes in that part of the network. The network will be divided into two and communications with the remaining nodes will be unreliable. Communications will continue (unreliably) with the remaining connected nodes. Network divided into two (Communications disabled) • Do not pull on the Optical Fiber Cable. The maximum tension that can be applied to the cord is 10 kg (about 22 lbs) and the maximum tension that can be applied to the cable is 50 kg (about 110 lbs). Cord Cable • Do not bend the cable past its natural bending radius. The minimum radius for bends is 10 cm. R • To prevent the Optical Fiber Cable from being pulled too forcefully, always use the cable mounting bracket and provide space behind the Board as shown in the following diagram. Do not exceed the maximum tension for the cord and cable: Cord: 0 kg (Do not apply any tension.) Cable: 5 kg (about 11 lbs) Cord Cable Back of the computer 140 mm • Do not place objects on top of the Optical Fiber Cable. The maximum pressure that can be placed on the cord and cable is as follows: Cord: 30 kg/10 cm Cable: 50 kg/10 cm • Inspect the connector before installing it. • When connecting or disconnecting the Optical Fiber Cable, be sure to hold the connector firmly. (Do not pull on the cable itself.) 28 Section Backup Power Supply Wiring (Optical Systems Only) 2-3 2-3 Backup Power Supply Wiring (Optical Systems Only) A node bypass function can be used with an Optical Ring SYSMAC LINK System (H-PCF cable) by supplying a backup power supply to the Units and Boards. This will prevent the entire network from going down if a node malfunctions or the power supply to the PC or computer is turned OFF. Optical transmission path Bypass SLK SLK SLK SLK Computer Power supply down Backup power supply (24 VDC or 100 VAC) Each node requires a backup power supply for the node bypass function. Several nodes can be connected to a single power supply or each node can be connected to an independent power supply. If several nodes are connected to a single power supply, be sure to wire each node separately as shown in the diagram. Note Use a separate power supply as the backup power supply. Do not use the same power supply being used as the I/O power supply, equipment (such as motors) power supply, or control power supply. 2-3-1 Backup Power Supply Specifications The input specifications for the backup power supply to the SYSMAC LINK Unit and Support Board are described below. When providing a backup power supply, make sure that the following specifications are satisfied. Item Specifications Power supply voltage 24 VDC Allowable power supply voltage fluctuation range Consumption current 20.4 to 26.4 VDC (24 VDC, –15 to +10%) Inrush current 2.5 A max. (when 24-VDC rising time is 5 ms) 24 VDC, 400 mA max. (per node) An OMRON S82K-series Power Supply Unit is recommended. Note 1. If connecting multiple nodes to one power supply, or if the distance between the power supply and the node is great, carefully consider the maximum current and voltage needed to satisfy the specifications at the node’s power supply connectors and terminals. 2. Power supply from the backup power supply is given priority. Consider the following points when designing a system. a) Turn ON the backup power supply before turning ON the power supply to the PC and computer. b) The communications data will be corrupted in the instant when the backup power supply is turned ON or OFF. c) To make sure that the node bypass function is operating when the power supply to the PC or computer is OFF, use a separate backup power supply that is not connected to the PC or computer. d) Always use a separate backup power supply. Do not use the same supply as the I/O power supply, motor power cables, or control power cables. 29 Section Backup Power Supply Wiring (Optical Systems Only) 2-3 e) Use a backup power supply with double or reinforced insulation. 3. Use the correct power supply voltage, as given above. 2-3-2 Connecting the Backup Power Supply Observe the following precautions when connecting the backup power supply. • Separate the backup power supply wires from other power lines and high-voltage lines to prevent noise. • Attach special crimp terminals to the backup power supply wires. • Do not reverse the power supply polarity. • Tighten the power supply cable hold-down screws to 0.2 Nm. • Do not pull on the power supply cable. • Do not bend the power supply cable too sharply. • Do not place any objects on top of the power supply cable. • Verify that the connector is installed properly before using the power supply. • Check the wiring configuration carefully before turning ON the power. Connect the power supply cable to the cable connector and then secure it to the Board, as shown in the following diagram. Be sure that the power supply polarity is not reversed. + – + 24 VDC – Backup power supply Note It is difficult to connect or disconnect the backup power supply connector after the Optical Fiber Cable’s mounting bracket has been installed. Insert the connector before installing the mounting bracket. 30 SECTION 3 Creating Applications Using the C Library This section describes how to create applications (user programs) that control the SYSMAC LINK Support Board. 3-1 3-2 Basic Flow . . . . . . . . . . . . . . . . . . . . . . . . . . . . . . . . . . . . . . . . . . . . . . . . . . . . . . . . . . . . . . 3-1-1 Data Link Procedure . . . . . . . . . . . . . . . . . . . . . . . . . . . . . . . . . . . . . . . . . . . . . . . 3-1-2 Message Service Procedure . . . . . . . . . . . . . . . . . . . . . . . . . . . . . . . . . . . . . . . . . . Using the C Library . . . . . . . . . . . . . . . . . . . . . . . . . . . . . . . . . . . . . . . . . . . . . . . . . . . . . . . 31 Section Basic Flow 3-1 3-1 Basic Flow This section describes the basic procedural flow in creating the applications (user programs) necessary to use the SYSMAC LINK Support Board data link function and the message service function. Create the applications according to the flowcharts in this section. The following explanations assume that the driver and C library have already been installed. If they have not been, refer to SYSMAC LINK PCI Support Board Installation Guide (W389) before proceeding. 3-1-1 Data Link Procedure The basic procedure for using data links is outlined in the following flowchart. START Data link tables not yet written (no DATALINK.DAT file) Data link tables already written Write the data link tables using the Support Software. Writing data link tables Transfer the data link tables to the other nodes using the Support Software. (Data link tables transferred to the Board will be recorded in the Board’s EEPROM.) Initialization Sending/receiving data link data Ending Note 32 Open the application interface using the SlkOpen function. Read and write data link data using the SlkRadDatalink and SlkWriteDatalink functions. The network participation status and data link operating status can be read using the SlkGetNetworkStatus function. Close the application interface using the SlkClose function. 1. Repeat the process to read/write data link data as often as required by the application. 2. Data links can be started and stopped from other nodes, by sending FINS commands from Support Software, by using PC software switches, or by sending a FINS command from the application using the SlkSendFins function. 3. Information on errors that occur in using the C library can be read using the SlkGetLastError function. For details on various methods for making programs, refer to the following resources. • Information on using the C library: 3-2 Using the C Library • Details on C library functions: Section 4 C Language Function Reference • Support Software: SYSMAC LINK Support Software Operation Manual (W369) Section Basic Flow 3-1 3-1-2 Message Service Procedure The basic procedure for using the message service is outlined in the following flowchart. Routing tables already written START Routing tables already written or not necessary Write the routing tables using the Support Software. Writing routing tables Transfer the routing tables to the other nodes using the Support Software. (Routing tables transferred to the Board will be recorded in the Board’s EEPROM memory.) Open the application interface using the SlkOpen function. Initialization Send FINS message using the SlkSendFins function. Sending and receiving FINS messages Check for responses to FINS message using the SlkRecvFins function. No response Response The network participation status and data link operating status can be read using the SlkGetNetworkStatus function. Ending Note Close the application interface using the SlkClose function. 1. Routing tables are not needed if all communications take place with other nodes in the local network, but routing tables must be prepared if there are communications between nodes on different networks. 2. Repeat the process to send and receive FINS messages as often as required by the application. 3. To use Windows-based messages to determine if a FINS message has been received, use the SlkSetMessageOnArrival and SlkSetThreadMessageOnArrival functions to register the Windows-based messages to be used for notification. When not using Windows-based messages, check periodically for FINS messages using SlkRecvFins. For details on various methods for making programs, refer to the following resources. • Information on using the C library: 3-2 Using the C Library • Details on C library functions: Section 4 C Language Function Reference 33 Section Using the C Library 3-2 3-2 Using the C Library The Microsoft Visual C++ library functions for the SYSMAC LINK Support Board are provided in the following file. Fine name SLK_LIB.LIB Contents Microsoft Visual C++ Ver. 6.0 (Service Pack 3) import library file The library contains the following functions. Functions Function name Name Function Page SlkOpen Board Open Opens the application interface and gets an SLK handle. 38 SlkClose Board Close Closes the application interface and releases the SLK handle. 39 SlkSendFins FINS Message Send Sends a FINS message. 39 SlkRecvFins FINS Message Receive Receives a FINS message. 40 SlkWriteDatalink Data Link Data Write Writes data to a data link area. 40 SlkReadDatalink Data Link Data Read Reads data from a data link area. 41 SlkGetNetworkStatus Network Status Read Reads the network status. 41 SlkSetMessageOnArrival FINS Message Reception Notification Registration to Window Makes settings to notify the specified window with a Windows message when a FINS message is received. 42 SlkSetThreadMessageOnArrival FINS Message Reception Notification Registration to Thread Makes settings to notify the specified thread with a Windows message when a FINS message is received. 43 SlkClearMessageOnArrival FINS Message Reception Notification Clear Clears windows message notification when a FINS message is received. 43 SlkGetLastError Detailed Error Information Acquire Gets an error code generated when a SLK library function is used. 44 34 Section Using the C Library 3-2 Setting Up Visual C++ Ver. 6 Use the following procedure to set up Microsoft Visual C++ to use the C library. Include Files 1, 2, 3... 1. Start Visual C++ Ver. 6.0 and select Tools and then Options. 2. Select the Directory Tab, set the directory being displayed to the one for the include files, click the first empty row in the list, and then click the ... Button at the left of the row. 3. Specify the folder in which the C library for the Support Board was installed and click the OK Button. The installation directory in the header file default for the C library is \Program Files\OMRON\SYSMAC LINK\Lib. 4. Include the following line at the beginning of the program: #include <SLK_LIB.h> Setting Up the Library File 1, 2, 3... 1. Start Visual C++ Ver. 6.0 and select Tools and then Options. 2. Select the Directory Tab, set the directory being displayed to the one for the library files, click the first empty row in the list, and then click the ... Button at the left of the row. 3. Specify the folder in which the C library for the Support Board was installed and click the OK Button. The installation directory in the header file default for the C library is \Program Files\OMRON\SYSMAC LINK\Lib. 4. Open the workspace for the program being created and select Project and then Set. 5. Select the Link Tab and input the library file name “SLK_LIB.LIB” for the object/library module. Refer to the user’s manual for Visual C++ or online help for information on Visual C++ other than that for setting up the install file and library file. Note There are sample programs provided as Visual C++ V6.0 projects that use the C library for the Board. They can be found in the SYSMAC LINK\Sample directory using the installation directory specified during the installation procedure. 35 SECTION 4 C Language Function Reference This section gives details on the C++ library functions supported by the SYSMAC LINK Support Board. 4-1 4-2 4-3 Library Functions . . . . . . . . . . . . . . . . . . . . . . . . . . . . . . . . . . . . . . . . . . . . . . . . . . . . . . . . . 4-1-1 SlkOpen() Board Open . . . . . . . . . . . . . . . . . . . . . . . . . . . . . . . . . . . . . . . . . . . . . . . . . . . . . . 4-1-2 SlkClose() Board Close . . . . . . . . . . . . . . . . . . . . . . . . . . . . . . . . . . . . . . . . . . . . . . . . . . . . . . 4-1-3 SlkSendFins() FINS Message Send . . . . . . . . . . . . . . . . . . . . . . . . . . . . . . . . . . . . . . . . . . . . . . . . 4-1-4 SlkRecvFins() FINS Message Receive . . . . . . . . . . . . . . . . . . . . . . . . . . . . . . . . . . . . . . . . . . . . . 4-1-5 SlkWriteDatalink() Data Link Data Write . . . . . . . . . . . . . . . . . . . . . . . . . . . . . . . . . . . . . . . . . . . . . . . 4-1-6 SlkReadDatalink() Data Link Data Read . . . . . . . . . . . . . . . . . . . . . . . . . . . . . . . . . . . . . . . . . . . . . . . 4-1-7 SlkGetNetworkStatus() Network Status Read . . . . . . . . . . . . . . . . . . . . . . . . . . . . . . . . . . . . . . . . . . . . . . . 4-1-8 SlkSetMessageOnArrival() FINS Message Reception Notification Registration to Window . . . . . . . . . . . . . . 4-1-9 SlkSetThreadMessageOnArrival() FINS Message Reception Notification Registration to Thread . . . . . . . . . . . . . . . 4-1-10 SlkClearMessageOnArrival() FINS Message Reception Notification Clear . . . . . . . . . . . . . . . . . . . . . . . . . . . . . 4-1-11 SlkGetLastError() Detailed Error Information Acquire . . . . . . . . . . . . . . . . . . . . . . . . . . . . . . . . . . . Structure Descriptions . . . . . . . . . . . . . . . . . . . . . . . . . . . . . . . . . . . . . . . . . . . . . . . . . . . . . 4-2-1 SLKHEADER/*PSLKHEADER Structure . . . . . . . . . . . . . . . . . . . . . . . . . . . . . . 4-2-2 EMSLKADDRESS/*PEMSLKADDRESS Structure . . . . . . . . . . . . . . . . . . . . . . 4-2-3 NSTBUFFER/*PNSTBUFFER Structure . . . . . . . . . . . . . . . . . . . . . . . . . . . . . . . Detailed Error Information . . . . . . . . . . . . . . . . . . . . . . . . . . . . . . . . . . . . . . . . . . . . . . . . . . 37 Section Library Functions 4-1 4-1 Library Functions This section describes the library functions for Microsoft Visual C++ (version 6.0). Refer to Section 3 Creating Applications Using the C Library for details on using the library file. Functions Function name Name Function Page SlkOpen Board Open Opens the application interface and gets an SLK handle. 38 SlkClose Board Close Closes the application interface and releases the SLK handle. 39 SlkSendFins FINS Message Send Sends a FINS message. 39 SlkRecvFins FINS Message Receive Receives a FINS message. 40 SlkWriteDatalink Data Link Data Write Writes data to a data link area. 40 SlkReadDatalink Data Link Data Read Reads data from a data link area. 41 SlkGetNetworkStatus Network Status Read Reads the network status. 41 SlkSetMessageOnArrival FINS Message Reception Notification Registration to Window Makes settings to notify the specified window with a Windows message when a FINS message is received. 42 SlkSetThreadMessageOnArrival FINS Message Reception Notification Registration to Thread Makes settings to notify the specified thread with a Windows message when a FINS message is received. 43 SlkClearMessageOnArrival FINS Message Reception Notification Clear Clears windows message notification when a FINS message is received. 43 SlkGetLastError Detailed Error Information Acquire Gets an error code generated when an SLK library function is used. 44 4-1-1 SlkOpen() Board Open Function Opens the application interface and gets an SLK handle. Call Format Arguments PSLKHANDLE SlkOpen( BYTE byAppUnitAdr, INT *piRetErr); Type Variable name Description BYTE byAppUnitAdr Unit address allocated to the application INT* piRetErr Error information for SlkOpen() Return Value An SLK handle is returned if the function ends normally. SLK_ERROR is returned if the function ends in an error. Detailed error information is stored in piRetErr. Description Set a value between 1 and 15 for byAppUnitAdr. Set 0 when it is not necessary to set a specific application unit address. An unused unit address will be automatically allocated. The function will end in an error if a SYSMAC LINK Support Board is not mounted. (Detailed error information = ERR_NO_SLKUNIT: No SLK Unit) The function will end in an error if a handle cannot be obtained because of insufficient memory. (Detailed error information = ERR_NO_MEMORY: Memory acquisition error) The function will end in an error if the unit address specified in the argument is not between 0 and 15. (Detailed error information = ERR_UNIT_ADDRESS: Unit address range error) Supplemental Information The unit address is different from the board ID on the Support Board. It is not normally necessary to specify a unit address when sending a command from an application running on the computer and receiving a response. Always specify the unit address when sending a command to the application from an application running on a computer or from a PLC at a different node. 38 Section Library Functions 4-1-2 SlkClose() Board Close Function Closes the application interface and releases the SLK handle. Call Format INT SlkClose( PSLKHANDLE hSLK ); Arguments Type Variable name PSLKHANDLE Return Value 4-1 hSLK Description The SLK handle obtained with SlkOpen() SLK_SUCCESS is returned if the function ends normally. SLK_ERROR is returned if the function ends in an error. Detailed error information can be obtained using SlkGetLastError(). Description If the application is ended without using SlkClose() to close the application interface, the address specified for SlkOpen() cannot be used again. Always execute SlkClose() for all SLK handles obtained with SlkOpen() before ending the application. 4-1-3 SlkSendFins() FINS Message Send Function Sends a FINS message. Call Format INT SlkSendFins(PSLKHANDLE hSLK, PSLKHEADER pHeader, LPVOID lpMessage, DWORD dwSize ); Arguments Return Value Type Variable name Description PSLKHANDLE hSLK The SLK handle obtained with SlkOpen() PSLKHEADER pHeader Pointer to the header information structure for the FINS message LPVOID lpMessage Pointer to the send buffer for the FINS message DWORD dwSize Size of FINS message send buffer SLK_SUCCESS is returned if the function ends normally. SLK_ERROR is returned if the function ends in an error. Detailed error information can be obtained using SlkGetLastError(). Description Refer to 4-2 Structure Descriptions for information on the header information structure. Store the FINS message in the FINS message send buffer from the command code (MRC) on. The network specifications determine the maximum amount of data that can be transferred through the network. The maximum size that can be specified for the send buffer (dwSize) is 542 bytes. When –1 is specified for the Service ID (SID), the SID is automatically incremented and attached. The SID value incremented within the function is retained within that one process only. The incremented value is not managed on the network handle or thread level. The function will end in an error in the following cases: Error cause Detailed error information A FINS message send buffer size of less than 2 ERR_SEND_BUFFER_SIZE bytes was specified in the argument. (Send message size error) The argument’s Service ID (SID) was not set between –1 and 255. 39 (SID setting error) 39 Section Library Functions 4-1-4 SlkRecvFins() 4-1 FINS Message Receive Function Receives a FINS message. Call Format INT SlkRecvFins(PSLKHANDLE hSLK, PSLKHEADER pHeader, LPVOID lpMessage, DWORD dwSize, DWORD dwTimeLimit ); Arguments Type Variable name Description PSLKHANDLE hSLK The SLK handle obtained with SlkOpen() PSLKHEADER pHeader Pointer to the header information structure for the FINS message LPVOID lpMessage Pointer to the receive buffer for the FINS message DWORD dwSize Size of FINS message receive buffer DWORD dwTimeLimit Reception wait time (unit: ms) Return Value The size of the FINS message that was receive is returned as the number of bytes if the function ends normally. SLK_ERROR is returned if the function ends in an error. Detailed error information can be obtained using SlkGetLastError(). Description The number of receive bytes in the return value is for all bytes starting from the command code (MRC) in the FINS message. Refer to 4-2 Structure Descriptions for information on the header information structure. The FINS message from the command code (MRC) on will be stored in the FINS message receive buffer. The function will end in an error in the following cases: Error cause Detailed error information A FINS message receive buffer size of less than 2 bytes was specified in the argument. ERR_RECV_BUFFER_SIZE (Receive message size error) A message reception area cannot be reserved because of insufficient memory. ERR_NO_MEMORY (Memory acquisition error) The reception wait time is set to 0 and a FINS message has not yet been received. 38 (Receive timeout) A FINS message was not received within the specified reception wait time. 38 (Receive timeout) The received FINS message is larger than the reception buffer size. ERR_MSG_SIZE_OVER (Receive buffer size error) 4-1-5 SlkWriteDatalink() Data Link Data Write Function Writes data to a data link area. Call Format INT SlkWriteDatalink(PSLKHANDLE hSLK, PEMSLKADDRESS pEmAddress, LPWORD lpWriteData, DWORD dwSize); Arguments 40 Type Variable name Description PSLKHANDLE hSLK The SLK handle obtained with SlkOpen() PEMSLKADDRESS pEmAddress Pointer to the starting address structure for writing data LPWORD lpWriteData Pointer to the buffer to store the write data DWORD dwSize Write data size (unit: words) Section Library Functions 4-1 Return Value SLK_SUCCESS is returned if the function ends normally. SLK_ERROR is returned if the function ends in an error. Detailed error information can be obtained using SlkGetLastError(). Description Refer to 4-2 Structure Descriptions for information on the starting address structure for writing data. The function will end in an error in the following cases: Error cause Detailed error information A value of 0 was specified for the argument’s write data size. ERR_WRITE_BUFFER_SIZE (Write data size error) Access is requested to 3 or more different memory areas for one SLK handle. ERR_MEMORY_AREA (Multiple memory area specification error) The memory name specified in the argument does not exist. ERR_NO_MEM_TYPE (No such memory) 4-1-6 SlkReadDatalink() Data Link Data Read Function Reads data from a data link area. Call Format INT SlkReadDatalink( PSLKHANDLE hSLK, PEMSLKADDRESS pEmAddress, LPWORD lpReadData, DWORD dwSize); Arguments Type Variable name Description PSLKHANDLE hSLK The SLK handle obtained with SlkOpen() PEMSLKADDRESS pEmAddress Pointer to the starting address structure for reading data LPWORD lpWriteData Pointer to the buffer to store the read data DWORD dwSize Read data size (unit: words) Return Value SLK_SUCCESS is returned if the function ends normally. SLK_ERROR is returned if the function ends in an error. Detailed error information can be obtained using SlkGetLastError(). Description Refer to 4-2 Structure Descriptions for information on the starting address structure for reading data. The function will end in an error in the following cases: Error cause Detailed error information A value of 0 was specified for the argument’s read data size. ERR_READ_BUFFER_SIZE (Read data size error) Access is requested to 3 or more different memory areas for one SLK handle. ERR_MEMORY_AREA (Multiple memory area specification error) The memory name specified in the argument does not exist. ERR_NO_MEM_TYPE (No such memory) 4-1-7 SlkGetNetworkStatus() Network Status Read Function Reads the network status. Call Format INT SlkGetNetworkStatus( PSLKHANDLE hSLK, BYTE byNet, PNSTBUFFER pBuffer); 41 Section Library Functions Arguments Type Variable name 4-1 Description PSLKHANDLE hSLK The SLK handle obtained with SlkOpen() BYTE byNet Network address of the Board to read network status PNSTBUFFER pBuffer Pointer to the buffer structure to store the read data Return Value SLK_SUCCESS is returned if the function ends normally. SLK_ERROR is returned if the function ends in an error. Detailed error information can be obtained using SlkGetLastError(). Description Refer to 4-2 Structure Descriptions for information on the read data structure. The read data size is fixed. Provide a memory area the size of the PNSTBUFFER structure as a read data storage buffer. If the function is executed when the Board is not participating in the network, 0 will be set for the following members of the read data structure. Network participation status Communications cycle time Polling node address Data link operation status and data link mode Data link status The function will end in an error in the following cases: Error cause Detailed error information An error response code was returned for the FINS message. ERR_RESPONSE (Error response code error) A SYSMAC LINK Support Board is not mounted in the network specified by the argument’s network address. ERR_NO_SLKUNIT (No SLK Unit) A message reception area cannot be reserved because of insufficient memory. ERR_NO_MEMORY (Memory acquisition error) A value of 0 is specified for the network address, but there is more than one network. ERR_NETWORK_ADDRESS (Network address specification error) 4-1-8 SlkSetMessageOnArrival() FINS Message Reception Notification Registration to Window Function Makes settings to notify the specified window with a Windows message when a FINS message is received. Call Format INT SlkSetMessageOnArrival( PSLKHANDLE hSLK, HWND hWnd, UINT uMsg); Arguments Type Variable name Description PSLKHANDLE hSLK The SLK handle obtained with SlkOpen() HWND hWnd Window handle to receive event notification UINT uMsg Message to use for notification (WM_USER to 0x7FFF) Return Value SLK_SUCCESS is returned if the function ends normally. SLK_ERROR is returned if the function ends in an error. Detailed error information can be obtained using SlkGetLastError(). Description Both SlkSetMessageOnArrival and SlkSetThreadMessageOnArrival cannot be registered at the same time. 42 Section Library Functions 4-1 The function will end in an error in the following cases: Error cause Detailed error information A null pointer is specified for the window handle ERR_WINDOWHANDLE_PARA specified as the argument. (Window handle error) An illegal value is specified for the window handle specified as the argument 67 (Illegal window handle) The message specified in the argument is over 0x7FFF. ERR_MESSAGE_PARA (Message type error) A message has already been registered for FINS message reception. 69 (Duplicated message registration error) 4-1-9 SlkSetThreadMessageOnArrival() FINS Message Reception Notification Registration to Thread Function Makes settings to notify the specified thread with a Windows message when a FINS message is received. Call Format INT SlkSetThreadMessageOnArrival( dwThreadId, UINT uMsg); Arguments Type PSLKHANDLE Variable name hSLK, DWORD Description PSLKHANDLE hSLK The SLK handle obtained with SlkOpen() DWORD dwThreadId Thread ID to receive event notification UINT uMsg Message to use for notification (WM_USER to 0x7FFF) Return Value SLK_SUCCESS is returned if the function ends normally. SLK_ERROR is returned if the function ends in an error. Detailed error information can be obtained using SlkGetLastError(). Description Both SlkSetMessageOnArrival and SlkSetThreadMessageOnArrival cannot be registered at the same time. The function will end in an error in the following cases: Error cause Detailed error information A null pointer is specified for the window handle ERR_WINDOWHANDLE_PARA specified as the argument. (Window handle error) An illegal value is specified for the window handle specified as the argument 67 (Illegal window handle) The message specified in the argument is over 0x7FFF. ERR_MESSAGE_PARA (Message type error) A message has already been registered for FINS message reception. 69 (Duplicated message registration error) 4-1-10 SlkClearMessageOnArrival() FINS Message Reception Notification Clear Function Clears windows message notification when a FINS message is received. Call Format INT SlkClearMessageOnArrival( PSLKHANDLE hSLK); Arguments Type PSLKHANDLE Variable name hSLK Description The SLK handle obtained with SlkOpen() 43 Section Library Functions Return Value 4-1 SLK_SUCCESS is returned if the function ends normally. SLK_ERROR is returned if the function ends in an error. Detailed error information can be obtained using SlkGetLastError(). 4-1-11 SlkGetLastError() Detailed Error Information Acquire Function Gets detailed error information generated when a SYSMAC LINK library function is used. Call Format INT SlkGetLastError( PSLKHANDLE hSLK); Arguments Type PSLKHANDLE Variable name hSLK Description The SLK handle obtained with SlkOpen() Return Value Detailed error information is returned if the function ends normally. SLK_ERROR is returned if the function ends in an error. Description Refer to 4-3 Detailed Error Information for details on the return value. 44 Section Structure Descriptions 4-2 4-2 Structure Descriptions 4-2-1 SLKHEADER/*PSLKHEADER Structure This structure stores heading information for a FINS message. It is used by SlkSendFins() and SlkRecvFins(). Type BYTE Variable name Contents ByIcfBits FINS header ICF Set the following for the FINS message: Command/response and response needed/not needed. 0x80 (128) Command requiring response 0x81 (129) Command not requiring response 0xC0 (192) or 0xC1 (193): Response BYTE byNetAddr Source/destination network address For SlkSendFins(), set the destination network address. BYTE For SlkRecvFins(), the network address of the source of the FINS message is stored. Source/destination node address byNodeAddr For SlkSendFins(), set the destination node address. BYTE For SlkRecvFins(), the node address of the source of the FINS message is stored. Source/destination unit address byUnitAddr For SlkSendFins(), set the destination unit address. INT For SlkRecvFins(), the unit address of the source of the FINS message is stored. Service ID nSid Any value can be set to identify the FINS message. (–1 to 255) (See note.) For SlkRecvFins(), the SID of the received FINS message is stored. Note When –1 is specified for the Service ID (SID), the SID is automatically incremented and attached. The SID value incremented within the function is retained within that one process only. The incremented value is not managed on the network handle or thread level. 4-2-2 EMSLKADDRESS/*PEMSLKADDRESS Structure This structure stores heading information for a FINS message. It is used by SlkWriteDatalink() and SlkReadDatalink(). Type LPCTSTR DWORD Variable name Contents lpszMemName Area type dwWordOffset Specify the text string for the event memory area type set for the data link area. Number of offset words Set the number of words to offset from the beginning of the event memory area specified with IpszType. The areas and ranges that can be accessed can be changed using FinsGateway event memory settings. The default areas and ranges are listed in the following table. Area Designation Range CIO Area CIO 0 to 32767 DM Area DM 0 to 32767 45 Section Structure Descriptions 4-2 4-2-3 NSTBUFFER/*PNSTBUFFER Structure This structure stores network status that has been read. It is used by SlkGetNetworkStatus(). Type BYTE Variable name byConnectionMethod Contents Specifies whether the system is a coaxial or optical system. Bit ––: Not specified. Cable type 0: Coaxial 1: Optical BYTE byMyNodeAddr Local unit address BYTE byMyUnitAddr Always set to 0. BYTE byMyNetAddr Always set to 0. BYTE abyNodeList[32] Network participation status Stores the local unit address set for the SYSMAC LINK Board. Stores a list of the nodes participating in the network. Node Participation Information Bit [0] Node 1 Reserved [1] Node 3 Node 2 Node 5 Node 4 [2] [30] Node 61 Node 60 [31] Reserved Node 62 0: Not participating in network 1: Participating in network 0: Normal disconnection 1: Error disconnection (when not participating) 0: Normal 1: No response to polling. WORD wComunicationCycleTime BYTE byPollingNodeAddr BYTE byStatus1 BYTE byStatus2 Communications cycle time Stores the current value of the communications cycle time. (unit: 0.1 ms) Polling node address Stores the node address of the current polling node. Reserved area Contains undetermined data. Indicates the backup power supply’s status when using an optical system. Bit Optical System 0: Backup power not being supplied 1: Backup power being supplied BYTE byStatus3 Error information 1 Stores information such as node address setting errors. – – – – ––: Not specified. 1: Node address setting error 1: Node address duplicated 1: Network parameter mismatch 1: Communications controller hardware error BYTE byStatus4 Reserved area Contains undetermined data. 46 Section Structure Descriptions Type BYTE Variable name byStatus5 4-2 Contents Error information 2 Stores information such as EEPROM write errors, setting table errors, etc. Bit 1: EEPROM write error 1: Network parameter error 1: Data link table error 1: Routing table error BYTE byStatus6 BYTE byStatusFlag Reserved area Contains undetermined data. Data link operation status and data link mode Stores the data link operation status, data link mode, etc. Bit ––: Not specified Current Data Link Mode 0: User-set links 1: Automatic Data Link Operating Status 0: Stopped 1: Running BYTE abyDataLinkStatus[62] Data link status Stores the data link status. Data is stored for the nodes in the same order that the nodes are registered in the data link table for refreshing. Bit [0] 1st node [1] 2nd node [2] 3rd node [60] 61st node [61] 62nd node Node Data Link Status ––: Not specified PC Operating Status 0: Stopped 1: Running (PC program being executed.) CPU Unit Error Status 0: No error 1: Error Data Link Communications Error Status 0: Normal 1: Error (Data link data not received normally.) Data Link Participation Status 0: Not participating or data links stopped 1: Participating 47 Section Detailed Error Information 4-3 4-3 Detailed Error Information The information read by SlkGetLastError is listed in the following table. Macro names for error codes are defined in SLK_LIB.H. Error code 48 Macro name Meaning 1 ERR_UNIT_ADDRESS Unit address range error 2 ERR_NO_SLKUNIT SYSMAC LINK Unit is missing. 3 ERR_NO_MEMORY Memory could not be obtained. 4 ERR_MSG_SIZE_OVER Reception message was too large. 5 ERR_NO_MEM_TYPE Memory type does not exist. 6 ERR_RESPONSE Response code error 7 ERR_SEND_BUFFER_SIZE Send message size error 8 ERR_RECV_BUFFER_SIZE Reception message size error 9 ERR_WRITE_BUFFER_SIZE Write data size error 10 ERR_READ_BUFFER_SIZE Read data size error 11 ERR_WINDOWHANDLE_PARA Window handle error 12 ERR_MESSAGE_PARA Message type error 13 ERR_MEMORY_AREA Memory type designation error 14 ERR_INTERNAL_FAILURE Unexpected error 15 ERR_NOT_RING_MODE Not in Optical Token Ring Mode. 16 ERR_NETWORK_ADDRESS Network address specification error 30 --- Service not defined. 32 --- Memory insufficient; cannot execute. 34 --- Network busy; cannot execute. 35 --- Reception buffer overflow 36 --- Data size error 37 --- FINS header error 38 --- Reception timeout 39 --- SID setting error 41 --- Destination address not in routing tables; cannot execute. 42 --- Routing table setting error; cannot execute. 43 --- Too many gateways. 67 --- Illegal window handle error 69 --- Message registration duplication error SECTION 5 Data Links This section describes how to use data links in a SYSMAC LINK Network. 5-1 5-2 5-3 5-4 5-5 5-6 What Are Data Links? . . . . . . . . . . . . . . . . . . . . . . . . . . . . . . . . . . . . . . . . . . . . . . . . . . . . . 5-1-1 Data Link Specifications . . . . . . . . . . . . . . . . . . . . . . . . . . . . . . . . . . . . . . . . . . . . Setting Data Links . . . . . . . . . . . . . . . . . . . . . . . . . . . . . . . . . . . . . . . . . . . . . . . . . . . . . . . . 5-2-1 Selecting Manual or Automatic Settings . . . . . . . . . . . . . . . . . . . . . . . . . . . . . . . . 5-2-2 Manual Setting . . . . . . . . . . . . . . . . . . . . . . . . . . . . . . . . . . . . . . . . . . . . . . . . . . . . 5-2-3 Data Link Table Settings (Manual Settings) . . . . . . . . . . . . . . . . . . . . . . . . . . . . . 5-2-4 Automatic Setting: “Select All” . . . . . . . . . . . . . . . . . . . . . . . . . . . . . . . . . . . . . . . 5-2-5 Data Area Allocation with Automatic Settings . . . . . . . . . . . . . . . . . . . . . . . . . . . Starting and Stopping Data Links . . . . . . . . . . . . . . . . . . . . . . . . . . . . . . . . . . . . . . . . . . . . 5-3-1 Using a Programming Device or a Ladder Program . . . . . . . . . . . . . . . . . . . . . . . 5-3-2 Using Support Software . . . . . . . . . . . . . . . . . . . . . . . . . . . . . . . . . . . . . . . . . . . . . 5-3-3 Using the SYSMAC LINK Unit’s DIP Switch (C-Series Units Only) . . . . . . . . . 5-3-4 Using FINS Commands . . . . . . . . . . . . . . . . . . . . . . . . . . . . . . . . . . . . . . . . . . . . . 5-3-5 Data Link Timing Precautions . . . . . . . . . . . . . . . . . . . . . . . . . . . . . . . . . . . . . . . . Checking Data Link Status . . . . . . . . . . . . . . . . . . . . . . . . . . . . . . . . . . . . . . . . . . . . . . . . . . 5-4-1 LED Indicators . . . . . . . . . . . . . . . . . . . . . . . . . . . . . . . . . . . . . . . . . . . . . . . . . . . . 5-4-2 Data Link Status Area . . . . . . . . . . . . . . . . . . . . . . . . . . . . . . . . . . . . . . . . . . . . . . 5-4-3 Checking by Manipulating Bit/Word Status . . . . . . . . . . . . . . . . . . . . . . . . . . . . . Data Link Performance . . . . . . . . . . . . . . . . . . . . . . . . . . . . . . . . . . . . . . . . . . . . . . . . . . . . Data Link I/O Response Time . . . . . . . . . . . . . . . . . . . . . . . . . . . . . . . . . . . . . . . . . . . . . . . 5-6-1 Computer to PC . . . . . . . . . . . . . . . . . . . . . . . . . . . . . . . . . . . . . . . . . . . . . . . . . . . 5-6-2 PC to Computer . . . . . . . . . . . . . . . . . . . . . . . . . . . . . . . . . . . . . . . . . . . . . . . . . . . 49 Section What Are Data Links? 5-1 5-1 What Are Data Links? A data link is a function that automatically exchanges the data in predetermined areas between nodes (PC ↔ PC or PC ↔ Computer) on one network. Data links can be created freely among CS-series PCs, C200HX/HG/HE PCs, CV-series PCs, and IBM PC/AT or compatible computers. Two data link areas, area 1 and area 2, can be set in the Board. SYSMAC LINK data links can be set in two ways: manually or automatically. • Data link areas can be manually set by inputting each node’s data link table using the SYSMAC LINK Support Software or the FinsGateway’s SLK Data Link Setting Utility. Data link tables are created to define the data links. The configuration of the data links can be set freely with manual settings. • Data links can be set automatically from a Programming Device. With automatically set data links, each node has the same sized send area. Either the automatic or the manual setting method must be used throughout the network. The two methods cannot be combined in the same network. The following rules apply to these two methods of setting data links. 1, 2, 3... 1. The data links in area 1 and area 2 can be used simultaneously. 2. The settings (starting words and send area size) for areas 1 and 2 are completely independent. The send/receive order is the same for areas 1 and 2. 3. It is not necessary for the Board to participate in the data links. Manually Setting Data Links Node 2 Node 5 Node 6 Node 8 Data area Data area Data area Data area Refresh parameters (Unique to node) Refresh parameters (Unique to node) Refresh parameters (Unique to node) Refresh parameters (Unique to node) Data link areas Data link tables Common link parameters (Common) • Manually set data links when you want to create data links tailored to meet the requirements of your application. Data links can be set in each node’s SYS- 50 Section What Are Data Links? 5-1 MAC LINK Unit or Board using the SYSMAC LINK Support Software or the FinsGateway’s SLK Data Link Setting Utility. • Each node’s send area size and location can be allocated freely. • It is possible to change the order in which data is received from the other nodes. • Nodes can be set as send-only or receive-only. Automatically Setting Data Links The following diagram shows an example of automatic setting: Area 1 (Bit areas) Area 2 (Data memory) Node #3 Node #1 Node #2 #1 #2 #3 #1 #2 #3 #1 #2 #3 #1 #1 #1 #2 #2 #2 #3 #3 #3 Automatically set data links when you want to create data links easily. • Use a Programming Device (such as a Programming Console) to set the automatic data link mode in the startup PC’s PC Setup or DM parameter area. • The CIO or LR Area can be selected for area 1 and the DM Area can be selected for area 2. • A computer cannot be used as the startup node if the data links are being automatically set. • A computer can only participate in the data links if the data links are being automatically set. 5-1-1 Data Link Specifications Item Description Number of 62 nodes max. (2 nodes min.) data link nodes Number of Send and receive data link words words per node Allocation of data link areas 2,966 words max. (total in areas 1 and 2) Send words per node 508 words max. (254 CIO/LR Area words and 254 DM Area words max.) Manual setting Area 1: CIO Area or LR Area Area 2: DM Area Automatic setting g The allocation is set in the data link table. Data area Word Units (number of data link nodes) addresses dd 2 4 8 CIO/LR 1000 to 1063 32 words 16 words 8 words 16 4 words DM D00000 to 64 words D00127 32 words 16 words 8 words 51 Section Setting Data Links 5-2 5-2 Setting Data Links 5-2-1 Selecting Manual or Automatic Settings The data link mode (manual or automatic) is specified by using a Programming Device to set the data link mode parameter in the startup PC’s PC Setup in the DM Parameter Area. Note 1. The data link mode can be selected only with a SYSMAC LINK Unit. Refer to the SYSMAC LINK Units Operation Manual (W202/W376) for more details. 2. Data links must be set manually when the SYSMAC LINK Support Board has been set as the startup node. 3. The data link mode can be set in the data link startup node only. The data link mode setting is determined by the data link mode of the startup node even if the data link mode settings of the nodes participating in the data links are different from the settings in the startup node. 4. In manual setting, a data link table must be set in the data link startup node and in automatic setting, automatic data link setting parameters must be set in the data link startup node. Data links will not be started unless the settings are correct. 5-2-2 Manual Setting Transfer the data link tables that were created on the Support Software to the SYSMAC LINK Units and the SYSMAC LINK Support Boards of all nodes participating in the data links. Transferring from a Programming Device C200HX/HG/HE PCs Nodes + IBM PC/AT or compatible SYSMAC LINK Support Software SYSMAC LINK Unit CPU Unit RS-232C CV-series PCs Nodes SYSMAC LINK Unit CPU Unit Transfer CS-series PCs Nodes Data link tables SYSMAC LINK Unit CPU Unit L Note 1. Data link tables cannot be set in the SYSMAC LINK Support Board using the CX-Net in the CX-Programmer. Use the SLK Data Link Setting Utility in FinsGateway or the SYSMAC LINK Support Software (version 2.00 or higher). 2. When transferring the data link tables to a SYSMAC LINK Unit in a CV-series PC, set the System Protect Keyswitch on the CPU Unit to “NORMAL.” With a CS-series PC, set pin 1 of the CPU Unit’s DIP switch to “OFF.” 3. The SYSMAC Support Software cannot be connected directly to a CS-series PC. 52 Section Setting Data Links 5-2 Transferring from a Computer Connected as a Node SLK Data Link Setting Utility in FinsGateway IBM PC/AT or compatible SYSMAC LINK Support Board Data link tables Note 1. To create data link tables for nodes in the network using the SLK Data Link Setting Utility in the FinsGateway, the network must have been constructed correctly. Set routing tables at each node as required. When using manually set data links, be sure to delete data link tables for all nodes not participating in data link. See 1-4 Applications Precautions for details. Refer to FinsGateway online help for actual setting procedures for the SLK Data Link Setting Utility. 2. Refer to the FinsGateway online help for details on setting data link tables with the FinsGateway’s SLK Data Link Setting Utility. 5-2-3 Data Link Table Settings (Manual Settings) Item Common link Communications cycle time parameters Local node’s send area size CIO/LR Area DM Area Refresh parameters Data link starting CIO/LR word addresses Area DM Area Node refresh order Contents Sets the data link’s communications cycle time. Select either automatic calculation or a manual setting. The default setting is automatic calculation. The manual setting range is 5 to 255 ms. Refer to 5-2-4 Data Link Timing Precautions if you are setting a fixed communications cycle time (manual setting). Set the size of the local node’s send area in the Note: If the total send CIO/LR Area. The setting range is 0 to 254 area size is 0, the words. node will not send Set the size of the local node’s send area in the data. (It will only DM Area. The setting range is 0 to 254 words. receive data.) Set the starting address of the local node’s data link area in the CIO/LR Area. The setting range is 0 to 2550. (See note 1.) Set the starting address of the local node’s data link area in the DM Area. The setting range is 0 to 32767. (See note 1.) Sets the order of the node addresses when the local node refreshes data in the data link area defined with the data link starting word addresses above. (The local node address indicates the send area. Other node addresses indicate areas that receive data from other nodes.) For example, if “3, 2, 1” is input, the data link area is allocated to nodes 3, 2, and 1 starting from the data link starting word address. When the local node address is 1, data will be received from node 3, received from node 2, and then sent from the last area. Note Note 1. Always include the local node in the node refresh order. 2. When the node address of a node is omitted from the node refresh order, data will not be received from that node. 1. The actual range of addresses in the CIO/LR and DM Areas depends upon the PC being used. Refer to the PC’s Operation Manual for details on the actual data area ranges. 53 Section Setting Data Links 5-2 2. Refer to the CX-Net Operation Manual for details on setting parameters with CX-Net. 3. Data link areas in the SYSMAC LINK Support Board are allocated in the FinsGateway event memory. Refer to the FinsGateway online help for information on the area types and sizes in event memory. 4. If you are using a C-series SYSMAC LINK Unit with this Support Board, a CS-series SYSMAC LINK Unit, or a CV-series SYSMAC LINK Unit, the addresses 1000 to 1063 correspond to the 64 words in the LR area (LR 00 to LR 63). Set the data link words in the LR area of the C-series PC. 5. The data link words in the CIO or IR Area, and the words in the DM Area, are continuous. 5-2-4 Automatic Setting: “Select All” Use a PC Programming Device (CX-Net, SYSMAC Support Software, or Programming Console) to set the appropriate value in the system settings or DM parameter area of the startup PC. The startup node is the node from which the data links are activated. When automatically setting data links, data link operation is based on the values set in the startup node. Startup node Programming Console Or CPU Unit SYSMAC LINK IBM PC/AT or compatible SYSMAC Support Software Note 54 DM parameter area 1. Parameters for automatically setting data links can only be set in PCs. Refer to the SYSMAC LINK Units Operation Manual (W202/W367) for details. 2. A computer (SYSMAC LINK Support Board) cannot be the startup node for an automatically setting data links. 3. A computer can participate in automatically set data links. Data link tables are not required in the computer (the data link tables in the startup node will be used). Section Starting and Stopping Data Links 5-3 5-2-5 Data Area Allocation with Automatic Settings The following table shows the allocation of the data link area when automatic settings are used. The numbers following the “#” symbol are the node addresses of the nodes in the data link. CIO/LR Area addresses 1000 to 1003 1004 to 1007 1008 to 1011 1012 to 1015 1016 to 1019 1020 to 1023 1024 to 1027 1028 to 1031 1032 to 1035 1036 to 1039 1040 to 1043 1044 to 1047 1048 to 1051 1052 to 1055 1056 to 1059 1060 to 1063 DM Area addresses D00000 to D00007 D00008 to D00015 D00016 to D00023 D00024 to D00031 D00032 to D00039 D00040 to D00047 D00048 to D00055 D00056 to D00063 D00064 to D00071 D00072 to D00079 D00080 to D00087 D00088 to D00095 D00096 to D00103 D00104 to D00111 D00112 to D00119 D00120 to D00127 CIO/LR: 4 words DM: 8 words CIO/LR: 8 words DM: 16 words CIO/LR: 16 words DM: 32 words CIO/LR: 32 words DM: 64 words #1 #2 #3 #4 #5 #6 #7 #8 #9 #10 #11 #12 #13 #14 #15 #16 #1 #1 #1 #2 #3 #2 #4 #5 #3 #2 #6 #7 #4 #8 Note If you are using a C-series SYSMAC LINK Unit together with a SYSMAC LINK Support Board, a CS-series SYSMAC LINK Unit, or a CV-series SYSMAC LINK Unit, addresses CIO 1000 to CIO 1063 correspond to LR 00 to LR 63 in the C-series PC and addresses D00000 to D00127 correspond to DM 0000 to DM 0127 in the C-series PC. 5-3 Starting and Stopping Data Links The data link must be started after data link areas have been created. Use any of the methods described below for the startup node to start and stop data links. These methods are the same for both manually and automatically set data links. Note The data link mode (manual setting or automatic setting) and data link method are determined according to the data link setting in the startup node. In the startup node, set a data link table in the case of manual setting and data link automatic setting parameters in the case of automatic setting. If the settings are incorrect, the data link will not start. ! Caution Check the following items before starting data links. If incorrect data link tables or parameters are set, injury may result due to unexpected operation of the system. Even if the correct data link tables and parameters have been set, do not start or stop data links before verifying that there will be no adverse influence on the system. • Manually Set Data Links Check the data link tables in each node participating in the data link to see that they are correct. Be sure that data link tables are deleted from nodes that are not participating in the data links. • Automatically Set Data Links Set the appropriate settings in the data link startup PC’s DM parameters or CPU Bus Unit system setup area. 55 Section Starting and Stopping Data Links 5-3 5-3-1 Using a Programming Device or a Ladder Program Set the software switches (AR or DM Start Bit) in the PC to ON using a Programming Device or from the ladder-diagram program. User program Startup node Programming Device SYSMAC LINK + CS-series PCs Turn ON the Start Bit in DM 30000 + 100 × N. (N: unit number) CV-series PCs Turn ON the Start Bit in DM 1500 + 25 × N. (N: unit number) The data links will start when the Start Bit changes from OFF to ON or is already ON when power is turned ON. The data links will stop when the Start Bit changes from ON to OFF. Note 1. Refer to the SYSMAC LINK Units Operation Manual (W202/W367) for details on starting and stopping data links using a Programming Device or ladder program. 2. The data in the DM Area is retained even when the power is turned OFF. Therefore, settings can be made in the DM Area in advance so that the data links will start as soon as the power is turned ON. When a CV-series PC is being used, specify the Start Bit in the Holding Area. We recommend turning ON the Start Bits in multiple nodes that are participating in the data link so that the data links will start even if the startup node is down. The same data link mode must be set in these nodes. Also, the same data link settings must be set in these nodes when automatic settings are being used for the data links. CS-series Startup Node 15 14 13 12 11 10 9 8 7 6 5 4 3 2 1 0 Word N N: DM 30000 + 100 × (unit number) Data link Start Bit Start: Changed from OFF to ON or set to ON when power is turned on Stop: Changed from ON to OFF CV-series Startup Node 15 14 13 12 11 10 9 8 7 6 5 4 3 2 1 0 Word N N: DM 2000 + 100 × (unit number) Data link Start Bit Start: Changed from OFF to ON or set to ON when power is turned on Stop: Changed from ON to OFF 5-3-2 Using Support Software Data links can be started or stopped using Support Software. The node which is being instructed to stop must be participating in the data links. 56 Section Starting and Stopping Data Links 5-3 Using a Computer Connected to a PC Node IBM PC/AT or compatible SYSMAC Support Software or CX-Net Node in data links Start/stop data links Using a Computer Node with FinsGateway IBM PC/AT or compatible FinsGateway Start/stop specified directly to SYSMAC LINK Support Board. 5-3-3 Using the SYSMAC LINK Unit’s DIP Switch (C-Series Units Only) Data links can be started turning with the Start Bit on the DIP switch on the front of a C-series SYSMAC LINK Unit. The data links will start when the Start Bit is turned from OFF to ON or is already ON when power is turned ON. The data links will stop when the Start Bit is turned from ON to OFF. Note 1. Refer to the SYSMAC LINK Units Operation Manual (W202/W367) for details on starting and stopping data links using the Unit’s DIP switch. 2. If the DIP switch’s Start Bit can be turned ON in advance so that the data links will start as soon as the power is turned ON. We recommend turning ON the Start Bits in multiple nodes that are participating in the data link so that the data links will start even if the startup node is down. The same data link mode must be set in these nodes. Also, the same data link settings must be set in these nodes when automatic settings are being used for the data links. 5-3-4 Using FINS Commands Data links can be started and stopped by sending the DATA LINK START and DATA LINK STOP FINS commands from a node on the SYSMAC LINK to a node that is in the data links. Sending FINS Commands from a Computer Node IBM PC/AT or compatible FINS command: DATA LINK START/ DATA LINK STOP Node in data links Issuing the FINS Command from a CV-series or CS-series PC CV FINS command: DATA LINK START/ DATA LINK STOP Node in data links Data links can be stopped in the same way by sending the DATA LINK STOP FINS command. The node receiving the FINS command must be participating in the data links in this case, too. 57 Section Checking Data Link Status 5-4 5-3-5 Data Link Timing Precautions When the data link table’s communications cycle time is not being calculated automatically, set a fixed communications cycle time that is long enough. If the setting is too short, it will not be possible for 3G8F7-SLK11/21 SYSMAC LINK PCI Support Boards and CS1-series SYSMAC LINK Units to participate in data links. Furthermore, the data links will not start if the communications cycle time setting is too short and a SYSMAC LINK PCI Support Board or CS1-series SYSMAC LINK Unit is being used as the startup node. If a timing error such as the one above occurs, the LNK indicator will be flashing quickly. At the same time, a “data link communications cycle time setting error” with error code 021D will be recorded in the error log. Calculating the Minimum Communications Cycle Time Use the following equation to estimate the minimum communications cycle time (TMIN) that can be set: TMIN = + + + + Maximum node address × 0.01 Number of polled nodes × 0.25 Number of linked nodes × 0.161 Total number of data link area words × 0.01 5.322 ms The communications cycle time is expressed in ms units and fractions are rounded off. Error Log Contents The following error log entry will be recorded if a “data link communications cycle time setting error” occurs. Error code d 021D Detailed information First byte Communications cycle time set in the data link table (ms units, two-digit hexadecimal) Second byte Minimum communications cycle time that can be set (ms units, two-digit hexadecimal) The second byte of the detailed information provided with error 021D provides the minimum communications cycle time that can be set. Example: A communications cycle time of 5 ms was set in the data link table, the LNK indicator is flashing quickly, and the error log contains the entry “021D 0512.” This error log entry indicates that the minimum communications cycle time is 18 ms (12 hexadecimal). 02 1D 05 12 Minimum communications cycle time Current communications cycle time setting Error code 5-4 Checking Data Link Status There are two methods for checking the status of active data links: • Check the LED indicators on the front of the Units. • Check the data link status area. 58 Section Checking Data Link Status 5-4 5-4-1 LED Indicators Check the LNK indicator on the front of the Board. Optical Unit (H-PCF) Make sure that the LNK indicator is ON at nodes participating in the active data links. Name LNK (d (data li k) link) Color Yellow Coaxial Unit Status Contents ON Flashing Flashing quickly Participating data links. Data link table setting error. The data link table’s communications cycle time setting is too short. OFF Not in data links or data links are inactive. The LNK indicator will be lit at all node participating in the data links as long as operation is normal. 5-4-2 Data Link Status Area The data link status area can be used to check for errors when data link does not operate normally even though no abnormality has been detected by the computer or the SYSMAC LINK Support Board. Data link status can be monitored using the SLK Data Link Setting Utility in FinsGateway or it can be stored in FinsGateway event memory. Refer to the FinsGateway online help and installation guide for details. See 9-2 Status Information and Troubleshooting for troubleshooting procedures. First word +1 +2 +3 2nd node 4th node 6th node 8th node to to +14 +17 30th node 32nd node 34th node 36th node to to +15 +16 +27 +28 +29 +30 56th node 58th node 60th node 62nd node 1st node 3rd node 4th node 7th node to 29th node 31st node 33rd node 35th node to 55th node 57th node 59th node 61st node – – – – – – – – PC Operating Status 0: Stopped 1: Running (PC program being executed.) CPU Unit Error Status 0: No error 1: Error Data Link Communications Error Status 0: Normal 1: Error (Data link data not received normally.) Data Link Participation Status 0: Not participating or data links stopped 1: Participating Unpredictable status Note The first word is set in the FinsGateway settings. Refer to FinsGateway online help for details. 59 Section Data Link Performance Status Data link participation Communications error CPU Unit error PC status Values 0: Not participating in data links or data links inactive 1: Participating in data links 0: Normal 5-5 Description Indicates the corresponding node’s data link participation status. 1: Error Indicates if data link data for node was received normally or not. 0: No error Indicates if an error has occurred in the PC. 1: Error Always 0 for SYSMAC LINK Support Board nodes. 0: Program execution stopped Indicates if the PC program is being executed or not. 1: Program being executed Always 1 for SYSMAC LINK Support Board nodes. Note 1. Communications errors will be indicated for node that are not participating in the network. 2. When a communications error occurs in the local node or it is separated from the network, the local node retains the most recent status information it received for the other nodes in the network. 5-4-3 Checking by Manipulating Bit/Word Status Although the data link function itself may be operating correctly, the data link areas may have been input incorrectly. After you have confirmed that the data link function is operating normally, check to see whether or not the data link is operating as intended, i.e., check to see if the desired bits/words data is being transferred to the intended words at other nodes. Change the contents of a bit or word in a data link send area using a Programming Device or the user program and check whether the change is reflected in data link areas of other nodes as intended. The contents of the data link areas set on the local node for the SYSMAC LINK Support Board can be read and written using the memory monitor program of the FinsGateway. For details refer to the FinsGateway online help. 5-5 Data Link Performance When precise timing is required, it will be necessary to know the time required for to send and receive data through data links and the exact timing when the data is exchanged. Data Link Communications Cycle In a SYSMAC LINK network, the data link service takes priority and the communications cycle time is fixed even if FINS message communications (instructions such as SEND, RECV, and CMND) are being used simultaneously. Automatic Settings The standard values shown in the following tables are generated automatically and set. Coaxial System Number of nodes i the h data d li k in link 60 Data link area 2 nodes CIO/LR only 17 ms DM only 18 ms CIO/LR and DM 19 ms 4 nodes 17 ms 18 ms 19 ms 8 nodes 18 ms 18 ms 19 ms 16 nodes 18 ms 19 ms 19 ms Section Data Link Performance 5-5 Optical System Number of nodes i the in h data d li k link Manual Settings Data link area 2 nodes CIO/LR only 20 ms DM only 21 ms CIO/LR and DM 21 ms 4 nodes 20 ms 21 ms 22 ms 8 nodes 21 ms 21 ms 22 ms 16 nodes 21 ms 22 ms 22 ms When the communications cycle time varies due to noise or other factors, use the Support Software to set a fixed communications cycle time between 5 and 255 ms. If a fixed time is not set, the communications cycle time (T) will be calculated automatically with the following formula. The communications cycle time is expressed in ms units and fractions are rounded off. Coaxial System T (ms) = Maximum node address × 0.085 + Number of event frames allowed × 0.654 + Number of polled nodes × 0.75 + Number of linked nodes × 0.056 + Total number of data link area words × 0.01 + 1.322 ms Optical System T (ms) = Maximum node address × 0.1115 + Number of event frames allowed × 0.77 + Number of polled nodes × 0.75 + Number of linked nodes × 0.056 + Total number of data link area words × 0.01 + 1.322 ms Example Calculations The example calculations are based on the following network specifications: Maximum node address: 62 Number of polled nodes: 4 Number of event frames allowed: 10 Number of linked nodes: 32 Total number of data link words: 2,000 • Coaxial System: T (ms) = 62 × 0.085 + 10 × 0.654 + 4 × 0.75 + 32 × 0.056 + 2,000 × 0.01 + 1.322 ms = 37.924 ms → 38 ms • Optical System: T (ms) = 62 × 0.1115 + 10 × 0.77 + 4 × 0.75 + 32 × 0.056 + 2,000 × 0.01 + 1.322 ms = 40.727 ms → 41 ms The communications cycle time (present value and maximum value) can be read or set with the Support Software or a command. Note 1. Refer to Section 8 Communications Timing for details on the network parameters. 2. The data link may no operate correctly if the communications cycle time is changed to a value shorter than the value that was automatically set by the system. 3. If the LNK indicator on the front of a CS1W-SLK11/21 SYSMAC LINK Unit is flashing quickly (about 10 times/second), either change the data link table’s 61 Section Data Link I/O Response Time 5-6 communications cycle time setting to automatic calculation or set a longer manual setting. Changing the Communications Cycle Time When the communications cycle time is set to automatic calculation, the communications cycle time can be changed by changing the network parameters (maximum node address, number of event frames allowed, number of polled nodes) with the Support Software. The communications cycle time is set to automatic calculation, the communications cycle time will change just after the network parameters are changed. The following table shows the default values and setting ranges of the network parameters. Network parameter Maximum node address Default value 62 Setting range 2 to 62 Number of event frames allowed 10 5 to 255 Number of polled nodes 1 to 62 4 If the result of the following formula is positive, the communications cycle time will be reduced. If the result is negative, the communications cycle time will be increased. The units are ms and fractions are rounded off. Coaxial System Change (ms) = (Old max. node address – new max. node address) × 0.085 + (Old no. of event frames – new no. of event frames) × 0.654 + (Old no. of polled nodes – new no. of polled nodes) × 0.75 Optical System Change (ms) = (Old max. node address – new max. node address) × 0.1115 + (Old no. of event frames – new no. of event frames) × 0.77 + (Old no. of polled nodes – new no. of polled nodes) × 0.75 Example Calculations The example calculations are based on the following changes to the network parameters: Maximum node address: 62 → 16 Number of event frames: 10 → 13 Number of polled nodes: 4 → 5 • Coaxial System Change (ms) = (62 – 16) × 0.085 + (10 – 13) × 0.654 + (4 – 5) × 0.75 = 1.198 ms → 1 ms • Optical System: Change (ms) = (62 – 16) × 0.1115 + (10 – 13) × 0.77 + (4 – 5) × 0.75 = 2.069 ms → 2 ms Note 5-6 1. If there are any nodes in the network with node addresses higher than the maximum node address set in the network parameters, those nodes will be unable to join the network or communicate through the network. 2. If the number of event frames setting is too small, the FINS message communications that can be executed in one communications cycle (such as the SEND, RECV, and CMND instructions, echoback tests, and remote monitoring) will be overly restricted during data link operation and may end in errors. 3. If the number of polled nodes setting is too small, it will take too long for a node to join the network when a Unit is reset or the PC’s power is turned ON. Data Link I/O Response Time When the SYSMAC LINK Support Board’s data link function is being used, there is a time delay from the time the data link area of one node is changed until this 62 Section Data Link I/O Response Time 5-6 change is reflected in the data link area at another node. This time delay is called the data link I/O response time. 5-6-1 Computer to PC In the following diagram illustrating the maximum data link I/O response time, a CS-series PC is used for the PC (node #2) and the PC’s cycle time is greater than or equal to the communications cycle time. Computer at node #1 User application (SlkWriteDatalink) Send processing (FinsGateway) (*) Late Communications cycle time Data link transmissions I/O refresh Data exchange Program execution PC at node #2 1 cycle Output ON delay Output device Data link I/O response time There are two points shown in the diagram above where processing is delayed. 1, 2, 3... 1. Data exchange occurs just after the computer at node #1 receives the token that gives it the right to send data, so processing is delayed about one communications cycle time until the data is transferred in the next data exchange. 2. The data link transmission just misses the PC’s data exchange at node #2, so processing is delayed about one PC cycle until the data is read into the PC during the PC’s next data exchange. (If the cycle time of the PC at node #2 is longer than the communications cycle time, the delay would be approximately two PC cycles.) Note 1. The I/O response time may be increased by noise or other factors. 2. The data send processing time for the area marked by the asterisk (*) in the diagram will be affected by the processing capacity of the computer that is used. 3. The communications cycle time may fluctuate. 4. For details regarding the time required for data exchanges between the SYSMAC LINK Unit and the PC, refer to the SYSMAC LINK Units Operation Manual (W202/W367). 63 Section Data Link I/O Response Time 5-6 5-6-2 PC to Computer In the following diagram illustrating the maximum data link I/O response time, a CS-series PC is used for the PC (node #2) and the PC’s cycle time is greater than or equal to the communications cycle time. Input Input device I/O refresh Input ON response time Data exchange 1 1 cycle Late PC at node #2 Program 2 Late Communications cycle time Data link transmissions (*) 3 Receive processing (FinsGateway) (SlkReadDatalink) User application Computer at node #1 Data link I/O response time There are three points shown in the diagram above where processing is delayed, increasing the data link I/O response time. 1, 2, 3... 1. The input arrives in the PC just after I/O refreshing, causing a delay of up to one cycle before the input is read into the PC. 2. Data exchange occurs just after the PC at node #2 passes the token that makes it the polling node, causing a delay of up to one communications cycle time before the data is transferred in data link processing. 3. The data arrives at the Data Link Area of the Support Board mounted at the computer at node #1, but processing is delayed until the user application executes the SlkReadDatalink library function. This delay will vary depending on the contents of the user application. Note 1. The I/O response time may be increased by noise or other factors. 2. The data send processing time for the area marked by the asterisk (*) in the diagram will be affected by the processing capacity of the computer that is used. 3. The communications cycle time may fluctuate. 4. Refer to the SYSMAC LINK Units Operation Manual (W202/W367) for details on the time required for data exchanges between the SYSMAC LINK Unit and the PC. 64 SECTION 6 Message Service This section explains how to use the message service functions provided by a SYSMAC LINK Support Board. 6-1 6-2 6-3 6-4 Introduction . . . . . . . . . . . . . . . . . . . . . . . . . . . . . . . . . . . . . . . . . . . . . . . . . . . . . . . . . . . . . 6-1-1 Message Service Specifications . . . . . . . . . . . . . . . . . . . . . . . . . . . . . . . . . . . . . . . 6-1-2 Message Service Functions . . . . . . . . . . . . . . . . . . . . . . . . . . . . . . . . . . . . . . . . . . FINS Command/Response Format . . . . . . . . . . . . . . . . . . . . . . . . . . . . . . . . . . . . . . . . . . . . 6-2-1 Headers . . . . . . . . . . . . . . . . . . . . . . . . . . . . . . . . . . . . . . . . . . . . . . . . . . . . . . . . . 6-2-2 Parameters . . . . . . . . . . . . . . . . . . . . . . . . . . . . . . . . . . . . . . . . . . . . . . . . . . . . . . . 6-2-3 Data Formats . . . . . . . . . . . . . . . . . . . . . . . . . . . . . . . . . . . . . . . . . . . . . . . . . . . . . Commands and Responses for the Support Board . . . . . . . . . . . . . . . . . . . . . . . . . . . . . . . . 6-3-1 Command Codes . . . . . . . . . . . . . . . . . . . . . . . . . . . . . . . . . . . . . . . . . . . . . . . . . . 6-3-2 DATA LINK START . . . . . . . . . . . . . . . . . . . . . . . . . . . . . . . . . . . . . . . . . . . . . . . 6-3-3 DATA LINK STOP . . . . . . . . . . . . . . . . . . . . . . . . . . . . . . . . . . . . . . . . . . . . . . . . 6-3-4 CONTROLLER DATA READ . . . . . . . . . . . . . . . . . . . . . . . . . . . . . . . . . . . . . . . 6-3-5 CONTROLLER STATUS READ . . . . . . . . . . . . . . . . . . . . . . . . . . . . . . . . . . . . . 6-3-6 NETWORK STATUS READ . . . . . . . . . . . . . . . . . . . . . . . . . . . . . . . . . . . . . . . . 6-3-7 DATA LINK STATUS READ . . . . . . . . . . . . . . . . . . . . . . . . . . . . . . . . . . . . . . . . 6-3-8 ECHOBACK TEST . . . . . . . . . . . . . . . . . . . . . . . . . . . . . . . . . . . . . . . . . . . . . . . . 6-3-9 BROADCAST TEST RESULTS READ . . . . . . . . . . . . . . . . . . . . . . . . . . . . . . . . 6-3-10 BROADCAST TEST DATA SEND . . . . . . . . . . . . . . . . . . . . . . . . . . . . . . . . . . . 6-3-11 ERROR LOG READ . . . . . . . . . . . . . . . . . . . . . . . . . . . . . . . . . . . . . . . . . . . . . . . 6-3-12 ERROR LOG CLEAR . . . . . . . . . . . . . . . . . . . . . . . . . . . . . . . . . . . . . . . . . . . . . . Response Codes . . . . . . . . . . . . . . . . . . . . . . . . . . . . . . . . . . . . . . . . . . . . . . . . . . . . . . . . . . 6-4-1 Configuration . . . . . . . . . . . . . . . . . . . . . . . . . . . . . . . . . . . . . . . . . . . . . . . . . . . . . 6-4-2 Network Relay Errors . . . . . . . . . . . . . . . . . . . . . . . . . . . . . . . . . . . . . . . . . . . . . . 6-4-3 Response Codes and Troubleshooting . . . . . . . . . . . . . . . . . . . . . . . . . . . . . . . . . . 65 Section Introduction 6-1 6-1 Introduction A message service is a command/response system used for data transmission between nodes on a network, i.e., computer to computer, PC to computer, or computer to PC. The message service can also be used to control operations, such as mode changes. The message service is implemented by executing from the user program the library functions for sending or receiving messages. 6-1-1 Message Service Specifications Communications from an computer are executed according to the specifications shown in the following table. Item Direction of transmission Data length Data content Specifications 1:1 Message transmission or reception 1:N Message transmission (broadcast) 522 bytes max. (including FINS header) Any command/response data can be sent or received. Depends on the message being sent. 6-1-2 Message Service Functions FINS commands can be sent to specified nodes and FINS responses can be received by executing C library functions from the user program to send and receive messages. Functions Features Sending Messages This library function and driver call send command/response data. SlkSendFins library function (See note.) Can be issued with respect to any Units at a PC, or to the Support Board or user program at a computer. Mainly used for sending FINS commands and responses. The FINS commands and responses enable various types of control, and allow the status to be read. Data is prepared according to a fixed format in the program and sent by executing SlkSendFins. No special program is required at the receiving end if FINS commands and responses supported by the receiving Unit are used. When sending data to the computer with a user program, a program that can process the received data is required. When a response to a command is returned, a program for reading and analyzing the response is required. Receiving Messages These library functions and driver call receive command/response data. SlkRecvFins library function Data received by the SYSMAC LINK Support Board is read. Mainly used for receiving FINS commands and responses. The FINS commands and responses enable various types of control, and allow the status to be read. Data is received by executing SlkRecvFins, and it is analyzed by the program according to a fixed format. A program is required for analyzing the data that is received. A program is required for preparing and sending responses when commands requesting responses are received. Note Using SlkSendFins or SlkRecvFins to send the “MEMORY AREA READ” and “MEMORY AREA WRITE” FINS commands for PCs is equivalent to executing the SEND and RECV ladder-diagram instructions. 66 Section FINS Command/Response Format 6-2 6-2 FINS Command/Response Format This section explains the format of the FINS commands and responses specified by the “SlkSendFins” library function. When actually sending or receiving message service data, the contents specified by the library function parameters are attached as a header. When the message service is used, however, there is normally no need to pay special attention to headers. 6-2-1 Headers Although parameters are used to designate the source, the destination, and other required information, there are some cases where a header must be manually added before the command code. Refer to the operation manuals for individual systems to determine if a header is required. The header format described below is attached before the command code and the other parameters described for individual commands in the rest of this manual. Command Data Structure 00 02 ICF RSV GCT DNA DA1 DA2 SNA SA1 SA2 SID Command code Text Header Response Data Structure 00 02 ICF RSV GCT DNA DA1 DA2 SNA SA1 SA2 SID Command Response code code Text Header Details ICF Information control field. Individual bits of the ICF are used as follows: Bit 7 1 6 5 4 3 2 1 0 0 0 0 0 0 Set to 0. Response setting (0: response required; 1: response not required) Data type (0: command; 1: response) Gateway usage (0: don’t use; 1: use); set to 1. Note All settings below are shown in hexadecimal except where otherwise indicated. RSV Reserved. Set to 00. GCT Gateway count. Set to 02. DNA Destination network address. Specify within the following ranges. 00: Local network 01 to 7F: Remote network (1 to 127 decimal) DA1 Destination node number. Specify within the following ranges. 01 to 3E: Node number in SYSMAC LINK network (1 to 62 decimal) 01 to 7E: Node number in SYSMAC NET network (1 to 126 decimal) 01 to 3E: Node number in SYSMAC LINK network (1 to 62 decimal) FF: Broadcast transmission 67 Section FINS Command/Response Format 6-2 DA2 Destination unit address. Specify within the following ranges. 00: PC (CPU Unit) 01 to 0F: Application on FinsGateway (Refer to FinsGateway online help.) 10 to 1F: Board for CPU Bus Unit or computer FE: Unit or Board connected to specified network (Any Unit or Board in SYSMAC LINK, SYSMAC NET, or SYSMAC LINK network) SNA Source network address. Specify within the following ranges. 00: Local network 01 to 7F: Remote network (1 to 127 decimal) SA1 Source node number. Specify within the following ranges. 01 to 3E: Node number in SYSMAC LINK network (1 to 62 decimal) 01 to 7E: Node number in SYSMAC NET network (1 to 126 decimal) 01 to 3E: Node number in SYSMAC LINK network (1 to 62 decimal) SA2 Source unit address. Specify within the following ranges. 00: PC (CPU Unit) 01 to 0F: Application on FinsGateway (Refer to FinsGateway online help.) 10 to 1F: Board for CPU Bus Unit or computer SID Service ID. Used to identify the processing generating the transmission. Set the SID to any number between 00 and FF 6-2-2 Parameters All parameters are specified in hexadecimal unless otherwise specified. Where decimal is specified, it is indicated by BCD. 6-2-3 Data Formats Commands The command code and text for the command are stored in memory as operands and the transmission is executed using the required parameters. The specific method depends on the programming method being used. Prepare the transmission data from the command code to the end of the text (with the data determined by the individual command), and execute the SlkSendFins library function. There are two bytes available for the command code and 0 to 540 bytes for the text. Command code Responses Text When the SlkRecvFins library function is executed, the data from the command code to the end of the text (with the data determined by the individual command) is stored as reception data, as shown in the following diagram. There are four bytes available for the command and response codes, and 0 to 538 bytes for the text. Command Response code code Text Note When multiple networks are connected, there are limits to the amount of data that can be transferred via the SYSMAC LINK Network and the host link function. 68 Section Commands and Responses for the Support Board 6-3 6-3 Commands and Responses for the Support Board 6-3-1 Command Codes Command code d 04 05 06 08 21 Data link operation mode Name Page g 01 02 01 Active Not valid Valid Valid Inactive Valid Not valid Valid DATA LINK START DATA LINK STOP CONTROLLER DATA READ 69 69 70 01 02 03 01 02 03 02 03 Valid Valid Valid Valid Valid Valid Valid Valid Valid Valid Valid Valid Valid Valid Valid Valid CONTROLLER STATUS READ NETWORK STATUS READ DATA LINK STATUS READ ECHOBACK TEST BROADCAST TEST RESULTS READ BROADCAST TEST DATA SEND ERROR LOG READ ERROR LOG CLEAR 70 72 74 75 75 76 76 77 6-3-2 DATA LINK START Starts the SYSMAC LINK Network data links. Command Block 04 01 Command code Response Block 04 01 Command code Response code The DATA LINK START command can be received for manually set data links. An error will occur if manually set data links are specified and yet data link tables do not exist. The node that receives this command and starts the data links will become the data link startup node. Note The Support Board can participate in automatically set data links, but it cannot be the starting unit. 6-3-3 DATA LINK STOP Stops the SYSMAC LINK Network’s data links. Command Block 04 02 Command code 69 Section Commands and Responses for the Support Board 6-3 Response Block 04 02 Command code Response code The DATA LINK STOP command can be received only while the data link is active. An error will occur if this command is sent at any other time. This command can be received by any node that is participating in the data link. 6-3-4 CONTROLLER DATA READ Reads the SYSMAC LINK Support Board’s model, version, connection type, shared RAM size, and node address data. Command Block 05 01 Command code Response Block 05 Command code 20 bytes 20 bytes 01 Response code Model Version Connection type and Shared RAM size Parameters Node address Model, version (response): The SYSMAC LINK Support Board’s model and version are returned as shown below, each 20 characters in ASCII. If fewer than 20 bytes of data are used, the remaining bytes will be packed with spaces (ASCII code 20 Hex). In the version numbers shown below, the spaces are represented by boxes (j). Model 3G8F7-SLK21jjjjjjjjj (Coaxial) 3G8F7-SLK11jjjjjjjjj (Optical) Version V1.00jV1.00jjjjjjjjj The first “V1.00” represents the Communications Controller’s version number, and the second represents the Support Board’s version number. Connection Type and Shared RAM Size (response) Bit 0 0 0 Not used Shared RAM size (Always 0 for the SYSMAC LINK Support Board.) Connection type 0: Coaxial 1: Optical Node address (response): The Support Board’s node address is returned between 01 and 3E Hex (1 to 62). 6-3-5 CONTROLLER STATUS READ Reads the SYSMAC LINK Support Board’s operating status (controller status). 70 Section Commands and Responses for the Support Board 6-3 Command Block 06 01 Command code Response Block 06 00 01 Command code Response code Operating status 00 Status 1 Status 3 Status 2 00 Status 5 Status 4 00 Count 1 Status 6 Total 6 bytes Parameters 00 Count 8 Network participation status Total 8 bytes Operating status (response): The operating status of the data links is as follows: 00 (Hex): Data links inactive. 01 (Hex): Data links active. Status 1 (response): Indicates the status of test operation as follows. Always 00 with a SYSMAC LINK Support Board. Bit 7 6 5 4 3 2 1 0 0 0 0 0 0 0 0 Status of test (0: Stopped; 1: Executing) Status 2 (response): Indicates the circuit status as follows. Bit 7 6 5 4 3 2 1 0 0 0 0 0 0 0 0 Power supply status (0: Not being supplied; 1: Being supplied) Status 3 (response): Indicates error information as follows. Bit 7 6 5 4 3 2 1 0 0 0 0 0 0 1: Node address setting range error 1: Node address duplication error 1: Network parameter mismatch error Note A network parameter mismatch error occurs if the registered network parameter contents do not match the actual network parameter contents after the power is turned ON. The system, however, will not stop. When a network parameter mismatch error occurs, the actual network parameter contents are automatically registered again. Status 4 (response): Indicates the cause of a communications controller error as follows. Bit 7 6 5 4 3 2 1 0 0 1: Local node loopback test error 1: Communications controller transmitter error 0 0 1: Communications controller watchdog timer error 1: Communications controller memory error 1: Communications controller chip error 71 Section Commands and Responses for the Support Board 6-3 Status 5 (response): Indicates the backup status as follows. Bit 7 6 5 4 3 2 1 0 0 0 0 1: EEPROM error 1: Network parameters error 1: Data link table error 1: Routing table error 1: Memory switch error Status 6 (response): Indicates error log information as follows. Bit 7 6 5 4 3 2 1 0 0 0 0 0 0 0 Error log entries recorded (0: No; 1: Yes) 1: Error log overflow (64 entries) Count 1 to Count 8 (response): These 8 bytes count how many times the following events have occurred since the power was turned ON. Each counter can count from 0 to 255 (i.e., 0 to FF in hexadecimal). Count 1: Number of CRC errors Count 2: Number of token re-sends Count 3: Number of token returns Count 4: Number of token timeouts Count 5: Number of polling timeouts Count 6: Number of polling node changes Count 7: Number of active node changes Count 8: Number of communications controller data-transfer function stops Network participation status list (response): These 8 bytes contain flags that indicate which nodes are participating in the network. A node is participating in the network (active) when the corresponding bit is ON. Bit Byte 1 Byte 2 Byte 3 Byte 4 Byte 5 Byte 6 Byte 7 Byte 8 7 6 5 4 3 2 1 0 8 16 24 32 40 48 56 – 7 15 23 31 39 47 55 – 6 14 22 30 38 46 54 62 5 13 21 29 37 45 53 61 4 12 20 28 36 44 52 60 3 11 19 27 35 43 51 59 2 10 18 26 34 42 50 58 1 9 17 25 33 41 49 57 The numbers in the boxes indicate the node addresses. The bit status of a particular node address shows whether or not that node is participating in the network. 0: Not part of network 1: Part of network (The 2 bits marked with a “–” are always 0.) 6-3-6 NETWORK STATUS READ Reads the operating status of the entire SYSMAC LINK Network. Command Block 06 02 Command code Response Block 06 31 bytes 02 Command code Response code Participation Actual data communications cycle time Polling node address Cyclic operation 72 8 bytes 62 bytes Continuous cyclic error status Cyclic error counter Cyclic transmission Section Commands and Responses for the Support Board Parameters 6-3 Participation data (response): These 31 bytes indicate the status of individual nodes within the network (i.e. their participation in the network). As shown in the following diagram, that status is expressed in four bits corresponding to the node address. Bit 7 6 5 4 3 2 1 0 Byte 1 Node #2 Node #1 Byte 2 Node #4 Node #3 Byte 3 Node #6 Node #5 Byte 31 Node #62 Node #61 Participation Status of Individual Nodes 0 0: Not part of network 1: Part of network 0: Normal disconnection 1: Abnormal disconnection (Applicable only for inactive nodes.) 0: Normal node 1: Non-responding node (No response to polling) Actual communications cycle time (response): The actual communications cycle time is returned in units of 100 µs in hexadecimal. Polling node address (response): The current polling node’s node address is returned in hexadecimal. Cyclic operation (response): Indicates the status of cyclic operation in the network. Bit 7 6 5 4 3 2 1 0 0 0 0 0 0 0 0 Cyclic operation status 0: Stopped 1: Operating Cyclic transmission (response): Indicates the status of cyclic transmissions. Bit 7 6 5 4 3 2 1 0 0 0 0 0 0 0 0 Cyclic transmission status 0: No transmission 1: Transmission Continuous cyclic error status (response): Indicates when continuous errors are occuring in cyclic transmission. If an error continues to occur at the same node during cyclic transmission, the corresponding bit is turned ON. The configuration is shown in the following diagram. Bit Byte 1 Byte 2 Byte 3 Byte 4 Byte 5 Byte 6 Byte 7 Byte 8 7 6 5 4 3 2 1 0 7 15 23 31 39 47 55 – 6 14 22 30 38 46 54 62 5 13 21 29 37 45 53 61 4 12 20 28 36 44 52 60 3 11 19 27 35 43 51 59 2 10 18 26 34 42 50 58 1 9 17 25 33 41 49 57 – 8 16 24 32 40 48 56 The numbers in the boxes indicate the node addresses. The bit status of a particular node address shows whether or not there is a recurring data link error at that node. 0: No recurring cyclic error 1: Recurring cyclic error (The 2 bits marked with a “–” are always 0.) Cyclic error counter (response): These bytes contain the total number of cyclic errors that occurred with each node (node addresses 1 to 62) since the power was turned ON. There is a one-byte counter allocated to each node and the 73 Section Commands and Responses for the Support Board 6-3 count is expressed in hexadecimal. The count can range from 0 to 255 (i.e., 0 to FF in hexadecimal) and the counting stops at 255. Bit 7 6 5 4 3 2 1 0 Byte 1 Number of error occurrences for node #1 Byte 2 Number of error occurrences for node #2 Byte 3 Number of error occurrences for node #3 Byte 62 Number of error occurrences for node #62 6-3-7 DATA LINK STATUS READ Reads the data link operational status. Command Block 06 03 Command code Response Block 06 03 Command code 31 bytes Response code Refresh time Refresh time present value max. value Status Status flags Parameters Status flags (response): The overall data link status is returned in one byte of data, as shown in the following diagram. Bit 7 6 5 4 3 2 1 0 0 0 0 0 1: Data link table setting error 1: No data link table Data link operating status 0: Stopped 1: Operating Data link table setting method 0: Manual settings 1: Automatic settings Refresh time present value and refresh time maximum value (response): These words contain the present value and the maximum value of the cycle time between data link area refreshes. Both values are returned in units of 1 ms, in hexadecimal, within a range of 0005 to 00FF (5 to 255 decimal). Status (response): Each node’s data link status is returned as shown in the following diagram. The status is the same as the data link status monitored with the 74 Section Commands and Responses for the Support Board 6-3 FinsGateway’s SLK Data Link Setting Utility as described in 5-4-2 Data Link Status Area. Bit 7 6 5 4 3 2 1 0 Node #2 Node #1 Byte 1 Byte 2 Byte 3 Node #4 Node #3 Node #6 Node #5 Byte 31 Node #62 Node #12 Note Data link status for each node PC operating mode 0: PROGRAM 1: RUN or MONITOR PC error 0:Normal 1:PC stopped due to an error Communications error 0:Normal 1:Communications error or not in network Data link operation (for each node) 0:Stopped 1:Operating 1. The data link status is not refreshed while the data links are stopped. 2. Communications errors will be indicated for nodes which are not active in the network or not participating in the data links. 3. When a communications error occurs in a node, that node retains the most recent status information it received for the other nodes in the network. 4. Only the PC operating status and PC error information will be reflected for nodes which are participating in the network but are not participating in the data links. 6-3-8 ECHOBACK TEST Executes an echoback communications test between specified nodes. Command Block 08 01 Command code 512 bytes max. Test data Response Block 08 Command code Parameters 512 bytes max. 01 Response code Test data Test data (command, response): For the command, up to 512 bytes of data can be specified to be sent to a specified node. For the response, the test data that was sent by the command is returned unchanged. Some kind of error occurred if the data returned in the response is different from the data that was sent in the command. 6-3-9 BROADCAST TEST RESULTS READ Reads for each node the results (number of receptions) of a BROADCAST TEST DATA SEND command that has been sent to all nodes in a specified network. (For details on the BROADCAST TEST RESULTS SEND command, refer to 6-3-10 BROADCAST TEST DATA SEND. Command Block 08 02 Command code 75 Section Commands and Responses for the Support Board 6-3 Response Block 08 02 Command Response code code Number of receptions Number of receptions (response): The number of times that broadcast test data has been received at the command destination node from the time that the last BROADCAST TEST RESULTS READ command was sent until this one was sent is returned. An error will be generated if that number of receptions differs from the number of times that the BROADCAST TEST DATA SEND command was issued during that same period. The number of receptions value being retained at the destination node is cleared when the BROADCAST TEST RESULTS READ command is executed. Parameters 6-3-10 BROADCAST TEST DATA SEND Broadcasts test data to all nodes in a specified network. Command Block 08 03 Command code 512 bytes max. Test data There is no response to this command. The control data must be set as follows when this command is issued: Destination node address: FF (Hex) (for broadcasting the data) Destination unit address: FE (Hex) (to SYSMAC LINK Support Boards/Units) Response required/not required flag: 1 (response not required) The transmission and reception status is checked by comparing the number of times this command is issued with the number of receptions parameter of the BROADCAST TEST RESULTS READ command. (For details, refer to 6-3-9 BROADCAST TEST RESULTS READ. 6-3-11 ERROR LOG READ Reads the PC’s error log. Command Block 21 02 Command code Beginning record no. No. of records Response Block 21 02 Command code Parameters 76 Response Max. no. of No. of code stored records stored records No. of records to read 10 bytes 10 bytes Error log data Error log data Beginning record no. (command): Specifies the first record to be read, in two bytes (four digits) in hexadecimal. (The first record number is 0000 hexadecimal). Section Response Codes 6-4 No. of records to read (command and response): Specifies the number of records to be read, within a range of 0001 to 0027 hexadecimal (1 to 39 decimal). Max. no. of stored records (response): Specifies the maximum number of records that can be recorded, within a range of 0001 to 0027 hexadecimal (1 to 39 decimal). No. of stored records (response): The number of records that have been recorded by the time the command is executed. For the SYSMAC LINK Support Board this is fixed at 0027 Hex (39 decimal.) Error log data (response): The specified error log records are returned in sequence starting from the beginning record number. The total number of bytes required is calculated as follows: No. of records x 10 bytes The configuration of each error record is as follows: 1st byte Error code 10th byte Details Minutes Day Hour Year Month Seconds Error code, details: These parameters show the contents of errors. For details, refer to 9-3-2 Error Codes. Date and time: These parameters show the seconds, minutes, hour (0 to 23), date, month, and year (the rightmost two digits) in BCD specifying the time that the error occurred. Note If the PC does not have the specified number of records, the response will return all of the records that have been stored up to that point and the command will end normally. 6-3-12 ERROR LOG CLEAR Clears all error log records and sets the error log pointer to 0. Command Block 21 03 Command format Response Block 21 03 Command format 6-4 Response code Response Codes This section describes the response codes returned with responses to FINS commands. Response codes can be used to confirm normal completion of command execution or to troubleshoot problems when commands fail. For further troubleshooting information, refer to Section 9 Troubleshooting and Maintenance of this manual and to the operation manuals for specific Units or Systems. 77 Section Response Codes 6-4 6-4-1 Configuration Response codes for FINS commands consist of two bytes that indicate the result of executing a command. The structure of the response codes is shown in the following diagram. First byte Bit 7 6 5 4 3 Second byte 2 1 0 7 6 5 4 3 2 1 0 Sub-response code (SRES) Main response code (MRES) 1: Relay Error Flag 1: PC Non-fatal Error Flag 1: PC Fatal Error Flag The main response code (MRES) in the first byte classifies the response and the sub-response code (SRES) in the second byte indicates details under the MRES classification. If bit 7 of the first byte is ON, a network relay error has occurred. Refer to 6-4-2 Network Relay Errors for details on troubleshooting the error. If bit 6 or 7 of the second byte is ON, an error has occurred in the PC or computer returning the response. Refer to the operation manual for the device returning the response for details when troubleshooting the error. 6-4-2 Network Relay Errors A network relay error will occur whenever a command cannot reach the destination. These errors can occur for several reasons: 1) Data was not successfully passed between two Link Units, 2) Data was not passed successfully between a Link Unit and another Unit, such as the PC’s CPU Unit, or 3) The destination of a gateway does not exist. In any case, the Unit that was not able to transfer data will return a response indicating a network relay error. Bit 7 of the first byte of the response code will be ON if a network relay error has occurred. When this happens, two more bytes of data will follow the response code to indicate the location of the error. This information, along with the response code, should enable you to track the error. First byte Bit Second byte 7 6 5 4 3 2 7 6 5 4 3 2 1 0 7 6 5 4 3 2 1 0 Command code 1 0 7 6 5 4 3 2 1 0 First word Second word Main response code (MRES) Sub response code (SRES) 1: Relay Error Flag 7 Third word 6 5 4 3 2 1 Error network address 0 7 1: PC Non-fatal Error Flag 1: PC Fatal Error Flag 6 5 4 3 2 1 0 Error node address Error network address: 00 to 7F (Hex) (0 to 127 in decimal) Error node address: Controller LINK:01 to 3E (Hex) (1 to 62 in decimal) SYSMAC NET: 01 to 7E (Hex) (1 to 126 in decimal) SYSMAC LINK: 01 to 3E (Hex) (1 to 62 in decimal) Relay Errors 78 A relay error indicates that the command did not reach the Unit to which it was sent. There are two types of situation in which this can occur. Example 1 (below) shows a situation in which a relay error occurs when data cannot be transferred from one Communications Unit to another in an interconnected network. In Example 2, the relay error occurs because either the specified destination node or the next relay node does not exist. Section Response Codes 6-4 In the two diagrams, the numbers indicate the following: (1) The transmitted data fails to be received. (2) The relay error and response code are returned to the command source. In this example, data cannot be transferred between SYSMAC LINK Units due to some cause such as a routing table error. Example 1 Computer Controller Link Unit SYSMAC LINK Units SYSMAC LINK Support Board Transmission Example 2 Response In this example, the specified destination node or the next relay node does not exist. Computer Controller Link Unit SYSMAC LINK Unit Units SYSMAC LINK Support Board Transmission Response If an error occurs, check the MRES and SRES codes for the node in question, and correct the problem. 6-4-3 Response Codes and Troubleshooting The table below lists response codes (main and sub-codes) returned after execution of the FINS commands, the probable cause of errors, and recommended remedies. Upon receipt of some commands, the destination node will issue a request to another node; the other node is referred to as the third node. Main code 00: Normal completion Subcode 00 01 Probable cause --Service was interrupted Remedy --Check the contents of the destination transmission area of third node. Check the data link status. 79 Section Response Codes Main code 01: Source node error 02: Destination node error 03: Communications controller error 04: Not executable 05: Routing error 80 Subcode Probable cause 6-4 Remedy 01 Source node not part of Network Add to Network. 02 Token time-out, node address too large Set the source node’s node address below the maximum node address. 03 Number of transmit retries exceeded Check communications with echoback test. If the test fails, check network. 04 Maximum number of frames exceeded Either check the execution of events in the network and reduce the number of events occurring in one cycle, or increase the maximum number of frames. 05 Node address setting error (range) Correct the node address so that it is within specified range and that there are no node addresses that are set twice. 06 Node address duplication error Make sure that there are no node addresses that are set twice. 01 02 Destination node not part of Network No node with the specified node address Add to Network. Check the destination node’s node address. 03 Third node not part of Network Broadcasting was specified. Check the third node’s node address. Check the control data and specify only one node as the third node. 04 Busy error, destination node busy Increase the number of transmit retry attempts or re-evaluate the system so that the destination node is not so busy receiving data. 05 Response time-out, message packet was corrupted by noise Increase the number of transmit retry attempts. Response time-out, response watchdog timer interval too short Increase the value for the response watchdog timer interval in the control data. Frame lost in transmission Check the error log and correct the process. 01 Error occurred in the communications controller, ERC indicator is lit Take corrective action, referring to communications controller errors and remedies table at end of this section 02 CPU Unit error occurred in the PC at the destination node Clear the error in the CPU Unit (refer to the PC’s operation manuals) 03 A controller error has prevented a normal response from being returned. Check network communications status and reset the controller board. If the error still exists, replace the controller board. 04 Unit address setting error Make sure the unit address and unit number are within the specified ranges and that each number/address is set only once. 01 An undefined command has been used. Check the command code and be sure that the Unit supports it. 02 Cannot process command because the specified unit model or version is wrong. Check the unit model and version. 01 Destination node address is not set in the routing table. Set the destination node address in the routing table. 02 Routing table isn’t registered. Set the source nodes, destination nodes, and relay nodes in the routing table. 03 Routing table error Set the routing table correctly. 04 The maximum number of relay nodes (2) was exceeded in the command. Redesign the network or reconsider the routing table to reduce the number of relay nodes in the command. Section Response Codes Main code 10: Command format error 11: Parameter error Subcode Probable cause 6-4 Remedy 01 The command is longer than the max. permissible length. Check the command format of the command and set it correctly. 02 The command is shorter than min. permissible length. Check the command format of the command and set it correctly. 03 The designated number of data items differs from the actual number. Check the number of items and the data, and make sure that they agree. 04 An incorrect command format has been used. Check the command format of the command and set it correctly. 05 An incorrect header has been used. Set the routing table correctly. (The source node’s relay table or relay node’s local network table is wrong.) 01 A correct memory area code has not been used or Extended Data Memory is not available. Check the command’s memory area code and set the appropriate code. 02 The access size specified in the command is wrong, or the first address is an odd number. Set the correct access size for the command. 03 The first address is in an inaccessible area. Set a first address that is in an accessible area. 04 The end of specified word range exceeds the acceptable range. Check the acceptable limits of the data area and set the word range within the limits. Check the data link tables to be sure the limit to link words has not been exceeded. 06 A non-existent program no. has been specified. Check the program number and be sure that it is set correctly. 09 The sizes of data items in the g command block are wrong. Check the command data and be sure that the sixes of the data items are correct. Check the data link tables to be sure all nodes in the refresh parameters are in the common link parameters. 0A The IOM break function cannot be executed because it is already being executed. Either abort the current IOM break function processing, or wait until it is completed and execute the command. Check the data link tables for node addresses that have been set twice. 0B The response block is longer than the max. permissible length. Check the command format and set the number of items correctly. 0C An incorrect parameter code has been specified. Check the command data and reenter it correctly. Check the data link table file for corruption. 81 Section Response Codes Main code 20: Read not possible Subcode 02 Probable cause 6-4 Remedy The data is protected. Execute the instruction again after issuing the PROGRAM AREA PROTECT CLEAR command to the PC. An attempt was made to download a file that is being uploaded. Check the file name and either interrupt servicing or wait for servicing to complete before re-executing the command. The registered table does not exist or is incorrect. Set or reset the registered table. Too many files open. Close open files and re-execute the command. 04 The corresponding search data does not exist. --- 05 A non-existing program no. has been specified. Check the program number and be sure that it is set correctly. 06 A non-existing file has been specified. Check whether the correct file name was used. 07 A verification error has occurred. Check whether the memory contents are correct and replace if incorrect. 03 Check the contents of the file. A read error may have occurred. 21: Write not possible 01 The specified area is read-only or is write-protected. 02 The data is protected. An attempt was made to simultaneously download and upload a file. Check the file name and either interrupt servicing or wait for servicing to complete before re-executing the command. The data link tables cannot be written manual because the Unit is set for automatic generation. Change the data link mode to manual. The number of files exceeds the maximum permissible. Write the file(s) again after erasing unneeded files, or use different disk or Memory Card that has free space. Too many files open. Close open files and re-execute the command. 05 A non-existing program no. has been specified. Check the program number and be sure that it is set correctly. 06 A non-existent file has been specified. --- 07 The specified file already exists. Change the name of the file and execute the instruction again. 08 Data cannot be changed. Check the contents of the memory area being written to. 03 82 If the specified area is read-only, the write cannot be performed. If it is write-protected, turn off the write-protect switch and execute the instruction again. Execute the instruction again after issuing the PROGRAM AREA PROTECT CLEAR command to the PC. Section Response Codes Main code 22: Not executable in d current mode 23: No Unit 24: Start/stop not possible Subcode Probable cause 6-4 Remedy 01 The mode is wrong (executing). Data links are active. Check the operating mode. Check the data link status before execution. 02 The mode is wrong (inactive). Data links are active. Check the operating mode. Check the data link status before execution. 03 The PC is in the PROGRAM mode. Check the PC’s mode and the computer mode. 04 The PC is in the DEBUG mode. Check the PC’s mode and the computer mode. 05 The PC is in the MONITOR mode. Check the PC’s mode and the computer mode. 06 The PC is in the RUN mode. Check the PC’s mode and the computer mode. 07 The specified node is not the control node. Check which node is the control node. 08 The mode is wrong and the step cannot be executed. Check whether the step has active status or not. 01 A file device does not exist where specified. Mount the Memory Card or disk 02 The specified memory does not exist. Check the specifications of the installed file memory. 03 No clock exists. Check the model number. 01 The data link tables either have not been created or are incorrect. Set the data link tables correctly. 83 Section Response Codes Main code 25: Unit error Subcode Remedy 02 Parity/checksum error occurred because of incorrect data. Transfer correct data into memory. 03 I/O setting error (The registered I/O configuration differs from the actual.) Either change the actual configuration to match the registered one, or generate the I/O table again. 04 Too many I/O points Redesign the system to remain within permissible limits. 05 CPU bus error (An error occurred during data transfer between the CPU Unit and a CPU Bus Unit.) Check the Unit, Service Boards, and cable connections and issue the ERROR CLEAR command. 06 I/O duplication error (A rack number, unit number, or I/O word allocation has been duplicated.) Check the system’s settings and eliminate any settings that occur twice. 07 I/O bus error (An error occurred during Check the Unit, Service Boards, and cable data transfer between the CPU Unit connections and issue the ERROR CLEAR and an I/O Unit.) command. 09 SYSMAC BUS/2 error (An error occurred during SYSMAC BUS/2 data transfer.) Check the Unit, Service Boards, and cable connections and issue the ERROR CLEAR command. 0A Special I/O Unit error (An error occurred during CPU Bus Unit data transfer.) Check the Unit, Service Boards, and cable connections and issue the ERROR CLEAR command. 0D Duplication in SYSMAC BUS word allocation. Check and regenerate the I/O table. 0F A memory error has occurred in internal memory, in the Memory Card, or in Expansion DM during the error check. If the error occurred in internal memory or the EM Unit, correct the data in the command an execute it again. 10 84 Probable cause 6-4 Terminator not connected in SYSMAC BUS System. If the error occurred in a Memory Card or EM used for file memory, the file data has been corrupted. Execute the MEMORY CARD FORMAT command for the PC. If the above remedies do not eliminate the error, replace the faulty memory. Connect the terminator correctly. Section Response Codes Main code 26: Command error Subcode 01 02 04 30: Access right error 40: Abort Probable cause 6-4 Remedy The specified area is not protected. This response code will be returned if an attempt is made to clear protection on an area that is not protected. An incorrect password has been specified. The program area is not protected, so it isn’t necessary to clear protection. The specified area is protected. Execute the command again after executing the PROGRAM AREA PROTECT CLEAR command for the PC. To many commands at destination. The destination has received more than 5 commands. Either interrupt servicing or wait for servicing to complete before re-executing the command. Execute the command again after the service has been completed or aborted. Specify a password that is registered. 05 The service is being executed. 06 07 The service is not being executed. Execute the service if necessary. Service cannot be executed from source node because the source node is not part of the data links. Execute the service from a node that is part of the data links. A buffer error has prevented returning a normal response. Reset the board. If the error persists, replace the board. 08 Service cannot be executed because necessary settings haven’t been made. Make the necessary settings. 09 Service cannot be executed because Check the command format of and make necessary settings haven’t been made the necessary settings. in the command data. 0A The specified action or transition number has already been registered. Execute the command again using an action or transition number that hasn’t been registered. 0B Cannot clear error because the cause of the error still exists. Eliminate the cause of the error and execute the ERROR CLEAR command. 01 The access right is held by another node. Execute the command again after the access right has been released. (Either a peripheral device at the other node is executing an SFC online edit, or the other node is executing an ACCESS RIGHT ACQUIRE or ACCESS RIGHT FORCED ACQUIRE command.) (The command can be executed after the ACCESS RIGHT FORCED ACQUIRE or ACCESS RIGHT RELEASE command is completed. Releasing the access right might affect processes in progress at the node that held the access right.) Command was aborted with ABORT command. --- 01 85 SECTION 7 Network Interconnections This section describes the method used to connect multiple networks. 7-1 7-2 7-3 What is Network Interconnection? . . . . . . . . . . . . . . . . . . . . . . . . . . . . . . . . . . . . . . . . . . . . 7-1-1 Interconnecting SYSMAC LINK Networks . . . . . . . . . . . . . . . . . . . . . . . . . . . . . 7-1-2 Interconnecting Different Types of Networks . . . . . . . . . . . . . . . . . . . . . . . . . . . . Routing Tables . . . . . . . . . . . . . . . . . . . . . . . . . . . . . . . . . . . . . . . . . . . . . . . . . . . . . . . . . . . Setting Routing Tables . . . . . . . . . . . . . . . . . . . . . . . . . . . . . . . . . . . . . . . . . . . . . . . . . . . . . 7-3-1 Example Routing Table Settings . . . . . . . . . . . . . . . . . . . . . . . . . . . . . . . . . . . . . . 87 Section What is Network Interconnection? 7-1 7-1 What is Network Interconnection? Network interconnection enables commands and responses for the message service to be sent and received across multiple networks, including FA and OA networks. The four networks listed below can be interconnected to achieve this. FA Networks • Controller Link Networks • SYSMAC NET Link Networks • SYSMAC LINK Networks OA Networks Ethernet Networks 7-1-1 Interconnecting SYSMAC LINK Networks SYSMAC LINK Networks can be connected through CV-series PCs, CS1-series PCs, or computers with FinsGateway. SYSMAC LINK Network SYSMAC LINK Network CS-series, C200HX/HG/HE, or CV-series PC CV-series PC, CS-series PC, or IBM computer with FinsGateway (See note.) IBM PC/AT or compatible IBM PC/AT or compatible Note A data bridge is created between SYSMAC LINK Units mounted on the same PC. 7-1-2 Interconnecting Different Types of Networks CV-series PCs, CS-series PCs, or computers with FinsGateway can be used to connect a SYSMAC LINK Network with another network (SYSMAC NET Link, Controller Link, or Ethernet.) SYSMAC LINK Network CS-series, C200HX/HG/HE or CV-series PC IBM PC/AT or compatible Ethernet CV-series PC, CS-series PC, or IBM computer with FinsGateway (See note.) Note A data and communications protocol gateway is created be- tween a SYSMAC LINK Unit and a SYSMAC NET Link or Controller Link Unit mounted on the same PC. Note 1. A bridge is used between Communications Units/Boards to connect the same type of networks. 2. A gateway is used between Communications Units/Boards to connect different types of networks. Bridge function Gateway function SYSMAC LINK SYSMAC LINK Controller Link PC SYSMAC LINK PC Data 88 Data Data and communications protocol gateway Section Routing Tables 7-2 • Computer Bridges and Gateways: FinsGateway automatically implements the bridge or gateway functionality. It does not need to be programmed by the user. The FinsGateway, however, does not connect all networks. Refer to the FinsGateway online help for details. Computer FinsGateway SYSMAC LINK Support Board Controller Link Support Board SYSMAC LINK Controller Link • Communications across bridges or gateways can include up to three networks, including the local network (data generating network). Network 1 (local network) Network 2 Network 3 Although 2,012 bytes of data (including the header) can be sent and received through a Controller Link Network, the maximum amount of data is limited by any network the data passes through, i.e., the network with the the smallest capacity will determine the limit. If, for example, data passes through a SYSMAC LINK network as shown in the figure, the amount of data sent and received from the SYSMAC LINK is limited to 552 bytes (including the header) because the SYSMAC LINK Network can only handle that many bytes. See the manual for the network you are using in order to determine the maximum amount of data for each network. 7-2 Routing Tables Routing tables that define the communications path from the SYSMAC LINK Unit on the local PC to the network connected to the destination PC must be created in order to send and receive data across networks. Creating Routing Tables The routing table consists of a local network table and a relay network table. Local Network Table The local network table lists the unit numbers and corresponding network addresses for the SYSMAC LINK Unit and Support Board unit numbers. Example Unit number 04 Unit number 05 Unit number 06 Unit number 07 Local network address Unit number Network address 1 Network address 2 Network address 3 Network address 4 Local network table Local network address Unit number 1 04 2 05 3 06 4 07 89 Section Setting Routing Tables Note Relay Network Table 7-3 1. The unit number is set between 00 and 15 using the rotary switch on the front panel of CV-series and CS-series SYSMAC LINK Units, and is the same as the operating level for C200HX/HG/HE PCs. For a SYSMAC LINK Support Board, the unit number is 16 less than the unit address (i.e., the Communications Unit number: 16 to 31) set for the Board in the FinsGateway settings. 2. The network address is the address of the network connected to the Unit (between 1 and 127). The address is set when the local network table is created. A relay network table provides the node and network addresses corresponding to the initial relay point (first point the data must go to) en route to a target network (end network) not directly connected to the local PC. The table traces the route from the relay point to the end network. Local node Computer Relay node PC (a) Node Node address 2 address 1 Node address 2 Unit number 0 Relay node PC (b) Node ad- Destination dress 1 Unit number 1 Node address 3 Node address 1 Network address 1 Network address 2 Node address 2 Network address 3 End network Computer relay network table End network Relay network 2 1 3 3 1 3 PC (a) relay network table Relay node Data first goes to node address 3 at network address 1 to reach network address 3. 7-3 End network Relay network 3 2 PC (b) local network table Relay node 2 Data then goes to node address 2 at network address 2 to reach network address 3. Local network address Unit number 2 0 3 1 We know from the local network table that the data goes through local unit number 1 to reach network address 3. Data goes to node address 2 at network address 3, i.e., the local network. Setting Routing Tables This section describes routing table settings. Routing tables are set through the FinsGateway, Controller Link Support Software, CX-Net, or SYSMAC LINK Support Software. This section describes setting procedures and setting details. For specific procedures, see the FinsGateway online help, SYSMAC LINK Support Software Operation Manual (W308), CX-Programmer User’s Manual. 90 Section Setting Routing Tables 7-3 7-3-1 Example Routing Table Settings This section shows examples of routing table settings for a SYSMAC LINK Support Board. Example 1 The example below shows local network table settings when a SYSMAC LINK Support Board is mounted to a computer. Computer Unit number b SYSMAC LINK Network address A Local Network Table Loc SIOU No. Netwk unit # 1 Example 2 A b The following example show the settings for a relay network table connecting three networks. Relay Network Tables No. End Netwk 1 2 B C PC 2 No. End Netwk Node address b Node address c 1 C PC 3 No. End Netwk 1 2 A C PC 4 No. End Netwk Node address e Node address f 1 A PC 5 No. End Netwk 1 2 A B PC 1 Node address a Network address A Network address B Network address C Node address d Node address g PC ID PC ID PC ID PC ID PC ID Relay Netwk Node A A b b Relay Netwk Node B e Relay Netwk Node B B c e Relay Netwk Node B c Relay Netwk Node C C f f On closer examination of the relay network table for PC 3, we see that the relay network is B and the relay node is c when network A is the destination, and that the relay network is B and the relay node is e when network C is the destination. 91 Section Setting Routing Tables Example 3 The network structure example in the figure below shows routing tables for all nodes. Unit 5 Node 1 SNT: CLK: SLK: PC (1) SNT SYSMAC NET LINK Unit SYSMAC LINK Unit or Board SYSMAC LINK Unit Network 10 Unit 3 Node 4 Unit 2 CLK SNT Node 3 Unit 4 Node 5 PC (2) SNT SLK PC (3) Unit 7 Node 15 Network 20 CLK Unit 0 Node 1 Network 30 Computer CLK PC (4) SLK Unit 1 Node 2 PC (5) Unit 5 Node 5 PC (6) SLK Unit 6 Node 10 Routing Tables on PC 1 Local Network Table Relay Network Table No. Loc Netwk SIOU unit# No. End Netwk 1 2 3 010 05 1 2 3 020 030 PC ID Relay Netwk Node 010 010 004 005 Relay Netwk Node 010 005 Relay Netwk Node 010 004 Relay Netwk Node 020 020 003 003 Routing Tables on PC 2 Local Network Table Relay Network Table No. Loc Netwk SIOU unit# No. End Netwk 1 2 3 010 020 03 02 1 2 3 030 PC ID Routing Tables on PC 3 Local Network Table Relay Network Table No. Loc Netwk SIOU unit# No. End Netwk 1 2 3 010 030 04 07 1 2 3 020 PC ID Routing Tables on Computer Local Network Table 92 7-3 Relay Network Table No. Loc Netwk SIOU unit# No. End Netwk 1 2 3 020 00 1 2 3 010 030 PC ID Section Setting Routing Tables 7-3 Routing Tables on PC 4 Local Network Table Relay Network Table No. Loc Netwk SIOU unit# No. End Netwk 1 2 3 020 01 1 2 3 010 030 PC ID Relay Netwk Node 020 020 003 003 Relay Netwk Node 030 030 015 015 Relay Netwk Node 030 030 015 015 Routing Tables on PC 5 Local Network Table Relay Network Table No. Loc Netwk SIOU unit# No. End Netwk 1 2 3 030 05 1 2 3 010 020 PC ID Routing Tables on PC 6 Local Network Table Relay Network Table No. Loc Netwk SIOU unit# No. End Netwk 1 2 3 030 06 1 2 3 010 020 PC ID 93 SECTION 8 Communications Timing This section explains SYSMAC LINK Network communications in detail. Refer to this section for network communications that require accurate communications timing. 8-1 8-2 Network Parameters . . . . . . . . . . . . . . . . . . . . . . . . . . . . . . . . . . . . . . . . . . . . . . . . . . . . . . . 8-1-1 SYSMAC LINK Communications . . . . . . . . . . . . . . . . . . . . . . . . . . . . . . . . . . . . 8-1-2 Communications Cycle . . . . . . . . . . . . . . . . . . . . . . . . . . . . . . . . . . . . . . . . . . . . . 8-1-3 Network Parameters . . . . . . . . . . . . . . . . . . . . . . . . . . . . . . . . . . . . . . . . . . . . . . . . 8-1-4 Specifying Network Parameters . . . . . . . . . . . . . . . . . . . . . . . . . . . . . . . . . . . . . . Message Service Delay Times . . . . . . . . . . . . . . . . . . . . . . . . . . . . . . . . . . . . . . . . . . . . . . . 95 Section Network Parameters 8-1 8-1 Network Parameters This section explains how to use SYSMAC LINK Network communications and how to adjust the network parameters to match the system. 8-1-1 SYSMAC LINK Communications The token bus method is used for communications in the SYSMAC LINK Network. With this method, a piece of data called a “token” is passed between the various nodes in the network. The only node that can transmit data at any given time is the one that currently holds the token, thereby preventing interference or conflicts in the transmission of data within the network. The token travels from in node-address order beginning with the node with the lowest node address, without regard to the order in which the nodes are connected. When the token reaches the node with the highest address, it is passed back to the node with the lowest address to start the cycle over again. If a node has data to send, it will send that data and then pass the token to the next node. If the node has no data to send, it will just pass the token to the next node. Polling Node Each SYSMAC LINK Network always has a Unit that controls communications within the network. This Unit is called the “polling node.” Normally, the node that has the lowest node address in the network is the polling node. All Units at nodes other than the polling node are called “polled nodes.” The polling node controls the token, checks the network, and performs other relevant tasks. Should the polling node break down, the node with the next lowest node address is automatically selected as the polling node to prevent the entire network from shutting down. Note There are times when the node with the lowest node address will not be the polling node depending on the order in which the nodes are started, models, settings, and node status. 8-1-2 Communications Cycle The “communications cycle” is the cycle for repeating SYSMAC LINK Network processing. The time required for one communications cycle is called the “communications cycle time,” and each communications cycle is divided into a “token cycle” and a “polling cycle” as shown in the following diagram. Communications cycle Token cycle Polling cycle Communications cycle Token cycle Polling cycle Token Cycle The token cycle is the period during which the token is sent from the polling node to the nodes in order and returned to the polling node. During this cycle, any nodes with data to send will send that data. Data link data will also be sent during this cycle. Polling Cycle The polling cycle is the period during which the polling node checks the status of the nodes in the network. The polling node checks whether each node is actually participating in the network, whether there are any new nodes participating, and so on, and notifies all the nodes of the results of the check. 8-1-3 Network Parameters Network parameters are also used to control network operations. Network parameters are read from the polling node and distributed to all other nodes when 96 Section Network Parameters 8-1 the SYSMAC LINK Network is started. In this way, all nodes on the network always have the same network parameter settings. If nodes are connected to the network halfway during network operation, the network parameter settings will also be distributed to these nodes when they are connected. The following three network parameters can be specified. Maximum Node Address This parameter specifies the maximum node address of nodes to be checked by the polling node. The default is 32 for Wired Networks and 62 for Optical Ring Networks Reducing the setting of this parameter reduces the number of nodes checked by the polling node and can thus avoids unnecessary check operations. However, if the network contains nodes with node addresses greater than the setting of the parameter, these nodes will not be connected to the network. No. of Polled Nodes Per Communications Cycle This parameter specifies the number of nodes to be checked (polled) by the polling node during each polling cycle. The default is 4. Increasing this setting increases the communications cycle time, but reduces the time required to recognize that nodes have been removed from or added to the network. On the other hand, reducing this setting shortens the communications cycle time but delays a network response when a node is disconnected from or connected to the network. No. of Event-frames per Communications Cycle This parameter specifies the maximum number of event frames (communications other than data links, such as message service transmissions) that can be transferred during a communications cycle. Specify a value in units of 128 bytes. The default is 10 (128 10 = 1,280 bytes). Increasing this setting increases the communications cycle time but allows for more event communications such as the message service. If this setting is too low, event communications will be restricted and errors will occur. See 5-5 Data Link Performance for the actual effects of network parameter changes on communication cycle times. 8-1-4 Specifying Network Parameters Set the network parameters from the FinsGateway’s SLK Data Link Setting utility. This section describes only the allowable setting range for each network parameter. Refer to the FinsGateway online help for setting procedures. The following table shows the setting range and default for network parameters. Network parameter Setting range Default value Maximum node address 2 to 62 62 Number of polled nodes per communications cycle 1 to 61 4 No. of event-frames per communications cycle 5 to 255 10 The network parameters become valid immediately after being set. Note 1. Always stop the data link before changing network parameters. 2. Specify a value for the maximum node address that is equal to or greater than the highest node address in the SYSMAC LINK Network. 97 Section Message Service Delay Times 8-2 8-2 Message Service Delay Times The following diagram illustrates the maximum message service transmission delay time. In this example, the MEMORY AREA READ FINS command is sent to the PC at node #2 (a CS1-series PC) by the user application at the computer at node #1. Computer at node #1 User application (SlkSendFins) (SlkRecvFins) Receive processing at node #1 (response) Send processing at node #1 (command) Transmission delay (response) Communications cycle Transmission delay (command) Send processing at node #2 (response) Receive processing at node #2 (command) PC at node #2 Maximum transmission delay Max. transmission delay time = + + + + Send processing (node #1) + Communications cycle time Transmission delay time (for command) + Receive processing (node #2) PC processing time (node #2) + Send processing (node #2) Communications cycle time + Transmission delay time (for response) Receive processing (node #1) Send/Receive Processing at Node #1 Depends on the processing capacity of the computer that is used. Communications Cycle Time See 5-5 Data Link Performance. Transmission Delay Time Number of words transferred × 0.008 + 0.112 ms Receive Processing at Node #2 Number of words transferred × 0.00125 + 2.3 ms Send Processing at Node #2 Number of words transferred × 0.00125 + 3.0 ms Note 1. The I/O response time can increase due to noise or restrictions on the number of frames that can be transmitted while data links are operating. 2. Refer to the SYSMAC LINK Units Operation Manual (W367) for details on the time from reception at the SYSMAC LINK Unit until transmission. 98 SECTION 9 Troubleshooting and Maintenance This section provides information on troubleshooting errors that occur during SYSMAC LINK Support Board operation, as well as daily inspection, cleaning, and other maintenance procedures. 9-1 9-2 9-3 9-4 9-5 Troubleshooting Using Indicators . . . . . . . . . . . . . . . . . . . . . . . . . . . . . . . . . . . . . . . . . . . . 9-1-1 Using the RUN, ERR, and INS Indicators . . . . . . . . . . . . . . . . . . . . . . . . . . . . . . . 9-1-2 Troubleshooting with the LNK Indicators . . . . . . . . . . . . . . . . . . . . . . . . . . . . . . . Status Information and Troubleshooting . . . . . . . . . . . . . . . . . . . . . . . . . . . . . . . . . . . . . . . 9-2-1 Troubleshooting with the SlkGetNetworkStatus Function . . . . . . . . . . . . . . . . . . 9-2-2 Error Processing . . . . . . . . . . . . . . . . . . . . . . . . . . . . . . . . . . . . . . . . . . . . . . . . . . . Error Log . . . . . . . . . . . . . . . . . . . . . . . . . . . . . . . . . . . . . . . . . . . . . . . . . . . . . . . . . . . . . . . 9-3-1 Error Log Table . . . . . . . . . . . . . . . . . . . . . . . . . . . . . . . . . . . . . . . . . . . . . . . . . . . 9-3-2 Error Codes . . . . . . . . . . . . . . . . . . . . . . . . . . . . . . . . . . . . . . . . . . . . . . . . . . . . . . Cleaning and Inspection . . . . . . . . . . . . . . . . . . . . . . . . . . . . . . . . . . . . . . . . . . . . . . . . . . . . 9-4-1 Cleaning . . . . . . . . . . . . . . . . . . . . . . . . . . . . . . . . . . . . . . . . . . . . . . . . . . . . . . . . . 9-4-2 Inspection . . . . . . . . . . . . . . . . . . . . . . . . . . . . . . . . . . . . . . . . . . . . . . . . . . . . . . . . Handling Precautions . . . . . . . . . . . . . . . . . . . . . . . . . . . . . . . . . . . . . . . . . . . . . . . . . . . . . . 9-5-1 Replacing the Unit . . . . . . . . . . . . . . . . . . . . . . . . . . . . . . . . . . . . . . . . . . . . . . . . . 9-5-2 Replacing the Board . . . . . . . . . . . . . . . . . . . . . . . . . . . . . . . . . . . . . . . . . . . . . . . . 99 Section Troubleshooting Using Indicators 9-1 9-1 Troubleshooting Using Indicators This section describes the errors shown by the SYSMAC LINK Support Board’s indicators and possible remedies. Optical System Name Coaxial System Status Description RUN Lit The Board is operating normally. ERR Lit An error has occurred. INS LNK Lit Participating in network. Lit Flashing Lit Sending data link (participating in data link) Error in the data link table settings. Backup power supply is ON. (Optical Units only.) P/S 9-1-1 Using the RUN, ERR, and INS Indicators The SYSMAC LINK Support Board’s RUN, ERR, and INS indicators can be used to check whether SYSMAC LINK Support Board startup and Network participation are operating normally. Note Be sure to turn OFF the computer before performing any of the following: • Disconnecting the Board or connectors. • Securing Board or connectors. • Setting hardware switches. Indicators RUN ERR INS Lit Not Lit lit Error history hi Probable cause Probable remedy y --- Unit operating normally; Network participation normal. --- Not lit Lit --- --- The SYSMAC LINK Support Board is faulty. Not lit Not lit Not lit --- Power is not being supplied correctly to the computer. If the ERR indicator still lights when the Board is mounted on another computer, replace the SYSMAC LINK Support Board. Check the power supply voltage and supply at the recommended voltage. The SYSMAC LINK Support Board has become loose. Secure the SYSMAC LINK Support Board firmly. The SYSMAC LINK Support Board is mounted in the wrong slot. Refer to the Installation Guide and mount the Board correctly. The SYSMAC LINK Support Board is faulty. The same node address is being used by two different Units. If the indicators do not light when the Board is mounted in another computer, replace the SYSMAC LINK Support Board. Reset so that each node address is used only once within the same Network. The Board is connected to a Controller Link network. Check the networks and correct the cable connections. Lit 100 Lit Not lit 0211 Hex Section Troubleshooting Using Indicators Indicators RUN ERR INS Lit Lit --- Error history 021A Hex Probable cause Probable remedy Routing table setting error. There is an error in the data link table settings. EEPROM error Lit --- Not lit 9-1 Reset the routing table correctly, referring to 7-3 Setting Routing Tables. When no routing table is being used, delete the routing table. When using data links, refer to 5-2 Setting Data Links and correct the tables. When not using data links, delete the tables. Refer to 9-2 Status Information and Troubleshooting, correct the data where the error has occurred, and reset the Board. If the error occurs again, replace the SYSMAC LINK Support Board. --- Cables are not connected correctly. Check the cable connections and reconnect correctly. 021A Hex The node address is larger than the maximum node address set for the network parameters. --- No other nodes exist. Either reset the maximum node address using the SYSMAC LINK Support Software or reset the node address to below the maximum. Make sure that 2 or more nodes exist within the Network. --- No node has been set as a polling node. Refer to Installation Guide and set at least one polling node. (A SYSMAC LINK Support Board should normally be set as the polling node.) 9-1-2 Troubleshooting with the LNK Indicators Data Link Cannot be Started The following table describes the LNK indicators at the startup node and their use in troubleshooting when a data link cannot be started. Starting a data link depends on the SYSMAC LINK Support Board operating normally and participating in the Network. Refer to 9-1-1 Using the RUN, ERR, and INS Indicators earlier in this section and check Board operation before using the following table. Indicators LNK Lit Flashing slowly y Probable cause Probable remedy y Data link operating normally. --- There is an error in the data link tables. When the ERR indicator is flashing, reset the data link tables. When manual setting is used, either data link tables Refer to 5-2-2 Manual Setting and set data link have not been created for the startup node or there tables for the startup node. is an error in the data link tables. Flashing quickly The data link table’s communications cycle time setting is too short. Not lit Manually set data links are already operating on the Refer to 9-5 Handling Precautions. same Network. Automatically set data links are already operating on the same Network. Node Cannot Participate in Data Link Change the data link table’s communications cycle time setting to automatic calculation or set a longer manual setting. Refer to 9-5 Handling Precautions. The following table describes the LNK indicators when a node cannot participate in the data links. Data link participation depends on the SYSMAC LINK Support Board operating normally and participating in the Network. Refer to 9-1-1 Using the RUN, ERR, 101 Section Status Information and Troubleshooting 9-2 and INS Indicators earlier in this section and check Unit operation before using the following table. Indicators Probable cause Probable remedy y LNK Lit Data link operating normally. --- Flashing slowly When manual setting was used, there is an error in the data link table. Refer to 5-2-2 Manual Setting and reset the data link table. Flashing quickly The data link table’s communications cycle time setting is too short. Change the data link table’s communications cycle time setting to automatic calculation or set a longer manual setting. Not lit For manual setting, there are no data link tables set for the local node. Set data link tables for the local node. For automatic setting, the startup node is not set to participate in the data links. Stop the data links, delete the parameters in the startup node’s DM Area, and then restart the data link. The SYSMAC LINK Support Board cannot become the start-up node with automatic settings, so set a PC in which a SYSMAC LINK Unit is mounted as the start-up node. For details refer to the SYSMAC LINK Units Operation Manual (W202/W367). Data Links Cannot be Stopped The following explanation describes how to use the LNK indicator when the data links cannot be stopped. Stopping the data links depends on the SYSMAC LINK Support Board operating normally and participating in the Network. Read the above explanations before attempting to stop operation. Note Stop the data link from the node at which the LNK indicator is flashing (indicating active data links). Data links cannot be stopped from nodes which do not have active data links. Indicators LNK Not lit 9-2 Probable cause Probable remedy y Data link stopped normally. --- Status Information and Troubleshooting The SYSMAC LINK Support Board contains status information which reflects the current status of communications and the Board. This status information can be read using the STATUS READ or DATA LINK AREA READ FINS command. The cause of the error can be found by reading the status information. This section explains the contents accessed by the SlkGetNetworkStatus function and tells how to troubleshoot error information obtained. 9-2-1 Troubleshooting with the SlkGetNetworkStatus Function The following network status is read by SlkGetNetworkStatus(). Type BYTE Variable name byConnectionMethod Contents Indicates the type of connection (Coaxial or Optical) being used. Bit 0 0 0 ––: Not specified. Connection type 0: Coaxial 1: Optical BYTE byMyNodeAddr Local node address Stores the local node address set for the SYSMAC LINK Support Board. BYTE byMyUnitAddr A value of 0 will always be read for a SYSMAC LINK Support Board. BYTE byMyNetAddr A value of 0 will always be read for a SYSMAC LINK Support Board. 102 Section Status Information and Troubleshooting Type BYTE Variable name abyNodeList[32] 9-2 Contents Network participation status Stores a list of the nodes participating in the network. Node Participation Information Bit [0] Node 1 Reserved [1] Node 3 Node 2 Node 5 Node 4 [30] Node 61 Node 60 [31] Reserved Node 62 [2] 0: Not participating in network 1: Participating in network 0: Normal disconnection 1: Error disconnection (when not participating) 0: Normal 1: No response to polling. WORD wComunicationCycleTime BYTE byPollingNodeAddr BYTE byStatus1 BYTE byStatus2 Communications cycle time Stores the current value of the communications cycle time. (unit: 0.1 ms) Polling node address Stores the node address of the current polling node. Reserved area Stores undetermined data. For Optical Systems, this byte stores the power supply status. Bit Optical System 0: No backup power supply 1: Backup power being supplied BYTE byStatus3 Error information 1 Stores information such as whether or not there is an error log recorded, node address setting errors, etc. 1: Error log recorded 1: Fatal data link error 1: Communications controller transmitter error BYTE byStatus4 BYTE byStatus5 1: Node address setting error 1: Node address duplicated 1: Network parameter mismatch 1: Communications controller hardware error Reserved area Stores undetermined data. Error information 2 Stores information such as EEPROM write errors, setting table errors, etc. Bit 1: EEPROM write error 1: Network parameter error 1: Data link table error 1: Routing table error BYTE byStatus6 Reserved area Stores undetermined data. 103 Section Status Information and Troubleshooting Type BYTE Variable name byStatusFlag Contents Data link operation status and data link mode Stores the data link operation status, data link mode, etc. Bit ––: Not specified Current Data Link Mode 0: Manual settings 1: Automatic settings Data Link Operating Status 0: Stopped 1: Running BYTE abyDataLinkStatus[62] Data link status Stores the data link status. Nodes are listed in the same order in which they are entered in the data link table for refreshing. Bit [0] 1st node [1] 2nd node [2] 3rd node [60] [61] 61st node 62nd node Node Data Link Status ––: Not specified PC Operating Status 0: Stopped 1: Running (PC program being executed.) CPU Unit Error Status 0: No error 1: Error Data Link Communications Error Status 0: Normal 1: Error (Data link data not received normally.) Data Link Participation Status 0: Not participating or data links stopped 1: Participating 104 9-2 Section Status Information and Troubleshooting 9-2 9-2-2 Error Processing Data Link Status: abyDataLinkStatus [ ] Bit status Probable cause The “CPU Unit Error Status” flag is ON. The “Data Link Communications E Error S Status”” flflag iis ON ON. A fatal PC error, non-fatal PC error, or a watchdog timer error has occurred. Refer to the PC’s operation manual and correct the error. If the error occurs again, replace the PC. The Unit is mounted to a non-compatible PC. Mount onto the correct PC. The relevant node is not in the Network. A communications error has occurred as a result of noise. Enter the node in the Network. Conduct an echoback test using the CX-Net or other method. If this does not correct the error, check the usage environment. Refer to 9-1-1 Using the RUN, ERR, and INS Indicators and troubleshoot accordingly. A communications error has occurred. The “Data Link Participation Status” flag is OFF. Probable remedy The relevant node is not part of data links. There are no active data links in the Network. Enter the relevant node in data links. If an error occurs, refer to page 101, Node Cannot Participate in Data Link and troubleshoot accordingly. Activate the data links. Note The data link status can also be monitored with the FinsGateway’s SLK Data Link Setting Utility. Other Status Bit status Probable cause Probable remedy The “Error log recorded” flag is ON. Error information on the SYSMAC LINK Support Board (an error log) has been recorded. Using the SYSMAC LINK Support Software or an FINS command, read the cause of the current error. Alternatively, use past error log records to troubleshoot the problem. The “Fatal data link error” flag is ON. There is an error in the data link table settings. Refer to 5-2 Setting Data Links and correct the data link table settings. After correcting the settings, stop the application and restart the system. The “Communications controller transmitter error” flag is ON. The SYSMAC LINK Support Board is faulty. Replace the SYSMAC LINK Support Board. The “Communications controller hardware error” flag is ON. The SYSMAC LINK Support Board is faulty. Replace the SYSMAC LINK Support Board. The “Network parameter mismatch” flag is ON. The network parameters in EEPROM do not agree with those being used by the network Use the SYSMAC LINK Support Software to check the current parameters and correct the settings as required. The “Node address duplicated” flag is ON. The same node address has been set more than once. Correct the node addresses so that each one is assigned to only one node. The “EEPROM write error” flag is ON. An error has occurred while writing data to the CPU Unit’s EEPROM. Check the status of bits 0 to 2 in the same byte and correct any problems found. If the error recurs, replace the SYSMAC LINK Support Board. 105 Section Error Log Bit status The “Routing table error” flag is ON. Probable cause The routing table data within the CPU Unit’s EEPROM is damaged. There is an error in the routing table setting. The “Data link table error” flag is ON. The data link table data in the EEPROM of the CPU Unit is damaged. There is an error in the data link table settings. The “Network parameter error” flag is ON. Network parameters in EEPROM are damaged. There is an error in the network parameter settings, or node address of the local node is larger then the maximum address set within the network parameters. 9-3 9-3 Probable remedy Refer to 7-3 Setting Routing Tables and reset the routing tables correctly. If the error recurs, replace the SYSMAC LINK Support Board. When using a routing table, refer to 7-3 Setting Routing Tables and reset the routing tables correctly. If no routing tables are being used, delete the tables. Refer to 5-3 Starting and Stopping Data Links and reset the data link tables correctly. If the error recurs, replace the SYSMAC LINK Support Board. When using manually set data links, refer to 5-3 Starting and Stopping Data Links and reset the data link tables correctly. When manually set data links are not being used, delete the data link tables. Refer to 8-1-3 Network Parameters and correct the settings. If the error recurs, replace the SYSMAC LINK Support Board. Refer to 8-1-3 Network Parameters and correct the network parameters or the node address settings. Error Log Information on errors that occur in the SYSMAC LINK Support Board is recorded in the Board’s RAM or EEPROM. The entries that are stored in EEPROM will be retained even when the computer is turned OFF or reset. The error log can be read or cleared using a Programming Device (FinsGateway or Controller Link Support Software) or the message service. 9-3-1 Error Log Table Errors are recorded in an error log table in the Board’s RAM, with one record for each error and a maximum of 39 records. Serious errors are also recorded in the Board’s EEPROM so that when the power to the Board is turned OFF or reset, a record of the error will remain. (The error log table in EEPROM is automatically read to the Board’s RAM when the power is turned ON again.) Item Specification No. of records 39 max. Data code Binary (The time/date information is in BCD.) Length of each record 10 bytes Configuration of records Error code: 2 bytes (Refer to 9-3-2 Error Codes) Detail code: 2 bytes (Refer to 9-3-2 Error Codes) Time: 6 bytes (Refer to the Time Information) Record order From the oldest record to the most recent. If the number of records exceeds 39, the oldest record will be deleted and the most recent error recorded. 106 Section Error Log 9-3 Error Log Table Configuration 10 bytes 10 bytes 10 bytes 1 record 1 record 1 record Maximum 39 records Record Configuration 1st byte 10th byte Error code Details Minutes Day Hour Year Month Seconds Time Information The time is recorded in BCD with one byte each for the year (the rightmost two digits), month, day, hour, seconds, and minutes of the time the error occurred. Note The SYSMAC LINK Support Board reads and uses the computer’s time information. If the time cannot be read from the computer, all error log times will be set to 0. (When these error log records are read, they will be dated 0 s, 0 min, 0 hr, 0 day, 0 month, 2000.) 9-3-2 Error Codes The following table lists the error codes (in 4-digit hexadecimal) and the contents of the errors. All error codes and detail codes are in hexadecimal. Error code (Hex) Detail code Contents 1st byte (Hex) 2nd byte (Hex) 00 0001 CPU Unit watchdog timer error 00 0002 CPU Unit service monitor error Monitor time (ms) 0003 CPU Unit RAM error 01: Cyclic 02: Event 04: CPU bus link 0004 CPU Bus Unit ID number error 0005 Correction Recorded in EEPROM Replace the CPU Unit. Yes Check the environment settings. Yes 00 Check the environment settings. Yes 00 00 Check the I/O tables. Yes Unit number error Unit set value CPU Unit detected value Check the unit number settings and recreate the I/O tables. Yes 0006 CPU error Bit 11: Unit missing in registered I/O tables Bit 12: Hard test number detected Bit 13: Illegal number detected Bit 14: Unit number duplicated Check the unit number settings and recreate the I/O tables. Yes 000E I/O bus error 00 Check the environment settings. Yes 000F CPU Unit initialization error Check the environment settings. Yes 0010 System capacity exceeded 0011 CPU Unit initialization timeout 00 Yes Check the environment settings. Yes 107 Section Error Log Error code (Hex) Contents 0012 CPU Unit memory error 0013 CPU Unit write-protected 0101 Transmission failed; local node not in Network 0103 Transmission failed; retry count exceeded Detail code 1st byte (Hex) 2nd byte (Hex) 01: Read error 02: Write error 01: Data link tables 02: Network parameters 03: Routing tables 04: System setup Command block Bits 0 to 7: Source node address Bits 8 to 14: Source Network address Bit 15: OFF Response block Bits 0 to 7: Destination node address Bits 8 to 14: Destination Network address Bit 15: ON Correction Check the relevant settings. Recorded in EEPROM Yes Release write protection for the Yes CPU Unit. Refer to 9-1 Troubleshooting Using Indicators and place the local node into Network. No Using the SYSMAC LINK Support Software or FINS commands, run echoback test and check operating environment if errors occur. No Check event status on the network. Reduce the number of events per communications cycle or increase the maximum number of network parameter frames. No Refer to the Installation Guide and check node address settings to be sure they are within range and unique. No 0104 Transmission failed; maximum number of frames exceeded. 0105 Transmission failed; node address incorrect 0106 Transmission failed; redundant node address Correct node addresses so that they are unique within the same Network. No 0107 Transmission failed; destination node not in Network Refer to 9-1 Troubleshooting Using Indicators and place destination node into Network. No 0108 Unit missing; cannot execute. Refer to the Installation Guide and check the SYSMAC LINK unit number. No 0109 Transmission failed; destination busy Increase number of retries or reconfigure system to distribute load. No 010A Transmission failed; communications controller error Conduct an echoback test and if the effects of noise are considerable, reconsider the operating environment. Restart the computer. If the error occurs again, replace the Board. Yes 010B CPU Unit error; cannot send. Refer to the manuals for the CPU Unit and correct the problem. If the problem cannot be corrected, replace the CPU Unit. No 010C Unit number setting error; cannot send. Refer to the Installation Guide and check node address settings to be sure they are within range and unique. No 108 (1st byte: bits 8 to 15; 2nd byte, bits 0 to 7) 9-3 Section Error Log Error code (Hex) Contents 010D Transmission failed; destination address incorrect 010E Transmission failed; routing tables not registered 010F Transmission failed; routing table error 0110 Transmission failed; too many relay points 0111 Transmission failed; command packet too long 0112 Transmission failed; header error. 0113 I/O setting error; cannot send. Correct either the system configuration or the registered I/O tables. No 0114 CPU bus error; cannot send. Check the Board and cable connections and clear the error. No 0115 I/O duplication; cannot send. Check the unit numbers to be sure the same number is not set twice in the same PC. No 0116 CPU Bus Unit error; cannot send. Check the Board and cable connections and clear the error. No 0117 Internal buffer full Increase number of retries or reconfigure system to distribute load. No 0118 Illegal packet discarded Check for nodes sending illegal data. Yes 0124 Maximum frame length exceeded; cannot route. Correct the FINS command format. Also, be sure that the parameters specified for the command do not produce a response that is too long. No 0203 EEPROM error 01: Read error 02: Write error 01: Data link tables 02: Network parameters 03: Routing tables Reset the relevant data. If the error occurs again replace the SYSMAC LINK Support Board. Yes 0206 Number of participating nodes decreased (local node still participating) Number of non-participatin g nodes Check network parameters, node participation, cables, and terminating resistance. No 0207 Number of participating nodes decreased (local node not participating) Network parameters maximum node address 0208 polling node changed Address of previous polling node Address of new polling node Detail code 1st byte (Hex) Correction 2nd byte (Hex) Recorded in EEPROM Command block Bits 0 to 7: Source node address Bits 8 to 14: Source Network address Bit 15: OFF Check routing tables. R bl k Response block Bits 0 to 7: Destination node address Bits 8 to 14: Destination Network address Bit 15: ON Check routing tables and system configuration. Do not try to access Networks separated by more than one other Network. No Be sure to use the correct FINS command format. No (1st byte: bits 8 to 15 15; 2nd byte, bits 0 to 7) 9-3 No No No No No Check previous polling node. No 109 Section Error Log Error code (Hex) Contents Detail code 1st byte (Hex) 2nd byte (Hex) Correction Recorded in EEPROM 0209 Network parameter disagreement 00 Address of polling node Using the SYSMAC LINK Support Software, check network parameters. Yes 020C Time out with token 00 Error status (See note 2.) Check network parameters, node participation, cables, and terminating resistance. No 0210 Communications controller transmitter error 00 Replace the SYSMAC LINK Support Board. Yes 0211 Duplicate node address error (connected to Controller Link by mistake) 00 Reset so that each node address is used only once within the same Network. No 0214 Node address setting error Not set Correct the node address setting. Yes 0216 Backup power supply error 00 Check the backup power supply and the power supply cables. Yes Local node address Error type 01: OFF to ON 02: OFF to ON 021A Set table logic error 00 01: Network parameters 02: Data link tables 03: Routing tables Reset the appropriate data. Yes 021B Hardware error 00: SL1 error 01: SL2 error Error status (See note 2.) Replace the SYSMAC LINK Support Board. No 021C Data link error stopped Not set Stop the user application, reset the computer, and retry. Yes 021D Communications cycle time setting error in data link table Present cycle time setting (2-digit hexadecimal, ms units) Either change the data link table’s communications cycle time setting to automatic setting or increase the manual setting. Yes 0220 Additional information 1 for number of participating nodes decreased (0206) Bits 00 to 15 correspond to disconnected nodes 1 to 16 Check the network parameters, the disconnected node, and the cables. No 0221 Additional information 2 for number of participating nodes decreased (0206) Bits 00 to 15 correspond to disconnected nodes 17 to 32 No 0222 Additional information 3 for number of participating nodes decreased (0206) Bits 00 to 15 correspond to disconnected nodes 33 to 48 No 0223 Additional information 4 for number of participating nodes decreased (0206) Bits 00 to 15 correspond to disconnected nodes 49 to 62 No 0300 Packet discarded Not set Conduct an echoback test and find the cause of the error. Yes 0601 Unit error Not set Check the operating environment. Yes Note 110 Minimum possible cycle time setting (2-digit hexadecimal, ms units) 9-3 1. Errors indicated by error codes 0101 through 0116 are recorded only when the frame was discarded because transmission was impossible. Section Cleaning and Inspection 9-4 2. Error Status The status of each bit indicates that an error has occurred as given in the diagram below. 1: Token timeout error 1: Polling timeout error 1: Communications controller hardware error 1: Polling node was changed 1: Nodes in Network changed (added or removed) 1: Communications controller send error 1: Duplicate node address setting error 9-4 Cleaning and Inspection 9-4-1 Cleaning Conduct the following periodic cleaning to keep the SYSMAC LINK Support Board in optimum condition. • Wipe the Unit with a dry, soft cloth daily. • If glue, vinyl, or tape is left on the Board for long periods of time, it will stain. Remove these items during cleaning. ! Caution Do not use volatile solvents such as benzine or paint thinner, or chemical cloths for cleaning. They will damage the quality of the coating on the Board. 9-4-2 Inspection SYSMAC LINK Support Boards must be inspected on a regular basis to ensure correct operation. Inspections should be conducted once every 6 to 12 months. If the Board is subject to extremes in temperature or humidity, inspections should be conducted on a more regular basis. Tools and Equipment Need for Inspection The following tools and equipment will be needed to perform inspection and adjustments. • Assorted flat-blade and Phillips screwdrivers • Circuit tester or digital voltmeter • Industrial-grade alcohol and clean cotton cloth • Synchroscope • Pen-chart recording oscilloscope • Thermometer, hygrometer • Optical tester 111 Section Handling Precautions 9-5 Inspection Items Inspect the following items to see if they deviate from the prescribed standards. If any items do deviate from the standard either adjust so they are within the operating range or adjust the Board accordingly. Item Ambient conditions i Installation Optical fiber deterioration Description Inspection instrument Temperature: 5° to 45°C Humidity: 8% to 80% (no condensation or freezing) Dust-free Board securely attached? Communications cable connectors tight? Communications cables securely locked into place? Communications cabling used for external wiring intact (no breaks)? Thermometer Hygrometer Optical loss increasing? Confirm that optical loss has not increased since installation. Sight Sight 50/125 µm: 3.0 db/km 62.5/125 µm: 3.5 db/km 9-5 Handling Precautions The SYSMAC LINK Support Board is a Network device. If the Board is damaged, it will affect the entire Network, so always ensure repairs are undertaken immediately. We recommend that you have a spare SYSMAC LINK Support Board on hand so that repairs may be conducted quickly. 9-5-1 Replacing the Unit Observe the following precautions when replacing the Board. • Always turn OFF the power to the computer before replacing the Board. • Check that the new Board is not faulty. • If you suspect that a poor connection is the cause of a malfunction, clean the connector terminals using a clean, soft cloth and industrial-grade alcohol. Remove any lint or threads left from the cloth, and remount the Board. • When returning a faulty Board for repairs, always attach a detailed fault report to the Unit and return to you nearest OMRON outlet as listed at the back of this manual. Note In order to prevent faulty operation be sure to turn off the power to all nodes before replacing the Board. 9-5-2 Replacing the Board Note 112 1. When replacing the Board, do not reconnect that node to the Network before carrying out the procedures listed below. In particular, a node with a low node address setting will become the polling node and communicate the initial network parameter status to other nodes, so there is the chance that network parameters in the entire Network will be damaged. 2. The data link table, network parameters, and routing table are stored in the SYSMAC LINK Support Board’s EEPROM. When the Board has been replaced, make these settings again before starting operation. The following procedure can be used to automatically set the network parameters in EEPROM from other nodes operating on the network. The data link tables will need to be reset from the FinsGateway’s SLK Data Link Setting utility. Section Handling Precautions 1, 2, 3... 9-5 1. Turn OFF the power supply to the computer containing Board to be replaced. 2. Detach the communications cables attached to the SYSMAC LINK Support Board to be replaced and remove the Board. 3. Set the new SYSMAC LINK Support Board’s ID switch to the same setting that was set on the previous Board. 4. Mount the SYSMAC LINK Support Board in the expansion slot of the computer and connect the communications cables. 5. Turn ON the power supply to the computer where the Board was replaced and open the FinsGateway settings. 6. Use the following procedure to set the Board as a polled node. a) Click the Basic Tab in the FinsGateway Settings. b) Click the Drivers Icon. c) Select SLK (PCI) and click the Properties Button. d) Select the Board to be set and click the Change Button. e) Click the Driver Tab in the SYSMAC LINK (PCI) Lists Dialog Box. f) Remove the check from the setting for the polling unit. g) Click the OK Button. 7. Use the following procedure to start the SLKPCI-UNIT service from the FinsGateway Settings so the Board will participate in the network. a) Click the Basic Tab in the FinsGateway Settings. b) Click the Services Icon. c) Select SLKPCI-UNIT and click the Start Button. 8. Using the SLK Data Link Setting Utility in the FinsGateway or the SYSMAC LINK Support Software, read the network parameters and make sure the Network is operating normally. 9. Using the SLK Data Link Setting Utility in the FinsGateway, register data link tables and routing tables in the new Board. 10. Change the Board to the polling node from the FinsGateway Settings, reversing the procedure in step 6., above. The RUN and INS indicators should light on the Board. The LNK indicator may also light. 11. Check that the data links are operating normally by using the SLK Data Link Setting Utility in the FinsGateway. Note The following procedure can be used to start the SLK Data Link Setting Utility in FinsGateway. 1, 2, 3... 1. Click the Basic Tab in the FinsGateway Settings. 2. Click the Networks Icon. 3. Select the desired Board and click the Properties Button. 4. Click the Data Links Tab. 5. Click the Set Data Links Tab. Refer to FinsGateway online help for details. 113 Appendix Standard Models SYSMAC LINK Support Boards for PCI Bus Applicable computer IBM PC/AT or compatible Connection type Model number Coaxial 3G8F7-SLK21-E Optical 3G8F7-SLK11-E Remarks Include FinsGateway SYSMAC LINK (PCI) Embedded Edition (Version 3) SYSMAC LINK Support Boards for ISA Bus Applicable computer IBM PC/AT or compatible Connection type Coaxial Model number 3G8F5-SLK21-E Remarks --- SYSMAC LINK Units Applicable PC CV-series PCs C200HX/HG/HE PCs C1000H/C2000H PC PCs CS1-series PCs Connection type Model number Coaxial Optical Coaxial CV500-SLK21 CV500-SLK11 C200HW-SLK23/24 Coaxial Optical Coaxial Optical C1000H-SLK21-V C1000H-SLK11 CS1W-SLK21 CS1W-SLK11 Remarks --- Specified Coaxial Cable and Accessories Item Model number Manufacturer Coaxial cable 5C-2V --- F-type Adapter C1000H-CE002 OMRON Terminator C1000H-TER01 OMRON Connectors and Tools for Optical Fiber Cable Name Optical Connector Model Remarks S3200-COCF2011 Connects a cable to a node. Two connectors are required for each cable. (Full-lock connector for crimp-cut cable.) S3200-COCF2511 Connects a cable to a node. Two connectors are required for each cable. (Half-lock connector for crimp-cut cable.) S3200-COIAT2000 Connects two cables. One adapter is required to connect two cables. Optical Fiber Assembly Tool S3200-CAK1062 For the S3200-COCF2011/2511 Connectors Optical Power Tester S3200-CAT2700 S3200-CAT2702 Head Unit, For the S3200-COCF2011/2511 Connectors Master Fiber Set S3200-CAT2001H For the S3200-COCF2011/2511 Connectors 115 Appendix Standard Models Indoor H-PCF Optical Fiber Cables Name H-PCF cables Specifications Black Orange g Model 10 m 50 m 100 m 500 m 1,000 m 10 m 50 m 100 m 500 m 1,000 m S3200-HCCB101 S3200-HCCB501 S3200-HCCB102 S3200-HCCB502 S3200-HCCB103 S3200-HCCO101 S3200-HCCO501 S3200-HCCO102 S3200-HCCO502 S3200-HCCO103 Note The Optical Fiber Cable model numbers are as follows. S3200-Hjjjjjjj Tensioner option None: Standard (with tension member) N: Without tension member Cable length jjj A B (A/10) x 10B m Cable color B: Black O: Orange Cable specification L: With power supply line C: Without power supply line Type B: C: Cord Cable Indoor H-PCF Optical Fiber Cable with Connectors The following Optical Fiber Cables are available with Connectors already attached. (These cables have power supply lines and tension members, which aren’t used in the SYSMAC LINK Network.) Specifications Length Optical Fiber Cable Connectors: 2 m 5m S3200-COCF2011 S3200 COCF2011 ⇓ 10 m S3200 COCF2011 S3200-COCF2011 15 m 20 m Over 20 m Optical Fiber Cable Connectors: 2 m 5m S3200-COCF2011 S3200 COCF2011 ⇓ 10 m S3200 COCF2511 S3200-COCF2511 15 m 20 m Over 20 m 116 Model S3200-CN201-20-20 S3200-CN501-20-20 S3200-CN102-20-20 S3200-CN152-20-20 S3200-CN202-20-20 S3200-CN-20-20 (Specify length (m) when ordering.) S3200-CN201-20-25 S3200-CN501-20-25 S3200-CN102-20-25 S3200-CN152-20-25 S3200-CN202-20-25 S3200-CN-20-25 (Specify length (m) when ordering.) Appendix Standard Models Specifications Length Optical Fiber Cable Connectors: 2 m 5m S3200-COCF2511 S3200 COCF2511 ⇓ 10 m S3200 COCF2511 S3200-COCF2511 15 m 20 m Over 20 m Model S3200-CN201-25-25 S3200-CN501-25-25 S3200-CN102-25-25 S3200-CN152-25-25 S3200-CN202-25-25 S3200-CN-25-25 (Specify length (m) when ordering.) Note Special training is required to assemble Optical Fiber Cables and connectors with epoxy adhesive. Contact your OMRON dealer for details on other optical fiber cords and cables. 117 Index A access modes, SYSMAC LINK Support Board, SYSMAC Compolet, AIMAX-FA, applications, creating, B backup power supply connection, optical system, specifications, wiring, BNC Connectors, Board ID Switch, precautions, broadcast test reading results, sending results, C C library, , functions, overview, Microsoft Visual C++, cables, coaxial, standard models, optical fiber, , backup power supply, connectors, standard models, with connectors, precautions, , cleaning, communications between different PCs, cables, optical fiber, polling node, SYSMAC LINK, timing, communications cycle, number of event-frames, number of polled nodes, polling, token, computer, specifications, configuration, software, connections backup power supply, coaxial systems, , inter-network, optical systems, (H-PCF Cable), connectors attaching to cables, BNC Connectors, installation, models, standard, , CX-Net, starting and stopping data links, D DA1, DA2, data area, allocations, data link, , area allocations, automatically set, , communications cycle, basic procedure, communications cycle, description, I/O response time, computer to PC, PC to computer, manually set, , communications cycle, from computer node, from Programming Device, tables, monitoring, data link status area, LED indicators, manipulating bit/word status, precautions, procedures, reading status, setting, specifications, starting, troubleshooting, starting and stopping, with CX-Net, with DIP switch, with FINS commands, with FinsGateway, with Programming Device or ladder program, with SYSMAC Support Software, , status area, stopping, SYSMAC LINK Support Board, tables, manual settings, timing, precautions, 119 Index troubleshooting status, with indicators, network, SYSMAC LINK, features, data structure commands, responses, DataFlowNavi, delay times, message service, destination network address, node number, unit address, dimensions, DIP switch, SYSMAC LINK Unit, ERROR LOG CLEAR, ERROR LOG READ, errors, format, headers, issuing from PC, NETWORK STATUS READ, parameters, response codes, configuration, errors, response data format, , sending from computer, starting and stopping data links, FinsGateway, SLK Data Link Setting utility, starting and stopping data links, SYSMAC LINK Embedded Edition, DNA, G–I E echoback test, error log, table, gateway count, GCT, H-PCF Cable Optical System, ICF, errors clearing, error codes, error log, error log table, network relay, processing data link status, other status, reading, reading with C language, response codes, event frames, indicators, , troubleshooting, LNK, RUN, ERR & INS, information control field, inspection, inspection items, tools and equipment, inter-network connections, inter-network connections, definition, other OMRON networks, routing tables, SYSMAC LINK, F F-type Adapter, standard models, features data links, message service, SYSMAC LINK network, FINS commands BROADCAST TEST DATA SEND, BROADCAST TEST RESULTS READ, command codes, CONTROLLER DATA READ, CONTROLLER STATUS READ, data format, , DATA LINK START, DATA LINK STATUS READ, DATA LINK STOP, ECHOBACK TEST, 120 L library C library, , functions, overview, SlkClearMessageOnArrival(), SlkClose(), SlkGetLastError(), SlkGetNetworkStatus(), SlkOpen(), SlkReadDatalink(), SlkRecvFins(), SlkSendFins(), SlkSetMessageOnArrival(), SlkSetThreadMessageOnArrival(), SlkWriteDatalink(), reading error information, Index specifications, structure descriptions, EMSLKADDRESS/*PEMSLKADDRESS, NSTBUFFER/*PNSTBUFFER, SLKHEADER/*PSLKHEADER, M maintenance, cleaning, inspection, message service, , basic procedure, delay times, features, functions/driver calls, procedures, specifications, Microsoft Visual Basic, Microsoft Visual C++ library, functions, overview, PLC Reporter 32, polling cycle, polling node, number of polled nodes, precautions application, applications, Board ID, cables, , data link, timing, general, handling, operating environment, routing tables, safety, procedures data link, message service, overview data link, initial, message service, N network interconnections, definition, other OMRON networks, routing tables, SYSMAC LINK, parameters, maximum node address, specifying, reading status, relay error, node bypass function, O R RAS functions, , , replacing Board, Unit, response codes configuration, response to FINS commands, troubleshooting, routing tables, creating, examples, precautions, setting, RSV, operating system, specifications, optical fiber cables See also cables accessories, connectors, connections, precautions, models, standard, S SA1, SA2, service ID, settings, data link, tables, Setup Diagnostic Utility, P parameters FINS commands, headers, PC, reading controller status, SID, SNA, software, configuration, source network address, node number, 121 Index unit address, specifications backup power supply, coaxial system, communications, data link, general, message service, optical system, standard models coaxial cables, connectors, , F-type Adapters, optical fiber cables, SYSMAC LINK Support Boards, SYSMAC LINK Units, terminators, SYSMAC LINK communications, cycles, parameters, timing, network interconnections, SYSMAC LINK Driver, SYSMAC LINK Support Board access modes, configuration, 122 connections, definition, FINS commands, for ISA Bus, for PCI Bus, indicators, models, replacing, standard models, SYSMAC LINK Unit DIP switch, starting and stopping data links, standard models, SYSMAC Support Software, starting and stopping data links, , system configuration, T–W token cycle, troubleshooting, status information, using indicators, LNK, RUN, ERR & INS, using SlkGetNetworkStatus, wiring, Revision History A manual revision code appears as a suffix to the catalog number on the front cover of the manual. Cat. No. W390-E1-1 Revision code The following table outlines the changes made to the manual during each revision. Page numbers refer to the previous version. Revision code 1 Date March 2001 Revised content Original production 123 Authorized Distributor: Cat. No. W390-E1-1 Note: Specifications subject to change without notice. Printed in Japan