1
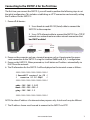
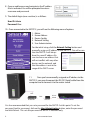
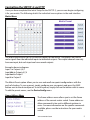
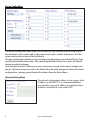
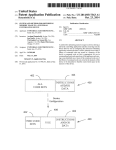
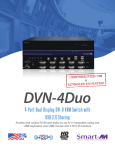
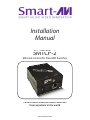
Installation
Manual
SMTCP-2
Ethernet Control for SmartAVI Switches
Control most SmartAVI matrix switches
from anywhere in the world
www.smartavi.com
Introduction
The SMTCP-2 is an RS-232 control module that allows most SmartAVI switching
matrixes to be controlled remotely via HTTP or TELNET. Manage the switching
functions of your matrix with ease from anywhere in the world. With the SMTCP-2
you can save up to 10 preset input/output configurations for easy access. TELNET
access provides transparent command control of your matrix, perfect for use with
automated third-party control software.
Features
Applications
•
•
•
•
•
•
•
•
•
•
•
•
•
•
•
Supports HTTP and TELNET control
10/100 Ethernet Interface
Up to 10 user-definable configurations
Password Protected
Up to 5 Users can Control the Matrixes
IP Configuration via TCP/IP and RS-232
Flexible control of several types of matrixes
What’s in the Box?
PART NO.
QTY
DESCRIPTION
SMTCP-2
1
SMTCP-2 Device
PS5VDC2A
1
5VDC2A Power Supply
CCRS232-X
1
Serial male to male cross-over cable
Technical Specifications
Power
External 100-240 VAC/5VDC2A @10W
Dimensions
2.8125”W x 1”H x 3.375”D
Weight
0.5 lbs
Approvals
UL, CE, ROHS Compliant
Operating Temp.
32-131°F (0-55 °C)
Storage Temp.
-4-185 °F (-20-85 °C)
Humidity
Up to 95%
2
www.smartavi.com
Server Collocation
Digital Signage
Airports
Dealer Rooms
Control Rooms
Audio/Visual Presentations
Hotels/Resorts
KVM Switches
Connecting to the SMTCP-2 for the first time
The first time you connect the SMTCP-2, you will need to perform the following steps to set
the initial configuration. This includes establishing an HTTP connection and manually setting
the IP address for the SMTCP-2.
1. Power off all devices.
2. Use a female to male RS-232 (Serial) cable to connect the
SMTCP-2 to the computer.
3. Use a CAT5 ethernet cable to connect the SMTCP-2 to a TCP/IP
network via a network router or other network connection that
has DHCP enabled.
RS-232
SERIAL
CAT5
CAT5
COMPUTER
IP ROUTER
SMTCP-2
MATRIX SWITCH (NOT CONNECTED)
4. Power on the computer and run a terminal program such as Hyperterminal to open a
serial connection to the SMTCP-2 using the standard 9600 baud, 8, N, 1 configuration.
5. Power on the SMTCP-2. When powered on, it will obtain an IP address automatically via
DHCP from the network.
6. The IP information for the SMTCP-2 will be displayed on the terminal screen as follows:
**************************
* SmartAVI control is UP *
*
version 10.12.20#6
*
**************************
addr:192.168.1.102
Mask:255.255.255.0
gtwy:192.168.1.1
**************************
NOTE: the above IP address is for demonstration purposes only. Actual results may be different.
7. The IP address shown must be used to connect to the SMTCP via HTTP.
www.smartavi.com
3
8. Open a web browser and navigate to the IP address
that is indicated. You will be prompted to enter a
username and password.
9. The default login (case sensitive) is as follows:
User ID: Admin
Password: Pass
10. Once connected to the SMTCP-2, you will see the following menu of options:
1.
2.
3.
4.
5.
Matrix
Frame Address
Device Config
Network Setting
User Administration
For the initial setup, click the Network Setting button and
manually assign an IP address to the SMTCP-2. This will assure
that the SMTCP-2 will always
have the same IP address. Be
sure to choose an address that
will not conflict with any other
devices on the network, and
that the address is not in the
range of the DHCP server.
11.
Once you have manually assigned an IP address to the
SMTCP-2, you may disconnect the RS-232 (Serial) cable from the
computer and to connect it to the matrix switch.
CAT5
RS-232
SERIAL
CAT5
COMPUTER
IP ROUTER
SMTCP-2
MATRIX SWITCH
It is also recommended that you set a password for the SMTCP-2 at this point. To set the
password (and/or username), click on the User Administration button, enter the password
and click Submit. This sets the password for the HTTP interface only.
4
www.smartavi.com
Controlling the SMTCP-2 via HTTP
Once you have completed the Initial Setup for the SMTCP-2, you can now begin configuring
it for your matrix. The following details the individual menu options in the web interface:
Matrix Menu
The matrix menu allows you to set the crosspoints for the matrix. Crosspoints are used to
route signals from the individual inputs to individual outputs. The output channels can only
have one input, but each input can have several outputs.
Example shown in diagram:
Input 1 to Outputs 3,4,5
Input this to Outputs 6,7,8
Input test to Output 1
Input 6 to Output 2
The Matrix Preset option allows you to save and recall crosspoint configurations with the
push of a button. To save a preset, simply configure your crosspoints and press the SAVE
button next to the desired preset. To recall a preset, simply click on the button with its name.
To edit the preset names, see the Device Config menu.
Frame Address Menu
The frame address menu allows you to set the frame
address of the current matrix switch. Frame addresses
allow commands to be sent to different matrixes in
series. For more information on the specific commands
available, please see the instructions for your matrix
switch.
www.smartavi.com
5
Device Config Menu
The device configuration menu allows you to select the type of matrix you are using, specify
the dimensions of the matrix, and assign names to the inputs, outputs and presets, reset the
names and reset the system to factory defaults.
To begin, set the type of device you are using from the drop-down menu labeled Device Type
and specify the Matrix Dimensions. After specifying the Matrix Dimensions, press the Submit
button to make the changes.
Once the type of matrix is entered, you can assign names to each of your inputs, outputs and
presets. The preset names are used in the Matrix Menu for quick storage and retrieval of matrix
configurations. Leaving a preset blank will exclude it from the Matrix Menu.
Network Setting Menu
The network setting menu allows you to assign a static
IP address to the SMTCP-2. It is recommended that
you statically assign an IP address to avoid any future
conflict or connectivity issues with DHCP.
6
www.smartavi.com
User Administration Menu
The User Administration menu allows you
to change the user name and password for
the SMTCP-2. The default user name for the
SMTCP-2 is Admin and the password is Pass.
Once you modify the login information, press
the Submit button to make the changes.
Controlling the SMTCP-2 via TELNET
Commands may be sent transparently to the matrix via a TELNET connection to the SMTCP-2.
To use this function, use a telnet client such as Hyperterminal or PuTTY to connect to the IP
address of the SMTCP-2. You will be prompted for a username and password - this will be the
same as the login information via HTTP. Once logged in, the SMTCP-2 is ready to accept the
standard RS-232 commands. For a list of the available commands, please see the user manual
for the matrix you are using. Although the commands are not echoed to the client display, the
commands are being issued to the matrix. Should you need commands to be echoed, please
see the instructions for your TELNET client.
Upgrading the SMTCP-2
To updgrade the SMTCP-2 with the latest firmware, contact your sales representative to
obtain the firmware upgrade file or visit the SMTCP-2 product page at www.smartavi.com.
The version information is listed on the Main Menu. Once you have the file, use an FTP client,
preferably TFTP, to navigate to the IP address of the SMTCP-2. To upload the file to the SMTCP-2,
navigate to the /var/ directory, and upload the file firmware.img - IMPORTANT: the file MUST
BE NAMED firmware.img for the upgrade to work properly. Again, the full path MUST BE
/var/firmware.img. Once the file has been copied, restart (power off and power on) the
SMTCP-2. Once restarted the firmware update will be installed. To verify the upgrade, see the
version information listed on the Main Menu.
SMTCP-2 Front
SMTCP-2 Rear
www.smartavi.com
7
© Copyright 2011 Smart-AVI, All Rights Reserved
NOTICE
The information contained in this document is subject to
change without notice. Smart-AVI makes no warranty of any
kind with regard to this material, including but not limited
to, implied warranties of merchantability and fitness for any
particular purpose.
Smart-AVI will not be liable for errors contained herein or for
incidental or consequential damages in connection with the
furnishing, performance or use of this material.
No part of this document may be photocopied, reproduced or
translated into another language without prior written consent
from Smart-AVI.
For more information, visit www.smartavi.com.
SmartAVI, Inc. / Twitter: smartavi
11651 Vanowen St. North Hollywood, CA 91605
Tel: (818) 503-6200 Fax: (818) 503-6208
http://www.SmartAVI.com
www.smartavi.com