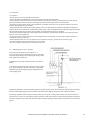
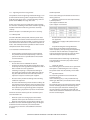
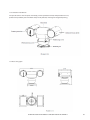
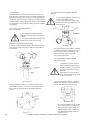
1
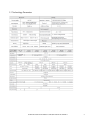
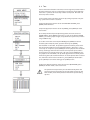
HDSDPTZIR202DH/B
Infrared Intelligent Vehicle PTZ Camera
User Manual
CONTENTS PAGE (IF IT IS A LARGE MANUAL)
1. Section 1 Header (Copy these for other sections)
•
Use this for Key features
2. Technical Specification
Model Number
HDSD2PTZ20-IRDH
*Design and Specifications are subject to change without notice.
CHANGE THIS TO WHAT THE PRODUCT IS AND COPY INTO THE MASTER PAGE A
3
1. Precaution
Electrical safety
Conform to country and local electrical safety standard when using or installing the product.
Transportation
The PTZ’s should be protected against extremes of pressure, vibration and humidity during storage, installation and
transportation. The infrared PTZ camera is transported by integrated packing.
Installation of care
Please refer to the user installation manual when installing.
Please pick up the infrared parts gently and do not press it, or else it will damage the parts.
Please do not touch the infrared lens with your hands to avoid scratching it.
Requirements to service personnel
All the service work should be done by a qualified technician.
Do not disassemble the pan/tilt module
Do not disassemble screws, and don’ t maintain the parts in the Pan /Tilt by yourself. Only qualified and authorized
personnel can undertake repairs.
Environmental requirements
Requirements for PTZ:
Environmental temp -40 ~+60 OC
Humidity < 90%
Air pressure 86~106Kpa
AC Power supply 24V/25 00MA50/60HZ
Don’t place the camera near strong lighting devices
Don’t point the PTZ towards the sun or other bright objects when in use or not. It may affect image quality.
Function of waterproof
Our product has good waterproof, humidity proof and dust proof housing, which are IP66 rated.
4
CHANGE THIS TO WHAT THE PRODUCT IS AND COPY INTO THE MASTER PAGE A
2.1 Technology Parameter
CHANGE THIS TO WHAT THE PRODUCT IS AND COPY INTO THE MASTER PAGE A
5
2.3 PTZ Performance and Feature
The intelligent PTZ is complete new compact design camera using built-in temperature sensor and wiper function to allow full resolution picture in raining day. The camera uses a multi pin socket for convenient installation.
The Infrared LED range more than 60 meters and the camera can rotate flexibly with low noise and allow wide
range capture. Certain auto-functions can provide perfect quality image for customer.
Built-in receiver
• All configurable options stored in main control board to protect against power cuts
• Integrate design and high durability
• 128 presets can be stored
• 01- 80 preset support auto-tour, and each tour can store up to 24 presets.
• 4 pattern tours
• Built-in direction indicator
• Built-in clock setting function
• 4 scan
• Built- in temperate re-indicator
• Rs4 85 Bus communication or American Dynamics Manchester code
• Support 24 masking zones at most (This function is decide by the parameter of built-in camera, if the camera
has not this function, this option is invalid.)
• 7 alarm input, 2 alarm output.
Pan Tilt Feature
• Aluminium alloy material and anti-violence design surface is well hidden
• Rapid heat removal; Level of protection IP 66 rated.
• Precise stepping motor drives the pan to run smoothly and react sensitivity.
• Integrated design, compact structure, easy to disassemble.
• Exquisite mechanical drive, support to rotate pan 360°continuously and tilt -9 0°~ + 90°, and may rotate
180°with auto flip.
• Pan 0.4°/s to rotate slowly, and the image doesn’t ‘t vibrate.
Built-in digital camera
•
•
•
•
•
•
•
•
High sensitivity, high resolution, and integrated digital processing
Auto-focus
Auto brightness control
IR cut filter
Auto slow shutter
Auto-Iris
Auto white balance
Auto back light compensation
OSD menu
•
•
•
•
6
All English menu can be selected.
Visual OSD menu available. Revising the PTZ ‘s information and parameter by keyboard and OSD
Set park action function and s et pre sets, or run scan, pattern , tour, etc during id le time.
Auto-resume movement or carry outpointed movements after power up.
CHANGE THIS TO WHAT THE PRODUCT IS AND COPY INTO THE MASTER PAGE A
3 Performance
Internal temperature test
• Set time display
• When the temperature exceeds the limit, the screen will display an alarm
• When the temperature is under the limit, the PTZ will delay to start up, and when the camera temperature is
over the limit the PTZ will not start up.
• The fan measures the temperature and decides if it is to start or not, and prolong the life of the camera.
Time running
• User may set time running function everyday, and set different up to four actions in four different time of the
day, including preset, scan, pattern and tour.
Night View Function
• Infrared LED range more than 60 meters, user can manually control or auto-control infrared LED ON /OFF.
• Manual control can be done through keyboard and auto-control will automatically switch colour image to
black and white when low brightness is detected, black and white image will switch to colour.
Wiper function
• Wiper function can be set ON /OFF by using on of the 63 preset or OSD menu. On a raining day, the wiper do
more than providing high quality image , it can also clean-up the dirtiness on the surface of the lens.
CHANGE THIS TO WHAT THE PRODUCT IS AND COPY INTO THE MASTER PAGE A
7
3 Function Instruction
This passage mainly describes the main function and general principle of the PTZ camera. Different system
platforms have different operation methods, generally you should refer to the system manufacturer’s operation
manual. Please contact dealer to get necessary information, there are some particular requirements and operations under specific condition.
3.1
Camera ID
There are two 8-bit switches (SW 1 and SW2 ) on the board, SW2 is for setting communication baud
rate and controlling protocol. (For setting, please refer to 10.5 DIP switch setting besides the factory protocol
(FACTORY) , the PTZ is compatible with various popular protocol ls, such as PECLO-D , PECLO-P, ER NITEC, VCL, M
OLYNX, VICON, SANTACHI, PANASONIC, SAMSUNG, DIAMOND, KALATEL, LILIN, PHILIP S, VIDO B02,AD and so on.
Any controlling command must be based on the objective camera address, and the camera only answer to the
controlling command address which coincide with itsel f. There are three kinds of camera addess:
• Common address: Use camera’s switch number to set address 1- 8 bits, the address range is 1-2 54.
• Debug address: (Only factory protocol an d PELC O can be set) if camera ID is set 0, u ser may select any address to control the PTZ.
3.2 Auto-run motion
Focus/speed proportion pan
When manually adjusting, for far focus situation, the PTZ responds at a high-speed so that touching rocker
slightly may make picture move rapidly, thus cause the picture to lose. To base on humanized d esign, the PTZ au
tomatically adjust pan and tilt rotation according to zoom ne ar and f ar, which make it is convenien t to operate
man ually to make tracking for the object. In the m enu, yo u may change system
parameter setting proport ion pan as ON t o run th is function.
Auto flip
If user holds the joystick in the down position, the camera rotates pan 180 degrees, then the camera
rotates tilts up to 180 degrees . In the menu, you may set the system parameter setting AUTO FLIP as ON
to run this function.
Park action
By the menu“ park time” and “park action”, use r may set auto-call preset or run tour, pattern, and
scan, etc after pointing a few minutes if t he PTZ doesn’t run any motions.
Power up action
By the menu“ power up action”, after the PTZ powers up or restarts, user may set auto- resume
mo vement s before power up and auto- call preset or run tour, pattern, and scan etc .
8
CHANGE THIS TO WHAT THE PRODUCT IS AND COPY INTO THE MASTER PAGE A
3. 3 Camera control
Magnification control
The user can control “Wide/Tele” to adjust zoom far and near of the image via the keyboard controller to obtain
panoramic image or close view that you need. The PTZ supports digital zoom and optical zoom.
Focus control
System defaults Auto focus. When the lens changes, the camera will auto-adjust focus according to the center of
the image to get legible image; users can also manually focus to get the desired image by operating the keyboard
“FAR/NEAR”. When operating the keyboard joystick, the camera resumes to auto focus.
The camera cannot auto focus in the following scenarios:
•
•
•
•
•
•
•
Target is not the center of the image
Observing the target closer and far at the same time, can not be clear at the same time.
Target is a strong light object, such as neon light, spotlight , etc.
Target moves too fast
Target area such as wall
Target is too dark or vague
Target image is too small
Iris control
System defaults Auto Iris. Camera can rapidly adjust size of Iris, through the automatically induct the changing
of environment ray, and thus make the brightness of deferent image stable.
User may adjust Iris by controller keyboard “open/close” to get required brightness that you need. User also can
resume auto Iris by joystick operation. When controlling the Iris manually, the PTZ locks current position you
manually controlled; when operating joystick, the PTZ resume auto Iris.
Auto back light compensation
Camera sub-area can carry out auto back light compensation. Under a strong light background, camera will auto
compensate light for the darker object and adjust daylight to the bright background. In order to avoid making
the image lack fidelity by the back line is too bright, and the object is unable to recognize because of darkness,
thus gain legible image.
Auto white balance
Camera can automatically adjust white balance in accordance with the alteration of background lightness
to reach a true colour.
3. 4 Monitor function
Set and call preset
Preset function allows the PTZ to store current pan/tilt angle, zoom and other position parameters into the internal memory. When necessary the PTZ recalls these parameters and adjusts the camera to that position. Users can
store and recall presets easily and promptly by using keyboard controlling. The PTZ can store up to 128 presets.
Tour
Auto tour is a built-in function in the PTZ, to make arranged preset in needful order in tour queue by programming it in advance. To make the camera tour between presets by inserting presets in cruise tour. It is feasible to
program tour order, each time as you run a tour, you can set the park time of preset. A tour can store 24 presets.
CHANGE THIS TO WHAT THE PRODUCT IS AND COPY INTO THE MASTER PAGE A
9
4. System setting
4. 1 Basic operation
4.1.1 Current-carrying to PTZ and Self-testing
The PTZ conducts self-testing after current-carrying , and it rotates slowly until displaying pan origin that is default setting, then moving to tilt origin, the lens is adjusted from far zoom to near zoom, then from near zoom to
far zoom, when the self-testing is finished, the relevant system information displaying on the screen, as follow:
The information will not disappear until you stop to operate the system. If you set “power up action”, the PTZ will
automatically activate motions after self-testing. How to operate the function? We will explain detail introduction
in following passages.
4. 1. 2 Call the main menu
The system enters into the main menu by calling 95 preset or by calling 9 preset twice within 3 seconds. All the
menu setting must be entered into the main menu at first.
4. 1.3 Menu and keyboard operation
Keyboard operation:
[OPEN] when choosing pictures, it means to increase Iris; when setting menu, it means to enter into the
next menu or setting, or means to save after setting.
[CLOSE]when choosing pictures, it means to reduce Iris; when setting menu, it means to exit without saving
setting.
[NEAR] Focus to near
[TELE] Increase magnification
[WIDE] Reduce magnification
Joystick to up: When choosing menu, it means to choose the former one; when choosing picture, it means camera tilt up.
Joystick to down: when choosing menu, it means to choose the next one; when choosing picture, it
means camera tilt down.
Joystick to left: when choosing menu, it is equal with [CLOSE], when choosing picture, it means
camera tilt left .
Joystick to right: when choosing menu, it is equal with [OPEN], when choosing picture, it means
camera tilt right.
Press [TELE] and [WIDE] at the same time, it means 3D joystick rotates joystick cap.
Menu operation
“BACK” : Back to the former menu
“EXIT” : Exit to menu
“ ON” : Open some setting
“OFF ” : Close some setting
“ON” : Open some setting
“OFF ” : Close some setting
10
CHANGE THIS TO WHAT THE PRODUCT IS AND COPY INTO THE MASTER PAGE A
4. 2 Edit dome label
When using a lot of the PTZ systems, in order to identify each PTZ, the
systems supports title settings. The settings are as follow
1) The system enters into the main menu by calling 95 preset or by calling 9
preset twice within 3 seconds.
2) Moving the joy stick up and down to move the cursor to [ SYSTEM SETTING], and pressing [OPEN] to enter into the next menu.
3) Moving the joystick up and down to move the cursor to [EDIT PTZ LABEL], and pressing [OPEN] to enter into the label setting menu.
4) Moving the joystick up/down to move the cursor to [LABEL], and pressing [OPEN] to edit current label
5) When the cursor is twinkling on the first character of the label, move the
joystick to choose another character, after editing, press [OPEN] to save.
6) Move the joystick to [BACK] and pressing [OPEN] will let you go to the
previous menu
The label may be set to16 characters, and doesn’t need editing characters.
Pressing [OPEN] continuously to jump over and using spacebar to replace
the deleted characters. When you finish
to edit a character, press [OPEN] to enter into the next editing
character; when you editing the last character, pressing [OPEN]
to save. Press [Close] to exit.
Characters of label available for choosing are as follow: 0- 9, A-Z,:<>-.,
Space.
Other label input ways are the same as above
CHANGE THIS TO WHAT THE PRODUCT IS AND COPY INTO THE MASTER PAGE A
11
4. 4 Display setup
1) The system enters into the main menu by calling 95 preset or by calling 9 preset twice within 3 seconds.
2) Tilt up/down joy stick to SYSTEM SETTING, press OPEN to enter submenu.
3) Tilt up/down joy stick to [DISPLAY SETUP], press [OPEN] to enter
“display setup” menu, May setting the content of the display set up as
follow:
• [DOME LABEL]
• [PRESET LABEL]
• [ZOOM LABEL]
• [ZONE LABEL]
• [DIRECTION LABEL]
• [TEMPERATURE LABEL]
• [TIME LABEL]
• [DATE LABEL]
4) Taking display PTZ label as an example to explain the operation
process. Tilt up/down the joystick to move the cursor to Dome LABEL
OFFER, press[OPEN], there is a sign “ ” besides Dome [LABEL], the cursor
is twinkling besides [OFF], as left picture shows;
5) Joystick tilt up/down, setting number changes between ON/OFF,
when setting [ON], it means to display “PTZ label”; when setting [OFF],
it means not to display “PTZ label”. When pressing [OPEN], the cursor
jump back in front of DOME LABEL, this means label setting is finished,
when moving the cursor to EXIT, it means exiting the menu setting.
The displaying information on the screen will change with the PTZ
rotation ; Through the information on the screen, user can see current
PTZ in side temperature, magnification, display zone etc. When all the
label are displayed, the PTZ works as the following picture shows,:
(In the picture “305” means pan angle, “45” mean s tilt angle. )
12
CHANGE THIS TO WHAT THE PRODUCT IS AND COPY INTO THE MASTER PAGE A
4. 5 Systematic motion control
Systematic motion controlling may control a series o f canonical movement of the PTZ, and play an important role in controlling the PTZ.
1) The system enters into the main menu by calling 95 preset or by calling 9 preset twice within 3 seconds.
2) Tilt up/d own joystick to SYSTEM SE TTING, press [OPEN] to enter submenu
3) Tilt up/down joystick for MOTION , press [OPEN] to enter systematic
motion controlling menu, as left picture shows.
4. 5. 1
Auto flip
1) Operate joystick , move the cursor to [AUTO FLIP] : press [OPEN] to
enter “auto flip ”setting, tilt up /down joystick , for example: choosing
“ON” to open“ aut o flip”; choosing “OFF” to close“ auto flip”.
Press [OPE N] to save.
R EMAR K: When opening the auto flip function, user holds the joystick
in the down position, the c amera rotates pan 180 degrees, after the
camera rotates tilt up to 180 degrees.
4. 5. 2 Speed proportion pan
.Operate jo ystick, move th e curso r to【PR OPORTIONAL PAN】; press
【OPEN】 to enter“ propo rtion pan” setting, til t up/down joystick to choose, if choo sing 【ON】, it means to open proportion pan ; if cho osing
【OFF】, it means t o close proportion pan , press 【OPEN】to save.
OPERATION KNACKS
When manually adjusting, for far focus situation, the PTZ responds at
a high-speed so that touching joystick slightly may make picture move
rapidly, thus cause the picture to lose. To base on humanized design, the
PTZ automatically adjust pan and tilt rotation according to zoom near
and far, which make it
is convenient to operate manua lly run after object.
CHANGE THIS TO WHAT THE PRODUCT IS AND COPY INTO THE MASTER PAGE A
13
4. 5. 3 Park action
This setting allows the PTZ to run an appointed action after it enters
stand by mode (1-240 minutes). If default sets as 0 , it means not to run
this action automatically.
1) Operate joystick, move the cursor to [PARK T IME], press [OPEN]
to set park time, the range is 0-240 (minutes), press [OPEN] to save.[PARK
ACTON] is running action at park time, when [PARK TIME] sets as 0, this
item can’t be set
2) Operate joystick, move the cursor to [PARK ACTON], press [OPEN]
there will be a sign in the front of [PARK ACTON] , the cursor will jump
to the right, after tilt up/down use joystick to choose“ park action” the
options for choosing are as follow, press [OPEN] to save.
•
•
•
•
•
NONE- (default) none action
PRESET - Use preset 1-80
SCAN -Run scan
PAT1- Run pattern X
TOUR- Run tour
4.5.4 Power up action
The PTZ starts to run actions after self-testing, if nobody intervenes , it
will repeatedly run this action continuously , if default sets as [NONE].
1. Operate joystick, move the cursor to [POWER UP ACTION] : press
4.5.5 Fan startup by temperature
The temperature of the PTZ will rise, when it is in high temperature the
fan will open automatically, when the temperature reaches to a very
high degree the system will shutdown to protect electronics.
Operate joystick, move the cursor to [FAN ENABLED] : press [OPEN] , the
cursor will skip to the back option. The user can choose the fan to start
up temperature, and press [OPEN] to save it in actual condition.
The default setting temperature of the fan startup is 40 OC. The user can
also enter the fan startup setting to adjust the temperature of fan startup. As picture shows: the temperature range is 0-60 OC. [TEMP] can
switch the temperature between fahrenheit and centigrade.
14
CHANGE THIS TO WHAT THE PRODUCT IS AND COPY INTO THE MASTER PAGE A
4.5.6 Advance setting
1. Operate joystick and move to [ADVANCE SETTING] , press [OPEN]
to enter into “advance setting”;
[EIS ENABLED]: Electronic Image Stabilizer function;
[PRESET FREEZE]: Function of Preset Freeze means during calling presets, the monitor displays the image before call presets, and releases the
freeze image when the camera arrives the appointed presets.
[HE AD-DO WN]: Settings of Top/Down. “ON” means DOWN,
“OFF”means TOP.
[DE FOGGER] : Lens of PTZ will be fogged when PTZ works in quite cold
temperature . In order to get clear image , defogger wil l open automatically at the appointed temperature. Choosing [DEFOGGED] by
operating the joystick, and pressing [OPEN], then cursor leap to the
optional. Choose the temperature to run the defogger, and press [OPEN]
to save.
Range of Temper ature: 0~30.
[ADJSPEED] The rotation percent age of P/T, 100 means factory speed,
80 means 80% of factory speed.
[WIPER]: Wiper runs by calling 63 Preset.
[MODE]: Setting of Infrared light. Call 62 preset to run Infrared light under the setting of MANUAL. Save 62 preset to close the infrared.
[DELAY TIME]: Setting the auto close time of IR light, ranging from
1-240 Minutes.
[IR Cut Filter0: Setting the imaging model after the IR light as ON, three
modes for choice : Auto, Color, Black.
[ACTIVATE AUX 1] Whether to link AUX 1 when open the IR light,
“ON” means Link. “OFF” means not to link.
[Auto] is invalid as it’s searchlight, it must be
controlled under [Manual]status.
[LED1] For LED brightness adjustment, range: 50- 200, Brightness
Increase in proportion as bigger digits is chosen.
[LED 2] S ame as the above
[LE D 3] Temporarily unavailable
[LIGHT] Options of light sources
(Temporarily unavailable)
1.After the PTZ set the EIS function, if the PTZ wobble slight when running, the camera will shield the wobble picture and ma ke the picture
calm and smooth.
2.When start-up preset freeze, it can eliminate the sense of flash caused
by calling presets when open function of Preset Freeze, which can reduce the storage space of DVR if image is stored by DVR.
These function in the a dvance setting menu depends on the models and parameters of built-in camera in PTZ, if the camera haven’t this funtion, then this function is invalid.
The option is useless (N/A) when the camera module has no such funtion
CHANGE THIS TO WHAT THE PRODUCT IS AND COPY INTO THE MASTER PAGE A
15
4. 6 Clear and restart
1) The system enters into the main menu by calling 95 preset or by calling 9 preset twice within 3 seconds.
2) Tilt up/down joystick to [SYSTEM SETTING], press [OPEN] to enter
submenu.
3) Tilt up/down joy stick to [CLEAR] , press [OPEN] to enter submenu, as
left picture shows.
• [CLEAR ALL ZONES]
• [CLEAR ALL PRESETS]
• [CLEAR ALL PATTERNS]
• [CL EAR ALL TOURS]
• [CLEAR ALL WINDOWS]
• [FACTORY DE FAULTS] : resume the factory default. Run this function, the camera parameter and system parameter will resume
to factory default, clear all windows and alarm setting. Please be
cautious to use this function.
• [RESTART]
4) Set clear zone as an example to explain the process. Tilt up/down
joystick to [CLEAR ALL ZONES], press [OPEN] to clear all zones.
16
Once clear all commands in the controlling menu, it cann’t resume, so please be careful of using it.
CHANGE THIS TO WHAT THE PRODUCT IS AND COPY INTO THE MASTER PAGE A
4.7 Password set
1. The system enter s into th e main menu by call ing 95 preset o r by
calling 9 preset twice within 3 seconds.
2. Operate the joystick up and down, move the cursor to [SY STEM
SETTI NG] , press [OPEN] to call the submenu.
3. Operate the joystick up and down , move the cursor to PA SSWO RD
[SETUP], press [OPEN] to cal l the su bmenu . Please refer t o the le ft
SYSTEM SETTING
EDI T PTZ LABEL INITIAL INFO DISPLAY SETUP MOTION CLEAR PASSWORD SETUP
4. Operate the joystick up and down , move the cursor t o [OLD]
PASSWORD, press [OPEN ] to choose it, operate the joystick right and
left to input the password, Tilt up and down to choose the number
which you need.
•
[NE W PASSWORD] Enter the new password
•
[CONFIRM PASSWORD] Confirm the new password
•
CLOCK SETTING DOME ADDRESS BACK
•
ENABLE PASSWORD
•
Set PASSWORD off / on
•
EXIT
The password function is noneffective under the PASSWOR D OFF.) It
means that users can enter into the main menu without a password.
The password function is effective under the password ON. It means
that user can only enter into the mian menu with a password
CHANGE THIS TO WHAT THE PRODUCT IS AND COPY INTO THE MASTER PAGE A
17
4.8 Time set
1. The system enters into the main menu by calling 95 preset or by calling 9 preset twice within 3 seconds.
2. Operate the joystick up and down, move the cursor to [SYSTEM SETT
ING] , press [OPEN] to call the sub menu.
3. Operate the joystick up and down, move the cursor to [CLOCK
SET TING] , press [OPEN] to call the submenu. Please refer to the left
picture.
Operate the joystick up and down, move the cursor to [TIME], press [OP
EN] to choose it, move the joystick up and down to choose the number
you need, move the joystick right and left to set hour, minute, second.
•
•
•
•
18
[DATE] set year, month, date
[DAY] set week
[BACK] return to the former menu
[EXIT] exit the main menu.
CHANGE THIS TO WHAT THE PRODUCT IS AND COPY INTO THE MASTER PAGE A
4.9 DOME Address Setting
1. The system enters into the main menu by calling 95 preset or by calling 9 preset twice within 3 seconds.
2.Tilt up/down the joystick and move the cursor to [SYSTEM SET TING],
press [OPEN] to enter submenu.
3. Tilt up/down the joystick and move the cursor to [DOME ADDRESS],
press [OPEN] to call dome parameter setting menu
S/N : Serie s No. of the dome
CONF: Confirm S /N and input the same NO. with S/N
DOME ADDRESS: Set dome address (ID ran ge: 001-255)
1. If [S/N] and [CONF] are different, the above operation can’t be implemented
2. The PTZ address should be set as 255 (mean set Switch 1 as ON), there will be display this item [PTZ ADDRESS]
3. After setting PTZ address, the PTZ need to restart, then the PTZ address will be effective
CHANGE THIS TO WHAT THE PRODUCT IS AND COPY INTO THE MASTER PAGE A
19
5. Camera setting
5. 1 Zoom speed
1. The system enters into the main menu by calling 95 preset or by calling 9 preset twice within 3 seconds.
2. Tilt up/d own joystick to [CAMERA SETTING] , press [OPEN] to enter
submenu
3. Operate joystick, move the cursor to [ZOOM SPEED]; press [OPEN]
will appear a sign “ “ in the front of [ZOOM SPEED], the cursor moves
to right , tilt up /down joystick to choose [HIGH] or [LOW]
4. Press [OPEN] to save, press [CLOSE] to cancel
20
CHANGE THIS TO WHAT THE PRODUCT IS AND COPY INTO THE MASTER PAGE A
5. 2 Digital zoo m cont rol
1) The system enters into the main menu by calling 95 preset or by calling 9 preset twice within 3 seconds.
2) Tilt up/down joystick to [CAMERA SETTING], press [OPEN] to
enter camera setting.
3) Operate joystick, move the cursor to [DIGITAL ZOOM], press [OPEN] to
enter digital zoom setting, tilt up/down joystick, to choose ON means
open digital zoom control which is digita l zoom is pulled near, if pulling
the digital zoom near again, the PTZ enters into“ digital zoom increase”;
to choose OFF me ans to close d igital zoom control.
4. Press [OPEN] to save.
OPERATION KNACKS
When digital zoom be se t as ON, the maximum zoom magnification of
the PTZ is digital zoom magnification times optical zoom magnification;
when digital zoom be set as OFF, the maximum zoom magnification of
the PTZ is optical zoom magnification.
The option of the digital zoom is ON/OFF when the camera module is
SONY, LG, CNB, HITACHI .
CHANGE THIS TO WHAT THE PRODUCT IS AND COPY INTO THE MASTER PAGE A
21
5.3 Backlight compensation
1) The system enters into the main menu by calling 95 preset or by calling 9 preset twice within 3 seconds.
2) Operate joystick, move the cursor to [CAMERA SETTING] to enter
submenu.
3) Operate joystick, move the cursor to [BLC MODE], press [OPEN], There
will bea signin the front of [BLC MODE] , the cursor jump to right, tilt
joystick to open or close back light compensation function. If choosing
ON means to open backlight compensation mode; if choosing OFF
means to close back light compensation model
4 Press [OPEN] to save.
OPERATION KNACKS
Strong background ray can make backlighting objects engender shadow, (back light compensation), the PTZ can auto-adjust iris to match
with the changes of various ray, and auto-revise the main lightness to
make the pictures more legible.
This function relates to models and parameters of the built-
in camera in the PTZ, when open black compensation, it has two functions which are auto-adjust (when you choose ON) or manual adjust(0-255) according to the different of the camera.
22
CHANGE THIS TO WHAT THE PRODUCT IS AND COPY INTO THE MASTER PAGE A
5. 4 Slow shutter control
1) The system enters into the main menu by calling 95 preset or by calling 9 preset twice wit hin 3 seconds.
2) Operate joystick, move the cursor to [CAMERA SETT ING] to enter
submenu.
3) Operate joystick, move the cursor to [SLOW SHUTTER], press [OPEN],
there will be a sign in the front of [SLOW S HUTTER], the cursor moves
to right , tilt up /down joystick to “slow shutter” choice, if choosing ON
means to open slow shutter function , if choosing OFF means close
“slow shutter” function.
4) Press [OPEN] to save.
OPERATION KNACKS
When the PTZ monitors at night or dark environment, because the ray
is not enough, the image on the screen is too dark, setting slow shutter
can lengthen the time of lighting so that make the picture that is shooted in dark more legible.
This function depends on the models and parameters of built-
in camera in PTZ, if the camera haven’t this function, then this function is invalid.
CHANGE THIS TO WHAT THE PRODUCT IS AND COPY INTO THE MASTER PAGE A
23
5 . 5 Line sync control
1) The system enters into the main menu by calling 95 preset or by calling 9 preset twice within 3 seconds.
2) Operate joystick, move the cursor to [CAMERA SETTING], press
[OPEN] to enter submenu.
3) Operate joystick, move the cursor to [LINE SYNC] ; press [OPEN], tilt up
/down joystick to set line sync. Line sync can divide two kinds : internal/
external, choose OFF is internal sync; choose ON is external sync;
press [OPEN] to save.
OPERATION KNACKS
When a lot of PTZs use a line at the same time, if the image is twinkling
or switching, please set each PTZ as external line and adjust the numerical value of the external line.
This function is relative to each model and parameters of the camera module which is inside the PTZ. The option is useless(N/A) when the camera module has no such function.
5. 6 WDR Control
1. Operate joystick, move the cursor to [WDR MODE] ,press [OPEN],
tilt up /down joystick to set WDR; Choose [ON] means open WDR,
choose [OFF] means close WDR, Press [OPEN[ to save.
[WDR MODEL]: WDR is the function that features of image can be
captured clearly by a camera while the picture is covered with strong
contrast background . For example: you can enable WDR function to
sub lime image quality when the two areas A an d B exist simultaneously, A: High Intensity are a under strong light exposure (source from
day light, lamp and soon ), B: Low luminance area, like shadow,
backlighting zone and soon.
24
This function is relative to the model and parameter of the camera module which inside in the PTZ. The option is useless(N/A) when the camera module has no such function.
CHANGE THIS TO WHAT THE PRODUCT IS AND COPY INTO THE MASTER PAGE A
5. 7 IR cut filter
1) The system enters into the main menu by calling 95 preset or by calling 9 preset twice with in 3 seconds.
2)Operate joystick , move the cursor to [CAMERA SETTING] to
enter submenu.
3) Operate joystick, move the cursor to [ADVANCE SETTING] 1; press
[OPEN], there will be a sign in the front of [ADVANCE]. [SETTING 1] the
cursor jumps to right, move joystick to “IR cut filter”, choices as follow,
[AUTO] is default.
•
[AUTO] IR cut filter mode, it means the PTZ automatically transfers
according to sensitivity.
•
[COLOR] set as color mode
•
[B LACK] set as black and white mode
•
[TIME] set ON time and OF F time of black and white mode
4. Press [OPEN] to save.
When user choose [TIME] , [IR CUT ON TIME] and [IR CUT OFF TIME] will
be effective. User may set ON time and OFF time of black and white
mode, as follow:
1.Operate joystick, move the cursor to [IR CUT FILT ER], tilt up/ down
joystick to choose [TIME] mode, press [OPEN] to save;
2. Operate joystick, move the cursor to [IR CUT FILTER] tilt up/ down joystick to set the beginning time of black and white mode; move joystick
to [I R CUT OFF TIME] to set t he finish time of black and white mode,
the same as setting the beginning time; [FLIP]: 180° inversion imaging
function of image, [MIRROR]: image mirroring function.
3 .Operate the joystick and move the cursor to [MAX GAIN] which is the
max limits of automatic gain and ranges from 8 to 28dB. As the ray
is dark, the more smaller value of [MAX GAIN], the more darker, the
noise of image is less; The more bigger value of [MAX GAIN], the more
brighter, but the noise of image is much.
4.[THRESHOLD]: sensitive of IR cut filter, the range from 0 to 28 dB.
5.[EXPOSRUECOMP]: exposure compensation function.
6. Press [OPEN] to save.
OPERATION KNACKS
IR cut filter function uses color in day; use black and white at night. This
function not only guarantees the quality of image, but also saves the
room of storage.
This function depends on the models and parameters of built-
in camera in PTZ, if the camera haven’t this function, then this function is invalid.(N/A)
CHANGE THIS TO WHAT THE PRODUCT IS AND COPY INTO THE MASTER PAGE A
25
5. 8 Advance setting2
1) The system enters into the main menu by calling 95 preset or by calling 9 preset twice within 3 seconds.
2) Operate joystick, move the cursor to [CAMERA SETTING] to enter
submenu.
3) Operate joystick, move the cursor to [ADVANCE SETTING2]; press
[OPEN] to enter submenu, as left picture shows;
5. 8. 1
AE mode
1) Operate joystick, move the cursor to [AE MODE], press [OPEN], tilt up/
down joy stick to choose AE mode, modes for choosing as follow:
•
•
•
•
[AUTO]: default setting , auto Iris mode
[BRIGHT]: brightness priority mode
[IRIS]: Iris priority mode
[SHUTTER] : Shutter priority mode
2) Choose Iris priority mode [IRIS], press [OPEN] to save.
3) Move joystick to the sub-choices of AE mode [IRIS] F1.4, press [OPEN]
to choose adequate Iris, press [OPEN] to save.
[SHUTTER 1/50] it means shutter speed, when AE mode is shutter
priority, this function can be set.
[IRIS F1.4] it means the size of iris, when AE mode is iris
priority, this function can be set.
[BRIGHT F2.0/ ODB] it means brightness, when AE mode is brightness
priority, this function can be set.
OPERATION KNACKS
Quality of photo relates to exposure amount, that is to say how much
light can make CCD receives legible image. Exposure amount is relative
to the time of lighten (be up to shutter speed)and the area lighten (be
up to the size of iris).
26
CHANGE THIS TO WHAT THE PRODUCT IS AND COPY INTO THE MASTER PAGE A
5. 8. 2
White balance mode
System supports [AUTO] indoor mode [INDOOR] outdoor mode [OUTDOOR] auto track mode [ATW] single mode [OPW].
[OPT] mode manual mode [MANUAL] and kinds of white balance
modes, etc. Detail setting as follow:
1) The system enters in to the main menu by calling 95 preset or by
calling 9 preset twice within 3 seconds. Click each command enter into
“advanced settig2” menu according to the order in left picture.
2) Operate joystick, move the cursor to [BW MODE] to choose white
balance mode, press [OPEN] to save.
Automode [AUTO] is t he default mode of speed PTZ, which is auto-revert real color after the white balance sensor check the environment by
camera. When choosing manual mode [MANUAL], adjust the numerical
value of [R GAIN] and [B GAIN].
[R GAIN] the range is 1-225 ; the numerical value is bigger, it means that
adding red is more, the tone changes to be warm.
[B GAIN] the range is 1-225 ; the numerical value is bigger, it means that
adding green is more, the tone changes to be cold.
Indoor mode [INDOOR], and the tone leans to cold. Outdoor mode
[OUTDOOR] , and the tone leans to warm.
[HI-RE SOLUTION] high resolution is built-in function of camera , This
function is relative with the model of camera.
It is possible that different cameras don’t have the same settings of [INDOOR], [OUTDOOR], [HI-RESOLUTION]; [N/A] That means the current camera has no such function when the setting option shows.
CHANGE THIS TO WHAT THE PRODUCT IS AND COPY INTO THE MASTER PAGE A
27
6. Function setting
6.1 Preset
1) The system enters into the main menu by calling 95 preset or by
calling 9 preset twice within 3 seconds. Click each command to enter“
preset menu” according to the order of the left picture.
As following:
•
•
•
•
•
PRESET NUMBER
SET PRESET
SHOW PRESET
CLEAR PRESET
EDIT PRESET LABEL
Define preset and call preset function can be set by keyboard operation,
input preset number at first, then click the key “save /call preset” to carry
out.
2) Define current preset number: move the cursor to [PRESET NUMBER]
, press [OPEN] to choose preset number, the range is 01-128 as the left
picture show, here chooses number 5 as current preset.
3) Define current preset: move the cursor to [SET PRESET], press [OPEN],
by operating joystick to adjust magnification, to choose good objective image, press [OPEN] to save. If the image is very near, the Image
is belong in digital zoom; when setting preset, the image will jump to
maximal optical zoom.
OPERATION KNACKS
Preset function is that PTZ stores current pan/tilt angle, zoom and other
position parameters into the memory. When necessary PTZ recalls these
parameters and adjust camera to that position.
4) Display current preset: move the cursor to [SHOW PRESET] , press
[OPEN], the screen will display the current preset;
5) Clear current preset: move the cursor to [CLEAR PRESET], press
[OPEN], the current pre set is cleared.
6) Edit current preset label: move the cursor to [EDIT PRESET LABEL],
press [OPEN] to enter into editing preset submenu, system auto-sets
label as PRESET-XX, press [OPEN] to revise label.
28
CHANGE THIS TO WHAT THE PRODUCT IS AND COPY INTO THE MASTER PAGE A
6.3 Pattern
6.1 Preset
Pattern is built-in function in camera; the PTZ can record tracks that are
no less than 180s . (A series of pan/tilt controlling and lens controlling
command ). A PTZ may set up to 4 pattern tours.
1)The system enters into the main menu by calling 95 preset or by calling 9 preset twice within 3 seconds.
2) Operate joystick, move the cursor to [FUNCTION SE TTING], press
[OPEN] to enter submenu.
3) Operate joystick to [PATTERN], press [OPEN] to enter menu “ Pattern”.
•
•
•
•
•
[PATTERN NUMBER]
[PROGRAM PATTERN]
[RUN PATTERN]
[CLEAR PATTERN]
[EDIT PATTERN LABEL]
4) Choose pattern number: move the cursor to [PATTER N NUMBER],
press [OPEN], pattern you choose as current pattern, the following operations aim at the current pattern;
5) Define current pattern tour : move the cursor to [PROGRAM PATTERN],
press [OPEN] to set pattern track, move the image random,
and draw the focus. The PTZ has a tour that is no less than 180s, a series
of park time , magnification, focus will be recorded, press [OPEN] to save.
6) Run pattern: operate joystick to [RUN PATTERN], press [OPEN] to run,
the PTZ will continuously and repeatedly record the specific track.
When carry out program, run, clear pattern and edit label, should choose pattern number
CHANGE THIS TO WHAT THE PRODUCT IS AND COPY INTO THE MASTER PAGE A
29
6. 4 Tour
Tour is the built-in function in the PTZ, it will arrange the presets into the
queue of auto-tour, and can set how long it will park at preset. Operate
auto-tour is a process of incessantly transfer each preset . One tour can
store 32 presets at most.
1) The system enters into the main menu by calling 95 preset or by calling 9 preset twice within 3 seconds.
2) Operate joystick, move the cursor to FUNCTION SETTING, press
[OPEN] enter submenu.
3) Operate joystick, move the cursor to [TOUR], press [OPEN] to enter
menu “tour”
4) Set the park time of preset: Operate joystick, move the cursor to
[TOUR DWELL], press [OPEN], there will b e a sign in the front of [TOUR
DWELL], the cursor jumps to right, tilt up/down to set park time, and the
range is 000-25 5(s)
5) Set tour :move the cursor to [EDIT TOUR],press [OPEN] to set tour
interface, [PO-S-T-M] set preset ,speed and time ,press [OPEN],
the first dwell is activated , tilt up/down joystick to choose preset number, the preset numberical value should be within 1-80 preset , a tour
can set up to 24 presets .press [OPEN],the cursor jump to the next dwell
,tilt up/ down joys tick to choose current arrival preset speed , total 8
level of speed ,increasingly from level 1 to level 8; Press [OPEN],the cursor jumps to t he next dwell , tilt up /down joystick to set current preset
maintaining time ,60 seconds maximum . If set the presets of the second
line ,move the cursor to the second line , press [OPEN] to continued it
.press [OP EN] to save after setting ,press [CLOSE] to exit.
6) Run tour: Operate joystick , move the cursor to [RUN TOUR], press
[OPEN] to exit the menu, it stars to run tour.
the system will leap over the pre set automatically when the stay time of one item setting up on 0; The PTZ will not run the tour of latter preset when preset or movement speed setting up on 0 .
A PTZ may be set up to 8 zones; the regional scene can 't be overlapped. User
can set label for each zone. When setting [ZONE LABEL] as ON,
the PTZ will display zone label as it runs some zone . It is convenient to know
the zone that the camera shoots by setting zone label.
1) The system enters into the main menu by calling 95 preset or by calling 9
preset twice within 3 seconds.
2) Operate the joystick, move the cursor to [FUNCTION SETTING], press
[OPEN]to enter submenu.
3) Operate the joystick, move the cursor to [ZONES], press [OPEN] to enter
submenu, as the left picture shows.
•
•
•
•
•
[ZONES NUMBER]
[SET LEFT LIMIT]
[SET RIGHT LIMIT]
[CLEAR ZONE]
[EDIT ZONE LABEL]
Regard the left/right limit as the demarcation line, and set the middle part as
a zone . Variou s operational ways are the same as both er settings in the
menu . Therefore we won't explain it again.
CHANGE THIS TO WHAT THE PRODUCT IS AND COPY INTO THE MASTER PAGE A
31
6 . 6 Time running
User can set the time of preset, scan, tour and pattern.
1.Call 95 preset or call 9 preset twice within 3 seconds to
enter into the ma in menu.
2. Operate the joystick, move the cursor to [FUNCTION SETTING] , press
[OPEN] to call the sub menu.
3. Operate the joystick, move the cursor to [TIME RUNNING]
, press [OPEN] to enter into the menu setting. Please refer to
the left picture.
•
•
•
•
•
[DAY] set the date
[TIM E CHANNEL] 4 channels can be set.
[START TIME] Set the start time
[END TIME] Set the en d time
[RUNNING] User can set the preset , scan , tour, pattern to every channel.( 1-4)
4. Th is channel will not conflict with other channels when
you set [RUNNING] as close.
1.When user do the action of scan, tour or pattern, if time is
over, then the PTZ will execute park action, the user’s action
will stop. After the time, the PTZ will resume the action
and preset which is set before the park time. (Before the
park time, if the PTZ is on some preset, the PTZ will resume
the preset, if PTZs execute the action of scanning, tour or
pattern, the PTZ will resume original action. If users handle
some action with keyboard, PTZ
will also resume the ac tion which users are going on with
keyboard.)
2. During the timing period of movement function, it is not
allowed that there is no action. When users handle the PTZ,
the timing movement function will interrupt. If there is no
any action during
30 seconds, it will be in the state of timing function, and
return to the timing movement function. Or if there is idle
function,
it will be do the action of idle time function.
3. Timing function will close while user setting presets, right
and
left limit, menu status, recording sca n and setting any other
function.
4.When the PTZ execute alarm, timing, idle function, the
priority for alarm is the highest, for timing is the second, for
idle is the lovest.
32
CHANGE THIS TO WHAT THE PRODUCT IS AND COPY INTO THE MASTER PAGE A
7. Privacy zone masking
Privacy function can show someone piece of regional shielding while protecting. For example, protect the window of
bedroom or ATM of bank. A PTZ can set up to 2 4 privacy
windows.( Masking setting function is relative with the model
of camera module. The masking numbers will be different
according to the different cameras.
Hitachi Camera: It can be set 8 masking at most in 360°surveillance range, can set 2 masking at most per screen. The screen
will note ”please move” when the position can not be set. It
can not set masking when the PTZ rotates down ≥45°.
Sony Camera: It can be set 24 masking at most in 360°surveillance range.
(Sony 45 series c an be set 8 masking at most ). It can not set
masking when the PTZ rotates down ≥20°.LG,CNB Camera
module have no masking function.
1) The system enters into the main menu by calling 95 preset
or by calling 9 pre set twice with in 3 seconds.
2) Operate the joy stick to [WINDOW BLANKING], press [OPEN]
to enter menu“ window blanking”.
•
•
•
•
[WINDOW NUMBER] choose window number as current
privacy window, other choices in the menu just aim at
current privacy window.
[EDIT WINDOW] program current window
[ENABLE WINDOW] permit/prohibit current privacy window, there are two choices: ON ---permit current privacy
window/O FF---prohibit current privacy window
[CLEAR WINDOW] clear current privacy window, after
clearing it, the window will auto- change as OFF.
3. Program current privacy window: Firstly choose window
number, then do the following operations:
a. Operate the joystick, move the cursor to [EDIT WINDOW],
press [OPEN] to move the image that need privacy window to
display in the screen.
b. Press [OPEN], there will be a square displaying in the center
of the screen, operate the joystick, and move the square to the
central place that need to conceal.
c. Press [OPEN], operate the joystick to adjust the size of privacy zone: joy stick to up, the height is increased; jo 8. Alarm
function
The PTZ may connect with 7 alarm input, 2 alarm output, and
support ala- rm linkage. The external alarm message sends
to the PTZ, then the PTZ sends to alarm point shoot (to call
preset, auto scan, auto cruise and auto pattern), and choose
that to run alarm output or not.
1、The system enters into the main menu by calling 95 preset
or by calling 9 preset
twice within 3 seconds. click each menu according to the left
picture, then enter m- enu alarm, choices as follow:
●【RESUME】resume mode after relieving alarm input, there are
CHANGE THIS TO WHAT THE PRODUCT IS AND COPY INTO THE MASTER PAGE A
33
8. Alarm function
The PTZ may connect with 7 alarm input, 2 alarm output,
and support alarm linkage. The external alarm message
sends to the PTZ, then the PTZ sends to alarm point shoot
(to call preset, auto scan, auto cruise and auto pattern), and
choose that to run alarm output or not.
1)The system enters into the main menu by calling 95 preset or by calling 9 preset twice within 3 seconds. click each
menu according to the left picture, then enter menu alarm,
choices as follow:
• [RESUME]resume mode after relieving alarm input,
there are two choices: ON---clear alarm output, the PTZ
will stop. OFF---just clear alarm output.
• [SEQUENCE] The park time between two alarm in the
same priority, the range is 1-60s.
• [RESET DELAY]set alarm reset and delay the time (1225s)how long to relieve and run [RESUME] after the
PTZ receives alarm message.
• [ALARM CONTACT] set state of the relay. N/C---often
close the state, N/O---often hold the state. If setting as
often closing the state, the relay is in closing the state
when there is no alarm to output; when there is alarm
to output, the relay is in holding the state.
• [ALARM SETTING]
• [ARM SETTING]
2. Operate joystick, move the cursor to[ALARM SETTING],
press[OPEN] to enter the menu alarm setting
•
•
•
•
•
34
[ALARM NUMBER] alarm number is corresponding with
12 bits plug in the external switching board of the PTZ
(as below shows). 001 priority is the highest, 007 priority is the lowest. The two lines alarm input at the same
time, the PTZ run alarm that the highest priority.
[ALARM ACTION] as current alarm input, to run the
action. Choices for choosing as follow. NONE---none
action/SCAN/PAT X---run a pattern tour /TOUR---run
tour/PRESET---call preset, when the PTZ number is set
as 1, to call preset 1; when the PTZ number is set as 2,
to call preset2.
[ACTIVATE AUX]as current alarm input, to run alarm
output or not. NONE---none alarm output/AUX 1---the first alarm output/
AUX 2---the sec- retaryond alarm output/BOTH--- two
alarms output.
[ALARM PRIORITY]alarm priority can be defined as
three grades: high, middle, low.
CHANGE THIS TO WHAT THE PRODUCT IS AND COPY INTO THE MASTER PAGE A
3.ARM Setting
1. Call 95 preset or call 9 preset twice within3 seconds and then input the
password to enter the main menu.
2. Operate the joystick up and down, move the cursor to [ALARMS] , press
[OPEN] to call the submenu.
3. Operate the joystick up and down, move the cursor to [ARM SETTING] ,
press [OPEN]to call the submenu. Please refer to the left picture.
4. Operate the joystick up an d down, move the cursor to [DAY], Press
[OPEN ]to choose it , Operate the joys tick up and down to set date, set
the date according to the week. To set the Alarm state and Alarm date
based on the time.
•
•
•
•
•
[ARM STATE] Alarm off /Alarm on (Alarm Setting is non effective under Alarm off. Alarm Setting is effective under Alarm on)
[ARM TIME] : User can s et the alarm time.
[UNARM TIME]: User can set the alarm off time.
[BACK]: back to the former menu.
[EXIT]: Exit the menu.
CHANGE THIS TO WHAT THE PRODUCT IS AND COPY INTO THE MASTER PAGE A
35
9. Set Language
1. Call 95 preset or call 9 preset twice w ithin 3 seconds and then
input the password to enter the main menu.
2. Operate the joystick up and down, move the curso r to [LANGUAGE] , press [OPEN] to call th e submenu.
3. Operate the joystick to choose the language English and French
ca n be choosed, Then press [OPEN]to save.
36
CHANGE THIS TO WHAT THE PRODUCT IS AND COPY INTO THE MASTER PAGE A
CHANGE THIS TO WHAT THE PRODUCT IS AND COPY INTO THE MASTER PAGE A
37
10.2 24VAC Wire Diamet er and Transmission Distance Comparison chart
The transmission distances listed below are farthest ones recommended for each giving wire diameter when the
24VAC voltage loss ratio is below 10% (for equ ipment powered by AC, the allowed maximum voltage loss ratio is
1 0%).
The rating power of PTZ is 50W, need a wire with a minimum diameter of 1 .0mm.
38
CHANGE THIS TO WHAT THE PRODUCT IS AND COPY INTO THE MASTER PAGE A
10. 3
Domestic and Ab road Wire Gauge Conversion Chart
CHANGE THIS TO WHAT THE PRODUCT IS AND COPY INTO THE MASTER PAGE A
39
1 0. 4 Rs485 Bus Basic Knowledge
• Characteristics of Rs485 Bus
As specified by Rs485 standard, Rs485 Bus is of
half-duplexed data transmission cables with characteristic impedance as 1 20Ω. The maximum load
capacity is 32 unit loads (including main controller
and controlled equipment.)
• The connection of 120Ω termination resist or:
Connection mode for 120 Ω resistance of equipment
terminal. Setting connection of terminal resistance
12 0Ω in the base cover. (Refer to Picture 10 -4.3):
Default of factory (No. 8 digit of SW2 is set “OFF” on
code s witch) No.8 digit of SW2 is set “ON ” on code
switch if needed to connect 120 resistance.
Setting of 120Ωresistance
• Transmission distances of Rs485 Bus
When user s elects t he 0.56 mm(24 AWG)twisted
pair wires as data transmission cab le, the maximum
theoretical transmitting distance are as follows:
If user selects thinner cables , or inst alls the PTZ
in an environment with strong electro magnetic
interference, or connects lots of equipment to the
R s485 Bus, the maximum transmitting distance will
be decreased. To increase the maximum transmitting distance, do the contrary.
• Connection and termination resistor.
The Rs485 standards require a daisy -chain Connection between the equipment. There must be termination resistors with 120Ω (as the picture 1 0-2.1).
Please refer to picture 1 0-2.2 for simple connection.
“D”should not exceed 7m.
40
CHANGE THIS TO WHAT THE PRODUCT IS AND COPY INTO THE MASTER PAGE A
• Problems in practical connections
In some circumstances user adopts a star configuration
in practical connection . The termination resistors must
be connected to the two equipment 1# an d 5# in
Picture 10-4.4. As the star con- figu ration i s not in conform ity with the req uire- men ts of RS 485 sta ndards,
problem s such as sig- nal r eflectio ns, low er anti- interfer ence pe rform- ance arise w hen the cables are
long in the c onne- ctio n. The r eliabilit y of con trol sig
nals is d ecrea- sed with the phenom ena tha t the PT Z
does not
resp ond to o r just re sponds at inter vals to t he contro ller, or does con tinuous operat ion with out stop.
In su ch circ umstan ces the factor y recom
mends the u sage o f RS48 5 distr ibutor. The
dis tributo r can chan ge the star configura tion
co nnectio n to th e mode of co nnecti on stip
ulated in the R S485 s tandar ds.
The new co nnectio n achi eves re liable d ata
tra nsmi- ssion . (Refe r to Pi cture 1 0-4.5).
CHANGE THIS TO WHAT THE PRODUCT IS AND COPY INTO THE MASTER PAGE A
41
10. 5 DIP switch setup
Open base, the re are two code switches with
8 digits, S W1and SW2. SW1 is for setting of
PTZ ID; SW2 is for settings of control protocol, baud
rate , terminal resistance connect.
10. 5. 3 ID setting (SW1)
10. 5. 1 Baud rat e setup(SW2):
Please according to "Appendix
RS4 85 Bus Basic knowledge", to
check whether Baud rate is satisfied
with the demand of transmission
distance.
42
The ID switch in decoder an d the ID setting of
the PTZ a s follow, in the picture,”1” set DIP
switch as “NO”, “0” set DIP switch as OFF.
CHANGE THIS TO WHAT THE PRODUCT IS AND COPY INTO THE MASTER PAGE A
CHANGE THIS TO WHAT THE PRODUCT IS AND COPY INTO THE MASTER PAGE A
43
44
CHANGE THIS TO WHAT THE PRODUCT IS AND COPY INTO THE MASTER PAGE A
CHANGE THIS TO WHAT THE PRODUCT IS AND COPY INTO THE MASTER PAGE A
45
46
CHANGE THIS TO WHAT THE PRODUCT IS AND COPY INTO THE MASTER PAGE A
11.Installation
11.1 Caution
• Please refer to user manual before installation.
• Power: AC220V/110V-AC24V, for actual needs, please refer to label of product.
• Precise optical and electronic parts inside of product. Avoiding severe press, hard vibration etc. non-correct
operation methods, which may cause damage to product when transportation and installation.
• Please do not disassemble parts inside of product at random, which may cause negative influence on use of
product. No additional parts available.
• Please comply with standards of Electrify Safety and use our own power transformer of product. Enough distance must be ensured between RS-485 cable, Video signal cable and equipments of high voltage when transmission. Thunder-proof, surge-proof and wave-proof , etc protection measures are needed.
• Do not use product beyond the rated temperature, humidity or specifications of power. Do not place camera
point to Sun or shining objects.
• Do not use cleansers with abrasion to clean product. Please use dry cloth to clean up dirt; Neutral cleanser is
needed when not easy to clean.
• Handle product with care so as to avoid crash or vibration; Damage is caused when incorrect usage.
• Please fix product to the position which is solid and firm.
• Please use special paper of lens to clean up dirt on Lens.
11. 2 Distributing the Line in Security
Please refer to the picture on the right 11.1 -1
D It is necessary to keep 50 meters distances at least between the high voltage unit and the high voltage cable
with signal transmission line.
D Outdoor wiring is best suited under the eave of the
house.
D Under thunderstorm or high inductive voltage region
(e.g .: high voltage transformer sub station ), you must
add extra high power lightning proof equipment and
install lighting rob.
D Outdoor equipment, routes of lighting proof and ground design must be considered according to the request
of construction lightning proof, and coincide with connection requests of country and industry standard.
Grounding equipment must satisfy the anti-jamming and electric al safety requirements and must not short circuited or mix c onnecti on with high voltage electricity net. When the system is grounded separately, the ground
resistance should be not more than 4Ωand section of the grounding conducting wire should be less t han 25mm
square .
CHANGE THIS TO WHAT THE PRODUCT IS AND COPY INTO THE MASTER PAGE A
47
11. 3 Lightning Proof and Surge Proof
Stuff Preparation
This product uses TVS lightning Proof technology, it can
prevent from the damage of the equipment caused by
kinds of pulse signal such a s instant lightning strike of
power below 4000V, the surge and so on.
Please select the type of cables bassed on transmitting distance:
• Minimum video coaxial cable requirements:
1)75Ωimpedance
2)All copper conductor wire
3)95% copper net structure
At the same time, you must adopt the essential protective measure according to the actual situation regarding
outdoor installation under the guarantee electricity
security.
(Refer to chapter 1.3 Distributing the line in security)
11. 4 Waterproof
The PTZ IS Outdoor, waterproof, moisture-proof dustproof and has achieved the IP66 international standard.
The indoor PTZ cannot be installed in a external environment which is full of moisture and possible exposure to
water . You should prevent the product and the internal
components from water damage.
11.5 Installation and Maintenance
•
All installation and maintenance work related to
this product should be completed by a technical
personnel who have a qualification of installation
and maintenance.
Basic requirements
• Please refer to this handbook for details.
• All electrical work must be observed by local latest
electricity laws and regulation on fireproof as well as
other related laws and regulations:
• Checking everything is completed according to
the packing list. Make sure the application and the
way of installation for the PTZ coincides with the
request. If not, please contact your supplier.
•
•
Please use this product according to the working
conditions required.
Please handle with the pan/tilt module carefully, do
not extrude various structure parts; The down cover
belongs to the senior optics part, do not touch with
hand; Please do not get through power except for
the electrifying inspection in process of installation.
Check the structure intensity for all installation space
and installation site.
•
•
RS485 Communication cables (Refer to manual appendix)
24VAC Power supply cable (Refer to manual
appendix)
• Keep All the Original Package Materials
Please preserve the mode original package
material properly after opening the PTZ packing,
in order to mail the PTZ that is wrapped with
original package material to the agent or return
it to the factory to repair if problem occur.
Brief introdu ction of mounting way Mounting
way of pan/tilt: wall mount, top-down mount,
stand-up mount.
• Stand-up mount
The mounting place must meet the re quirement
of chapter 1.3 distributing the line in security.
The pole bracket must be stability and no wobble.
• Top-down mount
The mounting position must undertake the
weight of pan-tilt.
Such a mounting wa y is only suitable for topdown type. Otherwise, it would be water-leaking.
• Wall mount
The mounting place must bear four times weight
of PTZ/ mounting bracket and mounting base.
The wall place you choose for mounting site
must be stability and nothing to take off, and
make sure the bracket is mounted in the wall not
the non-surface object.
•
Make sure you have enough space to hold this
product and it’s parts of installation on the site.
• Make sure the bearing capacity of the ceiling, wall,
bracket that installs the PTZ supports the gross weight
of the PTZ and the structural parts of installation.
It is necessary to have the safe coefficient of 4 times
or above.
48
CHANGE THIS TO WHAT THE PRODUCT IS AND COPY INTO THE MASTER PAGE A
11.6 Structure Introduction
The pan/tilt camera has five parts: main body, camera protection shield, LED protection shie ld,
pedestal and pedestal pad. DIP switch setup inside pedestal; and original integrated packing.
11.7 Basic Size graph
CHANGE THIS TO WHAT THE PRODUCT IS AND COPY INTO THE MASTER PAGE A
49
11.8 Installation
Stand-up mount, top-down mount and wall mount are
available for this product, which are suitable for different
applications. Because this product is an integrated package, please set parameters of baud rate, control protocol
as well as PTZ IP address by setting switch number before
any installation. Please refer to “setting of switch number”
in appendix.
11.8.2 Top-down Mounting (Non standard
setting)
1. the mounting position must be able to take the weight o f PTZ.
2. Such a mounting way is only suita
ble for top-down type. Otherwise, i be water will eaki
11.8.1 Stand-up Mount Installation
(Standard setting)
1 . Installation place must meet the requirements of wiring safety of 11.2 chapter.
2 . Installation pole must be strong and stable, which is not easy to shake.
Setting switch number of PTZ, setting
baud rate, control protocol and IP address of PTZ camera
according to “setting of switch number” in appendix of
user manual.
Picture11. 8-3
Using the bedplate of the PTZ as a model
to draw the position of bore which are on
the iron plate. (Refer to Picture 11 .8-3)
Then fix the top-down PTZ o n the
iron plate by M6 screw.
11.8.3 Wall Mount Installation (Non
standard setting)
1. Installation position must en
able to undertake high weight pressure , which is 4 ti mes of to
tal we ight of PTZ ,brack et and
bedplate.
2. Wall must b e stron g and sta
ble; b racket must be ensu red to install on clear wall.
Picture11. 8-1
Using the bedplate of PTZ as a model to draw the position of bore s which a re on the iron plate. Then fix the
PTZ on the iron plate by M6 screw. (Refer to picture
11.8-2)
Using wall bracket o f PTZ as a model to
confirm the position o f bores which are
on the wall. (Refer to picture 11. 8-4)
Picture11. 8-2
Drill 4 pieces of bores which are M8
meta l inflation bolts in surface of
wall; the depth of bore should be
approx imately 75mm , and fixing
with M8 inflati on bolts. ( Refer to
picture 11.8-5)
50
CHANGE THIS TO WHAT THE PRODUCT IS AND COPY INTO THE MASTER PAGE A
Please make video cable, power cable, control
cable and alarm cable penetrated the bracket, and fixed the bracket stably. Keep enough
length of cables:
Video cable should be kept 50 mm out of the
bracket , and other cables should be kept 8
0-100 mm from the bracket
Please connect cables refer to the attached tag. Detail connection refer to below list.
Lock 4 pieces of M8 screw and fix the bracket
on the wall, then smear the glass pastern on
the joint side between wall and the bracket pad
which passed the line in order to prevent water
entering. (Ref er to b elow p icture)
Alarm terminal 1:
RED: ALM1
PINK: ALM2
YELLOW: ALM3
GREEN: ALM4
BLACK: COM WHITE: NO BLUE: NC
RS485 terminal
YELLOW:RS485GREEN:RS485+
Alarm terminal 2 :
AQUA: NC2
BROWN: NO2
GRAY: ALM7
PURPLE: ALM6
ORANGE: ALM5
Power supply terminal:
RED:AC24V+
YELLOW: GROUNDING BLACK:AC24V11.10 Electrification inspection
Connect video cable and control cable to the other
equipments; Electrify 24VAC power.
The PTZ carries on self-checking and executes replacement procedure after power-on.
11.9 Cabling Connection
According to different night-vision function, you can
refer to the following connection drawing:
In the process of self-checking, camera will rotate
horizontally and slowly for one and half cycle to the
default original horizontal point which is set by factory, then upwardly turn to original vertical point, then
downwardly to original horizontal point. Lens will
be pulled from far focus to near focus to complete
self- checking. The whole camera is absolutely steady
means PTZ completed self-checking and ready to be
controlled.
If unstable, please refer to the troubleshooting in the
operation manual appendix.
Picture11. 9-1
CHANGE THIS TO WHAT THE PRODUCT IS AND COPY INTO THE MASTER PAGE A
51
12.Maintenance service terms
Warranty Repair
Product Returns
Genie CCTV will repair or replace any product that
fails within the terms of the limited warranty in
effect at the time of purchase. The warranty
commences from the date of invoice and varies
according to the product category.
Product can only be returned to Genie CCTV by
first obtaining a Return Material Authorisation
(RMA) number. This applies equally to product
returns, credit returns and advance replacements.
To obtain a RMA number simply telephone our
Customer Services Department and ask for a
Returns Number. They will ask for either the
original invoice number or the purchase order
number under which the goods were originally
supplied, the products serial number and request a
full description of the fault.
Returns will only be accepted from the customer
who originally purchased the goods from Genie
CCTV and the Returns Number must be clearly
stated on the packaging and accompanying
paperwork.
Goods under warranty will be repaired, replaced or
refunded in that order. Credit Notes will only be
issued if the goods cannot be repaired or replaced.
The value of the Credit Note will be as the original
invoice value.
Products must be returned with freight prepaid
within 30 days of obtaining a RMA number. Failure
to do so will invalidate the RMA number and the
Customer Services Department need to be contacted
to issue a new RMA number.
When returning goods please address them to:Genie CCTV, Customer Services Department,
CCTV House, City Park, Watchmead, Welwyn
Garden City, Hertfordshire AL7 1LT
Genie CCTV will reject unauthorised product
returns or freight charges relating to product
returns. Items received which have no valid RMA
number or are not listed on our RMA database will
be returned to sender at the senders expense.
For all warranty repairs Genie CCTV will provide,
free of charge, all necessary labour and materials.
The repaired product will be returned carriage paid
to the sender.
Non-Warranty Repair
If products are returned and found to be “out of
warranty” Genie CCTV will provide, upon request,
the customer with an estimate of the repair cost. If
the customer agrees to the cost of repair Genie
CCTV will require an authorised Purchase Order
from the customer to cover the repair.
Refunds
Genie CCTV only issue product refunds if we are
unable to repair or replace faulty items. This only
applies to products still within their warranty period.
Products Ordered in Error
Products ordered in error, or unwanted, can be
returned to Genie CCTV within 7 days of their
invoice date, but the following conditions apply:
A re-stocking charge of 20% will be applied, but the
returned item must be unused, returned complete
with all the original packaging and documentation,
unmarked and in saleable condition.
Goods “ordered in error” purchased in excess of the
above 7 day limitation shown above may also be
returned at the discretion of Genie CCTV. If
approved we will apply a re-stocking charge of 25%
All returned product will be evaluated by our
Technical Department to assess the warranty status
and the product operability. Customers will be
informed on the outcome of the evaluation process
52
CHANGE THIS TO WHAT THE PRODUCT IS AND COPY INTO THE MASTER PAGE A
Service Replacements
Advance Replacements
An advanced replacement is a new or like-new
product and carries a full warranty, as per the
relevant product category in the Product
Warranty table. Advanced replacements can
only be arranged for products purchased within
30 days from date of invoice.
Genie CCTV will ship out advance replacements
within the mainland United Kingdom on a next
business day service. An RMA number must be
obtained from our Returns Department - they
will need the original invoice number and a full
description of the fault in order to issue the
RMA number.
A Purchase Order must be raised to cover the
cost of the goods concerned plus any
applicable carriage costs. Genie will raise an
invoice for the replacements and carriage with
the customer RMA number quoted on the
invoice.
Upon receipt of the failing product it will be
fully tested and inspected, and if found to be
faulty and in warranty Genie CCTV will raise a
credit note for the advance replacement
invoice. If the product is found to be nondefective
it will be returned to the customer
and the invoice for the advance replacement
will remain outstanding.
It is vitally important that any returned product
is suitably packaged and it is the responsibility
of the sender to ensure that products are
correctly protected. Packaging must provide
sufficient mechanical protection for the
contents, with all parts packed securely inside.
Electrostatic protection should be used on
exposed electronic components e.g. PCB
Cameras.
Genie CCTV can provide a limited number of
Service Replacement items for certain product
categories; these being Genie Digital Video
Recorders, Genie Fully Functional Dome
Cameras and our range of Genie Professional
CCTV Monitors.
Service replacements are graded according to
age but none are more than two years old.
Requests for a service replacement can only be
progressed if Genie has the comparable
product available. Customers will be treated on
a “first come, first serve” basis.
Customers are expected to prioritise the return
of the failing product and we in turn will
expedite the repair, if under warranty, and
return of said product. If the returned product
is found to be out of warranty Genie will advise
the cost of repair.
If a service replacement is requested, Genie
will issue a Service Replacement Agreement
which must be completed and returned within
7- days.
Genie also require a purchase order to be
raised to the value of £500.00 (excluding Value
Added Tax), which will be held pending the
return of the Service Replacement. If the
Service Replacement is not returned within 14days, following the repair or replacement of
the original unit, Genie CCTV reserve the right
to invoice the goods using the associated
purchase order.
GENIE CCTV LTD.
CCTV House, City Park, Watchmead, Welwyn Garden City, Hertfordshire, AL7 ILT
Tel: +44 (0) 1707 330541 Fax: +44 (0) 1707 330543
www.geniecctv.com
Edition. GN-February 2015