1
National Energy Audit Tool (NEAT)
Users Manual (Version 8.2)
Draft Chapters 6 and 8
October 2006
Note: References in this draft manual in square brackets, “[ ],” are to sections in the
January 2006 publication of “The Weatherization Assistant Users Manual for
Administrative Features.” A reference of “XX” is to a section which does not yet
exist. All other references are to this document.
The NEAT Building Description
Chapter 6
The primary purpose of the Weatherization Assistant is to make energy
efficiency measure recommendations applicable to specific homes. This purpose is
fulfilled by gathering audit information on each dwelling and entering the information
into the program. This descriptive data on each dwelling is entered under one of the
Energy Audits buttons from the program Main Menu. For Version 8 of the
Weatherization Assistant, the audits available are NEAT for site built homes and
MHEA for manufactured, or mobile, homes.
You may initiate a new audit for a previously entered client in either of two
ways: (1) by selecting one of the Energy Audit buttons on the Main Menu, then
selecting the new record button,
, from the Audit Record Navigation Block (see
Section [4.1], Record Navigation); or (2) selecting the Client button on the Main
Menu, locating the client for which the audit is to be performed, selecting the Audit
tab, and then clicking on either “Create New Site Built (NEAT) Audit” or “Create
New Mobile Home (MHEA) Audit” (see Section [6.5], Audits (Client)), which ever
is appropriate for this specific dwelling. Either method will take you to a Audit
Information form for the respective audit type.
Since descriptive data for a site built home differs from that for a mobile home,
many of the tabs and fields under these two Audit Main Menu items also differ. This
chapter describes the data entered under the NEAT Main Menu item in describing a
site-build home. Chapter 7 does the same for data pertaining to a mobile home, as
found under the MHEA Main Menu item. Some information under the Audit Main
Menu items is common to both NEAT and MHEA. This data is described once in
Chapter 8. Specifically, data on the Status, Health and Safety, Itemized Costs, Utility
Bills, Photos, and Measures tabs will be described there. In addition, some optional
entries on the Heating tab and the Water Heaters form under the Baseloads tab will
also be described in Chapter 8.
6.1 Data Entry in NEAT
The building description contains all of the information needed to describe a
particular building to NEAT. Entry of this data is divided into component types, such
as walls, windows, attics, etc. Similarly, this chapter is divided into subsections, one
for each component type, each describing the data required to characterize a member
of that component type. Specifically for NEAT, this includes data under the Shell tab
10/06 Draft
Chapter Six • 1
The NEAT Building Description
and its sub-tabs (Walls, Windows, Doors, Unfinished Attics, Finished Attics, and
Foundations), as well as the Heating and Cooling tabs.
Form Views of each components’ input forms discussed are included in this
chapter. Blank input forms may be found in Appendix [A] under “NEAT Data
Collection Forms (Blank).” These forms can also be printed from within the
Weatherization Assistant (see Section [6.1], Client Information).
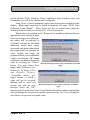
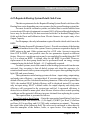
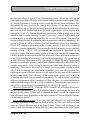
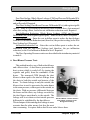
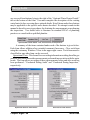
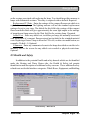
Entries whose description end in “Required” are mandatory and must have an
appropriate value entered in them
before you can proceed. Otherwise,
the entries will be indicated as
“Optional” and may be left blank
Numerical entries have ranges
associated with them within which
the program will not question the
value. Outside this range, the
program will ask you to confirm the
value by selecting the “OK” button
or indicate your intent to change the
value by selecting the “Cancel” Warning indicating a numeric entry is outside the “reasonable
range”
button. You may adjust these
ranges under Preferences (see
Section [11.2], Range Check
and Default Values).
“Acceptable values” give
ranges outside of which a
value will not be accepted.
Making such an entry will
Warning indicating a numeric entry is outside the “acceptable
present you with an error
range”
message. Select the “OK”
button to go back to the entry form. You will not be allowed to continue entering data
until you change the entry to an acceptable value or use the “Esc” key to change the
entry back to its previous acceptable value.
Chapter Six • 2
10/06 Draft
The NEAT Building Description
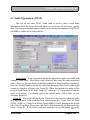
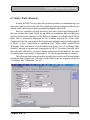
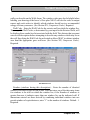
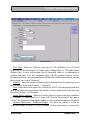
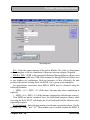
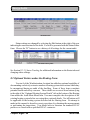
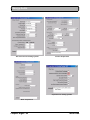
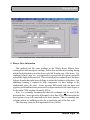
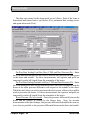
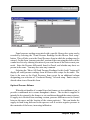
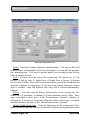
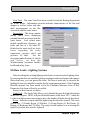
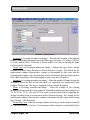
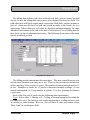
6.2 Audit Information (NEAT)
This tab on the main NEAT Audit form is used to enter overall audit
information about the house and what libraries to reference for non-house specific
data. Data entry items and controls visible on the form and common to both NEAT
and MHEA Audits are described below:
The Audit Information form (NEAT)
Audit Name – Some convention should be adopted to supply each audit with
a unique Audit Name. Most likely, each client will have only one audit associated
with it. However, the possibility of multiple audits for a client should be considered.
Since the Client ID must be unique for each client, the name of the client’s audit might
contain or somehow reference this Client ID. When first initiated, an audit will be
given an Audit Name of the form “Audit (#),” where the “#” is a number forcing the
name to be unique. You should replace this default name with a name of your
choosing. Required.
Client ID – This field will display the Client ID of the client for whom the audit
is being performed. If the audit has been initiated using the “Create New Site Built
(NEAT) Audit” or “Create New Mobile Home (MHEA) Audit” buttons on the Audits
tab of the Client Main Menu item, this field will automatically be filled with that
client’s Client ID. If, the audit is initiated using the new record button,
, in the
10/06 Draft
Chapter Six • 3
The NEAT Building Description
Audit Record Navigation Block on the form itself, the Client ID will remain the same
as the Client ID on the form prior to requesting the new audit. In this case, you may
have to use the combo box list associated with the Client ID field to choose the correct
client from those already in the database. When you do attempt to change the client,
you will get a warning, since changing the client associated with an existing audit is
not a normal operation. For a new audit, however, it is acceptable. The program
simply does not know that this is a new audit. Required.
Agency Name / State – These un-editable fields display the Name and State of the
Agency to which the Client whose house is being audited is assigned. The fields will
be automatically filled in to correspond to the agency assigned to the Client whose
audit is being performed, as displayed in the Client ID field immediately above.
Changing the Client ID will immediately update the Agency Name and State, if
needed.
Assigned To – Use the combo box list associated with this field to assign the
Auditor in your agency who will be responsible for the dwelling. The list will contain
only those contacts declared as Auditors on the Contacts tab of the Agency Main
Menu item corresponding to the agency responsible for the client. Required.
Conditioned Stories – Enter the number of conditioned stories. Include a finished
attic if the space is heated or cooled. Include a basement if it is heated or cooled and
a significant portion of its wall area is above-grade. You may enter a decimal (e.g.
1.5) for a split level or half story upstairs, though this degree of accuracy is normally
not necessary. The value is used to determine an approximate distance between the
lowest and highest points at which air infiltration can enter and exit the house. Default
- 1. Required.
Floor Area (sq ft) – Enter the approximate number of square feet of floor area that
is heated or cooled. Default - 1200. Required.
Billing Adjust – If selected and Pre-Retrofit Billing Data has been entered (see
8.11, Utility Bills), NEAT will compute adjusted measure savings estimates which
reflect this billed usage. Both unadjusted and adjusted results will be reported in the
Recommended Measure Report.
Impute Cooling – This entry was added to accommodate audits in extremely
southern climates where neither heating or cooling equipment is present in the house.
If selected, NEAT will “impute” cooling energy use assuming that an air-conditioner
with SEER given in Key Parameters is present in the house. The feature is designed
to allow installation of measures which could add to the occupants comfort even
though energy cannot be saved.
Chapter Six • 4
10/06 Draft
The NEAT Building Description
Selection of Setup and Supply Libraries Data Block
The following four entries tell the program what libraries to reference for nonhouse specific data used by the audit.
Setup Library – Select the Setup Library from which the audit is to take measure
costs, candidate measure information, and other key parameters. See Chapter [9],
Setup Library, for additional information on the contents of the Setup Library. When
you install the Weatherization Assistant on your computer, the installation routine will
automatically copy the default setup library to a library under the “Your Agency
Name” agency (which should have been renamed to be the name of your agency).
Thus, for this agency, there will be at least one Setup Library to choose from. You
may never have need for more than one Setup Library, making this selection a trivial
one. However, see Chapter [9] for more information on the use of multiple setup
libraries and the need to tailor the Setup Library copied from the default library to
reflect your local conditions. Required.
Fuel Cost Library – Select from the Fuel Cost Library combo box the entry which
contains the fuel costs to be used by the audit in calculating the dollar value of energy
savings. A Fuel Cost Library is a subset of data under the Setup Library. Thus, only
those fuel cost libraries under the chosen Setup Library will be available to choose
from. If you change the Setup Library to be used by the audit, the Fuel Cost Library
field will be automatically deleted, indicating the need to choose another entry, from
the new Setup Library. If you have more than one utility supplying a particular fuel
in your agency’s boundaries, you may need to have more than one fuel cost library
associated with your setup library. See Chapter [9], Setup Library, for more details.
Required.
Supply Library – Although the Supply Library is used primarily in applying the
optional feature of tracking your inventory (applied under Work Orders), the audit
uses entries in the Supply Library for replacement refrigerators and water heaters.
When you install the Weatherization Assistant on your computer, the installation
routine will automatically provide you with an empty supply library. This empty
supply library is sufficient to run the audit, although you will have no replacement
refrigerators or water heaters to choose from unless you populate the supply library
with these items. Unless an unusual situation arises, an agency will probably have
only a single supply library. Multiple libraries would make tracking of inventory
difficult because manual addition of the supplies in each supply library would be
necessary to derive the total items available in the agency’s inventory. See Chapter
[10], Supply Library, for more information on supply libraries. Required.
10/06 Draft
Chapter Six • 5
The NEAT Building Description
Weather File – The audit must be told what climatic data to use in estimating the
energy consumptions for the dwelling. Choose one of the approximately 220 weather
cities listed in the combo box. They are listed in alphabetical order, first by state, then
by city. You may wish to consider not only those cities in your state, but also cities
which lie in another state near a border with your state. Required.
Comment – Audit comments may be entered directly in the comment field on the
form. Or, select the Comment button to the left of the field, which will take you to the
Comment Editor. This text editor is similar to Window’s Notepad and may be used
to edit extended comments. The total comment may have up to 65,000 characters.
Text from other sources may be copied and pasted into the Comment Editor’s
window. The Audit Comment is displayed on the Recommended Measures Report
and the Input Report available from the Audit Report Block. You may also wish to
include the comment in a user-designed report. Optional.
Economics Summary Block – For audits which have already had NEAT or MHEA
produce recommendations, the Economics Summary block of data will display a
summary of these recommendations: the number of Measures Recommended, the
Total Initial Cost of these recommendations (using the audit’s estimated measure costs
prior to any modifications made in work orders to reflect actual costs), and the Life
Cycle Savings to Investment Ratio (SIR) for all the recommended work on the house.
If the audit has not yet been run on the house, the number of Measures Recommended
will be “0" and the other fields will be blank. All of the fields within the Economics
Summary block are un-editable.
Run Audit Button / Block – After completely describing the house to the audit with
data entered under the tabs visible on the main audit forms, use the “Run Audit”
button to have the audit perform its calculations and produce energy efficiency
measure recommendations for the home. Within the same data block as the Run Audit
button are un-editable fields showing the date and time the currently accessed audit
was “Last Run On.” If the audit has not yet been run for this specific house
description, the date field will display “Not Run.” An audit on a house may be run
any number of times, but the recommendations from any previous runs will be
overwritten. If you wish to run an audit on a house again, but save the
recommendations from a previous audit on the same house, use the “Copy” button in
the Audit Record Navigation Block in the lower left corner of the form to copy the
house description. Then, give the new house description a new Audit Name (possibly
a variant of the original name), make any modifications to the house description
desired, then use the Run Audit button to produce another set of recommendations.
Chapter Six • 6
10/06 Draft
The NEAT Building Description
The Run Button is available from all Audit forms and may be activated from any of
these forms once it has been decided that the building description is complete.
Audit Record Navigation Block – The Record Navigation block in the lower left
corner of the form allows you to find, copy, delete, and navigate to existing audits in
your database or to create new audits. See Section [4.1], Record Navigation, for
information on using the Weatherization Assistant’s Record Navigation Blocks. The
combo box lists will display only the audits associated with the Agency currently
selected (bookmarked) on the Agency Information tab under the Agency Main Menu
item. Normally the agency selected on this tab is your agency, so the combo box lists
will display only your agency’s audits. If you have more than one agency defined in
your database (e.g., your agency and the Sample Agency) and you want the combo
box lists to display audits from all defined agencies, un-check the “Use the last
bookmarked Agency record to filter find record lists,” feature 9 from the Preferences
/ Features tab (see the indicated top in Section [11.4], Features).
Audit Report Block – The Audit Report Block located in the lower right corner of
the NEAT and MHEA Audit Information forms allows access to the various reports
available in the audit: (1) Recommended Measures, available only after an audit has
been “Run;” (2) Input Report, summarizing all building description data entered in the
audit as well as a summary of the Client data; (3) Heating System Summary,
extracting only the Heating System information supplied to the audit; (4) Pressure
Diagnostics Report / Form; and (5) the Health and Safety Summary, available if any
health and safety issues were identified on any of the audit forms. Appendix A,
Sample Reports, contains examples of these reports and forms. See Section [4.13], The
Report Block, for the mechanics of using the Weatherization Assistant’s Report
Blocks.
If you have selected the third party photo browser check box (Feature 2) on the
Preferences/ Features tab, a Photo Folder field will appear on your Audit Information
form just below the “Selection of Setup and Supply Libraries” data block. Use the
Browse button to the right of this field to locate and select a location on your
computer in which you have stored digital photos for this specific audit. Once
selected, this location will be displayed in the Photo Folder field and remain there for
all subsequent visits to this audit’s data. Selecting the View button will present you
with a photo browser in which you may view and edit these photos. See Section
[13.1], Digital Photos for more information on viewing and editing photos. Note that
the ability to store digital photos also exists at the Client level. You should develop
a consistent policy regarding where you store reference to your photos.
10/06 Draft
Chapter Six • 7
The NEAT Building Description
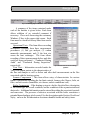
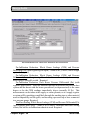
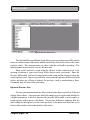
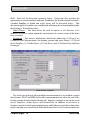
6.3 Shell - Walls (Exterior)
In order for NEAT to save data and execute to produce recommendations, you
must enter data for at least one wall. This could represent an apartment with only one
outside wall, with no heat transfer assumed through the other walls.
However, normally you will describe at least one exposed wall facing each of
the four cardinal directions. Walls having different orientations differ in their heat
transfer characteristics because of the different amounts of sunlight which fall on
them. This is particularly important for the windows that may lie on the walls.
Another criterion for separating walls of a home into multiple component descriptions
in NEAT is their construction or insulation level. Walls which would benefit
differently from installation of wall insulation or whose cost of insulating differ
should be entered as separate wall components in NEAT. In order to describe all of
the walls most efficiently, you may combine multi-storied walls that have the same
orientation and construction. A maximum of 18 wall descriptions may be entered.
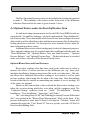
The following data items are used to describe each exterior wall having unique
orientation and construction. All items on the Walls form are required except the
“Comment” and “Additional Cost ($).”
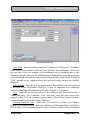
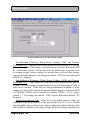
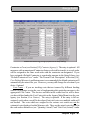
The Walls form
Chapter Six • 8
10/06 Draft
The NEAT Building Description
Wall Code – The user-supplied wall codes identify wall sections to you and the
computer. The codes may have up to twenty characters. However, space restrictions
in many reports suggest a lesser number of characters (perhaps three to five) to
preserve readability. Entries are not case-sensitive. The codes must be unique for all
wall descriptions within a given audit. Default wall codes are of the form “WL#”
where the “#” is an integer insuring uniqueness of the code. You may wish to include
characters in the code which indicate orientation, exposure, or some other
characteristics. The wall code allows NEAT to subtract the correct window and door
areas, entered in the Windows and Doors screens, from the corresponding wall area.
The wall codes may also be helpful when labeling your drawing of the house’s floor
plan. NEAT will use the codes in output reports and work orders to identifying which
walls should receive recommended insulation. (See Section XX, Component Codes).
Required.
Orientation – Enter the closest cardinal compass direction the component faces,
either North , South, East, or West. Required.
Area (sq.ft.) – Enter the total gross wall area in square feet of each wall segment,
including the windows and doors in that wall area. Values to the nearest ten square
feet are normally sufficient. Inaccuracy in this entry will mostly affect the quantity of
wall insulation reported as needed should wall insulation be recommended. A decimal
point is optional. This entry must be greater than zero. Required.
Measure # – The Measure Number divides the wall segments of a home into
groups, each group receiving a separate single SIR for insulating the walls of the
group. Give the same measure number to all walls you wish to be so grouped together.
If all walls of a home are of consistent construction, you will likely want to obtain a
single SIR for insulating all walls. In such a case, give all walls Measure Number 1.
Reasons for giving some walls a different measure number might be differing existing
insulation levels, differing costs for insulating, or differing Exposures. Frame walls
with existing batt or blown (including “Other”) insulation and all non-frame walls will
be automatically dropped from a group unless the Added Insulation type for these wall
segments is “User Type 2” (or whatever the user has defined this type to be). Walls
which have been designated as un-insulatable (having an Added Insulation Type of
“None”) will also be automatically dropped from a group. (See “Added Insulation
Type.”) Measure numbers of groups must be consecutive, starting with “1.” For
example, a group “3” cannot be assigned unless groups “1” and “2” already exist. (See
Sections XX and, Component Codes and Measure Numbers). Required.
Wall Exposure – The Exposure tells NEAT what conditions exist on the outside
of the wall. NEAT gives you three choices: (1) Exposed to the outside air, (2)
10/06 Draft
Chapter Six • 9
The NEAT Building Description
Buffered by an unconditioned but enclosed space (for example, a garage or porch), or
(3) adjacent to an unconditioned Attic. A wall adjacent to an unconditioned attic may
be described either here or as a “Kneewall” under the Finished Attic tab. Required.
Exterior Type – Select the type of siding on the exterior surface of the wall, not the
framing material or load-bearing structure. The six choices are: (1) Wood, (2) Metal
or Vinyl, (3) Stucco, (4) Brick or Stone, (5) None, and (6) Other. The thermal
characteristics of the “Other” selection are defined in the Setup Library (see [9.2]).
NEAT assumes a layer of wood sheathing under the siding. Required.
Wall Type – NEAT asks for the type of load-bearing structure. The five choices
are: (1) Balloon Frame, (2) Platform Frame, (3) Masonry, Stone, (4) Concrete Block,
(5) Adobe, (6) Other. NEAT does not differentiate between “Balloon frame” and
“Platform frame” Wall Types. The thermal characteristics of the “Other” selection are
defined in the Setup Library (see [9.7]). Only the “User Type 2" Added Insulation
Type will be considered for non-frame walls or frame walls with existing batt or
blown insulation. (See Added Insulation Type, below.) Required.
Existing Insulation Type and R Value – Enter the type and R-Value of existing
insulation found (inspect an electrical outlet, a drilled hole, or some other penetration).
The six choices for the Type are: (1) None, (2) Blown Cellulose, (3) Blown Fiberglass
(4) Rockwool, (5) Fiberglass Batts, (6) Polystyrene Board, and (7) Other. The thermal
characteristics of the “Other” selection are defined in the Setup Library (see [9,2], Key
Parameters). The default R-values displayed in the status bar assume a 3 ½ inch
cavity and a standard R-value/inch for the insulation type indicated by the user. If both
cavity insulation and exterior sheathing insulation are present, their R-values should
be added to provide input for this field. Adding insulation to a frame wall will be
considered only if “None” or “Polystyrene Board” is specified as the Existing
Insulation Type. If “None” is chosen for the Type, the associated R Value field will
not appear. Required.
Added Insulation Type – Indicate to NEAT the type of wall insulation you would
expect to use to insulate the wall if the recommendation is made. NEAT currently
allows entries of: (1) None, (2) Blown Cellulose, (3) User Type 1, and (4) User Type
2. Select “None” if conditions prohibit insulating this particular wall segment. The
User Types of insulation are defined by the user under the User Define Insulation
Types tab on the Setup Library form (see Section [9.7], User Defined Insulation
Types). Following their definition, the names you enter there for these types of
insulation will be displayed here as well as in all reports, instead of the “User Types”
designation. The R-Values added to the wall cavity for these two types are also
entered in the Setup Library. Only User-Type 2 insulation will be considered being
Chapter Six • 10
10/06 Draft
The NEAT Building Description
added to a frame wall with existing batt or blown (including “Other”) insulation or to
non-frame walls. Required.
Additional Cost ($) – Enter any added costs necessary to insulate this specific wall
segment not normally associated with the wall insulation measure and, therefore, not
accounted for in the measure costs in the Setup Library (see Section [9.5], Library
Measures). For instance, enter additional labor costs for removing and repairing an
unusual siding type. The cost is a total added dollar cost for this specific wall
segment, not a cost per square foot of wall. The amount will be added to the cost
computed from the wall area and cost per square foot specified under the Library
Measures tab of the Setup Library. A blank entry indicates no additional cost. Default
- 0. Optional.
Comments – Comments may be entered directly in the comment field on the form.
Or, select the Comment button to the left of the field, which will take you to the
Comment Editor. This text editor is similar to Window’s Notepad and may be used
to edit extended comments. The total comment may have up to 65,000 characters.
Text from other sources may be copied and pasted into the Comment Editor’s
window. Audit component comments are displayed on the Audit Recommended
Measure Report and the Input Report. In addition, all audit comments are made
available to Work Orders for importing to any specific work order (see Section [8.1],
Work Order Information). Thus, you may wish to enter comments related to any
observations made during the audit which might effect the installation of measures or
repair work that is needed. If an “Additional Cost” has been specified for insulating
the wall, this comment could be used to briefly explain the cost. Optional.
Windows on this Wall – Selecting this button will take you to a Data Sheet View
(see Section [4.8], Data Sheet and Form Views of Records) displaying only those
windows lying on the wall you are currently accessing. Except for this restriction the
display is the same as if you had chosen the Data Sheet View from the Windows subtab from the Shell tab of the NEAT Audit (see Section 6.4, Shell - Windows). There
is one other limitation. Execution cannot be initiated from this form. You are free to
make any modifications to the window description from this form just as you would
from the main Windows form. You may even choose to go to the Form View for a
specific window, though you cannot initiate execution or navigate to other
components from this form.
Doors on this Wall – This button behaves in an analogous manner as the
“Windows on this Wall” button described above except it allows you to view the
doors lying on the wall being accessed. See the description immediately above.
10/06 Draft
Chapter Six • 11
The NEAT Building Description
Wall Record Navigation Block – The Wall Record Navigation Block may be used
to find and access existing wall descriptions for the audit being edited, copy or delete
the currently accessed wall description, or initiate a new wall description for the audit.
See Section [4.1], Record Navigation, for information on using the Weatherization
Assistant’s Record Navigation Blocks.
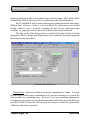
6.4 Shell - Windows
The Window form contains information needed to describe different window
types. Each screen describes a specific type with given dimensions, shading,
construction, etc. Windows of the same type and size on the same wall segment may
be entered on a single record. In the Number of Windows field, indicate how many
windows have this description.
A total of twenty-four window descriptions may be entered. If the twenty-four
window records are not enough to describe all the windows, you can combine
windows of the same height on the same wall by adding their widths in inches and
then recording them as one window on one line. You can also combine two or more
windows by adding their widths together and then averaging their heights (add the
heights together and divide by the number of windows). In both cases, you would
enter the combined width with the average height.
Be careful when adding or averaging window dimensions. Window treatments
may be priced either by dimension or unit. As a result, if unrealistically large pseudowindows have been described to NEAT by adding dimensions of individual windows,
and window treatment measures have been priced by unit, erroneous SIRs will be
reported for these window treatment measures.
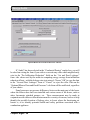
The following data items are used to describe each window description. All but
the “Comment” are required.
Window Code – The user-supplied window codes identify window descriptions
you enter to you and the computer. The codes may have up to twenty characters.
However, space restrictions in many reports suggest a lesser number of characters
(perhaps three to five) to preserve readability. Entries are not case-sensitive. The
codes must be unique for all window descriptions within a given audit. However, if
more than one window meets the description given, you may enter the description
once and indicate the number which are so described. Default window codes are of the
form “WD#” where the “#” is an integer insuring uniqueness of the code. You may
wish to include characters in the code which indicate orientation or some other
characteristics. The window code allows NEAT to assign window areas to specific
Chapter Six • 12
10/06 Draft
The NEAT Building Description
walls you describe on the Walls forms. The window codes may also be helpful when
labeling your drawing of the house’s floor plan. NEAT will use the codes in output
reports and work orders to identify which windows should receive recommended
energy efficiency measures. (See Section XX, Component Codes). Required.
Wall Code – Enter the Wall Code for the exterior wall on which the window lies.
The acceptable Wall Codes, as determined by your input for the Exterior Walls, will
be displayed in a combo-box list associated with the field. This dictates that you must
enter a wall description before attempting to describe any windows which may lie on
the wall. Specifying the Wall Code for each window allows NEAT to subtract window
area from the appropriate gross wall area. (See Section XX, Component Codes).
Required.
The Windows form
Number (windows having this description) – Enter the number of identical
windows described by this record of data. Note that since one of the data entry items
for windows is the wall on which the window lies, if the Number of windows is
greater than one, it indicates more than one window lies on the indicated wall. If
dimensions entered are those derived by combining individual windows into one
pseudo-window of equivalent area, enter “1” as the number of windows. Default - 1.
Required.
10/06 Draft
Chapter Six • 13
The NEAT Building Description
% Shaded – Enter the approximate percentage of window area frequently shaded
by eaves (typically 20 percent), porches (typically 100 percent), or other exterior
barriers. Do not enter the % sign. Default - 20. Required.
Width and Height – Enter the width and height in inches of the window being
described. NEAT will use these dimensions to estimate the glazing area of the
window. NEAT will also use these dimensions to compute the area of the window to
subtract from the appropriate wall area. For most windows, these dimensions can be
the same as those of a retrofit window or storm window. If so entered, the auditor can
refer to these dimensions if either of these measures prove to be cost-effective.
Otherwise the required dimensions may be entered into the Comments field, which
can then be copied to work orders, if desired.
Frame Type – Select the correct window frame and sash construction materials.
The three choices are: (1) Wood or Vinyl, (2) Metal, and (3) Improved metal (metal
frame with a thermal break).
Glazing Type – Select the window glazing types, depending on the number of
panes of glass in the primary window and the characteristics of any storm window that
may cover the primary window. The five choices are: (1) Single, (2) Single with wood
storm, (3) Single with metal storm (4) Double pane, and (5) Single with bad storm.
NEAT treats “Single with bad storm” as a single pane window without a storm. The
entry is for the auditor’s sue in conveying additional information.
Retrofit Options – Provides you with five options indicating different approaches
to retrofitting the window: (1) Evaluate All. Allows NEAT to determine the most costeffective approach , including possibly no action at all. (2) Weatherize. Indicates your
decision to weatherize the window using caulk, weatherstripping, incidental repair,
etc. (3) Replace. Due to damage beyond repair, you have decided that the window
must be replaced. (4) Add Storm. (5) Evaluate None. For all but the first selection,
NEAT views the action chosen as mandatory, producing a recommendation regardless
of the SIR and not considering the other options. However, an estimated energy
savings and SIR will still be determined. If the SIR is less than the accepted minimum,
the action will have to be considered a repair.
Leakiness – Provide an estimate of the air leakiness of the window being
described. The five choices are: (1) Very Tight, (2) Tight, (3) Medium, (4) Loose, and
(5) Very Loose. Typical categories by window type are listed below. Additional
guidance in the selection of the leakiness category can be found in Appendix XX.
Degrade the leakiness description one level if the window panes themselves have
become significantly loose in their mounting and/or a small (i.e. half-dollar-sized)
piece of window is broken out. Degrade the leakiness two levels if there is a larger
Chapter Six • 14
10/06 Draft
The NEAT Building Description
hole in a window pane and/or an entire pane is missing. Upgrade the leakiness
description one level if a storm window in average or better condition is installed.
Required.
Fixed windows – The leakiness of a typical fixed window is Very Tight.
Casement Windows – The leakiness of a typical casement window is Very Tight.
Single- or double-hung (vertical slider) windows – The leakiness of a typical nonwood vertical slider window is Tight and the leakiness of a typical wood window
found in older homes is Medium.
Horizontal slider windows – The leakiness of a typical horizontal slider window
is medium.
Jalousie windows – The leakiness of a typical jalousie window is Loose.
Awning and hopper windows (casement design)– The leakiness of a typical awning
and hopper window that are like casement windows is Very Tight.
Awning and hopper windows (awning design)– The leakiness of a typical awning
window that is like a jalousie window is Medium.
Comments – Comments may be entered directly in the comment field on the form.
Or, select the Comment button to the left of the field, which will take you to the
Comment Editor. This text editor is similar to Window’s Notepad and may be used
to edit extended comments. The total comment may have up to 65,000 characters.
Text from other sources may be copied and pasted into the Comment Editor’s
window. Audit component comments are displayed on the Audit Recommended
Measure Report and the Input Report. In addition, all audit comments are made
available to Work Orders for importing to any specific work order (see Section [8.1],
Work Order Information). Thus, you may wish to enter comments related to any
observations made during the audit which might effect the installation of measures or
repair work that is needed. Reasons for selecting a particular Retrofit Option for this
window description would be an appropriate comment. Optional.
Window Record Navigation Block – The Window Record Navigation Block may
be used to find and access existing window descriptions for the audit being edited,
copy or delete the currently accessed window description, or initiate a new window
description for the audit. See Section, Record Navigation, for information on using the
Weatherization Assistant’s Record Navigation Blocks.
10/06 Draft
Chapter Six • 15
The NEAT Building Description
6.5 Shell - Doors
Storm doors or replacement doors are not evaluated within NEAT because they
are normally not cost-effective measures, based solely on heat conduction savings.
Storm doors or replacement doors may, however, be considered as repair items related
to weatherization or as part of the air-leakage reduction work. If installed, their cost
could be entered as part of the Infiltration Reduction Cost (see Section 8.3, Ducts and
Infiltration) or a repair cost entered on the Itemized Costs form (see Section 6.10,
Itemized Additional Costs and User-Defined Measures).
NEAT subtracts door area from the wall area and figures heat loss from the wall
and door separately. If the door area is very small compared with the total wall area,
you may consider neglecting it. If wall insulation becomes a recommended measure,
however, the area of any doors not described here will be seen as wall area in the cost
calculations for wall insulation. Each door must be associated with a previously
defined wall. A maximum of ten doors (for all walls) can be entered per house.
Door data are presented in the following order:
Door Code – The user-supplied door codes identify doors you enter to you and the
computer. The codes may have up to twenty characters. However, space restrictions
in many reports suggest a lesser number of characters (perhaps three to five) to
preserve readability. Entries are not case-sensitive. The codes must be unique for all
doors within a given audit. However, if more than one door meets the description
given, you may enter the description once and indicate the number which are so
described. Default door codes are of the form “DR#” where the “#” is an integer
insuring uniqueness of the code. You may wish to include characters in the code
which indicate orientation or some other characteristics. The door code allows NEAT
to assign door areas to specific walls you describe on the Walls forms. The door codes
may also be helpful when labeling your drawing of the house’s floor plan. (See
Section XX, Component Codes). Required.
Wall Code – Enter the Wall Code for the exterior wall on which the door lies. The
acceptable Wall Codes, as determined by your input for the Exterior Walls, will be
displayed in a combo-box list associated with the field. This dictates that you must
enter a wall description before attempting to describe any door which may lie on the
wall. Specifying the Wall Code for each door allows NEAT to subtract door area from
the appropriate gross wall area. (See Section XX, Component Codes). Required.
Chapter Six • 16
10/06 Draft
The NEAT Building Description
The Doors form
Door Type – Select one of the five door types: (1) Wood Hollow Core, (2) Wood
Solid Core, (3) Steel Insulated, (4) Single (pane) Sliding Glass, or (5) Double (pane)
Sliding Glass. A door with glazing may be described either as a combination of
window and door or as the component type with the greatest fraction of area.
Normally door areas are small compared with the total window and wall area, making
the decision less critical. Required.
Number – Enter the number of identical doors that match the description given on
the remainder of the form. Default - 1. Required.
Area - Enter the area, in square feet, of the door. NEAT will compute the total door
area, as the door area entered times the number of doors indicated for the door type
described. Default - 20. Required.
Storm Door Condition – Enter one of three choices for the storm door condition:
(1) Adequate, (2) Deteriorated, or (3) None. NEAT treats “Deteriorated” the same as
“None,” the distinction allowing the auditor to convey added information. Required.
Optional Dimensions - Width and Height – Use these two entries to record the
width and height, in inches, of door openings, if door replacement or storm door
10/06 Draft
Chapter Six • 17
The NEAT Building Description
installation is needed as a repair item. Otherwise, the fields may be left blank. The
dimensions are for reference and are not used in NEAT calculations. Optional.
Comments – Comments may be entered directly in the comment field on the form.
Or, select the Comment button to the left of the field, which will take you to the
Comment Editor. This text editor is similar to Window’s Notepad and may be used
to edit extended comments. The total comment may have up to 65,000 characters.
Text from other sources may be copied and pasted into the Comment Editor’s
window. Audit component comments are displayed on the Audit Recommended
Measure Report and the Input Report. Optional.
Door Record Navigation Block – The Door Record Navigation Block may be used
to find and access existing door descriptions for the audit being edited, copy or delete
the currently accessed door description, or initiate a new door description for the
audit. See Section [4.1], Record Navigation, for information on using the
Weatherization Assistant’s Record Navigation Blocks.
6.6 Shell - Unfinished Attics
You may describe as many as seven unfinished attic areas to NEAT, though
many houses will require only one. Some homes have had additions built onto them
which may have attic areas which differ in characteristics from the attic of the original
home. Use the Finished Attic form to describe any components of a finished attic, i.e.
an attic area which contributes to the conditioned area of the home. Numerous fields
on the unfinished attic form are also on the finished attic form.
Data regarding unfinished attics are presented in the following order:
Attic Code – The user-supplied attic codes identify attic components to you and
the computer. The codes may have up to twenty characters. However, space
restrictions in many reports suggest a lesser number of characters (perhaps three to
five) to preserve readability. Entries are not case-sensitive. All codes for the
UNFINISHED and FINISHED attic components must be unique for a specific house.
Default unfinished attic codes are of the form “A#” where the “#” is an integer
insuring uniqueness of the code. The attic code may be helpful when labeling your
drawing of the house’s floor plan. NEAT will use the codes in output reports and work
orders to identifying which attics should receive recommended insulation. (See
Section XX, Component Codes). This field is found in both the Unfinished and
Finished Attic forms. Required.
Chapter Six • 18
10/06 Draft
The NEAT Building Description
The Unfinished Attic form
Attic Type – Enter one of three choices: (1) Unfloored, (2) Floored, (3) Cathedral
/ Flat. NEAT does not treat “Unfloored” and “Floored” attics differently. However if
the attic has a floor, an estimate of the additional cost of insulating due to this
obstruction may be entered in the column marked Additional Cost and the restriction
on the total depth of insulation may be entered into the Max. Depth field. “Cathedral
/ Flat” pertains to any segment where the roof and ceiling surfaces are parallel.
Required.
Joist Spacing – Enter the joist spacing in inches. This number is for reference and
is not used in the calculations. However, it may be important to an insulation
contractor installing batt insulation in the attic. Default - 24. Required.
Area – Enter the area in square feet of the ceiling or attic floor that borders a
conditioned space. For “Cathedral / Flat” attic areas, enter the actual area of the
slopped ceiling. This value must be greater than 0. This field is found in both the
Unfinished and Finished Attic forms. Required.
Existing Insulation Type – Enter one of six choices: (1) None, (2) Cellulose
Blown, (3) Fiberglass Blown, (4) Rockwool Blown, (5) Fiberglass Batts, or (6) Other.
Select “None” if no insulation already exists, in which case the Existing Insulation
10/06 Draft
Chapter Six • 19
The NEAT Building Description
Depth field will automatically disappear. The R’s per inch for the “Other” insulation
type may be specified by the user in the Setup Library. This field is found in both the
Unfinished and Finished Attic forms. Required.
Existing Insulation Depth – Enter the average depth of existing insulation, in
inches, found in this attic segment. Compression around eaves may be ignored. This
field will disappear if “None” is chosen for the Existing Insulation Type. This field
is found in both the Unfinished and Finished Attic forms. Required.
Measure # – The Measure Number divides the attic segments (if more than one
exists) of a home into groups, each group receiving a separate recommendation and
SIR for insulating the attics of the group. Give the same measure number to all attics
you wish to be so grouped together. If only one attic exists or all attics of a home are
of consistent construction, you will likely want to obtain a single recommendation and
SIR for insulating the attics. In such a case, give all unfinished attics Measure
Number 1. If the home has one or more additions and the unfinished attics in these
additions have differing existing insulation levels, costs for insulating, or restrictions,
give them different measure numbers. Each attic will then receive the insulation
recommendation most cost-effective in light of its existing condition. Measure
numbers must be consecutive, starting with “1.” For example, a group “3” cannot be
assigned unless groups “1” and “2” already exist. (See Sections XX and, Component
Codes and Measure Numbers). This field is found in both the Unfinished and Finished
Attic forms. Required.
Added Insulation Type – Select the type of insulation to be added to the attic area
should insulation be recommended: (1) None, (2) Cellulose Blown, (3) Fiberglass
Blown, (4) User Type 1, and (5) User Type 2. Select “None” if conditions prohibit
insulating the attic. “User Type 1" and “User Type 2" insulation types are defined by
the user under the User Defined Insulation Types tab on the Setup Library form.
Following their definition, the names you enter there for these types of insulation will
be displayed here as well as in all reports, instead of the “User Types” designation.
The R’s per inch for these two types are also entered in the Setup Library (see Section
[9.7], User-Defined Insulation Types). Unless entries are present in either the Added
R Value of Max Depth fields, the standard levels or R-Value (11, 19, 30, and 38) will
be considered for the type chosen, with the most cost-effective recommended. This
field is found in both the Unfinished and Finished Attic forms. Required.
Added R Value – If you wish NEAT to evaluate only a specific R-value of added
attic insulation, enter the R-Value in this field. If left blank, NEAT will determine the
most cost-effective level for you. If entered, all other levels will be ignored and the
addition of the specified level will be considered mandatory. WARNING: If the
Chapter Six • 20
10/06 Draft
The NEAT Building Description
specified level proves not to be cost-effective, its addition will still be listed with the
recommended measures. In such cases, it would be wise to run NEAT again, allowing
the program to choose a cost-effective level, if one exists. This entry might be used
if state codes dictate specific attic insulation levels. NEAT will hide this field if you
have entered “None” for added insulation type. This field is found in both the
Unfinished and Finished Attic forms. Optional.
Max. Depth – If there is a restriction to the depth of insulation which can exist in
an attic, enter the depth (existing PLUS added), in inches, in this field. If no restriction
exists, leave the field blank. It is expected that the insulation depth will be restricted
at the eaves though it may be virtually unrestricted toward the interior of the attic. For
floored attics, this depth will usually be the height of the attic floor joists (3 ½ in. or
5 ½ in.). If the space is greater than 15 inches, NEAT assumes unlimited insulation
may be added. If a maximum depth restriction has been indicated for a particular attic
segment, NEAT will evaluate not only adding the standard levels (R-11, R-19, R-30,
and R-38) which will fit into the cavity, but also the level of insulation to exactly fill
the attic cavity. Insulation costs use interpolations between costs of installing the
standard levels, as given by the User in the Setup Library. NEAT will hide this field
if you have entered “None” for added insulation type. This field is found in both the
Unfinished and Finished Attic forms. Optional.
Additional Cost – Enter any additional costs not normally associated with
installation of attic insulation. These might include the cost for cutting an opening into
the attic or for insulating beneath an attic floor. The value is a lumped dollar amount,
not per square foot. The amount will be added to the cost computed from the product
of the area and cost per square foot specified under the Library Measures tab of the
Setup Library. NEAT will hide this field if you have entered “None” for added
insulation type. This field is found in both the Unfinished and Finished Attic forms.
(Optional.)
Comments – Comments may be entered directly in the comment field on the form.
Or, select the Comment button to the left of the field, which will take you to the
Comment Editor. This text editor is similar to Window’s Notepad and may be used
to edit extended comments. The total comment may have up to 65,000 characters.
Text from other sources may be copied and pasted into the Comment Editor’s
window. Audit component comments are displayed on the Audit Recommended
Measure Report and the Input Report. In addition, all audit comments are made
available to Work Orders for importing to any specific work order (see Section [8.1],
Work Order Information). Thus, you may wish to enter comments related to any
observations made during the audit which might effect the installation of measures or
10/06 Draft
Chapter Six • 21
The NEAT Building Description
repair work that is needed. If you have specified a specific Added R Value, a Max.
Depth, or an “Additional Cost” for insulating the attic, this comment could be used to
briefly explain why such conditions exist. Optional.
Unfinished Attic Record Navigation Block – The Unfinished Attic Record
Navigation Block may be used to find and access existing attic descriptions for the
audit being edited, copy or delete the currently accessed attic description, or initiate
a new attic description for the audit. See Section [4.1], Record Navigation, for
information on using the Weatherization Assistant’s Record Navigation Blocks.
6.7 Shell - Finished Attics
Use the Finished Attics form to describe components of a finished attic, i.e., an
attic which contributes to the conditioned space of the home. Four types of finished
attic components can be described to NEAT: the outer ceiling joist, the collar beam,
kneewall, and roof rafter (see Attic Area Type, below). You may enter as many as 16
components in any combination of the four types.
The entries on the Finished Attic form
are similar to those for the Unfinished Attic.
Refer to Section 6.6, Unfinished Attics, for
descriptions of the majority of fields.
However, the following items should be
noted:
1. No Attic Floor Type is entered for the
kneewall or roof rafter since these
components cannot be floored or unfloored.
Finished Attic Area Types
2. No Measure Number is requested for the
kneewall. Insulation of a kneewall is
automatically ranked separately.
3. The Added Insulation Type for the kneewall is assumed to be an R-13 faced
fiberglass batt.
4. It is safer not to group finished attic sections because an insulation depth restriction
for one will be applied to all segments grouped together.
5. If “None” is selected for the type of either the existing or added insulation, the
corresponding depth entry will be hid.
Chapter Six • 22
10/06 Draft
The NEAT Building Description
The only entries which have been added to or altered from the Unfinished Attic
form are the following:
Attic Area Type – Choose from the following four area types: (1) Outer Ceiling
Joist, (2) Collar Beam, (3) Kneewall, and (4) Roof Rafter.
Attic Floor Type – This entry is analogous to the Attic Type on the Unfinished
Attics form. It differs in that the “Cathedral/Flat” option has been eliminated. Such
attic areas on the Finished Attics form would be entered as Roof Rafter segments. The
remaining options are (1) Unfloored and (2) Floored. This field will disappear for
Attic Area Types of Kneewall and Roof Rafter.
Finished Attic Record Navigation Block – The Finished Attic Record Navigation
Block may be used to find and access existing finished attic components for the audit
being edited, copy or delete the currently accessed finished attic component, or initiate
a new finished attic component for the audit. See Section [4.1], Record Navigation,
for information on using the Weatherization Assistant’s Record Navigation Blocks.
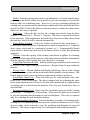
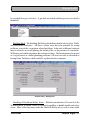
6.8 Shell - Foundations
The Foundations tab is used to describe basements (finished and unfinished),
crawl spaces, slab-on-grade foundations, and floors exposed to the outside air.
Basements and crawl spaces are assume to have concrete block walls, though other
cementitious materials will likely have similar
characteristics.
Data entries used to describe foundation spaces
are presented as follows:
Foundation Code – The user-supplied foundation
codes identify foundation spaces to you and the
computer. The codes may have up to twenty
characters. However, space restrictions in many
reports suggest a lesser number of characters (perhaps
three to five) to preserve readability. Entries are not
case-sensitive. The codes must be unique for all
foundation space descriptions within a given audit.
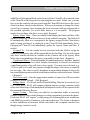
Foundation Spaces include
basements and crawl spaces
Default foundation space codes are of the form “F#”
where the “#” is an integer insuring uniqueness of the
code. You may wish to include characters in the code which indicate the foundation
space type or some other characteristics. The codes may also be helpful when labeling
your drawing of the house’s floor plan, particularly if there are more than one
10/06 Draft
Chapter Six • 23
The NEAT Building Description
foundation space. NEAT will use the codes in output reports and work orders to
identify which spaces should receive recommended energy efficiency measures. (See
Section XX, Component Codes). Required.
Foundation Type – Enter one of seven choices for the foundation space type: (1)
Conditioned (means the space has active thermostat control); (2) Non Conditioned
(the space is enclosed but with no sources of heat other than conduction through walls
and floors); (3) Vented Non Conditioned (the area is vented directly outdoors); (4)
Unintentionally Conditioned (a furnace, water heater, or other heat source may add
heat “unintentionally,” but there are no heating registers or radiators in the space); (5)
Uninsulated Slab; (6) Insulated Slab; and (7) Exposed floor (an overhang or house on
stilts). Required.
The Foundations form
Certain Foundation Space types do not require data in all fields of this component
type while others do. For example, the Slab foundation type requires only a Floor
Area and Perimeter Length while the Non Conditioned type requires all fields. If,
through editing an existing component entry, the Type is changed from one not
requiring certain fields to one which requires these same fields, a warning will appear
when you attempt to leave the Foundation Space screen indicating a need to supply
the required data. Exiting will not be permitted until the missing entries are supplied.
Chapter Six • 24
10/06 Draft
The NEAT Building Description
Foundation Insulation Options – Indicate how you wish NEAT to consider
insulating the foundation space. The choices are: (1) Evaluate Neither (do not consider
either floor or wall insulation for the space), (2) Floor and Wall (allow NEAT to
determine the most cost-effective of the two insulation strategies, (3) Floor Only, and
(4) Wall Only. Regardless of the option chosen, NEAT will still not recommend a
foundation insulation measure which does not meet the minimum SIR test. Some
Foundation Types preclude consideration of certain insulation strategies (e.g. wall
insulation for an exposed floor or a vented crawl space). These are automatically
excluded. Sill insulation is considered separately from the Floor and Wall insulation
measures addressed by this data field. However sill and floor insulation will never
both be recommended for the same space, since the program assumes floor insulation
includes insulation of the sill. Required.
Area – Enter the area, in square feet, of the floor directly above the foundation
space you are describing. For slab-on-grade, enter the area of the slab floor in the
living space. Your entry must be greater than zero. Required.
Ceiling R-Value – Enter the R-value of the existing insulation in the ceiling over
the basement or crawl space. The field will automatically disappear for Slab
Foundation Types. Required.
Perimeter Length – Enter the length, in feet, of the floor perimeter bordering the
outdoors. Do not include the perimeter that borders another foundation space. The
default is the perimeter of a square with area given in the Area field. The value is used
with the Wall Height to determine the space's wall area bordering the outside or
ground. The field will disappear for the “Exposed Floor” Foundation Type. The value
must be greater than zero. Required.
Perimeter Exposed (%) – Enter an estimate of the percent of floor perimeter for
which the band (rim) joist is uninsulated and exposed to the outdoor air. (Do not enter
the % symbol.) This entry is used only to determine what percent of the foundation
space's rim joist will benefit from insulation. Default - 100. Required.
Measure # – The Measure Number divides the foundation spaces (if more than one
exists) of a home into groups, each group receiving a separate recommendation and
SIR for insulating. It is wise to give each foundation space a different measure number
unless they are basically identical and you wish to have the same insulation strategy
(Foundation Insulation Option) applied to each. Foundation spaces of different Types
(e.g. “Non Conditioned” versus “Unintentionally Conditioned”), with differing
existing insulation locations or levels, different costs of insulating, or different retrofit
Insulation Options applied, will likely have different SIRs for implementing the
indicated insulation strategy. Measure numbers must be consecutive, starting with “1.”
10/06 Draft
Chapter Six • 25
The NEAT Building Description
For example, a group “3” cannot be assigned unless groups “1” and “2” already exist.
(See Sections XX and, Component Codes and Measure Numbers). Required.
Wall Height - Enter the height, in feet, of the basement wall or crawl space wall.
Estimate an average if height is not uniform. Your entry must be greater than zero. If
the wall height is less than two feet, no floor or foundation wall insulation measure
will be considered for the space.
Wall Exposed % - Estimate the percent of the basement wall or crawl space wall
which is exposed to the outside air, i.e., above grade. Estimate an average if the
exposure is not uniform. Do not enter the % symbol. Default - 100. Required.
Wall R-Value – Enter the R-value of insulation currently on the basement or crawl
space wall. NEAT assumes this coverage is uniform. If only part of the wall is
insulated either (1) adjust the Perimeter to subtract out the insulated portion and enter
zero here, or (2) enter an area-weighted average R-Value. No entry is the same as “0.”
Optional.
Additional Cost for Floor/Wall Insulation ($) – Enter any additional costs not
normally associated with insulating the foundation space. Separate entries are
provided for the floor and wall insulation options, provided each are being evaluated
(see Foundation Insulation Options). The value is a lumped dollar amount, not per
square foot. The amount will be added to the cost computed from the subspace
dimensions and cost per square foot specified under the Library Measures tab of the
Setup Library. The cost for freeze protecting water pipes is an example of an
additional cost for the foundation space insulation measures. Default - 0. Optional.
Comments – Comments may be entered directly in the comment field on the form.
Or, select the Comment button to the left of the field, which will take you to the
Comment Editor. This text editor is similar to Window’s Notepad and may be used
to edit extended comments. The total comment may have up to 65,000 characters.
Text from other sources may be copied and pasted into the Comment Editor’s
window. Audit component comments are displayed on the Audit Recommended
Measure Report and the Input Report. In addition, all audit comments are made
available to Work Orders for importing to any specific work order (see Section [8.1],
Work Order Information). Thus, you may wish to enter comments related to any
observations made during the audit which might effect the installation of measures or
repair work that is needed. If you have specified an “Additional Cost” for insulating
the foundation space or have specified a specific Insulation Option, this comment
could be used to briefly explain why such conditions exist. Optional.
Foundation Record Navigation Block – The Foundation Record Navigation Block
may be used to find and access existing foundation descriptions for the audit being
Chapter Six • 26
10/06 Draft
The NEAT Building Description
edited, copy or delete the currently accessed foundation description, or initiate a new
foundation description for the audit. See Section [4.1], Record Navigation, for
information on using the Weatherization Assistant’s Record Navigation Blocks.
6.9 Heating - General Data
NEAT Version 8 allows the definition of a “Primary” heating system and as many
“Secondary” systems as are required to describe all of the heat sources in a home.
Describe the Primary system as the first record on the Heating forms. The primary
system should be the system which supplies the majority of the heat to the home and
on which NEAT will consider installing energy efficiency measures.
On succeeding Heating forms, describe any secondary sources of heat used in the
home. NEAT version 8 allows you to specify that any secondary heating source will
be eliminated if the Primary source is replaced. The program assumes any heat
formerly supplied by such a secondary source will be supplied by the new Primary
system following its installation.
The Heating forms are divided into three sections: a general description of the
system at the top of each form, Required Heating System Details at the middle of the
form, and buttons for entry of Optional Heating System Details at the bottom. Always
enter data in the upper portion first, since the required system details will not be
necessary for all Equipment Types and Fuels and may differ for others.
Data entry items included in the general description of the Heating forms is
described in this section. Required and Optional System Details entries are described
in the succeeding sections.
System Code – The user-supplied System Code identifies the heating system to
you and the computer. The codes may have up to twenty characters. However, space
restrictions in many reports suggest a lesser number of characters (perhaps three to
five) to preserve readability. Entries are not case-sensitive. The codes must be unique
for all heating system descriptions within a given audit. Default heating system codes
are of the form “HS#” where the “#” is an integer insuring uniqueness of the code.
You may wish to include characters in the code that correspond to some
characteristics of the heating system. The codes may also be helpful when labeling
your drawing of the house’s floor plan, particularly if there are more than one heating
system. NEAT will use the codes in output reports and work orders to identify the
system which should receives the recommended energy efficiency measures. (See
Section XX, Component Codes). Required.
10/06 Draft
Chapter Six • 27
The NEAT Building Description
The Heating form
Equipment Type – Enter one of ten selections: (1) Gravity Furnace, (2) Forced Air
Furnace, (3) Steam Boiler, (4) Hot Water Boiler, (5) Fixed Electric Resistance, (6)
Portable Electric Resistance, (7) Heat Pump, (8) Vented Space Heater, (9) Unvented
Space Heater, and (10) Other. If more than one type of system exists, select as the
primary heating system the one that supplies the majority of heat and to which the
heating retrofits will apply. The System Details portion of the form will vary
depending on the Equipment Type selected here. Required.
Fuel – Enter one of seven selections for the heating system fuel: (1) Natural Gas,
(2) Oil, (3) Electricity, (4) Propane, (5) Wood, (6) Coal, (7) Kerosene, and (8) Other.
The heat content and price for the “Other” fuel type are set by the user under the Fuel
Costs tab of the Setup Library. The System Details portion of the form may vary
depending on the Fuel selected here. Required.
Location - Enter one of three locations of the heating system: (1) Heated Space (a
space that utilizes a thermostat to control its temperature), (2) Unconditioned Space
(a space not heated by a mechanical system), and (3) Unintentionally Heated Space
(a space which is partially heated by waste heat from a furnace, boiler, un-insulated
Chapter Six • 28
10/06 Draft
The NEAT Building Description
ducts, or other heat producing appliance). The choice will affect the savings attributed
to vent dampers. Required.
Heat Supplied (%) – Enter an estimate the percent of floor space that is heated by
the heating system being described. Do not enter the % symbol. A discussion with
household occupants will help you to arrive at this figure. The total of these entries
on all heating system forms will be forced to be less than 100. Required.
Primary System – NEAT supports only one primary heating system per house.
Use the Primary System check box to identify the Primary system. The Primary
system should be that system that supplies the majority of heat and to which the
heating retrofits will apply. If this check box is left unchecked, the system will be
assumed to be a secondary system, unless it is the only system described. Checking
the box for any heating system will automatically un-check the box for any other
system you may have previously indicated as being the primary system. It is best to
have the first heating system described be the Primary system.
Manufacturer, Model – Enter the name of the manufacturer and model of the
existing heating system if needed for reference, possibly in establishing an appropriate
replacement. The information will most often be found on the name- plate of the
equipment. Optional.
Eliminate with Primary System Replacement – Use this check box to identify any
secondary system that is to be eliminated by replacing the primary system. The
percent heat supplied by any secondary heating system so identified will be attributed
to the replacement primary system. This check box is applicable to secondary systems
only.
Uninsulated Supply Duct Length – Enter the length, in feet, of uninsulated supply
duct in unconditioned spaces. The value is used to estimate savings for the duct
insulation measure. Entry is optional but must be entered if the Duct Insulation
measure is to be evaluated. Entry is permitted for a ducted primary system only.
Secondary systems are assumed to have no distribution system. Duct leakage
characteristics are entered under the Ducts/Infiltration tab. Default 0. Optional.
Perimeter (of UnInsulated Supply Duct) – Enter the average perimeter, in inches,
of uninsulated supply duct in unconditioned spaces. The value is used together with
the Length to estimate the surface area of uninsulated duct in computing the savings
and quantity for the duct insulation measure. Ducts are often of varying sizes in
homes. Thus, this entry may be difficult to estimate. Though the quantity of insulation
and the cost of this measure depend on the area of insulation computed using this
parameter, the cost-effectiveness of insulating the ducts will most likely not be
significantly affected. This field is accessed and required only for non-zero entries of
10/06 Draft
Chapter Six • 29
The NEAT Building Description
Uninsulated Duct Length. The field will automatically disappear if the Duct Length
is set to zero. Conditionally required.
Location of Duct – Select the location of the uninsulated duct as either Attic or
Subspace. If the Location is “Subspace,” the duct is assumed to be in the largest
unintentionally heated space described by the user on the Foundations forms, else, in
an unconditioned space. If the location is “Attic,” an attic environment is assumed
surrounding the duct. If uninsulated ducts exist in both attic and subspace locations,
choose the space having the greatest uninsulated duct surface area. The field is
presented and required only if the Uninsulated Duct Length is greater than 0. The
entry will automatically disappear if the value for Uninsulated Duct Length is changed
to zero or erased. Conditionally required.
Comments – Comments may be entered directly in the comment field on the form.
Or, select the Comment button to the left of the field, which will take you to the
Comment Editor. This text editor is similar to Window’s Notepad and may be used
to edit extended comments. The total comment may have up to 65,000 characters.
Text from other sources may be copied and pasted into the Comment Editor’s
window. Audit component comments are displayed on the Audit Recommended
Measure Report and the Input Report. In addition, all audit comments are made
available to Work Orders for importing to any specific work order (see Section [8.1],
Work Order Information). Thus, you may wish to enter comments related to any
observations made during the audit which might effect the installation of measures or
repair work that is needed. Heating system comments may include observations of
equipment conditions, reasons for selecting specific Retrofit Options, or reference to
health and safety items. Note that comment fields are also available under each of the
Optional Heating System Details buttons. Optional.
Heating System Record Navigation Block – The Heating System Record
Navigation Block may be used to find and access existing heating system descriptions
for the audit being edited, copy or delete the currently accessed heating system
description, or initiate a new heating system description for the audit. See Section
[4.1], Record Navigation, for information on using the Weatherization Assistant’s
Record Navigation Blocks.
Optional Heating System Details – Version 8 of the Weatherization Assistant has
added an optional capability of documenting a relatively extensive number of heating
system observations which may be encountered during an audit of the dwelling. Input
forms for this data are accessed through buttons at the bottom of the Heating form in
both NEAT and MHEA. See Section 8.2, Optional Entries under the Heating Form,
for discussion of this optional data.
Chapter Six • 30
10/06 Draft
The NEAT Building Description
6.10 Required Heating System Details Sub-Form
The data requirements for the Required Heating System Details sub-form of the
Heating form varies depending on your responses for the general heating system data.
For most electrical resistance systems, no further data is needed and the form
is not activated. Electrical equipment is assumed 100% efficient, although distribution
losses may be described by the data associated with the Un-Insulated Supply Duct
fields and the Ducts and Infiltration form. Electric furnaces do require entry of an
Output Capacity.
For Heatpumps, the only information required from the details sub-form is the
HSPF:
HSPF (Heating Seasonal Performance Factor) – Provide an estimate of the heating
seasonal performance factor of the system. Newer systems are required to display the
HSPF rating on the unit. Older systems may list a COP value. An exact conversion
from COP to HSPF is not possible since the two parameters depend on different
factors. However, a rough conversion may be accomplished by multiplying the COP
by 2.4 to obtain an HSPF. A default value for the HSPF is provided. However,
replacement of the heat pump should not be performed based on energy savings
computed using the default. Default - 6.5. Conditionally required.
For other systems, most of the controls of the heating systems sub-form become
activated. One exception is that oil-fueled systems ask about the presence of a
retention head burner while systems using other fuels require data regarding the pilot
light, IID, and power burner.
Three parameters on the heating systems sub-form—input rating, output rating,
and steady-state efficiency—are interrelated. If you enter input and output ratings, a
default efficiency will be calculated from these parameters. If this value is greater than
100%, the standard NEAT default efficiency will be displayed instead. If you enter
only an input rating, NEAT’s default values for output capacity and steady-state
efficiency will correspond to the system type and fuel. A measured efficiency is
desired over a default or name-plate value because it better reflects actual operating
conditions and the potential efficiency increase obtained from replacing the system.
The required data is presented as follows:
Input Units and or Input Rating – Enter the appropriate Input Rating Units from
the menu provided. The choices are: (1) No Input, (2) KBTU per Hour, (3) Gallons
per Hour, (4) Lbs per Hour, and (5) CCM (cubic centimeters per minute). Then enter
the actual value in the following field. The value can be measured or taken directly
from the nameplate of the furnace, boiler, or space heater. If no input rating is
10/06 Draft
Chapter Six • 31
The NEAT Building Description
available, choose “No Input” for the Units. The Input Rating field will then be hid.
The input rating is used only with the Output Capacity to provide a default heating
system Steady State Efficiency. If other means of obtaining a system efficiency are
available, there is no need to obtain an input rating and the “No Input” menu item may
be selected. Required / Conditionally required.
Output Capacity – Enter the output of the furnace, boiler, or space heater in
kBtu/hr. The value can be measured, taken directly from the nameplate of the heating
system, or approximated. If a value for Input Rating has been entered, it will be used
with the Output Capacity to provide a default Steady State Efficiency. The default for
Output Capacity is based on system type. Required.
SS (Steady-State) System Efficiency – Enter the measured or estimated steadystate efficiency of the primary heating unit. Defaults are based on the system types or
previously entered data for Input Rating and Output Capacity. This parameter affects
the savings of most envelope measures and should be as accurate as possible. Beware
of replacing a heating system based on anything but a measured efficiency. Required.
Condition – Select one of three choices to describe the current condition of the
primary heating unit: (1) - Good, (2) Fair, (3) Poor (but working). This response for
the Primary system is used to estimate an efficiency increase resulting from a tune-up.
The poorer the condition, the greater will be the estimated efficiency increase.
Required.
Smart Thermostat? – Indicate whether the existing thermostat control allows
automatic ("smart") setback of the heating setpoint. The number of degrees assumed
for the setback may be adjusted in Key Parameters of the Setup Library. The presence
of a smart thermostat will affect the annual consumption computed by NEAT and
prevent the smart thermostat measure from being evaluated for the Primary system.
If the occupants manually set their thermostat back in winter and would, therefore, not
benefit from an automatic thermostat, indicate one as present.
Automatic Vent Damper Present? – Indicate whether the heating system flue is
equipped with an automatic vent damper. Presence of an existing automatic vent
damper associated with the Primary system will prevent installation of one from being
evaluated.
Automatic Vent Damper Recommended? – Indicate whether the installation of an
automatic vent damper would be recommended if found cost effective. In some areas
local codes prohibit their use. If selected, NEAT will recommend installation only if
found cost effective. If not selected, the measure will not be considered. This check
box will be visible only if you have indicated that such a damper does not already
exist.
Chapter Six • 32
10/06 Draft
The NEAT Building Description
Flue Diameter – If installation of an automatic vent damper is to be considered,
enter a suggested diameter in inches for use by the contractor in obtaining the part.
Whether this field is accessed depends on the previous two entries. Conditionally
required.
IID? – Indicate whether the heating system uses an IID (intermittent ignition
device). This device consists of an electric igniter that eliminates the need for a
standing pilot light. Presence of an existing IID will prevent NEAT from evaluating
the IID measure for the Primary system. This check box is visible for gas- or propanefueled primary furnace and boilers only.
Pilot Light? – Indicate whether the heating system uses a pilot light. This check
box is visible only if you have indicated that an IID is not present.
On in Summer? – Is the pilot light on the heating equipment left on through the
summer? This check box is visible only if you have indicated the presence of a pilot
light. This entry affects the savings assigned to the IID measure.
Power Burner Present? – Indicate whether the heating system is equipped with a
Power Gas Burner. Power burners use blowers to better mix the fuel and combustion
air. This device is normally found on oil or coal furnaces or boilers that have been
converted to natural gas. This check box is visible only for gas- or propane-fueled
primary furnace-boilers.
Retention Head Present? – Indicate whether the primary heating system is
equipped with a Retention Head Oil Burner. This device provides higher combustion
efficiency by mixing the oil and air more vigorously. This check box is visible only
for oil-fueled equipment.
Retention Head Recommended? – Indicate whether the installation of a retention
head burner would be recommended if found cost effective. If selected, NEAT will
recommend installation only if found cost effective. If not selected, the measure will
not be considered. This check box will be visible only if you have indicated that a
retention head burner does not already exist.
System Retrofit Data Block
The System Retrofit data block will appear on the right of the Required Heating
System Details sub-form for the Primary heating system. It asks for information
associated with the tuneup and replacement measures for the system.
System Retrofit Options – Select one of six choices regarding tune-up or
replacement of the primary heating unit: (1) Evaluate All. Evaluate both heating
system replacement (standard and high efficiency) and system tuneup and recommend
10/06 Draft
Chapter Six • 33
The NEAT Building Description
the most cost-effective option, if any. Replacement system efficiencies and costs for
both standard and high-efficiency replacements will be requested in subsequent fields.
(2) Tuneup Performed. A tuneup of the system has already been performed. The
SSSystem Efficiency given on the form is the efficiency of the tuned up system.
NEAT will not evaluate the system tuneup measure. Replacement system efficiencies
and costs for both standard and high-efficiency replacements will be requested in
subsequent fields. (3) Tuneup Mandatory. Inspection of the heating system has
indicated that a system tuneup is all that is necessary. NEAT will evaluate and
recommend the system tuneup, regardless of its cost-effectiveness. The tuned up
system will then be used in evaluating other measures not considered mandatory. No
system replacement will be considered. (4) Std (Standard) Replacement Mandatory.
NEAT will consider replacement of the existing heating system with a standard
efficiency system as mandatory. This may be the result of an unsafe yet un-repairable
existing system. NEAT will recommend the replacement regardless of its
cost-effectiveness. The replacement system efficiency and cost for the standard unit
will be requested in subsequent fields. The efficiency of the replacement system will
be used in evaluating other measures not considered mandatory. No system tuneup
or high efficiency replacement will be considered. (5) High Efficiency Replacement
Mandatory (natural gas, propane, and oil fueled furnaces and boilers only). NEAT will
consider replacement of the existing heating system with a high efficiency system as
mandatory. This may be the result of an unsafe yet un-repairable existing system.
NEAT will recommend the replacement regardless of its cost-effectiveness. The
replacement system efficiency and cost for the high-efficiency unit will be requested
in subsequent fields. The efficiency of the replacement system will be used in
evaluating other measures not considered mandatory. No system tuneup or standard
efficiency replacement will be considered. (6) Don’t Replace. No system replacement
(either standard or high-efficiency) will be considered. The tuneup measure, however,
will still be considered and recommended if cost effective. Required.
(Retrofit) System AFUE – Enter the AFUE (Annual Fuel Utilization Efficiency)
for the replacement units. The AFUE will most often be given on the unit label or in
the unit specifications. Entries will be required for either or both the standard and
high-efficiency units, depending on the choice made for System Retrofit Options.
Conditionally required.
Labor and Material Costs – Enter the Labor and Material cost associated with
replacing the primary heating system. Default values are those specified by the user
under the Library Measures tab of the Setup Library. Entries will be displayed for
either or both the standard and high-efficiency units, depending on the choice made
Chapter Six • 34
10/06 Draft
The NEAT Building Description
for System Retrofit Options. NEAT adds the labor and equipment costs in computing
the SIR and reporting costs. Thus, the total cost (labor plus equipment) may be entered
in either field, with $0.00 entered for the other of the two fields, with no adverse
consequences. Do not enter $0.00 in both Labor and Material Cost fields for either
replacement unit. Required.
6.11 Cooling
NEAT allows you to describe as many as five air-conditioning units in a home.
Data entry items on the Cooling forms are presented in the following order:
AC Code – The user-supplied air conditioning codes identify cooling equipment
to you and the computer. The codes may have up to twenty characters. However,
space restrictions in many reports suggest a lesser number of characters (perhaps three
to five) to preserve readability. Entries are not case-sensitive. The codes must be
unique for air-conditioning units within a given audit. Default AC Codes are of the
form “AC#” where the “#” is an integer insuring uniqueness of the code. You may
wish to include characters in the code which indicate the unity type some other
characteristics. The codes may also be helpful when labeling your drawing of the
house’s floor plan, particularly if there are more than one unit, such as multiple
window air-conditioners. NEAT will use the codes in output reports and work orders
to identify which units should receive recommended energy efficiency measures. (See
Section XX, Component Codes). Required.
AC Unit Type – Enter one of four choices: (1) Central, (2) Window, (3) Heat
Pump, or (4) Evaporative (cooler). NEAT will consider the Heat Pump Replacement
measure only if at least one of the air-conditioners described is of type "Heat Pump”
(see Section XX, Heatpump Replacement). If the “Evaporative” AC Unit Type has
been chosen, the fields for Size, SEER, and Year Purchased will be automatically
hidden. Required.
Manufacturer, Model – Enter the manufacturer and model of the existing airconditioning unit if needed for reference, possibly in establishing an appropriate
replacement. Optional
Area Cooled – Enter an estimate of the floor area in square feet of that part of the
house cooled by the air-conditioner. This entry is fairly important, affecting the
cooling energy consumption predicted by NEAT as well as the savings of cooling
measures. The sum of all areas cooled by listed equipment may be less than the total
floor area of the house, but should not be greater. Required.
10/06 Draft
Chapter Six • 35
The NEAT Building Description
The Cooling form
Size - Enter the output capacity of the unit in Kbtu/hr. The value is often printed
on the nameplate of the air-conditioner. Otherwise enter an estimate. Required.
SEER or EER – SEER is the acronym for Seasonal Energy Efficiency Ratio, used
to rate central air conditioners. EER is the acronym for Energy Efficiency Ratio, used
to rate window air conditioners. Both are measures of how efficiently the unit
produces the desired cooling. Enter the SEER, if it is given on the nameplate.
An approximate conversion from EER to SEER may be obtained using the
following formulas:
• SEER = (1.2 × EER) – 0.7 (if the unit’s fan runs only when conditioning is
required).
• SEER = (0.9 × EER) + 0.1 (if the fan runs continuously while the unit is in use).
If an SEER can not be estimated, leave the field blank and press [Enter] while
accessing the field. NEAT will display the Year Purchased field for alternate entry.
Optionally required.
Year Purchased – Enter the approximate year the unit was purchased new. Use the
full year, e.g. “1986,” not “‘96.” The purchase year is used to estimate the SEER, if
Chapter Six • 36
10/06 Draft
The NEAT Building Description
it is not provided. This entry is hid if a value has been provided in the SEER field.
Optionally required.
Comments – Comments may be entered directly in the comment field on the form.
Or, select the Comment button to the left of the field, which will take you to the
Comment Editor. This text editor is similar to Window’s Notepad and may be used
to edit extended comments. The total comment may have up to 65,000 characters.
Text from other sources may be copied and pasted into the Comment Editor’s
window. Audit component comments are displayed on the Audit Recommended
Measure Report and the Input Report. In addition, all audit comments are made
available to Work Orders for importing to any specific work order (see Section [8.1],
Work Order Information). Comments included on the Cooling form may include
observations of equipment conditions or the need for specific maintenance, such as
low refrigerant charge or dirty coils. Optional.
Cooling Record Navigation Block – The Cooling Record Navigation Block may
be used to find and access existing cooling equipment descriptions for the audit being
edited, copy or delete the currently accessed cooling equipment description, or initiate
a new cooling equipment description for the audit. See Section [4.1], Record
Navigation, for information on using the Weatherization Assistant’s Record
Navigation Blocks.
10/06 Draft
Chapter Six • 37
The NEAT Building Description
Chapter Six • 38
10/06 Draft
Energy Audits
Chapter 8
Chapters 6 and 7 of this manual addressed entry of building description data
specific to NEAT and MHEA. The Weatherization Assistant contains additional
building and audit description data which is common to both site-built and mobile
homes. This chapter describes the information entered under the Audit Main Menu
items which are common to both building types. This includes data under the Status,
Health and Safety, Itemized Costs, Utility Bills, Photos, and Measures tabs under the
Audit Main Menu items for both NEAT and MHEA. In addition, some optional
entries on the Heating tab and the Water Heaters form under the Baseloads tabs for
each building type are also described.
8.1 Status (Audit)
The Status tab under the Audit Main Menu item allows you to view the status
of the audit currently being accessed. The setting and tracking of statuses is an
optional feature in the Weatherization Assistant.
The Audit level status settings available are:
Audit
Site Visit Scheduled For
Site Visit Completed On
Billing Data Collected On
Recommendations Generated On
Audit Complete and Locked On*
Walk Away by Auditor On*
Delayed On
Denied On
Other
The Status tab displays not only the current status of the audit, but the date the
status became effective, the date it was last changed, and who changed it. You are
also shown any comment which has been appended to this current status setting. A
Completed column on the form will display an asterisk (*) when a status setting
indicates completion or closure of the activity associated with the status category. For
the audit category, this corresponds to those settings followed by the asterisk in the
table above.
10/06 Draft
Chapter Eight • 39
Energy Audits
The Status form
Status settings are changed by selecting the Edit button at the right of the row
indicating the current status for the audit. You will be presented with the Status Editor
form. Choose the “H” button to see a history of all settings for the current audit.
The Status History table
See Section [13.3], Status Tracking for additional information on the Status tabs and
changing status settings.
8.2 Optional Entries under the Heating Form
Version 8 of the Weatherization Assistant has added an optional capability of
documenting a relatively extensive number of heating system observations which may
be encountered during an audit of the dwelling. Some of these items constitute
potential health and safety concerns. These details are accessed from buttons lying
to the right of the “Optional Heating System Details” title at the bottom of the Heating
form under the Audit Main Menu item. You must complete the description of the
existing heating system before accessing these optional details. Not all buttons will
be applicable to the heating system described on the Heating form. No attempt is
made in this manual to describe correct procedures for obtaining the measurements
or performing the inspections. You should refer to literature on standard HVAC
practices or consult with a qualified HVAC contractor.
Chapter Eight • 40
10/06 Draft
Energy Audits
Optional Heating System Details - tests, measurements, and inspections
A summary of the items contained under
each of the buttons is given below. Each form
allows addition of an extended comment if
necessary. Close each form using the customary
Windows X box in the upper right corner. Each
form must be closed before any other form can be
accessed.
Operational Tests – This form allows recording
information resulting from three measurement
procedures: (1) flue gas analysis, (2) carbon
monoxide measurements, and (3) the heat rise
across the heat exchanger. The form allows
recording of these measurements before and after
work has been performed – “Conducted During
Audit” and “Conducted During Inspection,”
respectively.
Operational Tests form for heating
systems
Vent Tests – Information recorded under the
Vent Tests button pertain to the characteristics of
the flue and damper as well as before and after draft measurements on the flue
associated with the heating system.
Furnace Components – This form allows entry of characteristics for various
furnace components including the fan limit controls, burner, pilot, blower, belts, air
filter, and accessories (humidifier, air cleaner, and air-conditioner coil).
Boiler Components – If the heating system is a boiler, this tab allows description
of the boiler type, its overall condition, and the condition of the expansion tank and
drain valve. Additional information can be entered describing the associated controls
and convectors. The presence of asbestos associated with the boiler constitutes a
potential hazard and may also be noted. See the description under Section, Health and
Safety, on how the Weatherization Assistance handles health and safety items.
10/06 Draft
Chapter Eight • 41
Energy Audits
Vent Tests form for heating systems
Furnace Components
Inspections for heating systems
Boiler Components
Chapter Eight • 42
10/06 Draft
Energy Audits
Inspections – This form contains mostly check boxes identifying potential hazards
associated with the heating system, such as a cracked heat exchanger, insufficient
clearances, gas leaks, etc. See the
description under Section 8.9, Health and
Safety,
on how the Weatherization
Assistance handles health and safety
items.
Thermostat - Characteristics associated
with the thermostat used by the heating
system are entered on this form, including
its type, set points, and anticipator
settings.
Thermostat Details
8.3 Ducts and Infiltration
Both NEAT and MHEA provide means to evaluate the effectiveness of
infiltration reduction work and duct sealing. Note, however, it does not direct this
work. It assumes that available procedures of locating and repairing air leaks are
being used. Air leakage reductions from specific weatherization activities cannot be
predicted accurately with calculations.
The Blower Door—Used to locate and quantify envelope air leakage
10/06 Draft
Chapter Eight • 43
Energy Audits
What information you provide regarding ducts and infiltration will depend on
what measurements you are accustomed to taking during an audit.
Blower doors pressurize (or depressurize) a house to some pressure differential
(measured in Pascals, PA) with respect to the outside. They can then measure the
cubic feet per minute (CFM) of air passing through leaks in the house at that pressure
differential. Since the pressure differential is greater than under normal circumstances,
the air leaks are exaggerated above what they would be normally, allow easier
detection.
A duct blower works in a similar manner as the blower door, except that it
pressurizes only the ducts in the house with respect to the remainder of the house and
outdoors. Similarly, it will provide the CFM leaking from the ducts at this pressure
differential.
All forms under the Ducts/Infiltration tab have a standard Comment field
capable of holding up to 65,000 characters. Access the comment’s text editor by
selecting the Comment button to the left of the field. Text from other sources may be
copied and pasted into the Comment Editor’s window. Audit component comments
are displayed on the Audit Recommended Measure Report and the Input Report. In
addition, all audit comments are made available to Work Orders for importing to any
specific work order (see Section [8.1], Work Order Information). If leakage sites are
located during the initial blower door setup, you could use the comments section to
identify to the crew or contractor where these sites are.
Six different modes of data input relating to ducts and air infiltration are
available with a seventh in MHEA applicable to mobile homes. The first 3 below
assume that no duct leakage measurements are available. For all of these cases, leave
the Evaluate Duct Sealing check box, located on the Ducts & Infiltration form,
unchecked.
1. No duct or infiltration measurements available
If you wish to run NEAT without duct and infiltration measurement data (either
because your program doesn’t address these components or because measurements
are not available at the time you run NEAT), you can do so by accessing the Ducts
& Infiltration form, leaving the Evaluate Duct Sealing check box unchecked, then
supplying entries for the only two required fields on the form:
Post Infiltration Reduction, Whole House Leakage (CFM) – If your audit
procedure has established a target post-retrofit CFM leakage rate, enter it here.
Otherwise, use the default value of 2500 CFM. Default - 2500. Required.
Chapter Eight • 44
10/06 Draft
Energy Audits
Post Infiltration Reduction, Pressure Differential (PA) – Enter either the
pressure differential on which your target leakage rate is based or accept the
default of 50 PA, corresponding to the default leakage. Default - 50. Required.
These settings will allow NEAT to make logical recommendations for the other
measures it considers while not addressing the infiltration or duct leakage. The
reason a post-retrofit air leakage is required rather than a pre-retrofit value, is that
NEAT assumes some air leakage reduction is likely to occur, particularly if the
initial reading is significantly higher than the default or target level. Estimates of
savings for other measures will be more accurate if they are based on the air
leakage characteristics of the house after this reduction is accomplished, rather
than at its pre-retrofit level.
2. Only Pre-infiltration reduction air leakage readings are available.
If your audit procedure regularly takes pre-infiltration reduction blower-door
readings but has no post-reduction values at the time NEAT is run, you may
choose to run NEAT without infiltration and duct leakage data, as described in 1
above.
Or, you may enter these readings in the Pre Infiltration Reduction, Whole
House Leakage and Pressure Differential fields. However, you must still enter
values in the required Post-Infiltration Reduction fields. You could enter a target
post-retrofit air leakage rate appropriate for the house. NEAT will then compute
an energy savings associated with this reduction. If no infiltration reduction work
is deemed necessary for the house, enter the pre-retrofit rate into the post-retrofit
fields since, in this case, both pre- and post-retrofit levels will be the same and the
post-retrofit levels are required for NEAT to run.
If post-retrofit air leakage rate readings become available at some future time,
the house description could be recalled, the readings entered, and an appended
report printed. However, this may not be worth the time, especially if a target
value you chose is any where near the final reading obtained.
3. Pre- and post-infiltration reduction air leakage readings are available but no
duct readings.
Enter data in all fields available on the Whole House Infiltration Reduction with
Blower Door form. The Evaluate Duct Sealing check box remains unchecked.
10/06 Draft
Chapter Eight • 45
Energy Audits
The Ducts/Infiltration form - No duct readings available
Pre-Infiltration Reduction, Whole House Leakage (CFM) and Pressure
Differential (Pa) – These entries are from blower door measurements of air leakage
before sealing. The CFM reading is normally taken at a pressure differential of 50
Pa, if such can be reached. Pre-retrofit entries are optional but, if provided, used
to estimate savings from air sealing. Pre-retrofit entries will not affect savings
computed for other measures. Air leakage rate default - 2500. Pressure differential
default - 50. Optional.
Post-Infiltration Reduction, Whole House Leakage (CFM) and Pressure
Differential (Pa) – These entries are from blower door measurements after air
sealing. The CFM reading is normally taken at a pressure differential of 50 Pa, if
such can be reached. If the only air leakage information available is in air
changes-per-hour (ACH) at natural conditions, an approximate conversion to CFM
at 50 Pascals (CFM50) may be obtained as follows: CFM50 = ACH × House
volume ÷ 3. Air leakage rate default - 2500. Pressure differential default - 50.
Required.
Infiltration Reduction Cost – Enter the cost in dollars spent to reduce air
infiltration from the pre-retrofit to the post-retrofit level. If a cost is entered
together with the above entries of pre- and post-infiltration reduction blower-door
data, an SIR, in addition to the energy savings for the air-leakage reduction, will
Chapter Eight • 46
10/06 Draft
Energy Audits
be computed and reported (see Section XX, Energy Saving Measure Economics).
Optional.
The remaining modes of data entry for the Ducts & Infiltration forms provide
means of estimating the cost-effectiveness of duct sealing as well as infiltration
reduction. NEAT provides input fields to accommodate three different common duct
leakage measurement techniques: Whole House Blower Door Measurements; Blower
Door Subtraction; and Duct Blower Pressure Tests. In addition to these three
techniques, MHEA accommodates a fourth, Pressure Pan Measurements. To access
the forms needed, select (check) the Evaluate Duct Sealing check box on the Ducts /
Infiltration form. You will then be presented with the Duct Leakage Method dropdown list. It is from this list that you choose one of the three or four duct leakage
measurement techniques. Once you have made your selection, the form’s input fields
will be altered to accommodate that particular method.
Each of the data input modes associated with the three measurement techniques
requires duct operating pressure inputs. Since they are common to all three modes,
they will be described once here. The readings are taken during normal conditions
with the air handler fan on. Small holes (afterwards repaired) can be drilled in the
supply plenum near the air handler and in the return plenum in which to insert
pressure probes. It is recommended that a digital gauge be used to then measure the
pressure inside of these plenums with respect to the room or part of the house in which
they are located. The data entry fields for this data lie under the Duct Operating
Pressures title on each of the forms. The four duct operating pressures required are:
Pre Duct Sealing Supply (Pa) – Enter the supply duct - house pressure
difference before implementing any duct-sealing measures. Required.
Pre Duct Sealing Return (Pa) – Enter the return duct - house pressure difference
before implementing any duct-sealing measures. Required.
Post Duct Sealing Supply (Pa) – Enter the supply duct - house pressure
difference after implementing any duct-sealing measures. Required.
Post Duct Sealing Return (Pa) – Enter the return duct - house pressure
difference after implementing duct-sealing measures. Required.
The additional entries necessary for each of the three input modes will be
discussed separately below. They are arranged in order of complexity, the simplest
first. Unfortunately, the simplest tends to also be the least accurate.
10/06 Draft
Chapter Eight • 47
Energy Audits
4. Pre/Post Whole House Blower Door Measurements
This technique of estimating duct leakage uses whole house blower door
leakage measurements before and after duct sealing to estimate the duct leakage
reduction accomplished. To provide this method some assumption had to be made
with regard to the order in which duct sealing and infiltration reduction work was
performed. NEAT assumes that the duct sealing is accomplished first, followed,
at some point, by the infiltration reduction.
Most of the entries required are from readings you would normally take to
estimate the whole house infiltration. These readings are simply taken before any
duct leakage or infiltration reduction work has been performed, then after duct
sealing is accomplished - but before infiltration reduction work, then a third time
after both duct and infiltration reduction work has been performed. Note, for all
readings, the vents and registers of the distribution system should remain open,
thus making the ducts as much a part of the conditioned space as possible.
The entries required are described separately below:
Pre-Infiltration Reduction, Whole House Leakage (CFM) and Pressure
Differential (Pa) – Same as in (3) above, but no longer optional. Required.
Post Duct Sealing, Whole House Leakage (CFM) and Pressure Differential (Pa)
– These entries are from blower door measurements of whole house air leakage
after duct sealing efforts, but before air infiltration reduction work. Air leakage rate
default - 2500. Pressure differential default - 50. Required.
Post-Infiltration Reduction, Whole House Leakage (CFM) and Pressure
Differential (Pa) – Same as in (3) above, but no longer optional and is assumed to
be from readings taken after both duct sealing and infiltration reduction efforts
have been accomplished. Required.
Duct Sealing Cost – Enter the cost in dollars spent to reduce the duct leakage
from the Pre Infiltration Reduction (and, therefore, the pre duct sealing) to the Post
Duct Sealing level. Required.
Infiltration Reduction Cost – Enter the cost in dollars spent to reduce the air
infiltration from the Post Duct Sealing (and, therefore, the pre infiltration
reduction) to the Post Infiltration Reduction level. Required.
Chapter Eight • 48
10/06 Draft
Energy Audits
The Ducts/Infiltration form - Pre/Post Whole House Blower Door duct measurements
5. Blower Door Subtraction
This method uses the same readings as the Whole House Blower Door
technique but adds analogous readings, both before and after duct sealing, during
which the distribution system has been sealed off from the rest of the house. Use
cardboard, plastic, tape, etc., to temporarily cover and seal all registers and grills
on both the supply and return side. This essentially allows subtraction of the house
leakage from the duct plus house leakage to isolate the leakiness of the ducts. One
additional reading is required to help compensate for duct leakage to the
conditioned space, the duct - house pressure differential with the ducts and
registers sealed and the house pressurized (or depressurized) to the same degree as
for the other CFM readings (normally 50 Pa).
Note, it is normally recommended that this technique not be used if the
measured duct - house pressure differential is less than 20 Pa, indicating that the
duct system is very well connected to the house interior. This is commonly true
in homes which use building cavities for a significant part of the duct work.
The data entry items for this input mode are as follows:
10/06 Draft
Chapter Eight • 49
Energy Audits
The Ducts/Infiltration form - Blower Door Subtraction duct measurements
Pre-Infiltration Reduction, Whole House Leakage (CFM) and Pressure
Differential (Pa) (with registers/grills open) – Same as in (3) above, but no longer
optional. Required.
Pre-Infiltration Reduction, Whole House Leakage (CFM) and Pressure
Differential (Pa) (with registers/grills sealed) – Same as immediately above except
with registers and grills sealed. Required.
Pre-Infiltration Reduction, Duct House Pressure Differential (Pa) (with
registers/grills sealed) – Enter the measured pressure differential between the duct
system and the house with the house pressurized (or depressurized) to the same
degree as for the CFM readings immediately above (normally 50 Pa). This
measurement can be taken at the supply or return plenum, or at a supply register
or return grill by punching a small hole through the masking tape or other material
used to temporarily seal the grills, and inserting a pressure tap or hose connected
to a pressure gauge. Required.
Post Duct Sealing, Whole House Leakage (CFM) and Pressure Differential (Pa)
(with registers/grills open) – Same as in (4) above. Measured after duct sealing
efforts, but before air infiltration reduction work. Required.
Chapter Eight • 50
10/06 Draft
Energy Audits
Post-Duct Sealing, Whole House Leakage (CFM) and Pressure Differential (Pa)
(with registers/grills sealed) – Same as immediately above except with registers
and grills sealed. Required.
Post-Duct Sealing, Duct House Pressure Differential (Pa) (with registers/grills
sealed) – Same as Pre-Infiltration Reduction value obtained above, but measured
after duct sealing efforts, but before air infiltration reduction work. Required.
Post-Infiltration Reduction, Whole House Leakage (CFM) and Pressure
Differential (Pa) (with registers/grills open) – Same as in (4) above. Required.
Duct Sealing Cost – Enter the cost in dollars spent to reduce the duct leakage
from the Pre Infiltration Reduction (and, therefore, the pre duct sealing) to the Post
Duct Sealing level. Required.
Infiltration Reduction Cost – Enter the cost in dollars spent to reduce the air
infiltration from the Post Duct Sealing (and, therefore, the pre infiltration
reduction) to the Post Infiltration Reduction level. Required.
The Duct Operating Pressures entries are described in the introductory material
to mode 4.
6. Duct Blower Pressure Tests
This method involves use of both a duct blower
and a blower door. A duct blower pressurizes the
duct system which is sealed off (by taping the
registers and grills) from the remainder of the
house. The measured CFM through the duct
blower is then equal to the total air leakage from
the ducts to both the outside and interior of the
house. To obtain leakage to only the outside, the
blower door is used to pressurize the entire house
to the same pressure, with respect to the outside, as
the ducts. With no pressure differential between
the house and the ducts, any leakage recorded by
the duct blower must then be to the outside. The
leakage will be at whatever duct/outside pressure The Duct Blower—Used to measure
differential is established by the duct blower.
duct leakage. (Courtesy of The
Energy Conservatory)
This technique of determining duct leakage is more
accurate than the other means, but also the most
time-consuming. It requires both a duct blower and a blower door.
10/06 Draft
Chapter Eight • 51
Energy Audits
The data entry items for this input mode are as follows. Each of the items is
determined and entered twice, once before (Pre) permanent duct sealing occurs,
and again afterwards (Post).
The Ducts/Infiltration Form - Duct-Blower Pressure Tests measurements
Pre/Post Duct Sealing Total Fan Flow (CFM) and Duct Pressure (Pa) – Enter
the CFM measured through the duct blower with the duct pressurized with respect
to the house and outside. For these measurements, the registers and grills are
temporarily sealed off (taped) from the remainder of the house.
Pre/Post Duct Sealing Outside Fan Flow (CFM) and Duct Pressure (Pa) – Enter
the CFM through the duct-blower measured before/after duct sealing and with the
house at the same pressure difference with respect to the outside as the ducts.
While the duct-blower is used to pressurize the duct system, a blower-door will be
used to pressurize the house. For these measurements, the registers and grills are
temporarily sealed off (taped) from the remainder of the house.
House Pressure (Pa) wrt outside – Enter the pressure differential between the
house and the outside as created by the blower door. Note, for accurate
determination of the duct leakage, this pressure differential should be the same as,
or as close as possible to, the pressure differential between the ducts and outside.
Chapter Eight • 52
10/06 Draft
Energy Audits
The Duct Operating Pressures entries are described in the introductory material
to mode 4. The remainder of the entries on this form relate to the infiltration
reduction efforts and are the same as given in mode 3 above.
8.4 Optional Entries under the Ducts/Infiltration Form
Air and duct leakage measurements used by the NEAT and MHEA audits are
entered on the “Air and Duct Leakages” sub-tab located under the “Ducts/Infiltration”
tab of these audits. These data include whole house blower-door readings before and
after retrofit as well as other blower-door and duct measurements if the Evaluate Duct
Sealing check-box is selected. See the respective users manuals of these audits for
more information on these entries.
Additional blower-door-related readings may be taken for diagnostic purposes.
These optional readings may be recorded under three additional sub-tabs under the
“Ducts/Infiltration” tab: “Optional Blower Door and Zonal Pressures,” “Optional
Pressure Balance,” and “Optional Pressure Pans.” The data which may be recorded
under each of these sub-tabs will be discussed briefly below.
Optional Blower Door and Zonal Pressures
Blower-door readings other than those used by the audits may be taken to
measure the effects of various activities on the infiltration rate (e.g., dense pack
insulation installation), during an inspection of the work, or at other times. This subtab allows these additional blower-door readings to be recorded as well as zonal
pressure readings which might also be taken at the same time. Note that multiple
records of data may be entered accommodating any number of sets of readings. All
of the entries are optional.
Entries on this form include a date on which the blower-door readings were
taken, the occasion during which they were taken, and the equipment used. The
“Conducted During” comb-box items are: “Audit,” “Pre-Installation,” “During
Installation,” “Post-Installation,” “Inspection,” and “Other.”
The “Air Leakage Rate (CFM)” and “Building [to outside] Pressure Differential
(Pa)” are recorded in the “Blower Door Measurements” block on the form. If the
pressure differential is other than 50 Pascal, selecting the “Calculate” button will
automatically apply the “Can’t Reach 50” factor to provide you with a CFM at 50
Pascal in the adjoining field.
10/06 Draft
Chapter Eight • 53
Energy Audits
Optional Blower Door and Zonal Pressures sub-form
If “Audit” has been selected in the “Conducted During” combo-box, you will
be asked on exiting the form if you wish to overwrite any value which might already
exist in the “Pre Infiltration Reduction” fields on the “Air and Duct Leakages”
form—the values used by the audits in computing energy savings from infiltration
reduction efforts—with the leakage rates just entered. Choose “OK” to copy the data
to the “Air and Duct Leakages” form or “Cancel” to reject the offer. Data on the
“Optional Blower Door and Zonal Pressures” sub-form will be unaffected, regardless
of your choice.
Zonal pressures are pressure differences between the main part of the house
where the blower-door has been installed and various zones of the house, such as
attics, basements, attached garages, etc. These measurements may be made in
conjunction with a blower-door measurement for a variety of reasons, such as to help
identify the possible location of leakage sites, to locate where the functioning air
barrier is, or to identify potential health and safety problems associated with a
combustion appliance.
Chapter Eight • 54
10/06 Draft
Energy Audits
Zonal Pressures form
Zonal pressure readings associated with a specific blower-door setup can be
recorded by selecting the “Zonal Pressure Readings for this Blower Door setup”
button. This will take you to the Zonal Pressures form in which the readings may be
entered. On this form, you may enter the Location of the zone using the choices in the
combo-box list or by entering a location of your own if none of the choices meet your
needs. Enter the Pressure differential found, in Pascal, and whether any ducts are
present in the zone. You may also enter any comment.
Selecting the “Show All Zonal Pressure Readings for this Audit” button will
display all zonal pressure readings from all blower-door setups for the audit. The
form is the same as the Zonal Pressures form except for an additional column
designating your selection of “Conducted During” for each setup. Entries may be
altered when viewed from this form.
Optional Pressure Balance
When the air handler of a central forced air furnace or air-conditioner is on, it
provides conditioned air to rooms throughout a house. The air that is supplied is
intended to be returned to the furnace or air-conditioner through the return registers.
If supply air is blocked from reaching a return, pressure differences can be created
between the space and the location of the return register(s). This can hinder the
supply air from being delivered to the space as well as create a negative pressure in
the remainder of the house, increasing infiltration.
10/06 Draft
Chapter Eight • 55
Energy Audits
Optional Pressure Balance form
The Optional Pressure Balance form allows you to record pressure differentials
between various rooms of the house and the main body of the house (where the return
registers exist). The measurements are taken with the air handler operating. The
measurements do not involve use of a blower-door.
Enter each Location or room using the choices in the combo-box list or by
entering a location of your own if none of the choices meet your needs. Enter the
Pressure differential, in Pascal, found, between the room and the location where the
return registers exist. Space is provided for you to enter this pressure differential both
before and after any efforts to balance the pressure, such as undercutting a door.
Comments may be entered for each entry.
Optional Pressure Pan
Pressure pan measurements are taken with a home depressurized to 50 Pascal
using a blower-door. A pressure pan which fits snugly over a register and attached to
a digital manometer is used to measure the pressure differential at each supply or
return register with respect to the home. No pressure difference indicates that the
duct leading to the register is at the same pressure as the house and that little or no
leaks to the outside exist in that branch of the ducts.
Chapter Eight • 56
10/06 Draft
Energy Audits
Optional Pressure Pans form
Enter an optional Register # to uniquely identify the register, possibly
referenced in a drawing. Then enter the room in which the register is located using
the choices in the “Location” combo-box list or by entering a location of your own if
none of the choices meet your needs. Next, identify the register as Supply or Return.
Enter the Pressure differential, in Pascal, found, between the register and the home.
Space is provided for you to enter this pressure differential both before and after any
efforts to seal the ducts. Comments may be entered for each entry.
8.5 Base Loads - Water Heaters
Both NEAT and MHEA evaluate several water heating measures: water heater
replacement, tank insulation, pipe insulation, and low-flow showerheads. The data
required by the program on the Water Heaters form depends on what combination of
these measures you have chosen to evaluate in your program. Only those data entry
fields necessary to evaluate the water heating measures you have selected in the Setup
Library associated with a specific audit will appear on the form.
Because of the data needed to evaluate the measure, if water heater replacement
is to be considered, both the existing water heater and its replacement must be found
in the database provided by the program. This is why most of the fields in the
10/06 Draft
Chapter Eight • 57
Energy Audits
Replacement block of data are grayed and unaccessible for input. These fields will be
automatically filled in when you select a replacement unit from the database.
NEAT and MHEA will evaluate replacing an existing unit with a unit using a
different fuel. However, if this is to be considered, the replacement costs should
include whatever cost is involved in making the fuel for the replacement unit
available, e.g. piping the natural gas to the location of the replacement unit.
The data on the Water Heaters form are divided into three blocks: Existing
Equipment, Shower Heads, and Replacement. Data under the Existing Equipment
block are presented as follows.
Baseloads - Water Heaters form
Manufacturer – Enter the existing water heater’s manufacturer’s name. You may
use this field to either enter a manufacturer of your own choosing or to search the
look-up tables for a matching entry. However, if you are evaluating replacing the
existing unit, you must locate the manufacturer and model of the unit in the data base
in order for NEAT to have the efficiency data necessary to evaluate the replacement.
Otherwise, this entry is optional.
Chapter Eight • 58
10/06 Draft
Energy Audits
Model – Enter the existing water heater’s model number. As for the manufacturer,
you may use this field to either enter a model of your own choosing or to search the
look-up tables for a matching entry. However, if you are evaluating replacing the
existing unit, you must locate the manufacturer and model of the unit in the data base
in order for NEAT to have the efficiency data necessary to evaluate the replacement.
Otherwise, this entry is optional.
Fuel Type – Select the fuel used by the existing water heater from the three
choices: 1 - Natural Gas; 2 - Electric; 3 - Propane. The entry is required for all water
heater measures. If the manufacture and model have been successfully chosen from
the data base, this field will be entered automatically.
Water Heater Location – Select one of three locations for the water heater: 1 Heated Space (space that utilizes a thermostat to control its temperature); 2 - Unheated
Space (space not heated by a mechanical system); or 3 - Unintentionally Heated
(space which is heated by waste heat from furnace, boiler, or other heat producing
appliance).
Gallons – Enter the capacity of the existing water heater in gallons. If evaluating
replacement of the unit and the capacity of the replacement unit differs substantially
from the capacity of the existing unit, you will receive a warning.
Supply Pipe Insulation Present – Indicate whether pipe insulation exists on at least
the first five feet of pipe exiting the water heater. Required only for pipe insulation
measure.
Energy Factor – This un-editable field displays the Energy Factor of the existing
water heater when ever the unit has been located in the database of water heaters. This
field is displayed only when water heater replacement is being considered.
Rated Input / Input Units – These two fields give the value and units of the value
(kBtu or kW) of the existing unit. The data is required only for evaluating the water
heater replacement measure. However, the data will automatically be supplied when
an existing unit is selected from the database. Thus, the user should never have to
enter this data.
Existing Insulation Type – Select one of two insulation types used in the existing
water heater: 1 - Fiberglass; 2 - Polyurethane. Often an access plate can be removed
to view the insulation and determine its type and thickness. This entry is required
only for evaluating the tank insulation measure.
Existing Insulation Thickness – Enter the thickness, in inches, of insulation in the
existing unit. If an insulating wrap already exists, include its thickness as well. Often
an access plate can be removed to view the insulation and determine its type and
thickness. This entry is required only for evaluating the tank insulation measure.
10/06 Draft
Chapter Eight • 59
Energy Audits
Three data items are present in the Shower Heads data block. None of the items
will be displayed if the low-flow showerhead measure has not been selected in the
Setup Library.
Number of Shower Heads – Enter the number of showerheads used in the house
for which replacement with low-flow models needs to be evaluated. Required only
for the low-flow showerhead measure.
Minutes of Shower Use Per Day – Enter the total minutes per day the showerheads are in use. Combine the times for each shower-head being considered for
replacement. Required only for the low-flow showerhead measure.
Average GPM – Enter the average flow rate in gallons per minute of all showerheads being considered for replacement. You can determine this easily using a
container of known volume and a stop watch. Required only for the low-flow
showerhead measure.
Most of the data items in the Replacement data block cannot be entered
individually. They are automatically filled in when the user chooses a replacement
water heater from the “Pick from Library” data entry field. The fields are analogous
to those of the same name in the Existing Equipment data block except they apply to
the replacement unit. See the discussions of these fields in the material above. The
three remaining fields are discussed below. The entire Replacement data block will
disappear if the replacement water heater measure has not been selected in the Setup
Library associated with the job.
Pick from Library – Choose the replacement water heater from the entries in this
combo-box. The selections displayed will be those you have entered in the Supply
Library (see Section [10.3], The Hot Water Equipment and Refrigerator Forms).
Installation Cost – If you have entered unit costs for your replacement water
heaters in the Supply Library, these costs will be copied into this field when a unit is
selected for use. You are free to alter this cost here if the unit cost changed. Also, if
the unit cost entered in the supply library does not include the labor cost associated
with installation, you would add it to this value, unless you choose enter this cost in
the Additional Cost field.
Additional Cost – Enter any additional cost associated with installation of the water
heater not included in the value entered above. This may include labor costs, delivery
changes, or the cost of disposing of the old unit. Optional.
Chapter Eight • 60
10/06 Draft
Energy Audits
Comment – Enter any comments associated with the water heating you want
displayed on the output reports. If you use the Weatherization Assistant’s work order
feature, the comment will be available to include there. Optional.
8.6 Base Loads - Refrigerators
NEAT includes a refrigerator replacement measure (see Section XX, Refrigerator
Replacement). In order to evaluate the potential savings obtained from replacing an
existing refrigerator with a newer, more efficient unit, NEAT needs to know an
estimate of the existing and new refrigerators’ annual energy use, in kWh/yr. This
data can be obtained in either of three ways:
1. The Association of Home Appliance Manufacturers (AHAM) and an office of the
Department of Energy (DOE) have accumulated the results of efficiency tests for
many manufacturers’ models of refrigerators. The data base containing their data
has been incorporated into the Weatherization Assistant. Thus, if you are able to
locate the manufacturer and model in the look-up table provided, the required
annual consumption will be entered for you.
2. Refrigerators are sold with labels that list the estimated annual energy consumption
in kWh/yr. If such an energy guide label is available for either the existing or new
units (more likely for the latter), it can be used as the source for this required input.
3. Small meters exist which are capable of relatively easily monitoring the
consumption of a refrigerator. If you use one of these meters, the program asks for
the kWh consumed by the refrigerator during the monitoring period and the
number of minutes monitored.
Additional inputs adjust the consumption data for the ambient temperature of the
space in which the refrigerator is located, the existing refrigerator’s age, the condition
of the seals, and defrost cycles.
The data input is grouped into data blocks asking for general information on the
existing unit, the energy consumption of the existing unit, and data regarding the
replacement unit. The data entry descriptions for the existing unit are given below:
Manufacturer – Enter the existing refrigerator’s manufacturer’s name. You may
use this field to either enter a manufacturer of your own choosing or to search the
look-up tables for a matching entry. This entry is optional unless you are using the
data look-up tables to identify the unit.
10/06 Draft
Chapter Eight • 61
Energy Audits
Baseloads - Refrigerators Form
Model – Enter the existing refrigerator’s model number. You may use this field
to either enter a model number of your own choosing or to search the look-up tables
for a matching entry. This entry is optional unless you are using the data look-up
tables to identify the unit.
Style – You may record the style of the existing unit. The choices are: (1) Top
Freezer, (2) Side by Side, (3) Single Door, (4) Single Door w/Freezer, (5) Bottom
Freezer, and (6) Other. These styles correspond to those given in the Weatherization
Assistant’s database of refrigerators. If you choose an existing refrigerator whose
Style is available from this database, this entry will be entered automatically.
Optional.
Defrost – You may enter the defrost characteristics of the existing unit. The
choices are: (1) Automatic, (2) Manual, (3) Partial Automatic, and (4) Other. These
types correspond to those given in the Weatherization Assistant’s database of
refrigerators. If you choose an existing refrigerator whose defrost type is available
from this database, this entry will be entered automatically. Optional.
Height, Width, Depth, Size – Enter the dimensions of the existing unit. These
entries are always optional. However, if entered for both the existing and replacement
Chapter Eight • 62
10/06 Draft
Energy Audits
units, NEAT will compare the entries and produce a warning if the entries indicate a
possible size problem related to the replacement. If you used the look-up tables to
identify the existing unit and dimensions are available from the tables, these
dimensions will be entered automatically. Optional.
Location – Select one of three locations for the refrigerator: 1 - Heated Space
(space that utilizes a thermostat to control its temperature); 2 - Unheated Space (space
not heated by a mechanical system); 3 - Unintentionally Heated (space which is heated
by waste heat from furnace, boiler, or other heat producing appliance). Default Heated Space. Required.
The Consumption data block accommodates entries required to estimate the
existing unit’s current annual consumption from any of the three sources described
above. If the consumption is to be estimated from an energy guide label or from
values in the look-up tables, the following three entries will be used.
kWh/Yr – Enter the kWh/yr consumption listed on the energy guide label for the
existing unit, if one exists. If you have used the look-up tables to identify the existing
unit, this value will be entered automatically. The entry is not required if you are using
metered consumption data.
Age – Select one of the categories describing the age of the existing unit: 1 - Less
than 5 years; 2 - 5 to 10 years; 3 - 10 to 15 years; 4 - More than 15 years. If you used
the look-up tables to identify the existing unit and the data is available from the tables,
this data will be entered automatically. The age from the tables will be based on the
first year the model was sold. If you know that the existing model is newer than that
indicated from the tables, change the entry. The entry is not required if you are using
metered consumption data.
Door Seal Condition – Select the choice of Door Seal Condition which best
describes the current condition of the existing refrigerator’s door seals: (1) Good, (2)
Some Wear, and (3) Gaps Visible. The entry is not required if you are using metered
consumption data.
If you use metering to determine the consumption of the existing refrigerator,
enter data into the “Metered Consumption” portion of the Consumption data block.
Metering Minutes – If you are using metered consumption data, enter the number
of minutes you metered the existing refrigerator. Metering should be performed for
at least 180 minutes (3 hours). You should attempt to prevent refrigerator door
openings during the metering period. This entry is not required if the kWh/yr field has
been used to provide the consumption data.
10/06 Draft
Chapter Eight • 63
Energy Audits
Meter Reading – Enter the metered consumption in kWh for the period specified
by the Metering Minutes. This entry is not required if the kWh/yr field has been used
to provide the consumption data.
Manual Defrost – Is the existing unit manual defrost? This entry used for metered
consumption only.
Includes Defrost Cycle – Indicate in this check box whether or not the metered
consumption entered above included a defrost cycle. This can be determined if either
the consumption or refrigerator interior temperature is being monitored by the
presence of a peak in either of these parameters extending several times higher than
the surrounding peaks.
Regardless of the method you choose to estimate the current refrigerator
consumption, the Adjusted Consumption field at the bottom of the Existing
Equipment block of data will display the program’s estimate, adjusted for location,
age, condition of seals, and defrost cycles possibly present during metering. If you
change data after this value’s original display, you may need to select the “Refresh”
button in order to update the value.
Consumption data is also necessary for the replacement refrigerator. This data
will be provided either from the energy guide label on the replacement unit, or from
values of pre-selected replacement units in your library of replacement refrigerators.
This library is defined by you in the Setup Library (see Section [10.3], The Hot Water
Equipment and Refrigerator Forms). Data for the replacement refrigerator is entered
on the right side of the form in the Replacement data block. It includes the following
fields:
Pick from Library – Use this drop-down box to select a replacement unit from your
library of refrigerators. If this field is used, the entry must match a unit listed in your
library.
Manufacturer – Enter the manufacturer of the replacement refrigerator. If your
selection of a replacement has been made from your library of replacement
refrigerators, this data will be entered automatically. Optional.
Model – Enter the model number of the replacement refrigerator. If your selection
of a replacement has been made from your library of replacement refrigerators, this
data will be entered automatically. Optional.
Style, Defrost – These fields are analogous to those of the same name in the
Existing Equipment data block except they apply to the replacement unit. See the
discussions of these fields in the material above. If your selection of a replacement
Chapter Eight • 64
10/06 Draft
Energy Audits
has been made from your library of replacement refrigerators, this data will be entered
automatically. Optional.
kWh/Yr – Enter the annual consumption in kWh/Yr for the replacement
refrigerator. This value may be obtained from the energy guide label of the
replacement unit. Otherwise, if your selection of a replacement has been made from
your library of replacement refrigerators, this data will be entered automatically.
Material and Other Costs - Enter the purchase (material) price of the replacement
refrigerator and any other installation or disposal costs associated with the refrigerator
replacement. Note that any costs incurred in disposing of the old existing refrigerator
must be included in this Other cost.
Height, Width, Depth, Size - Enter the dimensions of the replacement unit. These
entries are always optional. However, if entered for both the existing and replacement
units, NEAT will compare the entries and produce a warning if the entries indicate a
possible size problem related to the replacement. If you choose your replacement
from your library of replacement refrigerators and dimensions are available in the
library entry, these dimensions will be entered automatically. (Optional.)
The Replacement data block contains two un-editable fields. The Adjusted
Consumption field displays an adjusted annual kWh/yr for the replacement unit. The
only adjustment made for the new unit is based on the number of occupants. A larger
number of occupants will slightly raise the adjusted consumptions. The Annual
Savings field displays the difference between the adjusted annual kWh of the existing
and replacement refrigerators. This will be the savings used to determine the savings
to investment ratio in NEAT or MHEA unless the refrigerator is not located in a
“Heated Space.” If the refrigerator is outside the heated space, additional temperature
dependency adjustments will be made which cannot be performed until the job is
actually executed.
Comments - Enter comments about the refrigerator replacement you may want to
appear in the NEAT audit report. (Optional.)
8.7 Optional Entries under the Baseloads Water Heaters Form
Similar to the feature described above for heating systems, the Water Heaters
form under Baseloads also has an optional capability of documenting observations
associated with the water heater which may be encountered during the audit. Some
of these items may also constitute potential health and safety concerns. These details
10/06 Draft
Chapter Eight • 65
Energy Audits
are accessed from buttons lying to the right of the “Optional Water Heater Details”
title at the bottom of the form. You must complete the description of the existing
water heater before accessing these optional details. Not all items under these buttons
may be applicable to the specific water heater described. No attempt is made in this
manual to describe correct procedures for obtaining the measurements or performing
the inspections. You should refer to literature on standard HVAC or plumbing
practices or consult with a qualified plumber.
Optional Water Heater Details - tests, measurements, and inspections
A summary of the items contained under each of the buttons is given below.
Each form allows addition of an extended comment if necessary. Close each form
using the customary Windows X box in the upper right corner. Each form must be
closed before any other form can be accessed.
Operational Tests – This form allows recording information resulting from flue gas
analysis and carbon monoxide measurements performed in association with the water
heater. The form allows recording of these measurements before and after work has
been performed –“Conducted During Audit” and “Conducted During Inspection,”
respectively.
Operational Tests for water heaters
Chapter Eight • 66
Vent Tests for water heaters
10/06 Draft
Energy Audits
Vent Tests – The same Vent Tests form is used for both the Heating System and
the Water Heater. Information recorded includes characteristics of the flue and
damper as well as before and after
draft measurements on the flue
associated with the water heater.
Inspections – This form contains
mostly check boxes identifying
potential hazards associated with the
water heater. Fuel related items
include insufficient clearances, gas
leaks, and lack of a fuel shut off.
Related to the water itself are check
boxes regarding the water
temperature, pressure relief, and
presence of leaks.
See the
description under Section 8.9, Health
and Safety, on how the
Weatherization Assistance handles
health and safety items.
Inspections for water heaters
8.8 Base Loads - Lighting Systems
Data describing the existing lighting in the house is entered on the Lighting form.
If your program does not consider replacing existing incandescent lamps with compact
fluorescent ones, you can ignore this form. The form is used only to describe the
lighting fixtures you intend to consider for this replacement measure. If the Lighting
Retrofits measure has been turned off in the Candidate Measures form of Key
Parameters, this form will not be accessible.
Entries on this form are a follows:
Light Code – The Light Code allows you to identify the specific Light description
in the NEAT reports. NEAT will provide default entries of the form “LT#,” where the
# is the next higher consecutive integer above the number of lights already described.
Room – Enter the room in which the lights being described are located. The seven
choices are: (1) Family Room, (2) Kitchen, (3) Living Room, (4) Rec Room, (5)
Dining, (6) Bedroom, and (7) Utility. The entry is for the auditor’s use in locating the
lights for possible later retrofit. Optional.
10/06 Draft
Chapter Eight • 67
Energy Audits
Baseloads - Lighting Systems
Location (of existing incandescent lamps) – Describe the location of the lighting
fixture/s within the room using one of the following selections: (1) Ceiling, (2) Floor,
(3) Table, and (4) Wall. This entry is for the auditor’s use only in locating the lights
for later retrofit. Optional.
Lamp Type (of existing incandescent lamps) – Indicate the type of the existing
incandescent lamp, either Standard or Flood (reflective or spot). The default for the
replacement compact fluorescent’s wattage is determined by this entry and the
existing lamp wattage. Also, the materials report will indicate that the replacement is
to be either standard or flood, depending on your entry here. Required.
Quantity (of existing incandescent lamps) – Enter the number of lamps having the
description given by this record and which are candidates for replacement with
compact fluorescents. The entry is required with no default. Required.
Watts (of existing incandescent lamps) – Enter the wattage of the existing
incandescent lamp which is to be replaced. Standard incandescent lamp wattages are
25, 40, 50, 60, 75, 90, 100, and 150. The value is required and used in computing the
savings resulting from its replacement with a fluorescent lamp. The default for the
replacement compact fluorescent’s wattage is determined by this entry and the lamp
type. Default - 100. Required.
Hours/Day Used – Enter the average number of hours per day the lamp is normally
on. The value must be 24 or less. Your response to this entry has a considerable effect
Chapter Eight • 68
10/06 Draft
Energy Audits
on the savings associated with replacing the lamp. You should target this measure to
lamps with substantial on-times. The entry is required with no default. Required.
Replacement CF Watts – Enter the wattage of the compact fluorescent which is to
replace the existing lamp. The lighting measure will use the standard replacement
wattage closest to your entry. The default for this field is the wattage of the compact
fluorescent bulb which will give approximately the same light output as the wattage
of incandescent lamp entered in the Watt field for the existing lamp. Required.
Added Cost – Enter any added cost, in dollars per lamp, not normally associated
with installation of a compact fluorescent and not included in the standard material
costs. Replacing a fixture’s harp to allow the CFL to fit, or other size modification, are
examples. Default - 0. Optional.
Comments – Enter any comments relevant to the lamps described or retrofits to be
installed, such as the reason for any added cost recorded or physical restrictions.
Optional.
8.9 Health and Safety
In addition to the potential health and safety hazards which can be identified
under the Heating and Water Heater tabs, the Health & Safety tab permits
identification and description of additional safety concerns. These additional safety
related tests are divided into three categories: Whole House, Equipment, and Building
Health & Safety - Whole House
10/06 Draft
Chapter Eight • 69
Energy Audits
Shell. Each will be discussed separately below. Each form also provides the
opportunity to record extended comments. In addition, the Weatherization Assistant’s
extended handling of health and safety issues will be discussed below. This
discussion applies to similar issues and hazards which may have been identified under
the Heating or Water Heater tabs.
Whole House – This form allows the need for smoke or CO detectors to be
identified as well as carbon monoxide concentrations in various rooms of the home
to be recorded.
Equipment – This form is divided into data blocks addressing (1) Worse Case
Condition Draft Measurements (for heating systems and water heater), (2) Wood
Stove/Fireplace, (3) Clothes Dryer, (4) Cook Stove, and (5) Exhaust Fans and Heat
Exchanger.
Health & Safety - Equipment
The worst case draft tests allow multiple measurements to be recorded in a spread
sheet format. NEAT and MHEA allow these measurements to be taken for each of the
heating systems described on the Heating tab. Improper venting is a concern for wood
stoves, fireplaces, clothes dryers, and exhaust fans. In addition, wood stoves or
fireplaces may have inadequate combustion air, and bathroom or kitchen exhaust fans
may be missing or not operational. Individual burner and oven CO measurements can
Chapter Eight • 70
10/06 Draft
Energy Audits
be recorded for a gas cook stove. A gas leak associated with the gas stove can also be
identified.
Heating system worst case draft tests table
Building Shell – The Building Shell tab is divided into data blocks for Attic, Walls,
and Basement/Crawlspace. All three of these areas have the potential for wiring
problems, water leaks, or moisture related problems. In the attic, additional concerns
may be related to recessed lighting, the chimney/flue, or the presence of vermiculite.
Walls may use lead based paint or have asbestos siding. The basement may be in need
of a vapor barrier or exhibit plumbing problems. All areas can also be described as
having Other Problems, which could be explained in the comments.
Health & Safety - Building Shell
Handling of Health and Safety Issues – With the introduction of Version 8 of the
Weatherization Assistant comes an extended capability to handle health and safety
issues. Most of the data items under the Health & Safety tab, as well as some under
10/06 Draft
Chapter Eight • 71
Energy Audits
the Heating and Water Heater tabs, have check boxes which
indicate potential hazards. When selecting such a check box,
a red broad border is drawn around the box. All such noted
hazards are reported under both the Heating System and the
Two check boxes, one
Health & Safety Summary Reports for the audit.
indicating a hazard
In addition, a pre-defined weatherization activity
suggesting action to remedy the condition is associated with each potential hazard.
These activities are defined under the User Defined Measure tab of the Setup Library
(see Section [9.6], User Defined Measures). If you have selected the feature to
“Automatically generate Itemized Cost Records for Health and Safety Problems,” on
the Preferences / Feature tab (see the indicated topic in Section [11.4], Features), the
program will present you with additional options. When you select a check box
indicating a potential hazard, the Weatherization Assistant will ask you if you wish
to add a specific Health and Safety remedial measure as an Itemized Cost to your
recommended measures lists. You may review the specific Itemized Cost by clicking
on the small square with three periods in it, , which will be located just to the right
of the check box. Thus, using this feature, you may supplement your recommended
measures produced by running the audit with activities you intend to perform to
alleviate potential health and safety issues.
8.10 Itemized Costs
The Itemized Cost form on the Audits Main Menu item allows you to enter
additional costs which are expected to be incurred during weatherization that are not
associated with any specific activity otherwise addressed by the audit. The items
described on the form may have energy savings attributed to them. However, for the
purposes of this form, this energy savings would have to be assigned by the user.
You may specify these activities by supplying information to each individual
data field in the specific audit you are currently referencing. Used in this mode, the
form behaves as it did in Version 7 of the Weatherization Assistant with the exception
that you may specify the units of the energy saving as kWh, MMBtu, or therms. See
the “Itemized Additional Costs and User-Defined Measures” sections in the Version
7 NEAT or MHEA User’s Manuals for additional information on entering data on this
form.
Beginning with Version 8, you may alternatively call up activities you have
previously defined in your Setup Library and copy them to the audit. This is
accomplished by using the “Copy from User Defined Measures” or “Copy from
Chapter Eight • 72
10/06 Draft
Energy Audits
Library Health and Safety Measures” combo boxes. The former list will include costs
and measures you have defined in your Setup Library (see Section [9.6], User Defined
Measures). The latter are health and safety remediation items which come as part of
the program. and are the same items that are accessible from the Health and Safety tab
of the audit (see Section 8.9, Health and Safety). By choosing an item from either of
these combo box lists, the remaining information on the form will be automatically
copied from the Setup Library to the form, overwriting any existing information on
the form. The Measure Name will appear not only in the Measure Name field, but
also in the un-editable field under “Referenced User Defined Measure.” An entry
Itemized Costs form (specific to audit)
Note: The entry could have had a “Material” associated with it
in this un-editable field is your indication that the measure displayed on the form is
a copy of one previously defined in the Setup Library. In addition, if the measure was
selected from the list of Health and Safety items in the Setup Library, the text, “Health
& Safety Item #” will appear in red in another un-editable field in the same area of the
form, where the # is a number uniquely identifying the specific health and safety item
in the Setup Library.
There is one major difference between a measure totally specified on the form
and one copied from the Setup Library. The former can have only one component to
its cost and material description, that entered on this form. On the other hand, items
10/06 Draft
Chapter Eight • 73
Energy Audits
defined in the Setup Library can have multiple material/labor components, each with
its own individual cost associated with it. In this latter case, only the component
designated by the user in the Setup Library (presumably the major component) will
be displayed in the Material field, followed by a plus sign (+), indicating that there is
more to the material description of the measure than this single entry. The Cost field,
however, will display the total cost of the measure, comprised of the sum of the
individual component costs. You may review the complete description of the userdefined measure in the Setup Library by clicking on the small square with three
periods in it, , which will be located just to the right of the un-editable display of
Itemized Costs form (health & safety measure taken from Setup Library
the measure name. Note, however, this button takes you to the actual Setup Library
entry. Any changes to the measure made at this point will change the measure
description for all future references.
Although the display of a measure copied from the Setup Library will show
only one component on the Itemized Cost form of the Audit, the complete description
with all of its individual components will be available in any work order created from
the audit. Any modifications to the measure can be made at that time.
If you have chosen to copy a pre-defined item in creating an Itemized Cost and
you do not want this detailed material costing to be forwarded to the Work Orders,
Chapter Eight • 74
10/06 Draft
Energy Audits
click on the “Clear Reference to User Defined Measure” button. You are then free to
alter any of the entries displayed on the Audit’s Itemized Cost form for this item.
However, now only the single Material and Cost entered there will be associated with
the item and forwarded to the Work Orders. WARNING: Modifying the information
for an Itemized Cost or User Defined Measure generated by copying an item from
your Setup Library without first clearing the reference to the pre-defined item will
cause inconsistencies in data reported in the NEAT or MHEA Recommended
Measures report and that reported in the Work Orders.
A comment field is available to add any comment you feel appropriate. If the
entry on the Itemized Cost form has been copied from the user-defined items in Setup,
Itemized cost with energy savings (copied from the Setup Library)
the comment will initially be populated with whatever comment you entered for the
item entered there.
A Data Sheet view of the Itemized Cost form is available. However, care must
be taken if any changes are made from this view, as it may not be obvious which
measures are copies of pre-defined measures from Setup.
10/06 Draft
Chapter Eight • 75
Energy Audits
Data Sheet View of Itemized Costs form
Note: Columns not displayed include “Fuel Saved,” “Health & Safety Item #,” and “Comment.”
8.11 Utility Bills
Although optional, utility billing data you enter into the Weatherization Assistant
for the homes you weatherize can be a valuable source of information. NEAT and
MHEA allow you to compare its consumption predictions with pre-retrofit billing data
(see Section XX, Heating and Cooling Energy Comparisons). Then, if you desire, it
will adjust the measure recommendations and savings to reflect this actual
consumption.
Post-weatherization billing data may also be input to the programs and stored with
the other data for a house. Computer software exists which can use both pre- and postweatherization billing data to derive actual energy savings estimates, possibly useful
in program evaluations.
Both NEAT and MHEA permit entry of four sets of utility bills: pre- and postretrofit heating and cooling energy usage. If you wish to enter billing data, ask the
client for up to 12 months of utility bills. If the client has discarded these bills, he or
she may request consumption records from the local utility. Or, the client may sign a
release which grants you authority to directly obtain the data.
The programs cannot separate heating and cooling consumptions from a single
billing history when the same fuel is used for both conditioning components. Thus,
an electrically heated house with air-conditioning or a house with a heatpump cannot
use the billing data features unless you can successfully divide the electric bills into
their heating and cooling components before entering the data.
Chapter Eight • 76
10/06 Draft
Energy Audits
The billing data feature works best with metered fuels, such as natural gas and
electric. In fact, the billing data entry screens were designed for these two fuels. Use
with other fuels will likely require units conversions. Bulk fuels, such as propane or
fuel oil, which are delivered in bulk and stored in tanks at the house, are less
appropriate. Unless deliveries are relatively frequent and approximately the same
amount of fuel remains in the tank at the time of each delivery, use of billing data for
these fuels can lead to substantial inaccuracy. The following discussions will assume
electric or natural gas heat.
Utility Bills Data Entry Form
The billing periods entered must be consecutive. They may extend from one year
into the next, but must span one year or less. Thus, no two periods can include any
of the same days of the year in two years. The number of periods entered must be 12
or less. Examples of entries are (1) twelve consecutive monthly readings, (2) one
annual consumption, or (3) any number of periods, 12 or less, spanning less than an
a years time.
Each of the four sets of entries has the following data requirements:
Type - Select either 1- Heating or 2 - Cooling as the major purpose for which the
fuel entered is used. The fuel may also supply non-heating or cooling end uses, such
as cooking or water heating. However, you will have to enter an estimate of this
“Base Load” in a subsequent field.
10/06 Draft
Chapter Eight • 77
Energy Audits
Period - Select whether the data being entered pertains to a 1 - Pre-Retrofit or 2 Post-Retrofit period. Only pre-retrofit data will be used for measure savings
adjustments.
Units - Select either 1 - Therms or 2 - kWh depending on the fuel source and
season for which data is to be entered. Normally cooling data will be in kilowatthours of electricity and heating data in either therms or kilowatt-hours. The utility may
document natural gas consumption in therms, mcf (thousand cubic feet), or ccf
(hundred cubic feet). Mcf and ccf can be converted to therms by multiplying by a
value obtained from the local gas utility. Because heat content of natural gas varies
according to composition, ask the utility for the number of therms contained in a mcf
or ccf delivered to homes in the area. This value (in therms-per-ccf) should be entered
in the Setup Library (see Section [9.3], Fuel Costs). Most natural gas contains
approximately ten therms per mcf and one therm per ccf of natural gas. Other fuels
may require additional conversion, such as gallons of propane or oil. However, note
the warning above regarding recording bulk fuel consumption.
Days in first period - Enter the number of days included in the first billing period.
Subsequent periods are assumed to be contiguous, thus allowing determination of their
lengths.
Base Temperature - The Utility Bills Data Entry screens provide an option for
entering heating degree days (HDDs) and cooling degree days (CDDs) for natural gas
and electricity billing data, respectively. The degree-day information will not affect
any adjustments to the measure savings. It simply allows you to compare degree-days
used by NEAT with those from the actual billing periods. Heating and cooling degree
days are available from local utilities, state energy offices or the U.S. Department of
Commerce National Weather Service, Asheville, NC.
If degree-day information is to be entered, base temperatures for these HDD or
CDD values are required. Assume a base temperature of 65 F for HDDs and 78 F for
CDDs, unless different base temperatures are listed on the utility bills.
Base Load - Enter an estimate of the average base load consumption per month in
the units chosen in “Units” above. The period consumptions entered likely result from
not only heating or cooling, but also from use of appliances, such as stoves, water
heaters, or refrigerators. The Weatherization Assistant needs to separate this “base
load” consumption from the heating and cooling consumption. This entry is an
estimate of this base load consumption for an average 30-day month.
To determine the base load for the heating fuel yourself, select a month when the
heating equipment did not operate, most likely during summer. This month should be
one of normal household occupancy—no long term visitors or household vacations.
Chapter Eight • 78
10/06 Draft
Energy Audits
Determine the heating fuel consumption for that month, in the units selected in the
“Units” field.
To determine cooling base load, select a month with no electric heating or air
conditioning consumption, most likely during fall or spring. The number of kilowatthours consumed is the base load.
The programs will adjust this value to correspond to each of the billing periods,
regardless of their duration. You may wish to leave this field blank until after entering
the actual billing data for the periods. A default value for the base load will then be
computed that reflects the period data entered.
Comments - Enter any comments regarding this particular set of billing data you
wish to be displayed in the output reports.
The above data is entered once per set of billing data. The following data are
required for each billing period within a set. They appear on the right side of the input
screen in a tabular format.
Month - Enter the number of the month in which the meter reading corresponding
to the billing period was taken (e.g. January - 1; February - 2, etc.).
Day - Enter the day of month on which the meter reading corresponding to the
billing period was taken.
Usage - Enter the consumption during the billing period. The units are those
selected in the “Units” field to the left.
Degree Days - Enter the number of heating or cooling degree-days (depending on
the “Type” selected) corresponding to the period.
8.12 Photos (Audit)
If you have selected the Photo Browser check box (Feature 1) on the
Preferences/ Features tab, the Photos tab will appear on the Audit form. From this tab,
you may select, view, and edit digital photos for the specific client currently being
referenced. See Section [13.1], Digital Photos, for more information on this feature.
Note that the ability to reference digital photos also exists at the Client and Work
Order levels. You should develop a consistent policy regarding where you reference
your photos.
10/06 Draft
Chapter Eight • 79
Energy Audits
8.13 Measures (Audit)
New to Version 8 of the Weatherization Assistant is the optional feature of
creating work orders. If you want these work orders to be created based on the results
from running either the NEAT or MHEA audits, the Measures tab of the Audit Main
Menu item is the starting point for this process. An alternate use of the work order
feature is to tailor the NEAT and MHEA recommendations to reflect actual conditions
or to add as much detail to the measure descriptions and costs as desired.
Following execution of either audit program, the Measures tab will list all
measure recommendations [similar to the listing in the Recommended Measures
report, see “Audit Report Block” in Section 6.2, Audit Information, and Appendix [A].
For each measure, the measure name, any building component designations applicable
to the measure (see the appropriate NEAT or MHEA User’s Manual), the total
measure cost, and SIR will be displayed. Notice that “Est” prefaces the cost and SIR
header names. This reminds the user that these are estimated costs and SIRs based on
estimated costs, used by the audits to make their initial recommendations and may not
be the same as actual costs and SIRs seen following implementation of the measures.
These are all un-editable fields, reflecting the assumptions used by the audits and their
recommendations. A breakdown of the costs for the standard audit measures can be
viewed by either double clicking the mouse on the Cost entry itself or selecting the
Costs button to the right of the measure description. However, these displays are still
un-editable.
The following items on the Measures tab can be altered and are used in creating
the work order(s) associated with the audit.
WO? – The header name is short for “Include in work order?” Check this box for
each measure you want transferred to a work order. Measures not selected will not
be sent to a work order. You may wish not to send a specific measure to a work order
because a work order already exists which includes the measure or because you are
rejecting the audit’s recommendation with regard to the measure. The “Select All,”
“UnSelect All,” and “Invert Select” buttons at the lower left of the form allow you to
accept all of the recommended measures, reject (unselect) all, or invert the selection
currently seen from the check boxes.
Contractor – This field allows you to assign each measure to a contractor. The
selection will determine how many work orders are created from the measure list. All
measures assigned the same contractor will be included in the same work order. The
choices displayed in the combo box list will be all Agency Contacts defined as
Chapter Eight • 80
10/06 Draft
Energy Audits
Itemized Cost with energy savings (copied from the Setup Library)
Contractor or Crew (see Section [5.2], Contacts (Agency)). The entry is optional. All
measures with an unassigned Contractor that are selected for transfer to a work order
will be assigned to the same work order with the contractor un-designated. If you
have assigned a Default Contractor to a particular measure in the Setup Library (see
“Default Contractor/Crew” under “The General Task Description” in Section [9.6],
User Defined Measures) and that measure is recommended, the default contractor will
automatically be entered for you. However, you may still change the selection if you
desire. Optional.
Cost Center – If you are tracking costs that are incurred by different funding
sources or programs, assign the cost of implementing this particular measure to the
appropriate Cost Center. The choices available in the combo box list will be those
you have defined under the Cost Center tab on the Agency Main Menu item for your
agency (see Section, Cost Centers). The entry is optional. If the entry is left unassigned, work orders can still be developed, but total costs over multiple audits will
not tracked. The costs which are assigned to the various cost centers are not the
estimated costs displayed on this Measures tab. They are the actual costs declared in
the work orders themselves (see “Quantity (Actual)” and “Unit Cost (Actual)” under
10/06 Draft
Chapter Eight • 81
Energy Audits
“The Materials/Labor Details Sub-Form” in Section [8.3], Measures (Work Order)).
If you have assigned a Default Cost Center to a particular measure in the Setup
Library (see “Default Cost Center” under “The General Task Description” in Section
[9.6], User Defined Measures) and that measure is recommended, the default cost
center will automatically be entered for you. However, you may still change the
selection if you desire. Optional.
When you are satisfied with the choices made for the entries described above,
you will need to decide whether you wish to transfer the estimated costs associated
with each measure to the work orders you are about to create. The costs transferred
will include the detail displayed by selecting the Costs buttons to the right of the
measure descriptions on the form. For measures copied to the audit from the Setup
Library (see Section 8.10, Itemized Costs), this detail will include as many costing
components as were defined in the Setup Library (see “The Materials/Labor Details
Sub-form” in Section [9.6], User Defined Measures). If you do wish to include the
cost data, select the “Include Details for Materials” check box in the lower right of the
form. Work orders will be created having their estimated costs identical with the
detailed costing of each measure as seen by the audit.
If you would rather create work orders with no cost data associated with the
measures, do not select the “Include Details for Materials” check box. This may be
chosen in order to make it easier to enter costing of the measures in the work orders,
perhaps expected to have greater detail than available from the estimated costs used
by the audits. The costing used by the audits will still be available to you in the work
orders and you may still transfer these costs to the work orders individually, measure
by measure, if you so choose.
Select the “Create Work Order(s)” button when ever you are ready to actually
create the work orders based on the information provided on the Measures tab. If you
have previously created work orders from this specific audit, a form will be displayed
asking if you prefer to (1) Save the previously existing work orders and create
additional work orders – leaving the potential for duplicate measures being included,
(2) Replace all work orders previously generated from the audit with new ones based
on the criteria currently on the Measures form, or (3) Cancel the request to create
work orders. Any work orders not created from this specific audit are unaffected by
the request to create work orders from this Measures tab of the audit. Thus, if you
used the Work Order tab under the Client Main Menu item to initiate and then fill in
work orders for a client, then ran an audit for the same client and asked to create work
orders based on the audit recommendations, the two sets of work orders will exist for
the same client. The program’s behavior is intended to address situations where
Chapter Eight • 82
10/06 Draft
Energy Audits
agencies may implement some measures outside an audit (such as from a priority list),
but use the audit for recommendations on other measures.
The program will next provide a small window displaying how many work
orders were created as a result of your selections on the Measures tab. This should
correspond to the number of unique contractors, including un-designated, you
indicated on the form. Pressing the OK button will take you to the Work Order Main
Menu item for the first work order created as a result of your request. You will see
a work order whose default name will be of the form, “WO/<Client ID>/<Contractor
ID>/#.” The <Client ID> is the Client ID supplied for the Client on the Client
Information tab of the Client Main Menu item and the <Contractor ID> will be the
Contact User Name assigned to the Agency Contact designated as a Contractor or
Crew on the Contacts tab of the Agency Main Menu item. The “#” is an integer
assigned to insure uniqueness of the Work Order Name.
Having created work orders from the audit recommendations, you are prepared
to make any modifications to them before printing out the actual work orders. See
Chapter [8], Work Orders, for additional information.
10/06 Draft
Chapter Eight • 83