1
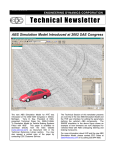
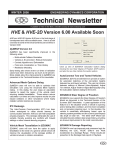
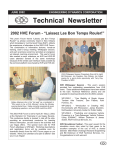
SUMMER 2003 ENGINEERING DYNAMICS CORPORATION Technical Newsletter 2003 HVE Forum - Humans, Vehicles and Elvis? HVE White Paper Session This years papers presented topics of interest ranging from scene data collection, to vehicle loss-of-control simulation, to the study of possible injury causation of occupants during a crash. The following White Papers may be downloaded directly from the EDC website: WP-2003-1 Downhill Commercial Vehicle Simulations - Part A (Tractor/Semi-trailer Brake Fade) WP-2003-2 Downhill Commercial Vehicle Simulations - Part B (Intercity Bus Equipped with an Engine Data Recorder) WP-2003-3 Reconstruction of Real World Side Impact Vehicle Elvis Grimes challenging Jack Beemer with HVE related Collisions Using HVE - A Case Study of Pediatric Pelvic Fracture questions in a round of HVE Jillionaire during Monday night social hour activities. WP-2003-4 Investigating the Use of Simulation Model Non-linear (SIMON) for the Virtual Testing of Road The 2003 HVE Forum once again brought HVE and HVE-2D users together to learn more about their software and to network with other users in a relaxed environment. The Users Group Meeting, the HVE White Paper session and all of the workshops were well Humps WP-2003-5 Constructing Detailed Road Surfaces for Vehicle Dynamics Simulation Using 3D Laser Scanning Techniques attended and received excellent reviews. As part of the weeks activities, a special guest was invited to host the Monday evening couldnt have contestants Jillionaire better win hosted HVE game. the Dollars The game good real and Elvis helped towards the purchase of EDC products and services. 2004 HVE Forum - San Francisco, CA Planning is already underway for the 2004 HVE Forum. Mark your calendar for the dates of May 3 - 7, 2004. The Crowne Plaza - Union Square hotel in downtown San Francisco, California, will serve as the conference hotel. Special room rates for attendees have been arranged with the hotel. Registration forms, workshop schedules and workshop descriptions will be available for download from the EDC website. Please visit the 2004 HVE Forum page at www.edccorp.com/service/hveforum.html. HVE White Paper Session Presenters posing for a quick group photo with Terry Day. (From left to right) Larry Jackson, Shresta Marigowda, Terry Day, Fabian Marsh, Iwan Parry and Yoganand Ghati. Technical Newsletter SUMMER 2003 Technical Session This Technical Session explains how the brake system on a 3-D simulation model (e.g., SIMON, EDVSM) Pedal Force Table (Force ) Pedal Ratio æ Press ö ç ÷ è Force ø works. 3-D simulation users will note that the driver brake table includes Pedal Force the option (2-D Pro Valve æ Press ö ç ÷ è Press ø simulations, not having a brake system model, include only the Wheel Force and % Available Friction options; ABS Sys æ Press ö ç ÷ è Press ø although these options may be available in some 3-D simulation models, they reduce the quality of the results Brake Torque and EDC does not recommend their use). æ ç è The 3-D brake system model in the simulation works Ratio Torque ö ÷ Press ø just like it does in a real vehicle. It starts with the driver Brake Torque (Torque ) pressing the brake pedal (in the simulation, this is presented as a table of brake pedal force vs. time). The master cylinder converts this force to brake system Brake pressure (in the simulation, this is called the Pedal Ratio). The system pressure may then be Figure 1 - Schematic flow of 3-D brake system simulation model reduced through a proportioning valve (modeled by a Threshold Pressure and Proportion Ratio). Next, the system pressure may be modulated at each wheel by an ABS system. This modulation is controlled by a The tire longitudinal slip is then: computer software algorithm in the simulation, just as it Slip = is on the actual vehicle. Finally, the system pressure is converted to brake torque by the assembly. The simulation calls this the Ratio. wheel brake VWheel Center Brake Torque The entire process is shown schematically in Figure 1. The tires friction (mu vs slip) data are then used to determine directly for the start of the next timestep the So, how does the resulting brake torque actually result in braking? In addition to equations of motion for linear motion VWheel Center - VxTire (X,Y,Z) and rotation (roll, pitch, yaw), 3-D simulations also have equations of motion for wheel spin. Application of first principles to wheel spin, W Wheel , results in: longitudinal braking force, Earlier we said that the Friction FxTire. Wheel Force and % Available brake table options were not recommended. It is now clear why: Use of either of these methods bypasses completely the wheel spin equations of motion. Any details related to tire spin dynamics are completely lost. Obviously, ABS simulation is also not && SM = Brake Torque - FxTire = ISpin W Wheel From this, wheel spin acceleration, && W Wheel , possible when either of these options is used (refer to the December 2001 Technical Newsletter for more is calculated Ispin is contstant and Brake Torque and FxTire for the details). ( current timestep are known): A question sometimes asked by new 3-D users is, How can I tell how much pedal force to use? There are a && W Wheel = BrakeTorque - FxTire couple of ways to answer this question. First, you have your ISpin common sense and years of actual driving experience. Think about it: You probably apply around 10 lb during a normal brake application, and maybe 50 Numerical integration is used to update the spin velocity lb of the wheel for the start of the next timestep. Using this analytical type, heres a method for you: First, create a patch is calculated: VxTire, RTire, more) during heavy braking. If youre the (also brake table that varies from zero force at time zero, and at the tire contact increases to 100 lb at 5 seconds. Start the vehicle at a spin velocity and the current tire radius, known), the linear velocity, (or high speed, say 80 mph, and execute the run. Then produce a graph of Forward Acceleration vs Brake VxTire = W Wheel × RTire & 2 Pedal Force. Voila! You now know precisely how hard to press the brake to achieve a desired deceleration. SUMMER 2003 Technical Newsletter HVE Brake Designer As shown earlier, 2003 HVE Forum Brake Torque Ratio is one of the key players in the calculation of brake torque. By default, Brake Torque Ratio is a single lumped However, we can go a step further: Top 10 Wish List parameter assigned for each wheel and editable by the user. Brake Torque Ratio Each year at the HVE Forum, attendees to the Users Group meetings develop a Wish List of additional can also be calculated using the mechanical and functionality or enhancements for HVE and HVE-2D geometrical in that they would like to have EDC implement over the properties the individual brake assembly. The HVE Brake Designer does exactly that. next 12 months. The groups suggestions are then narrowed down by voting for their Top 10 choices. Here Different types of brakes (disc, various types of drums, are the lists from the 2003 HVE Forum: S-cams, wedge, etc) are mechanically different from HVE Users’ Top 10 Wish List each other. Free-body diagrams of the forces acting between the pads and rotor (or shoes and drum) are 1. DyMESH used to compute the brake torque ratio for each of eight-different user-selectable brake types. The brake torque ratio will also vary as changes in brake temperature dynamically affect lining friction. Thus the model allows for a very thorough analysis of brake failure mechanisms. A good example of this is the study of marginal brake adjustment on the ability of a truck driver to maintain control while traveling over a 2. Tire Model/Sidewall Contacts 3. Save Camera View 4. Accelerometer Tracer 4. Display Key Results in Playback Window 4. Print All Reports 5. Heavy Truck Air Suspensions long down-hill grade. See the following three articles for 6. Add Vehicle to Existing Event examples: SAE Paper No. 200-01-1294, September 7. Dynamic Payload Shift 1999 EDC Technical Newsletterr, WP#2003-5. Contact EDC if you would like to receive copies of these articles. ABS 7. Attach Camera to Follow Target 7. Tire Interaction With Other Vehicles and Humans ABS An 7. Elliptical Air Bags (Anti-lock Braking System) system is an optional component that, when present, plays a major role in the calculation of brake torque (see Figure 1). ABS works by reducing brake system pressure, and therefore brake torque, so as to prevent wheel lock-up. This task is accomplished by monitoring the current longitudinal tire slip (actually, it is the wheel spin velocity and acceleration that are being monitored by 7. Retarders HVE-2D Users’ Top 10 Wish List 1. Path Follower 1.Create EDSMAC event from EDCRASH results (like EDVAP) 3. Undo Command (history of last 20 or so actions.) the ABS computer; longitudinal tire slip may then be 4. Include open report windows in current object list, inferred). and enable minimize for all report windows in Playback When tire slip reaches a specified level, system pressure is quickly dumped from the brake, thus 5. Are you sure? message when clicking intermediate allowing the wheel to again spin freely. Pressure is then position allowed to rebuild. The main goal of this process is to 5. Copy and paste contents of all report windows keep the tires rolling so the driver can steer the vehicle. Reduced braking distance is a secondary benefit. For more information about calculating brake torque, refer to the HVE Users Manual, Section Eleven - HVE Brake Designer. Or contact EDC Technical Support were always glad to help! 7. Make EDCRASH damage profile visualized like v1.33 and EDVAP 7. Lock cursors Z coordinate to zero in 3D editor, or allow to pick friction zone vertices in event viewer 7. Add, remove or switch vehicles in an existing event 10. Insert text into report windows 3 Technical Newsletter SUMMER 2003 Using Aerial Photos as Scene Drawings Many users are working with aerial photographs as the background for their reconstructions and simulations. These photographs may be from a company hired to provide a specific digital image or downloaded directly from image libraries available on the internet as shown in Figure 2. Figure 3 - Material Texture Editor dialog displaying the selected image to be applied to the surface. 3. Build a surface in the 3D Editor that corresponds to the size and shape of the image that you have created. If 1 inch equals 100 feet in your image and your image is 5 inches on edge, make the surface 500 feet. 4. After completing your surface and preparing it for Figure 2 - Example aerial photograph of a crowded editing, choose 3D intersection obtained from a company specializing in menu. Edit, Material Texture from the providing aerial images over the Internet dialog. Choose your image from the list of textures on This will display the Material Texture Editor the left hand side of the Material Texture dialog as There are different techniques for using these images, but the basic concepts are similar. manipulate the image in a shown in Figure 3. You may need to photo/drawing editor 5. Check the appearance of the image on the sample program. Then, you can use the capabilities of the 3D and adjust the rotation if required. Editor to apply a material texture to a surface and button to attach the texture to your surface. Click the Accept create your scaled site. Here are two approaches that At this point, if you are using a rectangular image, you you might consider: will need to adjust the Repeat and also the Translate Approach 1 - You may find it easiest to match a square settings for the image. image to a square surface in the 3D Editor. be You will the longest side The value used for Repeat will of your image divided by the need to add background area or crop your image to shortest side. make its dimensions a perfect square. pixels is a Repeat value of 2. This will shrink (scale) the Approach 2 - You may choose to work with a rectangular image and use the translation and repeat sliders on the Material Texture dialog to match your image to the surface. For either approach, follow these general steps: 1. Determine the size of the image in inches or pixels and also the scale of the image in feet per inch or pixel. For example 600 pixels divided by 300 texture which was stretched to a square in the Material Texture dialog started with. back to the rectangular shape you You need to click the Accept button to update your image displayed on the surface. 6. Thats it! Now create an event and place a vehicle on your suface to test the scale of your scene. As a side note, you could use the advanced capabilities of a 3D modeling program to create a 3D terrain model 2. Make sure your image is saved in the proper location and then map an aerial photograph to the surface. This of /supportFiles/images/environments/EnvTextures. It provides must be in this location to be available as a texture in accounts for terrain irregularities and changes when the 3D Editor. vehicles drive on the surface. 4 the scaled image appearance and also SUMMER 2003 Technical Newsletter Q: Can I make a QuickTime format movie directly from the Playback Window? User Hints and Tips HVE HVE-2D Users make the most of their software. A: No. The Playback Window produces an AVI format Not movie, This section contains useful hints and tips to help and Ø satisfied with the image quality of your movie. If you need to produce a different format of such as QuickTime or mpeg, you need to movies, but dont want to change the video codec convert the movie using a movie editing program such you are using? as Adobe Premier. Try increasing the settings for Anti-Aliasing from 1 to at least 3. (It is best to do this just after you set your Destination to AVI, as it increases the time to refresh the screen.) will see immediate improvements. You Some users report adjusting the setting up to 10 to achieve a very clear, crisp image. The only drawback to increasing your anti-aliasing setting this high is the length of time your graphics card will take to refresh the screen. Youll have to try and decide for yourself. Remember, if you do turn up your anti-aliasing settings, be sure to set them back down to 1 after making the movie, otherwise your program will be very slow to respond. Q: I’ve been working on the main collisions of my multiple vehicle crash simulation, but now I want to add an additional vehicle to my EDSMAC4 event? Is this possible? A: No. When you first created the event, you selected all of the objects that would be allowed in the event. You cannot add or remove any vehicles from the event. However, you have two possible choices to consider. One is to recreate your additional vehicle initially. entire event and add the The other is to add an additional event with only the new vehicle and then combine the Traj Sim sequences together in the Playback Window to complete your sequence. HVE and HVE-2D F.A.Q. Q: I try to run HVE and I immediately get an error message from Windows saying that the program failed to initialize. Why can I not run HVE? Q: I have a 16 second simulation run, but I only want to make a movie of the action from t = 5 seconds to t = 13.6 seconds. I’ve tried moving the slider to select the correct starting frame, but when I change the Destination to AVI and press the Play button to begin recording, the sequence starts from the beginning t = 0 . Do I have to use an external movie editing program, or can I somehow do this within the Playback Window? A: A: You can do this within the Playback Window. What This section contains answers to frequently asked questions submitted to our Technical Support staff by HVE and HVE-2D users. The error message you received probably read something properly like The application (0xc000142). Click failed OK to to initialize terminate the you need to do is to play the sequence forward from the beginning point recording. application. to the where you want it to start (Dont try to use the slider to set it to a starting frame). Press the Pause button to stop the This error occurs when a Windows program (often sequence and then change your render settings (if running OpenGL. desired). Change the Destination to AVI and press the When HVE starts it has to access OpenGL, so the Play button. Your movie will begin recording from that restriction results in HVE failing to initialize. To correct frame forward. the problem, you must stop the program/service that want to stop the recording, press the Pause button and has exclusive control over OpenGL. change your Destination back to the Playback Window. as a service) restricts access to When you reach the point where you When you view your AVI, you will see that you have Two programs that we are aware of that cause this recorded the exact sequence you wanted to. problem are MatLab and PCAnywhere. If one of these programs is running as a service, change the Startup Type of the service to Manual. Or you can disable the MatLab or right-mouse PCAnywere clicking on program their icon temporarily in the by Taskbar Notification Area and then choosing disable or exit. F.A.Q.’s on EDC Website The EDC website provides a special section dedicated to Technical Support, including answers to F.A.Q.s from this and previous Newsletters. We encourage you to visit this page to search for answers to your questions If you find other programs that cause this problem, please contact EDC Technical Support. before contacting Technical Support for assistance. Go to www.edccorp.comand follow the links to Support. 5 Technical Newsletter SUMMER 2003 Next, Contributors Corner Interested in learning how to improve the appearance of the textures applied to your environment model? Here is a method submitted by user Eric use the Image/Image Size command to determine the dimensions of the texture map in pixels. Deyerl The cement.tif texture supplied in HVE is 256 pixels by 256 pixels. for smoothing out texture maps to reduce the tiling effect which often occurs when using a texture map available Next, engage the Filter/Other/Offset command. In the window which appears, enter the values of 128 in the Horizontal and Vertical boxes, and put a check in the straight out of the box. box labeled Wrap Around. This will cause the texture As an example, lets look at a texture map intended to represent a concrete surface in HVE. This texture map is stored as a file named cement.tif which is located in the /supportFiles/images/environments/EnvTextures to be shifted exactly half its dimension in both the vertical and horizontal directions. By doing this, you have just created a texture tile whose pattern will match exactly with the edges of the tiles adjacent to it on all sides when the texture is repeated. Figure 5 depicts the directory within the HVE program directory. results of the application of this filter in Photoshop If you used HVEs 3D Editor and created a rectangular compared to the original texture. roadway surface with dimensions 50 feet by 200 feet and applied the standard cement texture to the surface at a repetition of 2.5 cycles in X and 10 cycles in Y, youd get the environment model shown in Figure 4. Figure 5 - Original texture map (left) and texture map with offset filter applied (right) Figure 4 - Roadway with unsmoothed concrete texture map Were not quite done yet, though. As you can see, the offset filter has eliminated the differences in patterns at the edges of adjacent texture maps, but it has created a A viewer of the scene gets the general idea that the surface is comprised of concrete, but the effect is not entirely realistic because of the pronounced tiling effect created by the repeated square boundaries of the pair of vertical and horizontal discontinuities which run across the middle of the texture. To minimize this effect, click on the Clone Stamp tool in Photoshop. Use this tool to copy smooth areas of the texture onto the hard discontinuities across the middle of the texture. applied texture. This effect can be reduced by modifying the edges of the texture map so that they match better when the pattern is repeatedly applied to a surface. Heres how. To make this effect realistic, use a medium-sized brush with a feathered edge from the Brushes palette (a 45 pixel brush works well). You may have to make multiple First, open the texture map within an image editing application. This article will describe how to modify the texture using Adobe Photoshop 7.0, but other software packages should have similar features. Before proceeding further, be sure to save the file with a different name so you can experiment freely without fear of losing the original file. 6 attempts to get the effect just right. Also, take care not to modify the texture near the edges of the map, as the edges by definition already match perfectly from the application of the offset filter, and any changes to the texture near the edges will destroy this effect. Figure 6 depicts the texture after manipulation with the Clone Stamp tool. SUMMER 2003 Technical Newsletter Suggested Computer Requirements: EDC Needs Your Help We are constantly trying to offer advice to users about their choice of options and upgrades for computers they are considering purchasing for their office. However, it seems like there are new configurations of processor and graphics cards available every day of the year. We need your help in determining if there are Figure 6 Texture map after offset filter and smoothing configurations via the Clone Stamp tool running HVE (HVE-2D). If you have followed all of the out there that have problems with troubleshooting tips to try to correct your problems and are still experiencing random program crashes or not Youve now completed the modification of the texture map. Try applying the new texture to the roadway surface you created in HVE. likely find that it appears smoother and more realistic as Youll notice that there is still repetition in the surface smoothed but is, after the texture map has been all, all of the dialogs being displayed on your computer, please contact EDC Technical Support. Compare it with the surface mapped with the unmodified texture, and youll shown in Figure 7. seeing still being repeated. However, the effect is now less noticeable. Now, your vehicles will appear less like they are traveling across a dance floor. Good luck! We have heard that some notebook computers and desktop computers with ATI Radeon graphics chipsets can provide extremely sluggish reponse when running HVE, or will not properly display environment models. Users have typically returned these computers and bought others with different graphics cards to avoid the problem, without ever telling us the make and model of the one different that gave them configurations information we really problems. out need there, to With this know! so is many detailed Using this information we will be able to pinpoint and study the issues and then identify solutions to overcome any problems. Call for Papers and Simulation Movies If you are interested in presenting a technical paper in the HVE White Paper session or contributing a simulation movie to the HVE Simulations Festival for the 2004 HVE Forum, now is the time to prepare. Figure 7 - Roadway with smoothed concrete texture map For the HVE White Paper session, please submit your abstract to EDC Customer Service before October 15, If you have any questions or would like to discuss the techniques described in this Contributors article, please contact the author: Corner 2003. Please include complete contact information for the lead author with each abstract submission. If you would like to discuss possible topics for your paper, please call and talk them over with us. Eric Deyerl, P.E. 214 Main Street, Suite 303 For the HVE Simulations Festival, you are welcome to El Segundo, CA 90245 submit any simulation movies from previous cases, or (310) 615-2600 to prepare an example of your own creation. [email protected] contact us to discuss the format (file, tape, etc) that is best for submitting your movies. 7 Please Technical Newsletter SUMMER 2003 EDC Training Courses EDC Reconstruction & EDC Simulations EDC offers an excellent training course on the use of EDCRASH. Both EDCRASH agree that the the EDC reconstruction program, new and long-time users of EDC Reconstruction course is extremely beneficial and challenging. Vehicle Dynamics Theoretical and Applied Vehicle Dynamics extends the theory of the basic SAE course and includes direct applications using several vehicle simulation programs (e.g. of EDC simulation programs, such as EDSMAC, The EDC EDSMAC4, EDSVS and EDVTS. Simulations course offers the fastest way to learn what within the HVE simulation for such simulations. The course is focused towards vehicle design engineers and safety researchers with an EDC also offers an excellent training course on the use SIMON, EDVSM) environment, as well as a solid theoretical background interest in dynamics a greater and understanding automotive of chassis vehicle systems development. Hands-on Training you really need to know how to efficiently use the Intensive hands-on training on how to use your program and get the right results. HVE-2D system databases These one-week courses are designed to fully investigate the programs inner workings. Lectures are Service is for software, available. more physics Contact information HVE or programs EDC about and Customer bringing this two-day on-site course to your office. full of helpful hints gained from years of experience. During the course, students will use the programs (e.g. EDCRASH, EDSMAC4) in either the HVE or HVE-2D simulation environment to complete several workshops highlighting the capabilities of the programs. Course Registration You may register for Customer Service at a course by contacting EDC 503.644.4500, or by email to [email protected]. You can also visit the Training pages HVE Forum HVE Forum is an excellent opportunity for HVE and HVE-2D users to jump to a new level of ability. By The on our website and download a course registration form. All courses are eligible for Continuing Education and ACTAR credits. See you at our next course! participating in workshops, attendees brush up on their present skills, learn new techniques, and learn how to use the latest advancements in the software. The HVE Forum also presents a great opportunity to meet other users and expand your network of resources. Related Training Courses Northwestern University (NUCPS) no is COMPTAR Engineering Dynamics Corporation Training Course Schedule and EDCRASH and these EDSMAC. courses for actively MATAR covered in Center longer Public Safety scheduling courses which the used The material previously is available in the Reconstruction and EDC Simulations courses. EDC If you are interested in hosting one of these courses at your EDC Simulations location, please contact EDC Customer Service at 503.644.4500. Los Angeles, CA . . . . . . . . . . . . . . . . .January 2005 Miami, FL . . . . . . . . . . . . . November 10 - 14, 2003 EDC Reconstruction Los Angeles, CA . . . . . . . . . .January 19 - 23, 2004 Miami, FL . . . . . . . . . . . . . . . . . . . . November 2004 Theoretical & Applied Vehicle Dynamics Engineering Dynamics Corporation 8625 SW Cascade Blvd, Suite 200 Beaverton, Oregon 97008-7100 USA Phone 503.644.4500 / FAX 503.526.0905 Email: [email protected] Website: www.edccorp.com TBA . . . . . . . . . . . . . . . . . . . . . . . . . . Fall 2003 EDVAP, EDCRASH, EDSMAC, EDSMAC4, EDCAD, EDSVS, EDVTS, EDHIS, EDVSM, 2004 HVE FORUM San Francisco, CA . . . . . . . . . . .May 3 - 7, 2004 EDVDS, EDGEN, EDVDB, HVE, HVE-2D, HVE Brake Designer and GetSurfaceInfo() are trademarks of Engineering Dynamics Corporation. All Rights Reserved. SIMON and DyMESH (Patent number 6,195,625) are registered trademarks of Engineering Dynamics Corporation. All Rights Reserved. GATB is a trademark of Collision Engineering Associates, Inc. 8