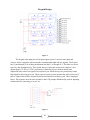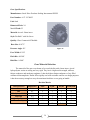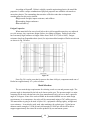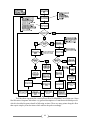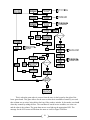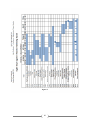
1
HARDING UNIVERSITY
Single Player Against
Machine BAttleship Game
Final Design Report
Matt Goodhart
Timothy Hoffmann
Matt Lewis
12/8/2009
Tatiana Zeledon
Table of Contents
Requirements Specification ....................................................................................................... 4
Overview ....................................................................................................................... 5
Operational Description ............................................................................................... 5
Deliverables ................................................................................................................... 5
Draft User Manual ........................................................................................................ 6
User Interface ................................................................................................................ 7
Capabilities.................................................................................................................... 7
Testing ........................................................................................................................... 7
System Design ............................................................................................................................ 9
Background ................................................................................................................. 10
System Overview ......................................................................................................... 10
Functional Description of Blocks ................................................................................ 11
Block Diagram ............................................................................................................ 15
Electrical Design ...................................................................................................................... 16
Power Supply Circuit .................................................................................................. 17
Digital Logic Design .................................................................................................... 18
LED Array Design ...................................................................................................... 19
Keypad Design ............................................................................................................ 20
Electromagnet ............................................................................................................. 21
LCD Selection ............................................................................................................. 22
Microcontroller ........................................................................................................... 22
Mechanical Design ................................................................................................................... 23
Frame Design .............................................................................................................. 24
Stepper Motor Selection ............................................................................................. 26
Ball Selection ............................................................................................................... 27
Ship Sensor Design...................................................................................................... 37
Push Button Selection ................................................................................................. 38
Gear Selection ............................................................................................................. 38
Gear Material Selection .............................................................................................. 39
Rack Selection ............................................................................................................. 40
Gear Calculations ....................................................................................................... 42
Mechanical Analysis of Movement System ................................................................ 43
Mechanical Analysis of Sensing System ..................................................................... 45
Software Design ....................................................................................................................... 48
SPAMBAG Process Flow ............................................................................................ 49
Game Initialization ..................................................................................................... 50
Ship Placement ............................................................................................................ 51
Generate Computer Move .......................................................................................... 53
Checks for Ship ........................................................................................................... 55
Ball Placement............................................................................................................. 56
Ask User for Info Regarding Hit ................................................................................ 57
Determine if Game Over ............................................................................................. 58
Set as User’s Turn ....................................................................................................... 58
Take Input from User ................................................................................................. 59
2
Light up LED .............................................................................................................. 60
Determine Hit Information ......................................................................................... 60
Game is Over Process ................................................................................................. 61
Budget 62
Estimated Cost of Supplies ......................................................................................... 63
Budget Evaluation....................................................................................................... 64
Purchase List ............................................................................................................... 65
Gantt Charts ............................................................................................................................ 66
Schedule Evaluation.................................................................................................... 67
Fall 2009 ...................................................................................................................... 68
Spring 2010 ................................................................................................................. 69
Work Breakdown Schedule ........................................................................................ 70
Technical Drawings ................................................................................................. Appendix A
S-R Latch Data Sheets ............................................................................................. Appendix B
NAND Gate Data Sheets.......................................................................................... Appendix C
Power Rectifier Data Sheets .................................................................................... Appendix D
Multiplexer Data Sheets .......................................................................................... Appendix E
LED Data Sheet ....................................................................................................... Appendix F
Push Button for Keypad Data Sheet ....................................................................... Appendix G
LCD Data Sheets ..................................................................................................... Appendix H
Microcontroller Data Sheets .................................................................................... Appendix I
Voltage Regulator Data Sheets ................................................................................. Appendix J
Electrolytic Capacitor Data Sheet ........................................................................... Appendix K
Resistor Data Sheet.................................................................................................. Appendix L
Electromagnet Data Sheet ...................................................................................... Appendix M
Transformer Data Sheet .......................................................................................... Appendix N
Encoder Data Sheets ................................................................................................ Appendix O
Power MOSFET Data Sheets .................................................................................. Appendix P
Plexiglas Data Sheet ................................................................................................ Appendix Q
Stepper Motor Data Sheets ..................................................................................... Appendix R
Steel Ball Data Sheet ................................................................................................Appendix S
Push Button for Ship Sensor Data Sheet ................................................................ Appendix T
Delrin Data Sheets ................................................................................................... Appendix U
Nylon Data Sheets .................................................................................................... Appendix V
Gear Data Sheet ...................................................................................................... Appendix W
3
Requirements Specification
4
Single Player Against Machine BAttleship Game
(SPAMBAG)
Requirements Specification
Matt Goodhart, Timothy Hoffmann, Matt Lewis, Tatiana Zeledon
OVERVIEW:
Battleship is a classic game that many people play in their childhood. Typically,
it is a two player game where one person plays against another. We are recreating this game so
that one person can play by themselves against an interactive computer that has a robotic piece
placement device. This allows a novice player to get a feel for the rules and potentially develop
and improve strategies of their own. Aside from the inputs from the player on where he/she
wants to place his/her ships and target the computer’s ships, the game is hands free.
OPERATIONAL DESCRIPTION:
Our battleship game will follow all of the standard rules of the classic battleship game.
There will be a user input-interface, most likely an interactive LCD screen that will prompt the
user with instructions and notifications, such as when to make a move or indicate when the
player sunk one of the computer’s ships. There will also be a keypad which will accept the
coordinates of the player’s moves. Beginning game play will require the player to physically
place his/her ship pieces on the lower display. Once the player’s ships have been placed, the
game begins a random selection of who (player or computer) goes first. This selection will be
indicated on the LCD screen. On his/her turn, the player inputs his/her move. The
microprocessor then discerns if the input was a hit or miss and gives the corresponding output on
the upper display. Outputs include lighting a red LED (hit) or a green LED (miss). On the
computer’s turn, it makes a move, the microprocessor discerns a hit or miss, and shows its output
on the lower display by placing a red (hit) or green (miss) ball via the ball manipulator into its
respective spot. This process is repeated until the game is over.
DELIVERABLES:
· User’s Manual
· Software Logic Flowchart
· Technical Drawings and Analysis of Hardware
· Schematic of Circuit with Simulation Results
· Documentation of Testing
· A Final Report
· Parts List with Budget
· Battleship Game
5
DRAFT USER MANUAL:
Setup:
· Remove the game from its package
· Open the lid for the game
· Plug in the power cord to a Type B NEMA 5-15 15 A/125 V grounded outlet.
· Separate the balls by color and load them into the containers.
· Turn on the game by flipping the ON/OFF switch located on the board.
Operation:
1. Physically place the ship pieces on the lower display board so that the holes in the
piece correspond to holes in the board.
· For the aircraft carrier (five cells).
· For the battleship (four cells).
· For the cruiser (three cells).
· For the submarine (three cells).
· For the destroyer (two cells).
2. Wait for the computer to choose the location of its ships as indicated by the LCD
screen located in the upper display of the game.
3. If the LCD screen indicates that it is the player’s turn, select coordinate of attack (a
space on the grid you believe the computer’s ship is). If the LCD screen indicates that
it is the computer’s turn, continue to step six (beginning of game only).
4. Enter the coordinate on the keypad by selecting the letter (A-J) that corresponds to the
chosen location and then select a number (1-10) that corresponds to the same
location.
5. Notice the LED light up which indicates that the coordinate selected in step 3 was
either a hit (red) or a miss (green).
6. Wait for the computer’s turn.
7. The attack of the computer will be recorded by dropping a ball on the lower display.
The ball will be red if it coincides with the location of one of your ships; it will be
green if it is a miss.
8. Repeat steps three through seven until the game is completed as indicated by the LCD
screen.
9. Select the option to play a new game if desired and repeat steps one through eight or
turn off the device using the ON/OFF switch on the lower display.
10. Unplug the game from the outlet.
6
USER INTERFACE:
The user interface will consist of an ON/OFF switch that allows the system to be turned
on and off. There will also be ship pieces for the user to physically place on the lower display
board to indicate the location of the user’s ships. There will be a keypad that will act as an input
receiver for the user’s moves and will also have keys for the player to indicate if the computer
sunk a ship. Also included is an interactive LCD screen that will prompt the user when it is their
turn, whether they hit or missed the computer’s ship, and other instructions throughout the
gameplay.
CAPABILITIES:
· Will have artificial intelligence for the computer to choose locations close to a hit in
order to sink the user’s ship. Once two hits are found, only locations along a straight
line should be attempted until a sinking takes place as confirmed by the user via the
keypad. When the user indicates which ship has been sunk via the keypad, the
computer will determine if it hit another ship in the process. If so, the computer will
continue selecting coordinates in the area until it sinks that ship. Once the computer
determines that there are no more known ships in the area, it will continue selecting
random coordinates of attack.
· Will be able to be operated and moved by one person.
· Will acknowledge whether the coordinate selected corresponds to either a hit or a
miss by displaying a message in the LCD screen and lighting up the LED in the upper
display of the game that corresponds to the coordinate selected by the user. If it is a
hit the color of the LED will be red and if it is a miss it will be green.
· Will be able to setup in no more than 5 minutes.
· Will be able to place balls of different colors to different locations on the board in no
more than 20 seconds per move.
TESTING:
Ball Manipulator Test / Motor Test: To test the ball manipulator and the motors, a full
mechanical system test will be performed where a test program is run and tells the ball
manipulator to place one ball in every possible location (A1-A10 though J1-J10) in order. The
test will be considered successful if the mechanical device arrives at the correct coordinate every
time and if the ball makes it to the coordinate without dropping prematurely 99 out of 100 times
the movement is done. This test will be run five times and statistical analysis will be performed
on the results. If the ball drops prematurely, the user can place the ball in the correct location as
displayed on the LCD screen.
7
Portability Test: To determine portability and ease of operation by one person, three
volunteers not associated with the Senior Design class will move the device to a testing room
where outlets are available and will follow the setup and operation as described in the user’s
manual. Feedback will be gathered from the volunteers via a survey to determine if the device is
portable and through observation if it is easily operated. The game will weigh no more than
22.73 kg (50 pounds) and will take up a volume no more than 1.0 m3. The footprint of the
device will be no more than 1.0 m2 and its depth no greater than 1.0 m.
LEDs Test: To test the proper functioning of the LEDs, the program will be written so
that every possible location corresponds to a hit. Then, a tester will key in values for all one
hundred locations. The program will reset the board and repeat the process so that all locations
correspond to a miss. Only one LED must be lit whenever a coordinate is entered and should be
either green (miss) or red (hit). If only one LED lights up for each entry and corresponds to the
correct color, the LED test will be considered a success. Also, there will be a question on the
survey for the volunteers that asks how easily the LEDs were seen.
Artificial Intelligence Test: To test the artificial intelligence of the computer, following
a hit, it must continue choosing coordinates in the immediate proximity of the hit. Once two hits
are found, only locations along a straight line should be attempted until a confirmed sinking
takes place. Also, if it is known that a particular ship has been sunk, the computer will not
attempt to re-sink that battleship. Once sunk, the computer may choose a random location of
attack based on an externally programmed algorithm. The AI will be tested by playing the game.
8
System Design
9
Background
Battleship® is a very popular game around the world whose origin dates back to the early
1900’s when it was invented by Clifford Von Wickler. However, he never patented the game and
it was trademarked and commercially produced by the Milton Bradley Company in 1943 as a
paper and pencil game. By the 1960’s, and perhaps earlier, a player was able to purchase
prepared paper sheets for the game. Since the beginning, letters were printed in the outer vertical
edges of the sheet and numbers were printed horizontally at the top.
In 1967, the board game of Battleship® was created. The pencil and paper were
discarded and were replaced with plastic ships, pegs, and trays. Later, in 1983, the Milton
Bradley Company improved the version and included electronic components and new features
such as lights and sound. In 2008, the latest version of Battleship® called ‘The Tactical Combat’
was introduced and it includes several modifications to the existing version such as the shape of
the ships and board. The Milton Bradley Company has been the only company to continuously
produce a Battleship® game for any extended period of time.
Our motivation is to create a technically challenging, semi-automated version of the
game Battleship® in order to promote the interest of future Harding students into the engineering
program.
System Overview
Our goal is to create an essentially hands-free version of the classic Battleship® game.
The game will be powered through a standard 110 V AC household outlet. There will be a
keypad that will receive input such as accepting the coordinates of the player’s moves. Also,
there will be an LCD screen that will provide feedback to the user and will prompt the user with
instructions and notifications, such as when to make a move or indicate when the player has sunk
one of the computer’s ships.
Beginning game play will require the player to physically place his/her ship pieces on the
lower display board. The player then indicates to the computer that this has been done, and the
game begins a random selection of who (player or computer) goes first. This selection will be
indicated on the LCD screen. On his/her turn, the player inputs his/her move. The
microprocessor then discerns if the input was a hit or miss and gives the corresponding output on
the upper display. Outputs include lighting a red LED (hit) or a green LED (miss). On the
computer’s turn, a plunger/button system moves and senses whether there is a ship in that
coordinate or not, and shows its output on the lower display by placing a red (hit) or green (miss)
ball via the ball manipulator into the selected spot.
This process is repeated until the computer determines that all the player’s ships have
been sunk or all the computer’s ships have been sunk. Whenever one of these two scenarios
takes place, the game is over. At this point, the user will see where the computer’s ships were as
indicated by red LED’s on the upper display of the board. Results will be displayed until the
on/off switch is pushed. Our prototype will be delivered as a fully functional battleship game.
The top half may be closed and latched so that it may be transported.
10
Functional Description of Blocks
Module
I/0 System
Inputs
Power 5V DC and 25mA – Keypad
Power 5V DC and 25mA – LCD for power
Power 1V DC and 25mA – LCD for contrast
User Input at Keypad
Digital signal to LCD from microcontroller – 0 or 5V DC and 0 or 25mA
Outputs
LCD text on LCD
Functionality
The user will place his/her move by inputting it on the keypad that looks
similar to the keypad on a phone. The numbers A-J will correspond to the
numbers 1-10 such that 1=A, 2=B, etc. Each button will have both the
number and letter printed on it. The computer will prompt the user to select
a letter and the user will input a letter. After the letter is selected, the
computer will then prompt the user to select a number and the user will
input a number. Those two signals will be sent to the microcontroller as the
user’s move. The LCD screen is the microcontroller’s way of talking to the
user and telling him/her what to do.
Module
Power Supply
Inputs
Power 110V AC Grounded
Outputs
To keypad – 5V DC and 25mA
To LCD – 1V DC and 25mA
To LCD – 5V DC and 25mA
To microprocessor – 5V DC and 25mA
To 4 motor system – 5V DC and 800mA
To electromagnet controller circuit – 4V DC and 6.67mA
To ship sensor – 5V DC and 25mA
To digital logic – 12V DC and 2.5A
Functionality
The power supply system receives 110V AC from the wall. It then steps the
voltage down and rectifies it to provide a clean DC source of power before it
sends it out to the appropriate module.
11
Module
4 Motor System
Inputs
Power 5V DC and 800mA
Signal to motor from microcontroller – 0 or 5V DC and 0 or 25mA
Outputs
Movement
Functionality
Each of the four stepper motors is responsible for moving a part of the game
in a certain direction. There are four motors: the two letters motors, the
numbers motor, and the plunger motor. Each motor receives power from the
power supply and moves as long as power is received as determined by the
microcontroller. The letters motors cause the ball manipulator and plunger to
move parallel to the letters. The numbers motor has the same function as the
letters motors except it moves parallel to the numbers. The plunger motor is
what causes the push button and electromagnet to raise and lower to test for
the presence of a ship and pick up the ball respectively.
Module
Electromagnet Controller Circuit
Inputs
Power 4V DC and 6.67mA
Digital signal from microcontroller – 0 or 5V DC and 0 or 25mA
Outputs
0 or 4V DC and 0 or 20mA
Functionality
Accepts a digital signal from the microcontroller which tells the circuit
whether or not to allow power to the electromagnet.
Module
Electromagnet
Inputs
Power 4V DC and 6.67mA
Outputs
Ball Placement
Functionality
When the electromagnet receives power from the electromagnet controller
circuit, it attracts a ball from the ball hopper and carries that ball to the
appropriate location via the motors. When the electromagnet no longer
receives power, the ball drops into the hole corresponding to the computer’s
move.
12
Module
Ship Sensor
Inputs
Power 5V DC and 25mA
Outputs
Digital signal to microcontroller – 0 or 5V DC and 0 or 25mA
Functionality The ship sensor is in the form of a push button. The plunger motor will lower the
button down to approximately halfway between the height of the board and the
height of the ship piece. If a ship is present, the button will be below the level of
the ship and the button will be depressed. It will return a high signal telling the
microcontroller that a ship is present and the guess is a hit. If a ship is not present,
the button will not be depressed. It will continue to return a low signal telling the
microcontroller that the guess is a miss.
Module
Digital Logic
Inputs
Power 0V DC and 5V DC and 200mA – for flip-flop
Power 12V DC and 2.5 A
Digital signal from microcontroller – 0 or 5V DC and 0 or 25mA
Outputs
0 to 12V and 0 to 2.5A
Functionality
Accepts signals from the microcontroller and logically determines the necessary
output through a series of multiplexors and latches.
Module
LED Array
Inputs
0 to 12V DC and 0 to 2.5A
Outputs
Lit LEDs
Functionality
The LED array is the physical display the user will see that displays the moves
that he/she has selected. Individual LEDs receive power from the power supply
that has been directed by the digital logic.
13
Module
Microcontroller
Inputs
Power 5 V DC and max of 300mA
Digital signal from I/O System – 0 or 5V DC and 0 or 25mA
Digital signal from ship sensor – 0 or 5V DC and 0 or 25mA
Outputs
Digital signal to I/O System – 0 or 5V DC and 0 or 25mA
Digital signal to 4 motor system – 0 or 5V DC and 0 or 25mA
Digital signal to electromagnet controller circuit – 0 or 5V DC and 0 or 25mA
Digital signal to digital logic – 0 or 5V DC and 0 or 25mA
Functionality
The microcontroller will store and run the program for the battleship game.
This program will keep track of the game progress including storing previous
computer and user moves and will calculate future moves for the computer
accordingly. It will also output signals to the ball manipulator to place balls
indicating the computer’s moves and will send signals to the digital logic of
the LED system to indicate user moves. The microcontroller will also send
information to the user via the LCD screen and take in information from the
user via the keypad.
14
15
Matt Goodhart, Timothy Hoffmann, Matt Lewis, Tatiana Zeledon
Single Play er Against Machine BAttleship Game
Block Diagram
Electrical Design
16
Power Supply Circuit
Figure 1
The majority of the modules in this project require power in order to operate. These
modules include the microcontroller, the LED array, the digital logic, the ball movement system,
the ship sensor, the electromagnet, the LCD screen, and the keypad. All of these modules will
draw their power from this power supply circuit. This power supply will pull its power from a
standard wall outlet 110-120 VAC. It will step this voltage down to 15 VAC using a transformer.
This transformer’s low side voltage will be connected to a bridge rectifier with a load in parallel
with a capacitor (to filter). This rectifier converts the 15 VAC to approximately 15 V DC. The
rough 15 V DC is then regulated to 12 V DC and 5 V DC. 5 V DC will have a heat sink and a fan
on it to help release heat. Once the voltage has been regulated to these two voltages the 12 V DC
is put through a voltage divider creating 6 V DC, and the same from the 5 V DC only it divides
the voltage to 1 V DC. The 12 V DC will be used to power the electromagnet; the 6 V DC and
the 1 V DC will be used by the LCD; and the 5 V DC will be used for digital signals in
conjunction with 0 V DC.
17
Digital Logic Design
Figure 2
This is the digital logic behind each LED in the LED array. Its purpose is to hold the
LED’s state once it’s turned on, indicating a hit or a miss. The switches attached to the AND gate
are substitutes that simulate the multiplexers which will be attached to the entire digital logic
module. One represents the column indicator and the other the row indicator. The AND gate
requires that both of the switches be at digital signal high (5 V DC) in order to output a high
signal. So when that is not the case the output is low (0 V DC). The output of the AND gate is
the input of S on the latch. The R input of the latch is constantly low. The latch is also constantly
enabled at a digital signal high. But that is only in this diagram, there is no enable pin to set at a
digital signal high. So when the game is first turned on every latch is forced into the “hold state”
condition by the microcontroller setting the multiplexers to send a low signal to all the AND
gates making S low; which will cause the latch and to remain in the digital signal low until S is
turned to digital signal high when both column and row are simultaneously high. Until that
happens Q the output of the latch remains at digital signal low, putting no current through the
LED leaving it off. Once both S has a high output, the latch outputs 5 VDC and produces a
current through the LED turning it on. Even when the S input returns to low the LED remains on
because the latch has returned to its “hold state” condition so it will hold the last state it was in.
So regardless of whether S goes high or low the LED will remain on. The only way to turn the
LED off is by attaching its reset pin to high. The above model shows an example of a latch for a
hit (left of LED) and a miss (right of LED), each latch connecting to a different lead. Although
the design of this component seems complex it simplifies the software working with it.
18
LED Array Design
Figure 3
This is a layout of the LED array. It demonstrates the use of demultiplexers to control
which LED is being turned on by isolating a row and a column. The demultiplexer on the left
side of the diagram is used when the users move was a miss so it is connected to the green leads
of the LEDs. The demultiplexer on the top of the diagram is used when the user’s move was a hit
so it is connected to the red leads of the LEDs. It accepts a binary word from the microcontroller
(represented by the switches between a high and low digital signal because the microcontroller
will either send a high or a low signal) to establish which row it should send a signal to. Then it
uses its output 1 through 10 to supply a signal to the proper row. These will be row A through J
on the upper display. The demultiplexer on the bottom of the diagram goes through the same
process except that it indicates columns 1 through 10. When an LED is sent a signal from the
column and the row demultiplexers it is being turned on. In the above diagram, each LED has
one of the fore mentioned latch circuits behind it controlling it.
19
Keypad Design
Figure 4
The keypad is the input part of the input/output system. It receives user input and
converts it into a signal the microcontroller can understand (high and low signals). The keypad
has 12 push buttons. Ten of these push buttons are label 1-A through 10-J. The other two are an
enter key and a backspace key. This system runs to 12 pins that accept either a high or a low
digital signal (5 V DC or 0 V DC respectively). When the keys are in their natural state
(unpressed) they send a low signal to its respective pin. When the keys are pressed they send a
high signal to their respective pin. These respective pins are on a encoder that will convert our 12
pins to 4 pins which will be accepted by the microcontroller as a binary word. This is displayed
below. The keypad is how the user responds to the LCD prompts. It’s basically used for inputting
column and row, answering yes or no, etc.
Figure 5
20
ELECTROMAGNET
MODEL
EM-R75
DIAMETER
HEIGHT
THREAD
A
.75 inches
B
1.25 inches
C
10-32
WATTS
1.5
LBS.
PULL
NET
WGT.
10
2.6 oz.
Table 1
The electromagnet module is controlled by an on/off switch that either stops or allows
current flow to the magnet. The electromagnet will essentially attract and hold a ball from the
ball hopper and release it into a hole coordinate. The electromagnet operates at a maximum 12 V
DC and 20 mA. However, operating at the maximum value can lift a string of up to 5 balls at
once. This is undesirable. For our purpose we will only be operating it at 4 V DC and 6.67 mA.
We are operating at these values because then the electromagnet is strong enough to lift only one
ball at a time while still having a strong attraction on the ball to transport it.
21
LCD Selection:
Selecting what type of LCD screen to use for this project was easy to do because of the
minimal requirements needed for this project. The LCD screen’s main purpose is to
communicate with the user instructions and other information throughout the game. Different
types of LCD screens would include character displays, serial LCDs, USB LCDs, and graphic
LCDs. We went with a character display simply because it is the easiest to interface with the type
of microcontrollers we are looking at and relatively simple to use with experience. But when
looking at character displays, the choice was dependent on what was need for the project such as
character dimensions and the style of the backlight and font color.
LCD Decision Matrix
16*2
20*2
16*4
20*4
Characteristics
Importance yellow on
green on
black on
yellow on
dark
dark
yellow
dark
0.3
9
5
6
4
Cost
0.5
8
9
9
9
Character Size
0.2
9
9
3
9
Style
1.0
8.5
7.8
6.9
7.5
Table 2
As you can see, we went with this sixteen by two LCD screen that has yellow characters
on a dark background. Instructions will be sent to it from specific pins from our microcontroller
to initialize it to print out characters as we need to. The specifications can be found in appendix
B.
Microcontroller:
For a compact design, low cost and convenience of equipment to work with them, we
decided to go with a PIC processor in a QFP package from Microchip. Limiting our options to
the equipment we have, there are some criteria as to what to choose by the basic pin count sizes
that would work for our application.
Microcontroller Decision Matrix
Characteristics
Importance
64 pin
80 pin
100 pin
0.1
9
9
9
Cost
0.3
7
9
9
Pin Count Size
0.4
9
0
0
Testability
0.2
9
3
9
Programming Equipment
1.0
8.4
4.2
5.4
Table 3
As you see, we will be using a 64 pin microcontroller for this project due to the fact that
we have the equipment to program it and test it via breadboard before hardwiring it into the final
system. The pin count is a little small causing us to design around it but it is the best solution.
With the 80 and 100 pin counts, there are more than enough I/O pins to work with but there is no
equipment available for bread boarding them for testing before integrating them within the
project. When the final program has been installed, a schmart board will be used to solder the
microcontroller to and integrate it into the final device. We have already received and are
working with a microcontroller but will upgrade to one with more memory in the final system.
The spec sheets for that microcontroller can be found in Appendix I.
22
Mechanical Design
23
Frame Design
The overall goal of the frame design was to create a frame that incorporated all of the major
components of the classic Battleship® game while also allowing us to include our own
modifications such as the movement system and the ball placement system which allow the
computer’s moves to be automatically placed. It needed to be structurally sound while also
making it user friendly with ease of access to the major electrical components. The current
frame design may be seen in Fig. 6. The main components of the frame are as follows:
1)
2)
3)
4)
5)
6)
7)
8)
Material
Game Board
Sub Game Board
Ball Return System
Ball Hoppers
Upper Display
Electrical Component Storage
Movement System
1) Material:
The framing material is Plexiglas. It is strong, fairly easy to use, and compared to other
materials, relatively inexpensive. Table 4 below is a decision matrix showing the criteria and
potential options for frame material.
Characteristics
Cost
Weight
Aesthetic Look
Machinablility
Durability
Sturdiness
Magnetic
Importance
0.3
0.15
0.1
0.1
0.1
0.2
0.05
1
Plexiglas
9
5
9
5
5
5
9
6.8
Lexan
5
9
9
9
9
1
9
6.2
Aluminum
5
1
5
5
9
9
9
5.8
Steel
1
1
1
1
9
9
1
3.4
Table 4: Decision matrix of potential frame materials
As you can see from Table 4, Plexiglas was the winner and was chosen as our main
building material. While Lexan was a close second, further research into Lexan showed that due
to its ability to freely bend, it would not have been able to be used at all. Also, while steel was a
potential material, due to its magnetic nature, it would not have been able to have been used
because the electromagnet would have been attracted to it. That essentially left Plexiglas and
aluminum, and after review of the scores, Plexiglas was decided upon to be the main building
material for the frame.
24
2) Game Board:
Fig. 7 shows a SolidWorks sketch of the main game board. It is 12 in. x 12 in. (254mm x
254mm). The holes for the balls to fit into are 5/8 in. (15.875mm) which is 1/8 in. (3.175mm)
larger than the ½ in. (12.6mm) diameter of the balls so that there is a small amount of freedom
with the ball placement. The stepper motors have the ability to move as small as 1.8°,
corresponding to 0.015 in. (0.38mm). This is very precise, but a step may not land exactly on the
perfect spot to allow a ball to be placed in the exact center of a hole. Thus, a wider diameter is
used. There are two slots on the sides to allow tabs from the sub game board to come through
for release of the balls upon completion of a game. The game board is pressure fit into the frame
which allows it to be removed if the user should desire repairs or access to anything below.
3) Sub Game Board:
Fig. 8 shows a SolidWorks drawing of the sub game board. It is almost identical to the
game board except that the holes are slightly offset to allow the balls to rest on the board when a
game is in progress. The holes in the sub game board are the same diameter as the ones in the
game board. On the sides are tabs which were mentioned before in the game board section.
When the game is finished, the tabs may be slid forward causing the holes of the game board and
the sub game board to align. The balls may then fall through into the ball return system.
4) Ball Return System:
Fig. 9 shows a side view of the frame with the ball return system in place. Basically,
when the balls fall through the sub game board, they land on the sloped level and roll to the front
of the frame. They are directed by small rails to a small slot that can be seen in Fig. 10 allowing
them to be collected in the collection area in the front of the frame. They are then available to
the used to remove, sort, and place back into the respective ball hoppers.
5) Ball Hoppers:
Located in the front of the frame are two ball hoppers. You can see in Fig. 11 that the
hopper on the left is larger than the one on the right. This is due to the fact that there are exactly
100 positions, a maximum of 17 hits, and a maximum of 83 misses. The left hopper is for the
misses and holds approximately 87 balls while the right hopper is for the hits and holds
approximately 20 balls. A few extra balls are included in each hopper in case a few are lost. The
chances, though, of using all 83 misses without sinking all of the ships is so minute that there
will be plenty of miss balls left over. The design of the hoppers is such that they utilize gravity.
The balls are placed in the track on the outer edge of each hopper. The slight decline in height
forces the balls to roll towards the center where they can be picked up by the electromagnet. The
guide rails are sloped toward the center and act like ramps for the balls to switch back. This uses
the full surface area of the hoppers to store the balls. Precautions have been taken to disallow
daisy-chaining of the balls when the electromagnet picks one up. The electromagnet is being
supplied with sufficient power to pick up one ball and one ball only. Other balls in contact do
not attach themselves at all.
25
6) Upper Display:
The upper display can be seen in Fig. 10. The grid is 10 holes by 10 holes and is 9 in.
(228.6mm) high and 18 in. (457.2mm) wide. The holes are about the same size as the LEDs
since we know exactly where they will be placed. The rest of the space should be empty but may
contain extra wires or circuitry. Most of the upper display is taken up by the LED display and it
must be that large because of the size of the electrical components needed for the digital logic.
The upper display is only about an inch thick on the inside because there are only circuit boards
there and they are pretty thin. The back of the frame should open up on two sets of hinges. One
will be on the top half to allow us to have access to the LED and digital logic circuitry. The
other will be to give us access to the components underneath the game board such as the power
supply, microcontroller, keypad, and LCD screen.
7) Electrical Component Storage:
If you look at Fig. 11, you can see a large space on the right side of the frame and behind
the game board where the electrical components can be stored. The top of the right section will
be where the keypad and LCD will be attached. There is also a small amount of room
underneath the game boards and ball return system where any wires can be run or a small circuit
board can be placed. As stated above, we will have access to these areas via a door on the back
on the frame.
8) Movement System:
Fig. 6 shows the movement system incorporated into the frame while Fig. 12 shows the
movement system alone. The cart seen in Fig. 13 is the same as the ones on the sides of Fig. 12
and are driven by two stepper motors and a rack/pinion system that allow the system to move
from the front to the back on the frame and vice versa. They are kept straight using rails similar
to those used in a kitchen drawer. Connecting the two carts is a set of cross-members with a cart
shown in Fig. 14 that functions like the other two carts. Inside that cart, however, is the last
stepper motor which controls the height of the ship sensor and the electromagnet.
Stepper Motor Selection
Stepper motors were chosen for the movement system for many reasons. First of all, they
do not require a controller. If the microcontroller tells the motor to go through an arbitrary
number of steps, it has travelled a known linear distance based on the step-angle degree and the
size of the pinion on the shaft. Other motors require a controller to feedback the position, but it
is not necessary here. Related to this is the error per step. With the chosen stepper motor, there
is a possible 5% error per step. Since the shaft aligns with a different electromagnet inside of
each stepper motor on each step, the error per step is not cumulative. If the motor overshoots on
step 1 by 3%, it corrects itself by step 2. Also, stepper motors are very precise. We are using a
hybrid stepper motor which typically has a step-angle of 1.8° or 3.6° which is 200 steps per
revolution or 100 steps per revolution respectively. The motor we are using has a step-angle of
26
1.8° which translates to a linear distance of 0.015 in. (0.38mm). Finally, their size to power
output ratio is very low which is very nice when considering space and weight issues.
The RB-Soy-02 Unipolar stepper motor from Robot Shop was chosen for this project.
Below, Table 5 shows the decision matrix used for making the stepper motor choice.
Characteristics
Importance
Cost
Weight
Aesthetic Look
Mountability
Power Reqs
Power Output
Ease of Use
Precision
Size/Shape
0.1
0.05
0.15
0.2
0.1
0.1
0.1
0.05
0.15
1
Robot
Shop
5
5
9
9
9
9
9
9
9
8.4
Trossen
Hobby Engineering
9
5
9
9
1
9
5
9
9
7.6
9
9
5
1
5
9
9
5
1
5
Table 5: Decision matrix for the stepper motor company
The motors from the Robot Shop and the motors from Trossen were very similar in
appearance and style except the one from the Robot shop was a unipolar stepper motor as
opposed to the one from Trossen which was a bipolar stepper motor. The unipolar motor is easier
to handle. The cost for all three motors was about the same, so while it was important that
stepper motors are inexpensive compared to other types of motors, the relative cost of one
stepper motor to another was not hugely important.
Ball Selection
The steel balls used in this project were ordered from McMaster-Carr. There weren’t a
lot of options once a company was located that satisfied all of our needs. Requirements of the
material were that it was magnetic, durable, looked nice, and came in ½ in. diameter. After some
research E52100 chrome steel was chosen because it is durable, will not rust, and is moderately
magnetic. Stainless steel was the original desire, but due to the presence of nickel, it is not
magnetic at all. The only two suppliers that met the requirements for a reasonable price and
quantity were Thompson Ball and McMaster-Carr. I have ordered from McMaster-Carr in the
past and have been satisfied with their products. Also, the project only needs about 120 and they
sold them in packs of 100. Thompson sold them for a cheaper price per ball, but 600 balls would
have to be purchased at a time which would cost almost double.
27
Figure 6: Frame with movement system
28
Figure 7: Game Board
29
Figure 8: Sub Game Board
30
Figure 9: Side view of frame with game boards and ball return system
31
Figure 10: Front view of frame showing upper display and ball return system
32
Figure 11: Top view of frame with game boards and hoppers
33
Figure 12: Movement system without frame
34
Figure 13: Side cart that supports the cross-members
35
Figure 14: Cross-member cart
36
Ship Sensor Design
The ship sensor mechanism will be composed of a set of rails, two racks, and a gear. This
system will be physically attached to the movement mechanism of the overall frame. The
electromagnet will be attached to the end of one rack, and the push button will be attached to the
end of the other rack as depicted in Fig. 15.
Whenever the computer makes a move, the movement system will move the ship sensing
system over top of the coordinate selected to determine the presence of a ship. Once in this
location, the microcontroller will send a signal to the stepper motor and the stepper motor’s shaft
will rotate in the counter-clockwise direction. As the gear rotates, the push button will be
lowered and the electromagnet will go up. The front and back views of the sensing system can be
observed in Fig. 16 and Fig. 17 respectively.
Electromagnet
Push Button
Figure 15
Figure 16
Figure 17
37
If the push button is depressed as it is lowered, a high signal is sent to the microcontroller
indicating the presence of a ship. If the push button is not depressed, a low signal is sent to the
microcontroller indicating the absence of a ship. Independently of the presence of a ship, the
microcontroller will send a signal to the stepper motor to rotate the shaft in the opposite direction
to raise the push button and lower the electromagnet so that they are horizontally aligned.
Based on the high or low signal received by the push button, the ball movement system
will go to the ball hopper location and will lower the electromagnet by rotating the stepper
motor’s shaft in the clockwise direction to pick up a ball. The movement system will go back to
the selected location and drop the appropriate color ball into the selected location.
Push Button Selection
The push button chosen for the ship sensor system is a normallyopen, momentary push button. The driving criteria for the selection of this
push button was the height of the plunger (13 mm) which will reduce the
amount that the sensing system will need to go down in order to determine
the presence of ships. Also, the contact area between the board and the push
button is more than 0.24 in.2 (152.84mm2) which provides the necessary
precision on the board dimensions.
Gear Selection
Figure 18
The main design requirements for selecting a gear were cost and hub style. The gears
will need to be directly attached to the stepper motor’s shaft, so a main constraint when selecting
a gear is figuring out a way to successfully attach it to the 5 mm shaft of the stepper motors that
will be used. Based on the design requirement of cost, the material selected was identified as a
plastic rather than metal. Another consideration taken into account for selecting the material was
the fact that we are using an electromagnet to manipulate the balls during the game, so a nonmagnetic material was required. Knowing that a plastic gear was to be used and that the hub of
the gear was going to be interacting with the stainless steel shaft, a way to securely attach those
two pieces together was needed. It had to minimize sliding which would critically hinder the
conversion of rotational movement into the linear movement needed. The hub style with a set
screw provides a way to securely attach the stepper motor’s shaft to the gear. The brass insert on
the hub of the gear avoids the wear produced by the interaction of the metal shaft with the gear.
Other constraints for selecting the gear were diametral pitch and bore size. The selected
diametral pitch of the plastic gear with the set screw hub selected was the lowest one available in
the market since there is a direct relationship between the diametral pitch and the bending stress
produced on the teeth of the gear. As the diametral pitch of a gear is decreased, the bending
stress decreases. The goal when selecting the gears was to reduce the bending stress in order to
ensure that the movement mechanisms will not fail by fatigue or by yielding. The bore size was
selected to be the closest to the diameter of the stepper motor’s shaft that is 5 mm (0.1969 in).
38
Gear Specifications
Manufacturer: Stock Drive Products Sterling Instruments SDP/SI
Part Number: A 1T 2-Y24023
Unit: Inch
Diametral Pitch: 24
No. Of Teeth: 23
Material: Acetal - Brass insert
Style: Pin Hub – with Set Screw
Quality: Class Commercial –MoldedBore Size: 0.1875"
Pressure Angle: 20°
Figure 19
Face Width: 0.250"
Pitch Dia.: 0.9580"
Hub Dia.: 0.5469"
Gear Material Selection
The material of the gear was chosen to be acetal (derlin) with a brass insert. Acetal
hydropolymer resins are strong and very rigid. They have a high tensile strength, stiffness,
fatigue endurance and moderate toughness. It has the highest fatigue endurance of any filled
commercial thermoplastic. Derlin offers rigidity and wear resistance and for our design purposes
it has the necessary strength to carry the maximum load that we are going to handle.
Decision Matrix
Characteristics
Importance
0.3
Cost
0.1
Size
0.3
Hub Style (with SS)
0.2
Bore size
0.05
Quality Class
0.05
Functionality
1.0
Steel
1
5
1
5
1
5
2.4
Table 6
39
Nylon
9
5
1
1
5
5
4.2
Derlin
9
5
9
5
5
5
7.4
Aluminum
1
5
1
5
1
5
2.4
According to Dupont™, Delrin is a highly versatile engineering plastic with metal-like
properties. It offers a unique combination of physical properties not available with metals or
most other plastics. The outstanding characteristics of Delrin resins that are important
considerations for this project include:
• High tensile strength, impact resistance, and stiffness
• Outstanding fatigue endurance
• Natural lubricity
Fatigue Properties
When materials fail at stress levels below their yield strength because they are subjected
to cyclic stresses, they experience fatigue failure. According to Dupont, Delrin acetal resins
have extremely high resistance to fatigue failure from –40 to 82°C (–40 to 180°F). Fatigue
resistance data from Dupont’s website (in air) for injection molded samples of Delrin acetal resin
are shown in Fig. 20 below.
Figure 20
From Fig. 20 it can be seen that for stresses less than 4 000 psi, components made out of
Derlin have approximately 107 cycles to failure.
Rack Selection
The two main design requirements for selecting a rack are cost and pressure angle. The
pressure angle is determined by the hub style chosen on the gear. The pressure angle is a major
constraint for the rack selection since the gears manufactured with a set screw have a pressure
angle of 20 degrees. None of the racks available in the market fulfilled our two main design
requirements. As a consequence, the racks will be custom made using a CNC milling process.
The material that is going to be used is Nylon 101, a polyamide offering rigidity, strength and
wear resistance. It can also be easily used when meshing with a plastic gear. Nylon has an
ultimate tensile strength of 11500 psi and yield strength of 15000 psi which will be able to
support approximately four times the stresses produced by our movement system.
40
Note that for a rack and a pinion to mesh, it is necessary that both of them have the same
Diametral Pitch and the same pressure angle. For this specific design, DP=24 and Ø=20.
Decision Matrix
Characteristics
Cost
Compatibility with Gear
Importance
0.4
0.6
1
Steel
1
5
3.4
Nylon
9
9
9
Derlin
5
5
5
Aluminum
1
5
3.4
Table 7
Since the racks will be custom made using a CNC milling process, the SolidWorks
models were developed. The CNC machining process that will be used for the rack fabrication
requires the tooth profile sketch, shown in Fig. 21, and accurate rack models of the parts to be
machined, shown in Fig. 22. The designed racks have a diametral pitch of 24 teeth/in. and a
pressure angle of 20 degrees. For the movement system, the length of the rack will be 18 inches
(457 mm) and for the sensing system the racks will have a length of approximately 3.20 inches
(81 mm). The minimum thickness of the rack is 0.250 inches (6.35 mm) and the height
approximately 0.5 inches (12.7mm). However, the thickness of the rack can be increased as long
as the bending stress calculations as done with the surface that has the smallest face width – in
this specific case the gears.
Figure 21
Figure 22
41
Gear Calculations
To determine the smallest number of teeth on the pinion to avoid interference
≥ (2 ∗ )/(sin Ø)
Where
is the smallest number of teeth on a spur pinion and
= 1 for full depth teeth.
For a 14.5 degree pressure angle
≥ 2/ (sin 14.5) = 31.90 teeth
For a 20 degree pressure angle
≥ 2/ (sin 20) = 17.09 teeth
So, the number of teeth on the gear with a pressure angle of 14.5 degrees should be 32 or more
to avoid interference with a rack. And the number of teeth for a gear with a pressure angle of 20
degrees should be greater or equal to 18.
The maximum torque that will be transmitted to the gear is the maximum torque that the stepper
motor can generate is given by:
=
Where
is the torque and
∗
is the applied force.
From the stepper motor’s data sheet:
= 35
Converting the torque generated into English units
= 2.1875
(0.247
)
For the gear selected, the pitch diameter
= 0.9580
(2.4
)
The maximum force transmitted to the gear is:
=
=
2.1875
0.479
= 4.57
42
(19.82 )
Mechanical Analysis of Movement System
From Lewis equation:
∗
=
∗
Where is the face width of the gear,
is the velocity factor,
is the diametral pitch
(teeth/in),
is the transmitted load and is the Lewis Form Factor.
1200 +
1200
=
Where
is the pitch line velocity
= ( ∗ ∗ )/12 = ( ∗0.9580 ∗100)/12 = 25.0804 ft/ min
=
(0.127
/ )
1200 + 25.0804
= 1.0209
1200
The resultant bending stress exerted on the gear is,
=
1.0209 ∗4.57 ∗24
= 1340.1
0.250 ∗0.334
(9.24
)
From the tables of material properties for Acetal (Derlin)
Tensile Strength= 10 000
Yield Strength= = 9 000
(68.951
(62.06
)
)
According to the book “Plastics Engineering Manufacturing and Data HandBook”:
“cyclic loading significantly reduces the amount of allowable stress a material can withstand. If
data are not available on the endurance limit of a material being considered for use, a percentage
of its tensile strength can be used. …For engineering plastics the endurance limit could be about
50% of its tensile strength”
Based on that fact that the data of the endurance limit for Derlin was not found, it is assumed
that,
Endurance limit= 0.5
= 0.5 10000 = 5000
43
(34.47
)
Calculations of the Factors of Safety
For failure due to yielding:
9000
3
=
= 2.24
1340.1
Note that a very conservative approach was used when calculating the factor of safety
due to yielding since the yield strength used was one third of the yield strength found on the data
sheet for Derlin.
For failure due to fatigue using the Modified Goodman criteria:
1
=
Where
=
=
=
.
= 670.05
=
+
(4.62
1
670.05 670.05
5000 + 10 000
)
= 4.97
From the calculations of the factor of safety due to fatigue and yielding we can see that,
both factors of safety are greater than one which implies that the Derlin gear can withstand the
load produced by the maximum torque generated by the stepper motor and will not fail by
fatigue or by yielding.
44
Mechanical Analysis for the Sensing System
Since we are using the same gear for the sensing system, we have determined that the
maximum force that could be transmitted as calculated on the previous section is:
= 0.5 ∗
= 5000
(34.47
)
From Marin’s equation that includes the modifying factors of the endurance limit
=
∗
∗
∗
∗
∗
′
We use Marin’s equation to take into account the material, the manufacturing, the
environment in which the part will be used and the design. For the material, this equation takes
into account composition, basis of failure, and variability. For the manufacturing it takes into
account the method, the surface condition and the stress concentration. For the design it takes
into consideration the life, the shape, the stress state and the stress concentration.
Surface factor
=
∗
For a machined surface finish
= 2.70
(18.62
)
= − 0.265
= 2.70 ∗9
.
= 1.50831
Size Factor
The sum of the addendum and dedendum:
=
1
+
1.25
=
1 1.25
+
= 0.09375
24
24
45
(0.2
)
The tooth thickness is given by
= 4
where,
=
3∗
2∗
=
3 ∗0.034
= 0.002125
2 ∗24
= 0.028
0.0053975
(0.07112
)
The use of this equation means that only bending of the tooth is considered and that the
compression due to the radial component of the force is neglected. It also implies that the teeth
do not share the load and that the greatest force is exerted at the tip of the tooth. Examination of
run-in teeth showed that the heaviest load is experienced near the middle of the tooth. Therefore,
the maximum stress probably occurs when a single pair of teeth is carrying the full load, at a
point where another pair of teeth is just on the verge of coming into contact.
Treating the tooth as a cantilever beam of rectangular cross section, the rotating beam diameter is
given by,
= 0.808 ∗
∗
.
= 0.808 ∗ 0.250 ∗0.028
.
= 1.37
.
=
= 0.85
0.30
Load Factor
= 1 for bending
Since there is not any specified temperature or reliability
= 1
= 1
Stress concentration factor
=
0.300
=
= 0.0125
0.0125
= 0.45
0.028
46
(0.03175
= 1.4
)
(3.48
)
It is always safe to use =
doubt about the true value of
if there is any doubt about the true value of
=
is there is any
= 1.4
= 1/
= 0.714
Recall,
=
∗
∗
∗
∗
∗
= 1.50831 ∗0.85 ∗1 ∗1 ∗0.714 ∗5000 = 4576.97
(31.58
)
For the ship sensing system, the bending stress is:
=
1.0209 ∗4.57 ∗24
∗
0.250 ∗0.334
= 1340.1 ∗1.4 = 1876.14
(12.94
)
Calculations of the Factors of Safety
For failure due to yielding:
9000
3
=
= 1.60
1876.14
=
4576.97
= 2.44
1876.14
Since the factor of safety is greater than 1, it means the gear will not fail by fatigue or by
yielding.
47
Software Design
48
Figure 23
This flowchart represents the overall process flow for SPAMBAG as of right now. Steps
like “Generate Computer Move” are very general descriptions of a much more detailed process
which is described in greater detail in following sections. There are many points along this flow
that require simple yes/no decisions which redirect the path accordingly.
49
Figure 24
As can be seen above, the Game Initialization portion of the overall process flow is
relatively simple. It consists of initializing all variables for use in the program such as declaring
all ships as not yet sunk and hit counts to 0. Also a key part is initializing all the input/output
pins on the microcontroller to the appropriate setting for what they are used for. When
initializing the LCD screen, the appropriate signals, as specified by the manufacturer, will be
sent to the microcontroller to prepare it to receive signal input. To end this portion of the overall
process flow, a welcome message is passed to the write to LCD function.
50
Ship
Placement
Write Message to
LCD Screen
Call LCD Write
Function
Write Message to
LCD Screen
Call LCD Write
Function
Pass “Place Your Ship Process”
Pass “Hit Enter When Done”
Wait for enter to
be pressed
Write Message to
LCD Screen
Call LCD Write
Function
Prompt User if
sure
Pass “Are You Sure?”
No
Yes
Write Message to
LCD Screen
Pass “Wait for me to place
my ships”
Call LCD Write
Function
Generate Random
coordinate for ship
Pass Values to indicate for
ship placement.
Call Random
Number Generator
Can the current ship fit down
or to the right without hitting
another ship or board
boundaries
Check if room
for ship
No
Yes
Depending on the size of the
ships. Five ones for ACC
and four twos for battleship
and three threes for cruiser
and so on.
Place numbers in
selected
coordinates
Store Result in
whose_turn
Generate Random
coordinate for ship
Call Random
Number Generator
Yes
Done Placing
ships
Call LCD Write
Function
Write Message to
LCD Screen
Pass “You\I Go First”
depending on whose_turn
variable
Pass information to select 0
or 1 for user or computer
Enter Game Play
Process
Figure 25
51
No
The Ship Placement portion of the overall process flow is more complicated than the
Game Initialization portion and requires user interaction at the beginning of this process. In our
game board, we are using physical game pieces for the user ships so that there is no illusion of
the game possibly being able to cheat just by looking at the user ships locations in its memory.
The issue with this is that the game has to have a level of trust in those who play it. An example
would be that we must trust that the user placed ships and did not leave some pieces off to ensure
their victory. One solution that can be used to solve possibilities of accidental errors, such as
hitting enter before placing the game pieces, would be to double check every time the user is
asked to do something. This is seen right after the user is instructed to place their ships. Once the
user ship locations are selected, it is time for the program to place the computer ships. A random
number generator function will be called to select a position on the game board for the
computer’s ships and also to generate a number that indicates either up to down or left to right
for the ship direction. If currently placing the aircraft carrier, a one will be assigned to the
coordinate variable for each of the five spots representing the ship if the condition is met that the
positions for the ship do not cross over game boundaries or hit any other ships. Twos will be
placed in the coordinates representing the battleship and threes for the cruiser. This continues
until all five ships are placed. Once the computer is done placing ships, it then decides who goes
first using the random number generator. The result is set in the whose_turn variable and then is
output to the user. After all this is done, the process flow then moves onto game play.
52
Generate
Computer Move
Write Message to
LCD
Call LCD Write
Function
Call Random
Number Generator
for game board
Check Pursuit
Variable
0
1 if in pursuit
0 if not
1
Check location to
see if a shot was
already taken
Check up-down and left-right
to make sure there is enough
empty coordinates for
smallest ship
Pass “My Turn”
If fail
Check
Pursuit_w_sink
Check around
location
0
Store location in
Pursuit Start and set
pursuit variables
Check
Just_hit_count
more than one
1
1 if a ship has
been sunk in
current pursuit
0
1
If all hits, swap
pursuit start and
pursuit end and
select locations
around pursuit
start again.
1, follow previous moves
0, Check where to go
Check
Pursuit_gt_one
variable
1
Determine if
pursuit_end is left
– right or up –
down from
pursuit_start
0
Check for up –
down move the
left – right if not
good
Check around
pursuit_start
location
Move up first then
Down if not able
to.
If not able to move
up or down, move
left if can else
move right
If left, check right
and move. Else if
up, move down
and so on
If no move, swap
pursuit_start and
pursuit_end and
jump back
Move Made
Change
pursuit_end to
most recent move
Set pursuit_gt_one
and store
coordinate in
pursuit_end
variables
Enter into Check
for Ship Process
Figure 26
53
Select locations
around
pursuit_start
Jump
In the Generate Computer Move portion of the process flow, there are three possible
conditions that affect the way the computer chooses moves. These three conditions are that the
computer is not currently in pursuit of a user’s ship, the user just started a pursuit on a user’s ship
only having one hit, and finally that the computer is currently in pursuit of a user’s ship with
more than one hit. A condition that will also be considered is what must take place if there is a
hit on a user ship while during a pursuit while another ship has already been sunk. The computer
will take into account the difference between total hit count during that pursuit and number of
hits on a current ship.
54
Figure 27
This section checks the computer’s move coordinate just generated to determine whether
or not there was a hit. There are a number of steps for each stepper motor to get the ship’s sensor
over the correct coordinate. The ship sensor is then lowered to determine if there is a ship. The
results are stored in the appropriate variables and then the process flow moves into marble
placement after the ship sensor is moved back to the home position by reversing the stepper
motor process.
55
Figure 28
This portion is very similar to the Checks for Ship portion. The only difference is that the
electromagnet is moved over to pick up the appropriate colored ball, depending on hit or miss,
before moving to the coordinate. Another difference is the amount of steps moved to position the
electromagnet over the coordinate instead of the ship sensor. In order to minimize the amount of
code used, an offset will be added to the step count variables used to position the ship sensor
above the particular coordinate because the electromagnet must travel farther to be positioned
above that same coordinate. The process flow then enters into the next step which depends on
whether there was a hit or a miss.
56
Figure 29
57
This portion of the program is essential in the fact that it must determine information
based on a hit by the computer to aid in computer move generation for succeeding moves. It
determines if a ship was sunk or if there is a new pursuit. What also must be considered is the
fact that one of the messages outputted to the screen has too many characters for the LCD that
we are using. The solution to this problem is to simply split up the message into two parts
placing a delay in between the times that they are displayed allowing the user to read it. The
process flow then moves on to determine whether or not the game is over.
Figure 30
This section is very simple and only sets the Game_Over_Variable to indicate whether or
not the game is over yet. This only occurs if the computer or user generated a hit in their most
recent move.
Figure 31
At the end of a turn, user or computer, the whose_turn variable must be changed so that
the game will continue to alternate in between players’ turns. The above flowchart shows what is
seen at the end of the computer’s turn but it is identical to what is seen at the end of the user’s
turn. The only difference is the whose_turn is changed to a one to indicate a computer turn.
58
Figure 32
This is when the game takes in a move from the user via the keypad to the right of the
lower game board. This game allows for the user to select their coordinate of attack by row and
then column one at a time, being able to back up if they made a mistake. It also makes sure that’s
what they wanted by asking the user. The coordinate is stored in two variables, one is the row
and the other is the column. The game then moves on to light up the appropriate LED. The
message for the LCD screen will be done the same as it was in Figure 29 before.
59
Light up
LED
Convert Row to
binary
Convert Column to
binary
Determine if hit or
miss
Pass all binary
data to appropriate
pins of LED digital
logic
Was there a
hit?
Yes
Enter into
Determine
additional
information
No
Enter into Set as
AI’s Turn
Figure 33
Though the LED upper display is one of the more complicated pieces of our system, the
process of outputting a move to it is very simple. The complexity of this setup simply lies within
the digital logic of the LED system and only binary input values are needed from the
microcontroller.
Determine which
ship was hit
Determine hit
information
Subtract from user
hit variable on
particular ship
0
Check if 0
Set Variable for
ship indicating
sunk
Write message to
LCD Screen
Call LCD Write
Function
Pass “you sunk my [x] ship”
X is which ship was sunk
Enter into
Determine if game
is over
Figure 34
60
>0
This portion determines the results of a user hit. It simply checks which ship was hit and
whether or not it has been sunk. It then indicates which ship was sunk to the user. It is then
determined if the game is over by checking the amount of hits that the user has against seventeen
just as it did for the computer move portion. Now, at the end of the user turn, the whose_turn
variable is then set to indicate that it is the computer’s turn. The process flow then enters back
into the start of the game play.
Figure 35
When the game is over, these are the steps that will take place. The game will basically
hold until the enter key is hit unless the game is powered off. If the enter key is hit, The LCD
will not need to be initialized again, the welcome message will not need to be displayed, nor will
the I/O pin initialization need to take place again.
61
Budget
62
Estimated Cost of Supplies
Item
Latches
Transformers
Multiplexer
Resistors
Diodes
Voltage Regulators
Wire
Professional etching
board
Non-professional
etching boards
Steel balls
Motors
LEDs
Microcontroller
Materials for frame
Movement supplies
Push button
Keypad
LCD screen
Miscellaneous
Total
Possible Vendor
Cost
The Electronic Goldmine
Honeywell
$20.00
$10.00
$15.00
$8.00
$8.00
$8.00
$20.00
Date of
Estimate
10/12/2009
10/12/2009
10/12/2009
10/12/2009
10/12/2009
10/12/2009
10/12/2009
$60.00
10/12/2009
$30.00
10/12/2009
$33.00
$70.00
$30.00
10/5/2009
10/5/2009
10/5/2009
$50.00
10/5/2009
$200.00
$50.00
10/5/2009
10/5/2009
$5.00
10/5/2009
$20.00
$25.00
$188.00
$850.00
10/5/2009
10/5/2009
10/5/2009
Radio Shack
Radio Shack
Radio Shack
Radio Shack
McMaster-Carr
Robot Shop
Electronix Express
Microchip /
Schmartboard
McMaster-Carr
McMaster-Carr
All Electronics
Corporation
Crystal Fontz
Table 8
63
Budget Evaluation
Estimated
Cost
$20.00
$10.00
$15.00
$8.00
$8.00
$8.00
$20.00
$60.00
Item
Latches
Transformers
Multiplexer
Resisters
Diodes
Voltage Regulators
Wire
Professional etching board
Non profesional etching boards
$30.00
Steel balls
Motors
LEDs
Microcontroller
Materials for frame
Movement supplies
Push button
Keypad
LCD screen
Miscellaneous
$33.00
$70.00
$30.00
$50.00
$200.00
$50.00
$5.00
$20.00
$25.00
$188.00
$850.00
Spent
$47.00
$33.77
$96.56
$33.00
$165.22
$61.05
$9.15
$11.80
$24.41
$48.13
$530.09
Table 9
As of right now, the anticipated budget is looking well. The stepper motors went over
budget because three motors were budgeted and after some group deliberation, it was decided
that four would be necessary to make the system run as it should. We did not anticipate having
to purchase an electromagnet, but almost 200 dollars was budgeted for such surprises. After
determining the sizes of Plexiglas that was needed and ordering it, the total was about 35 dollars
less than expected due to discounts from the company, estreetplastics.com. These 35 dollars will
be used in other places where the budget has gone a little high. The movement supplies budget
was to take care of the expensive cost of racks and a potential expensive cost of gears, but we
will make our own racks on a CNC machine and the pinions will be cheaper due to the Delrin
that we are using as opposed to steel. After reviewing the entire budget and anticipated cost of
supplies as of now, it looks like we will come out within about 10% of our funds. Right now,
our group has spent 80 percent of the estimated budget of $662.00. Based on the fact that we
may get a microcontroller for free and a few other parts have not cost as much as expected, the
project is expected to be completed with approximately 100 to 150 dollars of our funds to spare.
64
Purchase List
Item
Push Button for Ship
Sensor
Steel Balls
Motors
LCD Screen
LEDs
Electromagnet
Movement Rails
Gears
$33.77
$96.56
$24.41
$33.00
$37.21
$14.52
$32.96
Ship Sensor Rails
$9.67
PVC Type 1
Quad SR Latches
Quad 2 Input NAND
Gates
Push Buttons for Keypad
Plexiglas
Binding
$3.90
$47.00
Table 10
65
Spent
$9.15
$8.92
$11.80
$165.22
$2.00
$530.09
Gantt Charts
66
Schedule Assessment
Currently, the project is right on schedule. According to the timeline, by the Final Design
Report all module designs should be completed with schematics and/or SolidWorks drawings.
There should also be simulations of the electronics and breadboard mockups. This has been
done and is shown in the appendices. As of right now, we do not have any real changes to make
to the spring semester. Since the project is being completed as expected, aside from a few minor
changes such as the addition of one stepper motor and using a purchased electromagnet as
opposed to a hand-made one, no changes have been necessary for the spring semester.
After looking over our module designs, discussing how things will be built, and what
order they will be built in, it is looking like time may be a bit tight. The frame will take a long
time to build because some of the components will have to be built into the frame and the frame
constructed around them. This presents a few issues of certain parts of the frame having to be
built before others. If construction is taking more time than expected, other team members can
help glue and/or cut pieces of Plexiglas. As a whole, all of the foreseen issues are solvable and
should not be insurmountable. The project should be fully completed on time with most if not all
of the requirements achieved.
67
Figure 36
68
Figure 37
69
Work Breakdown Schedule
70
Work Breakdown Structure – Fall 2009
Task
Activity
Deliverable /
Checkpoints
Description
F1.0
Requirements
Specification
Document stating what the
project will do in detail
F2.0
Overall System Design
Design entire project in
detail
F3.0
I/O Design
Communicates between
the user and the game
F3.1
Keypad Design
Takes input from the user
F3.2
LCD Design
Outputs Information to
user
F4.0
Microcontroller
Selection
Select an appropriate
microcontroller that will
run the game code
F5.0
LED Array Design
Displays the user's moves
F6.0
Digital Logic Design
Determines which LEDs
receive power
F7.0
Power Supply Design
Supplies power to all
modules of game
F8.0
Ball Placement Design
Displays computer's moves
F8.1
Movement System
Design
Moves ball to appropriate
coordinates
F8.2
Electromagnet Design
Magnetically picks up and
drops ball
F8.3
Electromagnet
Controller Circuit
Allows power to go to the
electromagnet
F8.4
Ship Sensor and Game
Piece Design
Senses the presence of the
constructed ships
F9.0
Frame Design
Encases entire game
71
Basic ideas of
project, written
document
Choose best
solutions and apply
them
Schematic of
keypad and
selection of LCD
screen
Schematic and
sketch of keypad
Selection of LCD &
manufacturer's
data sheets
Selection of
microcontroller &
manufacturer’s
data sheets
Schematic of LED
circuitry
Schematic of digital
logic
Schematic of
power supply
circuitry
SolidWorks
drawings and
MotionWorks
simulations
SolidWorks
drawings and
MotionWorks
simulations
Calculations of
necessary windings
and current &
material size and
shape
Schematic of
electromagnet
controller circuitry
Selection of push
button and idea of
how to lower the
push button &
design of game
pieces
SolidWorks
drawings and
mockups
Duration
People
Resources
9/13 9/29
M,M,T,T
Computer
9/25 10/16
M,M,T,T
Computer
10/15 11/3
Matt L.,
Tim
Computer,
Multisim
10/15 10/30
Matt L.
Computer,
Multisim
10/20 11/3
Tim
Computer
11/3 11/15
Tim
Computer
10/22 11/15
10/22 11/15
Matt L.
Matt L.
Computer,
Multisim
Computer,
Multisim
10/22 –
11/3
Matt L.
Computer,
Multisim
10/15 11/15
M,M,
Tatiana
Computer,
SolidWorks
11/1 11/15
Matt G.
Computer,
SolidWorks
10/20 11/5
Matt L.
Physical
tests
10/20 11/5
Matt L.
Computer,
Multisim
11/08 11/15
Tatiana
Computer
10/15 11/15
Matt G.,
Tatiana
Computer,
SolidWorks
Work Breakdown Structure – Fall 2009 (continued)
Activity
Description
Deliverable /
Checkpoints
Duration
(Weeks)
People
Resources
F10.0
Parts Selection
Make final decision as to
which parts to use
Documentation of
ordered parts and
data sheets of each
part
9/20 12/8
M,M,T,T
Computer
F11.0
System Design & Project
Plan
Breakdown of design and
build process and detailed
scheduling
Report and
Presentation
9/29 10/15
M,M,T,T
Computer
F11.1
Report
Write detailed report
regarding the above ideas
Written report
9/29 10/13
M,M,T,T
Computer
F11.2
Presentation
Present ideas to faculty
Power point and
verbal presentation
10/4 10/15
M,M,T,T
Computer
F12.0
Intermediate Design
Review
Finalize design of project
Report and
Presentation
11/16 12/9
M,M,T,T
Computer
F12.1
Report
Write detailed report
regarding the above ideas
Written report
11/16 12/9
M,M,T,T
Computer
F12.2
Presentation
12/1 12/9
9/13 12/31
Computer
Documentation
Power point and
verbal presentation
Engineering
notebooks
M,M,T,T
O1.0
Present design and analysis
to faculty
Keep logs of work and
research
M,M,T,T
Computer,
Notebooks
O2.0
A3 Status Reports
Bimonthly reports on
current project status
Presentation of
status and current
progress
9/13 12/10
M,M,T,T
Computer
O3.0
Time Management
Keeping to a schedule
Keeping on
schedule
9/13 12/10
Matt G.
Computer
Task
72
Work Breakdown Structure – Spring 2010
Task
Activity
Deliverable /
Checkpoints
Description
Duration
(Weeks)
People
Resources
S1.0
Parts assembly &
Testing
Assemble all parts and
verify they work correctly
Working modules
and test data
1/11 3/21
M,M,T,T
Various
digital and
general tools
S1.1
I/O System
Create and test interface
between user and game
Receives all inputs
and outputs all text
correctly
1/11 2/10
Matt L.,
Tim
ELVIS unit
Keypad
Create and test a keypad
circuit for user input
Working keypad
that accepts all
inputs correctly
1/11 1/25
Matt L.
ELVIS unit
LCD
Connect and test LCD
screen with the
microcontroller
1/20 2/10
Tim
ELVIS unit
S1.2
Microcontroller
Create and test code for
system
1/11 3/21
Tim
Programmer,
Computer
S1.3
LED Array
Create and test LED
circuitry for upper display
1/25 3/10
Matt L.
ELVIS unit
S1.4
Digital Logic
Create and test digital logic
circuitry for upper display
1/25 3/10
Matt L.
ELVIS unit
S1.5
Power Supply
Build and test voltage
control circuit
1/20 2/17
Matt L.
ELVIS unit
M,M,
Tatiana
Machine
equipment,
ELVIS unit,
Computer,
General
tools
S1.1.1
S1.1.2
S1.6
Ball Placement System
Working LCD
screen that
outputs all text
correctly at the
appropriate time
Microcontroller is
integrated with all
other systems
Array of LEDs that
are all visible when
lit in a well-lit room
Circuit that allows
power to go to all
of the right LEDs
Working module
that steps down
the voltage and
current to the
correct values
Build and test device to
place balls
Working module
and test data
1/15 3/21
1/27 3/21
Matt G.
Machine
equipment,
SolidWorks,
General
tools
S1.6.1
Movement System
Build and test the motor
and rail system
System of motors,
gears, and rails
that successfully
translates the drive
train to the correct
location
S1.6.2
Electromagnet
Build and test magnetic
device to pick up and drop
balls
Fully functional
electromagnet
1/15 2/15
Matt L.
ELVIS unit
Electromagnet
Controller Circuit
Create and test
electromagnet controller
circuit
Circuit that allows
power to go to the
electromagnet
when a signal is
received
1/152/15
Matt L.
Elvis unit
S1.6.3
73
Work Breakdown Structure – Spring 2010 (continued)
Task
Activity
Deliverable /
Checkpoints
Description
People
Resources
2/15 3/21
Tatiana
Machine
equipment,
SolidWorks,
General
tools
1/27 3/15
Matt L.,
Tim
Express PCB
Functioning system
code
1/11 4/15
Tim
Programmer,
Computer
Write and test code for the
keypad
Functioning keypad
code
1/11 4/15
Tim
Programmer,
Computer
LCD
Write and test code for
LCD screen
Functioning LCD
screen code
1/11 4/15
Tim
Programmer,
Computer
S2.3
Movement System
Write and test code for
translation motor
movement
Functioning
translation motor
movement code
1/11 4/15
Tim
Programmer,
Computer
S2.4
Plunger Motor
Write and test code for
plunger motor movement
Functioning
plunger motor
code
1/11 4/15
Tim
Programmer,
Computer
S2.5
Push Button
Write and test code for
push button
Functioning push
button code
1/11 4/15
Tim
Programmer,
Computer
S2.6
Electromagnet
Write and test code for the
electromagnet
Functioning
electromagnet
code
1/11 4/15
Tim
Programmer,
Computer
S2.8
LED Output Signals
Write and test code for
turning LEDs on
Functioning LED
output code
1/11 4/15
Tim
Programmer,
Computer
S2.7
Artificial Intelligence
Write and test code for
artificial intelligence
Functioning
artificial
intelligence code
1/11 4/15
Tim
Programmer,
Computer
S3.0
Final Design Review
Presentation of final
design
Report and
Presentation
2/20 3/4
M,M,T,T
Computer
S3.1
Report
Write detailed report
regarding the above ideas
Written report
2/20 3/4
M,M,T,T
Computer
2/20 3/4
M,M,T,T
Computer
2/4 3/20
Matt G.,
Tatiana
Project Lab
Ship Sensor
Build and test Plunger to
sense ship pieces on the
lower display of game
S1.7
Board Etching
Design circuit boards for
final system and etch them
S2.0
Programming
Write and test code for
microcontroller
S2.1
Keypad
S2.2
S1.6.4
Five ship pieces
and a push button
that sends a high
signal when
pressed
professionally
made circuit
boards
Duration
(Weeks)
S3.2
Presentation
Present ideas to faculty
Power point and
verbal
presentation
S4.0
Build Frame
Construct a frame to
encase the game
components
Completed Frame
74
Work Breakdown Structure – Spring 2010 (continued)
Task
Activity
Deliverable /
Checkpoints
Description
Duration
(Weeks)
People
Resources
S5.0
System Integration
Compile all modules to
create prototype
Assembled project
and test data
3/25 4/15
M,M,T,T
Project Lab
S6.0
System Testing
Run full system test
Test data
3/25 4/15
M,M,T,T
Project Lab
S7.0
Finalize Prototype
Verify correct operation
and prepare for
presentation
Completed
Prototype
4/5 4/29
M,M,T,T
Project Lab
S8.0
Project Readiness
Review
Presentation of project
prototype
Report and
Presentation
4/10 4/29
M,M,T,T
Computer
S8.1
Report
Write detailed report
regarding the project
Written report
4/10 4/29
M,M,T,T
Computer
S8.2
Presentation
Present project to faculty
Power point and
verbal presentation
4/10 4/29
M,M,T,T
Computer
O4.0
Documentation
Keep logs of work and
research
Engineering
notebooks
1/1 4/29
M,M,T,T
Computer,
Notebooks
O5.0
A3 Status Reports
Bimonthly reports on
current project status
Presentation of
status and current
progress
1/11 4/29
M,M,T,T
Computer
O6.0
Time Management
Keeping to a schedule
Keeping on
schedule
1/11 4/29
Matt G.
Computer
75