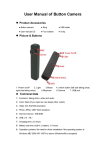
1
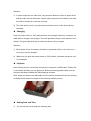
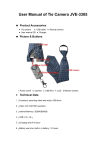
User Manual of Tissue Box Camera Product Accessories ●Tissue box camera ● Remote controller ● USB cable ● Adapter ● Manual CD Picture & Buttons 1. Cover 5. Indicator light 2. USB port 3. Power on/off button 6. Camera 7. MIC 4. Record / Save 8. Record / Save (remote) Technical Data This device is a new type of remote-control camera with internal memory, which can be used for digital video recording, also as the USB flash disk. It is characterized by ease of use, remarkable concealment and good audio effect. 1) Main function: Recording video and audio manually & by remote control, tissue box, USB flash disk 2) Video: AVI, 720*480 3) Internal memory: 2GB/4GB/8GB 4) USB interface: 2.0(Hs) 5) Charging time: 7-8 hours 6) Battery use time: built-in Li battery, 6 hours 7) Operation system: No need for driver installation if the operating system is Windows ME/ 2000/ XP/ Vista or above (windows98 is excepted) Operation Switch on Push the power button to “ON” after pulling open the tissue box, and then close it. At this time, camera comes to standby mode. Attention: to save power, if you no need to use it, please push power button to “OFF” position for saving power. Recording video and audio manually Under standby mode, slid the cover out. Long press the record button, then the green light keeps on for 2sec and off after blinking 3 times, which means it starts to record; press the same button again, so the video will be save and the device back to standby mode. Attention: the longest recording time is 30 minutes. If the memory is full, the device will save the video then turn off automatically during camera is recording. Recording video and audio by remote control Under standby mode, long press the record button, the green light keeps on for 2sec and off after blinking 3 times, which means it starts to record; press the same button again, so the video will be save and the device back to standby mode. Reset Under incorrect operation or an uncertain reason, the device may stop working, at this time, press the Reset button to reset, and then the device is under power off mode. Attention: when resetting while it is recording, the files cannot be saved. Switch off Under standby or recording mode, push the power button to “OFF” position to turns off the device. You could also press the reset key to turn it off. Attention: 1) In order to save the set video time, only press the Remote Control to power off so that the video time will be saved. If power off by the power on/off button, the video time will be needed to be set the next time. 2) The video will be lost if you push the power button to turn off the device during recording. Charging Push the power button to “ON” position before connecting the device to computer via USB cable or charge it with charger. Then the light blinks slowly, which means it is on charge. The green light will keep on when the device is fully charged. Attention: 1) When power is low, the battery will switch to protected mode, so you can’t turn it on and you need to charge it. 2) Make sure you push the power button to “ON” position, otherwise the device can’t be recharged. Playback After finishing record, connect the camera to the computer via USB cable. Find the file in removable disk then you can play them. Before connecting please make sure the computer has been installed the related playing software. Note: when you remove the USB cable from the device, please press the surrounding of USB port with medium strength as the following indicator picture: Setting Date and Time 1) You can set the time through the following way: 2) Create a file named “TAG.txt”, edit the file as the following format: 3) First line: [date] 4) Second line: 2010/12/12 (year/month/date) 5) Third line: 12:12:12 6) Copy the file to root disk of the camera, the time of camera will be updated when (hour:minute:second) you pull it out and restart it again. Attention 1) If the power is low during recording, the device will save the video automatically then turn off. 2) The effective induction distance is about 18 meters. 3) After every video file, a new file will come up during recording. 4) Please use it under bright environment. Keep the device vertical and stable, so that it can get the best recording 5) The device use built-in high capacity polymer lithium-ion battery, having memory effect, so in the first 5 times, please charge it fully when it is power off. So that can activate the maximum capacity and get the standard time. 6) The time of PC recognizing the device is different according to its different system and configuration, so please do not operate during recognizing. If the device can’t be recognized, please check your computer’s operation system, device drivers, USB port and the USB cable is normal, and then connect the hardware again.