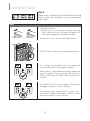
1
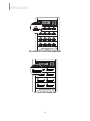
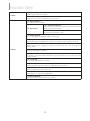
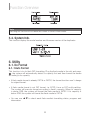
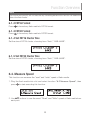
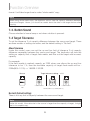
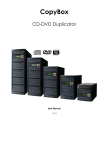
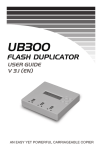
CopyBox
Flash Duplicator
User’s Guide 5.0
Virtual Vision CopyBox Data Duplicator
Index Content
Disclaimer of Warranties
Disclaimer of Warranties
Before You Start
Before You Start
Introduction
1. Features & Functions
2. System Overview
2-1.Panel
2-2. Front View
3. Package Contents
4.Definition
4-1. Flash/Flash Media/Media
4-2. Capacity 4-3. Port Function Table
Function Table
Operation Guide
3
4
5
5
5
6
6
7
7
7
7
9
1. How to Make a Copy
1-1. Step to Make Mass Copy
1-2. The Setting Related to Copy Result
1-2-1. Copy Area Setting 1-2-2. Target Tolerance Setting
1-2-3. Asychronous Setting
11
11
13
13
13
14
2. How to Prevent from Copying Failure
2-1. Stable Devices 2-2. Suitable Data & Setting 14
14
15
3. How to Make Sure of Copy Correctness
16
4. How to Check Flash Device's Quality,
Speed and Capacity
4-1. How to Check Flash’s Reading &
Writing Speed
4-2. How to Check If the Flash’s Capacity Is
Correct
4-3. How to Check Flash’s Quality
4-4. How to Check Flash Media’s Content Size
Function Overview
1. Copy
2. Compare
3.Copy&Compare
4. Capacity Check 5. Information
5-1. Flash Info.
5-2. System Info.
6. Utility
6-1. Do Format
6-1-1. Auto Format
6-1-2. FAT16 Format
6-1-3. FAT32 Format
6-1-4. Set FAT16 Cluster Size
6-1-5. Set FAT32 Cluster Size
6-2. Measure Speed
6-3. Media Check 6-3-1. H3 Safe 6-3-2. H5 RW 6-3-3. H6 Safe RW 6-3-4. Setup Range %
6-3-5. Setup Range MB
6-3-6. Setup Error Limit
6-4. Quick Erase
6-5. Full Erase
6-6. DoD Erase 6-7. System Update
6-8. Calc. Checksum
7. Setup
7-1. Start Up Menu 7-2. Copy Area
7-2-1. System and Files
7-2-2. Whole Media
7-3. Button Sound 7-4. Target Tolerance
7-5. Asynchronous 7-6. Check before Copy
7-7. Power off Time between Copy & Compare
7-8. Language 7-9. Select Speed (USB/SD duplicator)
7-9. CF Transfer Mode (CF duplicator)
7-10.Set HDD Mode (USB duplicator)
7-11.Set to Default 16
Specification
USB/Combo SD/CF Flash Duplicator
16
17
17
19
20
20
20
21
21
21
22
2
22
22
22
23
23
23
23
23
24
24
25
25
26
26
27
27
27
28
28
29
29
29
29
29
29
30
30
31
31
31
31
31
32
32
32
33
Disclaimer of Warranties
Disclaimer of Warranties
All Series flash duplicators are made specifically for data backup with legal
authorities from copyright owners. Any unauthorized action of copyright is strictly
prohibited, and the original manufacturer disclaims all warranties or representations
of illegal actions by users.
The manufacturer also disclaims any liability for any loss or damage due to not being
able to perform its undertakings or provide any of the services attributed to any
events or circumstances beyond our control. Users agree and accept all statements
above as soon as purchasing our products.
This manual contains materials that should be intended for personal use. All right
reserved. No part of this manual may be reproduced, transmitted or transcribed
without the expressed written permission of the manufacturer. The information
present in this manual is subject to change without prior notice.
3
Before You Start
Before You Start
Important Notice
• Read the complete operation instructions carefully. This contributes to better
operation.
• Make sure the source device is correct and workable.
• To guarantee data consistency, it is strongly suggested that the capacity of source
and targets should be the same.
• It is strongly suggest to use the function "Copy&Compare" to achieve perfect
duplication.
Safety Precautions
• The warranty will expire if damage is incurred resulting from non-compliance with
these operating instructions.
• Please turn off the power before replacing the socket.
• Never turn off the power while processing the firmware update.
• Use only approved power sources.
• The product is only suitable for operation in a dry, dust free, clean environment.
• Do not allow liquids or foreign objects to enter. Failure to do so may severely
damage your duplicator.
4
Introduction
Introduction
1. Features & Functions
• Scalable performance of 1.5GB per minute, per port data transmission.
• Multi-task processing capability-each flash media channel operates independently
whether to copy, compare or format media. The series provides special design of
the individual control processing unit behind each channel, task such as checking
the status of each flash medium can be performed by pressing ▲▼ during
asynchronous copy.
• Diagnostic tool for checking real capacity, speed, and quality of the media.
• Stand-alone system with instant power on and off switch. No PC required, and no
risk of virus infection.
• Simple one touch copy with real time LCD display.
• Support Synchronous and Asynchronous copy/compare/erase/format.
• Real high speed bit-for-bit hardware comparison.
• Optional copy speed settings to accommodate flash devices of various quality
grades.
• Differences between our flash duplicator and PC-based duplicator:
»» Multi-task processing capability--copying flash media independently and
simultaneously, while a PC (no matter how powerful the CPU) handles them
one at a time.
»» No risk of virus infection--flash duplicator is an embedded system. Once it
completes copying from the source, nothing lingers when it is turned off.
»» No human error of dragging and copying the wrong files. Direct source to
target delivers 100% duplication.
»» Instant on/off-- no wait time during system boot-up or shut down.
2. System Overview
2-1 Panel
5
Introduction
2-2 Front View
Keys
LCD panel
Source port
LED
Red: fail
Green: success
Power
SD+microSD Flash Duplicator
3. Package Contents
Flash Duplicator
Tower Advanced Series
USB Drive | SD/ Micro SD Card
User Guide
V 4.0
2013/12
6
Flash Duplicator
Tower Advanced Series
USB Drive | SD/ Micro SD Card
User Guide
Introduction
4. Definition
4-1 Flash/Flash Media/Media
Flash media including SD/microSD card, Compact flash card, and USB flash drive.
USB
CF card
SD card microSD card
4-2 Capacity
The maximum data amount can be contained in a Flash memory card.
4-3 Port
A mechanical construction used to insert flash cards or devices.
USB Flash Duplicator
7
Introduction
SD+microSD Card Flash Duplicator
CF Card Flash Duplicator
8
Function Table
Function Table
Advanced Series
Function
Description
1. Copy
USB flash drives, SD, Micro SD or CF copying.
2. Compare
Bit-for-Bit comparison between the source and the target(s) copied.
3. Copy&Compare
Compare immediately after done copying.
4. Capacity Check
Display real capacity.
5. Information
Display USB drives, SD, Micro SD or CF cards information such as file format, content
size, and capacity.
5-1. Flash Info. (USB/SD/CF Info.)
5.2.System Info.
Display controller model number and firmware version.
6-1-1. Auto Format
Auto perform FAT16/32 formatting.
6-1-2. FAT16 Format
Format media to be FAT16.
6-1. Do Format
6-1-3. FAT32 Format
Format media to be FAT32.
6-1-4. Set FAT16 Cluster Size
Set the size of FAT 16 cluster.
6-1-5. Set FAT32 Cluster Size
Set the size of FAT32 cluster.
6-2. Measure Speed
Display read/write speed.
6-3-1. H3 Safe
Check quality through reading
6-3-2. H5 RW
6. Utility
Check quality through reading and writing.
6-3-3. H6 Safe RW
6-3. Media Check
Check quality through safe reading and writing.
6-3-4. Setup Range %
Check quality through reading
6-3-5. Set Range MB
Check quality through reading
6-3-6. Set Error Limit
Set percentage of bad sectors threshold for screening.
6-4. Quick Erase
Erase content while preserving file system format (applicable to FAT only).
6-5. Full Erase
Erase content and clean up the file system.
6-6. DoD Erase
Erase according to USA Department of Defense (DoD) Standard.
9
Function Table
6-7. System Update
6. Utility
Update system firmware via media.
6-8. Cacl. Checksum
Calculate the checksum of the flash in the source port.
7-1. Start-up Menu
Set the first function to display.
7-2-1. System and Files
7-2. Copy Area
Copy only the data when the master is under FAT16/32/64,
NTFS, Linux (ext2/ ext3/ ext4).
7-2-2. Whole Media
Choose the whole media to copy.
7-3. Button Sound
Turn on/off the beep sound when a button is pressed.
7-4. Target Tolerance
Set capacity gap allowed between the master and a target. Default setting is "No limit".
7-5. Asynchronous
Engage asynchronous copying as long as the master data size is not exceeding the
memory buffer.
7. Setup
7-6. Check Before Copy
Check the media before copying.
7-7. Power Off Time Between Copy&Compare
Set duration of power disruption between Copy and Compare functions when executing
Copy&Compare .
7-8. Language
Set language displayed by the system.
7-9. Select Speed (USB/SD duplicator)
Select the speed of data transmission for USB, SD, micro SD card.
7-9. CF Transfer Mode (CF duplicator)
Select the speed of CF data transmission.
7-10. Set HDD Mode (USB duplicator)
Reset “Active” to copy external USB HDDs.
7-11.Set to Default
Reset the system to use default factory settings.
10
Operation Guide
Operation Guide
1. How to Make a Copy
1-1. Step to Make Mass Copy
Step 1
Plug-in the flash source.
Step 2
Plug-in the flash targets.
Step 3
The LCD will show the number of flash targets
which are ready to copy.
Step 4
Press "
11
" button to start copy.
Operation Guide
Step 5
When copy is finished, the LCD will show the total
time of copy, and quantity of copy passed and
copy failed.
Note
1. LED Light indication
a) When copy is processing, the green LED will
flash. When the copy is finished, the green LED
will stop flashing but will remain illuminated.
Green Light
Red Light
b) If an error occurs, the red LED will illuminate.
2. DO NOT take out the card during copying process.
3.It is strongly recommended that the target and
source have to be in close range of capacity.
When there is a big difference between target and
source's capacity, such as copying 1GB source to a
4GB or 1GB source to a 2GB, it may cause error or
copy fail.
4. If copy NTFS or Linux format, targets' capacity must
be bigger or equal to source's capacity.
For example, when making NTFS or Linux copy, if
the source is 2GB and the target is 1 GB, it'll have a
very big possibility to cause copy fail.
12
Operation Guide
1-2. The Setting Related to Copy Result
There are several sub-functions related to the results of copy, users could adjust
them in function 7.Setup to meet the needs before copy.
1-2-1.Copy Area Setting
1. Copy Area : System and Files
It is also called "Quick Copy" mode. The system
will automatically analyze the source flash card's
file format. If the data's file format is FAT16/32/64,
NTFS, Linux(ext2/ext3/ext4) which is recognizable
by the system, it will be able to copy data only
instead of the whole flash.
Note
If the file format is non-recognizable, the system will
still copy the whole flash card including the empty
space even that you select "System and Files" as
your copy area.
2. Copy Area : Whole Media
The system will copy the whole flash card,
including the empty space and format. This
function is used when users want to copy the
whole flash or have a flash source with unknown
format. It will take longer time to make "Whole
Media" copy.
1-2-2. Target Tolerance Setting
This function is to set the acceptable difference range of flash capacities between
the source and target. If the capacity difference between the source and target
exceeds the tolerance setting, the copy will fail.
For example, if the target tolerance setting is " ± 1%", the targets whose capacities
are more than 2.02GB or less than 1.98GB won't be able to be copied.
13
Operation Guide
Source
Target tolerance setting:± 1%
2.03GB~2.05GB
2GB
1.99GB~2.01GB
1.96GB~1.97GB
2.02GB (2GB+1%) 1.98GB (2GB-1%)
1-2-3. Asychronous Setting
Users can select "Disable" to close Asynchronous
copy or "Enable" to activate the function. If the
setup is "Enable", and the data in source is smaller
than system's buffer memory, it will automatically
use asynchronous mode to do copy. If the setting
is "Disable", no matter what the content size is,
the system will keep synchronous copy.
Note
1. The buffer memory of different product models may
be different.
2.About the "buffer memory", please refer to
Specification.
2. How to Prevent from Copying Failure?
2-1. Stable Devices
a) Good Connector
No matter the adapter, the extension cord, or the card reader, all of them must have
good quality to make sure of good connection.
Cord
Reader or Hub
14
Operation Guide
b) Stable Flash
USB drive
SD card
Micro SD card
Use the flash device of stable quality.
USB drive
SD card
CF card
Micro SD card
c) Good Source
Make sure your source is a good source.
2-2 Suitable Data & Setting
a) Target Tolerance Setting
Go to Function 7.4 Target Tolerance to check if the setting of capacity difference
range between source and target is right.
b) Capacity of the Data in Source
Make sure that the data of source is within the capacity of target.
15
Operation Guide
c) Capacity of Targets
When making NTFS/Linux format copy, make sure that the target's capacity is equal
or larger than your source.
3. How to Make Sure of Copy Correctness
The series duplicators provide the most rigorous "compare function" to assure our
clients with the best duplications. It is strongly suggested to execute function 2, 3 to
make sure of the correctness of copied result.
1.Execute Function 2.Compare to do data checking between source and targets
after finishing the copying process.
2.Select Function 3.Copy&Compare to make the duplicator execute data
comparison automatically after copying.
Note
These functions will check the contained data after copy through the strictest bit-for-bit
comparison. It can highly increase the security of data accuracy.
4.How to Check Flash Device's Quality, Speed and
Capacity
The series is not only made for duplicating but also has powerful flash device
diagnostic tools to detect flash's quality and check real capacity and speed. It is very
important to own high-quality flash devices, and the series can help users to achieve
this goal.
4-1. How to Check Flash’s Reading & Writing Speed
a) Execute Function 6.2 Measure Speed
Select function 6.2Measure Speed to measure
the "read" and "write" speed of flash media.
16
Operation Guide
b) Result of Speed Measuring
The system will show the exact "read " and "write"
speed of each flash media. Users can use ▲ ▼
button to check the status of each slot.
Note
1."Measure Speed" function may change or delete the content and format of flash media,
please do not execute this function if there is important data in it.
2. To protect source data, the system will not do "Measure Speed" on the master device.
4-2. How to Check If the Flash’s Capacity Is Correct
a) Execute Function 4 Capacity Check
Select function 4. Capacity Check to check the real capacity of flash media.
b) Result of Capacity Checking
System will show the checking result with Green/
Red LED light.
Users can use ▲▼ button to check the status of
each slot.
Note
• This function can support asynchronous operation. Users can continuously plug flash
media in and out without pushing any buttons.
• "Capacity Check" function may change or delete the content and format of flash media,
please do not execute this function if there is important data in it.
• To protect the source data, the system will not do capacity check on the master device.
4-3. How to Check Flash’s Quality
Select function 6.3 Media Check to examine flash's quality, that is to see if there are
bad sectors and how many of them in the flash media.
17
Operation Guide
1) Select One from 6.3.1~6.3.3 to Check Flash's Quality.
a) Function "6.3.1 H3 Safe"
"H3 Safe" will check flash's quality with reading
method, and the result will show the volume of
bad sectors and also the reading speed.
Use ▲▼ button to check the status of each slot.
Note
This function will not change or delete the content and
format of flash media.
b) Function "6.3.2 H5 RW"
"H5 R/W" will check flash's quality by reading and
writing the whole flash, and the result will show
the volume of bad sectors and also the reading/
writing speed.
Use ▲▼ button to check the status of each slot.
Note
1 This function will delete the content and format of
flash media, please do not execute this function if
there is important data in it.
2 To protect source data, the system will not execute
this function on the master device.
c) Function "6.3.3 H6 Safe RW"
"H6 Safe RW" will check flash's quality with
reading and writing method on the empty space
only, and the result will show the volume of good /
bad sectors, and unchecked sectors.
Use ▲▼ button to check the status of each slot.
18
Operation Guide
2) Make the Related Setting of "Media Check"
a) Function "6.3.4 Setup Range %"
When making quality check, users can set
the checking range from 1% to 100% before
executing checking mode.
b) Function "6.3.5 Setup Range MB"
When making quality check, users can set the
checking range from 1MB~9000MB before
executing checking mode.
c) Function "6.3.6 Set Error Limit"
When making quality check, users can set the
% of error tolerance before executing checking
mode.
4-4. How to Check Flash Media’s Content Size
a) Execute function 5.1 Flash Info.
Select function 5-1 USB Info., it will show flash
media's basic information including media type,
content size, and total capacity and users can use
▲▼ button to check the status of each slot.
19
Function Overview
Function Overview
1.Copy
Before executing this function, users can go to 7.Setup to set the copy area and
copy mode. After finishing these two settings, go back to function 1.Copy and
press , and the system will start copying.
Depending on the content data size on your master storage, if the onboard memory
buffer can accommodate, asynchronous copy can be performed; otherwise,
synchronous copy will be adopted.
Copy area setting ➡ 7.2.Copy Area.
Select System and File or Whole Media.
Copy mode setting ➡ 7.5.Asynchronous.
Select Enable or Disable asynchronous.
2. Compare
Verify bit-for-bit to ensure correct copying. After finishing copying, go to function 2
to start executing comparing process.
and press
3. Copy&Compare
Automatically start comparing once done copying. Function 3.Copy&Compare will
automatically run the compare function after finishing copying to make sure if the
copied result is correct.
20
Function Overview
4 Capacity Check
Check the real capacity of flash media.
1.Plug the flash media into slot and select function 4.Capacity Check, then press
. About 2~3 seconds, the system will find out its exact capacity.
2.System will show the checking result by Green/Red LED light.
3.You can use ▲▼ button to check the status of each slot.
4.This function supports working asynchronously. Media can be inserted and
removed without pressing any button.
Note
1. This function supports asynchronous operation, you can continuously plug in and pull out
flash media without pushing any buttons.
2. The function may change the content of data.
3. To protect source data, the system will not do Capacity Check on the master device.
4. When the Red light illuminates (Error), you can use ▲▼ to check the error information.
5. Information
5-1. Flash Info.
This function will show the flash media’s basic information such as file format,
content size, and total capacity.
Press ▲▼ buttons to check the information of each flash media including the
source.
21
Function Overview
Note
Executing this function will not delete the content or format of flash media.
5-2. System Info.
This function display the model number and firmware version of the duplicator.
6. Utility
6-1. Do Format
6-1-1 Auto Format
This function is to do flash FAT formatting. Plug the flash media in the slot and press
, the system will automatically detect its capacity first and then format the media
according to its capacity.
• If flash media format is already FAT16 or FAT32, the format function won’t change
its original format.
• If flash media format is not FAT format, i.e. NTFS, Linux or FAT multi-partition.
The system will execute format according to flash’s capacity. When its capacity
is above 2GB, the system will format the flash media to FAT32. If its capacity is
below 2GB, the system will format the flash media to FAT16.
• You can use ▲ ▼ to check each flash media’s formatting status, progress and
information.
22
Function Overview
Note
The source port (port#1) will not execute any formatting because this function will delete the
data of the flash media.
6-1-2 FAT16 Format
Press
to format any flash media to FAT16 format.
6-1-3 FAT32 Format
Press
to format any flash media to FAT32 format.
6-1-4 Set FAT16 Cluster Size
Set the size of FAT16 cluster, choosing from "Auto", "4KB~64KB".
6-1-5 Set FAT32 Cluster Size
Set the size of FAT32 cluster, choosing from "Auto", "4KB~64KB".
6-2. Measure Speed
This function can measure the "read" and "write" speed of flash media.
1.Plug the flash media into slot and select function "6.2 Measure Speed", then
to start executing this function.
press
[FAT32 Cluster S
Auto
2.Use ▲▼ buttons to see the exact "Read" and "Write" speed of flash media from
each port.
23
Function Overview
Note
1. The function may change the content of data and format of flash.
2. To protect source data, the system will not do "Measure Speed" on the master device.
6-3. Media Check
The function is to analyze flash’s quality. There are 3 kinds of methods to do media
check, 6.3.1 H3 Safe, 6.3.2 H5 RW and 6.3.3 H6 Safe RW. Before executing quality
check, user can go to function 6.3.4 Setup Range %, 6.3.5 Setup Range MB and
6.3.6 Setup Error Limit to finish setting.
6-3-1 H3 Safe
This function is to check the flash’s quality by reading the flash media. After
executing the function, it will show the volume of bad sectors and also the reading
speed of the flash device.
When processing, user can use ▲▼ buttons to check the status for each port.
(Port 1 Information)
(All Ports Information)
Note
1. This function will not change the content or format.
2. You can set the checking range % at 6.3.4 Setup Range % or set the checking MB range
at 6.3.5 Setup Range MB.
24
Function Overview
6-3-2 H5 RW
This function is to check the flash’s quality by reading and writing the flash media.
After executing the function, it will show the volume of bad sectors and also the
reading/writing speed of the flash device.
When processing, user can use ▲▼ buttons to check the status for each port.
(Port 1 Information)
(Port 2 Information)
(All Ports Information)
Note
1.This function will change the content and format of flash media, please do not execute
this function if there is important data inside.
2. To protect source data, the system will not execute this function on the master device.
6-3-3 H6 Safe RW
This function is used to check the flash's quality by writing and reading data on the
empty space of flash media.
25
Function Overview
(Port 1 Information)
(All Ports Information)
Note
This function will NOT change the content of flash media.
6-3-4 Setup Range %
This function is to set the % of flash’s range that you would like to check for its
quality. Use ▲▼ button to set the examined range from 1% to 100%. 100% means
to check the whole flash, and it will take more time.
6-3-5 Setup Range MB
This function is to set the flash’s range(MB) that you would like to check for its
quality. Using ▲▼ button to set the examined range from 1MB to 9000MB.
26
Function Overview
Note
Function 6.3.4/6.3.5 may conflict with each other. The duplicator will follow the latest setting
if users set both of these two functions.
6-3-6 Setup Error Limit
This function is to set the % of tolerance range of error when checking the flash.
User can use ▲▼ button to set the error limit value.
6-4. Quick Erase
This function will erase flash’s data, and it will keep the format if the original format
of flash is FAT16/32. User can use ▲▼ button to check each flash media’s erasing
status, progress and information.
Note
1. Quick erase function can only erase the flash which is FAT 16/32 format.
2.It will damage the data in flash, please make sure you have backup all important data
before using this function.
6-5. Full Erase
It will completely erase the whole flash media, including format and content.
to stop
Therefore full erase will take more time. During the process, you can use
the erasing process, but the original format and content can’t be read any more.
27
Function Overview
Note
It will damage the data in flash, please make sure you have backup all important data before
using this function.
6-6. DoD Erase
DoD Erase is an erasing method that complies with the U.S.A. Department of
Defense (DoD 5220) standard. It can guarantee the data was fully deleted by erasing
the flash three times.
Note
It will damage the data in flash, please make sure you have backup all important data before
using this function.
6-7. System Update
Update the system’s firmware version via flash. Please save an un-zipped update file
to your flash media and don’t put it in a folder.
1.Select function 6.7 System Update, and press
system updating.
, it will automatically start
2.When finished, please turn off the system for 5 seconds.
3.Turn on the system, and the new version of firmware will finish uploading process.
28
Function Overview
6-8. Calc. Checksum
This function will calculate the Checksum value of the flash media plugged in the
source port. The Checksum calculating area will base on the "copy area" you set
as the data block for this calculation. Be aware that even two flash medias have the
same data, if the capacity has any difference, their Checksum value will be different.
Note
1.The Checksum will take the same time as copy, if the capacity is large, you have to wait
for longer time to finish.
2. The function is not for comparing purpose. If you want to double check data correctness,
please use the Compare function which can provide you the safest and fastest bit-for-bit
comparison.
7 Setup
7-1. Start Up Menu
Select which function is shown first when the duplicator is turned on.
7-2. Copy Area
7-2-1 System and Files
This is also called "quick copy" mode. The system will automatically analyze the
source flash media’s file format. If the data’s file format is FAT16/32/64, NTFS, Linux
(ext2/ ext3/ ext4) which is recognizable by the system, it will be able to copy data
only when selecting “System and Files” as copy area setting. Otherwise, if the file
format is non-recognizable, the system will copy the whole flash media no matter
what the copy area setting is.
Note
If the source format is NTFS or Linux, to make sure the target could be operated normally,
the target capacity must be equal or bigger than the source device.
7-2-2 Whole Media
This setting is to select “Whole Media” as your copy area. The system will copy the
whole flash media, including the empty space and format. This function is used
when users want to copy the whole flash or have a flash source with unknown
29
Function Overview
format. It will take longer time to make "whole media" copy.
Note
When doing whole media copy, the duplicator will not care the capacity difference between
source and targets. Hence, you should be careful about the data in the target devices after
copying.
7-3. Button Sound
Choose whether to hear a beep or not when a button is pressed.
7-4 Target Tolerance
To set the tolerance % of capacity difference between the source and target. There
are three models of settings as below, and the default setting is "No limit".
Allow Tolerance
Under this model, users can set the up and low limit of tolerance % of capacity
difference separately between the source and target. The duplicator will view the
setting as capacity limit of target flash media, and filter out the target with incorrect
capacity.
For example:
If the flash media is marked capacity as 2GB, when user allows the up and low
tolerance to be 1 %, then the workable capacity of target flash media will be :
2GBx(99%~101%) => 1.98GB~2.02GB.
Source
2GB
Target tolerance setting:± 1%
2.03GB~2.05GB
1.99GB~2.01GB
1.96GB~1.97GB
2.02GB (2GB+1%) 1.98GB (2GB-1%)
No limit (Default setting):
There is not any limit of capacity between the source and target.
Note
Under this model, if the data size in the source is larger than the capacity of target, it might
lead to incomplete copy.
30
Function Overview
100% Same
The capacity of targets has to be exactly the same as the source, or it will not be
able to execute any function.
7-5. Asynchronous
There are two kinds of copy mode, which are "Asynchronous" and "Synchronous"
Copy. The system will check the content size of the source. If the content size of
source is less than system’s buffer memory and you set "Enable" at function 7.5
Asynchronous, then it will execute asynchronous copying. If the source content size
is larger than the system’s buffer memory, the synchronous copying mode will be
executed no matter you set "Enable" or "Disable"
7-6 Check before Copy
You can select "Do Check" if you would like to check whether the flash media is
workable before copying.
7-7 Power off Time between Copy&Compare
This setting is to prevent from any data loss because of unstable flash, we strongly
recommend you to enter the function to set the time gap of power supply between
copy and compare.
The time gap can be set from 0 to 15 seconds.
7-8 Language
Set the system’s language interface, i.e. English, Japanese.
7-9. Select Speed (USB/SD duplicator)
The working mode has 5 options to select the transmission speed:
•
•
•
•
•
Slowest Mode
Slower Mode
Normal Mode (Default setting)
Faster Mode
Fastest Mode
31
Function Overview
Please make sure your flash media has good quality and support faster mode. If
you are not confident on the flash quality or you find a high failure rate on copy or
compare. It is recommended to slow down the working mode. The factory default
setting is "Normal Mode".
7-9. CF Transfer Mode (CF duplicator)
The working mode has 7 options to select the suitable CF transfer mode: The default
setting is UDMA4, it will automatically adjust speed according to your CF card is
support. If you are not confident with the quality of your CF card, you can manually
reduce the transfer speed. The following are 7 options of the transmission speed:
•
•
•
•
•
•
•
PIO Mode 4
MDMA Mode 2
UDMA Mode 0
UDMA Mode 1
UDMA Mode 2
UDMA Mode 3
UDMA Mode 4 (Default Setting)
7-10. Set HDD Mode (USB duplicator)
This is the setting when users want to copy USB HDD. To copy USB HDD, users
could select "Active Mode" first and then start executing other operation. Or, if users
just want to copy USB devices but not USB HDD, just select "Inactive mode".
Note
The reason to make this setting before copying USB HDD is not only because USB HDD
requires more power but also because it has different file format with USB flash stick.
7-11. Set to Default
Return the system back to the factory default settings.
32
Specification
Specification
USB/Combo SD/CF Flash Duplicator
Model
Tower Advanced 8 Series
Target
USB
1:7 ~ 1:95
(8-port up)
Combo SD
1:7 ~ 1:95
(8-port up)
CF
1:4 ~ 1:47
(4-port up)
Media Supported
USB 1.1 / 2.0 / 3.0,
USB drive, HDDs
SD / MMC card,
microSD (TF) card
Compact Flash
(CF) Card
Buffer Size
256MB
Operation
Stand alone, no PC required
Display
Monochrome LCD Display
LED
LED (Green/Red) on each slot
Power supply /
consumption
110V/ 220V, 80W or up
Max Speed
1.5GB/minute
Max Capacity
Up to 4TB (USB HDD), 64GB (USB drive)
Language
English, Japanese
Buttons
4 push buttons
( ▲ /up, ▼ /down, OK/confirm, ESC/exit)
Humidity
Temperature
Safety
128MB
3.9GB/minute
Working humidity: 20%~80%
Storage humidity: 5%~95%
Working temperature: 5°C~45°C
Storage temperature: -20°C~85°C
CE, FCC, RoHS
The product specification is subject to change without further notice.
33