1
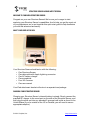
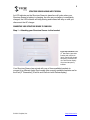
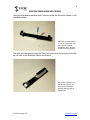
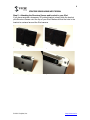
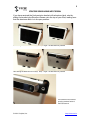
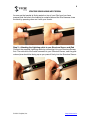
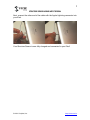
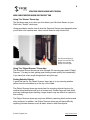
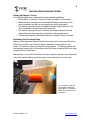
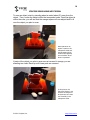
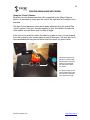
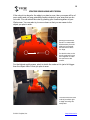
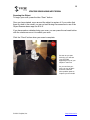
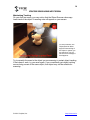
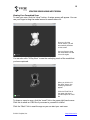
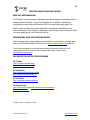
STRUCTURE SENSOR
& DEMO APPS
TUTORIAL
1
STRUCTURE SENSOR & DEMO APPS TUTORIAL WELCOME TO YOUR NEW STRUCTURE SENSOR
Congrats on your new Structure Sensor! We’re sure you’re eager to start
exploring your Structure Sensor’s capabilities. And to help you get the most out
of your experience, we’ve put together this quick start guide to help familiarize
you with this advanced accessory.
WHAT’S INCLUDED IN THE BOX
Your Structure Sensor should arrive with the following:
• One Structure Sensor
• One data cable with Apple Lightning connector
• One AC battery charger
• One screwdriver
• Four M1.6 screws
• One user manual
Your iPad attachment bracket will arrive in a separate box/package.
CHARGING YOUR STRUCTURE SENSOR
Charging your Structure Sensor’s internal battery is simple. Simply connect the
supplied AC charger to the round port on the side of the Structure Sensor, and
then plug the other end into any standard 2-pronged wall outlet as found in the
United States (if you’re outside of the US or Canada, you will need to use an
appropriate adaptor).
© 2014 Occipital, Inc.
http://structure.io
2
STRUCTURE SENSOR & DEMO APPS TUTORIAL An LED indicator on the Structure Sensor’s glass face will pulse when your
Structure Sensor’s battery is charging. As soon as your battery is completely
charged, the LED indicator will stop pulsing and instead will stay on until you
disconnect the AC charger.
CONNECTING YOUR STRUCTURE SENSOR TO YOUR IPAD
Step 1 – Attaching your Structure Sensor to the bracket
From top to bottom: iPad
(4th Generation) precision
bracket with aluminum
latch; iPad Air 3D printed
temporary bracket; iPad
mini with Retina display
3D printed temporary
bracket
Your Structure Sensor has arrived with one of three available brackets to
connect it to different Apple iPad models (the currently available brackets are for
the iPad [4th Generation], iPad Air and iPad mini with Retina display).
© 2014 Occipital, Inc.
http://structure.io
3
STRUCTURE SENSOR & DEMO APPS TUTORIAL Using the supplied screwdriver and 4 screws, attach the Structure Sensor to the
supplied bracket.
Place the Structure Sensor
in front of the bracket, and
then use the supplied
screwdriver and 4 screws
to attach the two together.
The data and charging ports on the Structure Sensor should be facing to the left
as you look at the Structure Sensor and bracket.
The proper orientation for
the Structure Sensor is to
have the two data ports
facing to the long side of
the bracket.
© 2014 Occipital, Inc.
http://structure.io
4
STRUCTURE SENSOR & DEMO APPS TUTORIAL Step 2 – Attaching the Structure Sensor and bracket to your iPad
If you have received a temporary 3D printed bracket, simply slide the bracket
plus Structure Sensor onto the top of your iPad. Make sure that the hole in the
bracket is centered around the iPad camera.
Left: Sliding the bracket onto an iPad Air.
Right: The bracket firmly seated.
Left: The bracket firmly seated on the iPad Air. Right: The bracket’s iPad camera opening.
© 2014 Occipital, Inc.
http://structure.io
5
STRUCTURE SENSOR & DEMO APPS TUTORIAL If you have received the final precision bracket with aluminum latch, start by
sliding the bracket plus Structure Sensor onto the top of your iPad, making sure
that the aluminum latch is in its open position.
Left: Sliding the bracket on an iPad (4th Gen). Right: The bracket firmly seated.
Left: Sliding the bracket on an iPad (4th Gen). Right: The bracket firmly seated.
The bracket’s iPad camera
opening centered around
the iPad camera.
© 2014 Occipital, Inc.
http://structure.io
6
STRUCTURE SENSOR & DEMO APPS TUTORIAL As soon as the bracket is firmly seated on top of your iPad, and you have
ensured that the hole in the bracket is centered around the iPad camera, close
the latch by pressing down on it with your thumb.
Step 3 – Attaching the Lightning cable to your Structure Sensor and iPad
Connect the supplied Lightning cable by connecting it to your Structure Sensor
first. The wide end of the cable connects to your Structure Sensor, and the goldcolored pins should be facing up as you press it firmly into the Structure Sensor.
© 2014 Occipital, Inc.
http://structure.io
7
STRUCTURE SENSOR & DEMO APPS TUTORIAL Next, connect the other end of the cable with the Apple Lightning connector into
your iPad.
Your Structure Sensor is now fully charged and connected to your iPad!
© 2014 Occipital, Inc.
http://structure.io
8
STRUCTURE SENSOR & DEMO APPS TUTORIAL USING YOUR STRUCTURE SENSOR FOR THE FIRST TIME
Using The “Viewer” Demo App
The first demo app to try when you first attach your Structure Sensor to your
iPad is the “Viewer” demo app.
Viewer provides a simple view of what the Structure Sensor sees alongside what
your iPad’s color camera sees. Here is what Viewer’s output looks like:
The Structure Sensor’s
output is on the left. The
iPad’s color camera
output is on the right.
Using The “Object Scanner” Demo App
The Structure Sensor also arrives with a simple 3D scanning app called “Object
Scanner.” It’s easy to start getting great looking scans quickly and consistently
if you learn just a few simple things about using this app.
Finding Suitable Objects
A great first test for the Object Scanner demo app is to try scanning another
person from the shoulders up to the top of the head.
The Object Scanner demo app works best for scanning objects the size of a
medium-sized stuffed animal up to a human bust. Smaller items will lack detail
and may challenge object tracking. Larger objects may be difficult to capture in
their entirety.
The Object Scanner demo app may have difficulty capturing black surfaces and
shiny surfaces. In addition, the Object Scanner demo app will have difficulty
capturing intricate features, such as hairs, wires or other fine objects.
© 2014 Occipital, Inc.
http://structure.io
9
STRUCTURE SENSOR & DEMO APPS TUTORIAL Setting Up Objects To Scan
For the best quality scan, please follow these general guidelines:
• Stand about 1 meter (or 3 feet) away from the object or the person
• Make sure that you have an unimpeded 360-degree path around the
object or person so that you may capture an entire scan easily
• For objects, placing them at a standard tabletop height allows for the
best combination of scanning quality and ease
• For objects, placing them on a smooth, flat surface ensures that the
Object Scanner demo app will consistently capture great scans
• The Structure Sensor works best indoors or outside of direct sunlight
Positioning the Scan Area Cube
When you first open the Object Scanner demo app and connect your Structure
Sensor to your iPad, you will see a large transparent cube appear on your
screen. The bottom of this cube has an orange square. The orange square will
automatically snap itself to flat surfaces such as floors or walls so that your scan
is positioned on a flat plane.
Alternatively, if you point the Structure Sensor towards a person, the transparent
cube will position itself around their upper torso and head for a bust scan.
The transparent cube and
orange square determine
what objects or people the
Object Scanner demo app
will capture.
© 2014 Occipital, Inc.
http://structure.io
10
STRUCTURE SENSOR & DEMO APPS TUTORIAL To scan an object, start by standing about a meter (about 3’) away from the
object. Then, center the object within the transparent cube. Once the object is
within the cube, you will see that the orange square will now adjust itself to fit
over the object you plan to scan.
When placed on an
object or person, the
transparent cube and
orange square show
what will be captured
once the blue “Scan”
button is pressed.
If parts of the object you plan to scan are not covered in orange, you are
standing too close. Back up until those parts are covered.
In this picture, the
Structure Sensor is too
close to the subject to
be scanned, as it does
not fit entirely in the
transparent cube.
© 2014 Occipital, Inc.
http://structure.io
11
STRUCTURE SENSOR & DEMO APPS TUTORIAL Using the “Pinch” Gesture
Because the cube determines what will be captured by the Object Scanner
demo, it is important to make sure the cube is the right size for the object to be
scanned.
The size of the transparent cube can be easily adjusted using the typical iPad
“pinch” gesture. Push your thumbs together on your iPad screen to make the
cube smaller, and pull them apart to make it bigger.
If the cube is too small to contain the object you plan to scan, you can expand
the cube by pulling your thumbs apart on your iPad screen. You may also try to
move backwards so that you are further from the object you plan to scan.
Although the Structure
Sensor is a reasonable
distance away from the
object to be scanned,
the scan area cube is
too small.
Put both thumbs on the
touch screen and move
them apart to make the
scan area cube larger.
© 2014 Occipital, Inc.
http://structure.io
12
STRUCTURE SENSOR & DEMO APPS TUTORIAL If the cube is too large for the object you plan to scan, then your scan will be of
poor quality and you may potentially capture objects in your scan that you do
not want. You can shrink the cube by pushing your thumbs together on your
iPad screen. You may also try to move closer so that you are nearer to the
object you plan to scan.
Although the Structure
Sensor is a reasonable
distance away from the
object to be scanned,
the scan area cube is
too large.
Put both thumbs on the
touch screen and move
them together to make
the scan area cube
smaller.
For the highest quality scans, pinch to shrink the cube so it is just a bit bigger
than the object within it that you plan to scan.
The size of the scan area
cube is just about right
to begin scanning this
teddy bear.
© 2014 Occipital, Inc.
http://structure.io
13
STRUCTURE SENSOR & DEMO APPS TUTORIAL Scanning the Object
To begin your scan, press the blue “Scan” button.
Once you have started, move around the object to capture it. If you notice that
there is a hole in the model, you can go back during the same scan to see if the
Object Scanner demo app can fill it in.
If you have made a mistake during your scan, you can press the red reset button
with the circular arrow on it to restart your scan.
Click the “Done” button when your scan is complete.
As soon as you start
scanning, you will see
your 3D model
appearing on top of your
subject in real time.
As you continue your
scan, you can go back
and fill in holes and
other problem areas to
improve your 3D model.
© 2014 Occipital, Inc.
http://structure.io
14
STRUCTURE SENSOR & DEMO APPS TUTORIAL Maintaining Tracking
On your first few scans, you may notice that the Object Scanner demo app
loses track of the object. A warning note will appear on your screen:
On rare occasions, the
Object Scanner demo
app will lose tracking of
the object or person you
are scanning. You will
see this error message if
that happens.
Try to rematch the scan to the object you are scanning to restart object tracking.
If that doesn’t work, try your scan again. If you consistently get object tracking
errors during a scan of the same object, that object may not be suitable for
scanning.
© 2014 Occipital, Inc.
http://structure.io
15
STRUCTURE SENSOR & DEMO APPS TUTORIAL Viewing Your Completed Scan
To view your scan, click the “done” button. A review screen will appear. You can
use your finger to drag the model around to see all sides of it.
Once you click the
“Done” button, you will
automatically be taken
to this screen.
Use your finger to drag
the model around to see
it from all angles.
You can also click “X-Ray View” to see the underlying mesh of the model that
you have captured.
When you click the “XRay View” button, the
underlying mesh will
appear.
Click the “Email” link in
the upper right hand
corner to export an .OBJ
file.
To share or export a scan, click the “email” link in the upper right hand corner.
Click this to email an .OBJ file of your scan to yourself or a friend.
Click the “Back” link to reset the app so you can start your next scan.
© 2014 Occipital, Inc.
http://structure.io
16
STRUCTURE SENSOR & DEMO APPS TUTORIAL MORE APPS ARE COMING SOON!
At Occipital, we’re planning on releasing more demo apps and complete apps to
expand the functionality of your Structure Sensor. In addition, developers
worldwide are now using the Structure SDK to create more great apps, too.
We’ll be sure to keep you posted whenever new apps are available for your
Structure Sensor. And, if you’re a developer, we’re always here to help you build
your own great app for the Structure Sensor!
NEED MORE HELP USING YOUR STRUCTURE SENSOR?
We’re always ready to help answer any questions or comments you might have
about your Structure Sensor. Contact us at [email protected] anytime!
If you’re a developer, you should have received an email invitation to our
developer forums. If you have not received this invite, contact us at
[email protected].
FOLLOW OCCIPITAL AND THE STRUCTURE SENSOR
On Twitter
http://twitter.com/structure
http://twitter.com/occipital
On Facebook
http://facebook.com/structure3d
http://facebook.com/occipital
On YouTube
http://youtube.com/occipitalhq
On the Internet
http://structure.io and http://structure.io/developers
http://occipital.com
Tutorial Version 1.1 (March 5, 2014)
© 2014 Occipital, Inc.
http://structure.io