1
IBM Tealeaf CX RealiTea Viewer
Version 9 Release 0.2
June 18, 2015
RTV User Manual
Note
Before using this information and the product it supports, read the information in “Notices” on page 261.
This edition applies to version 9, release 0, modification 2 of IBM Tealeaf CX RealiTea Viewer and to all subsequent
releases and modifications until otherwise indicated in new editions.
© Copyright IBM Corporation 1999, 2015.
US Government Users Restricted Rights – Use, duplication or disclosure restricted by GSA ADP Schedule Contract
with IBM Corp.
Contents
RealiTea Viewer (RTV) User Manual . . vii
Chapter 1. CX RealiTea Viewer overview
Architecture . . . . . . . . . . . .
Example Usage . . . . . . . . . .
RealiTea Viewer minimum system requirements
RTV disk storage . . . . . . . . . .
RTV memory usage . . . . . . . . .
Installing RealiTea Viewer . . . . . . . .
Connecting RTV to Tealeaf. . . . . . .
Performing silent installs for RTV . . . .
Upgrading RTV . . . . . . . . . . .
Updating the RTV stub file . . . . . .
Updating your Replay profile for DWR POST
matching . . . . . . . . . . . .
Replay logging . . . . . . . . . . .
About this manual . . . . . . . . . .
RTV versions . . . . . . . . . . . .
Switching between versions of RTV . . . .
Limitations of RTV Lite . . . . . . . .
Using RTV across multiple versions of CX . .
Initial RTV configuration . . . . . . . .
RTV installation . . . . . . . . . .
Configuration. . . . . . . . . . .
Testing your configuration . . . . . .
1
. . 1
. . 2
. . 3
. . 3
. . 3
. . 4
. . 4
. . 6
. . 6
. . 6
data
. . 7
. . 9
. . 9
. . 10
. . 10
. . 10
. . 10
. . 11
. . 11
. . 11
. . 20
Chapter 2. RealiTea Viewer navigation
RealiTea Viewer main window . . . . . . .
Main Window Views . . . . . . . . .
Status Bar . . . . . . . . . . . . .
Context menus in the main window . . . .
Improving Replay performance . . . . . . .
Replay view . . . . . . . . . . . . .
Fetching static content . . . . . . . . . .
Timing the parts that comprise a user impression.
Viewable Pages list . . . . . . . . . . .
UI Events pages . . . . . . . . . . .
Back button detection . . . . . . . . .
Events pane . . . . . . . . . . . . .
Display order for events . . . . . . . .
UI Events pane . . . . . . . . . . .
Replay of mobile sessions . . . . . . . .
Viewable Pages list . . . . . . . . . . .
Columns in Viewable Pages list. . . . . .
Icons in Viewable Pages list . . . . . . .
Context menus . . . . . . . . . . . .
For regular pages and pages with frames . .
For UI Events . . . . . . . . . . .
StatusCode information . . . . . . . . .
3xx Redirect pages . . . . . . . . . .
4xx errors . . . . . . . . . . . . .
5xx errors . . . . . . . . . . . . .
Flag icon . . . . . . . . . . . . .
Canceled pages . . . . . . . . . . . .
Client canceled pages . . . . . . . . .
© Copyright IBM Corp. 1999, 2015
23
.
.
.
.
.
.
.
.
.
.
.
.
.
.
.
.
.
.
.
.
.
.
.
.
.
.
.
.
23
24
25
25
29
30
31
31
32
33
34
34
36
36
37
38
38
39
39
39
42
47
48
48
50
50
51
51
Server canceled pages . . . . . . . .
StatusCodes for canceled pages . . . . .
Page Load Timeout dialog . . . . . . .
Large Page warning dialog . . . . . . .
Ordering of UI events . . . . . . . . .
Framed pages . . . . . . . . . . .
FrameSets . . . . . . . . . . . .
iFrames. . . . . . . . . . . . .
Replay rules . . . . . . . . . . . .
Pop-up pages. . . . . . . . . . . .
Identifying pop-up pages for RTV . . . .
Interpreting JavaScript . . . . . . . . .
Hidden DIVs . . . . . . . . . . . .
Ignoring pages in the replay . . . . . . .
Removing pages from replay . . . . .
Recovering a page removed from replay. .
Ignoring request variables for URL matching
ESI tag management . . . . . . . . .
Creating a response modification rule . . .
Request variables . . . . . . . . .
Example - Modifying based on user agent .
Example - Removing CDATA formatting .
Example - Misaligned forms in RTV . . .
Creating external file modification rules . . .
Dynamic modification rules . . . . . . .
Dynamic response modification rules . . .
Dynamic external file modification rules . .
.
.
.
.
.
.
.
.
.
.
.
.
.
.
.
.
.
.
.
.
.
.
.
.
.
.
.
.
.
.
.
.
.
.
.
.
.
.
.
.
.
.
.
.
.
.
.
.
.
.
.
.
.
.
51
52
52
53
53
56
56
58
58
58
59
59
60
60
61
62
63
64
64
65
67
67
68
69
69
69
71
Chapter 3. Request view . . . . . . . 73
Request view format . . . .
[iamie] section . . . . .
[appdata] section . . . .
[env] section . . . . . .
[TimeBlock] section . . . .
[timestamp] section . . . .
[urlfield] section . . . .
[cookies] section . . . .
[ResponseHeaders] section .
[RawRequest] section . . .
[ExtendedUserAgent] section
[Referrer] section . . . .
[TLFID_*] section . . . .
Displaying UI event pages . .
Response view . . . . . .
Full Response view . . . .
Indexed Response view . .
Hexadecimal Display view .
Displaying UI event pages .
Events view . . . . . . .
Columns . . . . . . .
Context menu . . . . .
Exporting the Event list . .
Creating events . . . . . .
Before you begin . . . .
.
.
.
.
.
.
.
.
.
.
.
.
.
.
.
.
.
.
.
.
.
.
.
.
.
.
.
.
.
.
.
.
.
.
.
.
.
.
.
.
.
.
.
.
.
.
.
.
.
.
.
.
.
.
.
.
.
.
.
.
.
.
.
.
.
.
.
.
.
.
.
.
.
.
.
.
.
.
.
.
.
.
.
.
.
.
.
.
.
.
.
.
.
.
.
.
.
.
.
.
.
.
.
.
.
.
.
.
.
.
.
.
.
.
.
.
.
.
.
.
.
.
.
.
.
.
.
.
.
.
.
.
.
.
.
.
.
.
.
.
.
.
.
.
.
.
.
.
.
.
.
.
.
.
.
.
.
.
.
.
.
.
.
.
.
.
.
.
.
.
.
.
.
.
.
73
73
75
77
80
81
84
84
85
85
85
86
86
86
86
86
87
87
89
89
90
91
91
91
92
iii
Creating events and hit attributes
Request view . . . . . . .
Creating events and hit attributes
Response view . . . . . .
AJAX Replay . . . . . . . .
Is UI Event Capture Required? .
Where to Start . . . . . .
Getting the Replay Right . . .
Hard-Coded Host Names. . .
Replay over HTTPS . . . . .
from
. .
from
. .
. .
. .
. .
. .
. .
. .
the
. .
the
. .
. .
. .
. .
. .
. .
. .
.
. 92
.
.
.
.
.
.
.
.
.
.
.
.
.
.
93
94
94
94
96
97
98
Chapter 4. Searching sessions . . . . 99
RTV Search Setup . . . . . . . . . . .
Connect to Search Server . . . . . . . .
Index summary . . . . . . . . . . .
Max sessions to return . . . . . . . . .
Stopping searches . . . . . . . . . . .
Create Summary . . . . . . . . . . .
Keep hands off data when displaying results . .
Return detailed search results . . . . . . .
Session search and Subsearch . . . . . . .
Specifying a search in RTV . . . . . . .
Advanced Search tab . . . . . . . . .
Executing searches. . . . . . . . . .
SubSearch . . . . . . . . . . . .
Search results in RTV . . . . . . . . .
Session List pane . . . . . . . . . .
Search Results pane . . . . . . . . .
Search syntax . . . . . . . . . . .
Advanced Search setup options . . . . .
Search templates . . . . . . . . . . .
Search Template versions . . . . . . .
Editing the Search Builder Template . . . .
Managing result sets in RTV . . . . . . .
Creating result sets . . . . . . . . .
RTV result sets window . . . . . . . .
Merging result sets . . . . . . . . .
Result set properties . . . . . . . . .
Customizing view . . . . . . . . . .
RTV Result Set Options . . . . . . . .
Exporting session data from RTV . . . . . .
Exporting data commands . . . . . . .
Customizing columns . . . . . . . . .
Available data in the Session List . . . . .
Available data in the Search Results . . . .
Monitoring client UI Events through RTV . . .
HighlightOnlyURL profile rules . . . . . .
Creating through RTV . . . . . . . .
Getting accurate highlighting of JavaScript links
Configuring the web application for
highlighting . . . . . . . . . . . .
Configuring RTV to recognize elements for
highlighting . . . . . . . . . . . .
Example JavaScript . . . . . . . . .
AJAX Replay . . . . . . . . . . . .
.
.
.
.
.
.
.
.
.
.
.
.
.
.
.
.
.
.
.
.
.
.
.
.
.
.
.
.
.
.
.
.
.
.
.
. 99
100
102
103
103
104
104
105
105
105
114
116
117
119
120
123
127
131
135
135
136
142
142
142
144
145
145
146
147
147
148
148
149
149
150
150
151
. 151
. 151
. 152
. 152
Chapter 5. Menu tools. . . . . . . . 153
RTV Menus .
File menu
Edit menu
iv
.
.
.
.
.
.
RTV User Manual
.
.
.
.
.
.
.
.
.
.
.
.
.
.
.
.
.
.
.
.
.
.
.
.
.
.
.
.
.
.
. 153
. 153
. 155
View menu . . . . . . . . . . . .
Tools menu . . . . . . . . . . . .
Window menu . . . . . . . . . . .
Help menu . . . . . . . . . . . .
Application toolbars . . . . . . . . .
Context menu . . . . . . . . . . .
Remapping URLs . . . . . . . . . .
Diffing posts . . . . . . . . . . .
Annotations in RTV . . . . . . . . . .
Availability of annotations through search . .
Working with annotations . . . . . . .
Session fragmentation . . . . . . . . .
Events for monitoring fragmentation . . .
Effects of fragmentation . . . . . . . .
Find and merge . . . . . . . . . .
Auto merge . . . . . . . . . . . .
RTV Merge . . . . . . . . . . . .
Differences in fragment counts between Auto
Merge and RTV Merge . . . . . . . .
Find and Merge controls . . . . . . .
RTV main window title bar changes with Find
and Merge . . . . . . . . . . . .
Replay tab . . . . . . . . . . . . .
Load remote files . . . . . . . . . .
Allow scripts to run . . . . . . . . .
Insert 'Back' pages . . . . . . . . . .
Do not display timeout dialog . . . . . .
Replay on Single Session TLA/TLS open . .
Load remote 304 pages . . . . . . . .
Replay frames . . . . . . . . . . .
JavaScript Highlighting (Match Params) . .
Invoke JavaScript when highlighting . . .
AutoMerge . . . . . . . . . . . .
Page Load Timeout (seconds) . . . . . .
Large Page warning threshold (Bytes) . . .
Highlight color . . . . . . . . . . .
Highlight delay (mS) . . . . . . . . .
Highlight width . . . . . . . . . .
HTTP header skip . . . . . . . . . .
Timezone. . . . . . . . . . . . .
RTV Profile . . . . . . . . . . . . .
Profile contents . . . . . . . . . . .
HostProfile nodes . . . . . . . . . .
Profile Options . . . . . . . . . . .
Backing up RTV profile . . . . . . . .
Example profile . . . . . . . . . .
Plugins options. . . . . . . . . . . .
Accessing plugins . . . . . . . . . .
Default plugins. . . . . . . . . . .
Adding plugins . . . . . . . . . .
Managing plugins . . . . . . . . . .
Privacy Tester . . . . . . . . . . . .
Configuration . . . . . . . . . . .
Privacy overview . . . . . . . . . .
Applying privacy . . . . . . . . . .
Deploying privacy rules changes . . . . .
Chapter 6. Session attributes
Accessing session attributes .
Searching for session attributes
Session attribute reference . .
.
.
.
.
.
.
.
.
.
.
.
.
.
.
.
.
.
.
.
.
.
.
.
156
167
174
174
175
177
179
181
181
182
182
183
183
183
183
184
184
. 186
. 186
.
.
.
.
.
.
.
.
.
.
.
.
.
.
.
.
.
.
.
.
.
.
.
.
.
.
.
.
.
.
.
.
.
.
.
186
187
187
188
188
188
188
188
188
189
189
189
190
190
190
190
190
191
191
191
191
192
194
200
201
202
203
205
206
207
225
225
226
227
229
. . . . 231
.
.
.
.
.
.
.
.
.
.
.
.
. 231
. 231
. 231
Example session attributes . .
Definitions . . . . . . .
How session attributes are stored.
Merge attributes . . . . . .
Index-based merge reference .
Auto-merge reference. . . .
.
.
.
.
.
.
.
.
.
.
.
.
.
.
.
.
.
.
.
.
.
.
.
.
.
.
.
.
.
.
.
.
.
.
.
.
232
232
234
235
235
236
Chapter 7. What is indexed and
searchable . . . . . . . . . . . . 239
Response . . . .
Request . . . .
Indexing options .
.
.
.
.
.
.
.
.
.
.
.
.
.
.
.
.
.
.
.
.
.
.
.
.
.
.
.
.
.
.
. 239
. 239
. 239
Chapter 8. Regular expressions in the
RealiTea Viewer . . . . . . . . . . 241
Overview. . . . . . . . . .
Greedy versus non-greedy searches .
.
.
.
.
.
.
.
.
. 241
. 241
Chapter 9. Using static archives in
RTV . . . . . . . . . . . . . . . 243
Types of static archives .
.
.
.
.
.
.
.
.
. 243
How RTV accesses static content . . .
Configuring RTV to use static archives .
Configuring advanced options. . .
Static Files options tab . . . . .
Reviewing static archive contents. . .
Static File Database contents . . .
Locating static content in session data
Refreshing static archives . . . . .
Refreshing local archives . . . .
Refreshing remote archives . . . .
Static archive Reporting . . . . .
.
.
.
.
.
.
.
.
.
.
.
.
.
.
.
.
.
.
.
.
.
.
.
.
.
.
.
.
.
.
.
.
.
.
.
.
.
.
.
.
.
.
.
.
243
244
244
244
250
250
254
254
254
255
255
Chapter 10. IBM Tealeaf
documentation and help. . . . . . . 257
Appendix. Build notes
RTV Build 8452.
.
.
.
.
. . . . . . . 259
.
.
.
.
.
.
.
. 259
Notices . . . . . . . . . . . . . . 261
Trademarks . . . . . . .
Privacy Policy Considerations .
.
.
.
.
.
.
.
.
.
.
.
.
. 263
. 263
Contents
v
vi
RTV User Manual
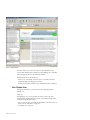
RealiTea Viewer (RTV) User Manual
The RealiTea Viewer User Manual describes how to use the standalone IBM Tealeaf
CX RealiTea Viewer application to find and replay visitor sessions. Use the links to
access specific topics in the manual.
v Events are edited through the Tealeaf® Portal. See "Tealeaf Event Manager" in the
IBM Tealeaf Event Manager Manual.
© Copyright IBM Corp. 1999, 2015
vii
viii
RTV User Manual
Chapter 1. CX RealiTea Viewer overview
CX RealiTea Viewer (RTV) is a stand-alone application that is part of the IBM
Tealeaf cxImpact product suite.
CX RTV provides the following significant capabilities:
v Allows you to view a visual replay of a visitor's session with your web
application
v Allows you to examine the information that the visitor's browser sends to your
web server and the information that is returned by your web server in response
v Plays a key role in searching for sessions that meet specific criteria
v Presents specific, customizable information about each hit that matches a search
CX RealiTea Viewer includes software that is developed by the OpenSSL Project for
use in the http://www.openssl.org/. RTV provides the following perspectives on
session data:
Replay View:
Through Replay view, you can experience a visitor's session as the visitor
experienced it. For more information, see the “RealiTea Viewer - Replay
View” section (in IBM Tealeaf CX RealiTea Viewer User Manual).
Request View
Through Request view, you can review the requests that are submitted by
the visitor's browser to the web server during the session. For more
information, see the “RealiTea Viewer - Request View” section (in IBM
Tealeaf CX RealiTea Viewer User Manual).
Response View
Through Response view, you can review the responses that are returned
from the web server to the visitor's browser during the session. For more
information, see the “RealiTea Viewer - Response View” section (in IBM
Tealeaf CX RealiTea Viewer User Manual).
The Tealeaf Event Manager is closely integrated with the RTV request and
response playback views, which allows easy visual identification of patterns that
can be used to create events.
For more information, see IBM Tealeaf Event Manager Manual.
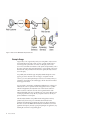
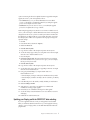
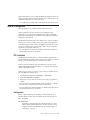
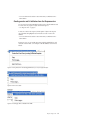
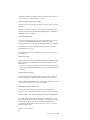
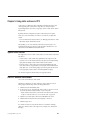
Architecture
The IBM Tealeaf cxImpact product is used to capture and preserve the detailed
information about every visitor's interaction with your web application. RTV
displays this detailed information in a visual format.
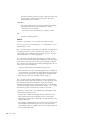
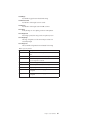
The figure that is shown is an overview of the IBM Tealeaf cxImpact architecture
and RTV's relationship to the other components of IBM Tealeaf cxImpact:
© Copyright IBM Corp. 1999, 2015
1
Figure 1. RTV's role in the IBM Tealeaf cxImpact architecture
Example Usage
Suppose that you are a typical analyst and you are using RTV to analyze sessions.
You start the RTV session with a search. You have a specific customer name or
error message and a specific time. You want to see the replay of the visitor's
session. You use the RTV search feature to enter specific search parameters, such as
the visitor's name and a time range. RTV displays a session segment of all sessions
that match the search parameters. From this session segment, the analyst selects a
session for replay.
You probably start with the first page and quickly thumbs through the visitor's
pages to get a feel for what the visitor was trying to accomplish. From this
overview, you can locate the particular piece of the session of interest, where you
examine the visitor's behavior, the selected pages, and the values that are entered
into the page's form fields.
You can research a reported error, and determine whether the error is because of a
mistake by the visitor or a problem with the web application. If it is a problem
with the web application, the analyst then casts a wider net and searches for
similar occurrences of the same error. The session segment from this search
indicates the breadth of the error. Is it affecting only a few visitors? Or many? Is it
occurring at specific times of day? Or only on specific web servers? Or only for
specific combinations of user inputs?
After the analyst identifies a real problem with the web application and any
potential causes, the next step is to communicate this information to the
application development team. Using RTV, the analyst can add an annotation to
the visitor's session in the IBM Tealeaf CX datastore and send this session to the
application developers by email, by copying and pasting into an application, or by
attaching the session file to a bug tracking report.
2
RTV User Manual
In addition, business analysts use RTV to understand visitor behavior. With
scorecards and dashboards of IBM Tealeaf cxView, the business analyst uses RTV
to analyze visitor behavior and increase the completion of transactions.
RealiTea Viewer minimum system requirements
RTV is a Windows application. It is supported on Windows Server 2003, Windows
Server 2008, Windows Vista, and Windows 7.
The minimum supported system is:
v One of the operating systems
v 1 GB RAM
v 100 MB disk space. See “RTV disk storage.”
v 500MHz processor
v Internet Explorer 6.0 or higher
Note: Replay of Tealeaf sessions in IBM Tealeaf CX RealiTea Viewer (RTV)
requires Internet Explorer to be installed on your local computer. If Internet
Explorer is not supported by your enterprise's IT department, basic replay must
be managed through the browser replay feature available with IBM Tealeaf
cxImpact. See "CX Browser Based Replay" in the IBM Tealeaf cxImpact User
Manual.
Performance and response time improve with a faster processor and more memory.
Note: If you have Windows Enhanced Security features, you experience issues
when you use RTV. See "Troubleshooting - Portal" in the IBM Tealeaf Troubleshooting
Guide.
RTV disk storage
RTV requires a minimum of 100 megabytes of storage on the disk to properly
install.
Depending on how many sessions you want to load, RTV performance improves
when more space is allocated on the disk for storing sessions, local caches, and
replay temporary files.
Note: Tealeaf recommends 2 GB of disk space for IBM Tealeaf CX RealiTea Viewer.
RTV memory usage
When RTV is started without opened sessions, it occupies approximately 13 MB of
RAM. When you search for sessions, open sessions, or download sessions from the
Canister, this data is stored in additional RAM that is allocated as needed.
Note: RTV is a 32-bit Windows application, which means that it can address up to
2GB of RAM, regardless of the amount of memory that is installed on your system.
Depending on the number of other applications that run on your system, you can
fill the available address space so that RTV is unable to load sessions or complete
operations.
When you use RTV:
v Constrain your searches to retrieve the minimum set of sessions.
Chapter 1. CX RealiTea Viewer overview
3
v Avoid downloading or loading TLA archives containing hundreds or thousands
of sessions.
v Close other desktop applications, if possible.
Installing RealiTea Viewer
IBM Tealeaf CX RealiTea Viewer must be installed on the desktop system of each
Tealeaf user that must use the RTV application.
v RTV can be installed across a network.
Note: Before you begin installing RTV, you must determine the appropriate roles
for each RTV user.
1. The Tealeaf software distribution includes the installation packages for each
version of IBM Tealeaf CX RealiTea Viewer. Depending on your role and
permissions, you can install IBM Tealeaf CX RealiTea Viewer directly from the
installation package directory.
v For more information about the available versions of RTV, see “RTV
versions” on page 10.
2. In the appropriate directory, run the RTV Setup program (setup.exe).
v If you have previously installed an earlier version of RTV, you must
uninstall it before you install the new version. Your settings are preserved
between installs.
v After you uninstall RTV, run setup.exe again to install the new version.
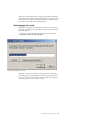
3. Select the language that you want to use for the installation screens and click
OK.
4. The Welcome screen is displayed.
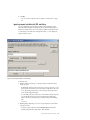
5. In the Welcome screen, click Next. The License screen is displayed.
6. In the License screen, click the I accept the terms of the license agreement.
Click Next. The Choose Destination Location screen is displayed
7. To choose a different directory from the default one, click Browse.... Browse
your local computer to select a directory where you want to install RTV.
8. Click Next.
9. The Installation screen is displayed.
10. When you are ready to install, click Install. The installation begins.
11. When the installation finishes, the Installation Complete screen is displayed.
12. When the Installation Complete screen is displayed, click Finish.
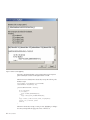
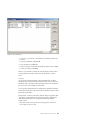
Connecting RTV to Tealeaf
After you run RTV on your local desktop, you must connect it to one or more
Tealeaf servers.
1. Run RTV by using either of the following methods:
v In the Tealeaf installation directory, double-click the RealiTea .exe file.
v From the Windows Start menu, select:
Start > Programs > TeaLeaf Technology > TeaLeaf RealiTea Viewer
Then, select the version of the Viewer to run.
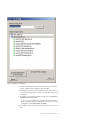
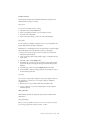
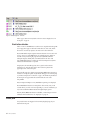
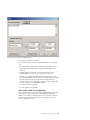
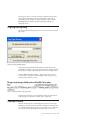
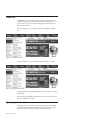
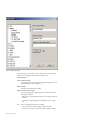
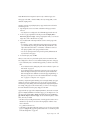
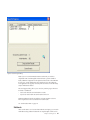
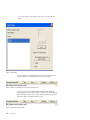
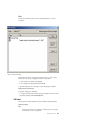
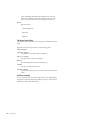
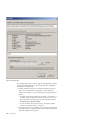
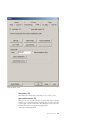
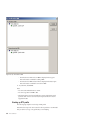
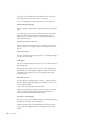
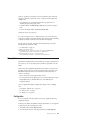
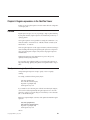
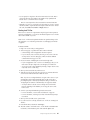
2. When RTV opens, select Tools > AutoConfig from TeaLeaf Master....
4
RTV User Manual
Figure 2. Configuring from Tealeaf Master
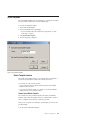
3. In the TeaLeaf IBM Tealeaf cxImpact Server field, enter the server name from
which to acquire the master configuration. Then, click Add.
4. RTV attempts to retrieve the master configuration from the server. If RTV is
successful, all of the Tealeaf servers that are associated with the master server
are displayed.
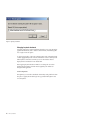
5. To configure your local instance of RTV based on the server, click Configure
RealiTeaViewer to use this system.
v If you want, you can configure the local profile for the current user that is
based on a shared profile that is maintained on the master server. To use the
shared profile, click Use Shared Profile, if available.
6. The configuration and optional profile are downloaded to your local version of
RTV.
Chapter 1. CX RealiTea Viewer overview
5
v To remove a Tealeaf installation from this list, click Remove. The local
instance of RTV is no longer connected to the Tealeaf server or servers.
7. If the master server already contains data, to test the configuration, search for
sessions on the server. In the IBM Tealeaf CX RealiTea Viewer toolbar, click
Search. See Chapter 4, “Searching sessions,” on page 99.
Performing silent installs for RTV
You can use the following steps to enable silent installs of RTV. This method
supplies answers to the RTV installer prompts through a configuration file.
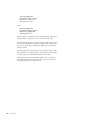
Note: Before you begin, you can copy the image of the RTV installation folder to
the local workstation where it is to be installed.
1. Copy the following text:
# Tealeaf Silent Install Script File
#
[General]
InstallFolder=C:\Tealeaf
2. Paste it into a text editor.
3. Save this file as a text file.
v This file must be saved in a location where the RTV installer can access it.
For example, you might save it as:
C:\TealeafSilentInstall.txt
4. Open a Windows command-line window.
5. Run the following command:
setup.exe /InstallScriptFile=C:/TealeafSilentInstall.txt
6. RTV installation continues without prompting.
Upgrading RTV
To upgrade RTV, you follow the same steps as for installing the application by
running setup.exe twice.
The first time that you run setup.exe, RTV is uninstalled. When you run it again,
RTV is upgraded to the new version.
Updating the RTV stub file
Your RTV installation file includes a stub file that is used to facilitate replay of user
interface events that are captured by using Tealeaf IBM Tealeaf CX UI Capture for
AJAX.
Note: If your Tealeaf solution does not use IBM Tealeaf CX UI Capture for AJAX,
you can skip this section. See "UI Capture FAQ" in the IBM Tealeaf UI Capture for
Ajax FAQ.
Note: IBM Tealeaf CX UI Capture for AJAX is only available to legacy users.
Note: In Release 2012.06.01.1, the method of generating xpaths was changed for
the JSON version. If you are using the JSON version of UI Capture for this release
or a later one, you must update RTV to use the latest stub file. For more
information on downloading IBM Tealeaf, see IBM® Passport Advantage® Online.
When RTV is initially installed, this file (Tealeaf.js) is automatically installed with
the RTV software. Depending on the type of rich internet application that your
6
RTV User Manual
system is monitoring, the file can be updated when RTV is upgraded. During the
upgrade, the Tealeaf.js file can be updated as follows:
v No modifications: If you or your Tealeaf administrator has not modified
Tealeaf.js, then the file is automatically updated for you during the upgrade
process. You can skip the rest of this section.
v Modifications: If your local version of Tealeaf.js is modified, the upgrade
process does not update the local copy of the file.
Note: During the upgrade process, RTV does not overwrite a modified version of
Tealeaf.js file. A developer or Tealeaf administrator must review and manage the
changes between the Tealeaf.js file in use within your Tealeaf environment and
then default one provided with the new version of RTV. This single version must
then be deployed to all RTV users. Complete the following steps to manage and
export the changes.
1. Run RTV.
2. From the RTV menu, select Tools > Options....
3. Click the UI Events tab.
4. Click Edit TeaLeaf.js Stub.
5. Copy all of the contents of the edit pane and paste it into Notepad.exe.
6. Save the file locally. Suppose that you are using RTV version 7284. You might
name this version: RTVStub-7284modified.txt.
7. Close the edit pane.
8. Click Reset TeaLeaf.js Stub. This step resets the file to the one provided in
the current installation. Since you have saved a copy to your local computer,
this step can always be reverted.
9. Click Edit TeaLeaf.js Stub.
10. Copy all of the contents of the edit pane and paste it into Notepad.exe.
11. Save the file locally. Suppose that you are upgrading to RTV 7296. You might
name this version: RTVStub-7296.txt.
12. Using your preferred diffing tool, compare RTVStub-7296.txt to
RTVStub-7284modified.txt.
v Items that display as changes are likely to be modifications that you made.
13.
14.
15.
16.
17.
18.
v Items that display as deletions are likely to be new code that is provided by
Tealeaf.
In the RTV edit pane for the stub file, carefully add back your modifications.
Click Save Changes and Exit.
Verify replay of a session from your application to confirm that the
modifications are being properly applied.
Iterate until you are confident that all changes have been applied.
Save the file locally as RTVStub-7296modified.txt. Store all three versions for
safekeeping.
Publish the new stub file to RTV users.
Updating your Replay profile for DWR POST data matching
If you have upgraded to Release 8.4 and your web application uses the DWR
library to communicate between client and server, you must apply the following
changes to your local replay profile to use the DWR POST data that matches the
plug-in in RTV.
Chapter 1. CX RealiTea Viewer overview
7
When RTV is upgraded, the required plug-in is included as part of the installation.
However, you must configure RTV to recognize the content type that is associated
with these POSTs and to then use the appropriate match POST data to response
data during replay.
v The DWR POSTs are in text/plain format and are managed by the FormData
plug-in.
v For more information about POST data that matches plug-ins in use in Tealeaf,
see "Managing POST Data Matching Plugins" in the IBM Tealeaf CX Configuration
Manual.
Note: These changes are applied to your local replay profile only and cannot be
shared through the Replay Server with other users. Each RTV user must apply this
change to the local RTV replay profile.
Steps:
Complete the following steps.
1. Run RTV.
2. Add the plug-in:
a.
b.
c.
d.
In the RTV menu, select Tools > Options....
Click the Plugins tab.
Verify that the FormData plug-in is enabled.
If not:
1) Click Add?.
2) Browse to the directory where RTV is installed on your local system.
Typically, this directory is:
C:\Program Files\Tealeaf
3) Select the FormData dll file and click Open.
4) The plug-in is added.
v See “Plugins options” on page 202.
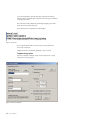
3. Make the required changes in your local replay profile:
a. In the RTV menu, select Tools > Options....
b. Click the Profiles tab.
c. To edit the profile, click Edit Raw Profile....
d. The raw profile is in XML format. You can copy and paste the profile text
into an external text editor.
e. Search for the following string:
<ReplayHitMatchPlugin name="FormData"
f. This XML entry contains the plug-in information for the FormData plug-in.
Beneath the top-level node, there is a HitType entry for the
application/x-www-form-urlencoded content type similar to:
<HitType contentType="application/x-www-form-urlencoded"
handlesQueryString="true" wantResponseData="false"
haveCustomOptionsDialog="false" haveCustomIgnoreParamDialog="false"
haveCustomResponseDisplay="false" haveCustomPostDataDisplay="false"
affinity="0.5" enabled="1">
<URLFilter pattern="" reqVar="" reqVarValue="" enabled="1"/>
</HitType>
g. Below the HitType entry, copy and paste the following entry into the profile,
just after the </HitType> closing tag:
8
RTV User Manual
<HitType contentType="text/plain" handlesQueryString="false"
wantResponseData="false" haveCustomOptionsDialog="false"
haveCustomIgnoreParamDialog="false" haveCustomResponseDisplay="false"
haveCustomPostDataDisplay="false" affinity="0.5" enabled="1">
<URLFilter pattern="" reqVar="" reqVarValue="" enabled="1"/>
</HitType>
h. If you were using an external text editor, copy and paste the entire profile
back into the Profile Editor.
i. Click Save Changes & Exit.
4. If possible, you must try to replay a session that includes DWR POSTs to verify
that the POST data matching plug-in is working correctly.
Note: A POST data matching plug-in does not guarantee that POSTs are
matched to the appropriate response. However, using one that is appropriate
for the content type greatly increases the chances of an appropriate match.
v See “RTV Profile” on page 191.
Note: For BBR users, a similar change must be applied through the Replay Server
profile on each instance of the Replay Server in your environment. See
"Configuring the Replay Server" in the IBM Tealeaf CX Configuration Manual.
Replay logging
You can monitor Tealeaf user replays from RTV through the Portal.
1. Log in to the Portal as a Tealeaf administrator.
2. From the Portal menu, select Tealeaf > User Activity.
3. For the Report, select User Activity.
4. Open the Search node.
5. Select the Replay Session - RTV option.
6. To include BBR replays, select the Replay Session - BBR option.
7. Apply any other settings as needed.
8. Click Refresh.
v See "Monitoring User Activity" in the IBM Tealeaf cxImpact Administration
Manual.
About this manual
The IBM Tealeaf CX RealiTea Viewer (RTV) User Manual helps the following roles
to learn how to use RTV.
v Web application analyst: Understand how visitors are interacting with your web
application and provide a visual replay view of the visitor's session.
v IT Operations staff: Find specific sets of sessions that have common
characteristics, such as specific error patterns.
v Business analyst: Understand how to find and replay sessions that represent
successful business transactions (like placing an order or generating a quote) and
locate sessions where customers were unable to complete the transaction.
The terminology that is used throughout attempts to conform to World Wide Web
Consortium (W3C) standards as much as possible. Because the IBM Tealeaf
cxImpact product, including RTV, must work with every web server technology on
the Internet, terminology is expanded beyond W3C standards where necessary.
Chapter 1. CX RealiTea Viewer overview
9
v For more information about terminology, see "Tealeaf Glossary" in the IBM
Tealeaf Glossary.
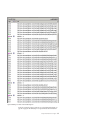
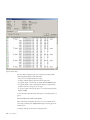
RTV versions
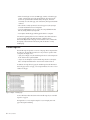
In IBM Passport Advantage Online, the following versions of IBM Tealeaf CX
RealiTea Viewer are available for installation in the listed compressed file.
v In the file name, * denotes the version and build reference, such as 8.2.0.8221.
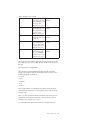
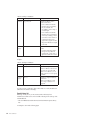
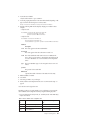
Table 1. RTV Versions
Version
File name
Description
Licensed
RTV_Licensed_*.zip
Enables all permissions
Lite
RTV_Lite_*.zip
Allows limited set of features. See
“Limitations of RTV Lite.”
Note: For customers who upgraded from Release 7.2 or earlier, the ability to edit
events is now a Portal function. You cannot edit events directly through RTV. You
can initiate the process of creating new event objects from within RTV, if you have
the appropriate Portal permissions. See “Creating events” on page 91.
Switching between versions of RTV
You can switch between versions of RTV by completing the following steps.
1. If both versions are installed, rename the old RTV version executable file to
1RealiTea.exe.
2. Double-click the new version of RTV to open it.
3. As part of its initial configuration, RTV automatically associates itself with
.TLS, .TLX, and .TLA files. The new version of RTV is now the default one.
Limitations of RTV Lite
The RTV User Manual describes the functions of professional versions of RTV.
RTV Lite cannot complete the following functions:
v Save
v Send a session through email
v
v
v
v
v
Generate load runner scripts
Generate Windows Application Stress (WAS) scripts
Search canisters. RTV Lite can perform subsearches.
Create exe files with sessions included
Print
v View result sets
v Create annotations
Using RTV across multiple versions of CX
Some Tealeaf installations contain multiple instances of IBM Tealeaf cxImpact.
Optionally, RTV can be configured to access each version.
10
RTV User Manual
Note: Changes between versions of RTV and IBM Tealeaf cxImpactcan make some
features inaccessible. Tealeaf recommends the latest version of RTV for the version
of IBM Tealeaf cxImpact in use in your environment.
v See "Troubleshooting - RealiTea Viewer" in the IBM Tealeaf Troubleshooting Guide.
Initial RTV configuration
This page describes how to complete the initial configuration of RTV.
Note: This information provides a framework for completing the initial
configuration of one component of the IBM Tealeaf CX system in a simplified
deployment model. Depending on your Tealeaf solution's deployment, additional
configuration can be required.
The IBM Tealeaf CX RealiTea Viewer allows Tealeaf users to search for and replay
Tealeaf sessions on their local desktop systems. The standalone RTV application
connects through the available network to the IBM Tealeaf CX platform to search
for active or completed sessions and then displays them as they were originally
experienced in a customized web browser.
v For more information about RTV, see "RealiTea Viewer (RTV) User Manual" in
the IBM Tealeaf RealiTea Viewer User Manual.
RTV installation
The IBM Tealeaf CX RealiTea Viewer is a standalone Windows application that
must be installed on the desktop system of each Tealeaf user. Before you configure
RTV, you must verify that the software is installed on your system.
Note: For Tealeaf Event Manager users, the installed major and minor version
number of the IBM Tealeaf CX RealiTea Viewer on your desktop must match those
numbers of IBM Tealeaf cxImpact.
Note: If you have not done so already, you must connect your installed version of
RTV to the IBM Tealeaf cxImpact server.
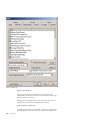
1. From the Windows Start menu, select Settings... > Control Panel.
2. Double-click Add or Remove Programs.
3. In the list, if you see an entry for Tealeaf RealiTea Viewer, the application is
installed.
v For more information about RTV minimum system requirements, see "RealiTea
Viewer Overview" in the IBM Tealeaf RealiTea Viewer User Manual.
v For more information about RTV installation, see "RealiTea Viewer Overview" in
the IBM Tealeaf RealiTea Viewer User Manual.
Configuration
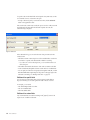
Before you begin configuring and using RTV, you must determine the roles of
individual Tealeaf users. RTV roles can be broken into the following categories.
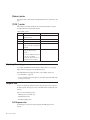
Role
Description
RTV Administrator
Responsible for managing replay rules and global profiles. Can overlap
with the Tealeaf application administrator. For more information about
configuration tasks for RTV administrators, see “Configuring RTV as an
administrator” on page 12.
Chapter 1. CX RealiTea Viewer overview
11
v RTV administrators can be required to configure replay rules to achieve
high-fidelity replay of the monitored web application in RTV. See
"RealiTea Viewer - Replay Rules" in the IBM Tealeaf RealiTea Viewer User
Manual.
RTV User
Individual Tealeaf user who must use the RTV application to search for
session data, replay selected sessions, and act on their findings. For more
information about configuration tasks for RTV users, see “Configuring RTV
as a User” on page 15.
RTV User Who Edits Events
Tealeaf user or administrator who is responsible for creating and
maintaining the event definitions that are used in the Tealeaf system. For
more information about configuration tasks for these users, see
“Configuring RTV for users who edit events” on page 16.
Configuring RTV as an administrator
This information describes the configuration steps that RTV administrators must
complete before they enable Tealeaf users to access session data.
Configuring RTV user accounts:
Any Tealeaf user with basic Portal access can also use the IBM Tealeaf CX RealiTea
Viewer application.
Accounts assigned to RTV users cannot have their Default Replay Mode set to BBR
at either the group or individual user level. It must be set to either RTV or Prompt
on Replay. For more information:
v "CX User Administration" in the IBM Tealeaf cxImpact Administration Manual
v "cxReveal User Administration" in the IBM Tealeaf cxReveal Administration Manual
Creating a default user profile:
After IBM Tealeaf cxImpact is initially installed, a default profile must be created
and stored on the server.
v For more information about creating replay rules, see “Configuring the user
profile” on page 16.
You can search for sessions and complete a basic replay of them by acquiring the
profile.
Note: The quality of session replay is dependent upon the nature of the web
application. Websites that employ sophisticated display technologies or rely on
client user interaction events can require significant customization of the common
replay profile and replay rules. Those steps are covered in later sections.
To
1.
2.
3.
acquire the default RTV user profile, complete the following steps.
Run RTV.
In the RTV menu, select Tools > Options.
Click the Profiles tab.
v At the top of the panel, you will see the following message:
You are using the default built-in profile.
4. Under the Default Profile, enter the server from which to acquire the default
profile. Click Check for Updates Now.
12
RTV User Manual
Test RTV connection:
This information describes the steps that RTV administrators must take to test
whether the RTV connection is working.
Testing search:
You can test to see whether search is working.
1. In the RTV toolbar, click the Search button.
2. Specify a search that must return a non-zero number of sessions.
3. To run the search, click Search.
4. In the Search Progress dialog, you must see search results displayed.
Testing replay:
You can test the basic capability of replaying sessions. You can see problems that
must be addressed before production deployment.
Note: Replay is a complicated process and can require tuning of your RTV settings
and possibly changes to the web application to get it to work properly.
1. After you have run the search, you must see a number of sessions that are
listed in the Search Results tab.
2. Select a session that contains a high number of pages, as indicated in the Page
Count column.
3. In the RTV toolbar, click the Replay button.
4. In the Replay tab, you must see a non-zero number of pages in the Viewable
Pages list. In the pane to the right, the first page in the Viewable Pages list is
displayed.
5. To test the replay of this session, click theReplay button in the toolbar.
6. If your installation of RTV is working properly, the session begins to replay as
the user initially experienced it.
Save session:
If your session is a representative example of a typical user experience with your
web application, you can choose to save it locally to help your subsequent
configuration tasks.
1. When the session is open in RTV, from the menu select File > Save.
2. Save it to a directory on your local workstation that is outside of the RTV
installation directory.
Other options tabs:
This information describes the other profile options that are available for RTV
administrators.
Testing profile changes:
Before you save your profile to the server, you can save a local copy and to test
your local copy against sessions that are saved in .TLS files.
Chapter 1. CX RealiTea Viewer overview
13
Copying host profile for other hosts:
If you have multiple hosts of your web application, you can rapidly create host
profiles by copying the host profile that you create and modifying the destination
profile as needed.
To copy the profile:
1. In the RTV menu, select Tools > Options.
2. Click the Profiles tab.
3.
4.
5.
6.
7.
Click Edit Raw Profile. The raw XML of the profile is displayed.
Click in the profile text. Press CTRL + A to select all of it.
Paste the text into a text editor.
To retain a backup, save the text file.
Search the text file for the following string:
<HostProfile
8. Verify that the value of the name attribute corresponds to the host that you
configured.
9. Select the text that starts at the preceding string down till:
</HostProfile>
10. Copy the text and paste the copy just after the preceding string.
11. Modify the name attribute in the first line of the copied text to match the host
name for which you are applying the copied host profile.
12. Save the text file under a new name.
13. Press CTRL + A to select the entire profile.
14. Paste the text back into RTV.
15. Click Save Changes & Exit.
16. Click Edit Profile....
17. The new host profile node must be displayed.
18. Modify the profile rules for the new host as needed.
Saving your profile to the server:
After you are satisfied with your user profile and rules for all hosts, you can post
it to the common server for other Tealeaf users.
1. In RTV, select Tools > Options.
2. Click the Profiles tab.
3. If you have not done so already, save a copy of your profile locally. Copy the
contents of the raw profile into a text editor and save it to a local directory.
4. In the Default Profile text box, verify that the Server and port number
correspond to the server that hosts the Portal application.
5. To see whether the server profile is updated since you last synced, click Check
for Updates.
v If other Tealeaf users can edit the server profile, you must select the Check
for Updates at Startup.
6. If there are updates to the server profile, you must reconcile them with your
saved local copy.
7. To upload the user profile that is currently stored in RTV, click Upload Settings
to Server.
14
RTV User Manual
v To apply specific settings to the BBR profile, click Sync to BBR.... Select the
settings to apply to the BBR profile, and click Commit....
8. In theOptions window, click OK.
Distribute connection information to RTV users:
After you upload your setting changes to the server profile, you can distribute
connection information to Tealeaf users.
Configuring RTV as a User
This information describes the steps that RTV users must take to acquire their user
profile.
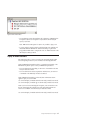
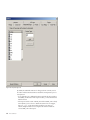
Auto-configuring RTV from the Tealeaf master server:
After the RTV administrator configures the user profile, RTV users can enter the
connection information to the master Replay Server and acquire the user profile.
1. Start RTV.
2. In the RTV menu, select Tools > AutoConfig from TeaLeaf Master.
3. In the list of available IBM Tealeaf cxImpact systems, select the top node of the
master server with which you want to sync.
v Below each master server node, you can review the different servers and port
numbers relevant to RTV that are part of the IBM Tealeaf cxImpact
deployment.
v If the master server is not listed, enter the simple host name in the IBM
Tealeaf cxImpact Server textbox and click Add. If RTV is able to connect to
the server, it is added to the list.
4. To sync with a listed server, click the server name in the server tree.
a. To use the shared profile that is stored on the server, click the Used Shared
Profile check box.
Note: If no shared profile is available on the server, your local profile is
unchanged.
b. To configure your local installation of RTV to work with the selected IBM
Tealeaf cxImpact server, click Configure RealiTeaViewer to use this system.
Note: It is recommended that you configure RTV to auto-configure by using
servers of the same version as the RTV installation. For example, if you are
using Release 7.2 RTV, you must connect only to Release 7.2 IBM Tealeaf
cxImpact servers.
v To remove a server from your list of available servers, select the server node
in the list and click Remove.
5. After you complete the auto-configuration, click Exit.
v See "RealiTea Viewer Overview" in the IBM Tealeaf RealiTea Viewer User
Manual.
Updating your local profile:
If your RTV administrator is periodically updating the common profile, you must
configure RTV to check for updates at startup.
1. In the RTV menu, select Tools > Options.
2. Click the Profiles tab.
Chapter 1. CX RealiTea Viewer overview
15
3. Under the Default Profile, enter the server from which to acquire the default
profile.
4. Select the Check for Updates at Startup check box.
5. Click Check for Updates Now.
6. To save changes, click OK.
v To restore your user profile to the default one provided by Tealeaf, click
Restore Default Profile.
Configuring RTV for users who edit events:
The Tealeaf Event Manager enables users with the appropriate permissions to
create, edit, and delete Tealeaf events and related data. This information describes
the configuration steps in RTV for users who must access TEM.
v See "Tealeaf Event Manager" in the IBM Tealeaf Event Manager Manual.
1. If you have not done so already, you must complete the configuration steps for
RTV users. See “Configuring RTV as a User” on page 15.
2. In the RTV menu, select Tools > Options.
3. Click the IBM Tealeaf cxImpact tab.
a. If Portal authentication is enabled, RTV must be provided with the Portal
user name and password with which to connect to the Portal Server. Enter
the user name and password to use to connect to the server.
v See "RealiTea Viewer - Advanced Options Tabs" in the IBM Tealeaf RealiTea
Viewer User Manual.
4. To save your configuration changes, click OK.
5. Users of the Event Manager must be part of the Event Admin group in IBM
Tealeaf cxImpact.
v See "CX User Administration" in the IBM Tealeaf cxImpact Administration
Manual.
v See "Event Administration" in the IBM Tealeaf Event Manager Manual.
6. To test the connection, in the RTV menu, select Edit > Event Editor....
7. The Events tab of the Tealeaf Event Manager opens, displaying all event
definitions on the server.
v See "Tealeaf Event Manager" in the IBM Tealeaf Event Manager Manual.
Configuring the user profile
After basic connectivity is established, RTV administrators can configure the user
profile to contain hints on how to display content during replay. Using replay
rules, you can provide instructions to RTV for how to handle specific pages or
other aspects of the web application during replay.
This information describes how to configure the RTV user profile. The user profile
is stored as an XML file inside your local RTV installation directory.
Note: It is recommended that you begin by modifying the user profile through the
RTV GUI, instead of editing the raw XML.
The local RTV profile can be optionally synchronized with a common user profile
stored on the server.
v This common user profile can be optionally synchronized with the user profile
used by Browser-Based Replay. See "RealiTea Viewer - Profile Options" in the
IBM Tealeaf RealiTea Viewer User Manual.
16
RTV User Manual
Editing the RTV profile:
Complete the following steps to edit the RTV profile.
1.
2.
3.
4.
In the RTV menu, select Tools > Options.
Click the Profiles tab.
Click Edit Profile.
The nodes of the RTV profile are displayed. Specific nodes to modify are
described in the following sections.
v For more information about user profiles, see "RealiTea Viewer - Profile
Options" in the IBM Tealeaf RealiTea Viewer User Manual.
Host-port remapping:
You can remap the hosts and ports that are detected in the transaction stream to
another host:port number gateway. If it is not practical or desirable for replay to
make requests to the live production server, you can change all references to the
live server in replay data to point to the other server or to a null server.
Note: In a user profile, you can have no more than one host-port remapping.
1. In the Edit Profile dialog, double-click the Remap Host node.
2. Click Add Hostname. Enter your web application's host name in the following
form:
www.<host_name>.<ext>
3. Click OK.
4. To enable remapping, select one of the following remap options:
v Remap host to - Enter the host to which you want to remap the source host
name, using the same format.
v Remap host to NULL server - If you do not have a remap server to use and
do not want requests that are made to the source web server, this option
effectively cancels any requests that are embedded in the replay data.
Note: If this option is enabled, some content does not display properly
during replay.
5. If you want, you can remap port numbers from the source web application's
traffic to new port numbers on the remap server. Click Add Port. Enter the
From and To remap ports, and click OK.
v You can enter multiple port numbers to remap.
6. From the Protocol drop-down, you can select the protocol to use when you
connect to the remap server. The Auto automatically detects the appropriate
protocol to use.
7. To save your remap settings, click OK.
Ignore URLs:
Some URLs for your web application are not viewable pages, which can result in
display issues in RTV. To avoid these pages, you can configure RTV to ignore URL
patterns, including query parameters.
1. In the Edit Profile dialog, double-click the IgnoreURL node.
2. Enter the path information for the URLs to ignore. The path /app/.asp?
instructs RTV to ignore any .asp file containing query parameters in the app
tree of the source host.
Chapter 1. CX RealiTea Viewer overview
17
v The wildcards * and ? are accepted.
v When you specify URLs to ignore, start simple and specific. You can
download a session and save it locally as a .TLS file and then to iterate on
your ignore URL rules.
3. To save the IgnoreURL rule into your profile, click OK.
4. To create the IgnoreURL rule, in the Edit Profile dialog click New. From the
drop-down, select Add IgnoreUrl.
v For more information about configuring your profile, see "RealiTea Viewer Profile Options" in the IBM Tealeaf RealiTea Viewer User Manual.
Popup URLs:
You can configure RTV to recognize URLs that must be displayed in a popup
window. When you browse to URLs that match the PopupURL pattern in the
NavList, RTV displays them in a popup window.
In Browser-Based Replay, popup URLs are displayed in the NavList yet are
displayed as regular pages during replay.
1. In the Edit Profile dialog, double-click the PopupURL node.
2. Enter the path information for the URLs to treat as popups. Path configuration
for popup URLs follows the same requirements as specifying Ignore URLs. See
“Ignore URLs” on page 17.
3. To save the PopupURL rule into your profile, click OK.
v For more information about configuring your profile, see "RealiTea Viewer Profile Options" in the IBM Tealeaf RealiTea Viewer User Manual.
Response modifications:
You can modify the response of replay data by performing pattern-based
replacement of text. For example, response modifications can be used to prevent
the unwanted execution of JavaScripts referenced or included in the response.
1. In the Edit Profile dialog, double-click the ResponseMod node.
2. For the specified host name, you can select whether the response modification
is to be applied to all responses or to those matching a regular expression
pattern.
v Regular expressions are a powerful mechanism for specifying pattern
matching. See "Regular Expressions in the RealiTea Viewer" in the IBM Tealeaf
RealiTea Viewer User Manual.
3. In the Pattern text box, you can specify by using a regular expression the text
for which to search the response.
4. In the Replacement text box, specify the text to replace the matched pattern.
5. Select whether to replace only the first occurrence (First) in the response or all
occurrences (All).
6. To save your response modification rule, click OK.
7. After you specify your response modification rule, you must test it against
sample data. See “Testing response modifications.”
Testing response modifications:
After you specify your response modification rule, you must test it against sample
data.
1. Load a session that you can use to test the rule.
18
RTV User Manual
Click theResponse View button in the toolbar.
Select some example text in the response to use for testing.
Right-click the selected text and select Test Response Modify Rules....
TheTest Modify Rules window opens.
To test the selected text against the Response Modify rules for the page, click
Test.
7. To edit the Response Modify rules, click Edit Rules.
v For more information about configuring your profile, see "RealiTea Viewer Profile Options" in the IBM Tealeaf RealiTea Viewer User Manual.
2.
3.
4.
5.
6.
Configuring dynamic response modifications:
If your web application includes data that is delivered from a third party, that
content must be associated with a specific request. You can use dynamic response
modification rules to modify response patterns that are based on the detection of
Tealeaf events in the transaction stream.
v See "RealiTea Viewer - Creating Events" in the IBM Tealeaf RealiTea Viewer User
Manual.
External file modifications:
If your web application references external files such as JavaScripts, you can
configure a set of file modifications so that undesirable actions are not taken within
the RTV web browser during replay. Typically, this feature is used to disable script
execution.
1. In the Edit Profile dialog, double-click the ExternalFileMod node.
2. For the specified host name, enter the regular expression pattern for the file
names to modify.
v Regular expressions are a powerful mechanism for specifying pattern
matching. See "Regular Expressions in the RealiTea Viewer" in the IBM Tealeaf
RealiTea Viewer User Manual.
3. In the Pattern text box, you can specify using a regular expression the text for
which to search.
4. In the Replacement text box, specify the text to replace the matched pattern.
5. Select whether to replace only the first occurrence (First) or all occurrences
(All).
6. After you specify your external file modification rule, you must test it against
sample data. See “Testing response modifications” on page 18.
7. To save your external file modification rule, click OK.
v For more information about configuring your profile, see "RealiTea Viewer Profile Options" in the IBM Tealeaf RealiTea Viewer User Manual.
Configuring dynamic external file modifications:
You can use dynamic external file modification rules to modify external file data
based on the detection of Tealeaf events in the transaction stream.
v You can configure these modifications by using the same interface as the one
used to configure dynamic response modifications. See "RealiTea Viewer Creating Events" in the IBM Tealeaf RealiTea Viewer User Manual.
Chapter 1. CX RealiTea Viewer overview
19
Creating frame rules:
If your web application uses framesets to organize the display page, you can create
frame rules to deliver URLs to named frames in the frameset.
1. In the Edit Profile dialog, double-click the FrameRule node.
2. Enter the name of the frame to which to map the URL pattern.
3. In the Matching URL textbox, enter the URL pattern for the source page or
pages to map into the frame.
v The wildcards * and ? are accepted.
4. To apply the frame rule to your user profile, click OK.
v For more information about configuring your profile, see "RealiTea Viewer Profile Options" in the IBM Tealeaf RealiTea Viewer User Manual.
Note: For dynamically loaded frames, you can create rules from the Viewable
Pages list to manage frame placement. Right-click the page in the Viewable Pages
list and select Replay Rules... > Place this page in a frame... and select the frame.
The rule is then created to always place the page into the selected frame. See
"RealiTea Viewer - Viewable Pages List" in the IBM Tealeaf RealiTea Viewer User
Manual.
Configuring replay for client-side user interface actions
The emergence of rich internet application technologies has greatly increased the
utilization of client-side user interface events in web applications. These UI events
may not be transmitted to the host server by default, which prevents Tealeaf from
tracking them.
As an optional part of the IBM Tealeaf CX platform, the Tealeaf IBM Tealeaf CX UI
Capture for AJAX can be deployed in your web application to provide detailed
monitoring of client-side user interface events. The IBM Tealeaf CX UI Capture for
AJAX can require additional development, configuration, and integration with
your web application.
Note: IBM Tealeaf CX UI Capture for AJAX is only available to legacy users.
v For more information about UI Capture, see "UI Capture for Ajax Guide" in the
IBM Tealeaf UI Capture for Ajax Guide.
If you are unable to deploy UI Capture at this time, you can configure RTV to
complete some limited monitoring of client-side UI events.
v See "Monitoring Client UI Events through RTV" in the IBM Tealeaf RealiTea Viewer
User Manual.
v If your web application uses Ajax technologies, additional configuration can be
required. See "RealiTea Viewer - Ajax Replay" in the IBM Tealeaf RealiTea Viewer
User Manual.
Testing your configuration
After you complete your initial configuration, you can complete the following
steps to verify the configuration.
For RTV, you must test the configuration for basic users, RTV administrators, and
users of the Tealeaf Event Manager. The following steps are listed.
v A complete set of tests can be run after all Tealeaf components is configured. See
"Testing Your Tealeaf Solution" in the IBM Tealeaf CX Configuration Manual.
20
RTV User Manual
RTV Administrators: RTV administrators must test that they can change replay
rules and that basic replay functionality is working.
v If you have not done so already, you must verify that you can make a replay
rule change and save it to the server. You might create an IgnoreURL rule for a
URL that will never be displayed in the web application. After you complete this
test, you should remove the rule.
v Test basic replay now. See "RealiTea Viewer - Replay View" in the IBM Tealeaf
RealiTea Viewer User Manual.
Note: Replay is a complex process that can require regular review of replay
rules to make it work properly. Now, you want to test basic replay functionality.
RTV Users: RTV users must be able to search for sessions and replay them. If you
have not done so already, you must test a basic RTV user account to verify that
search and replay are working properly.
v See “Testing search” on page 13.
v See “Testing replay” on page 13.
Tealeaf Event Manager Users: These users must be able to access the application
now. From the RTV menu, select Edit > Event Editor....
v If RTV is properly configured, the currently available events are displayed.
v Perform a simple change to an event definition, such as changing the
description, and then commit the change back to the server to verify that your
user account can modify event definitions.
When all Tealeaf components are configured, you must complete an end-to-end
test. See "Testing Your Tealeaf Solution" in the IBM Tealeaf CX Configuration Manual.
Chapter 1. CX RealiTea Viewer overview
21
22
RTV User Manual
Chapter 2. RealiTea Viewer navigation
You can use RTV's menu-driven interface to search for, locate, and review session
information and then replay the visitor's experience as the visitor experienced it.
v “AJAX Replay” on page 94
v “Creating events” on page 91
v “Events view” on page 89
v RealiTea Viewer - Main Window
v “Replay over HTTPS” on page 98
v
v
v
v
v
“Replay rules” on page 58
“Replay view” on page 30
Chapter 3, “Request view,” on page 73
“Response view” on page 86
“Viewable Pages list” on page 38
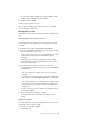
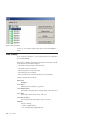
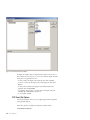
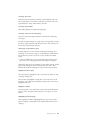
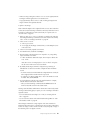
RealiTea Viewer main window
After you start IBM Tealeaf CX RealiTea Viewer, the main window is displayed.
Request, response, and replay content are displayed in the main window of the
RTV application for the currently selected page.
To use the application, follow the steps:
v Search for a session from the Portal or from IBM Tealeaf cxReveal
v Drill down into a session from a report in the Portal
v Open a session that is stored on the file system.
© Copyright IBM Corp. 1999, 2015
23
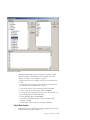
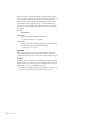
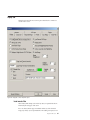
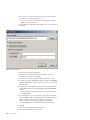
Figure 3. RTV Main Window
Below the toolbar, you can access the windows are generated based on your
actions in RTV. The Main window in RTV may contain different views of the IBM
Tealeaf cxImpact data that is shown within other windows.
The leftmost tab is the Search Results View.
v If there is only one matching session, RTV opens a second tab in the Child
window that displays the first page of the session.
v If RTV is opened without selected sessions, a blank Main window is displayed.
Main Window Views
Through the Main window, you can review the current page through three
different views.
Replay View:
Through Replay view, you can experience the visitor's session as the visitor
experienced. RTV uses the captured session data to reassemble each page locally
for display through the Main window.
v You can use the Zoom tools to change the magnification of the main window in
Replay view. See “RTV Menus” on page 153.
v See “Replay view” on page 30.
24
RTV User Manual
Request View:
Through Request view, you can review the request data that is submitted from the
visitor's browser to the web server to return the current page. Additionally, all data
that is inserted by Tealeaf into the request can be reviewed through Request view.
See Chapter 3, “Request view,” on page 73.
Response View:
Through Response view, you can review the response that is returned from the
web server to the visitor's browser. See “Response view” on page 86.
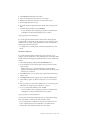
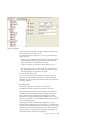
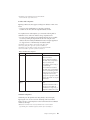
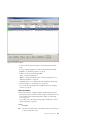
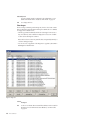
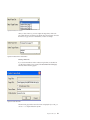
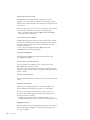
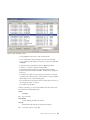
Status Bar
Figure 4. Status Bar
At the bottom of the main window, the Status bar contains the URL of the
currently selecting page and timestamp information.
Field
Description
URL
Location of the currently displayed page. The label on the upper left of the
status bar contains the URL of the current page, including any port or host
mappings. RTV can modify to this URL. If the request came in on a port
other than the default 80 or 443, the specific port number is appended to
the workstation name.
TimeStamp
Local timestamp for when the request was received by the Web server.
Generation Time
Time in seconds required to generate the page. This figure is also displayed
in the Viewable Pages List.
View Time
For sessions without UI events, this value measures the difference in
timestamps in seconds between the response of the current page and the
request of the subsequent page, as reported in the Viewable Pages List.
v Since this metric is updated only when the main page loads, on pages
that contains UI events, the value represents the difference in seconds
between the initial load of the page and the triggering of the first UI
event. See "UI Capture for Ajax Guide" in the IBM Tealeaf UI Capture for
AJAX Guide.
Note: IBM Tealeaf CX UI Capture for AJAX is only available to legacy
users.
Mem
Amount of RAM memory that is currently consumed by the RTV
application.
Disk
Amount of disk space currently used by the RTV application.
Context menus in the main window
Depending on the type of view in the main window, one of the following context
menus is available. For context options, right-click in the main display window to
display the menu.
Chapter 2. RealiTea Viewer navigation
25
Note: If you are creating event objects from the RTV context menus, it is advised
that you save each object after you create it before you create another one. See
"Tealeaf Event Manager" in the IBM Tealeaf Event Manager Manual.
Context menu for Request view
The following items appear in the context menu for Request view.
Menu Item
Description
Create New Event from selection
When text is selected, this context menu command is available for creating
an event from the selected text. The Tealeaf Event Manager is
pre-populated with values to match the selected text. See "TEM Events
Tab" in the IBM Tealeaf Event Manager Manual.
Create New Hit Attribute from selection
When text is selected, this context menu command is available for creating
a new attribute that uses the selected text as the pattern to match. The
Tealeaf Event Manager is pre-populated with values to match this
selection. See "TEM Hit Attributes Tab" in the IBM Tealeaf Event Manager
Manual.
Find on Page
Search the displayed page for a specific text string.
Search Completed Sessions for
Search completed sessions over the current date range for the request
variable that contains the value on which you right-clicked. See “Viewable
Pages list” on page 38.
Copy Value
Copy the selected value to the clipboard.
Subsearch for
Within the currently selected session, search for pages that contain the
specified request variable. See “Session search and Subsearch” on page 105.
Remove page with this request value from replay...
Based on a specified name-value pair in the request, you can remove
matching pages from replay. You typically do this process for pages which
are not viewable html pages. RTV generally removes non-viewable pages
from the viewable pages list, but it does not know to remove things like
partial html snippets that are requested by Ajax, or pages that incorrectly
identify their content type. See “Replay rules” on page 58.
Treat page with this request value as Highlight Only...
For Ajax pages, it can be useful to flag them as highlight only pages, which
contain form field data to identify client UI events and are not replayable
through RTV. Opens a dialog in which you can specify to treat pages with
this request value as highlight-only pages. When marked in this manner,
data in Highlight Only pages is not used as a displayable HTML page.
Instead, RTV leaves the previous page that is displayed, and the form
fields from the Highlight Only page are used to populate fields with data.
See “Monitoring client UI Events through RTV” on page 149.
Hexadecimal Display
Display page contents in hexadecimal code. To revert the display, select
this option again.
26
RTV User Manual
View AMF Data
You can view the AMF data that was submitted in the request. The AMF
data is displayed in Notepad.exe.
v To create events from AMF data, the binary data must be decoded in the
Windows pipeline. See "Inflate Session Agent" in the IBM Tealeaf CX
Configuration Manual.
View All AMF Data
You can view all AMF requests in a single file. The file is displayed in
Notepad.exe.
v To create events from AMF data, the binary data must be decoded in the
Windows pipeline. See "Inflate Session Agent" in the IBM Tealeaf CX
Configuration Manual.
Context menu for Response view
The following items appear in the context menu for Response view.
See “Response view” on page 86.
Menu Item
Description
Create New Event from...
When text is selected, this context menu command is available for creating
an event from the selected text. The Tealeaf Event Manager is
pre-populated with values to match the selected text. See "TEM Events
Tab" in the IBM Tealeaf Event Manager Manual.
Create New Hit Attribute from...
When text is selected, this context menu command is available for creating
a hit attribute that uses the selected text as the pattern to match. The
Tealeaf Event Manager is pre-populated with values to match this
selection. See "TEM Hit Attributes Tab" in the IBM Tealeaf Event Manager
Manual.
Copy Value
Copy the selected value to the clipboard.
Find on Page
Search the displayed page for a specific text string.
Search Completed Sessions for
Search completed sessions over the current date range for the variable that
contains the value on which you right-clicked. See “Viewable Pages list” on
page 38.
Subsearch for
Within the currently selected session, search for pages that contain the
specified variable. See “Session search and Subsearch” on page 105.
Add/Edit ResponseMod Rule...
Add or edit a response modification rule. See “Replay rules” on page 58.
Add/Edit new Dyn ResponseMod Rule...
Add or edit a dynamic response modification rule, which can be used to
match patterns in the response with regular expressions and to replace the
matching string with a string and up to three parameterized values. See
“Replay rules” on page 58.
Chapter 2. RealiTea Viewer navigation
27
Test Response Modify Rules...
Opens a dialog in which you can test the response modification rules that
apply to the current page. See “Replay rules” on page 58.
Full Response
Displays the full response text. See “Response view” on page 86.
Indexed Response
Displays the list of words that are indexed from the response. See
“Response view” on page 86.
Hexadecimal Display
Displays page contents in hexadecimal code. To revert the display, select
this option again. See “Response view” on page 86.
View AMF Data
You can view the data in AMF responses. The AMF response is displayed
in Notepad.exe.
v To create events from AMF data, the binary data must be decoded in the
Windows pipeline. See "Inflate Session Agent" in the IBM Tealeaf CX
Configuration Manual.
Save As...
If needed, you can save the response data to your local computer.
v For regular text-based responses, save the file by using a .txt extension.
The file can be opened in a text editor.
v For binary responses, you can apply the appropriate extension when you
save the file. For example, image files can be saved as .gif, .png, or
other appropriate extension.
Context menu for Replay view
The following items appear in the context menu for Replay view.
For more information about Replay View, see “Replay view” on page 30.
Menu Item
Description
View Document Source
View the source code for the currently selected document.
View Element Source
View the source code for the element on the page where you right-clicked.
View Element Properties
View the properties of the element you selected.
v Tag - HTML tag that defines the element.
v Id - The value of the specified id= attribute for the element.
v Size - The size of the element, in bytes, if applicable.
v Dimensions - The number of horizontal x vertical pixels that the element
occupies on the screen, if applicable.
v Name - The value of the specified name= attribute for the element.
v Url - If a destination URL is specified for the element, it is listed here.
– Open URL Open the specified URL.
– Copy URL Copy the specified URL to the clipboard.
Add Annotation
See “Annotations in RTV” on page 181.
28
RTV User Manual
Create New Event from selection
Create an event that is triggered on the presence of the selected text. See
"TEM Events Tab" in the IBM Tealeaf Event Manager Manual.
Create New Hit Attribute from selection
Create a hit attribute that tests for the presence of the selected text. See
"TEM Hit Attributes Tab" in the IBM Tealeaf Event Manager Manual.
Copy
Copy the selected value to the clipboard.
Find on Page
Search the displayed page for a specific text string.
Search Completed Sessions for
Search completed sessions over the current date range for the selected text.
See “Viewable Pages list” on page 38.
Subsearch for
Within the currently selected session, search for pages that contain the
selected text. See “Session search and Subsearch” on page 105.
Update Active Session
For active sessions, you can use this option to refresh the page list for any
user actions that occur after you previously opened or refreshed the list.
Note: When you refresh an active session, the currently displayed page is
not refreshed. When UI events are part of the currently displayed page, a
refresh may cause replay to jump to the previous standard page and
disrupt the replay.
Find login page for external files
For websites that store some static content in external systems, this option
can be used to programmatically find the login page to the system where
these files are kept. This option is useful if you wish to enter login
credentials to the external area for replay purposes.
Examine Cookies
Displays the browser cookies relevant to the session.
Improving Replay performance
Replaying Tealeaf sessions requires the downloading and display of data that can
be repetitive, changed, stored behind authentication, or no longer available. These
and other factors such as network performance can affect replay performance.
This information provides some tips on how you can improve replay performance
in the IBM Tealeaf CX RealiTea Viewer. In many cases, replay issues are caused by
the length of time that is required to load external static content, such as
JavaScript, style sheets, and images.
1. In RTV, set the following options:
a. In the RTV menu, select Tools > Options....
b. Click the Advanced tab.
c. Set the following values for these options:
v Javascript Auto Page Advance - Set to OFF.
v Store Images during Replay - Set to ON.
v Use Redirect for external images - Set to OFF.
Chapter 2. RealiTea Viewer navigation
29
2. The initial page load can be slow while RTV retrieves static content and caches
it on your local workstation. With changes in settings, subsequent page loads
reference the local content, which accelerates performance.
v See “Advanced Options tab” on page 207.
3. If the options do not improve performance sufficiently, you can create an
external database (.tli file) for static content. This file is used when you replay
each session, which speeds all page downloads, including the first one. To
create the file:
Note: Creating the external database results in a static set of content that does
not change when there are changes to the source website. You must remember
to update this database file, or static content that is displayed during replay can
become outdated. To update the .tli file, remove the existing one from the
configuration and create a new empty one.
a. Set the options that are listed in step 1.
b. In the RTV menu, select Tools > Options....
c. Click the Static Files tab.
d. Select Get images goes to static file database.
e. Click the New button. Enter a file name and location or accept the default
one.
f. Click OK.
g. External files are now stored in this file during replay. As you replay more
pages, fewer requests are required from the source server.
Replay view
In replay view, you can review each hit of the session in graphical format, called
auser impression and replay the session from any point as the user experienced it.
v A user impression is what the visitor sees when all items composing a page
finish rendering.
During replay, requests and responses that are captured by Tealeaf are reassembled
by RTV and displayed in the sequential order in which the user experienced them.
When you display the response, RTV can identify other content in the page that
must be acquired. Typically, this referenced content is static and is not captured by
Tealeaf.
Each item that is referenced in the response may or may not finish loading
successfully. How these elements run on a visitor's browser and on the desktop of
the user that runs RTV can vary based on the different systems that render the
user impression. For example, if the visitor's computer was able to successfully
fetch a Cascading Style Sheet (.css), and the RTV computer cannot fetch it, then
the pages differ in rendering those styles that are defined in the .css.
v If the visitor's computer can fetch an image while the RTV computer cannot,
then the page renderings differ. Security issues may play a role in reproducing
the user impression.
v If the user must log in to a site before the site delivers binary files, then the user
that runs RTV must be able to log in to the site, too.
Note: Replay of sessions across multiple browser tabs or multiple browser
windows is not supported.
30
RTV User Manual
Fetching static content
Every text page that makes up a whole or (in the case of framed pages) partial
user impression almost always makes more calls for other, external files.
These external files, called static content can be images, graphics, fonts, style sheets,
javascript, and more. They are generally not captured by IBM Tealeaf cxImpact, as
they would expand the data volume of the captured sessions with duplicate data.
The static content often defines most of the visual elements that are seen by the
visitor.
v To re-create the user impression, RTV must have access to all files requested by
the page.
v While most Tealeaf solutions reference the website from which to fetch these
files, a Tealeaf system can be configured to fetch files from a database.
v If static content is unavailable, RTV renders the page to the best of its ability.
Some pages are displayed with minor style differences when static content is not
available, while others that depend on external script files can be blank.
Depending on the Tealeaf capture mode, availability of static files can vary:
BusinessIT capture with DataDrop: Most Tealeaf systems are configured to operate in
the BusinessIT capture mode, coupled with DataDrop rules to eliminate successful
static file Requests. Requests for static files that were successfully filled by the web
server are not stored. Only Requests for static files associated with errors such as
StatusCode 404 or StatusCode 500 are available.
BusinessIT capture without DataDrop: In the BusinessIT capture mode without
DataDrop, every Request is stored. Since this configuration greatly increases the
volume of stored data, it should be used only as a temporary debugging aid. For
example, an RTV user can enable this capture mode to recreate a stored session for
greater detail and then re-enable DataDrop.
v See "PCA Web Console - Pipeline Tab" in the IBM Tealeaf Passive Capture
Application Manual.
You can review the source information of every file that is requested by a viewable
page. For each selected page, you can see the external files that are requested by
RTV as required for the successful replay of the page. See “Context menu” on page
177.
Timing the parts that comprise a user impression
In RTV Replay view, the web server generation time is displayed in the status bar
in the lower right corner. This generation time reflects the time that it took the web
server to generate the text page only and does not account for the time that is
required to fetch each binary file. Most user impressions include the basic text
page, all binary files, any JavaScript commands that affect how the page is
rendered, and any specified child pages.
All of the following factors affect the duration that is required to make the
complete user impression:
v The binary files are typically on your web application's hosting server, but the
text page might ask for binary files from a third-party server.
Chapter 2. RealiTea Viewer navigation
31
v When a browser begins to receive an HTML page, it starts to evaluate the page
contents, even before the page is fully downloaded from the web server. The
browser can spin off threads to handle the binary file requests, which runs
concurrently. To see the entire page, each of these binary file requests must finish
or timeout.
v After each file is loaded, any OnLoad event on the page is run, the JavaScript
associated with the OnLoad event is interpreted.
v Some sites establish Timer events on a page to fire some predefined time after
OnLoad, starting additional JavaScript code.
v Fast computers handle the page rendering quicker than slow computers.
Since Tealeaf is capturing the browser-server interactions, these client-side actions
are not recorded by Tealeaf. The UIEvents feature of Tealeaf hooks into
theDocument Object Model of the page and can track these actions, which enable
the reporting of this information and factoring it into the duration of a fully
rendered page.
Viewable Pages list
The Viewable Pages list provides an overview of the pages that are requested from
the web server. The Viewable Pages list has two major modes of operation which
correspond to the display views.
v Replay View: In Replay view, the Viewable Pages list shows each user impression
in the order the visitor experienced them.
v
Request View: In the Request view, the Viewable Pages list shows each request
that is stored by Tealeaf between the visitor's browser and the web server.
In addition to showing the list of pages, the Viewable Pages list adds information
about each page. Next to each page, a colored square indicates an event or an error
condition on the page.
Figure 5. Example of viewable pages
For more information about the columns in the Viewable Pages list, see “Viewable
Pages list” on page 38.
The figure below is a more complex example of a session in Replay View with
gaps in the sequence numbering:
32
RTV User Manual
Figure 6. Example of session that is in replay mode
Viewing this page in Replay View indicates that the visitor selected a link that
causes the browser to request a page with the URL modifyaddress.aspx. However,
this URL did not exist on the website.
The figure below is an example of an error page. It shows what the visitor saw for
page 10 in the previous figure:
Figure 7. Example of error page
From this page, the visitor clicked the Back button on the browser, which caused
the browser to display from its local cache the user impression of page 8 again.
From this user impression, the user selected the link to modify personal
information, which caused the browser to send the request for page 11. The web
application successfully served up that page.
UI Events pages
In the Viewable Pages list, UI events are represented as individual subpages of the
viewable page on which they occurred.
In the figure below, you can see how UI events are organized. Page 3 of the session
contains three UI events (3 UI-1, 3 UI-2, and 3 UI-3), and Page 4 has a single
listed UI event (4 UI-1).
Chapter 2. RealiTea Viewer navigation
33
Figure 8. Viewable Pages List - UI Events
When a page contains UI events, details on the UI events are displayed. See “UI
Events pane” on page 36.
Back button detection
When a visitor uses the Back button on the browser to step backwards through the
session pages, these pages are retrieved from the browser's local cache, and the
browser does not send any requests to the web server for this information.
Because IBM Tealeaf cxImpact captures interactions between a browser and a web
server, a visitor's use of the Back button is not captured. However, Tealeaf can
track the event by monitoring the page referrer (HTTP_REFERER) field in the
subsequent request to identify clicks of the Back button. If the value of the
HTTP_REFERER field references an earlier page in the User Impression stack, RTV
indicates that the Back button was pressed.
In Replay View, the Viewable Pages list shows a green box that contains a
left-facing arrow, and in the main window the word back is placed in the
upper-right corner of the Content pane.
In the Viewable Pages list, a dummy page representing Back button sequencing is
inserted. For example, the pattern 10*(8) indicates that page 8 was seen after page
10, and the user impression was the same as page 8. The number in parentheses is
the nearest previous page number whose URL matches the value of the
HTTP_REFERER.
Note: In Request and Response views, Back button sequencing is not displayed.
Because Back button detection is an interpolation of known hits, it may not be
accurate and may not work on all sites. Depending on your site's architecture, you
may want to disable Back Button Detection through the Replay options.
Note: By default, Back Button detection is disabled, as recent changes in browser
architecture limit its effectiveness. See “Replay tab” on page 187.
Events pane
If any Tealeaf events were triggered on the currently displayed page, they are
listed in the Events pane.
34
RTV User Manual
Figure 9. RTV Events Pane
Through the Events pane, you can browse the tree of events that were triggered on
the selected page. Events are listed in the order of the internal event ID, which is
listed in parentheses.
v For more information about events, see "TEM Events Tab" in the IBM Tealeaf
Event Manager Manual.
v For more information about all of the data objects that are listed in the Events
pane, see "Tealeaf Data Model" in the IBM Tealeaf Reporting Guide.
For each event that is fired, the following information is included. In the left
column below, example data is listed from the image.
Example
Description
Event(96):AT:C:AddToCartV:E
The parent node for the event.
v Event(EventID):EventName
Chapter 2. RealiTea Viewer navigation
35
Event Occurrences in Session:1
Number of occurrences of the event in the session.
Value[Count]:1
The recorded value includes [Value Type].
Report Group:AT:C:Product/Platform/Version
One of the report groups that are associated with the event. Values that are
captured at the time of event execution are reported for each of the
dimensions in the report group.
Fact(341)[Count]:1
An event, its value, and each report group that is associated with the event
constitutes a data entity that is called a fact. This internal data structure
cannot be directly manipulated by Tealeaf users.
v Fact(FactID):[ValueType]:Count
AT:C:ProductAddedToCart: Blackberry 8100 Pearl
A dimension and its recorded value.
v A dimension is a data structure for recording metadata that exists on the
page or in the session at the time when an event is recorded.
v In this case, when Event 96 fired, the dimension
AT:C:ProductAddedToCart, which stores the most recent product added
to the shopping cart, contains the value Blackberry 8100 Pearl.
v Dimensions enable the segmentation and filtering of reports that are
based on user-configured attributes. See "TEM Dimensions Tab" in the
IBM Tealeaf Event Manager Manual.
Display order for events
In the Events pane, RTV displays all events from all pages from the current page
to the next displayable page, as indicated in the Viewable Pages List. So, events
from interstitial pages that cannot be displayed are also visible in RTV.
For example, suppose that you have the following sequence of pages and events:
Table 2. Display Order for Events
Page
Status Code
Page Behavior
Events
2
Status Code 200
normal page
Event A, Event B
3
Status Code 302
redirect to page 4 (not
viewable)
Event C, Event D
4
Status Code 200
normal page
Event E, Event F
5
Status Code 200
normal page
Event G
v When you view Page 2, Events A, B, C, and D are listed in the Events pane.
v When you view Page 4, Events E and F are listed in the Events pane.
UI Events pane
If the currently selected page contains user interface events that are detected by
Tealeaf UI Capture, they are listed in the UI Events pane.
36
RTV User Manual
Figure 10. RTV UI Events Pane
v UI event detection requires the installation and configuration of IBM Tealeaf CX
UI Capture for AJAX. See "UI Capture for Ajax Guide" in the IBM Tealeaf UI
Capture for Ajax Guide.
Note: IBM Tealeaf CX UI Capture for AJAX is only available to legacy users.
v To create a Tealeaf event that is based on the detected UI event, right-click and
select Create Event for UI Data. The Tealeaf Event Manager is opened and
pre-populated with the data to configure the event. See "TEM Events Tab" in the
IBM Tealeaf Event Manager Manual.
Replay of mobile sessions
RTV supports the replay of visitor sessions that are experienced through mobile
devices. Depending on the device, more information can be displayed in RTV.
Note: The IBM Tealeaf CX Mobile module is a separately licensed module of the
IBM Tealeaf CX platform. please contact your IBM Tealeaf representative.
v For more information about enabling, see "Overview of CX Mobile" in the IBM
Tealeaf CX Mobile User Manual.
v For more information about data acquired from mobile devices, see "Overview
of CX Mobile" in the IBM Tealeaf CX Mobile User Manual.
Note: If IBM Tealeaf CX Mobile is not licensed, there are limitations that are
applied to replay of sessions in BBR.
See "Search and Replay for Mobile Web" in the IBM Tealeaf CX Mobile User Manual.
See "Search and Replay for Mobile App" in the IBM Tealeaf CX Mobile User Manual.
Note: If you have licensed and deployed UI Capture, some user interface events
that are captured from the mobile browser can be replayed through RTV. See
"Overview of CX Mobile" in the IBM Tealeaf CX Mobile User Manual.
See "Search and Replay for Mobile Web" in the IBM Tealeaf CX Mobile User Manual.
Chapter 2. RealiTea Viewer navigation
37
Viewable Pages list
On the left side of the RTV application window, the Viewable Pages list shows all
pages in the opened session that can be displayed in RTV.
Figure 11. Example of viewable pages
v To toggle display of the Viewable Pages List, select View > Show Viewable
Pages List.
v In the list, you can scroll up and down the pages list by using the arrow keys.
To display the page that is currently highlighted in the Viewable Pages List,
press SPACEBAR.
Columns in Viewable Pages list
The following columns are displayed by default in the Viewable Pages list.
Column
Description
Indicator icon
See “Icons in Viewable Pages list” on page 39.
Page
Sequence number of the hit.
Note: Gaps in the sequence of numbers can indicate the presence of UI
event pages, which may not be displayed in Replay view.
Red flag icon
When you load the session as the result of completing a search, any hits
that contain matching search conditions are indicated with a red flag icon (
).
URL
URL for the hit
Gen Time
Generation time for the page in milliseconds as reported by the Web Server
Net Time
Network transfer time for the page in milliseconds as reported by the Web
Server
RoundTrip
Round-trip time for the page in milliseconds as reported by the Web Server
Bytes
Bytes in the response
Status HTTP status code for the page.
38
RTV User Manual
TimeStamp
Timestamp of the hit.
Search Results
For pages where search results were indicated, this column indicates the
matched search terms and the number of occurrences.
Icons in Viewable Pages list
The icons in the first column of the Viewable Pages list indicate the status of the
page.
v You can move the mouse over an icon to see its tool tip.
Icon
Description
Green squares indicate that a text page is properly delivered.
v Green squares contain more icons to indicate redirect pages, framed
pages, or canceled pages.
Red squares represent an error condition.
UI icon indicates that the hit is an event that is captured from the visitor's
user interface by using UI Capture.
v Tealeaf IBM Tealeaf CX UI Capture for AJAX requires separate
installation, configuration, and deployment. See "UI Capture for Ajax
Guide" in the IBM Tealeaf UI Capture for Ajax Guide.
Note: IBM Tealeaf CX UI Capture for AJAX is only available to legacy
users.
In the second column, a blue square (
impression.
) indicates that the page is an entire user
Context menus
When the Viewable Pages List is displayed, the following context menus can be
accessed depending on the type of page that is selected in the list.
v For regular pages and pages with frames
v For UI Events
Note: When Auto Replay is in use, the context menu in the Viewable Pages List is
not available.
For regular pages and pages with frames
The following is a list of context menus for regular pages and pages with frames.
Menu Command
Description
Nav View Configuration...
Configure the navigation view in RTV. See “Nav View Configuration” on
page 40.
Remove this page from replay...
Opens a dialog pre-populated with the page information so that it can be
removed from replay. See “Replay rules” on page 58.
Chapter 2. RealiTea Viewer navigation
39
Place this page in a frame...
On sites that use window frames, you can use this option to place a page
in the viewable pages list into a named frame in the main window.
Treat this page as highlight only...
Opens a dialog in which you can specify to perform as a highlighting only
page. When marked in this manner, data in Highlight Only pages is not
used as a displayable HTML page. Instead, RTV leaves the previous page
that is displayed, and the form fields from theHighlight Only page are
used to populate fields with data. See “Monitoring client UI Events
through RTV” on page 149.
Treat this page as a Popup Page...
Opens a dialog in which you can specify to treat the page as a popup
page. After a page is identified as a pop-up, RTV ignores it when it
searches the preceding page list for field names corresponding to data
entered by the visitor. See “Replay rules” on page 58.
Copy URL to clipboard
Copy the URL for this page to the clipboard. You can paste the URL as text
by using CTRL+V into any other supporting application.
Open URL in browser
Opens the URL for this page in the default browser for your local system.
Nav View Configuration
You can configure aspects of the display in the navigation list by using the Nav
View Configuration options.
40
RTV User Manual
Figure 12. Nav View Options
Option Description
Display Page Title
You can choose to display the HTML page title in the navigation list for
each page.
Display URL
By default, the navigation list display the URL for the selected page.
Options:
Include host name - Include the host name in the URL. If all URLs
come from the same host, you can disable this option.
v Include query string - If URLs include query parameters, you can
choose to include them. If this option is cleared, all text that starts from
? to the end of the URL is omitted from the display.
v
Display TLT_URL
Optionally, you can choose to display the value of TLT_URL in the
navigation list. This value is generated after you apply any reference
values for the URL, which can normalize multiple related URLs to a single
consistent value.
Nav View Layout
You can choose to display the navigation list to the left of the main
window or above it.
Chapter 2. RealiTea Viewer navigation
41
For UI Events
The following is a list of menu commands for UI Events.
Menu Command
Description
Nav View Configuration...
Configure the navigation view in RTV. See “Nav View Configuration” on
page 40.
Create Event for
Create an event to identify the UI element. When selected, the Events tab
of the Tealeaf Event Manager is pre-populated with values to identify the
selected element. See "TEM Events Tab" in the IBM Tealeaf Event Manager
Manual.
Search Completed Sessions for
Search completed sessions for the selected UI element. See “Searching
completed sessions for UI elements.”
Highlight element
Highlight the selected UI element in the main window. This highlighting is
not permanent and cannot be saved; it is intended to help finding elements
on the page.
Add/Modify Custom UI Event Highlighting
Add or modify custom highlighting rules for the UI event. See “Add or
modify custom UI event highlighting” on page 43.
Ignore element
Configure a replay rule to ignore the element during replay. See “Ignore UI
elements during replay” on page 45.
Disable global BreakOutKeystrokes
Disable the global keystroke breakout feature in RTV. When this feature is
disabled, you can add rules to manage keystroke breakouts for individual
elements. See “Managing keystroke breakouts” on page 46.
v Global breakout of keystrokes can be enabled again through the Options
window. See “Advanced Options tab” on page 207.
Add/Delete BreakOutKeystrokes rule for this element
Enable or disable the global keystroke breakout feature in RTV. See
“Managing keystroke breakouts” on page 46.
Searching completed sessions for UI elements
When you choose to search completed sessions for selected UI event, the following
dialog is displayed, pre-populated with the search terms.
When you search for selected text in the Request view, any punctuation characters
that are displayed in the selected text are stripped before they are populated in the
search dialog, so that they do not adversely affect the search by being interpreted
as special search characters by the search engine.
For example, if the request name-value pair is HTTP_REFERER=http://host:8080/
GetValue.asp?param1=one¶m2=two
, the search is populated as
HTTP_REFERER contains "http host 8080 GetValue asp param1 one param2 two".
v Before you submit the search, you can modify the stripped text as needed. For
more information about search syntax, see “Search syntax” on page 127.
42
RTV User Manual
Figure 13. Search for UI Events in Completed Sessions
You can edit the search terms as needed.
v To save the search terms for later use, select the Remember Search String check
box.
v For fastest results, you must narrow the search as much as possible. You can
specify explicit date and time ranges or select a predefined range from the
drop-down.
v To further specify the search terms or to use other search features, click
Advanced Search.... See “Session search and Subsearch” on page 105.
v If needed, you can use the currently specified search terms as part of a more
sophisticated query that involves other terms. You can instruct RTV to remember
the current search query into this search window and then return to the
Viewable Pages List to select other items on which to search. To remember this
search for continuing use, click Remember & Return.
v To clear the search terms, click Clear.
v To run the specified search, click OK.
Add or modify custom UI event highlighting
For the selected UI event, you can add or modify custom highlighting rules. These
rules can be used when the element that is being highlighted needs special
handling, such as calling a javascript function for some custom control. They can
also be used for debugging or alerting purposes when specific user actions or
values are displayed in a session.
Chapter 2. RealiTea Viewer navigation
43
Figure 14. UI Event custom highlighting
In the dialog, the element identifier is pre-populated with the regular expression
pattern to identify the selected event through element ID or XPath.
When the UI event is detected, RTV evaluates the JavaScript. The following is the
default JavaScript:
alert("elementId: %1\r\nelementValue: %2\r\nelementName:
%3\r\nelementXPath: %4\r\neventType: %5");
tealeafCustomUIEventReturnFunc = function ()
{
var ret = new Array();
if ("%1".length) {
ret[0] = document.getElementById("%1");
} else {
ret[0] = TeaLeaf_Client_tlGetNodeFromXPath("%4");
}
ret[1] = "normal"; // RTV action: none, normal, or highlight-only
//ret[2] = "%2"; // new value, optional
return ret;
}
When RTV evaluates the JavaScript, no setting of values, highlighting or clicking is
done. The JavaScript defines the appropriate values on which to act.
44
RTV User Manual
In the default JavaScript, the function tealeafCustomUIEventReturnFunc is called by
RTV. This function returns an array that contains 2 or 3 items:
Array item
Description
ret[0]
Identifies the object to highlight.
v If this array element is set to 0, then RTV uses its normal method of
finding the element to use (id or xpath).
ret[1]
The action for RTV to take. Accepted values:
v none - RTV does nothing. Custom JavaScript completes all required
actions.
v normal - RTV does its normal highlighting and element processing.
v highlight-only - RTV highlights the element and does not complete
clicks or set values.
ret[2]
(Optional) If present, this variable contains the value to be set for the
element, which is applied only if the second array value is set to {{normal}.
The default JavaScript can be customized to complete any function that is needed
to highlight and replay the document element.
You can reference the following parameters in the JavaScript you define:
Parameter
Description
%1
Internal element identifier
%2
value of the UI element
%3
Name of the UI element
%4
XPath value of the UI element
%5
UI event type
v This option enables custom highlighting based on user interface events.
Ignore UI elements during replay
You can choose to ignore selected UI elements during session replay. When this
option is selected, the following dialog is pre-populated with the regular
expression pattern to identify the UI element.
v To ignore the specified UI element during replay, click OK.
Chapter 2. RealiTea Viewer navigation
45
Figure 15. Ignoring UI elements
Managing keystroke breakouts
UI Capture supports the capture of Intellisense keystrokes as UI events. Keystrokes
applied with UI elements, such as textboxes and form fields, are bundled together
into a single UI event for capture.
To support proper replay of the visitor experience, RTV can be configured to break
out these aggregated keystroke events into individual UI events for each keystroke.
When keystrokes are broken out in RTV, you can see the characters that are
displayed in the order that the visitor entered them.
Note: Applying keystroke breakout in RTV does not change the session data.
Keystroke breakout settings and rules must be applied by each Tealeaf user
through the RTV application.
Global configuration:
Through RTV, you can enable or disable this functionality at the global level. When
this option is applied, the Viewable Pages list is populated with KeyUp UI events
for each keystroke.
46
RTV User Manual
Figure 16. Viewable Pages List - KeyUp events
Note: To apply keystroke breakouts to individual screen elements, instead of
globally, you must disable global keystroke breakouts. In the Navigable Pages List,
right-click a KeyUp UI event page and select Disable global BreakOutKeystrokes.
The global setting is disabled, and more context menu items are available for
configuring individual items. See “Configuration for individual elements.”
You can toggle or re-enable global keystroke breakouts in the Advanced Options
tabs of RTV. See “Advanced Options tab” on page 207.
Configuration for individual elements:
In a typical web application, Intellisense keystroke support is enabled for a limited
set of fields, such as search fields or address fields. Instead of applying keystroke
breakouts at the global level, you can apply it to individual elements on the screen.
To apply keystroke breakout to an individual screen element, complete the
following steps.
1. Disable the global keystroke breakout setting. See “Global configuration” on
page 46.
2. To enable keystroke breakout on an individual element, right-click a KeyUp UI
event in the Navigable Pages List that applies to the element and select Add
BreakOutKeystrokes rule for this element.
3. The replay rule to break out the keystrokes into individual UI events is created
and applied to the individual element whenever it is replayed.
v To remove the replay rule, right-click the element again and select Delete
BreakOutKeystrokes rule for this element.
Note: After you create these replay rules, if you re-enable global keystroke
breakouts, the rules remain in your profile. They are not deleted. You can
anually remove the rules as a cleanup task.
StatusCode information
On the left side of the Viewable Pages List is a series of icons for each page. These
icons identify information, including the StatusCode, about each page.
Chapter 2. RealiTea Viewer navigation
47
For definitions of status codes in the W3C standard, visit http://www.w3.org/
Protocols/rfc2616/rfc2616-sec10.html.
3xx Redirect pages
The W3C standards define a number of redirect StatusCodes, the 300 series. This
class of status code indicates that further action must be taken by the user agent to
fulfill the request.
Many StatusCodes specify a new location for the URI. This new location is part of
the response and is called the location field.
Figure 17. This is the icon that is shown for a redirect page
Descriptions for 3xx errors follow:
Status Code
Description
301 Moved Permanently
The requested resource is signed a new permanent URI. Any future
references to this resource must use returned URIs. The new permanent
URI must be provided in the Location field in the response.
302 Found
The requested resource resides temporarily under a different URI. Since the
redirection might be altered on occasion, the client must continue to use
the Request-URI for future requests.
303 See Other
The response to the request can be found under a different URI and must
be retrieved by using a GET method on that resource.
304 Not Modified
If the client completes a conditional GET request and access is allowed yet
the document is not been modified, the server must respond with this
status code. The 304 response must not contain a message-body. It is
always terminated by the first empty line after the header fields. The 304
Status Code has its own special icon as shown in the figure below.
Figure 18. Example of status code with special icon
305 Use Proxy
The requested resource must be accessed through the proxy that is given
by the Location field. The Location field gives the URI of the proxy.
4xx errors
The 4xx class of StatusCode is intended for cases in which the client seems to have
erred. The server must include an explanation of the error situation and indication
of whether it is a temporary or permanent condition. These status codes are
applicable to any request method.
48
RTV User Manual
The figure displays the Bad request icon. This icon is used for a 4xx class of errors.
In addition to these codes, the W3C standard defines a number of other 4xx codes
which are not common.
Figure 19. Bad request icon - this displays in 4xx class errors
Descriptions for 4xx errors follow:
Status Code
Description
400 Bad Request
The request could not be understood by the server because of malformed
syntax.
401 Unauthorized
The request requires user authentication. The response must include a
WWW-Authenticate header field that contains a challenge applicable to the
requested resource. The client can repeat the request with a suitable
Authorization header field. If the request already included Authorization
credentials, then the 401 response indicates that authorization is refused for
those credentials.
403 Forbidden
The server understood the request but is refusing to fulfill it.
404 Not Found
The server has not found anything that matches the Request-URI. No
indication is given of whether the condition is temporary or permanent.
This status code is commonly used when the server does not want to
reveal exactly why the request is refused, or when no other response is
applicable.
405 Method Not Allowed
The method that is specified in the Request-Line is not allowed for the
resource that is identified by the Request-URI.
v The response must include an Allow header that contains a list of valid
methods for the requested resource.
406 Not Acceptable
The resource that is identified by the request is only capable of generating
response entities which have content characteristics not acceptable
according to the accept headers that are sent in the request.
407 Proxy Authentication Required
This code is similar to 401 (Unauthorized), but it indicates that the client
must first authenticate itself with the proxy. The proxy must return a
Proxy-Authenticate header field that contains a challenge applicable to the
proxy for the requested resource. The client can repeat the request with a
suitable Proxy-Authenticate header field.
408 Request Timeout
The client did not produce a request within the time that the server was
prepared to wait. The client can repeat the request without modifications at
any later time.
Chapter 2. RealiTea Viewer navigation
49
410 Gone
The requested resource is no longer available at the server and no
forwarding address is known. This condition is expected to be considered
permanent.
5xx errors
Response StatusCodes that begin with the digit 5 indicate cases in which the server
is aware that it has erred or is incapable of completing the request. These response
codes are applicable to any request method. The same icon that is displayed in the
above figure is used for 5xx errors.
Descriptions for 5xx errors follow:
Status Code
Description
500 Internal Server Error
The server encountered an unexpected condition that prevented it from
fulfilling the request.
501 Not Implemented
The server does not support the functionality that is required to fulfill the
request.
502 Bad Gateway
While it acts as a gateway or proxy, the server received an invalid response
from the upstream server it accessed while it attempts to fulfill the request.
503 Service Unavailable
The server is unable to handle the request because of temporary
overloading or maintenance of the server. This error implies that the
temporary condition will be alleviated after some delay. The existence of
the 503 status code does not imply that a server must use it when it
becomes overloaded. Some servers can refuse the connection.
504 Gateway Timeout
While it acts as a gateway or proxy, the server did not receive a timely
response from the upstream server specified by the URI.
505 HTTP Version Not Supported
The server does not support or refuses to support the HTTP protocol
version that was used in the request message.
Flag icon
When you run a search, the session segment can contain sessions with hundreds of
pages, which can complicate finding the pages on which your search terms
matched. In the Viewable Pages List, RTV marks the pages where the search terms
matched with the flag icon as shown in the figure below.
Figure 20. RTV marks the pages where the search terms matched with the flag icon
50
RTV User Manual
Figure 21. Example of the viewable pages list with the flag icon displayed
In the above figure, the search was for the field amount containing any value. The
flag is displayed on pages 14 and 16, indicating that the search matched on these
two pages.
Canceled pages
There are two types of canceled pages: client canceled and server canceled.
The Bad Request Icon in the figure below shows the icon for a canceled page. This
icon is often referred to as the Red X page icon.
Figure 22. Icon displays for canceled pages
Client canceled pages
Client canceled are the most common. Canceled pages represent a problem with the
delivery of the page to the visitor or a problem with delivering the page to the
Tealeaf Capture server.
There are a number of reasons why the IBM Tealeaf cxImpact system can report
pages as been canceled by the client (browser).
v The visitor clicks the Stop button on the browser while the server is still trying
to deliver a page.
v The visitor clicks a link or button on the page, requesting a new page, while the
server is still delivering a page.
v The visitor double-clicks a link or button.
v The network connection between the browser and the server is broken while the
server is still delivering a page.
v At the TCP/IP level, any piece of network equipment delivers a reset packet,
while the server is still delivering a page.
v If the server reports the content-length of a response greater than the actual
length of the response page, IBM Tealeaf cxImpact indicates that the page was
canceled.
v If the network equipment that connects the IBM Tealeaf cxImpact Capture server
to the network fails to duplicate all the packets that are destined for the Capture
server, pages of the user session are displayed as client canceled.
Server canceled pages
Server request cancellation is detected as the following.
v The number of bytes in the response was less than the value in the response's
Content-Length header.
Chapter 2. RealiTea Viewer navigation
51
v If a response lacks a Content-Length header altogether, that hit is marked as
request canceled = server as well.
v The server did not follow the TCP protocol correctly, for example, did not send a
TCP connection RESET packet when it was closing the connection.
StatusCodes for canceled pages
The status code for a canceled page depends on how much of the response was
returned.
v If none of the response was captured, the status code is set to 0.
v If some part of the response was captured, the status code is likely present, as it
is included as the first line in the header of the response. It is possible to receive
a Status Code 200 (ok) response even when the response is partially completed
because of a canceled page.
Page Load Timeout dialog
The figure shows an example of the Page Load Timeout dialog. This dialog
sometimes is displayed during replay of a visitor page, when RTV is trying to
fetch static content from the web server and did not get the file from the web
server before the pre-configured wait period expired.
Figure 23. Page Load Timeout dialog box
v The default timeout period is 20 seconds but can be changed for each RTV user.
You can choose to continue waiting or skip the file. In most cases, you must stop
waiting for the file. Most web servers respond within a few seconds, so waiting
longer probably will not help.
52
RTV User Manual
This dialog also allows you to change some replay configuration options. These
changes affect the global options and are persisted after your RTV session is
closed. When you have changed any of these configuration options, click the
Reload Page button to attempt to reload the current page using the new
configuration values.
Large Page warning dialog
This dialog is displayed during the replay of a visitor session in which a selected
page is large.
Figure 24. Large Page Warning dialog box
The Large Page warning indicates that RTV detected a text file that exceeds a
configurable upper limit for page sizes. It allows the RTV user to decide to display
the large page or to display a placeholder instead, as shown in the figure below.
Sometimes IBM Tealeaf cxImpact captures a large page from your web server.
Since it can take a long time for the RTV computer to render this page, you are
given the chance to skip it if you want.
Figure 25. Condensed example of large page warning
The limit for these large pages can be changed by each RTV user. If the website
sends large pages, you can want to raise this value to a larger limit.
Ordering of UI events
When the viewable pages list is created in Request or Response view, all pages,
including UI events, are listed in the order that is dictated by the timestamps that
are associated with their requests. In some cases, the request for a new parent page
can occur before the request submitted by UI Capture from a previous case.
Chapter 2. RealiTea Viewer navigation
53
v Since UI events are typically batched for submission, the timestamp observed by
Tealeaf for an individual UI event can occur some time after the event occurred
in the visitor's browser. Depending on the available network connections, the
browser can prioritize the request for the new page over the submitted POST.
Note: This ordering issue has no impact on RTV or Replay Server's ability to
replay the session.
When the viewable page list is assembled, the labels for UI event pages can be
changed, as RTV determines the parent page to which each UI event page belongs.
54
RTV User Manual
Figure 26. Ordering of UI Events in the Viewable Pages List
In the above example, UI page 33: UIEvent:1-6 is placed between the listings for
page 42 and page 43. The timestamp in its request indicates that it fell between
Chapter 2. RealiTea Viewer navigation
55
these two pages, but RTV analyzed the UI event to determine that it is associated
with page 33, which occurred several pages before.
During replay, RTV displays the UI event page with its properly labeled parent
page.
v When RTV is in replay view, the Viewable Pages List displays pages in the order
of replay. UI event pages are displayed beneath their parent pages.
Framed pages
Many sites use framed pages. There are two kinds of frames that are commonly
encountered in websites: framesets and IFrames. A site can use no frames,
framesets, IFrames, or almost any combination. A frameset can include an IFrame
in one of its child frames.
For RTV to render a correct user impression, RTV must first render the outmost
enclosing frameset and then render the inner frames. For this reason, RTV displays
the child frame only if it is encountered before the parent. For example, if you
open RTV on a specific child frame instead of starting at the first page of the
session and stepping through the pages, the child page is rendered as if that was
the only content that the visitor saw in the user-impression.
Correctly reassembling these pieces into the proper display requires the web
application to be diligent in following W3C coding standards to identify the frame
into which the child belongs. If the application neglects to supply this information,
RTV can be configured with replay rules to instruct it where to place the child
page. This configuration information is stored in the Profile.
v RTV administrators can create these frame-placing rules.
Each RTV user can control how child frames are displayed in Replay view. Child
frames and IFrames can be reassembled into a single user-impression or as
individual Request/Response hits.
FrameSets
An example of the HTML used to render a frameset.
<frameset rows="85,*" framespacing=0 border=0 frameborder="0">
<frame name="top" src="index.cfm?fuseaction=creditFramesTop"
marginwidth="0" marginheight="0" scrolling="no" frameborder="no">
<frame name="main" src="index.cfm?fuseaction=creditAppEntry&pr=XX"
marginwidth="0" marginheight="0" scrolling="yes" frameborder="no">
</frameset>
This frameset has two child frames: one called top and one called main. In the
standard W3C convention, a single page with no frames or child pages is
identified as _top.
v The example has a frame named top, which can be confusing for people who
are trying to understand the website and visitor's interaction (like RTV users).
While you can use top for a frame name is valid for a frameset, you must avoid
doing so for RTV users.
The following example shows a frameset, and the two content src= pages that are
called by the frameset. It also shows the src= page in one of the child frames using
JavaScript to tell the client browser to replace itself. The content of the child frame
comes from a different URL, which forces the client to call the server for this next
page. RTV needs some help in understanding how to place the pages.
56
RTV User Manual
Note: In the following example, the host name and the URI path were erased to
preserve the anonymity of the system where this example was captured.
Figure 27. Example of parent frameset
The preceding figure shows the parent frameset and the pages that are requested
by the client are displayed on the left side, as RTV is in Response view.
v Pages 19-22 in the Viewable Pages List have the following names:
polkPickerTop.jsp, polkPickerMenu.jsp, blank.html, and polkPickerLookup.jsp.
v In the Response blocks for each, review how each is processed and displayed:
– The Response view shows the frameset declaration.
– The first child frame is named content (off the screen capture), and its src=
tag calls for polkPickerMenu.jsp. You can see on the left that
polkPickerMenu.jsp is the next page that is requested of the web server
(number 20).
– The second child frame is named lookup, and has a src= tag of blank.html.
v Page 21 requested from the web server is blank.html. blank.html has an
unusual StatusCode - a 304 status code. See “3xx Redirect pages” on page 48.
– Status Codes are part of the Request View, and are not shown here, except for
the redirect icon in the left side of page 21. The 304 status code indicates that
the client made a request for a conditional page, and gave the web server a
HTTP_IF_MODIFIED_SINCE date. The web server does not have to send back the
page; it only sends back a blank page with the 304 status code, which tells the
client to use its cached copy.
– Therefore, blank.html is placed in the second child frame.
When the polkPickerMenu.jsp page is received by the client, its Response includes
the JavaScript code that is shown in the following figure.
This JavaScript is run when the client browser reaches these lines when it renders
the page.
These lines tell the browser to go to child frame 1 (the frame named lookup) and
replace the contents of frame lookup with the page polkPickerLookup.jsp.
The left side shows that indeed the 22nd page is polkPickerLookup.jsp:
Figure 28. polkPickerLookup.jsp example
Chapter 2. RealiTea Viewer navigation
57
RTV is unable to discern that polkPickerLookup.jsp belongs to the frame named
lookup, in the frameset on page 19.
Since there are a number of ways for JavaScript to change a frame's content, it is
important to provide a hint to RTV. In the Viewable Pages List, right-click a page
and place it in the wanted frame.
v See “Advanced Options tab” on page 207.
v For more information about creating replay rules, see “Replay rules.”
iFrames
An example of the HTML used to render an IFrame.
<IFRAME border=0 marginWidth=0
marginHeight=0 src="/html/privacy/esign.html"
scrolling=yes></IFRAME>
frameBorder=1
IFrames hold content that comes from a subsequent hit. The src tag in the IFrame
directive is calling a web server for data to place in the IFrame. The IFrame must
have a name attribute for RTV to be able to properly place this content in the parent
user-impression with no hints required.
Replay rules
Guidelines and steps for how to design replay rules in RTV to improve the quality
of replay.
Note: When you create response modify rules that modify content on UpdatePanel
pages, the byte count for the unmodified page must be maintained in the modified
page after the modification is applied. Otherwise, these pages do not replay
correctly.
v This limitation also applies to privacy rules. See "Privacy Session Agent" in the
IBM Tealeaf CX Configuration Manual.
Pop-up pages
A pop-up page is any page that causes the browser to display the page content in
a new browser window. During a visitor's session, the visitor usually closes this
window and then proceeds to click a link or button that is found on the page that
is displayed in the original window.
In RTV, pop-up windows interrupt the flow of displayed visitor impressions.
Unless RTV is provided information that identifies a page as a pop-up, RTV cannot
correctly show the data that is entered by the user on the page's input fields. When
a page is requested, RTV examines the field names of the immediately preceding
page in the session sequence to identify the matching field names. When a pop-up
page is present, the pop-up is part of the sequence, yet RTV fails to find matching
field names in it. Therefore, RTV does not know where to display the data.
The referrer of the second full page is the first full page, with the pop-up page
displayed in between. While RTV recognizes that the pop-up occurred between the
full pages, RTV assumes that the visitor clicked the Back button in the web
browser to move back to the first full page before the visitor moved on to the
second full page. However, it is more likely the visitor closed the pop-up window
and then clicked a link to proceed to the second page.
58
RTV User Manual
Pop-ups also affect detection of presses of the browser's Back button. RTV relies on
the HTTP_REFERER information for Back button detection.
RTV uses HTTP_REFERER to match a page with its form field and to highlight
information, thus reducing or eliminating the need for a profile to identify pop-up
pages.
Identifying pop-up pages for RTV
You can provide RTV information to identify pop-up pages through the RTV
Profile. After a page is identified as a pop-up, RTV knows to ignore it when it
searches the preceding page list for field names corresponding to data entered by
the visitor.
Figure 29. pop-up URL
In the dialog, you can enter a text string for the URLs to treat as pop-up windows.
You can use wildcards (* and ?) in the text string.
v To apply the rule to your profile, click OK.
Interpreting JavaScript
A text page can contain one or more calls to JavaScript functions, which can be
embedded in the text page or in external JavaScript files that are called by the text
page. JavaScript can do many things to the page while it is being rendered.
JavaScript functions are typically called by:
v Visitor interactions, such as clicking a button.
v The page's onLoad and onUnload rendering events.
RTV has a number of options to control how it renders JavaScript. You can decide
how you would like to see the visitor impression by using these options.
To disable all JavaScript playback, set the allow Javascript to run option to
disabled. If the page is designed with a significant use of JavaScript and this
option is disabled, the user impression that is rendered by RTV differs significantly
from what the visitor saw.
v This setting can be configured in the Replay tab of the Options window. See
“Replay tab” on page 187.
Chapter 2. RealiTea Viewer navigation
59
Hidden DIVs
A "Hidden DIV" is a construct that is used to hide parts of a page until the visitor
interacts with it. Many sites use hidden DIVS to hide content until the visitor
moves the cursor over it, such as menu lists dropping down when the mouse is
placed over the menu title.
The following figure shows an example of a menu full of hidden DIVS, hidden
now:
Figure 30. A menu with hidden DIVS
The following figure is the same bar with expanded menu items, now visible:
Figure 31. A menu with visible menu items
The preceding figure displays highlighted submenu choices after the user selected
the menu title.
RTV cannot display the hidden DIV until the RTV user moves the mouse over the
menu item, making the DIV visible.
Ignoring pages in the replay
A web application can be designed so that the same page is delivered repeatedly.
For example, integrated windows authentication by using NTLM causes a large
number of "status code 401" page responses be issued from the server.
60
RTV User Manual
Another type of repeated request involves pages by using Framesets and dynamic
content generation that requests a dummy page (Blank.html) for the initial content
pane. In both cases, it is important for IBM Tealeaf cxImpact to capture the pages
to properly account for them in the site technical metrics.
Removing pages from replay
During replay in RTV, pages can be eliminated to provide a more accurate replay
of the visitor experience. You can indicate for RTV to ignore specific URLs through
the Viewable Pages list.
v To remove a page, right-click the page in the Viewable Pages List and select
Replay Rules > Remove this page from Replay.
Figure 32. Selected page to be removed
Note: Removing a page from replay removes the page from the Viewable Pages
List, and the page is no longer displayed during replay. The page is not removed
from the session data. For more information about recovering a removed page, see
“Recovering a page removed from replay” on page 62.
Chapter 2. RealiTea Viewer navigation
61
Figure 33. Remove Page from Replay
The rule that you are about to create removes from replay all pages whose URL
matches the one that you are specifying. This IgnoreURL rule is applied to all
matching URLs.
v You can apply wildcards to the entered URL. The ? and * wildcards are
accepted.
v If the URL contains query parameters, you can create an IgnoreURL rule to
match for all query parameters. Click Replace query string with wildcard. All
instances of the URL, regardless of query parameters, are ignored during replay.
v You can use this dialog box to create an IgnoreURL rule for any URL for the
current domain.
v To clear the textbox and reenter the URL, click Clear URL.
v To create the specified IgnoreURL rule, click OK. A profile rule is added to your
profile, and all subsequent matching pages in the session are flagged to not be
replayed.
Note: If your site responds to multiple HTTP_HOST values, you must manually
edit the profile to ensure that the ignore rule is correctly recorded against all
server_name values.
You can further refine the pattern that identifies the page to be excluded from
replay that is based on request data. See “Ignoring request variables for URL
matching” on page 63.
Recovering a page removed from replay
When you remove a page from replay, the page is hidden from display in the
Navigable Pages list and is not displayed during replay. The page is still part of
the session and can be recovered.
To recover a removed page:
1. Switch to Request view or Response view.
2. In the Viewable Pages list, find the page that was removed.
3. Right-click the page and select Replay > Delete rule which removes this page
from replay....
62
RTV User Manual
4. Click OK.
v You can also remove the rule from your profile. See “RTV Profile” on page
191.
Ignoring request variables for URL matching
You can configure RTV to ignore request variables when it attempts to match
URLs. When RTV attempts to match requests that are generated during replay to
hits that are captured in the session, some request variables must be ignored, such
as a timestamp or form field values. Through this feature, you can configure the
request variables to ignore.
Figure 34. Ignore Request Variable for URL Matching
To create the rule:
1. Request variable: In the dialog, you specify the request variable name in the
textbox provided.
v By default, this rule ignores the values only. In some cases, however, you can
ignore both the name and the value of the request variable because the value
is also dynamically generated. If you want to ignore both the name and its
value, click the appropriate textbox.
v For some XML posts, the post body can never be matched. In these instances,
you can add the following special value for the Request variable name,
which forces RTV to ignore the entire post body for the specified matching
URL:
*ignorePost*
2. Matching RegEx: Optionally, you can use a regular expression to match name
and optional values.
v To specify a regular expression, click the Regular Expression check box.
Enter the string in the Test string textbox. Then, click Test.
Chapter 2. RealiTea Viewer navigation
63
3. Matching URL: In the textbox, you can specify the URL or set of URLs to
which to apply the ignore request variable rule. Enter a value in the textbox.
v To clear the textbox, click Clear URL.
v If the URL includes a query string (all content after a question mark ?), you
can replace the query string with a wildcard, which matches for all queries
for the URL. Click Enter or paste the URL with the query string included.
Then, click Replace query string with wildcard.
4. To create the specified rule, click OK.
v To cancel and exit, click Cancel.
ESI tag management
RTV provides limited support for the <esi::include> tag, which is a form of
partial dynamic page caching.
When RTV replays a page that contains <esi::include src="URI"> tags, the
content that is specified by the URI value is retrieved and inserted into the page
before the page is displayed.
When the session is opened for replay, a dialog displays the retrieval of this
content, much like the Get Images dialog. When the content is retrieved, the dialog
is automatically closed.
Note: No configuration is required to enable ESI tag management.
Through RTV, you can review ESI content that is stored in the current session or
sessions.
v See “RTV Menus” on page 153.
Creating a response modification rule
You can create rules to modify static data that is displayed in the responses that
are sent from the web application. For example, response modification rules can be
used to remove any reference to a server that you do not want to contact from
anywhere outside the production environment.
1. In the RTV menu, select Tools > Options > Profiles > Edit Profile.
2. Click the host you whose response data you want to modify.
3. Click New. Then, select Add Response Mod.
4. In the Response Modification window, specify the following properties:
Property
Description
Hostname
The host name value is inherited based on the host node that you
selected.
URL
Select the method of matching URLs:
All - response modification is checked for all URLs from the host
name.
Regular expression pattern - Enter a regular expression to use to
match the URI stem in all URLs from the host.
ReqVar You can specify request variables as the trigger for applying the
response modification rule. See “Request variables” on page 65.
64
RTV User Manual
Value
If specified, this field defines the value in the selected ReqVar on which
to trigger the response modification rule. This value can be specified as
a regular expression. See “Request variables.”
Pattern
The pattern on which to match.
You can enter regular expressions here.
Replacement
When the Pattern string is found, this string is used to replace.
Leave this value empty to remove instances of the Pattern value.
Occurrences
Select the replacement type: First instance or All instances in any
matching URL.
Test
Test the response modification rule on the currently selected page that
is displayed in Response View. The number of replaced text items for
the selected URL or URLs is displayed.
To see the resulting modified response, click View....
To compare the resulting modified response to the original response,
click Diff....
Edit Rules
Edit the response modification rule, which opens theProfiles window.
5. To save changes, click OK.
6. If the profile is shared, your changes must be committed to the server. Click
Upload Settings to Server.
Note: You can test response modification rules through Response View. Right-click
a field in the response data and select Test Response Modify Rules. A dialog with
the testing options is displayed.
Request variables
If you want, you can specify a request variable and specific values as the trigger
for completing the response modification. This method enables modification of
response data based on a wide range of available criteria.
v For more information about request contents, see Chapter 3, “Request view,” on
page 73.
In the Response Modification dialog, click the Pencil () icon next to the
ReqVarfield. The Request Vars window is displayed:
Chapter 2. RealiTea Viewer navigation
65
Figure 35. Request Vars dialog
In the left panel, you can browse the sections of the request to locate the request
variable to use as the trigger. Click the request variable to use it.
Setting Description
Value in Request Variable
If you create the response mod rule from a displayed request, the value of
the selected request variable is displayed.
Request Var Name
The name of the selected request variable
Request Var Value Pattern (regex)
You can optionally specify a regular expression on which to match values
in the regular expression.
v If this value is not specified, then all instances of the request variable are
matched.
v See Chapter 8, “Regular expressions in the RealiTea Viewer,” on page
241.
Test
66
RTV User Manual
To test a specified regular expression, click Test.
v Found - A match is found in the request variable value field.
v Not Found - No match was found in the request variable value field.
To add the trigger information in the Response Modification dialog, click OK.
Example - Modifying based on user agent
An example of modifying based on user agent.
Suppose you want to modify the response to improve replay for iPod. Using the
request variable configuration option, you can identify sessions that are initiated
by iPods and then create a response modification for these mobile devices.
1. In RTV, open an iPod-initiated session.
2. Click the Response View option.
3. Right-click and select Add Response Mod Rule....
4. The Response Modification dialog is displayed.
5.
6.
7.
8.
Click the Regular expression pattern check box.
Click the Pencil icon next to the ReqVar field.
From the left panel, select env/HTTP_USER_AGENT.
The Request Variable Name value is populated with the selected request
variable.
9. For the Request Var Value Pattern, enter iPod.
10. Click Test. If the response that you selected comes from an iPod session, the
result message must be Found.
11.
12.
13.
14.
Click OK.
Configure the Pattern and Replacement fields as needed.
To test it, click Test.
If the rule passes the test, click OK.
Example - Removing CDATA formatting
An example of removing CDATA formatting.
Many web applications are deploying content in application/xhtml+xml pages.
However, Internet Explorer does not support these pages. Since RTV uses an
embedded IE browser control, RTV cannot properly process these pages, which
results in replay problems, especially if they contain CDATA sections.
For replay purposes, it is necessary to be able to run the code within a CDATA
node. The solution is to create two response modify rules to remove the CDATA
formatting.
1. Create a profile rule with the following properties:
Property
Description
Hostname
The host name value is inherited based on the host node that you
selected.
URL
For this rule, you must enter a specific URL, as universally removing
the CDATA block can cause problems.
Pattern
<![CDATA[
Replacement
Leave blank.
Chapter 2. RealiTea Viewer navigation
67
Occurrences
Select All.
2. Create a profile rule with the following properties:
Property
Description
Hostname
The host name value is inherited based on the host node that you
selected.
URL
For this rule, you must enter a specific URL, as universally removing
the CDATA block can cause problems. You must enter the same value
that you entered in the previous rule.
Pattern
]]\>
Replacement
Leave blank.
Occurrences
Select All.
3. Be sure to test the response modification rule.
4. To save changes, click OK.
5. If the profile is shared, your changes must be committed to the server. Click
Upload Settings to Server.
The XML version of the rules looks similar to:
<ResponseModify id="36" url="/quote/details.asp"
pattern="<![CDATA[" replacementString=""
occurrences="all" enabled="1"/>
<ResponseModify id="37" url="/quote/details.asp"
pattern="]]>" replacementString=""
occurrences="all"/>
Example - Misaligned forms in RTV
An example of misaligned forms in RTV.
Playback of some web applications can result in misaligned forms that are
displayed in RTV. In a typical example, elements that must be aligned horizontally
are aligned vertically in the RTV main window.
The root issue is most often the use of conditional HTML to control display style
sheets that account for differences between versions of Internet Explorer. In this
case, you can correct the issue by changing IE6-specific conditional HTML blocks
to be used by later versions.
1. Create a profile rule with the following properties:
Property
Description
Hostname
The host name value is inherited based on the host node that you
selected.
URL
To apply to the entire site, select All.
Pattern
if IE 6
68
RTV User Manual
Replacement
if gte IE 6
Occurrences
Select All.
2. Be sure to test the response modification rule.
3. To save changes, click OK.
4. If the profile is shared, your changes must be committed to the server. Click
Upload Settings to Server.
The XML version of the rule must be similar to:
<ResponseModify id="255" url="" pattern="if IE 6"
replacementString="if gte IE 6" occurrences="all"/>
Creating external file modification rules
If the main page loaded into RTV references a separate file that is not part of the
session, the file can require modification before it is loaded into RTV. For example,
if a Javascript file referenced by a page in a session contains a domain reference,
that reference can result in a JavaScript error during replay.
You can design one or more external file modification rules to apply to the
referenced JavaScript file that modify the file before it is loaded into RTV.
External file modification rules use the same user interface as response
modification rules. However, external file modification rules cannot be applied to
all files in the domain.
v You can match file based on defined regular expressions.
v See “Creating a response modification rule” on page 64.
1. In RTV, select Tools > Get Images. This loads external content into RTV so that
the file can be used to create the rule.
2. In RTV, select View > Show Images....
3. In the Image List dialog, locate the file to modify.
4. To locate the text to be modified, select View in Notepad to display and search
for the text in Notepad.
5. Click Add Modify Rule, and enter a regular expression in the Pattern field,
and enter an appropriate Replacement string.
6. Click Test to make sure that the pattern is found. Click Diff to verify that the
replacement is the wanted string.
7. To create and apply the rule, click OK.
Dynamic modification rules
This information describes the steps to be taken to create a dynamic response
modification rule. Creating this rule helps in acquiring third-party content during
replay.
Dynamic response modification rules
When you replay a session that includes data that is delivered from a third party,
the contents from the third party must be associated with a specific request. If the
third-party content is required to accurately represent the customer's experience, a
dynamic response modification rule must be configured to acquire the content at
replay time.
Chapter 2. RealiTea Viewer navigation
69
v Dynamic response modification is different from the standard response
modification mechanism in RTV. See “Creating a response modification rule” on
page 64.
Through dynamic response modification rules, you can match patterns in the
response with regular expressions and replace the matched string with a new
string that contains up to three dynamically parameterized values from Tealeaf
event identifiers.
To create a dynamic response modification rule:
1. In RTV, click the Response View button.
2. In any displayed response, right-click and select Add new Dyn Response Mod
Rule.
3. The Dynamic Response Modification Rule dialog is displayed:
Figure 36. Dynamic Response Modification Rules
Options
Description
Hostname
The host of the application. Read-only.
70
RTV User Manual
URL
Select the URL matching type:
v All - Matches all URLs.
v Regular expression pattern - Enter a pattern so that this rule applies
to specific URLs.
Pattern
Enter a regular expression search pattern to be found in the response.
Replacement
Enter text to replace the pattern found in the response. Use %1, %2, and
%3 in the replacement string to substitute fact values from the events
specified.
Event ID
Enter the event identifier to insert as a parameterized value. To select an
event from a list, click Event Selection....
v You can choose to match the event to the nearest future event value
(Nearest Future Value) or to the most recent value (Last Value).
v If a mapped event identifier has no value, then the parameter is replaced
by an empty string.
v To test your regular expression Pattern, click Test. The number of matches found
in the current session is displayed.
– To view the test results, click View. The resulting response text is displayed in
Notepad.
– To view differences between the original page and the page after the pattern
is replaced, click Diff. The differences are displayed in Notepad.
Dynamic external file modification rules
If the main page loaded into RTV references a separate file that is not part of the
session, the file can require modification before it is loaded into RTV. For example,
if a JavaScript file referenced by a page in a session contains a domain reference,
that reference can result in a JavaScript error during replay.
You can design dynamic external file modification rules to apply to the referenced
JavaScript file that modify the file before it is loaded into RTV.
Dynamic external file modification rules use the same interface as described for
dynamic response modification rules in the preceding section.
v See “Dynamic response modification rules” on page 69.
Non-dynamic external file modification rules can be developed, as well. These
rules apply regular expressions to matching patterns to modify the content of
specified files before they are loaded into RTV.
v For more information, see "External File Modification Rules".
Chapter 2. RealiTea Viewer navigation
71
72
RTV User Manual
Chapter 3. Request view
The Request view is used to inspect the data that is sent from the browser to the
server. In the request block or buffer that is sent to the server from the browser, all
information is formatted in the form of field name and its corresponding value.
This format simplifies identifying the index-specific field names and their contents
and to create events from data in the request block.
v Information about the response is placed in the request block.
The IBM Tealeaf cxImpact system provides some computed information about each
hit, which is also stored in the request block. The following sections indicate
sources of the information in the request block: the browser, the server, or
computed by the IBM Tealeaf cxImpact system and inserted into the request block.
v A context menu is available when you right-click name/value data in Request
View. See RealiTea Viewer - Main Window.
Request view format
Request view breaks the display into sections. For each hit, most sections are
displayed, and under each section are individual fields. The number of fields and
their values vary with each hit.
[iamie] section
This chart provides details about the hit and the method that IBM Tealeaf cxImpact
used to capture the hit.
Key fields include:
Table 3. [iamie] section
Field Name
Use
Source
TLTSID
The final TLTSID value that
provides the unique key
value that is used to identify
all hits within a visitor
session
Tealeaf Cookie Injector.
Computed by IBM Tealeaf
cxImpact
TLTHID
A unique value that
Tealeaf Cookie Injector.
differentiates this hit from all Computed by IBM Tealeaf
other hits that are captured
cxImpact
by IBM Tealeaf cxImpact
TLTUID
A unique value that
differentiates this user from
all other users that are
captured by IBM Tealeaf
cxImpact
Tealeaf Cookie Injector.
Computed by IBM Tealeaf
cxImpact
CaptureSource
Identifies how this hit was
captured. Common Values
are for Client-Side Capture,
Passive Capture, or the IIS
Filter Capture.
Inserted by IBM Tealeaf
cxImpact system
© Copyright IBM Corp. 1999, 2015
73
Table 3. [iamie] section (continued)
CaptureType
The capture type defines the PCA
type of content that is
captured by the PCA. The
following possible values are
inserted by the PCA:
v 0 - Request and response
were captured.
Note: This capture type is
outdated.
v 1 - Request and response
were captured.
v 2 - No longer used.
v 3 - Content is captured per
specification in a Capture
Type list in the PCA.
v For more information
about configuring capture
type lists, see "PCA Web
Console - Pipeline Tab" in
the IBM Tealeaf Passive
Capture Application Manual.
CaptureVersion
The version of the Capture
PCA
Source that captured this hit.
CaptureInst
The PCA instance from
which this hit was captured
and reassembled. This value
is useful for determining the
origin of duplicated hits and
in load testing.
PCA
v Values can be from 0 to N
where N is the number of
additional instances of the
PCA. See "PCA Web
Console - Interface Tab" in
the IBM Tealeaf Passive
Capture Application Manual.
CapturePipelineInst
The PCA pipeline instance
that processed this hit. This
value is useful for
determining the load
distribution among multiple
pipeline instances.
PCA
v Values can be from 0 to N
where N is the number of
additional instances of the
PCA pipeline. See "PCA
Web Console - Pipeline
Tab" in the IBM Tealeaf
Passive Capture Application
Manual.
The TLTSID is used to stitch together the hits that compose a visitor session. The
IBM Tealeaf cxImpact system has a number of ways to generate this value:
74
RTV User Manual
v Tealeaf Cookie Injectors: The best way to identify a session is to have the
Tealeaf Cookie Injectors that are installed on the web servers.
v Session Agent: The default method that is used by Tealeaf creates a Session
Agent in the Tealeaf pipeline to create a TLTSID from a configurable value.
Typically, either the ASPSESSIONID cookie or the JSESSIONID cookie is used to
derive the TLTSID.
[appdata] section
This request block section is used by Tealeaf for indexing, which facilitates rapid
searching. Any field in this section is automatically indexed.
v Using the Extended Privacy session agent, you can insert data from other parts
of the request into this section. See "Extended Privacy Session Agent" in the IBM
Tealeaf CX Configuration Manual.
Some fields are always displayed in this section. Information that is computed by
the user-supplied rules is placed here.
Table 4. [appdata] section
Field Name
Use
Source
TLMergeID
(optional) This field is
cxImpact computed
displayed when a Sessioning
Agent is present in the
Transport pipeline or PCA. It
contains the name of the
field that is used for
sessioning and the original
field value.
TLT_URL
This value contains the
computed Tealeaf URL, after
any modification made by
Privacy/RTA or the TLRef
session agent. This value is
used in the various page
reports of the Portal.
cxImpact computed
v This field is inserted when
extended user agent
parsing is enabled, which
is the default
configuration. See "Tealeaf
Reference Session Agent"
in the IBM Tealeaf CX
Configuration Manual.
Chapter 3. Request view
75
Table 4. [appdata] section (continued)
TLT_SERVER
cxImpact computed
This value is the IP address
found in the To: Fields of a
hit request. Usually, it is the
IP address of the web
servers. If a web server
originates a request to any
other web server, the
TLT_SERVER field contains
the IP address of the external
website.
v This field is inserted when
extended user agent
parsing is enabled, which
is the default
configuration. See "Tealeaf
Reference Session Agent"
in the IBM Tealeaf CX
Configuration Manual.
TLT_HOST_NAME
This value is computed from
the HTTP_HOST after
modification by the TLRef
session agent. Note the Host
name must be present in the
list of HTTP_HOSTS in the
TLRef session agent in order
for the host value to to be
displayed here. This value is
displayed in the Host
drop-down of the Portal
charts.
v This field is inserted when
extended user agent
parsing is enabled, which
is the default
configuration. See "Tealeaf
Reference Session Agent"
in the IBM Tealeaf CX
Configuration Manual.
76
RTV User Manual
cxImpact computed
Table 4. [appdata] section (continued)
TLT_APPLICATION_NAME
cxImpact computed
By default, the Tealeaf
system populates this field
with the first part of the path
of the URI. Some IBM
Tealeaf cxImpact installations
configure this field through
RTA rules to partition a
group of pages into a
defined application. This
value is used in the
Application drop-down of
the Portal charts.
v This field is inserted when
extended user agent
parsing is enabled, which
is the default
configuration. See "Tealeaf
Reference Session Agent"
in the IBM Tealeaf CX
Configuration Manual.
[env] section
Information in this section can be used to find and fix problems with the site.
This section of the request is auto-populated from the following sources:
v HTTP request and response headers are rendered into name/value pairs and
inserted into this section of the request. For example, a header item such as
accept-encoding=gzip, deflate is rendered as a request name/value pair in the
[env] section as the following:
HTTP_ACCEPT_ENCODING=gzip, deflate
v Some values are inserted by the IBM Tealeaf CX Passive Capture Application at
the point of capture. The variable names of some of these values begin with
PCA_.
v Windows pipeline agents, such as Privacy session agent, can be configured to
insert data into this section. See "Privacy Session Agent" in the IBM Tealeaf CX
Configuration Manual.
Note: The following list contains common examples of values that are inserted
into the [env] section. Some of these items are inserted by the PCA for Tealeaf use.
Other items depend on how your web application is configured.
This section also contains many fields that are not indexed and therefore cannot be
searched. Many of the non-indexed fields rarely change across all hits of a session.
However, since it is possible for them to change on each hit, their values must be
captured for each hit.
v All variables in this section whose names begin with HTTP_ are standard HTTP
request or response variables. For more information, see http://www.w3.org/
Protocols/rfc2616/rfc2616-sec14.html.
Table 5. [env] section.
Field Name
Use
Source
CONTENT_TYPE
The content type for a POST
to the server
Client
Chapter 3. Request view
77
Table 5. [env] section (continued).
78
RTV User Manual
CONTENT_LENGTH
Contents of the HTTP
Response Header variable
Content-Length
Web Server
REMOTE_ADDR
The IP address of the client. Client
If any piece of network
equipment in the path
between the server and the
client terminates and
regenerates the IP connection
(proxies, reverse proxies,
load balancers, and Akamai
servers for example) can
replace the true client's IP
address with its own.
REMOTE_PORT
The port over which the
client is communicating
Client
LOCAL_ADDR
The IP address of the local
web server
IBM Tealeaf cxImpact
LOCAL_PORT
The port number for the
local web server
IBM Tealeaf cxImpact
SERVER_NAME
The IP address of the local
web server
IBM Tealeaf cxImpact
SERVER_PORT
The port number for the
local web server
IBM Tealeaf cxImpact
HTTPS
When set to on page was
sent through SSL protocol.
IBM Tealeaf cxImpact
CONNECTION_ID
Logical counter that is
initiated by the PCA server
PCA
PCA_NAME
The name of the PCA server
PCA
PCA_ADDR
The IP address for the PCA
server
PCA
PCA_UNAME_RELEASE
The IP address for the PCA
server, as returned from the
uname command
PCA
PCA_UNAME_SYSNAME
The operating system name
for the PCA server, as
returned from the uname
command
PCA
REQUEST_METHOD
The method of the issued
request: GET or POST
PCA
URL
The URI (full page path less
machine name and port)
requested by the client
Client
SERVER_PROTOCOL
HTTP protocol that is used
by the server to send
responses
Server
ResponseType
MIME-Type of the page
returned
cxImpact computed
Table 5. [env] section (continued).
StatusCode
The status code from the
Web Server
web server that is returned
for the page that is requested
by the client
StatusCodeText
The text equivalent of the
StatusCode value
Web Server
RequestHeaderSize
Request header size in bytes
Web Server
RequestDataSize
Request data size in bytes
Web Server
RequestSize
The total size of the request:
RequestHeaderSize +
RequestDataSize
Web Server
ResponseHeaderSize
Response header size in
bytes
Web Server
ResponseDataSize
Response data size in bytes
Web Server
ResponseSize
The total size of the
response:
ResponseHeaderSize +
ResponseDataSize
Web Server
REQ_BUFFER_ENCODING
The encoding method in the Web Server
request block. Tealeaf always
renders the request block in
UTF-8 format.
REQ_BUFFER_ORIG_ENCODING
Original encoding method
(primarily for POST'd data)
Web Server
RESP_BODY_ENCODING
The encoding method in the
response body. Tealeaf
always renders the response
body in UTF-8 format.
Web Server
ReqCancelled
Request was canceled by
client/server
PCA
ReqDiscarded
Request discarded.
Note: This feature is not
available.
PCA
StreamingHit
When set to true, the hit is a PCA
streaming hit.
Note: This feature is not
available.
StreamingHitType
When StreamingHit=true,
this value identifies the type
of streaming hit.
Note: This feature is not
available.
PCA
HTTP_USER_AGENT
User agent string that is
provided by the visitor's
browser
HTTP req/resp header
HTTP_ACCEPT
Accepted content encoding
types
HTTP req/resp header
HTTP_ACCEPT_LANGUAGE
Accepted language
HTTP req/resp header
HTTP_ACCEPT_ENCODING
Accepted compression
encodings
HTTP req/resp header
Chapter 3. Request view
79
Table 5. [env] section (continued).
HTTP_ACCEPT_CHARSET
Accepted character encoding
HTTP req/resp header
HTTP_KEEP_ALIVE
If the HTTP_CONNECTION value
is set to Keep-Alive, this
value defines the number of
seconds that the connection
is retained without activity,
before it is timed out.
HTTP req/resp header
HTTP_REFERER
Referrer of the current hit
HTTP req/resp header
HTTP_COOKIE
Contains all cookies that are
supplied in the response.
These cookies can include:
HTTP req/resp header
v TLTSID - Tealeaf session
identifier
v TLTHID - Tealeaf hit
identifier
v TLTUID - Tealeaf user
identifier
HTTP_HOST
Host name
HTTP req/resp header
HTTP_CONNECTION
Connection type between the HTTP req/resp header
visitor and your web server.
CONTENT_LENGTH
Length in bytes of the
response
HTTP req/resp header
PostRequestBodyEncoding
This value defines any
encoding is applied to
requests posted to your web
server, as identified by the
IBM Tealeaf CX Passive
Capture Application.
PCA
v If the binary posts are
enabled for capture, this
variable is set to base64.
Otherwise, the value is set
to None.
v See "PCA Web Console Pipeline Tab" in the IBM
Tealeaf Passive Capture
Application Manual.
Note: From the HTTP_COOKIE and HTTP_SET_COOKIE fields, it is possible to recognize
if your application is replacing its session variable in the middle of a visitor
session, which can be an indicator of the visitor experience in which the contents
of their shopping cart have disappeared.
[TimeBlock] section
The [TimeBlock] section identifies the time that is associated with the hit, down to
the hour. For accurate report drill-downs to individual sessions, this data is added
to each request and is automatically indexed.
Table 6. [TimeBlock] section
Field Name
80
RTV User Manual
Use
Source
Table 6. [TimeBlock] section (continued)
WEEK
The number of the week in
the year
IBM Tealeaf cxImpact inserted
MONTH
The number of the month in
the year
IBM Tealeaf cxImpact inserted
QUARTER
The number of the quarter in IBM Tealeaf cxImpact the year
inserted
YEAR
The year in YYYY format
IBM Tealeaf cxImpact inserted
HOUR_OF_DAY
The hour of the day (0-23)
IBM Tealeaf cxImpact inserted
DAY_OF_WEEK
The day of the week
(0=Sunday)
IBM Tealeaf cxImpact inserted
DAY_OF_MONTH
The day of the month
IBM Tealeaf cxImpact inserted
DAY_OF_YEAR
The day in the year (365 or
366 is the maximum value)
IBM Tealeaf cxImpact inserted
[timestamp] section
All data that is inserted into the timestamp section is generated by the Capture
source. For best performance, capturing this data by a IBM Tealeaf CX Passive
Capture Application server provides the richest information set.
All time stamp fields end in Ex and are recorded by using GMT time, as indicated
by the Z at the end of each time stamp, in the following format:
YYYY-MM-DDTHH:MM:SS:mmmmmm
The six digits at the end of the timestamp identify the microseconds in the
timestamp.
Table 7. [timestamp] section.
Field Name
Use
Source
RequestTimeEx
The time the first packet of
the request was received
from a client
IBM Tealeaf cxImpact measured
RequestEndTimeEx
The time the last packet of
the request was received
from the client
IBM Tealeaf cxImpact measured
ResponseStartTimeEx
The time the first packet of
the response came from the
web server
IBM Tealeaf cxImpact measured
ResponseTimeEx
The time the last packet of
the response came from the
web server
IBM Tealeaf cxImpact measured
ResponseAckTimeEx
The time that the ack packet IBM Tealeaf cxImpact acknowledged the last packet measured
of the response came from
the client
TLapiArrivalTimeEx
The time the ack packet was
observed by Tealeaf
IBM Tealeaf cxImpact measured
Chapter 3. Request view
81
Table 7. [timestamp] section (continued).
ReqTTLB
Time from first packet of the
request to the last packet of
the request
IBM Tealeaf cxImpact calculated
RspTTFB
Time from first packet of the
request to the first packet of
the response
IBM Tealeaf cxImpact calculated
RspTTLB
Time from first packet of the
request to the last packet of
the response
IBM Tealeaf cxImpact calculated
RspTTLA
Time from first packet of the
request to the
acknowledgement of the last
packet of the response
IBM Tealeaf cxImpact calculated
ConnSpeed
The average number of bytes IBM Tealeaf cxImpact calculated
in the response, which is
divided by the RT_Total time
for all hits in the session.
v Any detected client user
interface events are
ignored.
v Expressed as "Bytes per
second"
82
RTV User Manual
IBM Tealeaf cxImpact calculated
ConnType
Buckets into which the
page's connection speed are
placed by the Session Agent
in the pipeline
WS_Generation
The time that it took for the IBM Tealeaf cxImpact calculated
web server to generate the
page. It is measured from the
time of the last packet of the
request to the time of the last
packet of the response
WS_Grade
IBM Tealeaf cxImpact Text Description of the web
server generation grade. This calculated
value is defined either on the
IBM Tealeaf CX Passive
Capture Application server
or in the TimeGrades session
agent.
WS_GradeEx
Number value of the web
IBM Tealeaf cxImpact server generation grade. This calculated
value is defined either on the
PCA server or in the
TimeGrades session agent.
NT_Total
The time that is required for IBM Tealeaf cxImpact the data to flow over the
calculated
network. It is measured from
the time of the last packet of
the response to the time of
receipt of the TCP/IP ACK
(acknowledgement) of that
packet.
Table 7. [timestamp] section (continued).
NT_Grade
Text Description of the
IBM Tealeaf cxImpact network timing grade. This
calculated
value is defined either on the
PCA server or in the
TimeGrades session agent.
NT_GradeEx
Number value of the
IBM Tealeaf cxImpact network timing grade. This
calculated
value is defined either on the
PCA server or in the
TimeGrades session agent.
RT_Total
the sum of the
WS_Generation time and the
NT_Total time
IBM Tealeaf cxImpact calculated
RT_Grade
Text Description of the
network round-trip grade.
This value is defined either
on the PCA server or in the
TimeGrades session agent.
IBM Tealeaf cxImpact calculated
RT_GradeEx
Number value of the
network round-trip grade.
This value is defined either
on the PCA server or in the
TimeGrades session agent.
IBM Tealeaf cxImpact calculated
The XX_Generation/Total fields are calculated and are measured in microseconds.
For example, WS_Generation=5000 indicates that it took 0.005 seconds to generate
the page.
The XX_Grade fields are computed fields.
One of the session agents in the IBM Tealeaf cxImpact pipeline inspects the
Generation time and places them into a bucket that is based on ranges of values.
By default, the pipeline has buckets for:
v Excellent
v Normal
v HighNormal
v High
v HighPlus
The XX_GradeEx fields use 0-4 to identify the same buckets. Having the Grade
expressed both as a number and as a string simplifies analysis in the Portal and
third-party tools.
The NT_Total time measures the network transit time from the web server to the
next upstream network device that terminates a TCP/IP connection, which is
usually the visitor's client browser or a proxy.
See "TimeGrades Session Agent" in the IBM Tealeaf CX Configuration Manual.
Chapter 3. Request view
83
[urlfield] section
The contents of the [urlfield] section are populated from the input HTML tags in
HTML form pages that are submitted along with the request for the next page. The
contents of input tags are sent from the browser in one of two sections of the
request.
v GET HTTP: If the request is submitted according to the GET HTTP protocol, the
input tags are placed in the Query String, since there is no request body. The
QUERY_STRING field in the [env] section contains the complete and processed
Query String. Each name-value pair in the QUERY_STRING is placed on its own
line in the [urlfield] section of the request.
v POST HTTP: If the request is submitted by using a POST HTTP protocol, the
input tags and their values are placed in the request body. IBM Tealeaf cxImpact
does not capture the raw bytes of the request body. The information from the
request body is extracted and placed in the [urlfield] section of the request.
Data that is placed in a Query String is translated into a format that replaces
certain characters with a three-character replacement string. For example, the space
character is replaced with _. The URL Decode Session Agent in the Tealeaf pipeline
takes care of translating these character strings back into their single-character
equivalents. The Query String that you see in the Request view is processed by this
translation.
v See "URL Decode Session Agent" in the IBM Tealeaf CX Configuration Manual.
RTV shows the Query String parameters and the request body parameters in the
request block and displays both in the Form Fields pane.
[cookies] section
Data is only present in the [cookies] section if a cookie is sent by the client to the
web server or if the web server sets a cookie on the client. Data in the cookies
section consist of the cookie name and its value. The data in the cookies section is
derived from the HTTP request and response headers.
v The raw cookie information that is sent by the browser can be found in the
HTTP_COOKIE field in the [env] section of the request block. This raw information
is processed by the Cookie Parser Session Agent in the pipeline.
v The set cookie information from the web server to the client can be found in the
HTTP Headers of the response buffer.
The session agent places each cookie on its own line. All of the HTTP_COOKIE values
from the client are inserted first, followed by the cookie values from the
HTTP_SET_COOKIE lines.
v See "Cookie Parser Session Agent" in the IBM Tealeaf CX Configuration Manual.
Placing each cookie on its own line makes it much easier to create events that are
based on cookies.
In the following example, there are two HTTP cookies: the JSESSIONID and the
Campaign cookie. Cookies are terminated by CRLF pairs.
HTTP_COOKIE=JSESSIONID=673D273706BB61B79E06629675E78875.prodWebInstance2;
Campaign=mediacode=30&partner=&plancode=IR&LastUpdate=3%2F21%2F2007+3%3A53%3A05
##+PM&
Sample [cookies] section:
JSESSIONID=673D273706BB61B79E06629675E78875.prodWebInstance2
Campaign=mediacode=30&partner=&plancode=IR&LastUpdate=3%2F21%2F2007+3%3A53%3A05#
+PM&referrer=www%2Egmacinsurance%2Ecom
84
RTV User Manual
The Campaign cookie encodes information into a single encrypted cookie value.
Cookies are not decrypted into easy to understand text. They are left encoded to
make it easier to create events, as they must be based on the actual bytes received
in the request block.
If a specific cookie is received from the client and the web server sets that cookie
again to the same value or a different value, then RTV displays the same cookie
name two times: the first time with the value from the client and the second time
with the value from the web server.
The following is an example with the BV_IDS cookie received and a new value that
is sent back to the client:
HTTP_COOKIE=cookies=true;
BV_IDS=ccdgaddjeejfdimcflgcegjdfgndfki.0:@@@@1920104880.1161200520@@@@;
HTTP_SET_COOKIE=BV_IDS=ccckaddjeejfdhgcflgcegjdfgndfki.0:@@@@1231214819.
1161201511@@@@;path=/; |
[cookies]
BV_IDS=ccckaddjeejfdhgcflgcegjdfgndfki.0:@@@@1231214819.1161201511@@@@
cookies=true
BV_IDS=ccdgaddjeejfdimcflgcegjdfgndfki.0:@@@@1920104880.1161200520@@@@
[ResponseHeaders] section
If present, this section contains raw HTTP response header variables and values
that are associated with this hit.
[RawRequest] section
If present, this section contains the raw HTTP request header and data that is
associated with this hit.
[ExtendedUserAgent] section
If user agent detection is enabled, this section contains user agent information from
the client that was successfully matched against Browscap.csv.
See "Managing User Agents" in the IBM Tealeaf cxImpact Administration Manual.
v For more information about enabling extended user agent parsing, see "Tealeaf
Reference Session Agent" in the IBM Tealeaf CX Configuration Manual.
Table 8. [ExtendedUserAgent] section
Field Name
Use
Source
TLT_BROWSER
The user agent string
identifies the browser
Client
TLT_BROWSER_VERSION
The user agent string
identifies the browser
version number
Client
TLT_BROWSER_PLATFORM
The user agent string
identifies the client's
operating system
Client
TLT_TRAFFIC_TYPE
The type of traffic that comes Client
from the client
TLT_BROWSER_JAVASCRIPT
When set to true, the client
can accept JavaScript.
Client
TLT_BROWSER_COOKIES
When set to true, the client
can accept cookies.
Client
Chapter 3. Request view
85
[Referrer] section
The referrer section contains domain and filepath information for the referrer to the
page.
[TLFID_*] section
Each fact that is associated with the hit and recorded in the database is stored in
the request. This data is automatically indexed.
Table 9. [TLFID_*] section
Field Name
Use
Source
Searchable
If this value is set to true, the fact is
indexed for search.
IBM Tealeaf cxImpact - inserted
TLFID
The Tealeaf-generated ID for the fact
IBM Tealeaf cxImpact - inserted
TLFactValue The recorded value for the fact
IBM Tealeaf cxImpact - inserted
TLDimHash*
For each dimension in the reporting
IBM Tealeaf cxImpact - inserted
group, a hash of the recorded value is
generated
TLDim*
For each dimension in the reporting
group, the plain text value is
inserted.
IBM Tealeaf cxImpact - inserted
v A value of TLT$NULL indicates that
the value is not defined.
Note: Only the hashed value of a
dimensional value is indexed.
Displaying UI event pages
If you deploy the IBM Tealeaf CX UI Capture for AJAX solution, you can toggle
display of the UI Event pages in the Navigable Pages List.
Note: IBM Tealeaf CX UI Capture for AJAX is only available to legacy users.
v See “RTV Menus” on page 153.
v For more information about UI Capture, see "UI Capture FAQ" in the IBM Tealeaf
UI Capture for Ajax FAQ.
Response view
Response view displays the information that is sent by the web server in response to
the client's request. The response consists of the HTTP headers and the body of the
response.
Response view features three modes:
v Full Response View (Normal view)
v Indexed Response View
v Hexadecimal Display View
Full Response view
In Full Response view, the main window displays the HTML payload of the
response.
86
RTV User Manual
A properly formed HTML response consists of the outermost enclosing HTML tags
(<html> and </html>), the <head> and <body> tags, and all other components of an
HTML markup page.
Note: You can use the Find on Page function in the context menu to search for
strings in this response.
Indexed Response view
Indexed view approximates the words of the response to be indexed. This view is
useful for finding specific words for which you can search. Index view displays a
close approximation of the searchable words.
The following figure shows the Nordic Bank home page in indexed view.
Figure 37. Indexed View
Hexadecimal Display view
Hexadecimal Display view shows the hex values of the bytes in the response and
the associated ASCII string values on the right side. This view is useful for looking
for non-printing ASCII characters.
For example, the standard End Of Line characters in HTML pages, Carriage Return
(hex 0A) and Line Feed (hex 0D), can be examined.
Chapter 3. Request view
87
An example of the main page of the Nordic Bank in Hexadecimal view is shown in
the following figure.
Figure 38. Hex View, with end of line pairs embedded in Response
On the right side of Hexadecimal view, you can see the HTTP headers at the top,
and you can see the End of Line pairs that are embedded in the response body.
88
RTV User Manual
The W3C standard specifies that each header line is separated by a Carriage
Return-Line Feed (CRLF) pair, with two CRLFs in a row that indicate the end of
the headers and the beginning of the body.
Displaying UI event pages
If you deploy the IBM Tealeaf CX UI Capture for AJAX solution, you can toggle
display of the UI Event pages in the Navigable Pages List.
Note: IBM Tealeaf CX UI Capture for AJAX is only available to legacy users.
v See “RTV Menus” on page 153.
v For more information about UI Capture, see "UI Capture FAQ" in the IBM Tealeaf
UI Capture for AJAX FAQ.
Events view
Through RTV, you can review all of the events that are triggered in a specific
session.
v To see the list of events, select View > View Events in the RTV menu.
Depending on the current view when you select the menu command, Events View
displays the following events:
View
Events Displayed
Session list
v Events for all selected sessions
v All sessions if no session is selected
Replay view
Events from current session
Request view
Events from current session
Response view
Events from current session
Chapter 3. Request view
89
Figure 39. RTV Events View
When sorted by page, this list provides a step-by-step sequence of the Tealeaf
events as they occurred in the session.
v To sort the list by any column, click the column header. To sort it in the reverse
order, click the header again.
v To close the Event list, right-click the tab label and select Remove.
Columns
A list of columns and their description within the Events view.
Column
Description
Event icon
The icon for the event
Session ID
The session identifier in which the event occurred. In this view, this value
is always the same value.
Page
The page number where the event occurred
Event
The name of the event
Value
The value for the event
Count
The number of instances of the event on the page
ReportGroup
The report group that is associated with the event
90
RTV User Manual
FactValue
The value that is recorded for the instance of the event
Dim1Name
The name of Dimension 1 in the report group
Dim1Value
The value of Dimension 1 in the report group
Dim2Name
The name of Dimension 2 in the report group
Dim2Value
The value of Dimension 2 in the report group
Dim3Name
The name of Dimension 3 in the report group
Dim3Value
The value of Dimension 3 in the report group
Dim4Name
The name of Dimension 4 in the report group
Dim4Value
The value of Dimension 4 in the report group
Context menu
To open the context menu, right-click an event in the Events list and select one of
the following commands.
Command
Description
Open Session
Open page 1 of the session in replay view and begin playing.
Go to Page
Open the page where the selected event occurred.
View Request Data
View the request data for the page where the selected event occurred.
View Response Data
View the response data for the page where the selected event occurred.
List Pages
View the list of all pages in the session. See “RTV Menus” on page 153.
Exporting the Event list
You can export the Event list to Excel or CSV format.
v To export the Event list to Excel, clickEdit > Copy Event List to Excel.
v To export the Event list to CSV, click Edit > Export Event List to CSV....
Creating events
The IBM Tealeaf CX RealiTea Viewer provides multiple perspectives on session
data down to the individual field level. Through the RTV interface, you can create
Tealeaf events that detect the presence of a variable or value in the request or
response of the session.
v You can also create hit attributes to capture values from the request or response.
Chapter 3. Request view
91
v For more information about creating events, see "Tealeaf Event Manager" in the
IBM Tealeaf Event Manager Manual.
Before you begin
When you choose to create an event or hit attribute through the application, RTV
connects to the Portal page where these items are created and pre-populates the
fields for you.
Before you begin, please verify the following steps:
1. You have access to the Tealeaf Event Manager in the Portal.
v From the Portal menu, select Configure > Event Manager. You must be able
to access the Event Manager.
v If you cannot access this page, contact your Tealeaf administrator to enable
the menu permissions in your account.
v See "CX User Administration" in the IBM Tealeaf cxImpact Administration
Manual.
2. You must provide your Portal credentials to RTV.
a. From the RTV menu, select Tools > Options....
b. Click the IBM Tealeaf cxImpact tab.
c. Enter the credentials in the spaces provided.
v See “Advanced Options tab” on page 207.
Creating events and hit attributes from the Request view
The Request view has multiple context menu items for creating events from text
that is found in the Request view.
v See Chapter 3, “Request view,” on page 73.
To open the context menu, right-click an item in the Request view:
Figure 40. Context menu
If you select a variable name such as TLMergeID, then an event can be defined to
detect for the presence of the variable in the request. You can define a specific
value, as needed.
v When you create an event from a request variable or value, the hit attribute to
detect the event is automatically created as well.
92
RTV User Manual
v For more information about these context menu items, see RealiTea Viewer Main Window.
Creating events and hit attributes from the Response view
You can create events and hit attributes from the response. The hit attributes used
for events can be any sequence of bytes found in the response.
v See “Response view” on page 86.
To create an event from the response, find the pattern of bytes in the response
view; right-click the highlighted section and select to create an event or hit
attribute.
v For more information about these context menu items, see RealiTea Viewer Main Window.
In Response view, you can find the entire string, including embedded tags, and
create the event from there. Some examples of the hit attributes used for events
include:
Figure 41. A string "Please fill in the fields flagged RED below" put out by the application layer
Figure 42. A new event created
Figure 43. A tracking tag, HitBox, embedded in the HTML.
Chapter 3. Request view
93
Figure 44. HTML title of a page
Figure 45. A business transaction string, Order Number
In the preceding figure, after the basic hit attribute is defined, the event can be
modified to scrape the order number into one of the user-defined variables.
AJAX Replay
Replay of sessions that use Ajax typically requires capturing UI events that occur
in the visitor's browser.
UI Events are captured by including a set of JavaScript files on each page. This
JavaScript hooks all UI input, captures it, and periodically sends it back to the web
server. This post gets captured along with all other session data and is available at
replay time, where it is used to duplicate the actions that are undertaken by the
visitor when the session was captured.
Note: IBM Tealeaf CX UI Capture for AJAX is only available to legacy users.
Is UI Event Capture Required?
If your web application makes Ajax calls only at page load time to populate
elements on the page and does not have any dynamic content that changes based
on user input, then you do not need UI Event capture. Otherwise, you do.
Note: IBM Tealeaf CX UI Capture for AJAX is only available to legacy users.
v See "UI Capture for Ajax Guide" in the IBM Tealeaf UI Capture for Ajax Guide.
Where to Start
Suppose that you have installed and implemented UI Event capture in your pages
and you begin capturing sessions with UI events and Ajax pages. The list of pages
is displayed in the left pane of RTV. This list must contain only full HTML pages
and UI events. No Ajax pages are displayed.
The following are types of Ajax pages:
v Any dynamically requested content that is going to be processed by client script
to update the display
v Some data that the user may or may not immediately see
94
RTV User Manual
Note: IBM Tealeaf CX UI Capture for AJAX is only available to legacy users.
These pages can be XML, a chunk of HTML, a bit of JavaScript, JSON, or other
client-side scripting format.
Since they cannot be properly displayed, Ajax pages must be removed from the
Viewable Pages List:
1. Step through the session several times to determine which pages must be
removed.
v Any entry that is not displayed to be a full HTML page must be removed.
2. To remove a page, right-click it in the left pane and select Replay Rules >
Remove this page from replay. A dialog is displayed in which you can create a
replay rule to remove the URL from any replay.
3. You can edit the URL with simple wildcards to remove similar pages with a
single rule.
v For example, to match an individual page that requires query parameters,
you can delete the query string part of the URL (the part after the ?) and
replace the listed content with a *. All instances of the URL are removed
from replay, regardless of the query parameters in them.
v You can use any Request name-value pair that positively differentiates the
Ajax calls from normal pages.
4. To create the replay rule, click OK.
When you create a rule, it is placed in the profile, which is in XML format. The
rule is displayed in a HostProfile node with the matching host name of the page.
v If you accidentally create a rule that hides pages that you did not want to hide,
then:
– You can delete the rule by editing the profile on the Profile tab of options. See
“RTV Profile” on page 191.
– You can delete the rule from the Request or Response views. Pages that are
listed in the Request and Response views that have profile rules that hide
them are displayed with a different icon than other pages. Right-clicking on
them gives you the option to remove the rule that hides them. See “Replay
view” on page 30 or “Response view” on page 86.
Sometimes, a simple URL pattern matching does not uniquely identify Ajax pages
without also removing non-AJAX pages. You can also remove pages from the
Viewable Pages List by finding values in the Request that uniquely identify them.
For example, if all pages use the same base URL, you can have some Ajax pages
that can be filtered based on the query string part of the URL.
Suppose that all Ajax pages all have REQUEST_METHOD=POST, whereas the non-AJAX
pages have REQUEST_METHOD=GET. To find these pages, go to the Request view of an
Ajax page and locate the REQUEST_METHOD entry. Right-click it, and select Remove
page with this Request value from replay. You can edit the URL pattern, variable
name, and value, as needed.
v The Microsoft Ajax toolkit generates URLs of normal pages that are the same as
that URLs for Ajax hits. You can use the following Request variable to create
rules for these hits:
HTTP_X_MICROSOFTAJAX=Delta=true
v In the absence of the TeaLeaf UI Events capture, you can also choose to treat this
page as a Highlight Only page through the context menu. See “Monitoring client
UI Events through RTV” on page 149.
Chapter 3. Request view
95
Getting the Replay Right
After you remove Ajax pages from the Viewable Pages List, you can attempt to
replay the session.
The list of pages must show normal pages with UI events listed between them.
After a page load, you can step through the UI events in the list, and RTV
populates fields on the page, presses buttons, and triggers the other types of user
actions that are captured by UI events. Some of these actions may cause the page
content to change. Some may cause AJAX requests to be made, which in turn
causes page content to change. Ajax replays rarely work properly the first time
they are run.
When replay fails to work, verify the following items:
v An invaluable tool is the window, which shows all the images, JavaScript, CSS,
and other pages that are requested as the page loads. It also shows Ajax requests
as they are made. You can display it through the View menu.
v The Source column in the Page Load Details window shows how a request was
satisfied:
– Session - If the URL that was requested was found in the session, the Source
column contains, Session.
– Remote - If Source contains Remote, then the URL was not in the session, and
it was sent back to the original site, which is normal for static content such
images, JavaScript pages, and CSS pages. However, if AJAX requests are
indicated as Remote, they were not found in the session. This situation usually
results in the replay failing to work properly.
v RTV matches the URL, and also posted data, if any is present. There are several
reasons why RTV might not be able to match up a request with a page that was
captured in the session, and the Page Load Details window can help to find
them.
– If you find a POST entry in Page Load Details whose source is Remote,
right-click it. The menu lists all pages in the session whose URL matches the
post, and under each URL entry, the menu indicates the matching and
non-matching parameters. Some URLs may have wildly different parameters.
Locate the page with the most matching parameters, which is closest to your
current location in the session. You may be able to resolve the parameters that
are causing the problem.
v The most likely cause is that one or more parameters in the query string or in
the posted data do not match what was captured. For example, some sites use a
timestamp parameter on each Ajax request. Since the current time is never the
same in replay as it was during the original capture, the time stamp never
matches.
Ignoring Request Variables for URL Matching
You can use a profile rule to tell RTV to ignore a parameter when it tries to match
requests that are generated during replay to captured responses. By ignoring
request variables, you can improve matching of captured URLs to the server pages
they represent.
To create a rule:
1. In the RTV window, click the Request View button.
2. Right-click the parameter to ignore in the [urlfield] section. Select Ignore this
value for URL and Post data matching:
96
RTV User Manual
Figure 46. Ignore Request Variable for URL Matching
3. In the spaces that are provided, you can enter the request variable in the
[urlfield] to ignore for purposes of matching URLs. These parameters can be
specific [urlfield] fields, query parameters, or other variables that are passed
with the request to the server.
a. Enter the name of the [urlfield] variable to ignore. If this variable is found
in the section, it is ignored for purposes of matching the URL.
b. If the request variable name corresponds to a regular expression, click the
check box. In the Test string text box, enter the [urlfield] string that the
regular expression must match. Click Test. If the regular expression finds a
match in the test string, a success message is displayed.
c. In the bottom textbox, you can enter the URL pattern against which the
ignore rule must be applied.
v To apply the ignore variable rule against all URLs, leave this field blank.
4. To create the rule, click OK.
5. The rule is saved to your local profile.
v To share this rule with other Tealeaf users, it must be saved in the shared
profile that is maintained by Search Server. See “RTV Profile” on page 191.
Hard-Coded Host Names
Using hard-coded host names in Ajax requests can cause problems for replay in
RTV. In these cases, blank entries are displayed on Ajax requests in the Source
column of the Page Load Details window. When a hard-coded host name is used,
RTV is unable to see the requests in a context in which requests can be found in
the session data.
Using a hard-coded host name is seldom necessary because omitting the host name
causes the request to be relative to the host name of the page from which the
request is being made. To work around this issue, you can create ResponseModify
or ExternalFileModify rules to remove the host name from the code that is
Chapter 3. Request view
97
building the request's URL. Using a ResponseModify rule, you can replace strings
in the URL (for example, http://www.host.com/ with /).
Replay over HTTPS
To ensure a consistent and complete replay, RTV requires access to all content
related to a session. When some or all of the content is stored on a server to which
RTV does not have access, replay can be incomplete. Suppose an RTV session
references images that are stored on a protected server. When RTV reaches out to
these assets, it may not be able to download them and display them in the RTV
replay. These images are displayed as missing images in the replay.
Content that is stored behind a password-protected site or transmitted over HTTPS
cannot be directly accessed. Since many sessions are specific to the user's settings,
it can be impossible to re-create the session by using a global login of some kind.
Note: For content stored on a protected server and transferred over HTTPS, for
replay fidelity, the recommended practice is to move the content to another
unprotected server, where RTV can access it. This practice must be applied only to
content that does not require secure storage according to your enterprise IT
policies.
In most web applications, static content such as cascading style sheets and images
is stored in a consistent location. The basic approach is to move this content to a
new unsecured server and then to create a host/port remap rule to map the
original host/port to the new host/port on the unsecured server.
For example, suppose that the original content is stored at https://
www.example.com/ and the new content is stored at http://10.1.1.1/. After you
copy the content from the original server to the new server, you can create a
host/port remap rule within your profile to instruct RTV to change any
encountered reference of:
https://www.example.com/
to:
http://10.1.1.1/
Note: Depending on fidelity requirements, you must consider a method by which
you can maintain snapshots of static content that become outdated. For example, if
the web application is updated with new images and static content, the new
version must be stored at:
http://10.1.1.2/
For more information about host/port remap rules, see “RTV Profile” on page 191.
98
RTV User Manual
Chapter 4. Searching sessions
Through RTV, you can define and run searches of captured sessions and then
replay the results in the Viewer.
v After a search returns results, you can complete a subsearch of the results by
using newly specified parameters. See “Session search and Subsearch” on page
105.
v Returned sets of sessions are called result sets, which can be stored, accessed, and
manipulated as a unit. See “Managing result sets in RTV” on page 142.
RTV Search Setup
You can configure the search options in your RTV installation through the
application. When RTV is first started, no Search Servers are configured, and the
Search button displays the initial Search Setup dialog, as shown in the following
figure.
v To open Search Setup in a configured RTV installation, click the Search button in
the toolbar. Then, click Search Setup... at the bottom of the Search window.
© Copyright IBM Corp. 1999, 2015
99
Figure 47. Example of initial search setup dialog
Note: To search for events prior to the 8.0 release, select the Use Legacy Events
check box. Searches are composed in the legacy format and submitted to the
selected Search Server.
Connect to Search Server
The Search Servers to which RTV must submit queries must be specified.
To configure, click Connect to Search Server. The following dialog is displayed:
100
RTV User Manual
Figure 48. Connect to Search Server
In the upper text box, enter the name or IP address of each Search Server.
v Typically, this name is the name of a Processing Server or an All-in-One server
in the IBM Tealeaf cxImpact system.
v Add each IBM Tealeaf cxImpact server in the system.
Note: While you can manually add servers here, you can automatically add them
through auto-configuration from the Tealeaf master server. See “RTV Menus” on
page 153.
Note: You must connect to only one Tealeaf system at a time. If you have multiple
Tealeaf systems in your environment, you must remove the other set of servers
when you add a Canister from a new system to the list of Canisters, or inaccurate
search results can be returned.
After you populate the list of Search Servers, the Search Setup dialog displays each
Search Server to which you can connect and the indexes available on each Search
Server.
Note: RTV submits all searches in parallel to each active Canister. It does not
remove duplicate sessions across Canisters from search results.
Chapter 4. Searching sessions
101
Figure 49. Search Setup Dialog
To remove a server from the search list, select the server name and click Remove
Server.
Index summary
To see a summary of the indexes of a server, select the Search Server in the Indexes
pane and click Summary.
RTV generates an HTML page and displays information about all indexes available
on the selected server. This summary displays:
v The number of indexes that exist on that search server
v The number of sessions in each index
v The date range that is covered by each index
v The indexing style (fast or extended)
v The total size in bytes for each index and the sum for all of the indexes
Summary information about all indexes:
Header Field
Description
TLL written at
Timestamp when the Summary was generated
Total Indexed Documents
Total number of documents that are currently indexed on the Search Server
Total Indexes
Total number of indexes that are stored on the server
Total Index Size(bytes)
Total size in bytes of the indexes that are stored on the server
IndexStyle
The style of indexing:
v FastRsp - standard indexing
v Full - extended indexing (deprecated style)
102
RTV User Manual
Below the Summary is detail information about the individual indexes currently
accessible to the queried Search Server.
Index Field
Description
Day
Date that is covered by the index in YYYY-MM-DD format
Index
Index name
Valid
If True, index passed last execution of IndexCheck and is considered valid
for use.
InUse
If True, index is in use by Search Server.
Docs
Number of documents that are contained in the index
Size
Size of index in bytes
Session Indexes
Canister session IDs of the sessions that are stored in the index
From
Timestamp of earliest hit stored in the index
To
Timestamp of latest hit stored in the index
Duration
Time span that is covered by the index in HH:MM:SS format
Total Docs
Total number of documents in the index
v This value is different from Docs value only if multiple indexes are
written for a single date.
Total Size
Total size of index in bytes
v This value is different from Docs value only if multiple indexes are
written for a single date.
Max sessions to return
When you run a widely specified search, you can retrieve many sessions.
Downloading all returned items to RTV and displaying them might take a long
time and can consume all available memory, so you can use this setting to limit the
number of sessions for RTV to display.
v The Max sessions to return setting controls the number of sessions from each
search server to be downloaded. The default is 100 sessions.
Note: A limit of no more than 10,000 sessions is recommended. When a broad
search is run without session limits, the limited available memory of the Search
Server can quickly fill, causing the search service thread to crash.
Stopping searches
There are two methods to stopping searches: based on session limit and based on
time limit.
Based on session limit
When you configure this setting, searches are terminated when the specified
number of sessions that match the search query is found.
Chapter 4. Searching sessions
103
v By default, RTV completes exhaustive searches. Since you can cancel a search
and return the sessions found so far, you can retain the default settings in most
situations.
Based on time limit
Running an exhaustive search across many indexes can require quite a bit of time.
You may want to retrieve and use results before large searches are completed. You
can use this setting to terminate searches after a configurable number of seconds.
Create Summary
Enabling Create Summary instructs RTV to create a summary page of the results of
your search.
This summary provides information about the executed search, including the
number of pages and sessions that match the query, the date/time of the earliest
and latest session, the longest sessions in duration, and the largest session in
number of pages.
Figure 50. Example of summary with results
Keep hands off data when displaying results
When this setting is enabled, RTV does not retrieve the data for each session when
it loads search results. This setting makes the search results load much faster.
When enabled, session data is loaded when you double-click the session to replay
it.
v Use this setting if you are encountering out-of-memory conditions during
searches or are regularly completing broad searches.
104
RTV User Manual
Note: When this setting is enabled, RTV is unable to assemble full field
information for the individual word results in the lower pane.
Return detailed search results
When enabled, this option controls whether RTV displays the Hit Session Segment
pane in the lower half of the session segment view.
v This option is enabled by default.
Session search and Subsearch
RTV can search for sessions that are stored in IBM Tealeaf cxImpact datastore. RTV
issues a search query to Search Server, which returns a set of sessions that match
the search constraints.
Note: Session data search in the IBM Tealeaf CX RealiTea Viewer is intended for
advanced users who can build custom dtSearch queries through the Advanced
Search query builder. For most search functions, Tealeaf recommends using
Portal-based search, from which sessions can be loaded in RTV. See "Searching
Session Data" in the IBM Tealeaf cxImpact User Manual.
v To begin a search for active or completed sessions, click the Search button in the
toolbar or select Edit > Search Completed Sessions... from the RTV menu.
When you open search, you can specify the criteria with which to search Tealeaf
session data.
v The search query can contain up to six parameters.
v You can also search active sessions by using a reduced set of query parameters.
See “Searching active sessions in RTV” on page 114.
v More detailed search criteria can be specified through the Advanced Search tab.
See “Advanced Search tab” on page 114.
v See “Specifying a search in RTV.”
The set of sessions that are returned by Search Server is called the search session
segment. This list of sessions is displayed in the Session Segment pane.
v The search session segment can include sessions from each searched IBM Tealeaf
cxImpact server.
v The maximum number of sessions that are returned by each search server is
configurable by each RTV user. See “RTV Search Setup” on page 99.
v See “Search results in RTV” on page 119.
Sessions that are loaded into RTV and displayed in the Session Segment pane can
be searched with the Subsearch tool. You can search for any arbitrary text in the
Request or Response blocks of a search session segment by using the Subsearch
tool.
v It can be used to examine all name-value pairs found in the selected sessions for
specific combinations.
v See “SubSearch” on page 117.
Specifying a search in RTV
The Search dialog provides the RTV user two different approaches to creating the
search terms, available in different tabs.
Chapter 4. Searching sessions
105
Figure 51. RTV Search
v
Search Builder: The Search Builder tab creates the queries by using predefined
search terms. See “Search Builder tab.”
– By default, RTV search runs searches against completed sessions. Optionally,
you can choose to search currently active sessions, by using a reduced set of
parameters. See “Searching active sessions in RTV” on page 114.
v Advanced Search: The Advanced Search tab allows creating the search query by
entering in the search terms as text. See “Advanced Search tab” on page 114.
v Both tabs include a History control and a Date filter.
– See “Search history list” on page 112.
– See “Date filter” on page 113.
v When you use RTV search for the first time, you may be required to configure
search settings. See “RTV Search Setup” on page 99.
Search Builder tab
You can compose the terms of a search using predefined search terms in the Search
Builder.
106
RTV User Manual
Figure 52. Search Builder
v To add a search term, double-click it. The term is added to the right side of the
window. Enter the value for which to search.
v Any valid dtSearch syntax is accepted as a value. You can use wildcards and
regular expressions.
– In general, specify the minimum text that is required to produce meaningful
search results; lengthy search terms with extraneous words in them take
longer to return the same or marginally improved results.
– To apply a logical NOT to the search term, click the check box next to it.
Note: Using a NOT operator on a search for field values can slow response
time. The underlying search engine must retrieve all possible values for the
field and then apply the NOT to generate correct results.
v To remove the term, click the X icon.
v After a set of search terms has been selected, you may need to modify and
refine the terms in the Advanced Search dialog box. To refine, click Copy to
Advanced to copy the search terms to the Advanced Search tab. See “Advanced
Search tab” on page 114.
Notes on RTV search:
v RTV limits any single search to a maximum of six search terms.
v All defined Tealeaf events are listed and can be added as search terms.
Note: To limit index size, indexed words are truncated to a maximum of 32
characters each. Longer words are truncated at 32 characters to match search
terms in the index and are submitted without prompting the user. Tealeaf
administrators can change this limit through the configuration options of the
Index Service configuration. See "Tealeaf Management System" in the IBM Tealeaf
cxImpact Administration Manual.
v If auto merge of fragments is enabled, using the NOT option can display
improper results. If searching the session for the absence of a search term returns
a true result and a related fragment of the session returns a false result (meaning
that the term is present in the fragment), both the session and the fragment are
listed in the results, even though the term is displayed in the fragment. Avoid
using the NOT operator when sessions are fragmented.
Chapter 4. Searching sessions
107
– In general, searches using Boolean search terms can be applied to a single
session fragment only, as the underlying search engine is unaware of
fragmentation. If the session contains multiple fragments, search results can
be inaccurate. Through RTV, you can retrieve search results for one search
term and then complete a sub-search of the returned sessions on the other
term.
– See “Annotations in RTV” on page 181.
v When you search for URLs, remove the following punctuation in the URL::
– colons (:)
– question marks (?)
– equal signs (=)
– ampersands (&)
Binding search terms:
You can define how the search terms are combined by using the Search Builder
tab.
Search terms can be combined in the following ways:
v AND
v OR
v And on same page
OR
The OR binding is used to find all combinations of search terms that are displayed
in the same session. If a page contains any of the search terms, it is displayed in
the search session segment.
AND
The AND binding is used to find all search terms that are displayed in the same
session. To appear in the results, Search terms can appear on different pages of the
session. A page must contain all search terms that are combined with AND.
And on same page
You can specify all search terms that must be displayed on the same page of the
session using the And on Same Page (AOSP) binding.
v You cannot use the NOT operator in search terms for an AOSP search.
v AOSP Binding is not available on the Advanced Search tab, only on the Search
Builder tab.
RTV handles the AOSP request by issuing a search request to the Search Servers
specifying all search terms combined with AND in the session. Each returned
session has all of the terms somewhere in the session fragment. The Search Servers
return the maximum number of sessions to return. RTV examines each returned
session and discards those sessions that do not have all of the search terms on the
same page.
Note: When you do an AOSP search, do not click the Cancel button while the RTV
is processing the results, or the results set can be corrupted.
108
RTV User Manual
This two-step search process requires careful construction of your queries. Build
your query to find the true subset of events on the same page, so that AOSP does
not have to weed through many irrelevant sessions.
The Max Number of Sessions Returned setting affects this feature. Since the Search
Servers can return no more than the maximum number of sessions, the results can
be just a subset of the complete set of matching sessions. That subset may not
include any session fragments with all terms on the same page, even if they exist.
Search for event data
In the Search Builder tab, you can specify searches for events and event values,
and also the dimensions and dimension values that are associated with specific
events.
v Events are organized into groups called event labels . In the Search Builder tab,
event labels are the folder nodes. They are listed below the search groups that
are defined in the search template.
v You cannot search for events that are not configured to be Searchable &
Reportable.
v In active sessions, you cannot search for sessions that are set to fire on the End
of Session or Last Hit trigger.
v For more information about configuring events, see "TEM Events Tab" in the
IBM Tealeaf Event Manager Manual.
In the preceding screen capture, the event label S&P Checkout Events contains the event Abandoned Cart. This event is
associated with two report groups. The report group, event value, and underlying dimensions values constitute a fact.
Figure 53. Searching for events, report groups, and dimensions
v No Dimension Report Group - all events are associated with this default report
group. This fact is recorded in every instance of every event
v S&P State & Error - Beneath this report group reference are two dimensions:
Error and Shipping State
Chapter 4. Searching sessions
109
When you select the report group entity in the Search Builder, you are choosing to
search that fact for the specified event value.
v You cannot search for report groups as an entity.
For each event that is specified in the Search Builder tab, you can click to expand
the event tag to display the underlying fact attributes, which include the event
values and associated dimensions and dimension values.
v To add any of these items to the search, double-click it, which can also toggle
display of any underlying terms.
In the table below, you can review the event-related items in the Search Builder tab
and the type of search that can be completed.
v An example query for dtSearch is also listed.
Table 10. Search for Event Data
Icon
Description
Search Type
dtSearch Query
Notes
event label
no
n/a
Organizing element
for display only
event
existence
TLFID contains 271
Search for displayed
event by internal
event ID (271)
event value
existence and
value
hit//TLFID_272/
TLFactValue
contains
example.com
Searches facts that
are recorded in the
request for event
existence (if blank)
or for specific values
(if populated)
dimension value
(hashed)
value
hit//TLFID_272/
TLDimHash1 contains
35fcc022f293e102
ok6af20501de189d88
Searches facts that
are recorded in the
request for specific
hashed values
Searching for Other Types of Data
This information describes the types of data that you can search for in RTV.
Searching for numeric values:
Note: When you search for numeric values, values are treated as integers. Use of
floating point values (for example, 9.99)can result in false positives.
v In most fields, integers are required by the interface.
v Some fields, such as event value fields, cancontain numeric or text data,
depending on the type of field, which means that the integer restriction cannot
be imposed by the user interface. For event values that are expecting numeric
values, all entered values are converted to integers.
v Session attribute fields are stored as text data, regardless of the type of value in
them.
Form field search: You can specify the name of an input tag and its value in the
FormField term, under the Page Info node. You can search for pages where visitors
enter specific values for inputs in the FormField.
Searching for annotations: You can search for sessions that are based on
annotations that are made by Tealeaf users to the session. Annotations are an
effective method of tracking activities that are related to specific sessions.
110
RTV User Manual
Note: After an annotation is saved into a session, the session must be indexed or
reindexed before the annotation is available through search. You cannot search for
annotations in active sessions.
Note: To search for annotations that are saved to a session, the Auto Merge option
in RTV must be disabled. See “Replay tab” on page 187.
v For more information about adding annotations to a session through RTV, see
“Annotations in RTV” on page 181.
v You can also search for annotations through the Portal. See "Searching Session
Data" in the IBM Tealeaf cxImpact User Manual.
In the Search Builder tab, the following search terms are under the Session info
node:
v Annotations - Use this text field to enter search terms for the specific annotation
note. Wildcards are accepted.
v Annotation Authors - You can also search for the author of the annotation based
on the author's Tealeaf user ID.
If the above fields are not available in your search template, you can search for
annotations and their authors by entering the appropriate search keyword for these
search items in the All Text field.
v See "Search Keywords" in the IBM Tealeaf cxImpact User Manual.
Searching for session counts:
If you are searching against a large data set or are only interested in counts, you
can configure RTV to return only the number of sessions that match the search
criteria, plus an example session.
To configure:
1. In the RTV toolbar, click the Search button.
2. In the Search Builder, click Setup... at the bottom of the window.
3. In the Search Setup window, enter 1 for the Max sessions to return.
Note: You cannot enter a value of 0 for maximum sessions to return.
4. Clear the Create Summary check box.
5. Clear the Return Detailed Search Results check box.
6. Click OK.
When searches are run using these options, the returned result sets include a single
example session and counts of session and word hits.
Searching for IP addresses: If you want, you can create RTV search fields to
search for IP addresses in completed seessions in IPv4 format, IPv6 format, or
both.
Note: Before you can search for IPv6 formatted addresses, you must update the
search templates in use in RTV. See “Search templates” on page 135.
The following fields are to be added:
Chapter 4. Searching sessions
111
Table 11. Searching for IP addresses
Field Name
Search Keyword
Description
IP Address
ipv6_remote_addr
Search for IP addresses in IPv6
format or IPv4 format:
v For IPv6 addresses inserted into
this field, values are expanded, if
they are condensed, and
zero-padded to ensure a string of
consistent length.
v For IPv4 addresses inserted into
this field, values are expanded into
an IPv6-style formatting, in which
each of the four octets of the IPv4
is dispersed into the last four
groups of the 8-group IPv6 format.
v Ranges and wildcards are accepted
for this field
IP Address
(legacy)
tltstsipaddr
Search for IP addresses in IPv4
format
v Data that is entered into fields of
this type are zero-padded and
normalized into a single string of
digits before submission for search.
Examples:
Table 12. Searching for IP addresses
Field Name
Example Value
Description
IP Address
fe80::020b:dbff:fe93:a461-a465
Searches for a range of indexed
values for addresses: fe80 0000 0000
0000 020b dbff fe93 a461~~a465
Note: For IPv6 addresses, you can
specify ranges in one or more groups
as needed.
IP Address
(legacy)
127.0.0.1
Searches for a single IPv4 addresses:
127000000001
Note: For IPv4 addresses, search
across ranges of addresses is not
supported.
For active sessions, no indexing is done on these fields. As a result, IP addresses of
either format are treated as text strings.
Search history list
RTV keeps a history list of your most recent searches. This history list is
maintained across RTV sessions and is available in the drop-down at the top of the
Search Builder tab.
v The Search Builder tab and the Advanced Search tab maintain separate history
lists.
An example is shown in the following figure.
112
RTV User Manual
Figure 54. Search Builder
You can select one of these previously run searches from the drop-down, which
results in the fields being populated in the Search Builder tab.
v To clear the list, click Clear History.
Date filter
Across the bottom of both search tabs, the Date/Time filter can be used to filter the
date range for the specified search. Appropriate selection of the Date/Time filter is
important for efficient searching.
v There are a number of predefined periods available from the drop-down.
If you are looking for a specific time period for the search, you can select a custom
date/time range in the From and To controls in the Date filter.
Figure 55. Date Filter
Searching for pre-release 8.0 sessions
If you have upgraded your Tealeaf solution from a pre-release 8.0 version, your
Processing Servers (Canisters) can continue to retain session data in the old format
for a some time.
When you configure a search in your upgraded version of RTV, the application
queries the Search Server for the date when the Tealeaf solution was upgraded.
Canisters are then searched based on the date stamp of the upgrade, in the old
format for sessions earlier than the upgrade date and in the new format for
sessions after the upgrade date.
Chapter 4. Searching sessions
113
v Searches that include session attribute fields are automatically reformatted to
search the appropriate session attribute information that is based on the date
stamp of the upgrade.
Note: If you are searching a Canister that is not upgraded from pre-Release 8.0,
you can configure the Search Builder to be populated with events and event
structures in the old format for searching a non-upgraded Canister. See Use Legacy
Events.
Returned sessions are delivered to RTV for display in a single session list.
Searching active sessions in RTV
You can configure the search to examine only currently active sessions in the Short
Term Canister.
v To search only active sessions, click the Search Active Sessions check box.
Note: Since the sessions to be searched is not closed and indexed, the following
search fields are not available in active session search::
v End of Session events
v Last Hit events
v Events recording the last value
Advanced Search tab
In the Advanced Search tab, you can specify specific indexed words and indexed
fields for which to search and apply combinations of operators to them. Advanced
Search enables much more carefully specification of search criteria.
v For more information about the terms that you can specify in search, see "Search
Keywords" in the IBM Tealeaf cxImpact User Manual.
v For more information about specifying search criteria through text input, see
“Search syntax” on page 127.
114
RTV User Manual
Figure 56. Advanced Search
v You can select specific words or fields from the available indexes on the selected
canister. See “Indexed terms” on page 116.
v You can enter search terms by using a simple text block. See “Search
parameters.”
v The Advanced Search tab maintains its own search history, which functions like
the search history in the Search Builder tab. See “Search history list” on page
112.
v You can apply date and time filters to your specified search criteria. See “Date
filter” on page 113.
v You can also specify searches that return time grades for network, roundtrip,
and page generation times. See "Searching Session Data" in the IBM Tealeaf
cxImpact User Manual.
v If needed, you can save the specified search to a local file. See “Saving searches”
on page 116.
Search parameters
The Search Parameters textbox contains the currently specified search in the syntax
understood by the underlying search engine. When you specify search criteria in
the Search Builder tab, those criteria are rendered into the text string displayed in
the Search Parameters textbox and passed to the Search Server for execution.
Chapter 4. Searching sessions
115
v For more information about the terms that you can specify in search, see "Search
Keywords" in the IBM Tealeaf cxImpact User Manual.
v For more information about specifying search criteria via text input, see “Search
syntax” on page 127.
To add a new term, you can enter a text string or select a term from the available
Words or Fields. See “Indexed terms.”
v To insert a date stamp, click Add Date. Select the date. The corresponding
search term is inserted into the search parameters.
v
v
v
v
To
To
To
To
insert a time range, click Add Time.
clear the search parameters, click Clear.
save the currently configured search, click Save.
search only active sessions, select the Search Active Sessions checkbox.
Indexed terms
You can review the available terms and fields that are indexed in the selected
canister.
v Terms: For the selected canister, the list of terms that have been indexed is
available for use.
v Fields: For the selected canister, the list of indexed fields is available for selection.
To begin, select a canister from the drop-down just below Terms and Fields.
Depending on which button is selected, the pane below is populated with values.
v To add one of these terms to your search, double-click it. The term is added at
the cursor in the specified search.
Saving searches
Through the Advanced Search tab, you can save searches and load them later.
v To save: To save the configured search, click Save.
v If you want, edit the name of the search in the Saved Searches box.
v The search is saved in XML format to a local directory.
v To see the local directory that contains searches that are saved in XML format,
click Browse Saved Searches.
v To load:
To load a saved search, double-click its name in the Saved Searches box. The
search parameters box is populated with the search terms.
v Generating Result Sets: You can configure RTV to automatically create and save
result sets for each set of returned search results.
Executing searches
To run the search that is configured in the Search Builder or the Advanced Search
tab, click Search.
Searches are submitted to each IBM Tealeaf cxImpact server that maintains session
details, which includes all processing servers in the system. These searches are
submitted in parallel to all servers at the same time.
116
RTV User Manual
Figure 57. Search Progress Dialog
Note: If you run a search in RTV that returns 0 results and you are able to
complete the same search through the Portal and return a positive number of
results, additional configuration can be required to make search work within RTV.
In some cases, a newly added Search Server must be given an alias within the
Portal application to be properly resolved by RTV. See "Aliases" in the IBM Tealeaf
cxImpact Administration Manual.
The search progress dialog allows you to cancel any search in progress. There are
two kinds of cancellations:
v Cancel Search aborts the search and returns no results.
v Stop and View Results returns the search results found so far.
Note: RTV submits all searches in parallel to each active Canister. It does not
remove duplicate sessions across Canisters from search results.
See “Search results in RTV” on page 119.
SubSearch
After a search returns a set of sessions that match the search query, you can search
within that set using SubSearch. SubSearch can complete simple searches to look
Chapter 4. Searching sessions
117
for specific values in individual fields. To find specific values, RTV must scan the
set of returned sessions to create name-value pairs.
v To begin a SubSearch, specify a search and run it. Then, click the SubSearch
button on the application toolbar.
If the search results contain many records, this process can take a while; start with
small SubSearch tasks first. When the SubSearch completes its search, the
SubSearch dialog is displayed.
Figure 58. SubSearch
In the SubSearch dialog, you can search the name-value pairs retrieved in the
executed search.
v The leftmost column contains drop-downs of the available fields to search. This
set of fields is a superset of the indexed fields available for searching.
– If you select All Text from the drop-down, you can search the entire set of
name-value pairs.
v The middle column enables the selection of the search constraints on the field.
v For the selected field, the rightmost column contains the list of available fields.
v You can specify how the terms are logically bound together: AND, OR, or AND
ON THE SAME PAGE using the Operator drop-down in the upper right of the
SubSearch Search dialog. See “Binding search terms” on page 108.
SubSearch for specific fields
You can search for specific fields. Select a field to examine from the leftmost
drop-down. In RTV, you can search against ALL fields in the set of sessions.
For example, you can search:
v The standard Request fields of each hit
v The session attribute fields
v The Event attribute fields
SubSearch for custom fields
Any custom fields that are created for indexing in the [appdata] section of the
request are also available for SubSearch.
118
RTV User Manual
SubSearch results
SubSearch results are similar to the Hit Session Segment pane.
Figure 59. Example of subsearch view of data
Like the Hit Session Segment pane, the SubSearch session segment can also be
customized.
v All of the hit attributes, and every field found during the SubSearch, is available
to be added to the SubSearch session segment view.
v While you customize the view, you can remove unnecessary fields from the right
pane.
v When you select any of the fields in the left pane, all of that field's values across
all the sessions in the search session segment are displayed in the bottom pane.
v See “Search results in RTV.”
The final result after customization of the view can be a powerful tool for finding
the commonalities and the outliers that lead to web application problems.
Figure 60. Final results following customization
Search results in RTV
When you run a search in RTV, the returned search results are displayed in an
individual tab that can be accessed from the main application window.
Each displayed set of search results is given a unique identifier, beginning with
Search001 - Results.
Note: If the number of search results exceeds 16,384 sessions, then search details
are omitted in the returned results to prevent runaway searches. In RTV, these
details are displayed in the lower pane of search results.
Note: If the total session data retrieved by RTV exceeds 1.2 GB, RTV stops
downloading and displays the session data that is received. This limit prevents
large result sets from overloading the RTV application.
Note: Search results can be further filtered by data segmentation. Tealeaf enables
the limitation of access to sessions based on events that are created by Tealeaf
administrators. If data segmentation is applied to your account permissions by an
Chapter 4. Searching sessions
119
administrator, you can be seeing only a subset of all possible sessions available for
your search results. See "Configuring the Search Server" in the IBM Tealeaf CX
Configuration Manual.
v To cancel a search session in progress, click Cancel in the Search Progress
window.
Figure 61. RTV Search Results tab
In a search results tab, the returned session information is presented in two panes:
v Session List: The upper pane contains a list of all sessions retrieved by the
search. See “Session List pane.”
Search Results: The lower pane contains the list of pages in which the search
results were found across all sessions in the segment. See “Search Results pane”
on page 123.
v Above the Session List pane, the search query that was sent to the Search Server
service and generated the results is displayed in green.
v
Session List pane
The Session Segment is populated by RTV with the list of sessions that match the
query terms. This pane is populated as soon as RTV begins to display the results.
Note: RTV submits all searches in parallel to each active Canister. It does not
remove duplicate sessions across Canisters from search results.
120
RTV User Manual
Figure 62. RTV Search Results - Session List Pane
As the basic information about each session is populated, RTV begins fleshing out
the Session Segment and finding the specific hits that match the search terms, if
Return Detailed Search Results is enabled in RTV's Search Setup dialog.
Context menu for the Session List pane
After RTV finishes populating the Session List pane, right-click in the upper pane
to open the context menu, with the following options.
Command
Description
Open Session
Open selected session for manual replay in a new application tab.
Auto Replay
Begin automated (time-based slide show) replay of the selected session
with currently configured options.
List Pages
Displays the list of pages in the selected session in theSession Pages
window. See “RTV Menus” on page 153.
View Request Data
Open session in Request View. See Chapter 3, “Request view,” on page 73.
View Response Data
Open session in Response View. See “Response view” on page 86.
Source Info
Displays the identity of the Tealeaf Canister in which the session is stored,
including the relevant session index within that Canister.
Find and merge all fragments of this session
Completes a search of all Canisters that are configured in RTV's Search
Setup for all fragments of this session, which is based on the session
identifier, merges them into a single session for replay purposes, and opens
the merged session.
v See “Annotations in RTV” on page 181.
Customize View
Customize the display of the Session List pane. See “Columns in Session
List pane.”
Columns in Session List pane
The following columns are displayed by default in the Session List pane.
Command
Description
Flags
Click the entry in the flags column to review the types of pages in the
session.
SessionID
The session identifier that is used in the session index.
Chapter 4. Searching sessions
121
v For a merged session, this value is the Canister session index that is
appended to the Tealeaf session identifier.
Score
The search results score for the session.
TimeStamp
Timestamp for when the session ended.
Page Count
The number of pages in the session
Duration
The duration of the session in HH:MM:SS notation.
Annotations
If an icon is present in this column, user-created annotations are present in
the session.
Login ID
The value of the LoginID user-defined field in the Canister, which is
populated by a Canister event.
Events Icons indicating the Tealeaf events that were triggered in the session.
Title
The title of the first page of the session
Customizing columns in the Session List pane
You can customize the view of the Session List pane in the View Customization
window.
In the View Customization dialog, the left pane displays a list of fields available to
be added to the Session List pane. The right pane shows the fields that are
currently displayed.
122
RTV User Manual
Figure 63. View Customization
Note: Only fields that apply to the session segment are available to be added.
Most of these fields are session attributes. For more information about these
attributes, see Chapter 6, “Session attributes,” on page 231.
v Changes to these values are local settings only. They are not stored in the user
profile.
v To review field values in the current session segment, select a field in the left
pane. The field values are displayed in the lower pane.
v To add a field to the pane, select it in the left pane and then click Add.
v To remove a field, select it in the right pane and then click Remove.
v To rearrange the order of display in the Session List pane, select a field to move
and use the Move Up and/or Move Down buttons.
v To restore the default settings, click Set Defaults.
v To close the dialog and display the Session List pane with the new field
configuration, click OK.
v To cancel changes and return to the Session List pane, click Cancel.
Search Results pane
The bottom half of the Search Results view is the Search Results pane, where each
hit that matches the search query is listed in a row.
Chapter 4. Searching sessions
123
When a session is selected in the upper Session List pane, the pages in that session
where one or more of the search terms were found are highlighted in bold in the
lower Search Results pane.
Figure 64. RTV Search Results - Search Results Pane
If the search query has multiple terms and a page matches more than one term, the
page is listed in one row for each term that matches. For example, suppose that the
search query has two terms (Free Text search for Bob or Mary), and the words Bob
and Mary both are displayed on page 6 of a session. Page 6 is listed twice in the
Hit Session Segment.
v Row 1: The Page column contains 6, and the Result column contains Bob.
v Row 2: The Page column contains 6, and the Result column contains Mary.
Here is an example search result:
124
RTV User Manual
The preceding figure shows a search for the field amount containing a non-null value. In the Session List pane, the
Session ID 2201 is selected, and the corresponding hit is highlighted in bold in the lower Search Results pane. Both
rows contain the value 2201 in the SessionID column.
Figure 65. Example search results
v The Search Server query is displayed in the green bar above the Session List
pane.
The second column is the Score. Each found search term increments the score for
the session. The session that is labeled 2201 has a score of 2 because the value
found in the field named "amount" consists of two words, "29" and "99".
On the far right side of the Search Results pane is the Result column, which shows
the value of the Amount field for every hit.
Context menu for the Search Results pane
Most of the displayed options are also available in the context menu for the upper
pane.
Specific to the Search Results pane, you can configure either of the following
options:
Command
Description
Double-Click replays session
When this option is selected, double-clicking a row in this pane begins
replay of the session from the selected page.
Double-Click opens Req, Rsp, or Session Attributes
When this option is selected, double-clicking a row in this pane opens the
Chapter 4. Searching sessions
125
page in Request View, Response View, or the session attributes, depending
on where the search results were found in the page.
v For more information about Request View, see Chapter 3, “Request
view,” on page 73.
v For more information about Response View, see “Response view” on
page 86.
v Session Attributes are displayed in the request buffer of the page. For
more information about Request View, see Chapter 3, “Request view,” on
page 73.
Columns in Search Results pane
Each row of the Search Results pane corresponds to a found result for one of the
terms in the search query.
For each found result, the following columns are displayed by default in the
Search Results pane:
Command
Description
SessionID
The session identifier that is used in the session index. This value
corresponds to the SessionID column in the Session List pane. See
“Customizing columns in the Session List pane” on page 122.
Page
Page number in the session where the search result occurred.
Score
The search results score for the page.
TimeStamp
Timestamp for when the page occurred.
Gen Time
The time that is required for the web application to generate the page
NetTime
The time that is required to transfer the page across the network to the
client browser
RoundTrip
The time between the user initiating the request for content and the receipt
by the client of the final response packet
Bytes
The number of bytes in the page
Status The HTTP status code for the page, if applicable.
v See “Viewable Pages list” on page 38.
Source The source of the search match. Possible values:
v Session - stored in the session attributes
v Req - stored in the request of the hit
v Rsp - stored in the response to the hit
v Form Field - stored in the [urlfield] section of the request
Result Displays the search term and the detected value that is displayed in the
page.
Customizing columns in the Search Results pane
There are default columns available the Search Results pane. You can customize the
list columns that are shown in this pane.
126
RTV User Manual
Note: In the View Customization window for the Search Results pane, you can
include a wide variety of data in displayed list. Customizing the columns in the
pane is useful for tracking down the source of errors.
In theView Customization window, the upper-left pane contains the fields available
to be added to the Search Results pane's list of columns. The right pane contains
the fields currently showing on the page.
v You can add per-page data to the displayed columns in theView Customization
window and then export the view to Excel or CSV format, which effectively
exports session data from RTV. See “Exporting session data from RTV” on page
147.
v For more information about the View Customization window, see “Customizing
columns in the Session List pane” on page 122.
Scoring Search Results
This information describes how search results are scored and ranked by Tealeaf.
When a session segment is created, it uses a default value of 1000 sessions from
the search that is completed. When the defined limit of sessions is exceeded in the
results, some rules are applied to the sessions to determine which ones are shown
to the requesting user.
Each session is assigned a score that is based on what was found in it and the
number of occurrences. The score is a count of words that were found for each
search term.
v If you search for a phrase in the response, a session that contains five instances
of that phrase is more likely to be returned than a session that contains two
instances of the phrase.
v If you search for a session-level attribute that is displayed only once in the
session, that search item yields only one hit per session. As a result, the score is
consistent across all returned sessions. In this case, the most recent sessions are
returned, as the search indexes are searched from new to old.
Note: Events are indexed as session-level attributes. No matter how many times
an event fires in a session, it can generate one only search hit.
Search syntax
The syntax for the search terms is straightforward. All search terms are not
case-sensitive. Search terms can be grouped by using parentheses.
v For more detailed information about the search syntax, visit the dtSearch
download page:
http://www.dtsearch.com/download.html
Keywords
This setting finds a list of words or phases that match any or all of the terms.
v Use quotation marks (") around phrases
v Add + in front of any word or phrase to require it
v Add - in front of any word or phrase or to exclude it
Examples
banana pear "apple pie"
"apple pie" -salad +"ice cream"
Chapter 4. Searching sessions
127
Boolean
This setting finds a structured group of words or phrases that are linked by and,
or, not, and w/.
Table 13. Examples:
Search Term
Matches
tart apple pie
the entire phrase must be present
apple pie and pear
tart
both phrases (apple pie and pear tart) must be present
apple pie or pear
tart
either phrase (apple pie or pear tart) must be present
apple pie and not
pear tart
only apple pie must be present
apple w/5 pear
apple must occur within 5 words of pear
apple pre/5 pear
apple must appear first and pear must appear within 5 words
apple not w/27 pear
apple must not occur within 27 words of pear
subject contains
apple pie
finds apple pie in a subject field
Note: Use ( ) when a search includes two or more connectors for accurate
specification. For example, apple and pear or orange juice could mean either:
v (apple and pear) or orange
v apple and (pear or orange)
Special characters
This setting finds special characters that match the search terms.
Search Term
Matches
?
Matches any single character:
v appl? matches apply or apple
*
Matches any number of characters
v app*ion matches application and appellation
*
Matches any string at all
?*
Matches "any word"
~~
Indicates numeric range:
v 14~~18 looks for 14, 15, 16, 17 or 18
Weights
By default, all words in a request are counted equally in search results. You can
change this weighting by specifying the relative weights for each term in your
search request.
Variable term weighting allows the weight of each search to be specified in the
search request. When results are returned, they are stored based on the weights.
For example:
apple:5 and pear:1
128
RTV User Manual
The preceding request retrieves the same documents as the search apple and pear.
However, the search engine weights apple five times as heavily as pear when it
sorts the results.
You can apply weights to the following Boolean search terms:
(description:5 contains (apple and pear)) or
(author:2 contains ("John Smith"))
Note: When you run a search through Request view, punctuation is stripped from
the search terms when you populate the search box, so that you do not
inadvertently submit special punctuation to the search engine. See Chapter 3,
“Request view,” on page 73.
Searching within fields
The IBM Tealeaf cxImpact search system includes the concepts of fields. All of the
lines in the Request block are fields of the format name=value.
To search for these pairs, format the search as follows:
(name contains value)
A term with a contains clause is just like any other search term and can be
combined with other containing terms or simple terms.
The value part of the containing term can itself be a list of values.
v For example:
(loginid contains (smith or jones or clark))
v The not operator is supported. For example:
(loginid contains not (smith or jones or clark))
In the Request block, all lines in the [URLField] and [AppData] sections are
indexed. Since every line in the [URLField] section represents one of the Input tags
on a submitted page form, this mechanism can be used to search for specific user
inputs.
Note: When you specify [URLField field names in a text string search, you must
perform some character substitution to match how the indexes are formatted. See
"Character Indexing" in the IBM Tealeaf cxImpact Administration Manual.
Note: Some lines in the Request block are not indexed and cannot be searched. For
more information about what is indexed and searchable, see Chapter 7, “What is
indexed and searchable,” on page 239.
If you search for a field name without using a contains clause, Tealeaf indicates
that the field exists on the first page of the session. For example, searching for
loginid only. To find each page where a particular [URLField] exists regardless of
its value, you can:
v Search for the field alone and use SubSearch to search for the field again. The
SubSearch result pane indicates the page where it exists.
v Search by using the wildcard (loginid contains *), which produces a hit
session segment that identifies the exact pages where the field is displayed.
These results can be large.
Chapter 4. Searching sessions
129
Searching among multiple fields
You can specify searches that examine a sequential set of fields.
For example:
(name to description) contains My Company
In the preceding example, the search query examines all fields between name and
description for the string My Company.
Complex searching for events
Building searches in the Search Builder tab is the easiest method to create them.
However, some searches cannot be specified by using this method. Complex event
searches are searches that combine searching for events with other search terms
that cannot be expressed in the Search Builder tab.
For example, suppose you want all sessions that have the event "Credit Card
Invalid" and LoginID contains Bob or Mary as your search term. An example of
the original search in the Search Builder tab follows:
Figure 66. Example of original search in Search Builder tab
This search cannot be fully composed in the Search Builder tab, so the Advanced
Search tab must be used:
1. Select the desired event and the LoginID session attribute in the Search Builder
tab.
2. Click Copy to Advanced Page.
3. The search is displayed in the Advanced Search tab.
4. Edit the contains clause so it includes Bob and Mary, joined by the or operator,
as shown in the following figure:
130
RTV User Manual
Figure 67. Edit the contains cause
5. You now have the search clause that you need.
When you search for an event by using the Advanced Search tab, specify the event
by using the unique ID assigned to that event. This information can be found in
the Tealeaf Event Manager for each event, but the easiest way is to define the
event search terms by using the Search Builder tab and to copy these terms to the
Advanced Search tab.
Saved searches
After constructing a search, you can save the search for later use or to share it with
others.
1. To save it, click Save Search.
2. You can save the current search that is defined in the editing box as an .XML file
in the following directory:
%userprofile%\Application Data\TeaLeaf\RealiTea\SavedSearch
3. Each saved search creates one .XML file, and these files can be shared.
Selecting a saved search opens it in the Search Editor area.
Active searches
When Active Searches are enabled, RTV searches the Active sessions currently in
every applicable Tealeaf server for the search terms.
Active searches are different from Archive searches. An Active search examines
sessions that are still in progress, which means that the session data is not yet
indexed. The following limitations apply to Active searches:
v The stored session data has no awareness of fields; the contains operator cannot
be used.
v The nearness affinity operators (w/) do not work
v You cannot specify number ranges.
v When you search for Active sessions, searches are restricted to simple patterns.
v The * symbol is a valid wildcard and matches any substring.
Adding date/time to a search
You can add date and time parameters to your search terms. Select the From and
To ranges in the Date Filter pane at the bottom of the Search Builder.
v Selecting a date or a time adds the specified date or time to the search terms.
These terms are expressed in "seconds from January 1, 1970" and "seconds since
midnight".
Advanced Search setup options
In the Advanced Search tab, you can search the indexes to identify what is
indexed and the number of hits. The following figure shows the original view of
the Advanced Search tab.
Using the Words and Fields of an Index
Chapter 4. Searching sessions
131
Some applications do not conform to W3C standards for the names of input fields.
Some sites use characters in the field names that are punctuation characters and
are treated by the indexer as word separators. However, this poses a problem for
searching, as the RTV user would expect to be able to type in the field name
exactly as it is displayed in the Response and in the Request.
The drop-down that indicates <No Indexes Selected> can be used to select any of
the IBM Tealeaf cxImpact servers that host indexes: an All-in-One or any
Processing Server.
After the server is selected, two buttons become available. You can select a view of
the data that shows either the individual words or fields that are indexed with the
help of these buttons.
The data that is shown in the text box is filtered by the Date Filter.
Figure 68. List Box example after processing server was selected
In the following example, a small subset of the words arranged alphabetically is
shown. The left column has numbers that indicate how many times each word
occurred in the sessions that are covered by the index with the Date/Time filter
applied.
132
RTV User Manual
Figure 69. Example of populated list box with subset of indexed fields
The following figure shows the list box that is populated with a subset of the fields
that were indexed in the sessions that are covered by the selected index. The "Get
values for field" button is available. After you select any of the fields, you can then
ask for a list of all the values that are found within that field.
Figure 70. Field values - example of results
To acquire field values, click Get values for field. The following figure shows the
results. After values are found, you can select one or more values and then
construct a search term from the selected values.
Chapter 4. Searching sessions
133
v To cancel the search across the indexes for all values of a specific field, click
Cancel.
Figure 71. Exit the dialog
The following figure shows the Field Values that the search has returned. In this
example, both terms were selected by using a logical OR to bind them.
Figure 72. Example of Field Values after search return and terms selected
To create the search term, click Enter selected values into search criteria. The
following figure shows the search term that was created. You can see that the term
includes the field name, the contains operator, and the parentheses-grouped list of
field values, which are combined with the OR operator.
Figure 73. Search terms that was created
134
RTV User Manual
Search templates
The Search Builder Template allows an administrator to customize the search terms
that are presented to the RTV user in the Search Builder pages.
To access the Search Builder template:
1. In RTV, click the Search button.
2. In the Search Builder window, click Setup....
v For more information about the contents of the setup window, see “RTV
Search Setup” on page 99.
3. Click Search Builder Template....
4. The following dialog is displayed:
Figure 74. Search Builder Template
Search Template versions
Through the Search Template editor, you can change the local search template or
reset it to the system template available on the selected Search Server.
You can make one of the following selections.
v System Search Builder Template - RTV downloads and uses the Search Builder
Template stored on the server.
v Local Custom Search Builder Template - Use, modify, or reset the Search Builder
template stored in your local instance of RTV.
System Search Builder Template
For most RTV users, the most effective template is the System Search Builder
Template, which contains all templates necessary to complete effective searches of
active or completed sessions against your captured session data.
Unless you have a specific use for building a custom template, you must use the
provided template.
To use the system Search Builder template:
Chapter 4. Searching sessions
135
1. In the Search Builder Template dialog, click theUse System Search Builder
Template check box.
2. Specify the <hostname>:<port> of the Tealeaf Search Server that hosts the
system search builder template. Typically, you can specify the host name of the
Tealeaf Portal and a <port> value of 19000.
3. Click OK.
4. The local Search Builder template is updated to use the system one.
Editing the System Search Builder Template:
The System Search Builder Template is stored on the server that is specified in the
preceding Server field. Tealeaf administrators can edit this template if they have
permissions to access the server.
Note: To configure the search builder template that is stored on a Tealeaf server,
you must be a Tealeaf administrator.
On the server, it is stored in the following location:
<Tealeaf_install_directory\system\SearchBuilder.xml
See “Editing the Search Builder Template.”
Local custom Search Builder Template
You can edit a local customized version of the search builder template. You can
edit this template or revert it to the default by using the Search Builder Template
dialog.
It is for local use only and cannot be shared to other users.
To use the local custom Search Builder Template:
1. In the Search Builder Template dialog, click the Use Local Custom Search
Builder Template check box.
v To change it, click Edit.... The XML file is loaded into your local text editor.
See “Editing the Search Builder Template.”
v To reset the local version to the template stored on Search Server, click
Reset.... The local template is reset to the one that was originally installed
when RTV was last installed or updated.
Note: To configure a personal search builder template, you must be a local
administrator on the system on which the RTV application is installed.
2. To save changes to your local custom template, click OK.
The local custom Search Builder template is stored in this location:
%userprofile%\Application Data\TeaLeaf\RealiTea\RTVBuilder.xml
See “Editing the Search Builder Template.”
Editing the Search Builder Template
The SearchBuilder.xml file and RTVBuilder.xml files are in XML format and can be
edited with any text editor.
Note: The system-wide template must be edited only by Tealeaf administrators, as
it affects all RTV users.
136
RTV User Manual
Template types
Each system or custom template file can contain multiple templates. Depending on
the type of sessions (active or completed), you must edit the appropriate template
that is described here.
v RTV cannot be used to complete All Sessions searches. You must search by using
an Active search template or a Completed search template.
The template file contains comments that explain how to edit the file and the
meaning of the names. The default template declaration nodes look like:
<Template Name="Default" Type="standard">
<Template Name="Default" Type="active">
Template Name and Type
Applied to
Default/standard
Default template that is applied to searches of completed sessions under
standard indexing
Default/active
Default template that is applied to searches of active sessions. Indexing
does not apply.
Using the default template, you can add, edit, and remove fields to search.
Specifying index fields using search keywords
In the template field, specifications are references to index fields in the Short-Term
Canister and Long-Term Canister.
For more information about the text syntax of search queries, see “Search syntax”
on page 127.
Template customization examples
This information describes different examples that are used to customize templates.
Customizing text fields:
This example specifies a text field to include in a completed search template. The
field value indicates the index field to search for values that are specified by the
user.
<FieldSearch title="Login ID" description="Login ID"
field="TltStsLoginID" type="text" operator="contains" selected="true" />
Other attributes:
Attribute
Description
type
For text search items, set this value to text. For numeric items, set this
value to numeric.
operator
Specifies the operator to apply to the field.
v type=numeric
– all (recommended setting)
– =
– not
– >=
Chapter 4. Searching sessions
137
– <=
– between
– not between
v type=text - no operator
selected
When set to true, the field is preselected when the search tab is opened by
the RTV user.
HTMLcolsize
The width of characters of the text box for data entry.
Customizing numeric fields:
This example specifies a numeric field to include in a completed search template.
The field value indicates the index field to search for values that are specified by
the user.
<FieldSearch title="Hit Count" description="TltStsNumHits"
field="TltStsNumHits" type="numeric" operator="all"
maxValue="4096" />
Other attributes:
Attribute
Description
type
For numeric search items, set this value to numeric.
operator
Specifies the operator to apply to the field. Accepted values:
v all - all operators are available for selection. Only valid value.
maxValue
The maximum value for the numeric value.
v By default, this setting is configured to be the largest value possible for a
signed 32-bit integer, which corresponds to the upper bound accepted by
the search engine.
v If you know that a value is never greater than a specific number, the
search is more efficient if you set maxValue to that number.
Customizing session attribute fields in the search template:
You can add search fields for specific session attributes. A session attribute is a
user-defined variable that is populated by an event. Tealeaf supports the creation
of up to 64 session attributes.
v Session attributes are specified at the search template level by using search
keywords that include a zero-based index number to the specific attribute.
Numbering is as follows: 0, 1, 2, and on through 63.
v See "TEM Session Attributes Tab" in the IBM Tealeaf Event Manager Manual.
v Session attributes can also be added to Portal search templates. See "Configuring
Search Templates" in the IBM Tealeaf cxImpact Administration Manual.
Steps:
Complete the following steps to add a session attribute to the default completed
search template for RTV:
1. Open the system-wide SearchBuilder template file and find the appropriate
template to edit.
138
RTV User Manual
2. Locate the section labeled:
<Template Name="Default" Type="standard">.
3. Locate the grouping that holds all of the User Defined Fields depending on the
type of search. If the following does not exist, insert it:
<Group title="Session Attributes" description="Session Attributes">
4. Insert the following XML into the template, changing it as needed for these
examples.
v Completed Search:
<FieldSearch title="Login ID" description="Login ID"
field="tltstscustomvar0" type="text"
operator="contains" HTMLcolsize="40"/>
v Completed Search:
<FieldSearch title="Session Attribute 03"
description="Session Attribute 03"
field="customvar3" type="text" operator="contains" HTMLcolsize="40"/>
Attribute
Description
title
This value appears in the RTV Search Builder.
description
This value appears when the search term is moused over.
field
This value identifies the index term for the session attribute. The
above value (tltstscustomvar0) is the reference LTC index keyword
for Session Attribute 00. See “Session attribute search configuration
terms.”
type
The session attribute's type of value. Accepted values are text and
numeric.
operator
The operator for the search field
5.
6.
7.
8.
HTMLcolsize
(optional) The width of characters of the textbox for data entry
Edit the attributes as needed.
Save the file.
Close and open RTV to see your changes.
In RTV, load the search template from the server. See “RTV Search Setup” on
page 99.
Session attribute search configuration terms:
Depending on the type of search template you are configuring, you must specify
session attribute search configuration terms by using the following keywords.
v For more information about keywords, see "Search Keywords" in the IBM Tealeaf
cxImpact User Manual.
Table 14. Session attribute search configuration terms
Template
Type
Session Attribute Index
Completed Search Configuration
Term
Active
Session Attribute 00 (LoginId)
field="customvar0"
Active
Session Attribute 01
field="customvar1"
Active
Session Attribute 63
field="customvar63"
Chapter 4. Searching sessions
139
Table 14. Session attribute search configuration terms (continued)
Template
Type
Session Attribute Index
Completed Search Configuration
Term
Completed
Session Attribute 00 (LoginId)
field="tltstscustomvar0"
Completed
Session Attribute 01
field="tltstscustomvar1"
Completed
Session Attribute 63
field="tltstscustomvar63"
Request search configuration:
You can configure RTV search fields to scan fields or sections of the request, or the
entire request.
For example, critical session data can be inserted into the [appdata] section of the
request, since this section is automatically indexed. In the examples below, you can
see how to configure RTV to search the request, the [appdata] section, or a specific
field in the [appdata] section.
v For more information about adding content to the [appdata] section of the
request, see "Configuring CX Indexing" in the IBM Tealeaf CX Configuration
Manual.
Table 15. Request search configuration
Search area
Search Keyword
Notes
entire request
request
Searches the entire request.
[appdata] section
request/appdata
Searches the [appdata]
section of the request for a
user-specified value.
MobileDeviceType variable of request/appdata/
the [appdata] section
mobiledevicetype
Searches the
MobileDeviceType field in the
[appdata] section of the
request for a user-specified
value.
Note: The request and request/appdata keywords can be used for searches for
both active and completed sessions. See "Search Keywords" in the IBM Tealeaf
cxImpact User Manual.
Field to search entire request
<FieldSearch title="All Request" description="All Request"
field="request" type="text" operator="contains" selected="true" />
Field to search the [appdata] section
<FieldSearch title="AppData" description="AppData"
field="request/appdata" type="text" operator="contains" selected="true" />
Field to search for a value in the MobileDeviceType variable in the [\appdata]
section
<FieldSearch title="Mobile Event" description="Mobile Event"
field="request/appdata/mobiledevicetype" type="text"
operator="contains" selected="true" />
Form field search configuration:
FieldSearch specifies a form field to include in the template.
140
RTV User Manual
<FieldSearch title="FormField" description="FormField"
field="formfield" type="formfield" />
IP address field configuration:
Beginning in Release 8.4, RTV supports searching for IP addresses in IPv4 or IPv6
format.
v If you have newly installed RTV 8.4 or later, then your default
SearchBuilder.xml file contains the requisite fields that are listed.
For completed session search templates, you can insert the following fields to
enable RTV users to search for IP addresses among completed sessions.
v For active sessions, IP addresses are not indexed. Therefore, they are available
for search by searching the request buffer for the name-value pairs of the
addresses that are inserted by the IBM Tealeaf CX Passive Capture Application.
See "Support for IPv6" in the IBM Tealeaf CX Installation Manual.
<FieldSearch title="IP address" description="ipv6_remote_addr"
field="ipv6_remote_addr" type="text" operator="contains" />
<FieldSearch title="IP address (legacy)" description="TltStsIPaddr"
field="TltStsIPaddr" type="text" operator="contains" />
Table 16. IP address field configuration
Field Name
Search Keyword
Description
IP Address
ipv6_remote_addr
Search for IP addresses in IPv6
format or IPv4 format
v For IPv6 addresses inserted into
this field, values are expanded, if
they are condensed, and
zero-padded to ensure a string of
consistent length.
v For IPv4 addresses inserted into
this field, values are expanded into
an IPv6-style formatting, in which
each of the four octets of the IPv4
is dispersed into the last four
groups of the 8-group IPv6 format.
v Ranges and wildcards are accepted
for this field.
IP Address
(legacy)
tltstsipaddr
Search for IP addresses in IPv4
format
v Data that is entered into fields of
this type are zero-padded and
normalized into a single string of
digits before submission for search.
WordSearch configuration:
WordSearch passes the specified search string directly to the search engine,
bypassing the field contains value form structuring. When used with the
hidden_text type, a search template can contain search entries that are submitted
without any user input.
<WordSearch title="ASP Errors" description="ASP Errors" field="freetext"
type="hidden_text" textValue="(response contains (error w/5 ASP))" />
Chapter 4. Searching sessions
141
Managing result sets in RTV
When you run a search in RTV, the set of sessions that returned is known as a
result set. For repeated searches or searches that require more detailed analysis,
RTV enables you to save result sets and then retrieve, share, and manage them.
Note: Searches of active sessions do not generate result sets, even if you configure
RTV to automatically generate result sets from search. Result sets cannot be created
from active sessions.
v To manage result sets, select Tools > Result Sets... from the RTV menu. The
Result Sets window is displayed.
Creating result sets
By default, RTV does not create result sets when a search is run. You can configure
RTV to create result sets for you whenever a search is run.
1. In the RTV menu, select Tools > Result Sets.
2. In theResult Sets window, click the Create a result set on each search check
box.
3. Click OK.
Whenever a search is run through RTV from your desktop, a result set is created
on search server and is accessible through theResult Sets window.
v Result sets can also be created when you search through the Portal. See
"Overview of Segments" in the IBM Tealeaf cxResults User Manual.
RTV result sets window
In the Result Sets window, each available result set is listed.
v By default, RTV result sets are configured to expire after seven days. Expired
result sets are no longer available. For more information about changing the
expiration of result sets that you create, see “RTV Result Set Options” on page
146.
v In addition to the result sets that you create, the list can contain result sets that
are shared with you based on your authorization group. See “RTV Result Set
Options” on page 146.
v To review the properties of a result set, double-click the row in the displayed
list. See “Result set properties” on page 145.
142
RTV User Manual
Figure 75. RTV Result Sets Window
v To load a result set, select the result that is set in the displayed list and click
Load.
v To review or edit the properties of a result set, select the result set and click
Properties.... See “Result set properties” on page 145.
v To delete a result set, select it and click Delete....
Copy... - Copy the selected result set.
Options... - Sharing and expiration options for newly created result sets. See
“RTV Result Set Options” on page 146.
v Customize View... - You can customize the order of displayed columns in the
Result Sets window. See “Customizing view” on page 145.
v You can create unions and intersections of multiple result sets. See “Merging
result sets” on page 144.
v
v
Result set columns
The following columns are available for display in the RTV Result Sets window.
v The following columns are listed in the order of display for the default view. For
more information about customizing the fields to display, see “Customizing
view” on page 145.
v Some column values can be edited. To edit properties, double-click a value. See
“Result set properties” on page 145.
Column
Description
Name
The name of the result contains a date stamp for when it was runand some
or all of the search that was run.
Chapter 4. Searching sessions
143
Owner
The user name of the individual who initially run the search is registered
as the owner of the result set.
v A result set can be deleted by the owner or by the Tealeaf administrator.
Sessions
Number of sessions in the result set
Created
Time and date stamp when the result set was generated
Expires
Time and date stamp when the result set is scheduled to expire
ShareGroups
If the result set is shared, it is available for all RTV users unless share
groups have been specified for sharing newly created result sets. See “RTV
Result Set Options” on page 146.
Search String
The specific search string that is submitted to the search engine to run the
search
Search Description
The user-friendly description of the search string
Notes
Any notes that you add for the result set.
v To add notes, double-click the Notes column. See “Result set properties”
on page 145.
Selecting server
You can configure RTV to retrieve result sets that you created or that have been
shared with your authentication group from any server in the Tealeaf environment.
v By default, result sets are stored on the server that hosts the Tealeaf Portal. To
configure the appropriate server, select Tools > AutoConfig from Tealeaf
Master....
– In a multi-server environment, this server may be different from the
configured Search Server for RTV.
v To retrieve result sets from a different Tealeaf Portal Server, enter the host name
and port number in the textbox at the top of the window in the form
<hostname>:<port_number>.
v To refresh the list of result sets from the specified Portal Server, click Refresh.
v To configure RTV to create a result set whenever you run a search, click Create a
result set on each search. The result set is stored on the configured Portal
Server.
v See Chapter 1, “CX RealiTea Viewer overview,” on page 1.
Merging result sets
You can complete union and intersection operations on multiple result sets to
create additional result sets. The new result set is listed with a name of Union or
Intersection followed by the timestamp of when it was run. The Search String
column contains the details of which result sets were combined to create the new
one.
v To create a union result set, select two or more result sets in the displayed list.
Then, click Union.
v To create an intersection result set, select two or more result sets in the displayed
list. Then, click Intersect.
144
RTV User Manual
v You can complete these operations on Union or Intersection result sets.
v Generated Union or Intersection result sets are not shared by default.
Result set properties
A list of descriptions of result set properties.
Property
Description
Result Set Id
Unique Search Server identifier for the result set. This value cannot be
modified.
Name
Name of the result set, which is assigned by default. This value can be
changed.
Owner
The owner of the result set
Create time
The time when the result set was created
Expiration
The time when the result set is scheduled to expire. You can change the
expiration time for the selected result set.
v To retain the result set indefinitely, click the Never Expires check box.
v For more information about changing global expiration settings, see
“RTV Result Set Options” on page 146.
Shared To share the result set, click the Shared checkbox. To select the
authentication groups with which to share the result set, click Groups....
v For more information about changing global sharing settings, see “RTV
Result Set Options” on page 146.
Search String
The specific search string that is submitted to the search engine to retrieve
the result set. Although you cannot modify this value, you can copy and
paste it.
Search Description
A user-friendly description of the result set.
Notes
Use this text box to store notes on the result set.
Customizing view
You can customize the columns that are displayed in the Result Sets window.
Chapter 4. Searching sessions
145
Figure 76. Customizing the Result Sets Window
By default, all available columns are displayed in the window. However, some of
these columns can not be useful to you, or you can re-order their display. The Field
Values pane is not populated in this view.
v To add a column to the display, select it in the left pane. Then, click Add -.
v To remove a column from the display, select it in the right pane. Then, click <Remove.
v To set the current columns in the right pane as the default columns in the
displayed order, click Set Defaults.
v To change the order of display of a column, select it in the right column and
click Move Up or Move Down to reposition it.
v To save changes, click OK.
RTV Result Set Options
In the Result Set Options window, you can configure properties that are applied to
newly generated result sets.
Note: These options are not applied to results that are already created.
Setting Result Set Expiration
146
RTV User Manual
You can configure the number of days after which result sets expire. Increasing the
number of days increases the storage requirements for result sets on the Search
Server on which they are created.
v To disable expiration of result sets, click Result sets never expire. When
selected, result sets must be deleted to be removed from the Search Server.
Sharing Result Sets
To share result sets with members of selected groups, click the Shared check box.
To select the sharing groups, enter the group names as comma-separated list in the
text box or click Groups to select them.
v The list of available groups to which you can share new result sets depends on
whether Portal or NT domain authentication mode is enabled. See "Configuring
the Search Server" in the IBM Tealeaf CX Configuration Manual.
Exporting session data from RTV
When a search is run through RTV, the returned results include various
session-related data that is available for export. You can customize your view to
include other data fields that are returned as part of the search results or session
list and then export the displayed view to Excel or .CSV format for use in
third-party applications. This data can include name-value pairs of request
variables, statistics that are tracked by Tealeaf, and more.
v If you download a session list from the Portal to RTV, you can customize the
view in RTV and export the data from your Portal search.
v A similar technique for exporting session data is available directly from
Portal-based search. See "Searching Session Data" in the IBM Tealeaf cxImpact
User Manual.
For example, suppose that you are receiving complaints that visitors to your web
application are receiving Status Code 500 errors on the checkout page. If you are
capturing the email address of each visitor to your web application in the
CustomVar00 session attribute, you can configure a search to find all of the sessions
where this error occurred and then add the CustomVar00 value to the displayed
view for the Session List. The exported view contains the email addresses and the
session identifiers for each customer who encounters this issue, which can be used
for follow-up by Customer Support.
Note: To export a specific set of data, you must know the location or variable in
the request that contains the data.
Exporting data commands
Whether you customize the view of the Session List or the Search Results or you
do not, you can export the displayed list to Excel or .CSV format.
The following options are available in the Edit menu:
Command
Description
Copy Session List to Excel
Open the current contents of the Session List as a new worksheet in Excel.
Copy Search Results to Excel
Open the current contents of the Search Results as a new worksheet in
Excel.
Chapter 4. Searching sessions
147
Export Session List to CSV
Export the current contents of the Session List to .CSV format.
Export Search Results to CSV
Export the current contents of the Session Results to .CSV format.
The outputted data can be manipulated as needed by an appropriate third-party
tool.
Customizing columns
When a search is run in RTV, the results are displayed in two panes.
v Session List - Each line of data in the upper pane indicates a separate session in
which criteria of the search found at least one match.
v Search Results - Each line of data in the lower pane indicates an individual
instance of a search match. Depending on the search criteria, a single session
may contain multiple search matches.
You can customize the columns that are displayed in each pane.
v To change the columns that are listed in each pane, right-click in the pane and
select Customize View.... For more information about the displayed window, see
“Managing result sets in RTV” on page 142.
Available data in the Session List
The Session List displays individual sessions, so the data in it applies to the entire
session.
The following data are included by default:
v Flags
v SessionID
v Score
v TimeStamp
v
v
v
v
v
Page Count
Duration
Anno
Login ID
Events
v Title
The following data is available for adding into the session list:
v Conn Type
v EndTimeStamp
v IP Address
v Session GUID
v SessionAttr
– The content in SessionAttr is dynamically generated by the Tealeaf Canister.
For more information, select View > Session Attributes in the RTV menu.
v User ID
v UserDef1
v UserDef2
148
RTV User Manual
v UserDef3
v UserDef4
Available data in the Search Results
The Search Results pane displays individual hits where the search found a match,
so displayed data is taken from the listed hit.
The following data are included by default:
v Session ID
v Page
v
v
v
v
v
v
Score
Timestamp
Gen Time
NetTime
RoundTrip
Bytes
v Status
v Source
v Result
Name-value pairs within the following data can be available for adding into the
session list.
Note: The available data varies based on the session. These items are extracted
from the Tealeaf Canister with the session data.
v ExtendedUserAgent (section of request)
v
v
v
v
Hit ID
RawRequest
ResponseHeaders
SessionAttr
v Fact Values
– Dimensions
v
v
v
v
v
TimeBlock
Url
appdata (section of request)
cookies (section of request)
env (section of request)
v iamie (section of request)
v timestamp (section of request)
v urlfield (section of request)
Monitoring client UI Events through RTV
When implemented, IBM Tealeaf CX UI Capture for AJAX enables the capture of
user interface events that do not issue requests to the server. For example,
AJAX-based interfaces can change the page displayed to the user based upon
JavaScript routines that are embedded in the page. If the JavaScript does not make
a request to the web server, Tealeaf does not capture the event by default.
Chapter 4. Searching sessions
149
Note: IBM Tealeaf CX UI Capture for AJAX is only available to legacy users.
v See "UI Capture for Ajax Guide" in the IBM Tealeaf UI Capture for Ajax Guide.
Implementing the IBM Tealeaf CX UI Capture for AJAX may not be possible
currently. However, you can configure RTV to enable some of the UI Capture
functionality. This information describes how to configure RTV to do limited replay
and highlighting of pages which use JavaScript and/or Ajax.
HighlightOnlyURL profile rules
Without UI Event capture, replay of pages that uses Ajax is generally not possible.
If the Ajax requests happen to post form field information that corresponds to
named elements on the page, it sometimes possible to 'simulate' UI events, and to
display some page updates that happen during the session.
To determine whether a page is a candidate, examine it for the following
characteristics:
v Is it an Ajax page? Ajax pages can be of type text/plain, text/xml, text/json, or
others. An Ajax page can also be text/html, but the response data may not look
like a complete html page. It might contain <div> and other element tags yet no
main <html> tag.
v Examine the data in the [urlfields] section of the request. Do these entries
correspond to HTML page elements on a previous page?
v Are there Ajax calls for all or nearly all UI actions on the page?
If all of these conditions are met, you can create a rule to tell RTV to treat the page
as a Highlight Only page. The response data in Highlight Only pages is not used
as a displayable HTML page. Instead, RTV leaves the previous page that is
displayed, and the form fields from the Highlight Only page are used to populate
fields with data.
Under optimal conditions, the act of populating the field values causes OnClick or
OnChange events to fire, which causes JavaScript in the application to run. This
JavaScript generates an Ajax request for a page that is marked as highlight only.
The application itself then uses the data that is returned from the captured page
itself to update the displayed page.
Creating through RTV
There are multiple ways to create or edit HighlightOnlyURL rules.
From Replay view
In Replay view, right-click the page, and select Replay Rules > Treat this page as
Highlight Only. You can optionally edit the URL pattern in the resulting dialog to
add wildcard characters in place of sections of the string that might differ from
session to session.If the URL contains a query string, you might replace everything
after the ? with a *.
From Request view
If the URL itself is not unique enough to distinguish the prospective HighlightOnly
page from a standard page, you can use values in the Request view to further
qualify the rule.
150
RTV User Manual
v In Request view, locate an entry that distinguishes this page from standard
pages. Common examples are ResponseType and REQUEST_METHOD.
v Right-click the located entry, and select Treat page with this request value as
Highlight Only.
v Edit the URL pattern as needed.
Editing HIghlightOnly rules
Like all other profile rules, the HighlightOnlyURL rules can be edited in the profile
in the Options dialog.
Getting accurate highlighting of JavaScript links
This information describes the steps that one can follow to configure accurate
highlighting of JavaScript links. This helps RTV to examine URL and form field
data.
Configuring the web application for highlighting
To highlight buttons and populate element values from page to page, RTV
examines the URL and form field data. When an application uses JavaScript to
submit data from a page, the posted data may not contain information that RTV
can use to accurately highlight. Without using Tealeaf UI Capture, simple
modifications can be made to the application to facilitate accurate highlighting, if
you want.
These modifications consist of including more information with the form data to
indicate the button that was clicked.
1. Create a special named hidden form element, and set the value of the form
element to the ID of the button that was clicked.
2. Verify that the hidden element gets submitted.
3. When you highlight a page, RTV looks for the named hidden element in the
form data and highlights the button corresponding to its value. The hidden
form element can have any name that is constant across all applications that
you want to replay.
Configuring RTV to recognize elements for highlighting
RTV must highlight the correct elements. This information describes steps to
configure RTV to recognize elements for highlighting.
Configuring the Highlight Element Name setting
RTV must be configured to use the name. In the Advanced options tab, enter the
name of the hidden element as the value for the Highlight Element Name.
v The default name is __EVENTTARGET.
v See “Advanced Options tab” on page 207.
Configuring the Invoke JavaScript When Highlighting setting
RTV must also be configured to start JavaScript when it is highlighting. This
feature must be enabled so that the population of form field data can cause
JavaScripts on the page to run which, in turn, triggers any related Ajax requests.
v See “Replay tab” on page 187.
Chapter 4. Searching sessions
151
Example JavaScript
An example of a page that uses JavaScript to do page submits and that can be
modified to allow RTV to highlight the clicked buttons.
<html><head><title>Javscript Highlighting Example</title></head>
<!-This is an example of how to get accurate replay highlighting of
buttons that do submits via javascript. It consists of creating
a hidden element with a specific name and then setting the name of the
button that was clicked into the hidden element’s value at
submit time.
The element of type ’hidden’ can be named whatever you want,
it must be named the same across all applications that you want to replay.
You must set "Highlight Element Name" in RTV’s Advanced options
tab to match whatever name you choose.
-->
<script>
function doSubmit(buttonId)
{
document.TheForm.__EVENTTARGET.value = buttonId.id;
document.TheForm.submit();
}</script>
<body>
Javscript Highlighting Example
<br><form name="TheForm" action="/JSHighLightExample.html">
<input id="ButtonOne" type="button" value="Button 1"
onclick="javascript:doSubmit(this)">
<input id="ButtonTwo" type="button" value="Button 2"
onclick="javascript:doSubmit(this)">
<input id="ButtonThree" type="button" value="Button 3"
onclick="javascript:doSubmit(this)">
<input id="ButtonFour" type="button" value="Button 4"
onclick="javascript:doSubmit(this)">
<br>
<input id="ButtonFive" type="button" value="Button 5"
onclick="javascript:doSubmit(this)">
<input id="ButtonSix" type="button" value="Button 6"
onclick="javascript:doSubmit(this)">
<input id="ButtonSeven" type="button" value="Button 7"
onclick="javascript:doSubmit(this)">
<input id="ButtonEight" type="button" value="Button 8"
onclick="javascript:doSubmit(this)">
<input type="hidden" name="__EVENTTARGET">
<br>Field 1:<input name="Something1">
<br>Field 2:<input name="Something2">
<br>Field 3:<input name="Something3">
<br>Field 4:<input name="Something4">
<br>Field 5:<input name="Something5">
<br>Field 6:<input name="Something6">
<br>Field 7:<input name="Something7">
<br>Field 8:<input name="Something8">
<br>Field 9:<input name="Something9"></form></body></html>
AJAX Replay
If your web application uses AJAX replay, additional configuration can be required
for proper playback in RTV. See “AJAX Replay” on page 94.
Note: IBM Tealeaf CX UI Capture for AJAX is only available to legacy users.
152
RTV User Manual
Chapter 5. Menu tools
Through the RTV menu system, you can access all tools for finding and replaying
sessions, and also replay and advanced options to configure RTV to meet your
needs.
RTV Menus
The following menu tools are available in IBM Tealeaf CX RealiTea Viewer.
v Some menu items are displayed only in specific views of the data.
– See “Replay view” on page 30.
– See Chapter 3, “Request view,” on page 73.
– See “Response view” on page 86.
v Some menu tools are selections. When selected, the applicable tool, which is
usually a display switch, is enabled.
For more information on the contents of the application toolbars, see “Application
toolbars” on page 175.
File menu
This information describes the different options available in the RTV File menu.
Option Description
Open
Open a Tealeaf® archive (.tla), a Tealeaf session (.tls) file, or a Tealeaf
reference (.tlx) file.
v If you create an RTV .exe to which a Tealeaf session is bound, you can
select to open all file types and then select the RTV .exe in the Open
dialog to open the session or sessions that are attached to it. See Create
Viewer exe with Session(s) Attached.
Close
Close the current view or search results.
Save
Save the current session.
Save Selected
You can use the Save Selected command to save the selected sessions as a
Tealeaf® session file.tls
.
Properties
When a.tls
file is loaded, the Properties dialog displays the version of RTV that saved
the file, the version of the browser on the computer that saved the file, the
save timestamp, and additional information.
Send To
© Copyright IBM Corp. 1999, 2015
153
The Send To command saves the session file to a temporary location, starts
your email client, and attaches the saved session file to the email. It
functions like the Save As command.
Send Link To
You can send a link to the session through your default email application.
When selected, the link to the session is attached as a .TLX file.
v The entire session is not included.
v You must send or close the email before you continue to use RTV.
Exit
Exit and close the RTV application.
Save As
Use the Save As command to save your current session under a new name.
You can save your session as a Tealeaf session (.tls), a Tealeaf archive (.tla), or a
Tealeaf reference (.tlx) file.
The .tls format is usually used for sending sessions by email or attaching sessions
to problem reports. The .tls format can contain session annotations. The .tls
format includes copies of all binary files that are used by all pages of the session.
For most RTV users, the .tls format is appropriate.
The .tla format is used by the Tealeaf Archive Reader to re-examine a stored
session. This format is normally used by Tealeaf administrators in the development
of new events, new RTA rules, and new rules for privacy blocking or encryption.
The .tla format can be indexed by common desktop indexing programs. The .tla
format does not contain any binary files.
v .TLA files can be uploaded to the Event Tester for testing sessions.
Note: Sessions that are saved as .TLA files through RTV can have a different set
of events and hits if session fragments are merged by RTV. To ensure consistency
of results, you must verify that any auto-merging options are disabled in RTV
before saving the .TLA file. See “Annotations in RTV” on page 181.
The .tlx format contains the canister identifier for each session and the name of
the server from which it can be retrieved. When the .tlx file is opened, the actual
session data is retrieved based on the references, by using the appropriate
authentication mechanism for the accessing Tealeaf user. Since .tlx documents do
not contain session data, TLX files are much smaller in size than .tls or .tla files.
The format also provides an extra measure of security for session data.
Annotations in a session can be saved to different locations that depend on when
the annotation is placed in the session.
v If the annotation is added and committed to the session while the session is
being viewed from the canister, and before the session is saved to the file
system, then the annotation (after commitment) is saved into the canister and is
visible to all RTV users.
v If the annotation is added after the session is saved under a new name, then the
post-commitment annotation belongs only to the copy of the session that is
saved on the file system. It is available for anyone to whom the file is delivered
and is not visible in the canister.
154
RTV User Manual
Print
Use the Print command to print sessions to the default printer for your local
workstation.
Figure 77. Print Session dialog
In the Print Session dialog, select the pages from the session you wish to print.
Click the box next to pages to toggle their inclusion in the printout.
v To select all pages for printing, click Select All.
v To clear all pages from being printed, click Clear All.
To print the background colors and images of each selected page, click Print
Background Colors and Images.
To print the selected pages, click Print.
v To configure print options that include selecting the printer to which to send the
output before printing, click Print With Options....
Edit menu
This information describes the different options available in the RTV Edit menu.
Option Description
Copy
When the Session List view is visible, this command copies a list of pages
of all selected sessions to the clipboard.
Chapter 5. Menu tools
155
Delete
When the Session List view is visible, this command deletes all selected
sessions from the document.
Copy Session List to Excel
This command opens your installed version of Microsoft Excel displays the
list of selected sessions, by using the columns you select for display. See
Exporting session data from RTV.
Copy Search Results to Excel
This command opens your installed version of Microsoft Excel and
displays the list of Search Results in the lower pane of the Session List, by
using the columns you select for display. See Exporting session data from
RTV.
Export Session List to CSV
This command saves the list of selected sessions to a CSV file, by using the
columns you select for display. See Exporting session data from RTV.
Export Search Results to CSV
This command saves the list of Search Results shown in the lower pane of
the Session List to a CSV file, using the columns you have selected for
display. See Exporting session data from RTV.
Select All
Select all sessions in the Sessions List.
Clear Selection
Clear any sessions that are currently selected in the Sessions List.
Search Completed Sessions
You can specify and run searches of completed sessions with this
command. See Searching sessions.
Search Within Sessions
After you have searched and retrieved a list of sessions, you can run a
subsequent search of the found sessions. Use this command to perform a
search of the sessions that are displayed in the Session List. See RealiTea
Viewer - Session Search and Subsearch.
Event Editor
Opens the Tealeaf Event Manager, the Portal-based interface for creating
events, alerts, dimensions, and session attributes.
.
View menu
This information describes the different options that are available in the RTV View
menu.
Show Image, JS, CSS, etc. Pages
When the Main Window Content pane is displaying a hit in Request or Response
view, selecting this command displays static content files such as images,
JavaScript, CSS, and more, in the Viewable Pages list. In the following example, the
Viewable Pages list on the right is displaying static content.
156
RTV User Manual
Figure 78. Main Window Content Pane
Show Event Pages
When the content pane of the Main Window is displaying a hit in Request or
Response view, this command toggles the display of Canister event pages in the
Viewable Pages list. When you enable this option, if the session contains Canister
events, they can now be reviewed and selected as separate pages in the Viewable
Pages list.
Note: In Tealeaf Release 8.0 or later, Canister events are not stored as separate
pages. As a result, this command is not available for sessions that are captured by
these versions of Tealeaf. For Release 8.0 or later, all event data is stored in the fact
section of the request. See Chapter 3, “Request view,” on page 73.
v A canister event is a read-only event that is monitored within the Tealeaf Canister.
These event values are stored with the session. See "TEM Events Tab" in the IBM
Tealeaf Event Manager Manual.
v This command applies only to Request and Response views.
In the figure below, the image on the right side shows the effects of selecting this
command.
Figure 79. Viewable Pages with and without event pages
Show UI Event pages
If the IBM Tealeaf CX UI Capture for AJAX solution is deployed, Tealeaf is
capturing and processing user interface events as part of the session information.
These events can be displayed in the Navigable Pages List as subpages of the page
on which they occurred.
Note: IBM Tealeaf CX UI Capture for AJAX is only available to legacy users.
v See "UI Capture FAQ" in the IBM Tealeaf UI Capture for AJAX FAQ.
v See "UI Capture for AJAX Guide" in the IBM Tealeaf UI Capture for AJAX Guide.
Chapter 5. Menu tools
157
Note: In UI event hits, all of the important data is stored in the request, and the
response is irrelevant to replay. For UI event hits in which the reported status code
can cause problems in replay, RTV treats the page as Status Code 200, which
indicates that all is well. For example, if the TealeafTarget page reports a Status
Code 404 (Not Found) error, RTV treats the page as a Status Code 200, which
allows replay to continue despite an issue with a page that is not ever replayable.
The true status code value reported from the server is stored in the [env] section
of the request.
RTV View
Default Behavior
Request view
By default, UI event hits are displayed in Request view.
v See Chapter 3, “Request view,” on page 73.
Response view
In Response view, they are hidden by default, as they rarely contain useful
information in the response from the TealeafTarget page.
v See “Response view” on page 86.
Auto replay
When a session is selected, you can choose to automatically replay the session,
which immediately places the session in the RTV browser that is configured for
replay that is based on the currently selected options, and steps through the pages.
IE Cache
Embedded in RTV is a customized version of Internet Explorer through which RTV
replays Tealeaf sessions. To enhance performance of replay, this version of Internet
Explorer includes a cache, where assets common to multiple locations in your web
application can be stored on your hard disk for faster access.
v To identify assets are loaded from the IE Cache, review the Source column for IE
Cache in the Page Load Details screen. See “Context menu” on page 177.
158
RTV User Manual
Figure 80. IE Cache window
v To select an item, click it. To select multiple items, press SHIFT or CTRL and click
them.
Command
Description
Delete Delete the selected items from the cache.
Delete All
Delete all items from the cache.
Open
Open the selected item in the default application for it.
View in Notepad
View the selected item in Notepad.
Note: This command is useful only for text files, such as .htm or .js files.
Report
Generate a report of the contents of this window in Excel.
Refresh
Refresh the display of the IE cache.
Add Modify Rule
Create an ExternalFileModify rule to change or filter the contents of the
captured page when it is loaded from the cache. See “RTV Profile” on page
191.
Chapter 5. Menu tools
159
Edit Modify Rule
If you have already created a modify rule for the selected item, you can
edit the rule when the item is selected. See “RTV Profile” on page 191.
OK
Save changes and close.
Show Images
The Show Images command opens the Image List, which is a list of static content
that is loaded in the current document. The Image List itemizes the src= attributes
in all pages in all available sessions.
v This list is populated automatically with known content types from sessions as
they are loaded. Any static content that is displayed in one session is available
to other sessions that might not contain it.
Note: This list does not contain any static files that are requested dynamically as
a result of running JavaScript.
v You can also force a repopulation of the Image List. To populate it, select View >
Get Images from the RTV menu.
Figure 81. Image List
Column
Description
Mod
160
RTV User Manual
A value of Yes indicates that an external file modification rule is created for
this image. For more information about modifications, see “RTV Profile”
on page 191.
Size
The size of the file in bytes
Content Type
The content type of the image
Image Name
The full URL of the static file
At the bottom of the Image List, you can select the following commands:
v Delete - Delete selected image from session
v Delete All - Delete all images that are displayed in list
Note: Profile rules that reference deleted images are not updated or removed.
During subsequent replay, you may encounter replay errors if these replay rules
are not corrected.
v Save - Save the selected image to your local computer
v Save All - Save all images to your local computer
v Open - Open the selected image in the file's viewing application
v
v
View in Notepad - View the file in Notepad.exe
Report... - Generate a tab-separated report on the contents of the image list,
including the size, content type, and the URL of the source image.
Add Modify Rule... - Add an External File Modify rule to your profile. For
more information about modifications, see “RTV Profile” on page 191.
v Edit Modify Rule... - If the image has an external file modify rule that is
created for it, you can edit it as needed. For more information about
modifications, see “RTV Profile” on page 191.
v
List Session Pages
When search results are displayed during replay of a specific session, the List
Session Pages command has two distinct modes. It operates in different ways if it
is started from the replay of a single session or from a Search Result page.
List Session Pages during replay of a single session:
When you select View > List Session Pages when a single session is opened, the
Session Pages dialog displays all pages in a session.
Chapter 5. Menu tools
161
Figure 82. Session Pages
The total number of fragments in the session is listed above the table, and the
currently displayed fragment is listed in the textbox.
v If the session is not fragmented, this box is empty.
v To display a different fragment, select it from the drop-down list.
v To toggle the display of events in the list, click the Show Event Hitscheck box.
v To toggle the display of static content pages like images, JavaScript, click the
check box next to Show Images, JS, CSS, etc. pages.
v To copy the contents of the List Pages pane to a new text file in Notepad, click
Copy to Notepad.
For more information about the columns in the table, see “Viewable Pages list” on
page 38.
List Session Pages from a search session segment:
When Search Results are displayed and at least one session is selected, the List
Session Pages command opens a PageListtab that displays all of the pages in the
selected sessions.
An example of the Page List tab is shown in the figure below:
162
RTV User Manual
Figure 83. Page List
When a single session is selected, the resulting Page List dialog includes the
Session Canister ID. When multiple sessions are selected, the tab includes a simple
numerical sequence number.
As shown in the preceding figure, the PageList session segment looks identical to
the Hit session segment returned after a Search. Just like the Hit Session Segment
pane, this dialog can be customized.
v To customize, right-click in the table and select Customize View....
List ESI/Missing/Cache page data
When the currently loaded sessions contain ESI, missing, or server-side cached
content, this selection opens the following window, which provides information
about these objects.
Chapter 5. Menu tools
163
Figure 84. ESI/Missing/Cached Pages window
v To save an object to your local hard disk, click Save....
v To view a text-based object in Notepad.exe, click View in Notepad....
Column
Description
Status Code
Status code that is associated with the object
Size
Size of item in bytes
Content Type
HTTP content type information
TimeStamp
Timestamp reported by Tealeaf
Remote TimeStamp
Timestamp reported by the cache server
URL
URL for the object
Location
Location from which the object was retrieved:
v LiveSite - from the origin server
v
RemoteTLI - from a TLI file that is stored on a remote server
TLI Name
If the object is stored in a TLI file either locally or on a remote TLI server,
the TLI file name is listed.
MD5
MD5 associated with the object
Commands
The following commands are available for use.
View Request: When a session is selected for replay, use this command to view the
request data for the session. See Chapter 3, “Request view,” on page 73.
164
RTV User Manual
View Response: When a session is selected for replay, use this command to view
the response data for the session. See “Response view” on page 86.
View Events: When a session is selected for replay, use this command to view the
events that occurred on each page of the session. See “Events view” on page 89.
Show Page Load Details: When a page of a session is selected in Replay view, use
this command to view the page load details for the page. See “Context menu” on
page 177.
Note: The Page Load Details option is only available in Replay view.
Report: You can create an HTML report of either a summary of sessions or a list of
all pages by using the Report command.
Toolbars:
Use this command to select the toolbars to display in RTV and to configure toolbar
options.
Available toolbars:
Main Toolbar
Replay Navigation Toolbar
Request/Response/Replay Toolbar
Page Dropdown Toolbar
Search Toolbar
To toggle the display of text on each menu button, click the Display Toolbar
Labels check box.
v To hide from display any toolbar that does not apply to the currently active RTV
view, click the Hide Toolbars check box.
v To apply toolbar changes, click OK. The available toolbars are updated to reflect
the changes.
v To cancel changes, click Cancel.
v
v
v
v
v
v
Show HTTP header:
When a hit is selected in Response view, this command displays the HTTP headers
sent by the web server to the visitor.
The following figure shows an example of a Response view with HTTP headers.
The HTTP headers also can be displayed when the Response View is in Hex
display mode.
Chapter 5. Menu tools
165
Figure 85. Response view
Note: If the HTTP Header Skip option is set to NEVER, then RTV has no knowledge
of the lines that compose the header, so RTV cannot display the HTTP header in
Response View.
Zoom
In Replay view, you can use the Zoom tools to change the magnification of the
main window.
v Set to Fit to change the magnification so that the entire page fits in the display
window.
v Set to Fit in Width to change the magnification so that the page width fits in
the main window width.
– This setting is automatically enabled for replay of mobile sessions if replay
screen size is controlled by user agent attributes.
– This setting is not supported for IE6.
Note: For mobile browsers, screen dimensions are populated in the Extended
User agent section of the request by the Tealeaf Reference session agent.
Enabling this function requires the IBM Tealeaf CX Mobile module, a
separately licensable product for the IBM Tealeaf CX system. please contact
your IBM Tealeaf representative.
– For more information about mobile browser replay, see "Search and Replay
for Mobile Web" in the IBM Tealeaf CX Mobile User Manual.
v This setting is applied globally to all sessions loaded in RTV.
Show Viewable Pages list
When Show Viewable Pages is selected, the main window includes the Viewable
Pages list on the left side.
Show App Events: This option toggles display of application events in the
Viewable Pages List, when that pane is displayed.
Show Form Fields: When the Show Viewable Pages list is displayed and the Form
Fields Pane command is selected, the Show Viewable Pages pane includes the
Form Fields Pane.
166
RTV User Manual
Tools menu
This information describes the different options that are available in the RTV Tools
menu.
Option Description
Add Annotation
When a page is selected, you can add an annotation to the page, which can
be used to provide additional contextual information such as support case
numbers, troubleshooting notes, and similar useful information.
Annotations are stored with the session data, when it is written to disk or
back to the server. To delete a created annotation, right-click the annotation
on the page and select Delete.
Save Annotations
When one or more annotations are added to the session, this option
becomes available. When selected, the unsaved annotations are stored with
the session data in the Canister. You can save annotations to active or
completed sessions.
Note: Annotations are not available for search until the session has been
indexed or re-indexed. You cannot search for annotations in active sessions.
Diff Sessions
When two sessions are selected, you can use this command to display
differences between the sessions. The Diff Sessions command can be used
in Request view or Response view.
Create Viewer exe with Session(s) Attached
You can use this command to create an executable file that contains viewer
controls to replay only the selected sessions, which are attached to the file.
You can open the session file that is attached to an RTV .exe through RTV.
See Open.
Results Sets
Use the Results Sets command to review, copy, delete, join, and analyze
saved result sets. Optionally, you can configure RTV to automatically create
and save result sets for each set of returned search results. See Managing
result sets in RTV.
Find and Merge All Fragments of this Session
During normal operations, some sessions can become fragmented because
of interruptions in user activity or other unanticipated reasons. Using this
command, you can run a search for session fragments that are related
through one or more variables in the request. Fragments with matching
variables are joined to form a single session in the sequence that is dictated
by the timestamps on the session data.
Update Active Session
If a selected session is still being actively generated by a visitor's actions,
you can use this command to update the Session List with the latest
captured data from the session.
AutoConfig from Tealeaf Master
Updates the local configuration that is based upon the selected Tealeaf®
server. You can automatically configure all servers for searching, editing
Chapter 5. Menu tools
167
events, and updating shared profiles by entering the name of the main
Tealeaf server. All settings are then retrieved from the main server. This
option is especially useful when there are multiple processing servers.
Options
Opens RTV options.
v
Advanced Options tab
v
RTV Profile
v
Replay tab
Get Images Context Menu
When the download is complete, the following options are available in the context
menu.
Right-click an entry in the list and select one of the following options:
Option Description
Copy URL to clipboard
Copy the URL of the selected content to the clipboard.
Copy all to clipboard
Copy all the URLs in the list to the clipboard.
Open URL
Open the downloaded content in your default browser.
View Data
View the raw data through the browser.
View Data in Notepad
View the raw text data in Notepad.exe, which is useful only for text-based
content.
Host/Port remapping
You can control from where non-captured static content is retrieved during replay
using the Host/Port Remap dialog. These settings are stored in a profile, which is
explained more in the section about Profiles.
168
RTV User Manual
Figure 86. Host/Port Remapping
In the Host/Port Remapping dialog, you can specify the translation from one host
name to another or from one port number to another. You can also force all
requests for pages or static content files to use http or https, regardless of how the
visitor requested the page or binary file. Remapping a host to a null value forces
all binary files that are requested for that host to return a null. This null remapping
may be necessary when the host name of a site on the Internet is not accessible
from behind a firewall.
In the above example, the defined hint maps binary file requests from
internal.nordicbank.com:2001 to request that same page from the name
nordicbank.com:80. The "Always http" setting in the Protocol drop-down is
configured to make requests for the binary files using the HTTP protocol, even if
the visitor made the requests by using the HTTPS protocol.
v To remap to the default HTTP port, set the remapped value to 0.
After remapping, the host names that are displayed in the status bar and in the
viewable pages list are updated to reflect the remapped host.
Chapter 5. Menu tools
169
FramePlacer
The FramePlacer tool assists you in creating profile rules and hints to help RTV
reassemble child frames and framesets. The outputs of this tool are the hint lines in
the Profile file.
Note: The FramePlacer does not work well with dynamically generated framesets.
During replay, you can select Replay Rules from the context menu in the Viewable
Pages pane. Then, select Place this page in a frame. A list of available frames is
listed. This command also instructs RTV to always place the page in a specific
frame and creates a profile rule.
To begin, in the Viewable Pages list, you can select the file in the left plane. Then,
select Tools > FramePlacer.
Figure 87. FramePlacer
The URL text block contains the URL of the selected page, and the HTML Title of
the page, if available, is in the Title text box. The two drop-downs on the right
initially display _top, which is also displayed in the Available Frame Targets list
box. These references indicate that the page is identified to RTV as a standalone
page currently.
RTV does not know where to place the URI, so you must define it. Usually, the
frameset is the one referenced in the page that is displayed in the session before
the page in FramePlacer. To select a different frameset, click the Select Frame Set
drop-down. The following figure shows the framesets available in the session.
170
RTV User Manual
Figure 88. Framesets in a session
After you select a frame set, you must configure the target frame, which is the
pane within the frame set where the page belongs. The following figure shows that
the frameset on page 19 has two named frames, "content" and "lookup".
Figure 89. A frameset with two named frames
Creating a Frame rule:
If you close the FramePlacer window without saving the hint, it is discarded. To
save the frame rule that you have created, click Create frame rule for this page.
The Create Frame rule dialog appears.
Figure 90. Create Frame Rule
The URL for the page and the name of the frame are displayed. If you want, you
can use a "*" as a simple wildcard in any URI.
Chapter 5. Menu tools
171
If you select Include Query String, the entire query string from the Request is
included in the rule. Include the query string if the name of the page is insufficient
for specifying the content.
The Profile Section textbox identifies the specific Replay Mapping Section in the
Profile into which to place the frame rule.
The created frame rule is displayed in the following figure:
Figure 91. A Frame rule
This rule specifies that the URI polkPickerLookup.jsp must be placed in the
nearest prior lookup frame.
Additional frame rules are numbered sequentially as they are created.
Fragments merge options
RTV can be configured to attempt to merge all session fragments into a single,
unified session for replay purposes.
Figure 92. Find Session Fragments
172
RTV User Manual
Before replay is run, RTV completes a search of the session indexes that correspond
to the settings specified in the preceding dialog. When matches are found for the
sessions through the indexes, RTV assembles the pieces of session into a single,
integrated replay experience.
v Since RTV uses the Canister's indexes for locating session fragments, fragment
merging does not apply to active sessions.
v Sessions stay fragmented within the Canister. These fragment merge options
must be respecified whenever the session is requested.
Note: RTV uses the Canister indexes available through Search Server to locate
session fragments to merge based on the parameters that you specify. As a result,
you can specify only request variables that are marked for indexing. Other request
variables that are not indexed cannot be used to specify as the identifying key for
merging fragments.
v For more information about the request contents that are indexed for search, see
"Configuring CX Indexing" in the IBM Tealeaf CX Configuration Manual.
The following sections describe the options for merging session fragments.
Merge:
These options define the criteria on which session fragments are determined to be
from the same session.
Option Description
Request variable
You can specify an indexed variable in the request in the form of
<request_section>/<variable> to use as the basis for the merge.
v To reset merge options to default values, click Reset.
Field string
You can choose a data field whose value is used to match session
fragments.
v Automatic allows RTV to resolve the field string to use.
v Custom allows you to specify the field string.
Value string
This area can be used to define the value of the field string on which to
merge session fragments by using Automatic or Custom values.
Search:
These options define the scope of the search for session fragments.
Option Description
All currently selected indexes
When selected, RTV searches all currently selected indexes for matching
session fragments.
v To select different indexes to search, click Setup.... See “RTV Search
Setup” on page 99.
Adjacent hours
For any session fragment, RTV can be specified to search a defined number
of hours before and after the timestamp associated with the fragment.
Chapter 5. Menu tools
173
Date Range
You can search specific dates for matches.
Automatically get fragments on session open
After session fragments are merged, you can choose to automatically have
all merged fragments to be integrated into a single session when the
session is opened.
Display failure messages in automatic mode
In Auto Replay mode, you can choose whether to display messages when
session fragments cannot be merged.
Window menu
This information describes the different options that are available in the RTV
Window menu.
Option Description
New Window
Opens a new RTV window.
Cascade
Cascades the opened RTV windows.
Tile
Tiles the opened RTV windows.
Arrange Icons
Arranges any iconized RTV windows.
Current Windows
You can access currently opened windows in RTV at the bottom of the
Windows menu.
Help menu
This information describes the different options that are available in the RTV Help
menu.
Option Description
Help for this page
Access help from inside RTV. Tealeaf® Help contains the latest
documentation for each version of IBM Tealeaf CX RealiTea Viewer.
Product Documentation
Review the PDF documentation for RTV and all IBM Tealeaf products.
About
Review version information for your installation of IBM Tealeaf CX
RealiTea Viewer.
Note: If you are contacting Tealeaf® Customer Support, you can be asked
to provide the IBM Tealeaf CX RealiTea Viewer and web browser versions
that are listed at the bottom of the About screen.
174
RTV User Manual
Application toolbars
Above the main application window, you can use the displayed toolbars to access
common functions.
v You can choose which toolbars to display in RTV. See “Toolbars” on page 165.
Main Toolbar
Descriptions of buttons on the Main Toolbar.
Figure 93. Main RTV Toolbar
Button Description
Open
Opens a saved session file.
Save As
Save the selected session under a new name.
Print
Print the contents of the selected pane.
PageList
Toggle display of the Pages List.
Update
If an active session is selected, you can click the Update button to query
for and retrieve any pages that are added to the session.
SubSearch
Specify a subsearch of the currently active search results. See “Session
search and Subsearch” on page 105.
Search
Specify a new search for sessions. See “Session search and Subsearch” on
page 105.
Report
Generate a report of the currently selected sessions or all sessions available
in the segment. You can export summary, list, or detailed reports.
Replay Navigation Toolbar
The Replay toolbar is available when Replay view is active.
v See “Replay view” on page 30.
Figure 94. Replay Navigation Toolbar
Button Description
First
Start replay from the first page of the session.
Prev
Start replay from the previous page of the session.
Chapter 5. Menu tools
175
Next
Start replay from the next page of the session.
Last
Start replay from the last page of the session.
Stop
Stop replay.
Hilite
Toggle the highlighting of UI events on the page.
Refresh
Refresh the replay view.
Note: When you refresh an active session, the currently displayed page is
not refreshed. When UI events are part of the currently displayed page, a
refresh can cause replay to jump to the previous standard page and disrupt
the replay.
Request/Response/Replay Toolbar
A description of the buttons available on the Request/Response/Replay Toolbar.
Figure 95. Request/Response/Replay View Toolbar
Button Description
Request
Switch to Request view. See Chapter 3, “Request view,” on page 73.
Response
Switch to Response view. See “Response view” on page 86.
Replay
Switch to Replay view. See “Replay view” on page 30.
Page Dropdown Toolbar
A description of the Page Dropdown Toolbar.
Figure 96. Page Dropdown Toolbar
To jump to any page in the session, select the page from the dropdown.
v Pages are listed by page number in the session and the title of the page.
v You can use the page dropdown to jump to UI pages.
Search Toolbar
A description of how to use the Search Toolbar.
176
RTV User Manual
Figure 97. RTV Search Toolbar
You can use the Search toolbar to quickly specify a field search of completed
sessions in the currently selected canister or canisters.
To specify a search of a specific field:
1. Select the type of search from the first drop-down:
v Free Text - Searches all indexed text.
Request Text - Search the request text.
Response Text - Search the response text.
Page Count - Search for sessions that contain an equal, greater, or lesser
number of specified sessions.
v URL - Search for specific URL values. This value is derived from the
appdata/TLT_URL variable in the request.
v
v
v
Client IP - Search for a specific IP address for a visitor. This value is
contained in the REMOTE_ADDR field of the request.
v Domain - Search for a specific domain. This value is derived from the
appdata/TLT_SERVER variable in the request.
2. For numeric value fields, such as Page Count, you can specify comparison
operators.
v For text searches in this toolbar, all searches use the equal option.
v For more information about what can be entered in these values, see “Search
syntax” on page 127.
3. Select or enter the search term for which to search.
v
v The drop-down contains recent searches that you have run.
4. From the Date drop-down, you can specify the preceding time in which to
search for results in the canister or canisters.
5. To run the specified search, click Search.
Context menu
In the Page Load Details window, you can use the context menu to complete the
following commands.
Menu Item
Description
Host/Port Remap...
Starts the host and port remapping dialog. See “RTV Menus” on page 153.
Copy URL to clipboard
Copy the selected URL or URLs to the clipboard.
Copy all to clipboard
Copy all URLs to the clipboard.
Open URL
Open the selected URL in a browser.
Block this URL from contacting remote host
Block this specific URL or URL pattern from contacting a remote host
during replay. In the dialog, enter the URL to block.
v You can use ? or * wildcards in specifying the URL.
Chapter 5. Menu tools
177
v To replace the entire query string with a * wildcard, click Replay query
string with wildcard.
v If possible, the request is satisfied by the session data even if blocked. If
the data is in the browser cache internal to RTV, the request continues to
be satisfied from there.
v Blocked URLs are represented by an icon in thePage Load Details page,
and the Source column indicates Block Rule.
v Blocked URLs are saved as replay rules in the Profile.
Remap URL...
Remap the URL for the selected external resource to a new URL. See
“Remapping URLs” on page 179.
Post Data
(if request is a POST) contains a submenu that lists POSTed data items.
The submenu contents vary based on the content type of the POSTed data:
v For application/x-www-form-urlencoded data, submenus list individual
form parameters.
v For text/xml data, a single submenu that is labeled XML, followed by the
number of bytes, is displayed. Selecting the XML submenu item displays
the XML data in its raw format and in an easier-to-view format.
v For AMF data, the menu label is AMF, followed by the AMF IDs of the
messages that are contained in the POST. Selecting this submenu item
displays a decoded version of the AMF POST.
Pages
(if request is a POST) contains a submenu listing pages in the session
whose URLs match this request.
v Each submenu item indicates whether the page's POSTed data matches
the data that was POSTed during replay. For those items that do not
match, additional submenu items list the data items that do not match.
v For application/x-www-form-urlencoded data, the submenu items list
matching page URLs and differences between POSTed data and captured
parameters. Selecting a listed parameter initiates configuration of an
IgnoreReqVarForURLMatch rule.
v For AMF data, the submenu items list individual message IDs and the
20 IDs surrounding each message. They show differences between
decoded flattened versions of the AMF data, which allows you to
compare values in them.
v For XML data, the submenu items list matching page URLs. They show
differences between flattened versions of the XML data, which allows
you to compare values in them. You can use these comparisons to debug
Ajax replay issues. For example, some parameter value on Ajax calls
generated during replay never match the values that are generated
during the original session. You can use listed parameters to create rules
that allow RTV to ignore them when it tries to determine which
captured Ajax page best matches requests that are made during replay.
v To view the source data of any matching page, click View....
v To compare the submitted post with any matching page, select Diff....
See “Diffing posts” on page 181.
Request Headers
Click to view name-value pairs in the header of the request.
Response Headers
Click to view name-value pairs in the header of the response.
178
RTV User Manual
View Response Text...
When the selected object is an AMF hit, this option decodes the binary
object and displays it in text form in Notepad.exe.
Remapping URLs
You can use the remapping URL feature to remap the URL of content external to
the captured pages of a session to a new destination. Remapping URLs is
commonly used in situations where the external content is not available or
accessible from the original site, and a copy is saved on another server to which
you can remap the URL.
Note: This feature applies only to external content. It cannot be used to modify the
URL of captured pages.
This remapping feature simplifies the response modification methods.
Advantages:
v You can modify based on content that you can see, instead of working to locate
the content to remap.
v This method circumvents potential cross-site scripting issues that can occur in
response modification of some sites.
To remap a URL, right-click the resource in the Page Load Details display and
select Remap URL.... The following dialog is displayed:
Chapter 5. Menu tools
179
Figure 98. Remap URL dialog
The formatting options that you select are applied to the Output that is generated
by applying the Regular Expression to the Test Input URL string. Complete the
following steps to remap the URL.
1. Edit URL: The URL of the resource you selected is displayed in the topmost
textbox. You can edit this URL to make changes as needed. The URL is a
regular expression pattern, so you cam make changes using regular expression
patterns.
v If the URL contains query parameters (all content after a ? in the URL), you
can replace all of this content with a wildcard, so that any instance of the
URL is remapped. To remap all instances of a URL with query parameters,
click Replace query string with wildcard.
v For more information about regular expressions, see Chapter 8, “Regular
expressions in the RealiTea Viewer,” on page 241.
2. Format replacement: In the second textbox, you can format the output string by
referencing components of the example URL. In the example, the entire URL is
replaced by adding the following options:
180
RTV User Manual
%4%5
3. Test Input URL: By default, this text string is the URL of the resource you
selected. You can modify this text string as needed.
4. Test remap: To test the remap, click Test. The regular expression that you
created is applied to the test input URL and formatted by using the formatting
options you specified to generate the Output URL.
v If the regular expression was able to be successfully applied to the input
string, then a Found message is also displayed.
5. Output URL: The generated URL.
6. To apply the URL remapping, click OK.
7. The remapping is applied to the opened session as a new replay rule.
Diffing posts
For POSTed pages, you can compare the posted data from the page to the data that
was posted during RTV replay. Using this feature, you can track down
discrepancies that can impede or break replay of AJAX-based web applications.
For example, suppose that you identify a page in which a 404 error occurred while
you are requesting content during the replay. When you right-click the data and
select Pages > Diff, the following information can be displayed:
Matches: 16
Captured diffs: 1
/SOAP-ENV:Envelope/SOAP-ENV:Body/tns:GetMineSubsidance/tns:effDate/#text=
20100921
Requested diffs: 1
/SOAP-ENV:Envelope/SOAP-ENV:Body/tns:GetMineSubsidance/tns:effDate/#text=
20101202
In the preceding example, 16 items on the destination page were matches, and one
was not. You can compare the captured diff counts and data to the requested diff
counts and data to analyze the issue: A difference in the date parameter caused the
request to generate the 404 error.
With the provided information, you can create replay rules to ignore these requests
or to remap them to the original URL to best match the original request during
replay.
v See “Replay rules” on page 58.
Annotations in RTV
During replay of active or completed sessions, annotations can be added to the
stored session to provide contextual information that is supplied by the Tealeaf
user.
For example, if the session covers a problematic customer transaction, a customer
support representative can add an annotation through RTV to identify the page
where the customer had the problem.
v Annotations that are created on pages that are identified as non-viewable are
moved to the preceding viewable page in the session.
v Annotations are not saved in exported Tealeaf archive files (TLA).
Chapter 5. Menu tools
181
Note: After you create annotations, you can search for them through RTV and
through the Portal. For search purposes, it is useful to employ a standardized
lexicon for annotations.
To add an annotation:
1. Click the Replay tool in the toolbar to select Replay view.
v See “Replay view” on page 30.
2. Select the page to which you wish to add an annotation.
3. Right-click the main window, and select Add Annotation....
v In the RTV menu, you may also select Tools > Add Annotation.
4. In the popup, enter the text of the annotation.
5. The annotation is added to the page in Replay view as a yellow window or
icon, if the annotation is closed.
v In the Viewable Pages list, you can identify pages that contain annotations by
scanning the Yellow Icon column.
6. You can leave the Annotation window open, or click the X in the corner to
make it appear as an icon. The open state is saved with the annotation and is
restored on subsequent loads of the session data.
To open an annotation:
Right-click the annotation icon in the RTV main window and select Open
Annotation.
To delete an annotation:
Right-click the annotation icon in the RTV main window and select Delete. The
annotation is removed from the page.
You may also create annotations through Browser Based Replay. See "Tracking
Interactions through BBR" in the IBM Tealeaf cxImpact User Manual.
Availability of annotations through search
After you have added, edited, or deleted an annotation, the session is queued for
reindexing. When the session has been reindexed, changes to its annotations are
now available for search.
v If multiple changes are made to a single session, each change is queued. If
possible, the indexer reindexes all changes at the same time.
Note: Depending on the length of the queue at the time annotation changes are
saved, it may take a few minutes before the changes are available through search
of completed sessions.
Note: Since annotations must be indexed for search, you cannot search for
annotations in active sessions.
Working with annotations
You can search for annotations through RTV or the Portal.
v See “Session search and Subsearch” on page 105.
v See "Searching Session Data" in the IBM Tealeaf cxImpact User Manual.
Search templates can be configured to enable searching for annotations.
v See "Configuring Search Templates" in the IBM Tealeaf cxImpact Administration
Manual.
182
RTV User Manual
v For more information about search templates for RTV, see “Search templates” on
page 135.
Session fragmentation
For a single session identifier, you can discover that the session is stored in two or
more pieces. Session fragmentation can occur for intentional or unintentional
reasons.
Active session data is stored in the Short-Term Canister, an in-memory database.
To prevent the memory database from becoming overwhelmed with sessions that
can no longer be actively in use by the visitor, Tealeaf imposes three internal
safeguards to prevent the STC from being overwhelmed. These safeguards are
based on three criteria (defaults in parentheses):
v Session size (5242880 kb)
v Number of pages in a session (2048 hits)
v Time (60 minutes)
If any of these limits is exceeded, then the session is automatically closed in the
Short-Term Canister and moved to the Long-Term Canister for indexing for search.
For example, suppose that you are browsing a website for over one hour. The
resulting session data is stored in two fragments inside of Tealeaf, as the time limit
exceeds.
v For more information about configuring these limits, see "Configuring the CX
Canister" in the IBM Tealeaf CX Configuration Manual.
You can review attributes that are related to the merged fragments through RTV.
See Chapter 6, “Session attributes,” on page 231.
Events for monitoring fragmentation
Tealeaf provides three events that can be used to monitor the three criteria that are
mentioned that trigger session fragmentation. In the Tealeaf Event Manager, you
can look for events whose names begin with Costly Session.
v See "Tealeaf Event Manager" in the IBM Tealeaf Event Manager Manual.
In the Tealeaf Portal, you can create event charts to monitor the presence of these
events in your session data.
v See "Tealeaf Report Builder" in the IBM Tealeaf Reporting Guide.
Based on your analysis of these events, you may decide to change the limits, or
you can manage fragmentation through RTV.
Effects of fragmentation
The following are effects of fragmentation.
v An excess of session fragmentation can degrade performance in RTV.
v Session-based events are triggered in each session fragment, which can result in
redundant counting of individual events
Find and merge
You can configure RTV to locate and merge session fragments into a single
complete session. Using the Find and Merge command, you can find and merge
session fragments.
Chapter 5. Menu tools
183
There are two methods of merging fragmented sessions:
v Auto Merge: When Auto Merge is enabled through the RTV options, the finding
and merging of session fragments is done on the Tealeaf server before the
session is loaded by RTV. Matching fragments up to 24 hours before or after the
session fragment can be merged. Auto Merge is enabled by default and requires
no additional configuration.
v RTV Merge: RTV can merge fragments, too. While this method is slower, it can
be useful in special cases or when Auto Merge is not viable.
Auto merge
The following figure shows the result of an Auto Merge-enabled search. The
session IDs of sessions without fragments are shown with unique session identifier
(304, 256, 259 in the following image). Sessions with multiple, merged fragments
have session IDs consisting of their TLTSID (a 32-character string) followed by the
IBM Tealeaf cxImpact unique session identifier (such as
24FD407B4FBB088C623DD7BF2B9AFD63 - 396).
Note: RTV can auto-merge session fragments from a single canister only. If you
must merge across multiple canisters, use RTV Merge.
The session that follows the preceding fragment has the following identifier:
24FD407B4FBB088C623DD7BF2B9AFD63 - 83. This identifier has the same TLTSID
as the previous session and a different IBM Tealeaf cxImpact unique session
identifier. The search returned two session fragments (396 and 83) that were
actually part of the same session.
Figure 99. Session Fragment Merge Options
Auto Merge can be configured to ignore session close events, and also find
fragments that were erroneously closed by events. See “Advanced Options tab” on
page 207.
RTV Merge
You can use the RTV Merge method to merge fragments.
To merge fragments by using the RTV Merge method, select a session from the
session list. Then, select Tools > Find and Merge all Fragments of this Session.
The dialog that is shown in the following figure is displayed:
184
RTV User Manual
Figure 100. Find Session Fragments
Using the Find Session Fragments dialog, you can select how RTV merges session
fragments and run a session merge operation.
RTV uses the Request Variable field to extract a value from the loaded session.
This value is used to construct a search, which locates fragments of the session.
If a session is fragmented and your IBM Tealeaf cxImpact system is using a strong
sessioning mechanism such as the Tealeaf Cookie Injector, then the best field to use
for merging session fragments is the default, the iamie/TLTSID field.
v See "Installing and Configuring the Tealeaf Cookie Injector" in the IBM Tealeaf
Cookie Injector Manual.
If your IBM Tealeaf cxImpact system is using a weak sessionization mechanism
such as using the values of ASPSESSIONID or JSESSIONID, then you can merge
on another field in the Request block. Typically, the env/remote_addr field is used.
Merging on REMOTE_ADDR can reassemble session fragments in a couple of
meaningful ways:
1. If the IBM Tealeaf cxImpact system is sessioning on a weak sessionization
mechanism, merging on REMOTE_ADDR can show you if the JSESSIONID or
ASPSESSIONID is changing during the visitor's session.
2. In a strong or weak sessionization mechanism, merging on REMOTE_ADDR can
reassemble session fragments where a visitor crossed during a session primary
domain boundaries, which are controlled by the same Tealeaf system. A user
starts at myco.com, and then at some point is directed to the domain
myco-orders.com, and later is directed back to myco.com. By merging these
fragments on REMOTE_ADDR, these two session fragments can be re-assembled
into one session.
3. If you are trying to merge fragments for users behind a Proxy, it is best to use
the TLTSID field.
4. If the session fragment shows the HTTP_USER_AGENT to contain the string
"AOL", avoid using Find and Merge based on REMOTE_ADDR. The AOL systems
use dynamic proxies. User sessions/pages are intermingled, and a single user
Chapter 5. Menu tools
185
session can hop between proxies, which can create multiple address values
(REMOTE_ADDR) in pages from the same domain.
Differences in fragment counts between Auto Merge and RTV
Merge
A different number of fragments is returned when you allow Auto Merge to bring
together session fragments and when you use RTV merge to bring them together.
The possible reasons are:
v Auto Merge does not merge across servers. For example, suppose your Tealeaf
solution uses multiple Canister Servers and that session fragments are split
across them. Since Auto Merge cannot merge across servers, these multiple
fragments are displayed as separate sessions on different canisters.
v RTV Merge has a time window in which it searches for fragments. The value of
this window before and after the main fragment can differ from the time
window that is configured for Auto Merge.
v Auto Merge limits the total data size to prevent generation of enormous
sessions. Some fragments can be excluded based on the configurations setting.
For more information about Auto Merge settings, see “Replay tab” on page 187.
Find and Merge controls
The other Find and Merge controls define some of the search buttons.
You can search across:
v All currently selected indexes - searches every IBM Tealeaf cxImpact server of
which RTV is aware for sessions that have the same Find and Merge field value.
v
v
v
v
– To select a different set of indexes on one or more Search Servers, click
Setup.... See “RTV Search Setup” on page 99.
Adjacent hours - (default) Given a specific session that you wish to Find and
Merge, this option searches only those indexes that cover a specific time period
on either side of the specific session. This setting is configured by default to
search 12 hours on each side of the session.
– MaxSessions - Use this value to specify the maximum number of sessions to
retrieve as part of the Find and Merge operation.
Date Range - searches only the specific indexes that cover the specified time
range for other session fragments having the same find and merge field value.
When Automatically get fragments on session open is selected, RTV
completes a Find and Merge operation on any session that you open. RTV
remembers the find and merge field you have selected.
If RTV attempts a find and merge and fails to find any other fragments with the
same field value, RTV displays a dialog box that shows you the results. To
disable display of this dialog box, select Display failure message in automatic
mode.
RTV main window title bar changes with Find and Merge
If you are looking at a Request, Response, or Replay view of a session, the Canister
ID (a sequential number) is displayed in the main window's title bar. If RTV
successfully completes a merge operation, the main window's title bar contains the
value of the find and merge field.
186
RTV User Manual
Replay tab
The Replay tab controls the most common options that affect how an RTV user
sees the visitor's session.
Figure 101. Replay tab: controls many RTV options
Load remote files
When selected, RTV attempts to download any static, non-captured files that are
referenced by the text pages of the session.
If it is not selected, the text pages are rendered without any of the referenced
images, style sheets, or JavaScript include files. The resulting user impression can
Chapter 5. Menu tools
187
be different from the visitor's experience, but the speed of the replay of the session
is accelerated. Clearing this feature is a useful tool for somebody familiar with the
web application, who is interested in quickly stepping through the visitor's pages.
Allow scripts to run
This master control enables or disables all JavaScript in OnLoad events, external
files, or wherever it is displayed in the page.
When disabled, the page can be rendered with a user impression different from
what the visitor experienced. Write commands, including JavaScript requests for
binary files, are disabled.
If the page issues a request to a third-party tracking server, RTV issues those same
requests during replay. Turning off JavaScript prevents these requests. You can
choose to enable JavaScript while you notify the third-party tracking application to
ignore requests that include a HTTP_USER_AGENT containing the string
"RealiTeaViewer".
Insert 'Back' pages
This check box enables or disables the Back Button Detection feature of RTV.
Note: Recent changes to browser behavior have curtailed the usefulness of this
feature, which inserted pages into session data to enable Back button detection.
Some Ajax requests can generate false positives, so this feature is now disabled by
default.
Do not display timeout dialog
When selected, the dialog that is displayed when RTV cannot download one or
more external files for the page is suppressed. RTV pauses during the timeout.
Replay on Single Session TLA/TLS open
When selected, a session segment with a single session is automatically opened in
Replay View.
If the option is not selected, RTV opens the session segment pane first.
Load remote 304 pages
If a visitor session has some static pages in it that are already cached on the
visitor's workstation, the web servers return a 304 status code, and Tealeaf capture
ignores the page.
During replay, however, the whole page may be needed. When the session is
opened for replay, RTV looks for any 304 pages in the session information and
attempts to retrieve the files from the original site.
Replay frames
When selected, RTV assembles the parts that make up a framed page into a single
user-impression. If this is not checked, RTV displays each child frame or IFrame
content as an individual page in Replay view. This affects only Replay view. In
Request view, each child frame or IFrame is shown individually.
188
RTV User Manual
JavaScript Highlighting (Match Params)
When a site or page uses JavaScript to link to a page or submit a form, it is
generally not possible for RTV to highlight the button that the visitor clicked
because that information is not available in the captured session.
JavaScript Highlighting (Match Params) instructs RTV to inspect the arguments of
JavaScript methods that are attached to buttons and links to determine if any
argument matches the URI of the subsequent page. If a match is found, the related
link or button is highlighted in Replay View to indicate that the user clicked it.
In addition to looking for a URL as a parameter, RTV tries to match the JavaScript
method parameters against URL fields that are submitted with the following
request. RTV assigns a weight to each button based on the number of JavaScript
method parameters that match URL fields that are submitted with the following
request. It highlights the button with the highest weight.
The next two options can be used to help RTV to guess what must be highlighted.
Invoke JavaScript when highlighting
When highlighting is enabled, setting this option starts any JavaScript associated
with a highlighted object.
v This option must be selected for replaying sessions with client UI events.
v For sessions without UI events, it can cause undesirable behavior and must be
disabled.
AutoMerge
This feature enables session fragments to be merged together into a single session
by Search Server and delivered to the RTV desktop.
When AutoMerge is enabled, Search Server attempts to match session fragments
that are based on the TLTSID value, starting with the key session and then merging
adjacent sessions until the session is merged or the limits are reached. It allows the
merge to happen on the TeaLeaf server, which is more efficient than allowing RTV
to complete the merge.
Any search result set can contain results from multiple fragments, and those result
sets can merge into either identical sessions or sessions that share same TLTSID
with different sets of pages or with different start/end times that depend on the
data size limit and/or the time range. The following configuration settings can
affect Auto Merge:
v By default, Search Server imposes a limit of 16 MB for a merged session. This
setting prevents AutoMerge from building sessions that exceed 32-bit memory
capacity or that contain, for example, repeated bot traffic from a single day.
– You can adjust the setting that is based upon the configured value for the
maximum permitted session size (Max Size Per Session). See "Configuring
the CX Canister" in the IBM Tealeaf CX Configuration Manual.
v In the Merge Range setting, you can configure the range of hours before and
after a session fragment in which to look for other fragments from the same
session. For example, if Merge Range is set to 2 hours, RTV searches for
fragments from the same session in the 4-hour range around the timestamp for
the fragment.
– You can also configure this auto-merge range in Browser-Based Replay. See
"Managing Tealeaf Servers" in the IBM Tealeaf cxImpact Administration Manual.
Chapter 5. Menu tools
189
– You can adjust the setting that is based upon the configured value for the
maximum permitted session time (Max Time Per Session). See "Configuring
the CX Canister" in the IBM Tealeaf CX Configuration Manual.
v By default, AutoMerge honors session close events, which are triggered when a
session closes. If needed, you can enable the Auto Merge Ignores Close Session
Events in the RTV Advanced options. See “Advanced Options tab” on page 207.
The Auto Merge feature is limited to merging by TLTSID, while the Find And
Merge tool can merge on any search term. See “Annotations in RTV” on page 181.
Note: If fragments from the same session are displayed in multiple canisters,
AutoMerge does not merge them.
Page Load Timeout (seconds)
You can set the length of time that RTV waits while it tries to download any
binary files for the page being rendered.
If RTV tries to download a binary file and cannot retrieve the file, the Page Load
Timeout warning dialog is displayed after the defined number of seconds has
elapsed.
Large Page warning threshold (Bytes)
You can set the size of a page that triggers the Large Page Warning dialog.
When RTV encounters a page during replay that is larger than the size defined by
this option, it displays the Large Page warning dialog to allow the RTV user to
decide whether to render the page.
Highlight color
You can select the color that is used to highlight links or fields with which the
visitor interacted during Replay View of a page.
Note: Page items are highlighted based on the data that is returned in the
subsequent hit. If the default value for a check box is true, the returned data can
include no information about the check box. RTV interprets them to mean that
they were cleared and therefore must be highlighted.
Highlight delay (mS)
If a page dynamically builds or populates controls at load time, it can conflict with
RTV's highlighting, because it is possible that the highlighting operation happens
before the page is fully updated.
This can cause the highlighting to either not work, or do strange things, because of
elements being non-existent, or incomplete. Especially if Ajax is involved. Setting
the highlight delay allows the page to fully update before highlighting occurs. The
delay is measured in milliseconds, and RTV starts counting when it gets the
notification that the 'static' part of the page load is complete.
Highlight width
The highlighting used around links or controls is displayed with a rectangular box.
You can specify the width of the lines that are used to draw this box.
v If you set the width to 0, the form fields are populated, but no highlighting is
applied.
190
RTV User Manual
HTTP header skip
This setting controls how RTV treats the HTTP Header lines that occur at the start
of a response.
v Auto - RTV tries to recognize the HTTP Headers by looking for the first blank
line in the Response (a CR-LF-CR-LF sequence).
v Never - RTV treats all lines in the Response as part of the response body. Use
this option only if your web server does not return any HTTP headers in the
response, which is a rare configuration. This option can be used if you want to
see the HTTP Response Headers at the top in the Replay View.
v Always - RTV always skips down to the first blank line to start reading the
response body.
Timezone
Tealeaf always records timestamps for hits using GMT time.
When these sessions are replayed, the RTV status line includes information about
the time the Request was received from the client. This setting controls the
translation from GMT time that is recorded in the Request block to the time
displayed on the RTV status bar.
RTV Profile
In the received data stream, pages can be displayed that belong to child frames of
a parent page that was received earlier in the session.
For example, Ajax technologies and IIS PostBacks cause changes in the appearance
and content of pages already on the screen. Pages can cause XML data streams to
be emitted and received from the web servers, which are then captured by Tealeaf.
These pages must be integrated into the RTV replay stream.
For some applications, RTV must be provided with hints in the RTV Profile. Each
user has a profile file to which these hints can be added.
Hints can also be synchronized by a central profile server. The RTV power users
and Tealeaf administrators can update the central profile when the web application
changes. The updates are propagated to all RTV users.
v The profile server does not maintain a history of revisions to profiles. Tealeaf
administrators can manage revision history locally.
You can edit the most common profile elements through the RTV application.
Users who are comfortable with XML can edit all profile options in the XML file.
Profile contents
RTV ships with a default profile for providing hints that help RTV replay the
session. The Profile consists of a RequestMapping node and zero or more
HostProfile nodes.
The RequestMapping node rarely changes. It contains the standard mappings
followed by the major web server technologies: Apache and IIS. Each RequestEntry
node within the RequestMapping section gives RTV a list of entries for which to
search in a Request and from which to retrieve values that are needed to replay the
session. It is unlikely that you will require to modify the RequestMapping node.
Chapter 5. Menu tools
191
HostProfile nodes
In the HostProfile nodes, you can customize replay. The rules within each
HostProfile node apply to all pages that come from a specified host. The host name
is specified in the 'name' attribute. Do not include a protocol identifier, such as
http or https, or a port number in the host name.
If your IBM Tealeaf cxImpact system is capturing many different web applications
by using many different HTTP_HOST values, you need to create multiple
HostProfile nodes. The host name can contain simple wildcards to allow a set of
rules to apply to more than one host. For example, if your websites have one
application that responds to www.mybiz.com, mybiz.com, and public.mybiz.com, and
another application on www.internalmybiz.com, you would probably setup two
HostProfile nodes,*mybiz.com, and *internalmybiz.com.
Be careful when you use wildcards to avoid creating conflicts between multiple
HostProfile nodes that operate on the same domain. For example, if you had two
HostProfile nodes: www.tealeaf.com, and *.tealeaf.com, sessions from
www.tealeaf.comwww.tealeaf.comwould always pick up rules from the
www.tealeaf.comHostProfile node.
Note: When specifying a host, host names that exactly match a non-wildcard value
always trump wildcard values.
Note that a single HostProfile node named "*" is allowed. This will match every
host name, and if supplied, all session pages will use this HostProfile node.
The Rules within the HostProfile node control how RTV replays the session. Most
of these rules can be created or modified through dialogs and menus within RTV,
so editing the raw XML is not necessary.
The specific Replay Mapping directives are as follows:
Note: You may find it easier to add rules of these types through the view context
menus. See RealiTea Viewer - Main Window.
Table 17. HostProfile Nodes
New Menu Item
Directive
Attributes
Use
New > Add IgnoreUrl...
IgnoreUrl
value="/blank.html"
reqVar=
(optional) reqVarValue=
(optional)
Tells RTV that this is not a
viewable page. If a matching
page is displayed in the
session, it is not inserted into
the navigation list and
cannot be opened during
replay.
v If the page is requested by
an Ajax call or contains
static content that is
requested, it is used
during replay.
v The optional
reqVar/reqVarValue
attributes cause the page
to be ignored only when
the page contains either
the reqVar, or the reqVar
with a specific value.
v See “Replay rules” on
page 58.
192
RTV User Manual
Table 17. HostProfile Nodes (continued)
New Menu Item
Directive
Attributes
Use
New > Add Host/Port Remap...
RemapHost
mode=(on, off, null)
value=
Yourserver.com
Replaces the host name of
the page with the specified
host. There can be only one
RemapHost node within a
HostProfile node.
New > Add Host/Port Remap...
RemapPort
valueIn="1024"
valueOut="80"
Changes any page by using
the port in valueIn to the
port number in valueOut.
There can be multiple
RemapPort nodes within a
HostProfile node.
New > Add Host/Port Remap...
Protocol
value=(auto, http, https)
Overrides the captured
protocol of the all pages to
specified type. There can be
only one Protocol node
within a HostProfile node.
New > Add FrameRule...
FrameRule
url=
"olpeckLookupPage
.jsp" frame="lookup"
Places any matching URLs
into the named frame.
New > Add ResponseMod...
ResponseModify
url=(regex pattern for
matching for urls)
pattern=(regex pattern to be
replaced)
replacementString=
(string to replace the pattern)
occurrences=(first, all)
Used to do special
processing to pages before
replay, generally to nullify
any page execution that is
undesirable in replay.
url=(regex pattern for
matching for urls)
pattern=(regex pattern to be
replaced)
replacementString=
(string to replace the pattern)
occurrences=(first, all)
Used to do special
processing of external files,
such as js files, before replay,
generally to nullify any page
execution that is undesirable
in replay.
New > Add ExternalFileMod...
ExternalFileModify
v See “Replay rules” on
page 58.
v See “Replay rules” on
page 58.
New > Add
IgnoreReqVarForURLMatch...
IgnoreReqVarForURLMatch
url=
(regex pattern for matching
for urls)
reqVar=(var to ignore)
Used for Ajax replay. When
matching requests generated
during replay to captured
hits in the session, some
entries must be ignored, for
example, a timestamp
parameter. See “Replay
rules” on page 58.
New > Add PopupUrl...
PopupUrl
value="/popup.html"
All pages that match the
pattern are treated as Pop-up
pages. These items are
displayed in the NavList,
and when you browse to
them, they are displayed in a
pop-up window. See “Replay
rules” on page 58.
Chapter 5. Menu tools
193
Table 17. HostProfile Nodes (continued)
New Menu Item
Directive
Attributes
New > Add HighlightOnlyUrl...
HighlightOnlyUrl
value="/blank.html" reqVar= (AJAX pages) When UI
Capture is not deployed,
(optional) reqVarValue=
these rules mark the
(optional)
response of the specified
URL as highlight only. In
these cases, the response is
treated as modifying the
appearance of the preceding
page, instead of replacing it.
See “Monitoring client UI
Events through RTV” on
page 149.
Use
New > Add BlockUrl...
BlockUrl
url="http:///
www.example.com/
somepage.html"
Note: The protocol identifier
(http:// in the example) is
required for this rule type
only.
Specify a rule to block
specific URLs or URL
patterns from reaching out
to the origin server. If the
matching response is not in
the session, no request is
made to the origin server for
the content, and the
response is not displayed in
RTV.
Profile Options
The following describes the settings available under the RTV Profiles tab.
The Profile and other RTV options are stored in TLS files by default. When a TLS
file that contains these settings is loaded, changes to options within the Options
dialog are actually controlling the options that are stored within the TLS, rather
than RTV's global set of options. This is indicated by the TLS file name that is
displayed in the Options dialog title bar.
194
RTV User Manual
Figure 102. Options > Profile
Save profile in TLS
When selected, the current profile is saved when you save a session as a TLS.
Ignore profiles stored in TLS
When you load a TLS, if a profile and options are stored within it, they are applied
when the session is loaded and replayed. Any changes that you make to the profile
or options apply only to the loaded session. Those changes are lost if you close the
TLS without saving and are not applied to the global profile.
v This option is disabled by default.
Chapter 5. Menu tools
195
If this option is enabled, any profile or options that are stored within the TLS are
ignored when the file is loaded and replayed. The global options and profile
settings are used instead. You might choose to ignore the settings that are stored in
the TLS if they are known to be incorrect and are sure of the global settings.
Note: After you change this option, you must close and reopen any currently open
TLS files for the change to take effect.
Profile options buttons
A description of the buttons on the Profile Options dialog.
Button Description
Edit Profile
Opens the dialog shows in the following figure.
Edit Raw Profile
Opens a dialog for editing the raw XML of the profile. Be careful when
you edit the XML directly, as formatting errors can render the entire profile
unusable.
Restore Default Profile
Resets the profile to your default settings. These settings can be either the
factory defaults or a custom default profile that you download from a
Profile server.
Sync to BBR
Synchronizes the current RTV profile with the profile stored for BBR on the
Search Server. See “Synching RTV profile with BBR” on page 199.
Import Old Profile
Import the profile from an old version of RTV. The old versions used a
profile that is stored in a local configuration file, and the import function
translates these profiles into the new XML format. This option is only
useful if you have a pre-Release 6.0 version of IBM Tealeaf CX RealiTea
Viewer installed on your computer.
Restore Factory Defaults
Resets the profile to the version provided with RTV and deletes any
custom defaults loaded from a profile server.
196
RTV User Manual
Figure 103. Edit Profile
Enabling or disabling profile rules
As profiles become more sophisticated, you can find it useful to be able to disable
individual rules for troubleshooting purposes.
In the Edit Profile dialog, you can enable or disable individual profile rules or
groups of profile rules by selecting the appropriate check box.
Creating a new profile rule
To create a profile rule, select any displayed profile rule and then click New.
Note: You can also create new profile rules from the context menus from the
Request, Response, and Replay views in RTV. Using the context menu options
often pre-populates the rule with relevant settings, which greatly simplifies the
process.
v See Chapter 3, “Request view,” on page 73.
v See “Response view” on page 86.
v See “Replay view” on page 30.
v See “Viewable Pages list” on page 38.
Chapter 5. Menu tools
197
v See “HostProfile nodes” on page 192.
Select the type of rule from the displayed list:
Rule
Description
New Host
Add a host to monitor. The name of the host must be the full domain
name of it (for example, www.example.com. Each host has its own set of
profile rules, so you may need to add or copy rules from any existing host
to the new one.
Add IgnoreURL
Specify a URL for a page or pages that must not be included in replay. You
can apply wildcards * or ? to the string.
Add Host/Port Remap
If needed, you can remap detected host names and port numbers in the
captured session data to redirect to other host/port combinations. This
type of rule is useful for forcing replay to not use a production server.
Add FrameRule
If IFRAMES are in use for the web application, you can specify these rules
to place URLs or patterns of URLs into specified frames.
Add ResponseMod
These rules modify the response data based on detected patterns for one or
more URLs.
Add ExternalFileMod
For files that are referenced in session data, these rules modify the
response data based on detected patterns so that unwanted effects are not
applied to the session replay.
v See “Replay rules” on page 58.
Add IgnoreReqVarforUrlMatch
These rules can be used to specify [urlfield] values or query parameters
that must be ignored when matching replay requests to captured pages
within the session.
Add DynResponseMod
Dynamic response modification rules are used to modify the response data
by using parameterized event identifiers.
v See “Replay rules” on page 58.
Add DynExternalFileMod
Dynamic external file modification rules are used to modify external files
that are referenced in the session pages by using parameterized event
identifiers.
v See “Replay rules” on page 58.
Default profile options
You can share your profile settings with other users through a profile server.
Shared settings override RTV default settings. You can restore default and custom
settings at any time.
1. Enter the name or IP address of the IBM Tealeaf cxImpact server that is
designated as the profile server. Typically, this server also hosts the Tealeaf Web
Portal.
198
RTV User Manual
2. After you enter the name of the profile server, click Check for Updates Now.
You can synchronize your profile with any stored on the server. If you chose to
modify your profile, any open sessions are closed and reopened by using the
new settings.
3. When you select Check for Updates at Startup, RTV queries the profile server
each time it starts to update the local profile with any changes:
v If authentication is not configured through Search Server, then anyone can
change the stored global profile.
v If authentication is enabled, then only members of administrator-level groups
can change the global profile.
– The groups that are permitted to make changes are based on the Search
Server authentication mode and its admin groups on the designated
Profile Server.
– For more information about configuring authentication and authentication
groups, see "Configuring the Search Server" in the IBM Tealeaf CX
Configuration Manual.
Figure 104. Profile/Authentication
Synching RTV profile with BBR
You can synchronize the RTV profile to the BBR profile.
1. In the Profiles tab, click Sync to BBR.
2. RTV attempts to connect to the specified Profile Server and to compare the
selected profile to the one stored on the remote server.
3. The Sync Profile Rules to BBR dialog is displayed:
Chapter 5. Menu tools
199
Figure 105. Sync Profile Rules to BBR
v The rules that are in RTV and not in BBR are displayed in the top pane.
These rules must be considered for adding to BBR.
v The rules that are in BBR and not in RTV are displayed in the bottom pane.
These rules must be considered for removal from BBR.
4. To synchronize, click Commit.
Note:
v You cannot select individual items to commit.
v You cannot copy items from BBR to RTV.
v This feature requires Search Server build 7124 or newer. If this feature is tried
against an older version of Search Server, RTV reports that the server doesn't
support this feature.
Backing up RTV profile
The following steps explain how to back up an RTV profile.
Note: RTV does not provide version control for the user profile. It is recommended
that you retain a local copy of any profile that you are modifying.
200
RTV User Manual
To
1.
2.
3.
4.
back up a profile:
In the RTV menu, select Tools > Options.
Click the Profiles tab.
Click Edit Raw Profile. The raw XML of the profile is displayed.
Click in the profile text. Press CTRL + A to select all of it.
5. Paste the text into a text editor.
6. Save the text file.
7. In RTV, click Discard Changes & Exit.
Example profile
An example of an RTV profile.
<ReplayServerProfile lastWriteTime="2/22/2007 6:05:52 PM"
lastWriteTimeGMT="1172196352"
lastWriteUserName="TeaLeafSystem">
<RequestMapping>
<RequestEntry name="URL">
<Key name="HTTP_WGATE_ORIGINAL_URL"/>
<Key name="URL"/>
<Key name="DEJA_PATH"/>
<Key name="HTTP_PATH_INFO"/>
<Key name="PATH_INFO"/>
</RequestEntry>
<RequestEntry name="Host">
<Key name="HTTP_HOST_ORIG"/>
<Key name="HTTP_HOST"/>
<Key name="SERVER_NAME"/>
<Key name="HOSTUNSECURE"/>
</RequestEntry>
<RequestEntry name="Port">
<Key name="HTTP_PORT"/>
<Key name="SERVER_PORT"/>
<Key name="HTTP_SERVER_PORT"/>
<Key name="PORTUNSECURE"/>
</RequestEntry>
<RequestEntry name="QueryString">
<Key name="QUERY_STRING"/>
<Key name="HTTP_QUERY_STRING"/>
</RequestEntry>
<RequestEntry name="Referer">
<Key name="HTTP_REFERER"/>
<Key name="REFERER"/>
</RequestEntry>
<RequestEntry name="Frame">
<Key name="DEJA_FRAMENAME"/>
</RequestEntry>
<RequestEntry name="RemoteHost">
<Key name="REMOTE_HOST"/>
<Key name="REMOTE_ADDR"/>
<Key name="HTTP_REMOTE_HOST"/>
<Key name="HTTP_REMOTE_ADDR"/>
</RequestEntry>
<RequestEntry name="StatusCode">
<Key name="StatusCode"/>
<Key name="STATUS_CODE"/>
</RequestEntry>
<RequestEntry name="Secure">
<Key name="HTTPS"/>
<Key name="HTTP_HTTPS"/>
<Key name="SERVER_PORT_SECURE"/>
</RequestEntry>
</RequestMapping>
<HostProfile name="www.sample.com" id="1">
Chapter 5. Menu tools
201
<!-- IgnoreURL removes pages that shouldn’t be replayable from
"Viewable Pages". -->
<IgnoreURL value="/path/*.axd?*" id="2"/>
<!-- PopupURL marks pages as popup, so they aren’t used for
highlighting. -->
<PopupURL value="/path/popup.asp?*" id="3"/>
<!-- RemapHost remaps the host named in the HostProfile node to some
other host.
mode values: off, on, null -->
<RemapHost mode="off" value="www2.sample.com" id="4"/>
<!-- There can be multiple RemapPort nodes -->
<RemapPort valueIn="1024" valueOut="80" id="5"/>
<!-- Protocol forces the protocol to http or https, if needed
values: auto, http, https -->
<Protocol value="auto" id="6"/>
<!-- ResponseModify can be used to do special processing
to pages before replay. This example nullifies
JavaScript that many sites use to break their
pages out of frames.
url
-> this is a regex pattern for matching for urls
pattern -> this is a regex pattern to be replaced.
replacementString
-> this is the string to replace the pattern
occurrences -> first, all
-->
<ResponseModify url=".*" pattern="top.location != location"
replacementString="0" occurrences="first" id="7"/>
<!-- ExternFileModify can be used to do special processing
to external files that do things which interfere with
replay. This example disables a script file from hooking
into the "window.onunload" processing.
url
-> this is a regex pattern for matching for urls
pattern -> this is a regex pattern to be replaced.
replacementString
-> this is the string to replace the pattern
occurrences -> first, all
-->
<ExternalFileModify id="8" url="/script/functions.js"
pattern="window.onunload = onUnloadProcessing;"
replacementString=";" occurrences="first"/>
<!-- FrameRule is used to force a given URL to always load
into particular frame -->
<FrameRule id="9" url="/frames/content.asp" frame="content"/>
</HostProfile>
</ReplayServerProfile>
Plugins options
In the Plugins tab, you can add and remove POST Data Matching plugins from
use in the IBM Tealeaf CX RealiTea Viewer. A POST Data Matching plugin is a DLL
plugin that RTV uses to match a request made by the application during replay to
the most appropriate hit from the session. When the matching hit is found, the
response data from the hit is given to the RTV application, which drives the replay.
For rich internet applications, the appropriate response to use is not always
intuitive. For example, a request that includes a timestamp may not be able to
retrieve the appropriate response, which was saved as session data with a fixed
timestamp in the past.
Through POST Data Matching plug-ins, traditional built-in RTV request matching
is replaced with content-type specific plug-ins, which can provide much better
results for matching a request to the appropriate response.
202
RTV User Manual
v For more information about POST Data Matching plug-ins, see "Managing POST
Data Matching plug-ins" in the IBM Tealeaf CX Configuration Manual.
Accessing plugins
You can access the plugins available to RTV.
1. In the RTV menu, select Tools > Options.
2. Click the Plugins tab.
3. The currently loaded plug-ins are displayed.
v For more information about the default that is set of plug-ins provided by
Tealeaf, see “Default plugins” on page 205.
Chapter 5. Menu tools
203
Figure 106. RTV - Plugin Options tab
v To review the properties of a plug-in, select the plug-in and click Properties....
See “Plugin properties” on page 205.
v To add a plug-in for RTV use, click Add?. See “Adding plugins” on page 206.
v To remove a plug-in, select the plug-in and click Remove. The plug-in is no
longer used by RTV.
Note: Plug-ins that are removed from RTV still exist as DLL files on the local
drive. To add one back, click Add.... See “Adding plugins” on page 206.
Plugin fields
Descriptions of plugin fields.
Field
204
RTV User Manual
Description
Name
The user-friendly name of the plug-in.
Type
The HTTP content type that is handled by the plug-in.
v Multiple plug-ins can handle the same content type. The order of
evaluation of the plug-ins for the same content type is determined by
affinity.
Handles QueryString
If Yes, the plug-in is defined to evaluate name-value pairs in the query
string.
v This property is defined within the plug-in and cannot be modified.
Affinity
A weighting factor from 0.0 to 1.0, which is used to determine order of
evaluation when multiple plug-ins are configured to evaluate the same
content type.
Version
The Tealeaf build number that is associated with the plug-in.
IFaceVer
The interface version number. RTV uses this number to determine
compatibility of plug-ins with the current version of RTV.
Filename
The file name of the plug-in
v RTV plugin file names must begin with TLReplayPlugin.
Full Filename
The full path and file name of the DLL plug-in file on your local system
Default plugins
The following plugins are provided as defaults by Tealeaf.
v Form URL-encoded
v XML (text and msbin1 encoding)
v JSON
Plugin properties
A list of plugin properties and descriptions.
Except where noted, plug-in properties cannot be edited.
v You can copy and paste information from the fields, which is useful when you
must specify new content types in the PCA Web Console. See “Adding plugins”
on page 206.
Property
Description
Name
The user-friendly name that is associated with the plug-in
File Name
The full path and file name to the plug-in in your local environment
Content Type
The HTTP content type that is supported by the plug-in
v This value must be provided to the PCA to enable capture of the content
type by Tealeaf. See “Adding plugins” on page 206.
Chapter 5. Menu tools
205
Affinity
The affinity value indicates the preference for the order of evaluation
between multiple plug-ins that process the same content type. See
“Configuring affinity.”
Configuring affinity:
The affinity value indicates the preference that is given by RTV to the plug-in to
complete POST matching for the content type in the plug-in properties.
Affinity values range from 0.0 to 1.0, with a default value of 0.5 for all plug-ins.
v The default plug-ins that are provided by Tealeaf are set to 0.5.
You can change the order of evaluation by raising the affinity of the plug-in that
you want to evaluate hits of the specified content-type. Suppose that you have two
plug-ins, A and B, that handle the same content-type. If you raise the affinity of
plug-in A to 0.6 while plug-in B's affinity remains at 0.5, plug-in A is used to
complete matches of the content-type. If plug-in A indicates that it is unable to find
a satisfactory match, plug-in B is used.
v You can also change the order of evaluation by lowering the affinity value of the
less desirable plug-in.
For example, in the screen capture above, RTV has two plug-ins for handling
application/x-www-form-urlencoded content type. Among these two, the FormData
plug-in has an affinity of 0.5, while the FormDataCustom plug-in has an affinity of
0.4, which means that the standard form data plug-in is used first.
v See “Accessing plugins” on page 203.
A single plug-in can also handle multiple content types or variations of a
content-type. For example, the default XML plug-in handles both binary
(application/msbin1) and text (text/xml) XML content-types.
Adding plugins
POST Data Matching plug-ins are DLL files that are created by Tealeaf developers.
When new plug-ins are available, you can make them available for RTV to use by
completing the following steps.
1. Acquire the DLL file.
2. For RTV to detect the plug-in, the file name must have a TLReplayPlugin
prefix and a .dll extension:
TLReplayPlugin*.dll
3. Copy the plug-in into the RTV installation directory. Typically, this directory
is:
C:\Program Files\Tealeaf
4. If you are in RTV, close the application.
5. Start RTV.
6. From the RTV menu, select Tools > Options....
7. Click the Plugins tab.
8. Click Add....
9. Select the plug-in.
v UNC paths are not supported.
10. Click Open.
206
RTV User Manual
11. The plug-in is displayed in the plug-ins tab and is usable by RTV.
12. If there is already a plug-in that matches for the same content type, you must
configure the plug-in's affinity. See “Configuring affinity” on page 206.
v To remove a plug-in from use, select the plug-in in the Plugins tab. Then,
click Remove.... The plug-in is no longer used by RTV yet remains on your
local drive.
Configuring the PCA
When a plug-in is newly deployed to RTV, you must configure the IBM Tealeaf CX
Passive Capture Application to capture the new content type.
v See "PCA Web Console - Pipeline Tab" in the IBM Tealeaf Passive Capture
Application Manual.
Managing plugins
The following topics contain information on managing plugins within RTV.
For more information about managing, creating, and deploying POST Data
Matching plug-ins within your Tealeaf environment, see "Managing POST Data
Matching Plug-ins" in the IBM Tealeaf CX Configuration Manual.
Advanced Options tab
The Advanced Options tab controls some of the more sophisticated and less
common options for RTV. These options are typically configured by the Tealeaf
administrator and rarely need to be changed by individual RTV users.
Chapter 5. Menu tools
207
Figure 107. Advanced tab
Aggressive frame placement:
RTV tries to place pages in sessions with framesets by looking at referrers,
matching URLs, and other data. Since this process is inexact, RTV can place pages
in frames where they do not belong.
With Aggressive mode enabled, RTV tries to put a page in the same frame as its
referrer, when other means fail. By default, this option is disabled.
Allow Ajax POSTs to original server:
By default, images and other non-captured static content requests are redirected to
the original site. This option allows Ajax POSTs to go back to the original server.
208
RTV User Manual
Sending POST data has more implications than simple static content requests, so it
is up to the RTV user to allow these types of requests.
Allow new window creation from JavaScript:
This option allows JavaScript running on the page to create a window, and load a
page into it.
The window is created as a pop-up window. If the page being loaded does not
exist in the captured session, the Allow Remote Frame Pages option determines
whether the contents are displayed.
Allow remote frame pages:
This option allows frame pages that point to non-captured URLs, such as images
or PDF files, to be displayed during replay. This option can also apply to
non-frame pages, such as a page which uses JavaScript to redirect to another page.
When cleared, an error page is displayed containing a short message that the
requested URL was not found.
When selected, the request is allowed to pass to the original server of the page or
the specified host.
Assume req is UTF-8:
When this option is selected, RTV assumes that the request is submitted in UTF-8
format. Form data that is submitted in UTF-8 encoding is converted for correct
display in RTV.
v If version 7.x of capture is configured to convert form data to UTF-8, it places an
entry in the request data that indicates this conversion. In that case, RTV ignores
this setting.
Auto hide form & event views:
This option specifies to automatically display the Session Events and Form Field
windows when it replays a page that contains a business event or form field.
By default, IBM Tealeaf CX RealiTea Viewer always displays these windows even if
a page does not contain any business events or form fields.
AutoMerge ignores Close Session events:
AutoMerge stops at Close Session event boundaries by default. This option
provides a way to override the default behavior to get an entire set of fragments.
Note: This setting is not available in IBM Tealeaf cxImpact Browser Based Replay.
For example, when a Customer Service representative returns to the home page,
this step signals that the CSR has finished working on a customer issue, so a Close
Session event fires. Replay of this session must retrieve fragments that are
associated only with the specific customer. The following is how a set of session
fragments might look like:
Customer A session fragments:
345
Chapter 5. Menu tools
209
348 - CloseSession fires
Customer B session fragments:
354
355
358 - CloseSession fires
Customer C session fragments:
361
368 - CloseSession fires
Auto-merge returns only sessions 354, 355, and 358.
Auto suggest replay rules:
When this option is enabled, RTV attempts to suggest replay rules for Microsoft
AJAX-based hits.
v If the main page has UI events, IgnoreURL rules are suggested.
v Else, HighlightOnlyURL rules are suggested.
When prompted, you can accept all or none of the suggested rules.
v To disable the suggestion of replay rules, clear this check box.
Break-out keystrokes (Intellisense support):
If your web application deploys Intellisense keyboard support, which enables "type
ahead" population of form fields while a visitor types, you can use this option to
enable RTV to break out each keystroke into a separate UI event at the global level.
Note: To use this feature, UI Capture must be installed and deployed in your web
application. See "UI Capture FAQ" in the IBM Tealeaf UI Capture for Ajax FAQ.
Note: IBM Tealeaf CX UI Capture for AJAX is only available to legacy users.
When deployed on web applications that use Intellisense keyboard support, UI
Capture bundles individual keystrokes for each element together and submits them
to Tealeaf for capture. When this option is enabled, RTV breaks out these bundled
keystroke events into individual UI events, which can be individually replayed and
examined in the Viewable Pages list in RTV.
v When enabled, this breakout is applied to all sessions that contain Intellisense
events.
v You can optionally apply keystroke breakouts to individual screen elements. See
“Viewable Pages list” on page 38.
v For more information about UI Capture, see "UI Capture for Ajax Guide" in the
IBM Tealeaf UI Capture for Ajax Guide.
Check for meta refresh redirect:
This option causes a page to be treated as a redirect page with a 302 StatusCode, if
the page contains an html META tag with "http-equiv" set to "refresh" and if the
delay in the "content" attribute is 0. This option is on by default.
Client-side And On Same Page:
The "And on same page" mode of searching causes post-processing of search
results to remove page-based search results that are not displayed on the same
page as others.
210
RTV User Manual
As of Release 7.0, this processing now happens on the Tealeaf server, whereas
before it happened within RTV. The server-based processing tends to be faster
because it doesn't require the session data to be loaded on the client. This option
allows the old client side mode to be used.
Coalesce UI events:
When this option is enabled, RTV removes redundant UI events from replay.
Events such as click on a text field or change on a KeyUp event do not provide
additional descriptive value to the replay experience, since visitor actions on the
element already describe these events. In most cases, these events automatically
fire during replay. Therefore, including them in the replay and the list of UI events
is unnecessary.
v This option is enabled by default.
v To see all UI events, including the ones that are removed, clear this option.
Decode highlighted urlfields:
When RTV is rendering a page, it retrieves values from the [urlfield] section of
the request and passes the text area or text field values through URL decoding that
is based on the setting of this check box.
When this setting is enabled, a URL field value such as U+00C7 is decoded to U
00C7.
v By default, all URL field values are already decoded. As a result, the default
value for this setting is false.
v In some cases, particularly in older web applications, the URL fields may not be
decoded, so you can set this value to true to apply URL decoding to the
retrieved values from the request.
Delete duplicate adjacent UI events:
This option attempts to remove duplicate UI events that are created by buggy
versions of Tealeaf UI Capture JavaScript.
Note: This option is not needed for data that is captured by versions of Tealeaf
JavaScript that are dated 08/2008 or later.
Disable script debugger:
By default, JavaScript errors in RTV are intercepted. If errors are detected on a
page, you can access the messages in the script debugger by double-clicking the
yellow warning icon in the lower-left corner.
Clearing this option causes each JavaScript error to display a dialog, you can break
into your installed script debugger. You can use the enabled script debugger to see
the line of JavaScript that is causing the problem.
Disable window.onunload() Javascript:
This option attempts to disable any JavaScript execution on a page that is triggered
when the page unloads before moving to the next page.
Chapter 5. Menu tools
211
For example, if your site implements a Window.OnUnload function in JavaScript,
then selecting this option prevents the execution of this method.
You can use aResponseMod or ExternalFileMod rule to work around this issue.
Disable window.print() Javascript:
This option attempts to disable running any print calls made by JavaScript during
replay.
For example, suppose that your site has a Print This Page button, which opens a
child window that calls the JavaScript print method in the OnLoad event.
Replaying such a session sends the page to your default printer. Selecting this
option disables this behavior.
Discard images, JS, CSS, etc. (TLA only):
When you open a TLA file, selecting this option enables RTV to load the normal
pages only from the TLA. All image, JavaScript, css, and other binary content is
ignored.
Enable ActiveX controls:
This option is enabled by default. Using this option, you can disable the loading of
ActiveX controls during replay.
Enable applets:
This option is enabled by default. Using this option, you can enable the loading of
applets during replay.
During replay, when an applet is found, it can be run on the computer that hosts
RTV, which may not have the appropriate application or helper. You can disable
this setting if you are replaying sessions from a computer without the applet
interpreter installed.
Enable TeaLeaf JS stub:
This option attempts to intercept references to Tealeaf*.js and to replace them
with RTV's stub JavaScript. By default, this option is enabled, so Tealeaf*.js files
are not loaded during replay.
v RTV's stub JavaScript is editable on the UI Events tab.
When this option is disabled, no replacement is done, so references to those files
return to the original server during replay. In this case, RTV attempts to set
variables that indicates that the capture must be disabled.
Format Urls for script debugging:
This option causes pages to be loaded into the browser control during replay using
their temp file names instead of the actual page URL.
When the actual URL is used, the Script Debugger cannot find the correct page.
Use this option when debugging script errors are displayed in the main replay
window.
212
RTV User Manual
'Get Images' ignores 302s:
During execution of the Get Images command, a request redirecting (status code
302) to another URL does not result in a stored response for RTV. In cases such as
login authentication, storing of these redirects is not useful.
'Get Images' ignores HTTPS:
When enabled, RTV skips any requests that specify https.
'Get Images' loads remote files when parsing:
This option causes the Get Images command to load remote files while parsing
session pages.
Files such as background images in CSS pages and even CSS pages that are loaded
by other CSS pages are retrieved. While this option retrieves more content, it slows
the processing of the Get Images command.
Hide all pages except text/html in replay:
By default, RTV knows to remove from the viewable pages list all pages whose
content-type is text/javascript, image/gif, or other type that is of little interest to
the user. RTV does not remove text/plain, text/xml, and other user-readable
formats.
v To hide user-readable types, users must create profile rules to hide those page
types, such as Ajax or other pages that must not be displayed as full pages.
Selecting this option removes all content types, except text/html from the viewable
pages list, thus reducing the need for some profile rules. This option is off by
default, mainly because the content-type in response headers is often inaccurate.
Highlight search hits in replay:
This option specifies to highlight the words or values that were entered in a search
on the pages in Replay view.
The search terms are highlighted in a light yellow color to make it easier for the
RTV user to see the search terms that matched on the page. These words were not
highlighted to the visitor.
Highlight uses domain:
This option specifies to look at the domain of a URL when it checks links between
pages in a session. This option must be used when a session spans over several
domains.
Highlighting skips canceled pages:
When completing form fields or highlighting links, this option causes canceled
pages to be skipped, so that the fields can be completed with data from the next
valid page.
Chapter 5. Menu tools
213
Ignore ReqCancelled pages for replay:
This option causes all ReqCancelled pages to be treated as if no data at all was
captured for them. All requests for them during replay go back to the original site.
Insert missing or cached pages:
When enabled, this option attempts to insert pages that are missing in the session
or that have been cached by a content delivery network (CDN) by retrieving them
from the origin server. By default, this setting is disabled.
Note: This option must be enabled in isolation to rectify simple issues with replay
of missing data. Enabling this setting can result in false positives, in which query
parameters in the URLs for UI events cannot be matched with pages stored in the
session. In these cases, this option causes RTV to reach for the page from the origin
server; for UI event pages, the page does not exist, which can cause replay
problems.
JavaScript auto page advance:
While a page loads during replay, if some JavaScript on the page requests another
page in the session, RTV moves the current position in Viewable Pages list to that
page when this option is enabled.
For dynamic frame pages or pages that redirects to JavaScripts, enabling this
option forces the current replay position to move ahead one or two pages.
However, in some sites, the skipping is less predictable, so this option is disabled
by default.
Quiet active update:
When enabled, updates do not display a message box when there are no new
pages and do not prompt for loading when there are. Whether enabled or disabled,
you must click the Update button to update an active session.
Remove NULLs in Req/Rsp:
This option causes any null characters that are displayed in the middle of requests
or responses to be replaced with spaces. Aberrant nulls can cause pages displayed
to be truncated. This option is rarely needed and is off by default.
Replay from localhost:
Enabled by default, this option attempts to replay sessions from the localhost.
When enabled, RTV loads pages into the browser control from its internal HTTP
web server, which runs on localhost.
Replaying from the local web server can cause problems for some web
applications.
Note: If you are receiving Access denied JavaScript errors during replay, which
can be caused by cross-domain scripting errors in Ajax requests, disabling this
option can alleviate the problem. Unless you are experiencing some problem, you
must not change this setting.
214
RTV User Manual
When this option is disabled, RTV intercepts requests in the session before they
can reach the origin server and supplies the requested data from the captured
content. The browser controls DOM displays to be hosted from the origin server,
which can improve replay of some applications, even though content is being
provided from the captured session.
v The behavior when this option is enabled was previously the default behavior in
RTV. In a future build, this option can be disabled by default.
Replay Shield:
This option prevents users from interacting with displayed pages during replay.
The Replay Shield prevents any interaction with the page, which may be generated
by clicking or pointing to page elements. Some JavaScript events, such as
onmouseover, can be triggered by only moving the cursor, which can break the
replay in RTV.
Set captured cookie values during replay:
By default, RTV sets cookie values into the browser control on each page load.
Some apps require cookie values for accurate replay, and some do not. Using this
option, you can disable the setting of cookie values.
Show frame borders:
When selected, RTV outlines a child frame or an iFrame with a narrow black
border.
Show redirect pages in replay:
By default, RTV hides redirect pages in the navigation list during replay, since they
do not affect what is displayed. If you wish to see the redirects as part of the
replay, you can enable the display of these pages in the navigation list.
v This option determines how Status Code 302 pages are managed.
– If these pages are hidden in replay, any UI events that are associated with
these pages are also hidden from replay.
v By default, this option is disabled.
v This option replaces the Status Code Skip tab in Advanced options in earlier
Tealeaf releases.
Store images during replay:
The Get Images command cannot retrieve images or other static content that is
loaded dynamically by JavaScript. Checking this option causes all external content
that is loaded during replay to be stored with the session so that the saved TLS
contains the dynamic content as well.
Note: When Store Images During Replay is enabled, all images that include
error-related images that are sent from the web server, are stored in the image list.
Chapter 5. Menu tools
215
Use fixed screen size from UI event:
When IBM Tealeaf CX UI Capture for AJAX is deployed with your web
application, you can use this option to force RTV to resize its display window to
match the screen resolution information that is retrieved from UI Capture from the
visitor's browser.
Note: If this option and Use Fixed Screen Size from UserAgent are both enabled,
the values that are retrieved from user interface events take precedence.
v After you change this setting and closed the Options tab, click the Refresh
button in the toolbar to update replay.
Use fixed screen size from UserAgent:
Enabled by default, this option forces RTV to resize its display window to match
the screen size information that is provided by the client browser. The screen size
information is typically present only for sessions from mobile devices, where a
fixed screen size is known.
v After you change this setting and closed the Options tab, click the
Refreshbutton in the toolbar to update replay.
Use referrer for highlighting:
This option improves highlighting by using the referrer to find the correct
page/URLFields to highlight.
Use remote host as session ID (TLA only):
This option specifies to join multiple sessions for a single visitor by using
REMOTE_ADDR instead of TeaLeaf session IDs.
This option can be used when replaying sessions that were captured on different
domains for a single visitor. This option is only applicable when replaying sessions
stored in a TLA file.
Session list event data retrieval:
This option enables the retrieval of event data as part of the session lists displayed
in RTV.
Use DDE for file association:
When this option is disabled, selecting TLS or TLA files opens them in a new
instance of IBM Tealeaf CX RealiTea Viewer, instead of a running instance.
This option is needed only if you are receiving errors when you try to view
sessions from the Portal Web application. The errors mention permissions in
theTemporaryInternetFiles directory.
v To apply any changes to this setting, click Set Now. Depending on your
operating system permissions, you may or may not be able to apply the setting.
Highlight element name:
This option defines the name of a hidden button element whose value can be set to
the name of the button to highlight. It is used mostly when JavaScript controls
how a page is submitted.
216
RTV User Manual
The default name is __EVENTTARGET (the name that ASP.NET uses).
Temp file directory:
This option sets the location where IBM Tealeaf CX RealiTea Viewer places its
temporary files.
Note: Changing this location closes all open replay sessions.
Browser emulation (IE8-up only):
If your web application is using advanced features available only in later browser
versions or requires emulation of a specific version, you can use this setting to
select the emulation mode for the IE browser control that is embedded in RTV.
All currently known emulation modes that are supported by Microsoft are
available for selection. The emulation mode by the IE browser control in RTV is
determined by this RTV setting and the current emulation mode that is selected in
the version of IE installed on your desktop.
v If the IE emulation mode setting is not specified and you set this value to the
default value, RTV sets this value to the latest IE-compatible version that it
detects on the local desktop.
v If the IE emulation mode value is set to a value that RTV knows but the value
does not match the RTV selection, the RTV emulation mode is set to the IE
emulation mode.
v If the IE emulation mode value is set to a value that RTV does not know, you
can leave the configuration alone, which forces the default behavior, or set it to a
known value.
v If the IE emulation mode value is set to a value that RTV does not recognize,
RTV does not change the emulation mode.
v If the Not Set value is not selected, RTV does not reference the IE version of the
emulation mode, so the default behavior is applied.
Note: After you change this setting, you must restart RTV to apply it.
For more details, see http://msdn.microsoft.com/en-us/library/ee330730
%28v=vs.85%29.aspx.
Interpreted Pages Options tab
Some web applications may interpret pages before it delivers them as rendered
HTML to the browser. For example, your application can use executable files (.exe)
as a URI, and the file generates an HTML text page on the web server that is
delivered to the browser. RTV must know whether an unusual file extension must
be interpreted as a delivered HTML text page.
Chapter 5. Menu tools
217
Figure 108. Interpreted Pages tab
By default, the standard file extensions for file types that are commonly used on
the web are included and selected. These selected files are interpreted as part of a
user impression.
v If your application uses a different file extension and if the file does not deliver
the CONTENT_TYPE information in the response headers, you must add and select
that file extension.
v If the response header contains a CONTENT_TYPE and that CONTENT_TYPE is already
known by RTV, you do not have to add the file extension here. For example,
there is no .jsp or .do file extension that is listed here, since most Java™
Platform, Enterprise Edition servers using these file extensions include the
correct CONTENT_TYPE in the response.
218
RTV User Manual
AutoReplay Optionstab
The AutoReplay Options control how RTV replays page-by-page a complete
session.
You can control where the session is replayed with its original time spacing
between pages, with a fixed time spacing, or in an accelerated mode.
You can also define other replay options:
v Full Screen - Display replay in full screen mode.
v Repeat - Allow repeat play of the replay.
v Show App Events - During replay, any application events are displayed in the
left pane.
v Show Form Fields - During replay, the contents of form fields are displayed in
the left pane.
cxImpact Options tab
This image shows how RTV is configured to connect to the Portal Server, through
which RTV knows how to access the Tealeaf Event Manager. This reference is used
to build the URL to access the Event Manager.
Chapter 5. Menu tools
219
Figure 109. IBM Tealeaf cxImpact tab
v The value for the Portal Server in this tab must match the value for the Portal
Server in Search Server configuration. See "Configuring the Search Server" in the
IBM Tealeaf CX Configuration Manual.
Note: If you are using security transport to connect to your Portal, you must
enter the protocol identifier. In the preceding example, the following is the URL
for HTTPS:
https://OurPortal
– The transport protocol for the Portal is defined in the Portal Server definition
in the Portal Management page. See "Managing Tealeaf Servers" in the IBM
Tealeaf cxImpact Administration Manual.
220
RTV User Manual
If you are not using HTTPS, the protocol identifier is optional.
– Do not use localhost unless you are using RTV on the Portal Server.
v All other queries or references to the Portal Server from RTV are managed
through Search Server.
v The Tealeaf Event Manager is a Portal-based utility for creating and managing
Tealeaf events. See "Tealeaf Event Manager" in the IBM Tealeaf Event Manager
Manual.
If Portal authentication is enabled: In the cxImpact Options tab, you must
populate the RTV user's Portal ID and password to connect to the Canister to
search, retrieve sessions, and edit events.
v If no data is entered when you install RTV, the first time you use RTV under
Portal Authentication, you are prompted for your user name and password.
If NT authentication is enabled: The user ID and password settings do not apply.
Connection information is managed through the NT domain into which the user is
already logged.
v See "Authentication" in the IBM Tealeaf cxImpact Administration Manual.
Mobile licensing:
Through the cxImpact Options tab, you can review status of the IBM Tealeaf CX
Mobile license and perform updates as needed. In the Mobile License area, you can
review the current state of the license. If IBM Tealeaf CX Mobile has been licensed,
you must acquire the license from one of the servers to which the license has been
deployed.
Note: Before you apply any changes to the mobile license used by RTV, this
updated license must be applied through the Portal to the rest of the IBM Tealeaf
CX solution. See "Managing Your Tealeaf License Key" in the IBM Tealeaf cxImpact
Administration Manual.
v If IBM Tealeaf CX Mobile is not licensed, an Invalid message is displayed.
Note: When IBM Tealeaf CX Mobile module is not licensed, the following
limitations are applied to replay of mobile-based sessions:
v No display of mobile-specific events, such as scroll and touch
v
v
v
v
No
No
No
No
display of mobile device data during replay
use of a mobile skin (Extended user agent parsing is also required)
display of device orientation changes
resizing of the screen to the mobile browser dimensions
The underlying data is captured independent of the license; enabling the license
allows mobile-based replay of sessions that are already captured. See "Overview of
CX Mobile" in the IBM Tealeaf CX Mobile User Manual.
1. To check for an updated mobile license, click Update.
2. Enter the server name and port number for the Search Server where this license
information can be acquired.
v Typically, this value points to the Portal Server and uses the port number
19000.
v The default values are acquired from the Search Server to which RTV is
configured to acquire sessions. You can change the values in this dialog or
connect to a different Search Server. See “RTV Search Setup” on page 99.
Chapter 5. Menu tools
221
3. To update the license, click OK.
4. RTV queries the Search Server for an updated mobile license. If one is
available, it is downloaded for use in RTV. The license expiration date is
updated to reflect the new mobile license.
Note: Updates to the mobile license do not affect sessions that are currently loaded
at the time of the update. Any opened sessions must be closed and reopened to
apply the new mobile license.
UI Events Options tab
The UI Events Options tab configures how client-side UI event are replayed, if
enabled, and have included TeaLeaf Client UI Event capture JavaScript.
222
RTV User Manual
Using these options, you can hide or replay specific types of UI events. For example, you can hide mouse moves.
This feature is required if you want to replay Ajax or AJAX-like sites.
Figure 110. UI Events tab
Option Description
Show Info events
Shows informational events, such as JavaScript exceptions.
Replay GUI Events
Shows UI events in replay, such as clicks and text entry.
Show Performance Events
Shows Page load and unload events.
Chapter 5. Menu tools
223
Show UIEventAppInfo Events
These events are generated by IBM Tealeaf CX UI Capture for AJAX, which
can be deployed to capture user interface events in the client browser.
Show Context Events
Toggle display of context events that are captured from the client. Context
events mark any changes in context or screenview on individual pages. For
example, if a page contains tabs, clicking a new tab typically causes a
context event to be generated and captured by UI Capture. This setting
does not affect any events that occur between context events.
AutoNav
If you jump around in the viewable pages list, AutoNav steps back to the
preceding full page and then steps through the UI events sequentially to
the one that you selected. When AutoNav is enabled, you can configure
the AutoNav Delay, which specifies the number of milliseconds that RTV
waits between stepping from one UI event to the next one. This delay is
provided to enable RTV to run any required JavaScript between UI event
steps.
Disable navigation when busy
Disallows stepping through UI events before the page finishes loading.
UI Event SubTypes to show
You can configure selected user interface events to be displayed during
replay.
Truncate long IDs
You can truncate the display of long identifiers at a pre-configured number
of characters. This option can help improving the display of these
identifiers.
Tealeaf.js stub:
The Tealeaf.js is the main JavaScript file that is deployed to visitor's browsers by
UI Capture. If you have not deployed the IBM Tealeaf CX UI Capture for AJAX
library on your site, this feature is not necessary.
Note: IBM Tealeaf CX UI Capture for AJAX is only available to legacy users.
v See "UI Capture for Ajax Reference" in the IBM Tealeaf UI Capture for Ajax Guide.
RTV can be configured to deploy a stub version of this UI Capture file that is
customized for replay. The stub file helps to replay the UI events that were
captured during the visitor's original experience and recorded in the session.
Note: Editing the Tealeaf.js stub file requires detailed knowledge of your web
application and the Tealeaf UI Capture library. Experienced JavaScript developers
can replicate customizations from the web application's Tealeaf.js into the stub
file. If you have questions about how to customize the stub file, contact Tealeaf
Professional Services.
Part of the functionality of the Tealeaf.js stub is to disable UI Capture
functionality. Since the UI Capture scripts are included by the web page, during
224
RTV User Manual
replay it is possible for user interface events to be captured by these scripts and
sent again to Tealeaf for capture. The Tealeaf.js stub prevents UI Capture from
sending events.
v As an alternative, you can disable UI Capture by using replay rules. See
“Disabling UI Capture using replay rules.”
v To edit the stub file, click Edit TeaLeaf.js Stub. Edit or paste in the contents to
revise.
v To reset to the default stub file, click Reset TeaLeaf.js Stub.
Disabling UI Capture using replay rules:
If you are not using the Tealeaf.js stub file in RTV, you can use the following
replay rules to disable UI Capture during RTV replay, which prevents resubmitting
to Tealeaf user interface events that occur in the session during replay.
The following is an example of rules that can be inserted into the raw profile
through the Profile options tab in RTV.
v See “RTV Profile” on page 191.
// Disable Tealeaf UIC Library
<ResponseModify id="28" url="/open-account/" pattern="TealeafSDK(Config)?"
replacementString="tealeaf" occurrences="all" enabled="1"/>
<ExternalFileModify id="29" url="" pattern="TeaLeaf."
replacementString="//TeaLeaf." occurrences="all" enabled="1"/>
Privacy Tester
RTV includes an integrated Privacy Tester utility. You can apply a configured set of
privacy rules to one or more selected sessions and then to replay them to see the
effects.
Note: Privacy that is applied through the RTV Privacy Tester is a manual process
that affects only the list of sessions that are displayed in the local instance of the
IBM Tealeaf CX RealiTea Viewer. Session data that is stored in the Canister or
Archive is not affected.
v Privacy rules in RTV are tested against entire sessions.
v For more information about applying privacy to all sessions delivered for replay
through BBR or RTV, see "On-Demand Privacy" in the IBM Tealeaf CX
Configuration Manual.
Privacy is applied and displayed in Request View, Response View, and Replay
View.
v See Chapter 3, “Request view,” on page 73.
v See “Response view” on page 86.
v See “Replay view” on page 30.
Configuration
If you are using RTV to develop and test privacy rules, complete the following
configuration changes.
In RTV, response headers are hidden from display by default. If you are using RTV
to gather response data for testing privacy rules:
1. In the RTV toolbar, click the Response button.
2. From the drop-down menu on the Response button, select Full Response.
Chapter 5. Menu tools
225
3. In the RTV menu, select View > Show HTTP Response.
Privacy overview
From the point of capture through Tealeaf user replay, the IBM Tealeaf CX system
enables the masking or blocking of sensitive data at multiple points of access
throughout the system. For security purposes, you can determine the data and the
types of privacy rules to apply to sensitive data.
v For more information about data privacy in general, see "Managing Data Privacy
in Tealeaf CX" in the IBM Tealeaf CX Installation Manual.
In the IBM Tealeaf CX Passive Capture Application, Windows pipeline, and the
IBM Tealeaf CX RealiTea Viewer, data privacy is managed through the same
mechanisms, which means that you can apply the same privacy configuration at
any place in the system. Typically, privacy is applied at PCA for data that must
never be displayed in Tealeaf.
v For more information about PCA privacy, see "PCA Web Console - Rules Tab" in
the IBM Tealeaf Passive Capture Application Manual.
In the Windows pipeline, privacy is applied to remove or mask data that should
not be searchable, reportable, or replayable using the Privacy session agent or the
Extended Privacy session agent, which provides more features not available in the
standard session agent.
v Privacy can also be used to complete other useful manipulations on session data.
v For more information about Windows privacy, see "Privacy Session Agent" in the
IBM Tealeaf CX Configuration Manual.
v For more information about Windows privacy, see "Extended Privacy Session
Agent" in the IBM Tealeaf CX Configuration Manual.
Developing privacy rules
When privacy is applied, each active privacy rule is tested against session data.
A privacy rule consists of:
v Rules are used to determine which hits to select for data blocking, encryption or
other Privacy action.
v Tests are comparisons that are used to determine whether an associated action
must be taken upon evaluation.
v Actions indicate the data in the hit to process and how to process it.
v Keys determine the privacy keys to utilize for encryption processes. These keys
are used for encryption actions only.
Privacy rules development is an iterative process. You must develop simple rules,
tests, and actions and test them thoroughly on well-known data. You can then add
more sophisticated rules accordingly.
The Privacy session agent documentation contains detailed information about how
to develop privacy rules.
v See "Privacy Session Agent" in the IBM Tealeaf CX Configuration Manual.
Uses of RTV privacy
RTV Privacy works in the same manner as privacy in the Windows pipeline and in
the IBM Tealeaf CX Passive Capture Application. With RTV Privacy, you can apply
226
RTV User Manual
privacy to a controlled set of sessions without affecting the stored versions of them
and then immediately replay the outputted sessions. In this manner, RTV can be a
useful rules development mechanism.
RTV Privacy is most useful for evaluating the effects of privacy rules on replayed
sessions. In this manner, privacy rules that are developed and tested through RTV
can be applied to manage privacy for replay. See "On-Demand Privacy" in the IBM
Tealeaf CX Configuration Manual.
v See "CX Browser Based Replay" in the IBM Tealeaf cxImpact User Manual.
v See “Replay view” on page 30.
RTV does not include an integrated editor for rules development. You can choose
to develop your privacy rules in the TMS-based Privacy Tester Utility and then
acquire the configuration file for use with RTV.
v See "Privacy Tester Utility" in the IBM Tealeaf CX Configuration Manual.
v Experienced privacy developers can edit the privacy configuration file directly
before they load it into RTV.
Applying privacy
This information describes the steps that one must take to apply privacy rules to
sensitive data.
Before you begin
Before you begin, you must acquire a privacy configuration file for developing
rules and testing them through RTV.
In a Tealeaf Processing Server, acquire the following file:
<Tealeaf_install_directory>\Privacy.cfg
The preceding file contains the current privacy configuration that is applied to
session data when the Privacy session agent is enabled in the Windows pipeline
for that server.
If you want to start with the default file provided by Tealeaf, acquire the following
file from the Processing Server:
<Tealeaf_install_directory>\Privacy.cfg.ORIG
You must save a backup version of the file that you are using for development.
Later, you can compare the backup to the version you used for development to
determine the new rules you created.
Next, develop your privacy rules and apply them to the configuration file you
acquired.
Applying privacy through RTV
After you acquire the .cfg file and modified it to include your new rules, complete
the following steps to test those rules in RTV.
1. Open RTV.
2. Acquire test sessions or a session list in RTV:
v Load a .tls or .tla file in RTV. See “RTV Menus” on page 153.
v Perform a search. See “Session search and Subsearch” on page 105.
3. You can save as your baseline test data.
Chapter 5. Menu tools
227
4. If you open a session list, select the sessions that you want to test using the
Privacy Tester. You can select more than one.
v If you do not select any sessions from a session list, the privacy rules are
applied to all sessions in the list.
5. From the RTV menu, select Tools > Privacy Tester.... The Privacy Tester dialog
is displayed:
Figure 111. RTV Privacy Tester
6. In the Privacy Tester dialog, click Browse....
7. Browse your local computer to find the .cfg containing your rules in
development. Select the file and click Open.
8. The Privacy Tester dialog is populated with the full path to the .cfg file.
9. To display errors that are detected during privacy evaluation, click theDisplay
Errors in Notepad check box. These errors can be saved to a local .txt file for
further evaluation.
10. To log all privacy actions applied based on the rules to the request buffer of
each modified hit in the session, click theLog All Actions to Request Buffer
check box.
v Privacy log messages are stored in the [privacylog] section of the request
of the applicable hit.
11. For on-demand privacy, you can configure the values of the TL_USER_GROUPS
and TL_USER_NAME to which to apply privacy rules. Since on-demand privacy is
applied to a single user at a time, you can specify one user name or a
comma-separated list of user groups to which the user might belong.
v See "On-Demand Privacy" in the IBM Tealeaf CX Configuration Manual.
12. Click OK.
13. The Privacy rules are applied to the selected sessions.
14. The results are displayed in a new session list.
228
RTV User Manual
15. Replay sessions until you can determine whether the privacy rules are applied
correctly.
v You can review the session to see how the privacy rules were applied.
16. Repeat these steps if additional changes are required to your privacy rules.
Deploying privacy rules changes
After you finish developing privacy rules, you can deploy them into the
production data processing stream in other areas of the IBM Tealeaf CX system.
v If you are deploying the entire Privacy.cfg file that you used in RTV, locate this
file on your local computer.
v If you are only deploying part of this file, you must acquire as a text snippet the
parts that were modified from the source file.
Depending on the destination of your rules changes, use the following links below:
1. UI Capture Privacy: When the Tealeaf IBM Tealeaf CX UI Capture for AJAX is
installed and deployed for your web application, privacy rules can be
configured and applied through the client browser to ensure that private data
never enters the Tealeaf system. See "Data Privacy in UI Capture" in the IBM
Tealeaf UI Capture for Ajax Guide.IBM Tealeaf CX UI Capture for AJAX is only
available to legacy users.
2. PCA Privacy: Privacy rules must be configured manually through the Rules tab.
See "PCA Web Console - Rules Tab" in the IBM Tealeaf Passive Capture
Application Manual.
3. Windows Pipeline Privacy: Privacy rules are developed and applied through the
configuration of the Privacy session agents in TMS.
v See "Privacy Session Agent" in the IBM Tealeaf CX Configuration Manual.
v See "Extended Privacy Session Agent" in the IBM Tealeaf CX Configuration
Manual.
v You can also use TMS to acquire the current privacy configuration file, apply
your changes, and then post the file back to the appropriate location on the
Processing Server. See "TMS Advanced Tab" in the IBM Tealeaf cxImpact
Administration Manual.
4. On-Demand Privacy: Privacy rules changes are applied by Search Server to
sessions request by replay clients. For more information on configuring
on-demand privacy, see "Configuring the Search Server" in the IBM Tealeaf CX
Configuration Manual.
v See "On-Demand Privacy" in the IBM Tealeaf CX Configuration Manual.
Chapter 5. Menu tools
229
230
RTV User Manual
Chapter 6. Session attributes
Session attributes are statistical information about the captured session that is stored
as part of each session. By default, Tealeaf provides a set of pre-configured session
attributes to monitor data transfer size and rate, application errors, event
information, and page information.
v Session attributes are automatically indexed and therefore searchable without
searching for the triggering event.
v In addition to the provided session attributes, you can configure up to 64
additional session attributes to be populated by event actions and inserted into
the session summary. These user-defined attributes can be used to extend the
monitoring capabilities of your Tealeaf solution by capturing session-level
information about the visitor experience. Session attributes are populated by
event actions. See "TEM Session Attributes Tab" in the IBM Tealeaf Event Manager
Manual.
Accessing session attributes
There are two methods to access session attributes, through RTV or the Portal.
v RTV: Whether the session is active or completed, you can access the current
session attributes and their values through the RTV menu. Select View >
Session Attributes.
v Portal: In the session list, you can select the Session Info icon to display data
about the session, including user-defined session attributes. See "Searching
Session Data" in the IBM Tealeaf cxImpact User Manual.
Searching for session attributes
Through RTV, you can search for session attributes in the Session Info node. The
definition of the session attribute provides a mapping between the attribute name
and the internal attribute name and number.
To
1.
2.
3.
4.
search for a session attribute:
In RTV, click the Search button.
In the Session Facts pane, click the Session Info node .
Double-click the session attribute to add as a search term.
The session attribute is displayed in the list of search terms.
5. Enter the value of the attribute for which you would like to search.
6. To run the search, click Search.
Session attribute reference
Tealeaf accumulates attributes of a session as pages are passed to it for evaluation.
These attributes contain useful information about the session, data size, network
travel time, and event statistics.
v In the completed session, these attributes are written to the .STS section that is
part of the session. The primary ones of interest are in the [canisterSummary]
section.
v To view these attributes in RTV, select View > Session Attributes.
© Copyright IBM Corp. 1999, 2015
231
Example session attributes
An example set of session attributes that are displayed in RTV.
[canisterSummary]
TltStsCanisterID=CANISTER.dbs\LSSN_20100930_SIERRA4.dat
TltStsSesnIdx=4603208
TltStsFirstUse=1285847631
TltStsLastUse=1285847720
TltStsNumHits=591
TltStsServerHits=223
TltStsLicensedPage=147
TltStsTxtPages=147
TltStsSynthHits=0
TltStsReqCancelledHits=0
TltStsCUIPages=368
TltStsOtherPages=76
TltStsSesnID=DF2A0DEE773C018CA814B855CEA20AFE
TltStsReqBytes=260409
TltStsRspBytes=4963483
TltStsFactCount=1234
TltStsEventCount=33
TltStsIPaddr=63.194.158.158
TltStsDomain=www.straussandplesser.com
TltStsTLTVID=
TltStsSesnDuration=89
TltStsUserID=8FB06E8D6227D183BA830489FA2484AE
TltStsBrowser=Firefox
TltStsBrowserOS=WinXP
TltStsBrowserVersion=Firefox3.0
TltStsBrowserType=Firefox
TltStsIsBot=0
TltStsReferer=
TltStsInteresting=Yes
TltStsSessionTimeout=300
TltStsSessionVersion=8.0
TltStsCloseSessionEvent=No
TltStsSessionCloseReason=SessionExpired
TltStsEventUniqueId=6
TltStsEventUniqueId=7
TltStsTrafficType=BROWSER
Definitions
A chart containing definitions for session attributes.
Table 18. Definitions
Attribute Name
Example Value
Definition
Auto-Indexed
TltStsCanisterID
CANISTER.dbs\
LSSN_20100930_SIERRA4.dat
The IBM Tealeaf cxImpact canister
identifier
Y
TltStsSesnIdx
4603208
The IBM Tealeaf cxImpact session
index identifier
Y
TltStsFirstUse
1285847631
Timestamp of the first hit in UNIX
time format
Y
TltStsLastUse
1285847720
Timestamp of the last hit in UNIX
time format
Y
TltStsNumHits
591
The total number of hits in the
session
Y
TltStsServerHits
223
The total number of hits that are
listed on the server
232
RTV User Manual
Table 18. Definitions (continued)
Attribute Name
Example Value
Definition
TltStsLicensedPage
147
The total number of licensed pages
in the session
Note: This attribute applies only if
the Licensed Page model of
licensing is applied to your Tealeaf
solution.
Auto-Indexed
TltStsTxtPages
147
The total number of text pages in
the session
TltStsSynthHits
0
The total number of synthetic hits in
the session.
Y
v Synthetic hits are generated by
IBM Tealeaf cxConnect for Data
Analysis integrations for
integrating data from third-party
services. See "cxConnect for Data
Analysis Administration Manual"
in the IBM Tealeaf cxConnect for
Data Analysis Administration
Manual.
TltStsReqCancelledHits
0
The total number of Req Cancelled
hits in the session
TltStsCUIPages
368
The total number of client user
interface hits for the session.
Y
v Client user interface hits can be
captured if you have deployed
IBM Tealeaf CX UI Capture for
AJAX to your web application.
See "UI Capture for Ajax Guide"
in the IBM Tealeaf UI Capture for
Ajax Guide.
Note: IBM Tealeaf CX UI Capture
for AJAX is only available to legacy
users.
TltStsOtherPages
76
The total number of pages that do
not fit into the other page categories
TltStsSesnID
DF2A0DEE773C018CA814B
855CEA20AFE
The TLTSID of the session
TltStsReqBytes
260409
Total request size for all pages
TltStsRspBytes
4963483
Total response size for all pages
TltStsFactCount
1234
Total count of facts in the session.
TltStsEventCount
33
Total count of events that fired in
the session.
TltStsIPaddr
63.194.158.158
IP of the client, which is taken from
the REMOTE_ADDR request value
Y
TltStsDomain
www.straussandplesser.com
Domain in which the session was
experienced.
Y
TltStsTLTVID
N/A
The Tealeaf visitor identifier can be
populated if the Tealeaf Cookie
Injector is installed and deployed.
Y
Y
v The Tealeaf Cookie Injector is a
lightweight server utility that
issues cookies to uniquely
identify visitors for Tealeaf. See
"Installing and Configuring the
Tealeaf Cookie Injector" in the
IBM Tealeaf Cookie Injector Manual.
TltStsSesnDuration
89
The session duration, in seconds
Y
Chapter 6. Session attributes
233
Table 18. Definitions (continued)
Attribute Name
Example Value
Definition
TltStsUserID
8FB06E8D6227D183BA83048
9FA2484AE
The unique user identifier that is
Y
generated by Tealeaf for the session.
Auto-Indexed
TltStsBrowser
Firefox
The browser from which session
came (from HTTP_USER_AGENT)
TltStsBrowserOS
WinXP
The operating system on which the
browser was installed
TltStsBrowserVersion
Firefox3.0
The version of the browser in use
TltStsBrowserType
Firefox
The type of browser: Firefox, IE,
Chrome, or similar
Note: The source of this attribute
has changed beginning in Release
8.6.
TltStsIsBot
0
If the user agent is a bot, this value
is set to 1. Otherwise, it is set to 0.
TltStsReferer
N/A
The referrer IP for the session.
TltStsInteresting
Yes
The session was marked as
interesting by at least one event.
Note: As of Release 8.0, this
attribute is deprecated. It is always
set to Yes.
TltStsSessionTimeout
300
The session timeout setting for the
session.
Y
v The default value is configured
through TMS. See "Configuring
the CX Canister" in the IBM
Tealeaf CX Configuration Manual.
TltStsSessionVersion
8.0
The version of Tealeaf for which this
session was captured.
v This field is not populated for
sessions that are created before
Release 8.0.
Y
TltStsCloseSessionEvent
No
Indicates whether the session was
forcibly closed by a session close
event
TltStsSessionCloseReason
SessionExpired
Indicates the reason why the session
was closed
TltStsEventUniqueId
6
Y
The ID of each event that fired in
the session. Event #6 in this case.
The Event ID can be found in the
tooltip for events that are displayed
in the Tealeaf Event Manager. See
"TEM Events Tab" in the IBM Tealeaf
Event Manager Manual.
TltStSTrafficType
BROWSER
The type of traffic that is detected in
the hit
v BROWSER indicates a client Web
browser
v BOT indicates a web-crawling bot
How session attributes are stored
As the Canister evaluates individual hits from a session, it maintains a set of
system and user-defined session attributes. While the session is active, the Canister
continues to update these attributes as needed.
234
RTV User Manual
v When the session is marked as completed in the Canister, the session attributes
are written to the STS file in the [canisterSummary] section of the file and stored
with the session while it exists in Tealeaf.
v For active sessions, these values are stored in the Canister's in-memory database.
v RTV presents them as part of the [CanisterSummary] section, even though their
data source has not yet been recorded permanently.
Merge attributes
If the displayed session is merged from a set of fragments, RTV displays
information about the merged operation and the component fragments in the
[MergeSummary] section at the top of the Session Attributes page.
For more information about configuring fragment merging:
v RTV: “Annotations in RTV” on page 181
v BBR: Through the Replay Server, sessions can be automatically merged prior to
deliver through BBR. See "Managing Tealeaf Servers" in the IBM Tealeaf cxImpact
Administration Manual
– As needed, individual BBR users can override the Replay Server settings. See
"BBR Options" in the IBM Tealeaf cxImpact User Manual.
In the following sections, you can review reference information about the merged
data, depending on the type of merge completed:
v Index-Based Merge Reference
v Auto-Merge Reference
Index-based merge reference
Also known as RTV merge, this form of merging fragments attempts to find
matching fragments that are based on a specified request variable that uniquely
ties the session fragments together. Typically, this variable is the unique session
identifier.
v See “Annotations in RTV” on page 181.
In the Session Attributes window, the index-based reference information is similar
to:
[MergeSummary]
NumSessions=3
TotalNumPages=448
[Session0]
SessionIndex=360308
CanisterName=CANISTER.dbs\LSSN_20120213_TYNDALL.dat
[Session1]
SessionIndex=360564
CanisterName=CANISTER.dbs\LSSN_20120213_TYNDALL.dat
[Session2]
SessionIndex=361131
CanisterName=CANISTER.dbs\LSSN_20120213_TYNDALL.dat
Field
Description
NumSessions
Number of session fragments that are included in the merge
Chapter 6. Session attributes
235
TotalNumPages
Total number of pages that are included in the merge
Table 19. [SessionX] sections:
Field
Description
SessionIndex
The internal session ID for the specified CanisterName to locate the
session
CanisterName
The Canister file that contains the listed fragment
Auto-merge reference
When enabled, auto-merging allows Search Server to attempt to match session
fragments 24 hours before or after the main fragment. Auto-merge requires no
additional configuration.
v See “Annotations in RTV” on page 181.
In the Session Attributes window, the auto-merge reference information is similar
to:
[MergeSummary]
NumSessions=3
TotalNumPages=363
TotalDurationSeconds=22729
TotalDuration=06:18:49
PartialMerge=YES
PartialMergeReason=Merge data size limit exceeded: 16777216
PartialMergeRange=16-25
PartialMergeTotal=29
[Session0]
SessionIndex=361562
CanisterName=CANISTER.dbs\LSSN_20120213_TYNDALL.dat
SearchServer=tyndall:19000
NumPages=86
TimeStamp=2012-02-14 05:40:48
DurationSeconds=915
RawPageStart=0
RawPageEnd=85
[Session1]
SessionIndex=363160
CanisterName=CANISTER.dbs\LSSN_20120213_TYNDALL.dat
SearchServer=tyndall:19000
NumPages=4
TimeStamp=2012-02-14 07:07:14
DurationSeconds=5
RawPageStart=86
RawPageEnd=89
[Session2]
SessionIndex=364296
CanisterName=CANISTER.dbs\LSSN_20120214_TYNDALL.dat
SearchServer=tyndall:19000
NumPages=19
TimeStamp=2012-02-14 08:16:58
DurationSeconds=87
RawPageStart=90
RawPageEnd=108
Field
Description
NumSessions
Number of session fragments that are included in the merge
236
RTV User Manual
TotalNumPages
Total number of pages that are included in the merge
TotalDurationSeconds
Total duration of the merged session in seconds
TotalDuration
Total duration of the merged section in HH:MM:SS format
PartialMerge
If YES, the merge was not complete, per the PartialMergeReason.
PartialMergeReason
If the merge is partial, this entry provides an explanatory reason.
PartialMergeRange
The range of fragments out of the PartialMergeTotal that were
successfully merged
PartialMergeTotal
The total number of fragments that were detected for the merge
Table 20. [SessionX] sections:
Field
Description
SessionIndex
The internal session ID for the specified CanisterName to locate the
session
CanisterName
The Canister file that contains the listed fragment
SearchServer
The host name and port number for the Search Server from which
the session fragment was retrieved
NumPages
The number of pages in the fragment
TimeStamp
The timestamp that is associated with the fragment
DurationSeconds
The replay length in seconds of the fragment
RawPageStart
In the merged session, the starting page number of the content in
this fragment
RawPageEnd
In the merged session, the ending page number of the content in
this fragment
Chapter 6. Session attributes
237
238
RTV User Manual
Chapter 7. What is indexed and searchable
Tealeaf indexes a selection of content in session data to enable faster retrieval of
searches. This information describes the content of the request and the response
that are indexed by Tealeaf indexing.
Response
In the response, which is indexed terms do not include HTTP Headers, HTML
markup tags, and JavaScript code because of space considerations.
To review indexed content in the response:
1. Select Response view.
2. Right-click in the Response view, and select Indexed Response.
v See “Response view” on page 86.
Request
In a request, a selection of fields is indexed automatically.
Note: Cookies are not automatically indexed. Most sites have cookies that contain
personalization information as encoded data, which is often unique to every hit.
Indexing cookies generates large indexes. If there is a specific cookie to index, you
can create a pipeline rule that casts the cookie and its value into the [appdata]
section of a request, where it is always indexed and searchable.
v For more information about the indexed fields, see "Configuring CX Indexing" in
the IBM Tealeaf CX Configuration Manual.
Indexing options
Tealeaf Indexing indexes a pre-configured set of parts of the request and the
response.
v You can employ free text searches of non-indexed content. These searches can
take longer to return results.
v For more information about configuring indexing and the items that are
indexed, see "Configuring CX Indexing" in the IBM Tealeaf CX Configuration
Manual.
© Copyright IBM Corp. 1999, 2015
239
240
RTV User Manual
Chapter 8. Regular expressions in the RealiTea Viewer
In RTV, you can use regular expressions in search criteria and in the configuration
of some replay rules.
Overview
Regular expressions (regex) are a way of specifying a string for pattern matching.
By using meta characters, regular expressions are a flexible and powerful way of
specifying patterns.
Some regular expressions are recognizable. For example, the command dir *.txt,
where the asterisk is a meta character (or "wildcard") indicates to match any file
name that has a .txt extension.
However, regular expressions can be cryptic, non-intuitive, and time-consuming to
create and debug. The following links present regular expressions at a high level
along with some important concepts as they relate to using regular expressions
with Tealeaf data.
Note: Regular expressions can be CPU-intensive to process and, if poorly
specified, can affect system performance.
For some replay rules configuration fields, you can insert regular expressions to
help pattern matching. Typically, these patterns are designed to match a range of
URLs.
Greedy versus non-greedy searches
An important regular expression concept is "greedy" versus "non-greedy"
searching.
For example, consider the following nursery rhyme.
Peter, Peter, pumpkin-eater,
had a wife and could not keep her;
He put her in a pumpkin shell,
and he kept her very well.
If you wanted to look for the string Peter followed somewhere by the string her,
such a search would be represented by the regular expression Peter.*her. This
expression is saying to look for the string Peter followed by 0 or more characters
(the .*) and then the string her.
But there are separate multiple occurrences of this pattern that match this regular
expression:
Peter, Peter, pumpkin-eater,
had a wife and could not keep her;
He put her in a pumpkin shell,
and he kept her very well.
and also
© Copyright IBM Corp. 1999, 2015
241
Peter, Peter, pumpkin-eater,
had a wife and could not keep her;
He put her in a pumpkin shell,
and he kept her very well.
and also
Peter, Peter, pumpkin-eater,
had a wife and could not keep her;
He put her in a pumpkin shell,
and he kept her very well.
The first occurrence is non-greedy; it is the shortest match string possible. The last
instance is referred to as greedy, as it wants to match as much as possible.
Note: By default, regular expression searches are greedy. Greedy searches can have
severe performance implications, specifically when applied to the response buffer.
The only way a greedy match can determine the largest match is to examine the
string in its entirety.
For example, if the Peter nursery rhyme was a very long nursery rhyme (~100 kb)
and even if there were no further occurrences of the phrase her, it would still have
to scan the string to the end to determine that there were no matches.
Greedy regular expressions must be limited to "filtered" events or value parts of
request buffer name-value pairs. They must never be used to do any searches in
the response buffer, unless its contents are known.
242
RTV User Manual
Chapter 9. Using static archives in RTV
A static archive is a database of static content that is detected in the session data
stream. Typically, static content such as image files, CSS, and JavaScript are
repeated frequently in session data, occupy large volumes of data, and are often in
binary format.
By default, Tealeaf is configured to drop this content at the point of capture.
However, in some environments, it is useful or even necessary to capture this
content.
v For more information about static archives, see "Managing Static Archives" in the
IBM Tealeaf cxImpact Administration Manual.
Through RTV, you can access static file archives that are stored locally or are
managed remotely through a TLI server. This information describes how to use
static archives in the IBM Tealeaf CX RealiTea Viewer.
Types of static archives
RTV supports the use of two kinds of static archives, local TLI archives and remote
TLI archives.
v Local TLI archives - Static content can be gathered from the origin server and
stored in a local .TLI file. When references to the object are encountered during
replay, RTV can attempt to retrieve them from the local TLI archive.
v Remote TLI archives - Static archives can be managed centrally through a TLI
server. These archives are populated by a session agent, which inserts detected
static objects into .TLI files. During replay, Search Server queries the TLI server
for the appropriate content, which is served through RTV for display.
See "TLI Session Agent" in the IBM Tealeaf CX Configuration Manual.
How RTV accesses static content
An overview of how RTV uses static content.
When RTV is configured to use TLIs, references to static content are resolved
during replay in the following order for the best possible match:
1. Check the IE Cache maintained by RTV.
2. If a TLI server is in use, check the static archive cache. If a TLI server is not in
use, check any TLI files created manually on your local system.
v When content is retrieved from a remote TLI server, RTV stores the content
locally in a cache for faster access. See “Local TLI cache” on page 246.
3. Check the session itself. Static content can be embedded in the session.
4. Check the Remote TLI archives that are managed by a TLI server.
5. Check the origin server.
If no match is found in one area, then the next area is searched for matching
objects. If no match is found on the origin server, an empty area is inserted into
the replay.
© Copyright IBM Corp. 1999, 2015
243
Configuring RTV to use static archives
This information describes the steps that one must take to configure RTV to use
static archives.
Configuring advanced options
The following advanced options must be configured so RTV can use static
archives.
1. In the RTV menu, select Tools > Options.
2. Click the Advanced tab.
3. Set the following values for these options:
Option Value
Store Images during Replay
OFF
4. Configure the options in the Static Files tab. See “Static Files options tab.”
5. Acquire static content from the selected session. See “Static File Database
contents” on page 250.
Static Files options tab
In RTV, the Static Files tab controls the locations where static files are stored and
retrieved. Static files can be stored locally in a .TLI file, or you can retrieve static
files that are automatically generated and stored on the TLI Server for you.
v To open the Static Files tab, select Tools > Options from the RTV menu. Click
the Static Files tab.
244
RTV User Manual
Figure 112. Static Files tab
Configuration in the Static Files options tab
v For more information about configuring RTV to use a remote TLI server, see
“Using a TLI server” on page 246.
v For more information about creating local .TLI files, see “Creating local TLI
files” on page 247.
– For more information about how to manage these local .TLI files, see
“Managing local TLI files” on page 248.
v For more information about updating local static content, see “Configuring static
content updates” on page 250.
Chapter 9. Using static archives in RTV
245
Using a TLI server
When management of static archives is properly configured, the Windows pipeline
automatically detects static content and adds it to a .TLI file that is stored on the
server. This archive then can be accessed by RTV through Search Server during
replay to ensure that all Tealeaf users are referencing the same static content.
Note: Creation and management of static archives requires additional
configuration. See "Managing Static Archives" in the IBM Tealeaf cxImpact
Administration Manual.
v For more information about static files in general, see "Managing Static
Archives" in the IBM Tealeaf cxImpact Administration Manual.
– For more information about creating a TLI server, see "Managing Tealeaf
Servers" in the IBM Tealeaf cxImpact Administration Manual.
v Typically, new archives are created on a daily basis. For more information about
configuring server-side static content capture, see "TLI Session Agent" in the IBM
Tealeaf CX Configuration Manual.
If a TLI Server is created in your Tealeaf environment, you can configure RTV to
use the static files that are stored in TLI archives on that server.
v You may not delete static archives from a TLI server through RTV.
To configure use of the TLI Server:
1. In the Static Files options tab, click the Use TLI Server check box.
2. In the textbox, enter the name of the server that is hosting the TLI Server.
v By default, the TLI Server uses port 19000, which is the same port that is
used by default for Tealeaf Search Servers. If needed, you can specify a
different port number.
v A fully qualified domain name or IP address of the TLI server can be
inserted, if needed.
Note: You do not have to create a local database to store static content from
the TLI server.
3. Click OK.
During replay, RTV connects to Search Server, which queries the TLI Server to
attempt to provide static content from the most appropriate .TLI file that is stored
on the server.
Local TLI cache:
When static content is retrieved from the remote TLI server, RTV stores the content
locally in a cache. This cache is maintained as a series of files in a specified
directory.
v To specify the local directory where the TLI cache is stored, click Browse... in the
Static Files Options tab. Select the directory or create the directory folder. Click
OK.
v When static content is retrieved from the remote TLI server, RTV stores it locally
in this cache for faster access. If updates are made on the server, then the cache
is updated the next time that a request is made for the static object.
v To clear this directory of TLI data, click Clear Local Cache.... Click Yes. The
cache is emptied.
246
RTV User Manual
v You can specify how long data is allowed to remain in the local cache. Enter a
value in the Max Age (days) textbox for the number of days permitted. The
default value is 1.0. Decimal values are accepted.
– Time for a static object in the cache is measured from its initial create time.
v Optionally, you can choose to clear the local cache whenever a session is opened,
which forces RTV to acquire the latest static objects from the TLI Server. To clear
the cache, select theClear Local Cache on Replay check box.
Creating local TLI files
If the session or sessions are a representative sample of typical visitor experiences
with your web application, you can create a TLI file that captures most or all of the
static content available on your site.
Note: A local .TLI file must be updated when there are significant changes to the
web application or on an otherwise periodic basis. See “Managing local TLI files”
on page 248.
To create a .TLI file
1. Begin a new session with your web application.
2. Visit as many pages as possible where static content is referenced.
v Some knowledge of the web application structure is required.
v If you are unsure, create a session by browsing to various areas of the site.
You may need to visit some detail pages, which can reference different
content from the home page of an area.
3. Create some means of identifying the session later through search.
v If your web application stores a session or user identifying cookie, you can
retrieve that value by looking in the source through your web browser.
v You can also create a unique identifier by inserting a unique value in a data
entry field, such as a search string.
4. When you have browsed the site, end the session.
5. After the session has closed, it may be a period of 5 to 15 minutes before the
session has been indexed and made available for search.
Note: If you have not configured Tealeaf to recognize when a session of your
web application ends, Tealeaf automatically times out the session after a
pre-configured period of inactivity. By default, this setting is 5 minutes. See
"Configuring the CX Canister" in the IBM Tealeaf CX Configuration Manual.
v You may be able to locate the session as through active search in RTV.
However, depending on the identifier you are using, the session can be
hard to locate.
6. Search for your unique identifier through Portal or RTV search.
v For more information, “Session search and Subsearch” on page 105.
v For more information, "Searching Session Data" in the IBM Tealeaf cxImpact
User Manual.
7. When you have found the session, open it in RTV.
8. If you have not done so already, create the local .TLI file. See “Creating local
TLI files.”
9. From the RTV menu, select Tools > Get Images....
10. The static content is stored in the active .TLI file. This file is identified with a
red asterisk (*) in the Databases panel of the Static Files Options tab.
Chapter 9. Using static archives in RTV
247
v By default, RTV stores static content in a .TLI file in the following local
directory:
C:\Documents and Settings\<username>\Application Data\TeaLeaf\RealiTea
where:
v <username> is the login identifier for your account on the local
workstation.
Managing local TLI files
Over time, a static .TLI can become outdated with the current static content of
your web application. Issues can be caused by .TLI content being incompatible
with the current site. .TLI files must be managed and updated from time to time.
Broken .TLI files must be removed from use. Through the Static Files tab, you can
manage use and updating of the local .TLI files.
Note: In general, a single .TLI file must be used for each replay site in your web
application.
In the Database Files pane of the Static Files tab, you can review the locally stored
.TLI files, each of which corresponds to a separate database of static content,
which is captured by Get Images at a separate time.
v The databases are listed in the order that they are searched for static content. To
change the order, select a database file and use the Move Up and Move Down
buttons.
Note: To force an update of a specific file, move it to the top of the list and then
select Tools > Get Images from the RTV menu. See “Get Images.”
v To check for the last update of the file, browse your local computer to the TLI
storage directory, which is listed in the previous section. Right-click the file and
select Properties. The Modified date indicates the last time that it was updated.
v To create a new static database file, click New.... The file name and location can
be modified before you save it. When saved, the file is added to the list.
Note: A newly created database file is empty until it is populated by a Get
Images command.
v To remove a static database file, select it and click Remove.... The file is removed
from use as a static database file.
Note: Removed files are not deleted from the file system. They are no longer
populated by Get Images commands. You must delete them manually from the
directory in which they are stored.
v To open a static database file that is not displayed in the list, such as one that is
removed or copied to your computer, click Open.... Navigate your local
computer to find the file to open. The opened file is added to the list of files.
For more information about reviewing the contents of a static file database (.TLI
file), see “Reviewing static archive contents” on page 250.
Get Images
Using the Get Images command, you can download all non-captured static content
files that are referenced in the current session at the same time, instead of
acquiring them as needed during RTV replay renders.
v If RTV is displaying in the topmost window the replay of a single visitor's
session in any view mode, then only the images that are needed for that session
are fetched.
248
RTV User Manual
v If RTV is showing in the topmost window a view of a session segment, then the
Get Images command applies to the set of selected sessions.
v If a page dynamically calls for a file as a result of running JavaScript, the Get
Images command cannot pre-fetch these files.
To perform a Get Images:
Note: If Static Files Options tab is configured for RTV to access static content from
a remote TLI server, the Get Images command is unnecessary. When the TLI server
is queried for content, RTV stores static content locally in a separate cache. See
“Local TLI cache” on page 246.
1. When Get Images goes to Static File Database is selected in the Static Files
tab, running the Get Images command stores all static content in the currently
active .TLI file. See “Creating local TLI files” on page 247.
2. Select a session or sessions:
a. Select or open a session.
b. You can apply the Get Images command when you select multiple sessions
in the sessions list.
3. Select or load a recently captured session in RTV.
4. From the RTV menu, select Tools > Get Images....
5. The static objects in the selected session are compared to any corresponding
objects stored in the local archive.
a. If there are differences between the objects, the new object is added to the
local .TLI file.
Note: New versions of existing objects in a local .TLI files do not replace
the old version. Both versions are stored in the file.
6. By default, the Get Images command is configured to stop retrieving an
individual item of content if it is unable to complete the retrieval within 45
seconds.
v If an item cannot be downloaded within the configured timeout seconds, the
item is skipped, and the next item in the list is processed.
v To configure a new timeout setting, enter a value for the number of seconds
in textbox. Then, click Set Timeout.
7. To close the dialog box after the copy to the static file database is complete,
click the check box at the bottom of the window.
v After you run the Get Images command, click the Refresh button in the
toolbar to refresh the session from the cached content.
Creating a static file database enables RTV to reference this content locally, instead
of having to fetch it during replay or require you to run a Get Images command to
acquire the content.
v For more information about creating local .TLI files, see “Creating local TLI
files” on page 247.
v You can review the contents of the static file database through RTV. See “Static
File Database contents” on page 250.
The Get Images command runs a single snapshot of the static content that is
referenced in the current session or selected sessions. However, this content and its
location can change over time. Since the local data is static, the quality of replay of
the referencing session can degrade over time.
Chapter 9. Using static archives in RTV
249
v For more information about how to manage Static File databases over time, see
“Managing local TLI files” on page 248.
Configuring static content updates
The Static Files Options tab provides controls for configuring how Search Server is
instructed to manage updating RTV with static content referenced in a session.
You can configure when the Get Images command checks for updated files: Never
(default) or Always.
Note: Setting this value to Always can affect impact system performance.
Image Substitution: The Image Substitution drop-down controls how Search Server
locates the best .TLI file. This option allows older static content to be either
archived or deleted depending on its usefulness, instead of storing all static content
in a single large .TLI file.
When there are multiple images that are found for any URL, RTV can substitute
the image that is based upon one of the following options:
Option Description
Use newest
The newest available image is substituted for the missing one.
Use closest date/time match
The missing image is substituted for the image that is closest to it, either
forward or backward in time.
Use closest previous date/time match
The missing image is substituted for the image that is closest to it
backward in time.
Use closest following date/time match
The missing image is substituted for the image that is closest to it forward
in time.
Reviewing static archive contents
Whether you are using local or remote .TLI files, you can review the contents of
the active static archive through RTV.
v If you are using a local .TLI file, you can get images from the currently open
session into your .TLI file before you review it. See “Get Images” on page 248.
v To review the contents of the active static archive, select View > Static File
Database? in the RTV menu. The Static File Database Contents dialog is
displayed.
Static File Database contents
Using this tool, you can see the contents of the static file databases that are stored
in the Tealeaf .TLI format.
v To view the contents of the currently active static file database, select View >
Static File Database.
v You can manage multiple static file databases through RTV and configure RTV
to download content to a local .TLI file when a Get Images command is
completed. See “Static Files options tab” on page 244.
v For more information about getting images, see “Get Images” on page 248.
250
RTV User Manual
Figure 113. Static File Database Contents
v To select multiple files, press SHIFT or CTRL and select the files.
v To view a static database file in its default viewer, select it and click View.
v To view a text-based static database file in Notepad.exe, select it and click View
in Notepad?.
v To export the list into Excel-readable format, click Export List to Excel....
v To delete one or more files, select them and click Delete....
v To compare the differences between two text-based items in the static file
database, select the items and then click Diff.... The differences are displayed in
Notepad.exe.
v To search the list of objects, enter a text string in the Search box. To match the
search against all words in the text box, click the check box. Then, press ENTER to
filter the display to show only the matching objects.
v For more information about using this window to interact with a TLI server, see
“Browsing TLI Server files” on page 252.
v To close the dialog, click Close.
At the top of the dialog, you can review the number of files and volume of data
that is stored in the selected database file(s).
Column
Description
Type
Type of static file
Host/Path/Name
Columns define the full URL to the static file.
Timestamp
Timestamp when the static file was loaded into the database
Size
Size in bytes of the raw source object
Chapter 9. Using static archives in RTV
251
CmpSize
Size in bytes of the compressed static file
ContentType
Mimetype of the listed file
File
Full path to the .TLI file where the static file resides
MD5
MD5 checksum applied to the file to verify data integrity. If multiple
objects share MD5 value, then the underlying data is the same. The stored
data is shared between the entries.
Browsing TLI Server files
When you use a TLI Server, you can use theStatic File Database Contents window
to browse the local TLI cache that contains objects that are retrieved from the TLI
Server or TLI files that are stored remotely on the server.
v When you use a TLI server, the local cache is first queried for static objects to
display. If no matches are found, RTV then queries the remote TLI server.
v For more information about TLI Servers, see "Managing Static Archives" in the
IBM Tealeaf cxImpact Administration Manual.
Browsing the Local TLI cache:
Instructions on how to browse the Local TLI cache.
To browse the local TLI cache:
1. In the lower-left corner, click the Local Cache button.
2. The contents of the window are updated with the static objects that are stored
in the local cache that is managed by RTV.
Selecting TLI Files from remote server:
Instructions on how to select TLI Files to view from the remote server.
1. In the lower-left corner, click the TLI Server button.
2. The configured TLI server is listed in the textbox. For more information about
changing the TLI server, see “Static Files options tab” on page 244.
3. To browse TLI files available on the server, click Select.
4. The Server TLI Selection dialog is displayed.
Server TLI Selection:
In the Server TLI Selection dialog, you can select a specific TLI file or set of TLI
files to view in the Static File Database dialog. The list of TLIs available on the
selected server is displayed.
252
RTV User Manual
Figure 114. Server TLI Selection
v To select one or more TLI files on the specified server, click the check box next
to its name.
v To select all available TLIs, click Select All.
v To clear all selections, click Clear All.
v To load your selections into the Static File Database Contents window, click OK.
v To cancel your selections, click Cancel.
When one or more TLI files is selected, the Static File Database Contents window
is updated with the static objects retrieved from the selected files on the TLI
Server.
TLI settings:
You can specify the maximum number of entries permitted when viewing the
selected TLI file in the Static File Database Contents window. Enter a value in the
Max Entries textbox. This setting is enforced when the entries in the selected file or
files on the server are downloaded for review in RTV.
You can specify the maximum time in seconds that RTV is permitted to attempt to
contact and download static content entries from the selected TLIs. Enter a value in
the Timeout Seconds textbox.
During retrieval of entries from the TLI file, both TLI settings are applied; if either
of the settings is reached during the download, the retrieval is stopped, and the
entries that are downloaded so far are displayed in theStatic File Database
Contents window.
v These limits are imposed to prevent excessively large queries of the Search
Server, which can cause it to crash.
Chapter 9. Using static archives in RTV
253
Locating static content in session data
During replay of a session, it is not apparent to the RTV user whether the static
content is in the RTV cache, in a .TLI file, or on the origin server.
To locate static content objects in session data:
1. Perform a search using Text in Response as a search term, specifying the file
name of a static object that should be stored in a static archive (for example,
example.gif).
v See “Session search and Subsearch” on page 105.
2. When you are able to locate a session that contains the static object, find the hit
where the object is referenced.
3. Click the Replay view button.
4. From the RTV menu, select View > Page Load Details.
5. In the Page Load Detailswindow, the Source column cancontain the following
references:
Value Description
IE Cache
Retrieved from the RTV cache
TLI + filename
Retrieved from local TLI filename file or the local cache, depending on
whether you are using a TLI server or not.
Remote TLI + date
Retrieved from the TLI server file for the specified date
See “Context menu” on page 177.
Refreshing static archives
This information describes the steps one must take to refresh static archives.
Refreshing local archives
This information describes the steps one must take to refresh local archives.
Clearing the IE Cache
Clearing the IE Cache allows RTV to initially look for content in local .TLI files or
through the remote TLI server system. Clearing the cache periodically ensures that
RTV is using the most current versions of the content available for replay.
v For more information about clearing local content that is cached from a TLI
server, see “Clearing the local TLI cache” on page 255.
To clear the IE cache:
1. In the RTV menu, select View > IE Cache.
2. In the IE Cache window, click Delete All. Confirm the deletion.
3. Click OK.
v For more information about the IE Cache, see “RTV Menus” on page 153.
When RTV encounters subsequent references to these objects in session data, the
application attempts to retrieve the content from local or remote TLIs.
254
RTV User Manual
Refreshing local archive contents
Instructions on how to refresh local archive contents.
v To refresh the currently active local archive, load a recently captured session in
RTV. Then, select Tools > Get Images... to update the local archive with the
content referenced in the session data. See “Get Images” on page 248.
v You can also remove the current local static archive or make a different file the
active one. See “Static File Database contents” on page 250.
Refreshing remote archives
Static archives that are managed by a remote TLI server are renewed every day. If
the content of a static object changes, the TLI server recognizes the difference and
loads the new version of the object into the archive while it retains the former copy
for archival purposes.
For example, if a JavaScript file is changed and deployed, sessions that reference
the file before it was updated still reference the old version. Sessions that are
captured and processed by Tealeaf after the new JavaScript file is deployed and
stored on the remote TLI server reference the new file.
Clearing the local TLI cache
Content that is retrieved from a TLI server is cached locally.
As needed, you can clear this cache to force a refresh from the TLI server.
See “Local TLI cache” on page 246.
Static archive Reporting
Through RTV, you can export the contents of a static archive into Excel for
reporting purposes.
To generate a report on static archive contents:
1. If needed, you must update the contents of the local version of the static
archive by using a Get Images command. See “Get Images” on page 248.
2. From the RTV menu, select View > Static File Database....
3. The contents of the local copy of the currently active static archive are
displayed.
4. To export this data to Excel, click Export List to Excel....
5. The contents of the displayed list of static content are opened in a new Excel
worksheet.
v See “Static File Database contents” on page 250.
6. The exported list can be inserted into an Excel report that provides summary
information and detail breakdowns for each object in the static archive.
Chapter 9. Using static archives in RTV
255
256
RTV User Manual
Chapter 10. IBM Tealeaf documentation and help
IBM Tealeaf provides documentation and help for users, developers, and
administrators.
Viewing product documentation
All IBM Tealeaf product documentation is available at the following website:
https://tealeaf.support.ibmcloud.com/
Use the information in the following table to view the product documentation for
IBM Tealeaf:
Table 21. Getting help
To view...
Do this...
Product documentation
On the IBM Tealeaf portal, go to ? > Product
Documentation.
IBM Tealeaf Knowledge Center
On the IBM Tealeaf portal, go to ? > Product
Documentation and select IBM Tealeaf
Customer Experience in the ExperienceOne
Knowledge Center.
Help for a page on the IBM Tealeaf Portal
On the IBM Tealeaf portal, go to ? > Help
for This Page.
Help for IBM Tealeaf CX PCA
On the IBM Tealeaf CX PCA web interface,
select Guide to access the IBM Tealeaf CX
PCA Manual.
Available documents for IBM Tealeaf products
The following table is a list of available documents for all IBM Tealeaf products:
Table 22. Available documentation for IBM Tealeaf products.
IBM Tealeaf products
Available documents
IBM Tealeaf CX
v IBM Tealeaf Customer Experience Overview
Guide
v IBM Tealeaf CX Client Framework Data
Integration Guide
v IBM Tealeaf CX Configuration Manual
v IBM Tealeaf CX Cookie Injector Manual
v IBM Tealeaf CX Databases Guide
v IBM Tealeaf CX Event Manager Manual
v IBM Tealeaf CX Glossary
v IBM Tealeaf CX Installation Manual
v IBM Tealeaf CX PCA Manual
v IBM Tealeaf CX PCA Release Notes
© Copyright IBM Corp. 1999, 2015
257
Table 22. Available documentation for IBM Tealeaf products (continued).
IBM Tealeaf products
Available documents
IBM Tealeaf CX
v IBM Tealeaf CX RealiTea Viewer Client Side
Capture Manual
v IBM Tealeaf CX RealiTea Viewer User
Manual
v IBM Tealeaf CX Release Notes
v IBM Tealeaf CX Release Upgrade Manual
v IBM Tealeaf CX Support Troubleshooting
FAQ
v IBM Tealeaf CX Troubleshooting Guide
v IBM Tealeaf CX UI Capture j2 Guide
v IBM Tealeaf CX UI Capture j2 Release Notes
IBM Tealeaf cxImpact
v IBM Tealeaf cxImpact Administration Manual
v IBM Tealeaf cxImpact User Manual
v IBM Tealeaf cxImpact Reporting Guide
IBM Tealeaf cxConnect
v IBM Tealeaf cxConnect for Data Analysis
Administration Manual
v IBM Tealeaf cxConnect for Voice of Customer
Administration Manual
v IBM Tealeaf cxConnect for Web Analytics
Administration Manual
IBM Tealeaf cxOverstat
IBM Tealeaf cxOverstat User Manual
IBM Tealeaf cxReveal
v IBM Tealeaf cxReveal Administration Manual
v IBM Tealeaf cxReveal API Guide
v IBM Tealeaf cxReveal User Manual
IBM Tealeaf cxVerify
v IBM Tealeaf cxVerify Installation Guide
v IBM Tealeaf cxVerify User's Guide
IBM Tealeaf cxView
IBM Tealeaf cxView User's Guide
IBM Tealeaf CX Mobile
v IBM Tealeaf CX Mobile Android Logging
Framework Guide
v IBM Tealeaf Android Logging Framework
Release Notes
v IBM Tealeaf CX Mobile Administration
Manual
v IBM Tealeaf CX Mobile User Manual
v IBM Tealeaf CX Mobile iOS Logging
Framework Guide
v IBM Tealeaf iOS Logging Framework Release
Notes
258
RTV User Manual
Appendix. Build notes
This information contains release notes about the individual official builds for the
IBM Tealeaf CX RealiTea Viewer available for this release. Included in these notes
is a list of issues that are addressed in the build, and also new features and any
dependencies.
Note: RTV is released on a schedule that is independent of IBM Tealeaf cxImpact.
Note: Tealeaf recommends upgrading to the latest available RTV build for any
Release whenever possible.
The IBM Tealeaf CX RealiTea Viewer is a stand-alone application that can be
installed on your local desktop to enable searching for and replaying Tealeaf
sessions. For more information about RTV, see "RealiTea Viewer (RTV) User
Manual" in the IBM Tealeaf RealiTea Viewer User Manual.
Note: No RTV-only builds were issued for Release 8.7.
RTV Build 8452
RTV version: 8.4.1.8452
Release Date: 24-Apr-2012
Dependencies:
v Other fix dependencies: Customers can upgrade to RTV 8452 from any 6.x or 7.x
build of RTV.
Note: In general, avoid installing builds of RTV that are for versions of IBM
Tealeaf cxImpact released later than the version in use in your Tealeaf
environment. If you are also installing the Event Editor with RTV, the major and
minor version of the Event Editor must match the major and minor version of
IBM Tealeaf cxImpact. If they do not match, the Event Editor cannot commit
changes to the Event Master server.
v Other component dependencies: None
Compatibility:
Customers can upgrade to RTV 8452 from any 6.X or 7.X build.
Note: Before you begin upgrading, verify that your system is properly sized for
RTV Release 7.x, as the system requirements changed. See "RealiTea Viewer
Overview" in the IBM Tealeaf RealiTea Viewer User Manual.
Table 23. 8.4.1.8452 Issues Addressed:
Description of Issue
Status Code 404 errors that are caused by failing to remove question marks (?) display
before anchor tags in response content during replay.
© Copyright IBM Corp. 1999, 2015
259
260
RTV User Manual
Notices
This information was developed for products and services offered in the U.S.A.
IBM may not offer the products, services, or features discussed in this document in
other countries. Consult your local IBM representative for information on the
products and services currently available in your area. Any reference to an IBM
product, program, or service is not intended to state or imply that only that IBM
product, program, or service may be used. Any functionally equivalent product,
program, or service that does not infringe any IBM intellectual property right may
be used instead. However, it is the user's responsibility to evaluate and verify the
operation of any non-IBM product, program, or service.
IBM may have patents or pending patent applications covering subject matter
described in this document. The furnishing of this document does not grant you
any license to these patents. You can send license inquiries, in writing, to:
IBM Director of Licensing
IBM Corporation
North Castle Drive
Armonk, NY 10504-1785
U.S.A.
For license inquiries regarding double-byte (DBCS) information, contact the IBM
Intellectual Property Department in your country or send inquiries, in writing, to:
Intellectual Property Licensing
Legal and Intellectual Property Law
IBM Japan, Ltd.
19-21, Nihonbashi-Hakozakicho, Chuo-ku
Tokyo 103-8510, Japan
The following paragraph does not apply to the United Kingdom or any other
country where such provisions are inconsistent with local law: INTERNATIONAL
BUSINESS MACHINES CORPORATION PROVIDES THIS PUBLICATION "AS IS"
WITHOUT WARRANTY OF ANY KIND, EITHER EXPRESS OR IMPLIED,
INCLUDING, BUT NOT LIMITED TO, THE IMPLIED WARRANTIES OF
NON-INFRINGEMENT, MERCHANTABILITY OR FITNESS FOR A PARTICULAR
PURPOSE. Some states do not allow disclaimer of express or implied warranties in
certain transactions, therefore, this statement may not apply to you.
This information could include technical inaccuracies or typographical errors.
Changes are periodically made to the information herein; these changes will be
incorporated in new editions of the publication. IBM may make improvements
and/or changes in the product(s) and/or the program(s) described in this
publication at any time without notice.
Any references in this information to non-IBM Web sites are provided for
convenience only and do not in any manner serve as an endorsement of those Web
sites. The materials at those Web sites are not part of the materials for this IBM
product and use of those Web sites is at your own risk.
© Copyright IBM Corp. 1999, 2015
261
IBM may use or distribute any of the information you supply in any way it
believes appropriate without incurring any obligation to you.
Licensees of this program who wish to have information about it for the purpose
of enabling: (i) the exchange of information between independently created
programs and other programs (including this one) and (ii) the mutual use of the
information which has been exchanged, should contact:
IBM Bay Area Lab
1001 E Hillsdale Boulevard
Foster City, California 94404
U.S.A.
Such information may be available, subject to appropriate terms and conditions,
including in some cases, payment of a fee.
The licensed program described in this document and all licensed material
available for it are provided by IBM under terms of the IBM Customer Agreement,
IBM International Program License Agreement or any equivalent agreement
between us.
Any performance data contained herein was determined in a controlled
environment. Therefore, the results obtained in other operating environments may
vary significantly. Some measurements may have been made on development-level
systems and there is no guarantee that these measurements will be the same on
generally available systems. Furthermore, some measurements may have been
estimated through extrapolation. Actual results may vary. Users of this document
should verify the applicable data for their specific environment.
Information concerning non-IBM products was obtained from the suppliers of
those products, their published announcements or other publicly available sources.
IBM has not tested those products and cannot confirm the accuracy of
performance, compatibility or any other claims related to non-IBM products.
Questions on the capabilities of non-IBM products should be addressed to the
suppliers of those products.
All statements regarding IBM's future direction or intent are subject to change or
withdrawal without notice, and represent goals and objectives only.
This information contains examples of data and reports used in daily business
operations. To illustrate them as completely as possible, the examples include the
names of individuals, companies, brands, and products. All of these names are
fictitious and any similarity to the names and addresses used by an actual business
enterprise is entirely coincidental.
COPYRIGHT LICENSE:
This information contains sample application programs in source language, which
illustrate programming techniques on various operating platforms. You may copy,
modify, and distribute these sample programs in any form without payment to
IBM, for the purposes of developing, using, marketing or distributing application
programs conforming to the application programming interface for the operating
platform for which the sample programs are written. These examples have not
been thoroughly tested under all conditions. IBM, therefore, cannot guarantee or
imply reliability, serviceability, or function of these programs. The sample
262
RTV User Manual
programs are provided "AS IS", without warranty of any kind. IBM shall not be
liable for any damages arising out of your use of the sample programs.
Trademarks
IBM, the IBM logo, and ibm.com® are trademarks or registered trademarks of
International Business Machines Corp., registered in many jurisdictions worldwide.
Other product and service names might be trademarks of IBM or other companies.
A current list of IBM trademarks is available on the Web at “Copyright and
trademark information” at www.ibm.com/legal/copytrade.shtml.
Privacy Policy Considerations
IBM Software products, including software as a service solutions, ("Software
Offerings") may use cookies or other technologies to collect product usage
information, to help improve the end user experience, to tailor interactions with
the end user or for other purposes. A cookie is a piece of data that a web site can
send to your browser, which may then be stored on your computer as a tag that
identifies your computer. In many cases, no personal information is collected by
these cookies. If a Software Offering you are using enables you to collect personal
information through cookies and similar technologies, we inform you about the
specifics below.
Depending upon the configurations deployed, this Software Offering may use
session and persistent cookies that collect each user's user name, and other
personal information for purposes of session management, enhanced user usability,
or other usage tracking or functional purposes. These cookies can be disabled, but
disabling them will also eliminate the functionality they enable.
Various jurisdictions regulate the collection of personal information through
cookies and similar technologies. If the configurations deployed for this Software
Offering provide you as customer the ability to collect personal information from
end users via cookies and other technologies, you should seek your own legal
advice about any laws applicable to such data collection, including any
requirements for providing notice and consent where appropriate.
IBM requires that Clients (1) provide a clear and conspicuous link to Customer's
website terms of use (e.g. privacy policy) which includes a link to IBM's and
Client's data collection and use practices, (2) notify that cookies and clear gifs/web
beacons are being placed on the visitor's computer by IBM on the Client's behalf
along with an explanation of the purpose of such technology, and (3) to the extent
required by law, obtain consent from website visitors prior to the placement of
cookies and clear gifs/web beacons placed by Client or IBM on Client's behalf on
website visitor's devices
For more information about the use of various technologies, including cookies, for
these purposes, See IBM's Online Privacy Statement at: http://www.ibm.com/
privacy/details/us/en section entitled "Cookies, Web Beacons and Other
Technologies."
Notices
263
264
RTV User Manual
Printed in USA