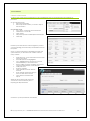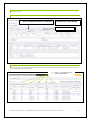
1
AXEZE STUDIO PHOENIX User Manual DRAFT Version 8 PHOENIX USER MANUAL CONTENTS System Requirements for Axeze Studio .............................................................................................. 5 End-User License Agreement for Axeze Software ............................................................................ 5 Software Product License ..................................................................................................................... 5 Limited Warranty..................................................................................................................................... 7 About Axeze Studio................................................................................................................................ 9 Installing Axeze Studio ......................................................................................................................... 10 Removing Axeze Studio ...................................................................................................................... 10 Repair Axeze Studio ............................................................................................................................. 10 Flow Chart to Setup Phoenix .............................................................................................................. 11 Configuring Phoenix ............................................................................................................................... 0 Log On and Log Off ............................................................................................................................... 0 System ....................................................................................................................................................... 1 Networks ................................................................................................................................................... 1 Controllers ................................................................................................................................................ 2 Groups ...................................................................................................................................................... 3 Mapping ................................................................................................................................................... 9 Zones ....................................................................................................................................................... 13 Event Handler ........................................................................................................................................ 14 Lift............................................................................................................................................................. 17 Date/Time Synchronization ................................................................................................................. 22 Cameras ................................................................................................................................................. 23 data......................................................................................................................................................... 27 credential data ..................................................................................................................................... 27 Personnel ................................................................................................................................................ 30 Building Data ......................................................................................................................................... 31 Holidays .................................................................................................................................................. 31 Options ................................................................................................................................................... 32 Default Settings ..................................................................................................................................... 32 View......................................................................................................................................................... 37 View Controller Events ......................................................................................................................... 37 View Controller Configuration ........................................................................................................... 38 View Event Handler Actions ............................................................................................................... 39 View Event Handler OUTGOING EMAILS .......................................................................................... 40 Filtering reports: ..................................................................................................................................... 41 View Zone Occupancy ....................................................................................................................... 42 Account ................................................................................................................................................. 43 Change Password ................................................................................................................................ 43 Change Password Question and Answer ........................................................................................ 43 User Management ............................................................................................................................... 43 Recent Activity ...................................................................................................................................... 44 Event Log................................................................................................................................................ 44 Home ...................................................................................................................................................... 45 Tips and Tricks ........................................................................................................................................ 47 Right click to select one from a drop down list .............................................................................. 47 Find a Credential in the Database .................................................................................................... 47 Add a Person to the Database........................................................................................................... 47 Find a specific person or credential ................................................................................................. 47 Quick Find .............................................................................................................................................. 51 Create a Filter ........................................................................................................................................ 52 Export ...................................................................................................................................................... 53 Common snapshots within Phoenix .................................................................................................. 54 Right Click Select .................................................................................................................................. 54 CONTROLLER HARDWARE TIPS ........................................................................................................... 55 Number of controllers per network. ...................................................................................................... 55 KENCfg Setup Controller Hardware...................................................................................................... 55 Configuring Controllers .......................................................................................................................... 55 Check ID Number of a Controller ......................................................................................................... 55 DEFINITIONS ............................................................................................................................................. 56 PERMISSIONS AND TASKS AVAILABLE IN PHOENIX ........................................................................... 59 Software RequirementS ....................................................................................................................... 60 SYSTEM REQUIREMENTS FOR AXEZE STUDIO System requirements include: Windows XP->Windows7->Windows Vista->Windows Server 2003->Windows Server 2008->Windows Server 2008R2. Microsoft .NET Framework 4.0 Internet Information Service (IIS) 6 and above SQL Server 2008R2 Windows Installer 4.5 END-USER LICENSE AGREEMENT FOR AXEZE SOFTWARE IMPORTANT—READ CAREFULLY: This Axeze End-User License Agreement (“EULA”) is a legal agreement between you or the corporate entity and Axeze Pty Ltd incorporated in the State of South Australia for the Axeze software accompanying this EULA, which includes computer software and may include hardware firmware, software security device, associated media, printed materials, and “online” or electronic documentation (“SOFTWARE PRODUCT” or “SOFTWARE”). By exercising your rights to retain, copy, download, install or use this SOFTWARE PRODUCT, you agree to be bound by the terms of this EULA. If you do not agree to the terms of this EULA, you may not use the SOFTWARE PRODUCT and at the discretion of Axeze you may be entitled to a full refund on return of the SOFTWARE and all its component parts. This agreement includes any subsequent updates to the original but does not cover any third party software or other Axeze software which may be covered by its own license agreement. SOFTWARE PRODUCT LICENSE The SOFTWARE PRODUCT is protected by copyright laws and international copyright treaties, as well as other intellectual property laws and treaties. The SOFTWARE PRODUCT is licensed, not sold. 1. GRANT OF LICENSE. This EULA grants you the following rights: Installation and Use. You may install and use this SOFTWARE PRODUCT on a single computer for use at a single site only. Reproduction and Distribution. You may not reproduce or distribute copies of the SOFTWARE PRODUCT. You may make one backup copy of the SOFTWARE PRODUCT for the purpose of recovery only. 2. DESCRIPTION OF OTHER RIGHTS AND LIMITATIONS. Limitations on Reverse Engineering, Decompilation, Disassembly and Re-Engineering. You may not reverse engineer, decompile, disassemble or make changes to through re-engineering the SOFTWARE PRODUCT, except and only to the extent that such activity is expressly permitted by applicable law notwithstanding this limitation. Separation of Components. The SOFTWARE PRODUCT is licensed as a single product. Its component parts may not be separated for use on more than one computer. Software Transfer. The SOFTWARE PRODUCT may not be resold, rented, leased, lent, or its value transferred once installed or if subsequently rejected. Termination. Without prejudice to any other rights, Axeze may terminate this EULA if you fail to comply with the terms and conditions of this EULA. In such event, you must destroy all copies of the SOFTWARE PRODUCT and all of its component parts. 3. COPYRIGHT. Software. All title and copyrights in and to the SOFTWARE PRODUCT (including but not limited to any images, photographs, animations, video, audio, music, and text incorporated into the SOFTWARE PRODUCT), the accompanying printed materials, and any copies of the SOFTWARE PRODUCT are owned by Axeze. The SOFTWARE PRODUCT is protected by copyright laws and international treaty provisions. Therefore, you must treat the SOFTWARE PRODUCT like any other copyrighted material. Data. All database files, export files, reports and other user created content produced by the SOFTWARE PRODUCT as part of normal use are owned by and copyright attributed to the user. Data created by the SOFTWARE PRODUCT as part of internal workings such as but not limited to error handling, performance optimization, caching, statistical analysis and temporary working files remain the property of Axeze. 4. NO WARRANTY LIMITATION OF LIABILITY. Axeze's entire liability and your exclusive remedy under this EULA shall not exceed one dollar (AUD$1.00). NO WARRANTIES. Axeze expressly disclaims any warranty for the SOFTWARE PRODUCT. The SOFTWARE PRODUCT and any related documentation is provided “as is” without warranty of any kind, either express or implied, including, without limitation, the implied warranties or merchantability, fitness for a particular purpose, or non-infringement. The entire risk arising out of use or performance of the SOFTWARE PRODUCT remains with you. NO LIABILITY FOR CONSEQUENTIAL DAMAGES. In no event shall Axeze or its suppliers be liable for any damages whatsoever (including, without limitation, damages for loss of business profits, business interruption, loss of business information, or any other pecuniary loss) arising out of the use of or inability to use this Axeze product, even if Axeze has been advised of the possibility of such damages. Because some jurisdictions do not allow the exclusion or limitation of liability for consequential or incidental damages, the above limitation may not apply to you. 5. MISCELLANEOUS This EULA is governed by the laws of the State of South Australia. If this product was acquired outside of Australia, then local laws may apply. Should you have any questions concerning this EULA please contact Axeze. About Axeze Pty Ltd Axeze Pty Ltd is the 100% Australian Owned Company which manufactures advanced Keyless Entry Systems. Axeze Keyless Entry Systems features are: Suitable for doors, gates, etc. Available for multiple, commercial applications. Easy to use - no searching for or fumbling with keys, pushing buttons or swiping. Cost effective. Can be quickly and easily managed if card or fob is lost. Safe and secure - access is controllable. Do-it-yourself installation. Can work with existing alarm systems. Axeze contact details: Axeze Pty Ltd PO box 387, Hindmarsh SA 5007 Australia Mason College Building 85-91 South Road THEBARTON South Australia 5031 Phone: +61 8 8352 1608 Facsimile: +61 8 8352 1623 Email: [email protected] www.axeze.com.au LIMITED WARRANTY Axeze warrants that the software will perform in compliance with the relevant descriptive materials for a period of 90 days from date of delivery, or to the extent provided by applicable law. Axeze will provide support and reasonable efforts to resolve all issues promptly. Liability of Axeze and its distributors to the user shall be at our option to replace the product if it is deemed faulty. To the maximum extent permitted by law, Axeze and its suppliers and distributors shall not in any event be liable for any special damages whatsoever arising out of the use or inability to use the software product. Any third party interface that modifies or changes the software in anyway whatsoever absolves Axeze from any warranty, implicit or implied. ABOUT AXEZE STUDIO Axeze studio is a suite of products combined into a single solution. Axeze Studio enables you to combine RFID 125 KHz, 134.2 KHz, Mifare and biometrics into one solution seamlessly controlled through Axeze Studio. This package has been developed with the latest version of Microsoft .NET. The Axeze Studio uses Microsoft SQL Server. Axeze Studio Databases could be installed on separate computers. Axeze Studio supports Serial Port or LAN (wired or wireless) for Communication with the Axeze access control Network. Phoenix is a Web Application so it can be installed on a Server whilst users can log onto the Phoenix with an Explorer. Phoenix can be worked within on the Internet or the Intranet. KENCore Agent always ensures that the system is operational. Third Party Applications could easily communicate with KENCore to run Axeze commands. All decisions about the Access control are made on the database side, so any third party application can easily participate or integrate with the code. Axeze Studio consists of several applications that administrates, maintains, manages and configures Axeze access control Network products. KENCore Service is a Windows Service that handles all the communication with the access control Network and software like Phoenix. The KENCore can be installed on the Server Application. KENCore Agent Service is a Windows Service that monitors KENCore Service and ensures that it is always operating. KENCore Manager – is a Windows Application that is a user interface (GUI) for the KENCore Service and KENCore Agent Service. Phoenix- is a Web Application user interface that is used to administer, maintain and manage the Axeze access control Network. Phoenix has been designed to offer you total control of access to your property for businesses, commercial. Axeze Credential Manager - communicates with Axeze Readers and sends the badged card code to Phoenix (or any other third party application). When new Readers are developed, or bought into the range, this wizard is the interface between the hardware and software. It can send a tag code to any Text Control - It enables smooth ongoing development. Axeze Database Management - Manages the KENCore and Phoenix databases. This is a Wizard that helps you. It handles the common tasks (like those built into SQL Server) like Backup, Restore, Attach, Detach, Upgrade. This means you can maintain the database if you change a Server. You can use the DB Management tool. It offers a huge benefit as upgrading the database is easy. The Axeze Database Manager can be installed on the Database Server without the need for the KENCore or Phoenix. KENCfg – is the software that configures the reader and enables the user to retrieve the reader ID and version. INSTALLING AXEZE STUDIO Phoenix is a Web Application so you can install the system on the Network and expose Phoenix to the web. The benefit of the tool placed on the internet is that you can access Phoenix from your desktop, laptop, phone or tablet. Step 1: Step 2: Step 3: tools) Install KENCore Install Phoenix Configure the software (it is assumed all hardware has been configured in accordance with Axeze directions and It is assumed that you have prepared, completed and printed the necessary help sheets like – Axeze on existing Network cables – Network IO Planning templates – Group Access Planning Template – Group Member Planning Sheet – Network Reader Planning Sheet – Zone Planning Sheet – Cable Size Calculator.xls (if needed) – Troubleshooting Guide.doc – Data Sheets – if relevant – Templates - including WPA template – Wiring Diagrams – Configured Axeze Controllers (refer Network) NEED HELP? GO TO www.axeze.com.au/support Phoenix setup and KENCore setup –These products will install all the necessary software required to run the system, for instance if they need Windows Installer or .NET framework these will automatically be installed. If there is no SQL Server 2008R2 instance the KENCore setup will automatically install SQL Server 2008R2 Express Edition and the instance name is SQLEXPRESS. Note 1: check that there is no previous version of instance name “ SQL EXPRESS” installed. Note 2: KENCore and Phoenix area compatible with SQL Server 2012R2. Phoenix works with the latest versions of IE, Chrome, Firefox, Safari and Opera. REMOVING AXEZE STUDI O You will need to remove both KENCore and Phoenix programs. Click the Windows Start button, point to Settings, and then click Control Panel. Double-click the Add->Remove Programs icon. Click KENCore on the Install->Uninstall tab, and then click Add->Remove. Click the Windows Start button, point to Settings, and then click Control Panel. Double-click the Add->Remove Programs icon. Click Phoenix on the Install->Uninstall tab, and then click Add->Remove. Follow the instructions on the screen or Run the Relevant Setup (KENCore or Phoenix), and chose to remove it) REPAIR AXEZE STUDIO Run the Relevant Setup (KENCore or Phoenix), and chose to repair it. FLOW CHART TO SETUP PHOENIX We recommend the following steps when setting up the Phoenix. You do not have to follow these, they are a guide only. If you see something missing or have a suggestion to make this process easier, please just send us an email with your suggestion to sales at axeze.com.au TO SETUP THE NETWORK USING PHOENIX (Go To System-> Network) Setup defaults Data->Options SETUP THE CONTROLLERS (Go To System ->Controllers -> Define) {to Map see below) SETUP THE GROUPS (Go To System -> Groups) Defaults include default email addresses for notifications number of lines per report access control times and more CREATE PERSONNEL (Go To Data ->Personnel Data) SETUP CREDENTIALS (Go To Data Credential -> Credential Data) SETUP HOLIDAY (Data -> Holidays) ASSIGN CREDENTIAL TO PERSON (Go To Credential -> Credential Data -> Add ASSIGN PERSON TO GROUP/ADD GROUP TO SETUP LIFTS (If applicable) (Go To System -> Group) SETUP THE BUILDING (Go To Data -> Building Data) MAP CONTROLLER TO GROUP SETUP LIFT (Go To System ->Controllers -> Mapping) (Go To System ->Lift) SETUP EVENT HANDLERS (If applicable) {Go To System -> Event Handlers} ASSIGN I/O CHANNEL TO FLOOR (Go To System-> Lift-> Lift, +) ALLOCATE GROUPS TO LIFT/FLOOR SETUP ZONE (if applicable) (Go To Lift-> Group ->Map) (Go To System -> Zone ) SETUP CAMERA (if applicable) (Go To System -> Camera) AXEZE WEBSITE HAS ALL THE PLANNING SHEETS AND DIAGRAMS YOU NEED, GO TO www.axeze.com.au/support TO FIND NETWORK PLANNING, ZONE PLANNING, GROUP MEMBERS PLAN, GROUP ACCESS PLAN, IO PLAN, TEMPLATES, WIRING DIAGRAMS AND DATA SHEETS AND MORE. Configuring Phoenix Having loaded the software Go to start button Left Click 1. Select All Programs Left Click 2. Axeze Products Left Click 3. Select Phoenix 4. Logon: Default User and Password a. Admin b. admin 5. Select the colour theme of choice. Click Theme on right hand side of Phoenix screen. 6. Set your own Password a. Account b. Change Password LOG ON AND LOG OFF To Log onto the system, click on Phoenix, Click Log on Enter User Name Default User Name: Admin Default Password: admin To Log off the system Click Home Click Log Off Note 3: It is strongly recommended that when you first enter Phoenix you immediately setup your own password. Go to Administration ->Password Note 4: Only Admin user can change the Password if the question and answer are not known © Copyright Axeze Pty Ltd \\AXEZESERVER\Distribution\Manuals\Axeze Studio\Phoenix V10 Draft.docx P0 SYSTEM NETWORKS SET UP THE NETWORK Go to System -> Network Click New Fill in the detail – see below Click Create Network Connection Properties - Details Network Name: should be unique Tag: is for future use Connection type: (LAN module or COM port) LAN - Axeze recommend Moxa product range for Network enabler modules. Software is provided to the TCP->IP. Using the relevant COM port– The physical serial port on the server computer. Port Number: port used to communicate with the Network Enabler or COM port. IP Address: Network Enabler IP address Connect as Client: Define whether KENCore is Server or Client. Configure the ->Network Enabler as the Client. In the event that the Network Administrator has setup a firewall you can configure KENCore as the Client and the Network Enabler as the Server. The Network Administrator can set a port for a specific task i.e. Port 8000 and have the Network communicate through that Port. (By default KENCore is the Server.) Detection Type: Disable, Automatic, Manual. (Connection to the KEN Axeze Network hardware). Automatic if the connection is broken (i.e.; blackout->wiring issue etc.) KENCore will continue to try to reconnect to the COM port or LAN module automatically. Manual – KENCore continues to try to reconnect to the COM port or LAN module for a set number of times. Disable – KENCore will not try to reconnect to the Network. These options can be changed at any time. Redetect Attempts: When in Manual Detection Type, set the number of redetect attempts you wish to use (1-65535). Note 5: In order to restart the detection, log into the KENCore Manager and select Reset Manual Detection button. Time between Attempts: Set how long do you wish to set the time between attempts to connect the KENCore to the Network. Note 6: This is in milliseconds 10,000 = 10 seconds). EDIT A NETWORK Go to System -> Network Find the Network you wish to modify Click Edit and modify the Network as needed Click Update DELETE A NETWORK Go to System -> Network Find the Network you wish to delete Click Delete Note 7: You cannot remove a Network if it is in use by any Controller. Note 8: If you create, edit or delete any Network it will be necessary to restart KENCore. The system has built in tips so that you don’t accidentally delete things you should not delete. © Copyright Axeze Pty Ltd \\AXEZESERVER\Distribution\Manuals\Axeze Studio\Phoenix V10 Draft.docx P1 CONTROLLERS SET UP CONTROLLERS You need to define the connection properties to enable Phoenix to communicate with the Controllers Go to System -> Controllers Legend for Setting up the Controllers: Definition Mapping Proximity Configuration AUI configuration IO configuration DEFINE THE CONTROLLER Go to System-> Controller-> Definition Click New a. Enter Name of Network b. Check Enabled c. Enter Name for the Controller d. Select Type of Controller (3 Types) e. Select he Controller an ID (To do this you need to use the KENCfg Software – see Installation of Hardware. f. Click Create Controller Types Axeze Phoenix requires you to select the type of Controller it will be communicating with: a. Axeze Universal Interface is used to set the time on the Controllers in Offline mode if the power goes off. b. IO Controller c. Proximity Controller When selecting any type of Controller the relevant configuration will automatically be created, you will only need to modify certain settings. EDIT A CONTROLLER Go to System->Controllers->Definition a. Select the Controller b. Select Edit DELETE A CONTROLLER Go to System->Controllers->Definition a. Select the Controller b. Select Delete CHANGE CONTROLLER NETWORK Go to System->Controllers->Definition a. Select the Controller b. Select Change Network NOTE 9: If you create, edit or delete any Controller it will be necessary to restart KENCore. Configuration for all three types of Controllers: Once the connection properties have been defined you must Map the Controllers to the system. Before you commence Mapping we suggest you set up Groups Zones (if applicable) Event Handlers (if applicable) Lift Control (if applicable) © Copyright Axeze Pty Ltd \\AXEZESERVER\Distribution\Manuals\Axeze Studio\Phoenix V10 Draft.docx P2 GROUPS SET UP GROUPS Go to System -> Groups Click New Enter Group Name Click Create EDIT GROUPNAME Go to System->Groups Select appropriate Group Select Edit Change name Click Update ADD OR REMOVE A PERSON TO/FROM A GROUP Go to System->Groups Select the Group Click + to expand the Group Click Add to add new members When adding select from the drop down box If the member is not in the dropdown box, go to Data>Personnel->personnel Data and add that member first, or Go to Home->Get started and add new member. Click Add To Remove a member, select member name Click Remove to remove a member REMOVE OR DELETE A GROUP Go to System->Groups Select the Group Select Delete You will see a popup box confirming your wish to delete Click ok © Copyright Axeze Pty Ltd \\AXEZESERVER\Distribution\Manuals\Axeze Studio\Phoenix V10 Draft.docx P3 PERSONNEL – CREATE, EDIT, DELETE, IMPORT In order to give someone the Credentials to enter a building they need to be entered into the database of personnel. In the Axeze Studio, Phoenix Access is assigned by Group NEW PERSONNEL Go to Data ->Personal->Personnel Data (see also Data->Personnel>Import Personnel) Click New Complete the details Click Create Note the person is in the personnel list but has no access or credential at this stage. Now Add the member to a Group or several groups. Click + Click Add Select Group Click Add EDIT PERSONNEL Go to Data ->Personal->Personnel Data Click Edit Update as desired Click Update DELETE PERSONNEL Go to Data ->Personal->Personnel Data Click + Highlight Relevant Group Click Remove Highlight Personnel to be deleted Click Delete Axeze recommends that you first remove a person from a Group before you delete a person. UNASSIGN A PERSON’S CREDENTIALS Go to Data-> Credential->Credential Data Click Edit Check the box as desired Note 10: When selecting Delete you will see a pop up box to ensure that you are taking the correct action. © Copyright Axeze Pty Ltd \\AXEZESERVER\Distribution\Manuals\Axeze Studio\Phoenix V10 Draft.docx P4 IMPORT PERSONNEL OR CREDENTIALS To Import a Personnel or Credential file This software has been designed to try to minimise issues faced when large files are imported. Therefore A Validation Process is implemented in the Import feature of the software. The software will advise the number of issues detected and highlight the issues. If you hover over the highlighted issue the software will provide tips on that issue. You will need to fix all issues. Save the File. Validate again to ensure all issues are resolved. Save the file and then import. Go to Data-> Personnel->Import Personnel or Data/Credential/Import Credential. Click Browse Locate File Click Upload Map information as necessary Click map Wait for the Import – this may take a few minutes © Copyright Axeze Pty Ltd \\AXEZESERVER\Distribution\Manuals\Axeze Studio\Phoenix V10 Draft.docx P5 Click Validate – to validate the information that you are bringing into the Phoenix. Once validated you will see the following information: o No of Detected Issues o Issues will be highlighted in Blue (Errors could be two names, repeated credentials etc.) Hover over the blue highlight to see the issue. Fix all issues o Double click on the error and make the correction. The correction will now be highlighted in a different colour Save changes Validate a second time to ensure no hidden issues or missed issues Once all fixed Click Save Changes now you can Import the file Click Import Note if you do not save changes, they will not be saved. Therefore Validation a second time will look like you have made no changes, as all changes will be lost. © Copyright Axeze Pty Ltd \\AXEZESERVER\Distribution\Manuals\Axeze Studio\Phoenix V10 Draft.docx P6 ASSIGN CREDENTIAL TO THE PERSON A Credential is a tag, card, fob, band, face, finger etc. issued to a person. The means by which they gain access! You need to assign credentials with access permission. Go to Data -> Credential-> Credential Data Click Add to add credential. Select the Input Method Badge the Tag/credential Decide to enter a name or have Phoenix automatically generate the name. Click Edit & Add to assign credential to a person. Note inaccurate Credential Codes will not be accepted by Phoenix. Now you need to map this Credential to a Group. VIEW GROUP MEMBERS Go to Data -> Credential-> Credential Data Click + to see which Groups a credential belongs to. Below, shows Shelley, is a member of several groups and when she was added to that group. TO EDIT CREDENTIAL Go to Data -> Credential-> Credential Data Click Edit Modify as desired Click Update © Copyright Axeze Pty Ltd \\AXEZESERVER\Distribution\Manuals\Axeze Studio\Phoenix V10 Draft.docx P7 EXPORT CREDENTIALS Go to Data -> Credential->Proximity Select Export or Drag item desired as shown on screen or Select Create Filter Select Export Select Export type Select Detail Mode (future development) © Copyright Axeze Pty Ltd \\AXEZESERVER\Distribution\Manuals\Axeze Studio\Phoenix V10 Draft.docx P8 MAPPING MAP ACCESS TO THE CONTROLLER We recommend that you Map Credentials to Groups, rather than directly to Controllers. Mapping access control to the Controller - known as Controller Credential Map. There are five sections to address here Controller Credential Map Controller Group Map Controller Zone Map Access Control Commands Access Control Synchronization CREATE CONTROLLER CREDENTIAL MAP Go to System-> Controllers-> Mapping Select New Select the Controller from drop down lists as required (If you are a Super Admin, you will need to select the Network). Hold Lock Open is set by Super Administrator Time Restricted is set by Super Administrator Enter Start Time Enter End Time Select day/s access is permitted Check if Access Does Not Expire Enter Expiry Date if Access does expire Click Create CHANGE ACCESS To change a Groups Access Go to System->Controller->Mapping Change Access Select Group o Restrict Time o Change Start or End Time o Change days allowed access o Change if Access Does Not Expire o Change Expiry Date Click Apply © Copyright Axeze Pty Ltd \\AXEZESERVER\Distribution\Manuals\Axeze Studio\Phoenix V10 Draft.docx P9 EDIT CREDENTIAL MAP System->Controller->Mapping Click Edit Update when complete EDIT CONTROLLER CREDENTIAL MAP Go to System-> Controller-> Mapping Select appropriate Controller Click Edit Modify as desired Click Update Note 11: When a Credential is Mapped by Group it is not possible to ”unMap” it by selecting Delete. If you try to delete a credential that is Mapped you will receive this message. Note 12: it is strongly recommended that you use Group for Mapping and not directly Map Credentials to the Controller. © Copyright Axeze Pty Ltd \\AXEZESERVER\Distribution\Manuals\Axeze Studio\Phoenix V10 Draft.docx P 10 CONTROLLER GROUP MAP Map the Group to the Controller. First Create the Group. Go to System -> Controllers-> Mapping Click Controller Group Map Click Add Select the Controller from the drop down box Select Group from the drop down box Click Add Filter: You can user a Filter here to guide you on who is a member of which Group and when this was last modified. See Filtering You can Export from here see Export CONTROLLER ZONE MAP If you require Zone control, you need to Map the Zone to the Controller Zones can be Hard Timed or Soft Timed, go to Zones -> Set up Zones to setup Anti Passback type and intervals. To Map a Zone Go to System ->Controllers -> Mapping Select Controller Zone Map Select Add Select Controller from the drop down box Select Zone type from the drop down box (To set Zone type go to System -> Zone) Select Entrance Type from the drop down box (in or out) Click Add © Copyright Axeze Pty Ltd \\AXEZESERVER\Distribution\Manuals\Axeze Studio\Phoenix V10 Draft.docx P 11 ACCESS CONTROL COMMANDS Access Control Commands is the area where you can manage all the Access Control commands on the Network and Controllers within the system. Commands on network and controller: You can send any modified Access Control commands on a Controller, Or You can Re-Send All Access Control commands on a Controller Or You can Send the Hold Lock Open only command to a controllers Alternatively You can Erase Access Control commands from this screen. To Send Access Control Commands Go to System -> Controllers -> Mapping -> Access Control Commands Select Controller Select Sent All Access Control Commands – this will send all modified Access Control Commands to the selected Controller or Re-Send All Access Control – this will send All Access Control Commands to the selected Controller. Send Hold Lock Open only – This will send the Hold Lock Open only command to the chosen Controller Erase Access Control Check Erase All if desired. ACCESS CONTROL SYNCHRONIZATION The Phoenix Software can send all your access control permission modifications to the Controllers for you automatically. If you wish to have all the Access Control Commands Synchronized from the moment you make changes, you can set up the system to carry out those changes automatically. There are two sections under this window: Synchronization Settings Synchronization items ACCESS CONTROL SYNCHRONIZATION SETTING This setting allows you to disable all synchronizations, and enable them as needed. ACCESS CONTROL SYNCHRONIZATION ITEM Go to System -> Controller-> Mapping -> Access Control Synchronization Select Synchronization Items Select New Select the Controller from the drop down box Check if enabled Select the Synchronization type. There are two types of Synchronization available: o Scheduled Time (Schedule at non buy times like midnight, or schedule over 3-4 time periods) o As soon as possible. The system will automatically update as soon as it can Click Create. © Copyright Axeze Pty Ltd \\AXEZESERVER\Distribution\Manuals\Axeze Studio\Phoenix V10 Draft.docx P 12 ZONES Set Up Zones Go to System->Click Zone Click New Enter Zone Name Enter Type of Zone i.e. o Hard o Hard timed o Soft o Soft timed Select Anti-Passback Interval Select Reset if you wish to Reset Passback Click Create Note 13: If you select a no- timed Anti-Passback you will not be able to select an interval period. Note 14: Reset Passback provides you with the ability to set a Passback to zero, so that someone can present their tag at that set period (for example 6 minutes) of time, if not then the counter is not reset. EDIT ZONE Go to System->Zone Select appropriate Zone Select Edit Modify as desired Select Update DELETE ZONE Go to System->Zone Select the Zone Select Delete to delete Zone Note 15: You will receive a pop up note to ensure you wish to delete the Zone © Copyright Axeze Pty Ltd \\AXEZESERVER\Distribution\Manuals\Axeze Studio\Phoenix V10 Draft.docx P 13 EVENT HANDLER If you want to set up an Event Handler, the following steps are designed to guide you on how to carry out this task. There are four types of event handlers in the Axeze Studio. Controller Zone Lift Time CONTROLLER EVENT HANDLER Go to System ->Event Handler Click Add Go to Event Trigger Check Enabled, or All Controllers Select Event type from the drop down box (see list below) Select Controllers from the drop down box Select Access Type from the drop down box, see list below Select Trigger and follow prompts (see below table) Select appropriate Trigger. o None o By Credential via dropdown box o By Personnel via dropdown box Card badged Door closed Door forced Door Left Open Input channel 1 Clear Input channel 5 Clear Input channel 5 Set Input channel 6 Clear Input channel 6 Set Input channel 7 Clear Output channel 3 Set Output channel 4 Clear Output channel 4 Set Output channel 5 Clear Output channel 5 Set Input channel 1 Set Input channel 2 Clear Input channel 2 Set Input channel 3 Clear Input channel 3 Set Input channel 7 Set Input channel 8 Clear Input channel 8 Set Output channel 1 Clear Output channel 1 Set Output channel 6 Clear Output channel 6 Set Output channel 7 Clear Output channel 7 Set Output channel 8 Clear Input channel 4 Clear Output channel 2 Clear Output channel 8 Set Input channel 4 Set Output channel 2 Set Output channel 3 Clear Request to Exit Denied Authorised Denied Controller Prevented Passback Denied Credential not in Database Denied – Unsupported Credential Type Denied – Zone Denied Controller Disabled Denied inactive Credential Denied Person not Assigned Denied Controller not in Database Denied Unassigned Credential Lift Authorised – Disable Controller relay Lift Denied - Disabled Output channel Lift Denied – Duplicate Input channel Found Lift Denied – Configuration Not Found Denied Unsupported Controller Type Lift busy Lift Denied - Disabled Input channel Lift Authorised Lift Denied – Lift Not Found Denied © Copyright Axeze Pty Ltd \\AXEZESERVER\Distribution\Manuals\Axeze Studio\Phoenix V10 Draft.docx P 14 EVENT ACTION Enter Action Type. Select with the type of Action desired from the dropdown box. IO Controller. The IO Controllers are defined in the system. Select the appropriate IO Controller from the dropdown box.) Select the Output Channel (1-8) Set Pulse Duration (1-1000 seconds) Click Add Edit Event Go to System->Event Handler Select appropriate Event Select Edit Modify as desired Click Update Delete Event Go to System->Event Handler Select the Event Delete Event EVENT SEND EMAIL To send an Event Email you can select Email Priority High Low Normal Select Check box if you want the email to include the Event Action Information sent to the recipients. Set who is to receive the email. You can set your standard default settings under Data->Options Standard Defaults enable you to Set the name of the Event to suit your needs Set who or which email address is sending the Event notification Select the number of attempts for an email to be sent. Note 16: The log will show you if the email has been sent successfully or not. . © Copyright Axeze Pty Ltd \\AXEZESERVER\Distribution\Manuals\Axeze Studio\Phoenix V10 Draft.docx P 15 ZONE EVENT HANDLER Follow the same steps for the Zone Event Handler as Controller Event Handler, but select Zone Event Handler. LIFT EVENT HANDLER Follow the same steps for the Lift Event Handler as Controller Event Handler, but select Lift Event Handler. TIME EVENT HANDLER Fill in the prompts as desired Send Email Events see Controller Event Handler above or go to Data/Options to setup your Defaults © Copyright Axeze Pty Ltd \\AXEZESERVER\Distribution\Manuals\Axeze Studio\Phoenix V10 Draft.docx P 16 LIFT The following is a list of steps required to setup the lift control system STEPS TO SET UP THE LIFT CONTROL 1) CREATE THE BUILDING Go to Data->Building Data Click New Give the Building a name Enter f floors Give the floor a name Note 17: Total Units is for future use. To see the number of units on a floor, or edit a floor Click + Update information as desired Click Update TO EDIT NUMBER OF UNITS PER FLOOR SELECT EDIT, SELECT FROM DROPDOWN BOX, SELECT UPDATE Note: Ensure you give the Floor a Name that you can recognize, do not just give it a number. © Copyright Axeze Pty Ltd \\AXEZESERVER\Distribution\Manuals\Axeze Studio\Phoenix V10 Draft.docx P 17 2. CREATE THE LIFT The second step is to create the Lift. Go to System->Lift Select Lifts Click New Name the Lift Select the building from the dropdown list Select Lift Controller from the dropdown list When Badging o Disable Controller Relay – the relay will not be energised when successfully badged if this is selected o Individual Set Period – In I->O Controller configuration you can set the set period time. If you select Individual Set Period the system will revert to that setup in the Input->Output Controller configuration o Select Period (up to 1,000 seconds). If you set this period it will override the Individual Set Period on the Input>Output Controller configuration When Press Key (Unit Occupier) enables the Lift to come to the floor o Select Delay period (up to 1,000 seconds). Delay Period is the delay before for getting to the Lift. o Select Set Period (up to 1,000 seconds). Time that allows user to push the button for access. Click Create EDIT LIFT Go to System->Lift_>Lifts Select Lift Select Edit Click update DELETE LIFT Go to System->Lift Select Lifts Select the Lift Select Delete – you will receive a message “Do you really want to delete this record. Select OK if you wish to Delete the Lift. To see which floors are allocated to this Lift select + © Copyright Axeze Pty Ltd \\AXEZESERVER\Distribution\Manuals\Axeze Studio\Phoenix V10 Draft.docx P 18 3. SET THE INPUT AND OUTPUT CHANNELS ON THE IO CONTROLLERS Set the Channel for the Lift Select + Select the Floor by Number or Name Select I/O Controller Set Output Select Controller Select Input Click Update Note: Input and Output channels selected on Floor 1 and North Tower Atrium 5 © Copyright Axeze Pty Ltd \\AXEZESERVER\Distribution\Manuals\Axeze Studio\Phoenix V10 Draft.docx P 19 4. ALLOCATE CREDENTIALS TO THE LIFTS/FLOOR LIFT CREDENTIAL MAP Set up the Lift Credential Map – the Credentials that will be able to use the Lift Go to System->Lift->Lift Credential Map Add Select from drop Down box as required Click Add TO DELETE CREDENTIAL FROM LIFT Go to System -> Lift -> Lift Credential Map Select Credential, Remove Credential from Group Select Delete TO VIEW CREDENTIALS ISSUED Go to System -> Lift -> Lift Credential Map You can Filter under the following: Lift Unit No Floor Name Credential Group To Export – follow prompts NOTE 18: it is strongly recommended that you use Group for Mapping and not directly Map credential to the Lift. © Copyright Axeze Pty Ltd \\AXEZESERVER\Distribution\Manuals\Axeze Studio\Phoenix V10 Draft.docx P 20 5. ALLOCATE GROUPS TO THE LIFT LIFT GROUP MAP Map the Groups to the Lift Go to System->Lift->Lift Group Map Click Add Using drop Downs select Lift, or start typing inside the box Select Floor->s Select Group that has access to the Lift using drop down box or type first letters Click Add TO DELETE LIFT GROUP Go to System->Lift->Lift Group Map Select Group Select Delete TO FILTER LIFT GROUP GROUPS IN LIFT CONTROL Go to: System -> Lift -> Lift Credential Map You can Filter under the following: Lift Unit No Floor Name Group LIFT CONTROL This tab enables you to have the ability to Enable or Disable all of the Lifts. Change Status of Lift Go to System ->Lift Click Lift Control Change Check Enable or Disable as needed Check Update © Copyright Axeze Pty Ltd \\AXEZESERVER\Distribution\Manuals\Axeze Studio\Phoenix V10 Draft.docx P 21 DATE/TIME SYNCHRONIZATION You can Disable or enable the Date/Time Synchronization. You can select how often you would like the system to synchronize the Date/Time To Synchronize Date/Time Go to System - > Date/Time synchronization Select status desired Select Interval period desired Click Update © Copyright Axeze Pty Ltd \\AXEZESERVER\Distribution\Manuals\Axeze Studio\Phoenix V10 Draft.docx P 22 CAMERAS To setup up TCP/IP Cameras go to System->Cameras Two sections: Connection Properties Controller Camera Map NEW Go to System->Cameras Click New Enter Name for Camera Select Port Enter IP Address Enter Server Name Enter Channel Enter Resolution Enter Quality Enter Compression Enter Timestamp Enter Camera URL Select Accept All SSL Certificates if desired Enter Authentication Details Enter Proxy Details if desired Click Create Note 19: most of these details are provided by the Camera manufacturer. Note 20: not all camera manufacturers offer the same variables. © Copyright Axeze Pty Ltd \\AXEZESERVER\Distribution\Manuals\Axeze Studio\Phoenix V10 Draft.docx P 23 TO EDIT Go to System->Cameras Click Edit Immediate Snapshot To take an immediate snapshot Go to System->Cameras->Connection Properties Click Snapshot © Copyright Axeze Pty Ltd \\AXEZESERVER\Distribution\Manuals\Axeze Studio\Phoenix V10 Draft.docx P 24 CAMERA CONTROLLER MAP Go to System->Cameras->Controller Camera Map Map the Controller to the Camera Select Add Select the Controller Select the Camera Select Add Select Controller (Cameras can monitor more than one Controller) Select Camera (You can select several cameras to watch one area) © Copyright Axeze Pty Ltd \\AXEZESERVER\Distribution\Manuals\Axeze Studio\Phoenix V10 Draft.docx P 25 TO DELETE CAMERA DETAILS Go to System->Cameras Connection Properties Select camera to delete Click Delete TO View Controller Events with Images Axeze Studio software is integrated with TCP/IP Cameras. There are times when clients will want to view the log of the Controller with the image taken. Images can be setup to suit a variety of needs and these are generally found in the Camera Data sheets or installation and technical details. However, photos can be time and date stamped. Go to View->Controller Events with Images Select Date Select Controller Click + © Copyright Axeze Pty Ltd \\AXEZESERVER\Distribution\Manuals\Axeze Studio\Phoenix V10 Draft.docx P 26 DATA CREDENTIAL DATA A Credential is a tag, card, fob, band, face, finger etc. issued to a person. The means by which they gain access! You need to assign credentials with access permission. Note, you can also Import Credentials. For details please see Data-> personnel Data->Import Personnel, and follow the same steps. Go to Data->Credential Data Click Add Credential Choose Proximity Reader type to be used at the desk->admin area for adding new tags. Code – you can enter the code, or badge a credential depending on the reader used The default name will be automatically generated if you select the Check box. If you want you can enter a different name Click Add or Add & Edit. You will need to Click Edit in order to assign a credential to a person. Add Adds the Credential to the Database (go to next step, Credential Data Edit) Add & Edit Adds the Credential to the Database then opens the Credential in Edit page, see below. Note 21: Click + to see which Group a person’s Credential has access to and when that person was made a member of that Group. Person Filter CREDENTIAL DATA EDIT You need to assigned that person access permission, alternatively you may need to Edit that persons access permission. Go to Data-> Credential Data Click Edit Enter Activation Date Enter Activation time Check if Credential does not expire Enter Expiry Date Enter Expiry time Assign or Unassign the Credential as desired Enter Personnel Name – you can use the drop down list or type first letters of the name Click Update Note 22: Credentials can sit on the system and not be assigned. Note 23: You can use this area Credential, Credential Data, Edit to assign or unassign a credential to / or for a person. Tip: When Unassigning a Credential, we recommend you use the Person Filter you can then immediately delete the person once you have unassigned them. Tip: If you do not see a full screen, click Refresh (Ctrl R or F5) © Copyright Axeze Pty Ltd \\AXEZESERVER\Distribution\Manuals\Axeze Studio\Phoenix V10 Draft.docx P 27 Credential Data - Remove To remove a credential permanently from the system make sure the credential is unassigned. Go To Data-> Credential Data Click Delete © Copyright Axeze Pty Ltd \\AXEZESERVER\Distribution\Manuals\Axeze Studio\Phoenix V10 Draft.docx P 28 To view or create a report of all credentials that exists in the system, and when they were added to the system Go to Data-> Credential->Credential Data Filter as desired Export to preferred format © Copyright Axeze Pty Ltd \\AXEZESERVER\Distribution\Manuals\Axeze Studio\Phoenix V10 Draft.docx P 29 PERSONNEL CREATE PERSONNEL In order to give someone the Credentials to enter a building they need to be entered into the database of personnel. Go to Data->Personnel Select Personnel Data Select Import Personnel if you want to import the information IMPORT PERSONNEL Go to Data -> Personnel ->Personnel Data Click Browse – locate file Click upload Map the Imported Credential/Personnel details Click Map Phoenix is powerful software and is designed to prevent you from entering personnel and/or credentials twice into the system. Once you have Mapped the credential/personnel, the system will show you that there are conflicts and how many conflicts. Detected Issue – shows that there are issues that need to be sorted All conflicts/issues are highlighted Go to highlighted issue and hover over issue, Phoenix will tell you what the issues is. These conflicts could be anything, same name, same Personnel Number, same DOB etc. Clarify the issues Save the changes Click Validate to ensure all issues resolved Save changes each time until you have no issues left to resolve Once all issues resolved Click Import All import files operate in the same way. You need to remove all issues prior to Importing the file/information. To Remove a person/credential, click Delete © Copyright Axeze Pty Ltd \\AXEZESERVER\Distribution\Manuals\Axeze Studio\Phoenix V10 Draft.docx P 30 BUILDING DATA CREATE THE BUILDING (See also System Lift) Go to Data->Building Data Click New Give the Building a name Enter number of floors Give the floor a name HOLIDAYS SETUP HOLIDAYS Go to Data-> Holidays Click New Name the holiday Enter the date of the holiday Check if recurring each year You need to broadcast the holidays to the Controllers Click Create HOLIDAY COMMANDS Go to Data->Holidays-> Holiday Commands Select desired Network Click Broadcast Holidays © Copyright Axeze Pty Ltd \\AXEZESERVER\Distribution\Manuals\Axeze Studio\Phoenix V10 Draft.docx P 31 OPTIONS DEFAULT SETTINGS DATA SETTING You can Personalise the Screen to select how many rows of information you can view within Phoenix on each page. Go to Data->Options->View Click Change Select how many rows you desire per view, return to default value, as desired. Click Update Or Select the shortcut keys you wish to use in the system. EVENT/ LOG DATA SETTING You can select the hours of logs and events that you see on the screen at a given time. Go to Data->Options->View->Event/Log Data Setting Modify as desired Click Change © Copyright Axeze Pty Ltd \\AXEZESERVER\Distribution\Manuals\Axeze Studio\Phoenix V10 Draft.docx P 32 CONTROLLER DEFAULT OPTIONS PROXIMITY CONTROLLER CONFIGURATIONS To set the default values of Controller configuration within the system. Go to Data->Options->Controller->Proximity Controller Configuration Set Lock Open Time o Sense Door Open o Warning Beep Set Warning Delay o Prevent Passback o Set time to prevent Passback o Reset Passback The screens show the last modified date Click Change if you modify this setting I/O CONTROLLER CONFIGURATIONS To Write the desired Information in the Text box, or maintain the standard default information. You can enable the Default Values You can set the standard Set Periods as desired. Go to: Data->Options->Controller Click IO Controller Configurations Enter the desired information Click change DEFAULT VALUES Enter as desired Set period as desired © Copyright Axeze Pty Ltd \\AXEZESERVER\Distribution\Manuals\Axeze Studio\Phoenix V10 Draft.docx P 33 ACCESS DEFAULT OPTIONS DEFAULT VALUES To set the standard Access Control defaults within the System Go to Data->Options->Access Check to restrict times o Enter start time o Enter end time Check appropriate daily access Check if Access does not expire, or Enter Expiry date if access does expire Click Update BUILDING DEFAULT OPTIONS DEFAULT VALUES There will be times when users want to have default values set for a buildings properties. Go to Data-> Options->Building Fill in the Prompts (please note, the Default name needs to be generic. See below + Click Update © Copyright Axeze Pty Ltd \\AXEZESERVER\Distribution\Manuals\Axeze Studio\Phoenix V10 Draft.docx P 34 EXPORT DEFAULT OPTIONS DEFAULT SETTING To set Default Settings for your Exported Files and Reports. Go to Data-> Options-> Export->Export Setting Fill in the Prompts Click Update EMAIL DEFAULT OPTIONS SMTP HOST To enter email defaults Go to Data->Options->Email->STMP Host Enter details as required Test to ensure it is working appropriately OUTGOING EMAIL – SET/RESET PASSWORD To Set or Reset email Password Go to Data->Options->Outgoing Email-> Reset Password Enter details as required Test to ensure it is working appropriately © Copyright Axeze Pty Ltd \\AXEZESERVER\Distribution\Manuals\Axeze Studio\Phoenix V10 Draft.docx P 35 OUTGOING EMAIL – EVENT HANDLER To set outgoing emails Go to Data->Options->Outgoing Email->Event Handler Enter details as required Test to ensure it is working appropriately ENROLMENT DEFAULT OPTIONS To enter default Enrolment Properties Go To Data->Options->Enrolment->Enrolment Properties Enter details as required Test to ensure it is working appropriately © Copyright Axeze Pty Ltd \\AXEZESERVER\Distribution\Manuals\Axeze Studio\Phoenix V10 Draft.docx P 36 VIEW To view Events within the Controller, Controller Configuration or Zone Occupancy, Go to View and the appropriate heading. VIEW CONTROLLER EVENTS Go To View->Controller Events. The Events can be filtered using the drop down list You can drag a column as directed You can filter using the Filter Wizard You can Export using the Export Wizard Pause Refresh When Pause Refresh is selected it prevents the Grid View from refreshing or fetching new changes from the database. © Copyright Axeze Pty Ltd \\AXEZESERVER\Distribution\Manuals\Axeze Studio\Phoenix V10 Draft.docx P 37 VIEW CONTROLLER CONFIGURATION Phoenix will advise you when there is a Conflict between the Database and the Controller. When you View-> Controller Events you can easily identify which Controllers are not up to date with the Database and vice versa. Phoenix will guide you on what is not up to date so that you can easily realign the system. The Phoenix system uses colours to highlight various aspects of the system. The blue = not updated for five minutes or more The green = shows that there is a conflict between the current Controller configuration and the database for these particular items. Note 24 the colour differences in the snapshot below. The two items highlighted in green are in conflict. Lock Open Time on Proximity 1 on SP is not up to date Warning Beep on Proximity 2 on SP is not up to date Pause Refresh When Pause Refresh is selected it prevents the Grid View from refreshing or fetching new changes from the database. Resolve Conflict between Database and the Controller To remove the Conflict you will need to either Synchronize the database or Edit the Controller as required Go to System-> Controllers-> Proximity Controller Click + to expand the information Click Update to change the configuration in the database according to the value on the Controller Click Synchronize to synchronize Controllers with the database Click Edit, to change the Controller configuration Click Export to Export Report – see Export PAUSE REFRESH Check Pause Refresh if you want to carry out some tasks. Pause Refresh will automatically start within a set time. The time will show in the bottom left hand screen. VIEW AUI CONTROLLER Please refer to the details about View Controller Configuration, but modify to suit the AUI Controller VIEW IO CONTROLLER Please refer to the details about View Controller Configuration, but modify to suit the IO Controller. © Copyright Axeze Pty Ltd \\AXEZESERVER\Distribution\Manuals\Axeze Studio\Phoenix V10 Draft.docx P 38 VIEW EVENT HANDLER ACTIONS The Events can be filtered using the drop down list You can drag a column as directed You can filter using the Filter Wizard. You can Export using the Export Wizard Pause Refresh When Pause Refresh is selected it prevents the Grid View from refreshing or fetching new changes from the database. © Copyright Axeze Pty Ltd \\AXEZESERVER\Distribution\Manuals\Axeze Studio\Phoenix V10 Draft.docx P 39 VIEW EVENT HANDLER OUTGOING EMAILS To view emails, to see the history of which emails have been sent and to see if any emails have not been sent Go to View->Event Handler Outgoing Emails Alternatively you can view the History of emails that have been sent. Note 25: Phoenix will have 3 attempts to send an email unless you set a separate number under Data/Options. © Copyright Axeze Pty Ltd \\AXEZESERVER\Distribution\Manuals\Axeze Studio\Phoenix V10 Draft.docx P 40 FILTERING REPORTS: When you select “Show All” checkbox in in 'Event/Log Data Setting' in 'Options -> View 'Controller Events', 'Event Handler Actions', 'Recent Activity' and 'Event logs' pages will show large amounts of data without slowing down the performance. Note 26: When 'Show All' checkbox is selected, 'Export' is not available on those pages. To personalise the report to just about any type of report you desire, Click on Report When you select report, you can select the format you require. You can View, Print the Report or Save the Report and you can select the page of the report you desire. The report can be filtered on Controller, Lift, Time or Zone. Filter on Event Type Controller Lift Time Zone Date Days Pages Select the Report format of choice View Report Export Report Print Report © Copyright Axeze Pty Ltd \\AXEZESERVER\Distribution\Manuals\Axeze Studio\Phoenix V10 Draft.docx P 41 VIEW ZONE OCCUPANCY COMMANDS ON ZONE You can clear the Zone from this screen Select Zone Clear Zone ZONE OCCUPANCY The Events can be filtered using the drop down list You can drag a column as directed You can filter using the Filter Wizard. Pause Refresh When Pause Refresh is selected it prevents the Grid View from refreshing or fetching new changes from the database. © Copyright Axeze Pty Ltd \\AXEZESERVER\Distribution\Manuals\Axeze Studio\Phoenix V10 Draft.docx P 42 ACCOUNT PASSWORD AND ACCESS LEVELS AND PERMISSIONS Phoenix has four different roles and these Roles. Phoenix has one level which is unassigned. The assigned roles are: Super Administrator - has access to everything inside the Phoenix Application. Administrator – Similar to Super Administrator; all entities in KENCore and Phoenix have special ID to make it manageable by SQL Server. By using Super Administrator role, users can see these Ids and when creating new items, the related ID will automatically be generated but users could change it to make it best suit their needs. If a user login as administrator, these Ids will be hidden but are automatically managed in background. Additionally you can select Network at the same time as selecting Controller. Supervisor - allows users to do some advanced tasks, next release. User - allows users to do some basic tasks, next release. Note 26: When a new user is created by using the register link, no role will be assigned to this user and only some limited access will be granted. CHANGE PASSWORD To change the Password Click Account ->Password. Enter Password. Click Change. CHANGE PASSWORD QUESTION AND ANSWER Set the Security Question and Answer. These are required to reset your password. You can use it to change your question and answer so that you can recover the Password. USER MANAGEMENT A Wizard built into Phoenix to provide Easy Registration and recognition of Users within the system. The Events can be filtered using the drop down list. You can drag a column as directed. You can filter using the Filter Wizard. You can Export using the Export Wizard. RESET PASSWORD. There will be times when a person needs their Password set and they cannot recall their password. The Administrator can reset the Password and generate a temporary password for a User. The User needs to provide the answer to the Security Question to the Administrator. Go to Account ->User Management Click Reset Password Enter Current Password Enter Password Question Enter Password Answer Enter Reset © Copyright Axeze Pty Ltd \\AXEZESERVER\Distribution\Manuals\Axeze Studio\Phoenix V10 Draft.docx P 43 UNLOCK If you try five times to log into Phoenix with an incorrect password that User will be locked. Only the Administrator can Unlock the User. Sign in as Administrator Go to Account -> User Management Select User Click Unlock TO DELETE A USER, Sign in as Administrator Go to Account -> User Management Select User Select Delete RECENT ACTIVITY A Wizard built into Phoenix to provide easy recognition of recent activity in the system for Logged on User for Phoenix only. The Activity can be filtered using the drop down combo box. You can drag a column as directed. You can filter using the Filter Wizard. You can Export using the Export Wizard EVENT LOG A Wizard built into Phoenix to provide easy recognition of the Event Log in the system. The Activity can be filtered using the drop down list. You can drag a column as directed. You can filter using the Filter Wizard. You can Export using the Export Wizard. © Copyright Axeze Pty Ltd \\AXEZESERVER\Distribution\Manuals\Axeze Studio\Phoenix V10 Draft.docx P 44 HOME HOME – Shows all information relating to a Credential, Controllers and Lifts. This is where you go do new enrollments, to find personnel, open locks remotely. GET STARTED TO ADD A NEW CREDENTIAL Home-> Get Started Select Input method from the dropdown box. Note Input Method is to let Phoenix know which Reader you will use to enrol a credential. Place cursor at the front of the Code box Badge the chosen Reader Click Add – this will take you into a new screen “Enrol New Credential Enter Activation dates Check if credential does not expire, or Enter Expiry date Select Person or Click New Person Check the Group that person will be a member of Click Enrol ENROLMENTS TO ADD A NEW PERSON Home -> Get Started Select Input method from the dropdown box. Note Input Method is to let Phoenix know which Reader you will use to enrol a person->credential. Place cursor at the front of the Code box Badge the chosen Reader Click Add – this will take you into a new screen “Enrol New Credential Enter Activation dates Check if credential does not expire, or Enter Expiry date Click New Person Enter Personnel Number Enter First Name Enter Middle Name Enter Last Name Enter Date of Birth Click Add Check the Group that person will be a member of Click Enrol Note 27: to remove, go to Data Personnel, Click Delete © Copyright Axeze Pty Ltd \\AXEZESERVER\Distribution\Manuals\Axeze Studio\Phoenix V10 Draft.docx P 45 PROXIMITY COMMANDS COMMANDS ON THE NETWORK. Choose the Network required TO BROADCAST DATE OR TIME Home -> Get Started Click Proximity Commands Select Network from dropdown box Select desired action: o Server Date->Time o Current Machine Date>Time o This Date->Time Click Broadcast COMMANDS ON CONTROLLER RETRIEVE DATE->TIME To retrieve the Date / Time on a Controller go to: Home ->Proximity Commands Click Commands on Controller to expand Select Controller from the drop down list Click Retrieve Date/Time Phoenix will advise if successful OPEN LOCK COMMAND To open the locks go to: Home ->Proximity Commands Click Commands on Controller to expand Select Controller from the drop down list Click Open Lock Phoenix will advise if successful UNLOCK DOOR There are times when you will want to unlock a given Controller at a given time. To do this go to: Home ->Proximity Commands Click Commands on Controller to expand Select Controller from the drop down list Click Open Lock Phoenix will advise if successful LOCK DOOR To Lock a given Controller at a given time go to Home ->Proximity Commands Click Commands on Controller to expand Select Controller from the drop down list Click Lock Door Phoenix will advise if successful © Copyright Axeze Pty Ltd \\AXEZESERVER\Distribution\Manuals\Axeze Studio\Phoenix V10 Draft.docx P 46 TIPS AND TRICKS RIGHT CLICK TO SELECT ONE FROM A DRO P DOWN LIST Find a Credential in the Database Go to Home-> Browse and Find Badge the tag at a reader (normally the reader at the Admin desk) Ensure you have selected the correct enrolment type There are four enrolment types in the Phoenix By Keyboard By Axeze KEP USB reader By Mifare USB RF ID Dongle By EM USB RF ID Dongle Click Find Note 28: Phoenix will automatically search for the entered Credential as soon as the credential is read. Add a Person to the Database Go to Home->Add Badge the enrolment reader with the new persons tag Enter the persons details Provide them with access by making them a member of a Group Find a specific person or credential If the Person name or the Credential name is know there is an easy way to find credentials in Phoenix even if the credential is not at hand. Go to Home-> Get Started Click Browse and Find Start typing the Personnel Name in the Personnel combo box and then click on the correct name when it appears below the box. or Start typing the Credential Name in the Credential combo box and then click on the correct credential name when it appears. © Copyright Axeze Pty Ltd \\AXEZESERVER\Distribution\Manuals\Axeze Studio\Phoenix V10 Draft.docx P 47 © Copyright Axeze Pty Ltd \\AXEZESERVER\Distribution\Manuals\Axeze Studio\Phoenix V10 Draft.docx P 48 ADD PERSONNEL ENROL A PERSON/CREDENTIAL INTO THE SYSTEM (RENAME A CREDENTIAL) PLACE THE CURSOR AT THE FRONT OF THE CODE TAB. Go to Home-> Get Started Badge at Reader (as selected in Input Method) Select Input Method Place Cursor at start of Code Box Badge Reader Click Add Click Rename Check Update (Used for renaming a Credential if applicable.) check if Credential does not Expire Enter permission Dates using Drop down lists Enter Personnel Name Select New Person if necessary Check Group if a member of a Group. Warning – do not give a person individual and Group membership to the same access points. LOST OR STOLEN CREDENTIALS Lost or Stolen Cards can be tracked through the log or you can create an event to warn you that this tag has been used. © Copyright Axeze Pty Ltd \\AXEZESERVER\Distribution\Manuals\Axeze Studio\Phoenix V10 Draft.docx P 49 Setup Time Restricted Access Step One (Setup a Group) Go to System-> Groups New Setup the Group Step Two (Map the controllers to the Group) System-> Controllers-> Mapping-> Controller Group Map Add Select Controller from drop down Select Group Name from drop down Click Add Step Three (Map the Credentials to the Controller) System-> Controllers-> Mapping-> Controller -> Credential Map Click Change Access Select Group Check Time Restricted Enter Time from Enter Time to Check days permitted Check if Access does not expire Enter Expiry date if relevant Click Apply TIP: Ensure you follow your Group Planning Sheets so that you do not overlap Credentials with different restrictions. © Copyright Axeze Pty Ltd \\AXEZESERVER\Distribution\Manuals\Axeze Studio\Phoenix V10 Draft.docx P 50 QUICK FIND TO FIND A CREDENTIAL’S ACCESS PERMISSIONS 2. BADGE TAG AT THE READER 1. PLACE CURSOR AT FRONT OF CODE BOX 3. Click Find 3. CLICK FIND TO FIND A PERSON’S LAST KNOWN ACCESS You can sort the events in ascending or descending date and time order by clicking on the Retrieved / Received at column and then filtering on the Person column. © Copyright Axeze Pty Ltd Home -> Controller Events Select desired filter \\AXEZESERVER\Distribution\Manuals\Axeze Studio\Phoenix V10 Draft.docx P 51 CREATE A FILTER Throughout Phoenix all screens are similar and all screens will enable you to create a Filter in the same way. You can either use Drag and drop or Create Filter wizard. DRAG AND DROP Drag by Left Click on the desired column and drop in the allocated place Click + to expand the filter Click + to expand the filter When you have all the desired information you can either view it or Export it Click Export When finished Click Reset Layout Select from the Heading on the Report you require and drag it to area as noted. To Clear, Click clear on command column, or at the bottom right hand corner When finished Click Reset Layout or drag back to original location. CREATE FILTER WIZARD 1. 2. Create Filter. On the bottom of almost every screen in Phoenix you can create a filter. a. To do this click on Create Filter. b. Click on + to expand the Filter. Filter using the drop down lists. You can filter more than one column at a time using the drop down lists in the system. Design Report using the Filter tools at the bottom left hand of each page in Phoenix Click Create Filter When finished Click OK To remove Click Remove © Copyright Axeze Pty Ltd \\AXEZESERVER\Distribution\Manuals\Axeze Studio\Phoenix V10 Draft.docx P 52 EXPORT EXPORTING INFORMATION Throughout the Phoenix System you can export information. You will find “Export” at the LEFT HAND side of the screen within the actions box. You can use a Filter to filter out the information by Using Drag and drop, or Create Filter to change your export to suite your needs (see Filtering) The reports can be sent out to the following formats: Comma Separated Values – CSV. Rich Text Files – RTF. Office 2010+ Excel format – XLSX. Office 2007 and earlier Excel format – XLS. Acrobat Adobe – PDF. Throughout Phoenix you can Export Files into a format that suits you. You can set up your preferences under Data Options or you can select your preferences at the time, from the report you are viewing. RESET LAYOUT When you want to return any pages that you have viewed and changed, click on the Reset Layout button. PAUSE REFRESH When Pause Refresh is selected it prevents the Grid View from refreshing or fetching new changes from the database. Relate to each page © Copyright Axeze Pty Ltd \\AXEZESERVER\Distribution\Manuals\Axeze Studio\Phoenix V10 Draft.docx P 53 COMMON SNAPSHOTS WITHIN PHOENIX Throughout Phoenix there are different tasks that can be carried out. These are shown in several places within the program For your convenience we have highlighted these in the diagram below: Drag & Drop a Column to Create a Filter. Reset Layout Export New Change Edit Delete Create Filter RIGHT CLICK SELECT There are four places where the Right Click Select Wizard will save you time: Right click to Select all Right click to Unselect all Groups ->System Groups ->Add Lift -> Lifts -> Lift Group Map Add -> Floor Number or Floor Name Home -> Enrolments ->Add >Group Name Data -> Personnel Data -> Add > Group Name © Copyright Axeze Pty Ltd \\AXEZESERVER\Distribution\Manuals\Axeze Studio\Phoenix V10 Draft.docx P 54 Controller Hardware Tips Number of controllers per network. Up to 62 Controllers can be on one Network, however ideally one Controller per Network is recommended for optimum performance. There is no limitation of networks available in the Axeze system. The Axeze Controller does not have a network adaptor. Ethernet connectivity with KENCore can be provided by connecting a device server such as the Moxa NPort 51x0 series using Windows Real COM Drivers to the RS485 port of the controller. KENCfg Setup Controller Hardware We strongly recommend you use the tools provided by Axeze to manage your setup. You need to track which doors are located where, which Network they Controllers will work on and the Controller ID. All Axeze Controllers are to be given an ID number. To do this you need to open the KENCfg software and connect the Controller to the Hardware lock. Follow the prompts. Once you have given the Controllers an ID you will need to setup the Controllers in Phoenix . Configuring Controllers Refer to Operations Manual p11-12. Each Controller on an Axeze network must have an ID that is unique to that network. This ID is referred to as the Internal ID. To set the ID on the Controller you need to follow these steps. Remove the Controller cover Plug Hardware Lock into 8 Pin Connector Plug into USB port (depending on the version you may need a USB to Serial converter) Open KENCfg software Select the appropriate port Enter ID number as per your Planning Sheet Click Send Note: Firmware version is displayed Check ID Number of a Controller If you need to check the ID number of a controller, disconnect the power, reconnect the power, and count the LED flashes. Green – 10’s © Copyright Axeze Pty Ltd Yellow – ones \\AXEZESERVER\Distribution\Manuals\Axeze Studio\Phoenix V10 Draft.docx P 55 DEFINITIONS ANTENNA This is a coil of wire used to create the RF field that energizes the transponders placed in the field and also used to pick up the signals from the transponders feeding them back to the receiver circuits in the reader. It can be internal to the reader assembly or external to the reader assembly. External antenna assemblies have a Tri-colour LED indicator and may have a sounder. AUI Axeze Universal Interface (AUI) - A Network support module that has a real-time clock on it with a battery backup system to maintain correct time on KEN Controller while the system is offline. AXEZE DATABASE MANAGEMENT The Axeze Database Management component of the system is a wizard based management program for KENCore and Phoenix DB’s. Operations such as backup, restore, deploy, upgrade and attach are assisted through the use of this wizard. CARD A card refers to the card form of transponder. Cards come in a variety of formats. Please refer to our website http:->>axeze.com.au->static->files->Cards_and_Tags.pdf. CREDENTIAL A card (or transponder) is a passive electronic device that relies on a reader to provide the necessary power for start-up and communication. The card consists of an application-specific integrated circuit connected to a multi-turn antenna, that when combined, creates the relevant resonant frequency. The card can also be manufactured with unique data for the purpose of anti-collision, as well as the personalized cardholder data for physical access control. A credential is a physical->tangible object, or a facet of a person's physical being, that enables an individual access to a given physical facility. The typical credential is an access card or key fob. There are many card technologies including magnetic stripe, bar code, Wiegand, 125 kHz Proximity, 26 bit card-swipe, contact smart cards, and contactless smart cards. Also available are key-fobs which are more compact than ID cards and attach to a key ring. Typical biometric technologies include fingerprint, facial recognition, iris recognition, retinal scan, voice, and hand geometry. DEFINITION A process to create and configure the Controllers DONGLE A Dongle is normally called a Hardware Lock. This unit is required by various items of hardware to prevent unauthorized interference with a database and the configuration stored in a reader. It connects between the reader and the PC and allows communication between the two. EVENT An event is a condition of the KEN system that can be detected by KENCore or an AUI. EXPIRE A CREDENTIAL The term “To expire a Lost or Stolen Tag” is to set the expiry date to the current date. The “Does Not Expire” setting for the credential must be set to false (Un-ticked). To Unassign or Delete a Credential will have the same effect but the relationship with the previous holder will be lost and as a result new events pertaining to this credential will contain less information. FOB A fob refers to the key fob form of transponder. It has a hole to facilitate placing on a key ring. Fobs come in a variety of formats, refer to our website http:->->axeze.com.au->static->files->Cards_and_Tags.pdf GROUP Groups are used to make allocation of access rights simpler to manage. Personnel with the same basic access rights are placed into groups and then access is granted based on the groups. Simply adding a person to a group gives that person all access that has already been established for the group. Granting individual access should be avoided wherever possible. KENCORE AGENT SERVICE © Copyright Axeze Pty Ltd \\AXEZESERVER\Distribution\Manuals\Axeze Studio\Phoenix V10 Draft.docx P 56 KENCore Agent service is a Windows Service that monitors the KENCore Service ensuring that it is operating. KENCORE MANAGER The KENCore service is a Windows Application GUI for the KENCore Service and KENCore Agent Service. KENCFG KENCfg.exe is the configuration software used to retrieve a unit’s firmware version and configuration and to set its network ID. KENCORE SERVICE Windows Service - handles communication with the access control Network. LED Light Emitting Diode. There are two types used in the Axeze systems. A Red LED is used to indicate power and a Tri-colour LED that can be red, yellow or green, is used to indicate status. A blue->amber combination is used in the WPA-05. MAPPING This label refers to the action creating a relationship between components of the system i.e. a credential to a controller, a controller to a group or a controller to a zone. NETWORK A group of KEN readers connected to a particular COM port or LAN module is said to be on the same Network NETWORK ENABLER The Network Enabler provides LAN connection between KENCore and Axeze Controllers. Network enablers, offer Ethernet connectivity to Network-enable RS-232 (NE-4110S) and RS-422->485 (NE-4110A) serial devices and can be easily integrated into serial devices. They are an RJ-45 design is suited to any type of Ethernet connector. The TCP->IP stack supports TCP Server, TCP Client, UDP, and Real COM operation modes. Serial devices such as card readers, SCADA systems, and Controllers that have been Network-enabled can be monitored in real time over a Network. This data can be integrated with business systems to create business information systems. Axeze Networked Access Solutions provide partners an open architecture, IP-enabled platform for deploying a broad range of access control systems. Axeze's versatile and easy-to-use Networked access control solutions bring intelligence to the door, enabling remote management and report generation via standard Web browsers. Designed to meet organizations' evolving requirements and future system expansion, Axeze's innovative solutions protect the value of customers' overall investments. OFFLINE KEYS User credentials that are saved on the KEN reader enabling the reader work offline. PHOENIX Phoenix is a Web Application (GUI) that is used to administrate, maintain and manage the Axeze access control Network. PROXIMITY CREDENTIAL Tags, cards, fobs, wristbands, finger, face etc. in the Axeze system READER An RFID or Proximity (Prox.) unit used to energise transponders placed in the RF field produced by the reader's antenna and then receive the data sent by the transponder. It is based on the TIRIS 134.2KHz RFID. Readers can be Wiegand 125 KHz, Mifare 13.56MHz. A reader is an electronic component of a physical access control system. Usually a self-contained unit, the reader is an autonomous device that performs the single purpose of interfacing to a card and providing an output to an access control panel. The core is encapsulated in a potting material to protect the reader electronics from the environment and vandalism. SYNCHRONIZATION The process used to align the information in the database with the information in the Controller. TAG This is a device, when energized by a specific signal, stores some of the energy from that signal to shortly later power a microchip. The micro-chip then transmits a signal containing a unique number and error checking information. It can be read © Copyright Axeze Pty Ltd \\AXEZESERVER\Distribution\Manuals\Axeze Studio\Phoenix V10 Draft.docx P 57 only (RO) or read write (RW). The tags referred to in this system are the RO type. Tags are available in a variety of formats. Please refer to our website http:->->axeze.com.au->static->files->Cards_and_Tags.pdf TRANSPONDER Another name for Tag. UNIVERSAL INTERFACE The Universal Interface is the Offline event handler that allows us to use events occurring when the Network is offline to control the relay outputs on the IO boards. It broadcasts the time from its battery backed real time clock 30 seconds after power is applied, setting the time in all the Controllers. WRISTBAND TAG The WB Transponder Wristbands can be used with all Axeze LF readers which currently include the KEP, KEN and KES ranges of Readers and Reader-Controllers. The strap is made from quality black leather or silicon. A range of silicon bands is available with EM4100 or Mifare transponders. ZONE Area restricted by entry and exit KEN readers. © Copyright Axeze Pty Ltd \\AXEZESERVER\Distribution\Manuals\Axeze Studio\Phoenix V10 Draft.docx P 58 Permissions and Tasks Available in Phoenix Tasks Showing Phoenix entities IDs Home – Get started Home –Enrolment Home – Proximity Commands Account – change password Account – change password question and answer Account – User management Account – recent activity Account –Event log – software log View – Controller Events View – Controller Configuration View – Event Handler Actions View – Zone Occupancy System - Networks System – Controllers Definition System – Controllers – Mapping System – Controllers – Mapping – Directly map credential to the controller System – Controllers – Mapping – Access Control Synchronization System – Controllers – Proximity controller System – Controllers – AUI controller System – Controllers – IO controller System – Groups System – Zones System - Lift System - Lift – Directly map credential to the lift-floor System - Lift – Lift Control System – Lift – Lifts – New, Edit and Delete System – Lift – Lifts – Detail – Edit System – Event Handler System – Date/Time Synchronization Credential – Credential Data Credential - Proximity Credential Data – Personnel Data Data – Building Data Data – Holidays Data – Options © Copyright Axeze Pty Ltd Super Administrator Yes Yes Yes Yes Administrator No Yes Yes Yes Supervisor No Yes Yes Yes User No Yes Yes No Unassigned No No No No Yes Yes Yes Yes Yes Yes Yes Yes Yes No Yes Yes No No No Yes Yes Yes No No Yes Yes No No No Yes Yes Yes Yes No Yes Yes Yes Yes No Yes Yes Yes No No Yes Yes Yes Yes Yes No Yes No No No Yes Yes No No No Yes Yes Yes Yes No Yes No No No No Yes Yes Yes No No Yes Yes Yes No No Yes Yes Yes No No Yes Yes Yes No No Yes Yes Yes Yes Yes Yes Yes Yes Yes Yes Yes Yes No No No Yes No No No No Yes Yes Yes No No Yes Yes Yes No No Yes Yes Yes No No Yes Yes Yes No No Yes Yes Yes No No Yes Yes Yes Yes No Yes Yes Yes Yes No Yes Yes Yes Yes Yes Yes Yes Yes Yes Yes Yes Yes Yes No No No No No No No \\AXEZESERVER\Distribution\Manuals\Axeze Studio\Phoenix V10 Draft.docx P 59 SOFTWARE REQUIREMENTS Windows Installer 4.5 Windows (Included in Imaging setup Component package) Microsoft .NET Framework 4 (Included in setup package) SQL Server 2008 R2 Express (Included in setup package) Microsoft .Net Framework 3.5 SP1 Needed (Before installing it you need to Optional Optional make sure (You might (You might there is no need to need to SQLEXPRESS install it install it instance before before name for installing installing SQL Server SQL Server® SQL Server® 2000, SQL 2008 2008 Server 2005 Managemen Managemen or SQL t Studio t Studio Server 2008 Express) Express) and if exist it should be uninstalled) Microsoft Windows Server 2003 Needed Optional (On Windows XP or Windows 2003 you might need to install it before installing Microsoft .NET Framework 4) Microsoft Windows XP Needed As above Needed As above As above Microsoft Windows Server 2008 Needed Not applicable Needed As above Microsoft Windows Server 2008 R2 Needed (Built in) Not applicable Needed Microsoft Windows 7 Needed (Built in) Not applicable Needed © Copyright Axeze Pty Ltd Needed Application SQL Server® SQL Server® Application Application Server 2008 2012 Server Windows Server - IIS 6 FrontPage Managemen Managemen Internet PowerShell Compatibilit 2000/2002 t Studio t Studio Information y Server Express Express Service Extension Application Server - ASP .NET Optional Not applicable Needed Not applicable Needed Needed As above As above Not applicable Needed Not applicable Needed Not applicable As above As above As above Not applicable Needed Needed Not applicable Needed As above As above As above As above Not applicable Needed Needed Not applicable Needed As above As above As above As above Not applicable Needed Needed Not applicable Needed \\AXEZESERVER\Distribution\Manuals\Axeze Studio\Phoenix V10 Draft.docx P 60