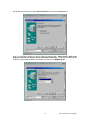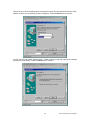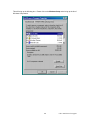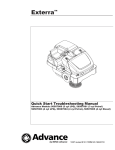
1
TERMITE INTERCEPTION
AND BAITING SYSTEM
EXTERIS USERS MANUAL
For use by Exterra Authorized Operators only
Version 1.90 manual
If you are working with a later version of Exteris a newer version of this manual
is available on your Exteris CD-ROM. It can be printed out using Acrobat Reader
***Appears next to items in the Table of Contents that are new or significantly
modified with this version of Exteris.
1
Call 1-888-Exterra for support
Table of Contents
WHY EXTERIS?.............................................................................................................................. 5
INSPECTION VERIFICATION ........................................................................................................ 7
SYSTEM USE AND SYSTEM USE SUBTYPES.......................................................................... 10
Initial System Use Subtype Tables ............................................................................................ 11
CONTROLLING AND ALTERING STATION INSPECTION INTERVALS .................................. 13
Configuring Check Periods ........................................................................................................ 13
Period of Predicted Limited Activity.......................................................................................... 14
EXTERIS - AN OVERVIEW .......................................................................................................... 16
A Special Note on the Handling of Barcodes............................................................................. 19
Flexible Use of the ExScanner................................................................................................... 20
EXPORT OF DATA TO ENSYSTEX............................................................................................. 21
INSTALLATION OF EXTERIS...................................................................................................... 22
STARTING EXTERIS.................................................................................................................... 23
MAIN MENU .................................................................................................................................. 25
NEW SITE MENU.......................................................................................................................... 26
1) Computer Generate Installation Workorder. (Before Installation) ......................................... 26
2) Print Computer Generated Installation Workorder (before installation) ................................ 28
3) Enter Installation Data from an Installation Workorder (after Installation)............................. 28
3a) Entering Installation Information from a Pregenerated Installation Workorder................... 29
3b) Entering Installation Information from a Field Generated Installation Workorder............... 34
4) Enter New Site Information Collected with ExScanner ......................................................... 36
5) Reprint Installation Workorder Batch.................................................................................... 36
EXISTING SITES MENU............................................................................................................... 37
1) Generate Inspection Workorders (Before Inspection) .......................................................... 37
2) Reprint All Inspection Workorders (Batch – Use for Printing Problems) .............................. 40
3) Reprint Individual Inspection Workorder............................................................................... 40
4) Force Generate Inspection Workorder (Special Case - Generate Before Due Date) ........... 41
5) Process Inspection Data Transferred From ExScanner (After Hotsync - Before #6 and #7) 42
6) Process Turned In Barcodes (After Inspection) (not Barcode Tabs) .................................... 44
7) Enter Inspection Data from Inspection Workorder (Only after #5 and #6) ............................ 45
SITE INFORMATION EDITOR (MODIFY/DEL SITES AND ADD/MODIFY/DEL STATIONS) .... 49
REPORTS ..................................................................................................................................... 53
1) Site Check Date Forecaster................................................................................................... 53
2) Site Discrepancy Report ........................................................................................................ 53
3) Pending Site Installation Report (List open pregenerated workorders)................................. 53
4) Individual Site Information Report ......................................................................................... 53
5) Check Period Configuration Report (Display non-standard check period sites) ................... 54
6) Individual Station Information Report .................................................................................... 54
7) Maintenance Fee Due Date Report....................................................................................... 54
8) System Use Summary Report ............................................................................................... 54
ALTER STATION INSPECTION SCHEDULING MENU .............................................................. 55
1) Configure Check Periods and Workorder Expiration............................................................. 55
2) Configure Period of Predicted Limited Activity ...................................................................... 56
3) Colony Elimination (switch stations back to unbaited status)................................................ 58
4) Convert Station Only System Use to Standard System Use................................................. 59
2
Call 1-888-Exterra for support
UTILITY MENU.............................................................................................................................. 60
1) Update Your Operator Information ....................................................................................... 60
2) Printer Configuration.............................................................................................................. 61
3) ExScanner Configuration....................................................................................................... 61
4) Turn on technical support mode ............................................................................................ 61
5) Purge deleted data from database ........................................................................................ 61
6) Reset Barcode Rolls .............................................................................................................. 61
EXPORT ........................................................................................................................................ 62
1) Export Data to Ensystex (1st and 15th of Month)................................................................... 62
2) Copy Ensystex Export Data to Floppy Disk (TECH SUPPORT ONLY) ............................... 63
3) Export Site Data to Text File (PCO use with other programs).............................................. 63
EXSCAN........................................................................................................................................ 64
EXSCANNER ................................................................................................................................ 65
ExScanner Step by Step............................................................................................................ 66
Getting Started with an ExScanner............................................................................................ 67
Connecting the ExScanner to the Host Computer..................................................................... 67
ExScanner Basics...................................................................................................................... 68
Battery Management.................................................................................................................. 70
Resetting the ExScanner ........................................................................................................... 71
Installing ExScanner Related Software ..................................................................................... 72
Configuring Exteris for an ExScanner........................................................................................ 72
ExScanner in Use ........................................................................................................................ 73
Generating Workorders for Use With an ExScanner ................................................................. 73
Transfer of Station History Data from Exteris to the ExScanner ............................................... 73
Using the ExScanner in the Field............................................................................................... 73
Accessing Data on the ExScanner ............................................................................................ 74
ExScanner Pull down Menus ..................................................................................................... 75
Reports Pull Down Menu ........................................................................................................... 75
Customer Information ................................................................................................................ 75
Station Information..................................................................................................................... 76
CheckPeriods Pull Down Menu ................................................................................................. 77
Global Check Period Configuration............................................................................................ 77
Individual Site Check Period Configuration ............................................................................... 78
Beginning the Inspection Process.............................................................................................. 78
Entering Station Data into the ExScanner ................................................................................. 80
Entering Station Data into the ExScanner ................................................................................. 80
Manually Scheduling Next Station Inspection............................................................................ 81
Viewing Station History .............................................................................................................. 81
Editing or Deleting Data Entered into the ExScanner................................................................ 82
Install New Site .......................................................................................................................... 83
Edit Newly Installed Site ............................................................................................................ 86
Uploading ExScanner Data to the Host Computer .................................................................... 86
Processing ExScanner Data on the Host Computer.................................................................. 86
HotSyncing the ExScanner ........................................................................................................ 86
DOCUMENTS ON EXTERIS CD- ROM........................................................................................ 88
HELPFUL HINTS .......................................................................................................................... 89
SHORTCUT KEYSTROKES......................................................................................................... 93
USING WINDOWS MICROSOFT BACKUP TO BACKUP EXTERIS DATA............................... 94
Creating a Microsoft Backup Job of Your Exteris Data........................................................... 94
Backing Up an Existing Exteris Backup Job .......................................................................... 102
3
Call 1-888-Exterra for support
Installing Microsoft Backup...................................................................................................... 105
INITIAL INSTALLATION INSTRUCTIONS FOR EXTERIS AND/OR EXSCANNER SOFTWARE
(1.90) ........................................................................................................................................... 109
Host Computer Exteris and ExInspect Installation................................................................... 109
Connecting ExScanner to Host Computer............................................................................... 110
Installing ExInspect on your ExScanner including updated Versions...................................... 112
Notifying Exteris that you are using an ExScanner.................................................................. 112
Correcting COM Port Selection................................................................................................ 112
4
Call 1-888-Exterra for support
Why Exteris?
Managing termite baiting systems means keeping track of many different baiting sites, each with
numerous termite bait stations. The large amounts of information that must be managed for each
station, let alone site, can be overwhelming. We developed Exteris to help you manage this
information with relative ease and accuracy. Exteris also fills the need for a system to reasonably
verify that station inspections are being made. Additionally, use of Exteris is mandated in the
Exterra License Agreement you signed when you became an Exterra Operator. Using Exteris
properly and to its fullest extent is the single best thing you can do to ensure that your use of
Exterra is as effective and hassle-free as possible.
Exteris - What is it?
Exteris is short for Exterra Information System. Exteris is a set of computer programs and an
optional portable field data input device (ExScanner) that makes it easy for you to:
•
•
•
Manage Exterra sites and station inspections
Comply with the Labyrinth label
Verify that station inspections are performed
One part of Exteris is a computer program that is installed on a desktop computer, most likely at
your place of business. This program is the centerpiece of Exteris. This program does many
things to help you properly manage your use of Exterra. For instance, it generates individual
workorders for each site at predetermined times. During site inspection visits, the technician
records station information on the workorder or optionally enters it into the ExScanner. This site
information is brought back to the office where it is input into the host computer. This information
is then used to update the conditions present in each inspected station at each inspected site.
This program then generates followup workorders using the updated station information. The
timing of the generation of such Workorders is based on the conditions found in the stations
during the last inspection and parameters you set.
In addition to its data collection capabilities, Exteris also has extensive data reporting capabilities.
Finally, Exteris is used to report to Ensystex your use of Exterra in order that you can be invoiced
for your use of Exterra.
Exteris and labor saving efficiencies
The Labyrinth label permits variablity in the timing of future station checks at a site based on the
presence or lack of termite activity in a station the last time it was inspected. If termites are not
found in a station during an inspection, the Labyrinth label permits a longer period of time to
elapse before you are required to check the station again than would be permitted if termites
were found in the station during the inspection. The scheduling of station checks based on this
permitted variability is one of the most important functions of Exteris.
Further inspection labor savings are realized with Exteris because of another concept contained
in the Labyrinth label, the "Period of Predicted Limited Activity". This "period" is a period of the
year during which no station inspections are required. The period of predicted limited activity for
an area is dependent upon the climate in that area. Not all parts of the US have a period of
limited activity, however in some areas this period can be of considerable length. Periods of
limited activity are determined based on the zip code of the site. Exteris also gives you the ability
to disable the period of limited activity so that you may generate workorders and continue to
check sites during their period of limited activity.
5
Call 1-888-Exterra for support
To take advantage of these labor saving benefits while remaining in compliance with the
Labyrinth label, you must be able to determine when checks of each individual station are due. To
do this manually would be nearly impossible because of the different variables, as explained
above, that are involved in determining when a station must be checked. Using the Exteris
computer program is the only way to reliably determine when station checks are due. Although
time must be spent accumulating and storing data in Exteris, this effort is rewarded with
substantial reductions in the number of station inspections during site visits.
6
Call 1-888-Exterra for support
Inspection Verification
To effectively suppress and presumably eliminate termite colonies, Exterra stations must be
inspected and baited. Although no method of inspection verification is absolutely foolproof, the
inspection verification methods used with Exteris can help keep inspectors honest, particularly if
the method is backed up with random field checks of stations by supervisory personnel.
There are two inspection verification methods available for use with Exteris. One is a barcode
swapping arrangement. The second one uses a handheld data collection device referred to as
the ExScanner that takes the place of barcode swapping.
Barcode Swapping
Barcode swapping eliminates the need for a field barcode scanner or rather makes the use of a
field barcode scanner optional. Instead of scanning the barcode in the station, the barcode in the
station is removed and replaced with a new one. This is a fairly efficient inspection verification
system if you have a relatively small number of sites. This process is illustrated with the following
example:
Barcode Label A, with a unique number on it, is left in Station 123 during station installation. The
number on Barcode Label A is recorded on a Workorder as having been placed in Station 123.
The Workorder is turned in at the office where the fact Barcode Label A has been placed in
station 123 is recorded in the Host Computer.
During the next inspection of Station 123, Barcode Label A is removed. Barcode Label B (with
another unique number on it) is left in Station 123. Label A is turned in at the office and recorded
by Exteris as having been removed from the station. Exteris automatically checks to make sure
Barcode Label A "belongs to" Station 123. If Barcode Label A does match with Station 123, this
is accepted as proof that the station inspection occurred.
During subsequent inspections of Station 123, Barcode Label B will be removed and replaced
with Barcode Label C and so forth. This substitution process continues on a regular basis for as
long as the station remains in place and inspections of the station are being made. Random field
checks of a few stations can ensure that technicians are placing barcodes into the stations
properly. During these field inspections, it is important to make sure a barcode label is present in
the station AND that the barcode matches the station correctly.
It is arguable that it is harder to defeat the barcode swapping verification method backed up with
random supervisory field checks of stations than a scheme that involves assigning a permanent
barcode number to a station and scanning it with a field barcode scanning apparatus (see
ExScanner below). Exteris' barcode swapping inspection verification system combined with
supervisory double checks makes Exterra's inspection verification almost foolproof.
7
Call 1-888-Exterra for support
Barcodes - The Inspection Verification Tool
Each individual barcode has a unique number on it that will never be duplicated. This means that
no two stations will ever contain the same barcode. The barcode number is printed on the
barcode both as a number and as a barcode.
Barcodes must be printed on water and termite resistant paper with a thermal transfer printer so
that the barcode will be legible even if it spends a considerable amount of time in a station.
Ensystex sells these special barcodes to you for a very reasonable price. You can expect
barcodes for the average structure to cost less than $2.50 per year. Because workorders can not
be generated without barcodes, make sure you always have plenty of barcodes in stock.
When the barcodes that are removed from the station are turned in at the office, the numbers on
the barcodes must be entered into the host computer. A barcode scanner hooked to the Host
Computer (not to be confused with the ExScanner explained below) is the most efficiently and
timely way to enter these numbers into the Host Computer, however it is not required to use
Exteris.
If you choose not to use a barcode scanner you can instead manually enter barcode numbers
using the keyboard or numeric keypad. If you have a large number of sites, you should purchase
an ExScanner as explained below.
ExScanner
TheExScanner is an electronic data collection device based on the popular
Palm Pilot Platform.
Barcodes are still placed in stations however the ExScanner eliminates the
need to "swap out" the barcodes. Instead of removing the barcode in the
station and replacing it with a new one, the barcode in the station is scanned
with the barcode reader built into the ExScanner.
The use of an ExScanner is also optional however its use makes sense if you
have a large number of sites.
Barcodes- Preassigned or Postassigned
Barcodes are either preassigned or postassigned to a station. Barcodes are “preassigned” by
Exteris at the time of Workorder generation or “postassigned” by the technician in the field.
Barcodes can be preassigned or postassigned for both Installation and Inspection Workorders.
Some, but not all, of the following may not apply when you are using an ExScanner.
Pre-assigned Barcode - barcode is assigned to the station by Exteris at the time the workorder
is printed.
Post-assigned Barcode - barcode is assigned to the station by the technician in the field and
entered into Exteris at the time the Workorder data is entered into the Host Computer.
8
Call 1-888-Exterra for support
Preassigned Barcodes
Barcodes can only be preassigned by Exteris. Barcodes will be preassigned when you:
•
Pre-generate an Installation Workorder.
•
Generate an Inspection Workorder for a site. Barcodes will be preassigned to stations by
Exteris only if they are scheduled to be inspected (and you have not indicated you are
using the ExScanner at the site in which case barcodes are not preassigned).
Postassigned Barcodes
Exteris never postassigns barcodes. A technician postassigns a barcode to a station:
•
During an installation if a Field Generated Installation Workorder is completed in lieu of a
pregenerated Installation Workorder.
During a regular inspection if a station is inspected that was not scheduled to be
inspected. (Replacement barcodes are preassigned by Exteris only to the stations that
are scheduled to be checked therefore if a station is inspected that was not scheduled to
be inspected the only way to swap a barcode is to postassign one to take the removed
barcodes place - not applicable if you are using the ExScanner).
If the technican loses a barcode that was preassigned to a station scheduled to be
inspected or installed they should instead postassign another barcode to the station
during the inspection/installation, marking it on the Workorder in the column provided for
that purpose. When Workorders are processed at the office, the new barcode number is
keyed in in place of the lost one. - not applicable if you are using the ExScanner.
•
If you are using an ExScanner and a station is inspected and the barcode is missing. If
this is the case, a new barcode is postassign with the ExScanner according to a routine
programmed into the ExScanner.
If a workorder expires and a replacement workorder is printed. The barcodes on replacement
workorders must be postassigned - not applicable if you are using the ExScanner.
How do technicians postassign barcodes?
•
•
•
Technicians are supplied with unassigned barcodes to postassign to stations.
Postassigned barcode numbers are written on the Workorder in the blank provided by the
technician.
These numbers are recorded in Exteris at the time the Workorder is processed after the
inspection.
Each barcode is printed with a tab attached that contains a miniature copy of the barcode.
The technician can mark the site and station number on this miniature when he postassigns a
barcode. These tabs are turned in with the Workorder where they may be scanned or keyed
into Exteris. (The miniature barcodes on the barcode tab cannot be used as substitutes when
it comes time to turn in barcodes because Exteris knows the difference between the scan of
the actual barcode and the scan of its miniature duplicate.)
9
Call 1-888-Exterra for support
System Use and System Use Subtypes
A system use is defined in the Exterra License Agreement as
installation, operation, maintenance, inspection, monitoring or baiting of one or more Components at
a Site. Reliance or dependence upon, in any form or fashion, any Component(s) for termite control or
protection at a Site.
In effect, a System Use occurs any time Exterra is used. Importantly for you, any time a System
Use occurs, an obligation is created to reimburse Ensystex for such use.
There are two main different use types. When Exterra is installed at a site, this type of use is
referred to as an Initial System Use. When an Initial System Use occurs, an Initial System Use
Fee becomes due and payable to Ensystex. The payment of this fee covers the use of Exterra at
the site for a period of one year. On the first Initial System Use Anniversary Date another type of
use occurs provided that Exterra continues to be used at that site. This use is referred to as a
Maintenance System Use. A Maintenance System Use Fee is payable for the use of Exterra
during the year following the initial year. Another Maintenance System Use Fee is due each year
for as long as use of Exterra continues at the site.
Initial System Use Subtypes
There are several different types of Initial System Uses. These are individually referred to as
Initial System Use Subtypes. All Initial System Use Subtypes fall into one of two categories. In
one category is the Standard System Use Subtype. All other Subtypes are in a separate
category. The Standard System Use Subtype differs from all other Subtypes in one important
respect. All other Subtypes allow for payment of part of the Initial System Use Fee to be deferred
to the First Maintenance System Use Year. The Standard System Use Subtype requires that the
entire Initial System Use Fee be paid the first year.
The first question you may have is, why does such an arrangement exist? The answer is, this
arrangement is intended to create an incentive for your use of Exterra in certain types of
situations that you may not be as inclined to use it as you might be otherwise. These uses
include preconstruction, change of ownership and liquid treatment conversion.
It is your option to take advantage of these Subtypes and you are encouraged to do so. However
keep in mind that if you elect to use them you are creating an obligation to pay a greater amount
for this sites at the time the First Maintenance System Use Year Fee becomes due. Also keep in
mind that when you choose to use an Initial System Use Subtype other than a Standard System
Use, complete customer information for each of these sites is transferred to Ensystex, not just for
a random 10% as applies to Standard Initial System Uses. Listed below are the different types of
Subtypes and the qualifications they must meet in order to be classified as being of this Subtype.
10
Call 1-888-Exterra for support
Initial System Use Subtype Tables
Initial
System
Use Subtype
Qualifications Initial System Use must
meet in order to be eligible for this Initial
System Use Subtype
Additional information that must be provided at time of
Initial System Use in order for Site to be eligible for this
Initial System Use Subtype
Standard
None. This Initial System Use Subtype applies to any
Site that does not qualify for any other Subtype.
None over and above that required by the Exterra License
Agreement.
Preconstruction
Initial System Use must occur prior to or within 10
days after transfer of ownership of site from builder
to first owner of the site (buyer). Applicable only to
Initial System Uses paid for by customers with a
contractor’s license.
New Site owner name, Site address and telephone number for every
Site for which benefit of this Subtype is claimed.
Change of
Ownership
Initial System Use Date must occur during the 40
day period beginning 30 days prior to and ending 10
days after transfer of ownership of site occurs. Wood
Destroying Insect Infestation Information Report
must have been issued at time of Initial System Use
by Operator.
Operator must have applied a complete liquid barrier
treatment to site prior to the effective date of the
Operator’s Exterra Licensee Agreement. Coverage
based on that treatment must still be in effect or
cannot have lapsed more than twelve months prior to
the Initial System Use Date.
.See below
New Site owner name, Site address and telephone number for every
Site for which benefit of this Subtype is claimed.
Liquid
Treatment
Conversion
Station Only
Station Only to
Standard
Conversion
Company must have been previously compensated
for a Station Only Initial System Use.
New Site owner name, Site address and telephone number for every
Site for which benefit of this Subtype is claimed.
Upon request, proof that liquid treatment occurred at the Site prior to
the effective date of the Operator’s Exterra License Agreement.
Site owner name, Site address and telephone number for every Site
for which benefit of this Subtype is claimed.
Upon request, proof that Site is under contract with Operator for
general household pest control. See conditions below.
None over and above those required for a Station Only Initial System
Use.
Station Only Initial System Use
Station Only Initial System Use is a very special type of initial system use. Station Only System
Use of Exterra stations is authorized only for the purpose of demonstrating the presence of
termites at a site in anticipation that once their presence is demonstrated, a Standard System
Use might occur at the Site. Station Only Use can occur at a Site for a maximum of two years
(Initial System Use Year and First Maintenance System Use Year).
Installation of Exterra Stations at a site qualifies as a Station Only System Use and not as a
Standard System Use only if the use meets all of the following conditions:
•
There is no agreement, written or verbal, in effect on the Initial System Use Date or at
any time Station Only Use is occurring that obligates Operator to control termites at the
Site.
•
There is a written agreement in effect which obligates the Operator to control general
household (non wood destroying insect) pests at the Site at the time of Initial System Use
and at all times a Station Only Use is occurring at the Site. Upon request, proof of the
existence of such an agreement shall be made available to Ensystex.
If an Initial System Use qualifies as a Station Only Initial System Use, a Station Only Initial
System Use Fee, computed according to the current Fee Schedule(s) shall be due for that Site. If
Components remain in place at the Site on the first Initial System Use Anniversary Date, a
Standard Maintenance System Use Fee shall be due for that Site.
11
Call 1-888-Exterra for support
A Station Only System Use converts to a Standard Initial System Use and a Station Only to
Standard System Use Conversion Initial System Use Fee for that Site shall become due if any of
the following occur:
•
Operator enters into an agreement for the control of termites at the Site during the two
year period beginning on the Station Only Initial System Use Date and ending on the
Second Initial System Use Anniversary Date.
•
Termites are found in a station at the Site at any time after Initial System Use and all
Components are not removed from the Site within thirty days of the discovery of termites
at the site.
•
Bait is placed in a Station at the Site or any Component installed at the Site is used for
the purpose of termite control (as opposed to termite monitoring).
12
Call 1-888-Exterra for support
Controlling and Altering Station Inspection Intervals
Configuring Check Periods
The Labyrinth label contains the following language with respect to station inspection scheduling:
The length of time between receptacle inspections is dependent upon the type of receptacle.
Square (40 cubic inch) station
If termite activity is known to be present in the structure at the time receptacles are initially installed, inspect all
receptacles three times at approximately 30, 60 and 90 days after the date of completion of initial receptacle installation.
If no termite activity is present in the structure at the time receptacles are initially installed, inspect all receptacles for the
first time within approximately 90 days after the date of completion of initial receptacle installation.
Thereafter, inspect any receptacle that does not contain Labyrinth within approximately 90 days after the date of the last
inspection of that receptacle.
Inspect a newly baited receptacle two times at approximately 30 and 60 days after the date of initial bait installation.
Thereafter, as long as the receptacle continues to contain Labyrinth, inspect the receptacle within approximately 45 days
of the date of the last inspection of the receptacle.
Round (80 cubic inch) station and bag
If termite activity is known to be present in the structure at the time receptacles are initially installed, inspect all
receptacles two times at approximately 45 and 90 days after the date of completion of initial receptacle installation. If no
termite activity is present in the structure at the time receptacles are initially installed, inspect all receptacles for the first
time within approximately 90 days after the date of completion of initial receptacle installation.
Thereafter, inspect receptacles within approximately 90 days after the date of the last inspection of the receptacles.
This language specifies the maximum amounts of time that can elapse between station
inspections. Based on the judgement of the operator and local conditions and other factors, it
may be necessary or advisable to schedule inspections more frequently than these maximum
time periods. For this reason, Exteris incorporates extensive functionality that allows the operator
to gain complete control over the timing of inspections of every station.
Unbaited Stations
Time between inspections of unbaited stations can be set between one day and ninety days.
Baited Stations
Time between bait installation and first inspection of a baited station can be set between one day
and the value for other baited stations (see below). This variable is to allow for a shorter check
period during the time of maximum bait consumption that normally occurs immediately after bait
is placed in a station.
Time between inspections of baited stations.
Configuring check periods for stations at individual sites.
The time between inspections of stations at individual sites can be set separately in the event
stations at certain sites need to be inspected on a different schedule. For example, you might sell
a large job at which it has been specified that all baited stations be checked every 30 days and all
unbaited stations be checked very 60 days. With Exteris this is possible.
13
Call 1-888-Exterra for support
Period of Predicted Limited Activity
The Period of Predicted Limited Activity (PPLA) is a period of the year during which it is not
necessary to check stations. Exteris contains functionality that lets you have complete control
over using or not using the PPLA.
The Labyrinth Termite Bait label also contains the following language regarding the PPLA:
Adjustments to In Ground Receptacle Inspection Scheduling
Decreases in elapsed time between inspections of a baited receptacle may be warranted if consumption of all the bait in
the receptacle occurs during the interval between any two inspections.
Because subterranean termites are cold blooded (poikilothermic) animals, low temperatures can substantially reduce or
stop their activity close to the earth's surface during a certain period of the year. For this reason, if the temperature falls
low enough, termites may cease to feed in receptacles or the onset of feeding in receptacles may be delayed until
temperatures have recovered above a certain level for a long enough period of time. Reductions in termite activity that
are the result of low temperatures may make inspections of receptacles unnecessary for as long as low temperatures
prevail in the area.
The temperature at which termite activity is substantially curtailed may vary significantly between different geographic
areas and with different species of termites. However, generally speaking, termite activity will be reduced in the
receptacles during those times of the year during which the average daily mean exterior air temperature is below 50 O F.
For this reason, the following rule may be applied when counting the number of elapsed days between inspections unless,
in the opinion of the operator, increases in the elapsed time between inspections are unwarranted based on local
circumstances.
In counting the number of days between inspections, exclude from the total number of days elapsed since the last
inspection any days whose date falls between the first date in the fall/winter that long term climate data predicts that the
mean exterior air temperature for that date at that application site will be below 50 O F (begin period of predicted limited
activity) and the first date in the winter/spring that the climate data predicts that the average mean exterior air temperature
for that date at that application site will be above 50 O F (end period of predicted limited activity).
However, if the number of days excluded according to this rule exceed 90, then schedule the date of the first inspection
after the end of the period of predicted limited activity according to the rule or within 30 days of the date of the end of the
period of predicted limited activity, whichever of these two dates occurs first. However, under no circumstances should
more than six months elapse between inspections of receptacles.
The PPLA is a period of the year during which low temperatures result in decreased levels of
termite activity. In certain parts of the country, such as Florida, Hawaii, southern Arizona and the
immediate Gulf Coast there is no PPLA. However for parts of the country the PPLA can be of
substantial length. The important thing to remember is that the use of the PPLA is
completely optional. If you do not want to use it, simply turn it off in Exteris.
In addition to being able to turn it off, you can turn it off for baited stations (continue to check
them) but leave it on for unbaited stations (not check unbaited stations). You can shorten the
length of the PPLA for all stations or for unbaited but not baited stations.
Consider the following variations on the use of the PPLA:
•
Leave PPLA disabled. Exteris will ignore the PPLA and continue to schedule station
inspections during the PPLA according to the configure check period values you have
entered (see previous section).
•
Enable the PPLA system and use the maximum length period values for both baited and
unbaited stations. To do this enable the PPLA. The maximum values are already set for
each zipcode.
•
Enable the PPLA but decrease the length of the PPLA. PPLA are set for each zipcode.
•
Enable the PPLA for unbaited stations but not for baited stations. Enable the PPLA. Set
the values for baited stations to 000 but leave the values for unbaited stations alone.
Enable the PPLA for only certain sites. This is done from the Site Editor.
•
14
Call 1-888-Exterra for support
Special Considerations for PPLAs longer than 90 days
If you are using the PPLA and you live in an area in which the PPLA is longer than 90 days you
need to keep the following Labyrinth label language in mind.
If the number of days excluded according to this rule exceed 90, then schedule the date of the first inspection after the
end of the period of predicted limited activity according to the rule or within 30 days of the date of the end of the period of
predicted limited activity, whichever of these two dates occurs first
What this means is that if you adhere to a PPLA longer than 90 days, you must inspect the site
within 30 days of the end of the PPLA. (If the PPLA is 90 days or less this is not the case). If you
have a large number of sites you may be confronted with the need to do a large number of station
checks within 30 days of the end of the PPLA. To eliminate this potential problem, you may want
to decrease the length of your PPLA to 90 days.
15
Call 1-888-Exterra for support
Exteris - An Overview
Exteris is intended to help you comply with the Labyrinth label, however it is your
responsibility as the applicator to make sure that you are adhering to the Labyrinth label
instructions. Remember, "the label is the law."
Exteris performs 3 main functions for you:
1. It helps you verify that station installations and inspections are conducted according to the
Labyrinth label.
2. It provides you with information concerning the progression of the baiting process at each
site.
3. It helps you efficiently manage routing of site inspections.
Installation, Configuration and Initial Export
Installation
Install Exteris on your host computer according to the Installation Instructions contained in the
Appendix of this Manual or supplied separately. Exteris can only be installed on a personal
computer with a CD-ROM drive running Windows 95 or later.
Configuration - Entering your Operator Code and Authorization Code
An initial installation of Exteris begins with the input of configuration information such as company
name, address and phone number as you want it to appear on your Workorders. At the time of
installation you must also input your operator and authorization code. These codes can be
found on your Installation Instructions.
Initial Export of Information to Ensystex
Export is the process by which required site information is transferred to Ensystex twice a month
for billing purposes. An export is done on the first and fifteenth of every month. Failure to submit
export information on a timely basis can result in your suspension or cancellation as an Exterra
Authorized Operator.
Using Exteris
Exteris use revolves around two principal events in the "life" of an Exterra site. These two events
are installation of Exterra stations at a site and recurrent regular inspections of these stations
Choosing an Inspection Verification Method
An important choice you must is the form of inspection verification you choose to use. As explain
earlier, two different forms of inspection verification can be used with Exteris. One form is
barcode swapping. The other is the use of a portable field scanner, referred to as the ExScanner.
16
Call 1-888-Exterra for support
New Site Installations
When a new site installation is made, certain data about that site and that installation must be
input into Exteris. The information that must be recorded for a new site includes information about
the site in general and specific information for each station installed at the site. This information is
recorded on an Installation Workorder by the installation technician and is entered into Exteris
after the Workorder is turned in for processing.
The general information entered into Exteris for a site includes customer name and address plus
other information such as installer name and perimeter lineal footage around structure. The
station information includes station number, station serial number, barcode number installed and
general comments about the station such as its location at the site.
Generating an Installation Workorder (Pregenerated or Field Generated)
You have two choices concerning completion of an Installation Workorder; pre-generating one
with Exteris and giving it to the technician to complete in the field or allowing the technician to
complete, or field generate, a blank Installation Workorder in the field. Exteris is designed to
handle both of these options easily.
Pre-generating an Installation Workorder with Exteris
After a new installation is sold but before it is installed, installation data can be input into the
computer to pregenerate an Installation Workorder. Installation Workorders are normally
pregenerated to maintain an orderly work flow in the office. The main advantage of pregenerating
Workorders includes the capture of information into Exteris before the installation is performed,
and preassignment of barcodes to stations. This reduces the amount of paperwork a technician
must complete during an installation.
During Installation Workorder pregeneration, barcodes are preassigned to stations. Barcodes are
preassigned to 25% more stations than are indicated will be installed. These extra barcodes are
assigned in the event a decision is made to install more stations than have been planned.
If the Installation Workorder is preprinted and barcodes are preassigned, the only information that
is normally entered on the Workorder by the technician is station serial numbers and station
comments.
Field Generating an Installation Workorder
If an Installation Workorder is not pregenerated, a blank Installation Workorder is completed in
the field by the technician or "field generated". The blank Installation Workorder form is contained
on the Exteris CD-ROM. See the Documents on the Exteris CD-ROM section of this manual for
instructions on how to print out this form.
The technician must be provided barcodes to be used for postassignment to stations as they are
installed. This is done by peeling labels off the roll of preprinted barcodes and giving them to the
technician.
If an Installation Workorder is not preprinted and a blank Installation Workorder is completed in
the field (field generated), the barcode numbers, station serial numbers and station comments
must be recorded on the Installation Workorder in the spaces provided. Alternately, instead of
writing the barcode and station numbers on the Workorder, the site and station numbers are
recorded on the Barcode Tabs. The Barcode Tabs are then turned in with the Workorder.
17
Call 1-888-Exterra for support
Entering Installation Workorder Information into Exteris
The Installation Workorder is turned in upon completion of the installation. If the Installation
Workorder was pregenerated and barcodes were preassigned, inputting installation data is limited
to entering the station serial numbers and comments.
If the Workorder was field generated, the barcodes, postassigned by the technician, are entered
into Exteris in addition to station serial numbers and comments. The barcode numbers are either
written on the Installation Workorder by the technician or, alternatively, the station numbers are
written on the barcode tabs. If the site and station numbers are written on the barcode tabs, the
barcode number can be scanned from the barcode tab instead of being keyed in manually (if you
have a barcode scanner).
Routine Inspections
Generating Inspection Workorders
You must generate workorders in order to perform inspections. Whenever you generate
workorders, Exteris automatically prints a Workorder for any site that needs to be serviced.
Exteris decides whether or not a sites needs to be inspected based on criteria you have
previously entered.
If you are not using an ExScanner, the workorder generation process begins with a prompt for
you to enter a beginning barcode number from your supply of purchased preprinted barcodes.
Using the number of the first available unused barcode, Exteris sequentially assigns barcodes to
all stations that must be checked at all sites for which it is generating barcodes. Barcodes are not
assigned to stations that are not scheduled to be checked during this inspection however these
stations can still be inspected. Information for all stations whether or not they are scheduled for
inspection are included on the Workorder.
If you are using an ExScanner, Exteris does not assign new barcodes. Instead it assumes that
you will scan the barcodes that are present in the station and leave them in the station.
Field Completion of Inspection Workorders
Completion of Inspection Workorders in the field involves recording information concerning each
inspected station on the Workorder. Inspections of stations at sites are normally limited to those
stations for which an inspection is due.
If you are not using an ExScanner, the barcodes in stations are removed and replaced with the
barcodes preassigned to the stations by Exteris. These barcodes are turned in with the
workorder. If you are using an ExScanner, barcodes are not removed but are instead scanned in
place.
A station that is not scheduled to be checked can still be inspected even if a barcode has not
been preassigned to it by Exteris. If you are not using an ExScanner (you are swapping
barcodes), the technician must remove the barcode in the station and turn it in if any information
is recorded for the station (Exteris requires that a barcode be turned in in order to enter
information for a station). The removed barcode is replaced with a barcode that the technician
supplies and postassigns to the station from a supply of unassigned barcodes they have been
given. The number of this barcode is then recorded on the Workorder in the space provided.
This new number is keyed in at the same time all the other Inspection Workorder information is
entered. If you are using an ExScanner the barcode in the station is simply scanned and left n
the station. The station data is also collected in the ExScanner.
18
Call 1-888-Exterra for support
All technicians, including those using ExScanners, should have a supply of unassigned barcodes.
Technicians using ExScanners need extra barcodes in case a barcode is missing from a station
that they inspect. Technicans swapping barcodes need barcodes in case they check stations that
are not scheduled for inspection.
Office Entry of Inspection Workorders
After an inspection, the Inspection Workorder and barcodes removed from stations are turned in
by the technician for processing into Exteris. Office Inspection Workorder processing consists of
inputting information collected on the Inspection Workorder into Exteris. If an ExScanner was
used, the information in the ExScanner is transferred to the host computer.
A Special Note on the Handling of Barcodes
Barcodes are a convenient and simple form of inspection verification. However, in order to be
effective, they must be handled carefully in order that the integrity of the data entered in Exteris
be maintained.
Most importantly, barcodes must be placed in the station to which they are assigned.
If barcodes are placed in the wrong station, the data in Exteris concerning barcodes will be
incorrect. The best way to make sure barcodes are placed in the correct stations is to emphasize
to your technicians the importance of:
1. Placing the correct barcode in the correct station.
2. Comparing the number of the barcode they are removing from the station to the barcode
number in column 7 on the workorder (column 7 is the number of the old barcode to be
removed from the station) and checking this off in the blank beside this column.
3. Checking off the barcode they are inserting in the station in the blank beside column 9 as
proof the barcode is being put in the correct station (column 9 is the number of the new
barcode assigned to the station).
Remember, if the technician loses the new preassigned barcodes before they are installed,
replacement barcodes can be postassigned by writing the replacement numbers in column 15 on
the workorder. Postassigned barcodes come from the supply of unassigned barcodes that
technicians should have with them at all times.
Making sure these simple steps are adhered to will go a long way toward making your use of
Exteris as hassle free as possible.
19
Call 1-888-Exterra for support
Flexible Use of the ExScanner
The implementation of the use of the ExScanner with Exteris is designed to be as flexible as
possible. For instance, you can use an ExScanner on one route while continuing to swap
barcodes on all your other routes. You can use an ExScanner on a route one day and not use it
on that same route the next.
The only limitation is that once you have generated a group of workorders for use with an
ExScanner, you must use the ExScanner with all of the workorders in that group before
you revert to swapping barcodes. This is because this group of workorders will not have had
barcodes pressigned to their stations by Exteris to swap. Other than that, the decision to begin
using or discontinue using an ExScanner at any time flexible down to the route level.
The process of using the ExScanner works as follows. When you are generating Inspection
Workorders, you are asked whether or not you want to use an ExScanner either for all
workorders generated or for one or more routes. When you tell Exteris that you are going to use
an ExScanner, it suspends the new barcode assignment process for the workorders that are
generated at that time for the routes for which you have told Exteris that an ExScanner will be
used. Barcode assignment is suspended because with the ExScanner the barcodes in the
station are scanned and left in the station instead of being removed.
In the field you use the ExScanner according to the instructions contained in another part of this
manual. When you return to the office, the ExScanner is connected to the Host Computer at
which time the data in the ExScanner is transferred to the Host Computer. At the time you are
processing Inspection Workorders you are presented with an option to process data transferred
from the ExScanner.
Every time you generate workorders you are asked whether or not you are using an ExScanner.
If you decide to stop using an ExScanner on one or more routes Exteris simply begins assigning
barcodes to stations again on those routes.
20
Call 1-888-Exterra for support
Export of Data to Ensystex
Component Fees vs. System Use Fees
Compensation for the use of Exterra is based on two factors - The number of Components you
order and, depending upon the payment plan you have chosen, either the number or size of
structures at which you use it, referred to as System Use.
You are automatically billed for Component Fees whenever you order components however we
need to receive certain information from you in order to bill you for your System Use Fees.
This information is automatically collected by Exteris during your normal use of Exteris. Twice a
month, on the 1st and the 15th, you are required to transfer this information to Ensystex either by
the internet or on a diskette you mail to Ensystex according to the data export routine imbedded
in Exteris. You are automatically prompted to export data on the 2nd and 16th of the month if you
have failed to perform the required export on the 1st and the 15th. When you have transferred
thte data to the diskette (if you choose this method), you should then promptly mail us this
diskette.
When we receive your data we process it, print an invoice and mail the invoice to you in order
that you can pay us the amounts due. Failure to send us this data on a timely basis can result in
your suspension or termination as an Exterra Authorized Operator.
21
Call 1-888-Exterra for support
Installation of Exteris
What you need to begin using Exteris:
Required Equipment
Exteris CD-ROM - sent to you with startup kit. Updates are sent out regularly.
Installation Instructions - Refer to the Appendix of this manual. You may also have received
Installation Instructions separately if you are a new operator.
Operator Code and Activation Code - These are written on a sheet of paper included with the CDROM. The Activation Code must be changed every three months.
Barcode Labels - Purchased from Ensystex. One roll of barcodes has 500 barcodes. You cannot
use Exterra with these barcodes.
Host Computer
• Running Windows 95 or later
• 500 megabytes of available hard drive space (more needed if you scan site plans)
Printer
• For printing workorders and site plans
• HP laser printer is preferred and fully supported
• Printer with built in "Postscript" is best but is not required
Optional Equipment
Host Computer Barcode Reader (not to be confused with the ExScanner).
• Attached to Host Computer - may be purchased from Ensystex (As you add more sites,
the barcode reader can make data entry much faster and reduce data entry errors if you
do not use an ExScanner)
• Available for purchase from Ensystex.
Flat Bed or Sheet Fed Scanner attached to Host Computer
• For scanning site plans into Exteris - site plans can be printed out at the time of
inspection.
• Additional hard drive space (each site plan occupies up to 2MB at 150 dpi. 100 sites
would occupy 200MB of hard drive space. Very large hard drives are inexpensive. Buy
as large a one as you can afford if you plan to scan sites plans.)
ExScanner
• Field Barcode Scanner
• Eliminates need to swap barcodes
• Does not necessarily eliminate desirablity of Host Computer barcode reader.
• Available for purchase from Ensystex designated supplier.
Installing Exteris
Install Exteris according to the Installation Instructions in the Appendix of this manual.
22
Call 1-888-Exterra for support
Starting Exteris
(You should be here only if you have successfully installed Exteris on your Host Computer
according to the Installation Instructions in the Appendix at the end of this manual).
To Start Exteris - double-click on the "Exteris" icon on your Windows Desktop screen.
Configuration (Required the first time you start Exteris)
Exteris Configuration
Build Number: 2365
Version: Exteris for DOS
Build Date: Wed Jul 15 15:44:31 EDT 1998
Builder: Jason
Operator code: 009892
Branch number: 000
Activation code: 5111081049
Payment type: 1
Company/Partnership/Proprietorship:
Company name at top of Workorder:
Address at top of Workorder:
City/State/Zip at top of Workorder:
Shipping Address:
Shipping City/State/Zip:
Phone Number:
State License/Certification Number:
Contact Name:
The first time you start Exteris you will be taken to the initial configuration screen shown above.
Enter all of the requested information. Your Operator Code and Activation Code are written
on the Exteris Installation Instructions.
NOTE: The Activation Code is good for only a single quarter of the year. It expires on
the first day of every January, April, July and October. Call 1-888-EXTERRA
the week before each expiration date to get your new Activation code. Your
Operator Code never changes.
Export The next step is the initial export of data to Ensystex.
•
•
•
Place a blank, formatted 3.5" diskette in your floppy drive
Follow the instructions on the export screen
Mail this diskette and the signed Certifcation to Ensystex to notify us of your successful
installation.
NOTE: As part of your use of Exterra, you will preform the export process twice a
month. This is an important condition of your use of Exterra.
23
Call 1-888-Exterra for support
Initial Screen
Whenever you start Exteris (after your initial installation), the screen below will appear.
Exterra Information System
Checking for valid configuration...done!
Checking date of last valid export...done!
Checking printer configuration...done!
Checking barcode database...done!
Press ANY key to enter the program
If Exteris finds any problem with your configuration, you will receive an error message like the one
below. You will not be able to continue until the error is corrected. (Call 1-888-EXTERRA for
help.)
Every 3 months, the following error will appear if you have allowed you Activation Code to expire.
New activation codes are given by Ensystex up to 15 days before the expiration of the current
code. You may call Ensystex at 1-888-EXTERRA during this period to receive your new
Activation Code.
Your operator code or activation code has expired.
You should have received an operator code and activation code from
Ensystex when you received this program. The activation code expires
once per quarter on 1 January, 1 April, 1 July, and 1 October each year.
To obtain a new activation code please call Ensystex at 888-EXTERRA.
Please press C to enter the configuration screen to update them
OR
Press E to exit Exteris
24
Call 1-888-Exterra for support
Main Menu
All uses of Exteris begin from the Main Menu shown below. Any part of Exteris is accessible from
this menu. Entering 0 (zero) or pressing <Esc> will exit you from Exteris.
Remember: In Windows you cannot close Exteris by clicking on the "X" in the upper right window
corner until you have exited the program.
Exterra Information System
Main Menu
****************************************************************
1) New Sites (before & after installation)
2) Existing Sites (before & after inspections)
3) Site Information Editor (Modify/Del Sites and Add/Modify/Del Stations)
4) Reports
5) Alter Station Inspection Scheduling
6) Utility Menu
7) Export
8) Help - Helpful shortcut keys here
9) View or Print Exteris Manual
0) Quit Exteris
******************************************************************
Select one of the options <0..9>
Broadly, the use of Exteris is broken down into groups of events that are represented by the first
seven choices shown on the Main Menu.
Option #1 takes you to a submenu from which you create new sites. All new site inforrmation is
entered after making this choice.
Option #2 takes you to a submenu from which you will deal with existing sites.
Option #3 allows you to modify or delete sites or modify individual station information.
Option #4 allows you to print out various reports that summarize your use of Exterra.
Option #5 allows you to, within certain limitations and parameters, affect how often individual
stations are inspected.
Option #7 allows you to launch the routine by which you twice a month export Exterra use data to
Ensystex.
25
Call 1-888-Exterra for support
New Site Menu
Pressing #1 from the Main Menu launches the New Site Menu.
New Site Menu (Before & After Installation)
******************************************************************
1) Computer Generate Installation Workorder (Before Installation)
2) Print Computer Generated Workorder (Before Installation)
3) Enter Installation Data from Installation Workorder (After Installation)
4) Reprint Installation Workorder Batch
0) Return to Previous Menu
*****************************************************************
Select one of the options <0..4>
1) Computer Generate Installation Workorder. (Before Installation)
Choosing #1 from the New Site Menu initiates the process by which you pregenerate a
Workorder before installation. You are not required to pregenerate a Workorder. You many
instead field generate an Installation Workorder by completing a blank Installation
Workorder in the field during site installation. See the Documents on the Exteris CD-ROM
section of this manual for an explanation how to print a blank Installation Workorder that can be
completed in the field. If you field complete an Installation Workorder go directly to option #3 (see
the menu above) to begin the process of inputting data for this new site into Exteris.
Select option #1 does not print your Workorder, it only generates it. Select menu option #2, Print
Installation Workorder, to print the actual Workorder.
Entering Site Information to Pregenerate an Installation Workorder
Site Information for Site Number 00000006
Name Business/Last: DUCK
First: DAFFY
Cust. #/ Acct #: 1234
Route: ABC
Property Street: 222 QUACK LANE
Property City: FAYETTEVILLE State: NC Zip Code: 28305-0000
Property Phone: 910-368-4749
Mailing Street:
PO Box/Route:
City:
State:
Zip Code:
Residential or Commercial structure: R Single or Multifamily: S
Other phone: - Site checksum: 283050006
Job Type: 1
Date Installed: 00/00/0000
Installer #:
Perimeter Linear feet around structure: 1250
Total number of structures at site: 2
Structure currently infested with termites (Y/N): Y
Length of initial coverage term (in years) covered by initial fee: 2
Site Comment:
Line 2:
Line 3:
26
Call 1-888-Exterra for support
The screen above is a screen shot of the data that you are required to enter when you
pregenerate an Installation Workorder. Make sure you have this information about the site you
are intending to input before you begin the pregeneration process. You will also be asked to
enter barcode information. For this reason be sure to have a roll of barcodes available from
which to provide this information. Barcodes are ordered from Ensystex in rolls of 500.
Zip Code: You must enter a 9-digit zip code (ex.64631-4321). You must correctly enter the last 4
digits of the zipcode. You can determine the 9 digit zipcode for any address by accessing the
Postal Service Website at http://www.usps.com/ncsc/lookups/lookup_zip+4.html
Mailing Address: Skip this field if the mailing and property addresses are the same.
Residential or Commercial structure: Enter R if the site is residential, C if it is commercial.
If the site is residential, you will be asked if it is a single famly S or multifamily M site.
Site Checksum: This number is automatically assigned and used by Exteris only.
Job Type: Not accessible at this time. (Input after installation.)
Installation Date: Not accessible at this time. (Input after installation.)
Installer #: Designation (Name or other identifier) of person making Exterra installation. This
may be corrected after installation if the designated installer does not do the installation.
Perimeter Linear feet around structure: Number of linear feet around the perimeter of the
structure(s) at the site. This footage is measured according to the definition in your Exterra
License Agreement.
Simply stated, "Perimeter Lineal Footage" is the distance around the exterior perimeter of
a structure measured one foot above the terrain. Any part of the structure that is EITHER
covered by a roof OR is intended to be stood on by a human and rises at least one foot
above the ground level around the structure is included.
For example, ground level patios without a roof are not included because they do not rise up at
least one foot above the ground. Porches and decks are included because they rise up more than
one foot above the terrain and although they may not always be covered with a roof, they are
intended for a human to stand on and are therefore included. Roofed carports are included
because they are covered by a roof.
Total number of structures at site: External structures such as detached garages and storage
buildings count as separate structures. For example, a house with a detached garage has two
structures.
Structure currently infested with termites: Yes or No. It is critical that this question be
answered correctly as the answer determines the length between site installation and the date of
the first station inspections. Failure to enter this information properly could result in
noncompliance with the Labyrinth label instructions. Be careful.
Length of initial coverage term (in years) covered by initial fee: Defaults to 1 year, but can
be changed depending on what your initial contract term is with this customer.
Entering Number of Stations and Assigning Barcodes
After filling out the site information, Exteris will prompt you for the number of stations you wish to
install at this site and the numbering of the barcodes you have in stock.
27
Call 1-888-Exterra for support
How many stations do you wish to install at site 0000000K (1-500)? 012
First barcode roll -->
first barcode: 0000000001 last barcode: 0000000500
Second barcode roll --> first barcode: 0000000501 last barcode: 0000001000
Third barcode roll --> first barcode: 0000001001 last barcode: 0000001500
Number of barcodes
available: 1000
needed: 18
Is all of this information correct including the number of the first barcode available
on the first roll?
After you have entered the number of stations you are installing, you must then enter beginning
barcode numbers from the rolls of barcodes that you have in stock. By doing this you are
providing Exteris the information it needs to assign barcodes to stations sequentially. It is
absolutely crucial that this information be entered correctly. Always be sure to double
check this information before you proceed! The number of the last barcode on each roll is
always printed on each individual barcode tab in case you lose the initial tab that begins each roll.
If you do not have enough barcodes available to print the Workorders you have entered, you will
be cautioned not to proceed. When a roll of barcodes has been exhausted, the roll below it is
moved up to the next roll position on the screen. At that time it is necessary to enter another roll
as the third roll. (You should keep one month's supply of barcodes on hand.)
NOTE: Exteris assigns 25% more stations to the site than you requested in case you
decide to install extra stations. These can be deleted if they are not installed.
When this information has been entered correctly, you are asked whether or not you wish to
pregenerate another Installation Workorder.
2) Print Computer Generated Installation Workorder (before installation)
This option prints the pregenerated Installation Workorders for which site information was entered
under New Site Menu option #1. If an Installation Workorder is not successfully printed, it must
be reprinted from the Reprint Installation Workorder Batch option also found on this Menu.
3) Enter Installation Data from an Installation Workorder (after Installation)
Entering data from a Pregenerated or Field Generated Installation Workorder
Data accumulated during installations (written on Installation Workorders) during new site
installations is entered here. You will see the following screen whenever you select Enter
Installation Data from Installation Workorder on the New Site Menu. When you answer this
question you are telling Exteris whether you are inputting information from a pregenerated
Installation Workorder for which it holds certain preentered information or from a field generated
Installation Workorder for which you have at this time entered no data for the site.
Enter Installation Data from Installation Workorder
Is this information being entered from a computer
pregenerated workorder (Y/N)?
No: If you answer no this means you are working with a field generated Installation Workorder.
Exteris will prompt you for detailed site information (the same information you enter before
28
Call 1-888-Exterra for support
installation for a pregenerated workorder) and barcode and station serial number information.
Skip to the section below 3b) Entering Installation from a Field Generated Installation Workorder
for an explanation of this process.
Yes: You are signifying that you are entering information from a pregenerated installation
workorder which is covered in the next section.
3a) Entering Installation Information from a Pregenerated Installation Workorder
If you answered "Yes" to the question above, the following menu will appear.
Enter Installation Data from Installation Workorder
Date of installation: 12/02/1999
Route: ABC
Installer #:
Do you wish to edit the site information (Y/N)?
ARE YOU SURE THE ABOVE INSTALLATION DATE IS CORRECT
(Y/N)?
Input barcode and serial number information
Input comments
Do you have any alpha numbered stations to input (Y/N)?
Do you wish to configure this site for individual check periods (Y/N)?
Date of Installation: Be careful to enter the correct installation date. Failure to enter this date
correctly can result in incorrect scheduling of the first inspection and violation of the
Labyrinth Temite Bait Label.
Route: If you have established a route system for Exterra site checks, enter the route number to
which this site is being assigned.
Installer #: Enter data processing number or other identifying term for the installation technician.
If an identifier has been previously entered that is incorrect, it can be changed at this time.
Editing Site Information: Selecting this option takes you to the site general information data
entry screen to enter or correct general site information. This is the same screen at which you
entered information for the site when you pregenerated the Installation Workorder.
29
Call 1-888-Exterra for support
After you verify that the installation date is correct by anwering the capitalized question, you will
be taken to the System Use Subtypes screen.
System Use Subtypes
For a more indepth explanation of System Use Subtypes refer to the System Use and System
Use Subtypes section of this manual.
Initial System Use Sub-type for site 00000012
Choose (1-5) initial system use subtype for which you believe this site
qualifies. All sites qualify as a standard use (1). All other uses
must meet qualifications that are presented after the selection is made.
(1) Standard (2) Preconstuction construction of the site.
(3) Change of Ownership -
Normal system use.
Initial system use at time of
Initial system use at time of transfer of
ownership of site from seller to buyer.
Initial system use at a site at which you
applied a liquid barrier treatment before the
inception date of your Exterra License
Agreement.
Installation of stations at a site at which
you perform general household pest
control. No termite control agreement in
effect on the site.
(4) Liquid Conversion -
(5) Station Only -
Type choice (1-5): 1
Select which type of installation you are performing based on the information in the table above.
When you make a selection, you will be asked a few questions regarding the installation. Based
on your answers to these questions, the system will determine whether the correct System Use
Subtype type has been selected. If a subtype has been selected for which a site is not eligible
the use will be reclassified as a Standard System Use.
Entering barcode and serial number information
Refer to the screen below that appears after you have correctly chosen a System Use Subtype.
Station serial numbers are entered and barcode information is confirmed here. Because you are
entering data from a pregenerated Workorder, station and barcode numbers have already been
entered. Serial numbers for bait bags are entered as "9999999". (Above-ground stations are not
entered into Exteris.)
Note: Alpha stations (extra stations added between number stations) are added later in
the Station Information Editor.
The information entered here was recorded by the technician either on the Installation Workorder
or the individual barcode tabs. If necessary, barcode numbers can be changed or rearranged if
barcodes were placed in the wrong station or the barcodes were lost before installation.
30
Call 1-888-Exterra for support
Type: This refers to the type of station installed. Indicate whether the station is “R”ound or
“S”quare or “A” bove Ground
Barcode and Serial Number Entry
Station Serial Number
------- ------------001. 0000000
002. 0000000
003. 0000000
004. 0000000
005. 0000000
006. 0000000
007. 0000000
008. 0000000
009. 0000000
010. 0000000
011. 0000000
012. 0000000
013. 0000000
014. 0000000
015. 0000000
016. 0000000
Barcode
Type (Round/Square)
-------------- -------------------------0000000001
R
0000000002
R
0000000003
R
0000000004
R
0000000005
R
0000000006
S
0000000007
S
0000000008
S
0000000009
S
0000000010
S
0000000011
S
0000000012
S
0000000013
S
0000000014
S
0000000015
S
0000000016
S
ALPHA NUMBERED STATIONS ARE NOT ENTERED ON THIS SCREEN
Esc to cancel without saving
When an Installation Workorder is pregenerated, station numbers and barcodes are generated for
25% more stations than you have indicated you will install. Press <Enter> to skip over a single
station that was not installed. When you are through entering information for all the stations
that were actually installed at the site, skip over the stations you did not install by entering
<Ctrl><D>. You will see the following message:
All stations for which no serial numbers were entered will be removed!
Done editing (Y/N)?
If you enter "Y", the unassigned stations will be erased leaving only the stations for which you
have entered serial and barcode numbers.
Comments: Station comments are not required but can aid in locating stations. The installation
technician will write comments at the bottom of the Installation Workorder.
Station Comment Editor
Station Comment
------- --------------------------------------------001. station is behind porch
002. station is under deck
003. station is beside doghouse
004.
005.
31
Call 1-888-Exterra for support
Alpha Stations - Alpha stations are additional stations that are placed between previously
installed stations.
They are called alpha stations because they are given the same number as the station next to
them PLUS a letter of the alphabet. For instance, an extra station placed between station 13 and
14 would be called 13A. This scheme is used so that stations added later appear on the
Inspection Workorder in the same order as they are found in the ground around the structure.
Alpha stations are typically entered on an initial installation only when a decision was made to
install an extra station after the installation was thought to be complete and stations had already
been numbered.
Alpha stations are entered from the Station Information Editor. The following menu appears when
you choose to enter alpha stations. The alpha character is entered after the period after the
last number.
Exterra Station Information Editor
Site Number: 00000001
Station Number: 003.A - This number is entered by you
Existing Stations: 002. 004. 007.
Type 000 to create a new station with the next available
Press ENTER when done
32
Call 1-888-Exterra for support
Barcode, Station Serial Number and Comments for Alpha Stations
Station Information Editor
Site Number: 00000006
Station Number: 001.A
Station Barcode: 0000000000
Station Serial Number: 0000000
Installation date: 12/02/1999 Last Inspection date: 12/02/1999
Last Service date: 12/02/1999
Record last updated: 12/02/1999 Next Inspection date: 00/00/0000
On last inspection:
Active termites? N Station baited? N Excessive moisture? N
* All barcode information up to date
* All work order information up to date
Bait Lot: 0000000
Station Type (Round/Square): S
Comments (one line):
Station behind porch
Enter the barcode number and the station serial number here plus any station comments. Only
these three fields (in bold above) may be entered for a station at this time. The other fields cannot
be accessed until the first inspection has been performed.
After you have finished entering information for an alpha station, you are prompted to either enter
another Alpha station or quit. If you enter no, you are finished entering information for this
Installation Workorder.
At this time you are asked if you would like to print an Individual Site Information Report. This
report will allow you to review information that has been input for the site.
33
Call 1-888-Exterra for support
3b) Entering Installation Information from a Field Generated Installation
Workorder
A Field Generated Workorder is an Installation Workorder that was not pregenerated by Exteris.
Instead it was initiated and completed in the field by the installation technician.
The only difference between a field and pregenerated installation workorder is that with a field
generated workorder the technician assigns the barcodes to the stations instead of the computer.
Additionally, the general site information is first entered into Exteris after site installation instead
of before.
The process of entering information from Field Generated Workorders is initiated by pressing #3
from the Installation Menu. Exteris will know you are entering data from a field generated
workorder instead of a pregenerated workorder when you answer no to the following question
that appears when you press 3.
Enter Installation Data from Installation Workorder
Is this information being entered from a computer
pregenerated workorder (Y/N)? N - the information below appears when you enter N
You will now be transfered to the Site Editor to enter the new site
information. After you complete that screen you will be
transferred to the Station Editor to input the new stations.
Be sure you have all the necessary information including the completed
installation workorder and barcode tabs
Press any key to enter the Site Editor
Be sure you have all the necessary documents, including the Installation Workorder (and the
barcode tabs if the barcode numbers have not been written on the Installation Workorder).
For directions on completing the entry of site information, return to the beginning of the
Installation SubMenu Section above. After you have review this section return here to continue
within entry of station information.
Entering Individual Station Information
Here you must enter information for each station you have installed.
Exterra Station Information Editor
Site Number: 00000006
Station Number: 001. - number that you enter
Existing Stations:
Type 000 to create a new station with the next available
Press ENTER when done
34
Call 1-888-Exterra for support
Station Information Editor
Site Number: 00000006
Station Number: 013.
Station Barcode: 0000000000
Station Serial Number: 0000000
Installation date: 12/02/1999
Last Inspection date: 12/02/1999
Last Service date: 12/02/1999
Record last updated: 12/02/1999 Next Inspection date: 00/00/0000
On last inspection:
Active termites? N Station baited? N Excessive moisture? N
* All barcode information up to date
* All work order information up to date
Bait Lot: 0000000
Station Type (Round/Square): S
Comments (one line):
After you enter a station number, you are taken to the Station Information Editor to enter barcode
number, station serial number and station comments. Note that some fields cannot be accessed
here. These fields will be updated later when you enter information from an Inspection
Workorder.
All stations, including alpha stations, are entered at this time.
After entering information for each station, you are asked whether or not you want to enter
information for another station. If you enter "Y", you are taken back to the top of the same screen
to enter data for another station. Answer "N" if information for all installed stations has been
entered.
Individual Site Information Report
You will be asked if you would like to print an Individual Site Information Report. This report will
allow you to review information that has been input for the site.
35
Call 1-888-Exterra for support
4) Enter New Site Information Collected with ExScanner
Entering a new site from information collected with an ExScanner is very similar to entering data
from a Pre-generated Installation Workorder. However, instead of entering the data, you are
mostly asked to confirm the data that was entered in the field.
5) Reprint Installation Workorder Batch
This option reprints batches of Installation and Inspection Workorders if they failed to print from
their respective menus. This is the only way to reprint Installation Workorders. Installation
Workorders cannot be reprinted individually.
When you choose this menu option, you are given a choice between reprinting Installation
Workorders or Inspection Workorders.
Reprint
Reprint
Reprint last printed:
1 for Installation Workorder Batch
3 for Inspection Workorder Batch
36
Call 1-888-Exterra for support
Existing Sites Menu
Exterra Information System
Existing Sites (Before & After Inspections)
***********************************************************************
1) Generate Inspection Workorders (Before Inspection)
2) Reprint All Inspection Workorders (Batch - Use for printing problems)
3) Reprint Individual Inspection Workorder
4) Force Generate Workorder (Special Case - Generate Before Due Date)
5) Process Inspection Data from ExScanner (After HotSync - Before #6 & #7)
6) Process Turned In Barcodes (After Inspection) (not Barcode Tabs)
7) Enter Inspection Data from Inspection Workorder (Only after #5 & #6)
0) Return to Previous Menu
The menu above is the Existing Sites Menu. It is accessed by pressing #2 from the Main Menu.
The functions that are accessed by this menu are the most important functions of Exteris. They
are related to the maintenance and regular inspection of Exterra sites.
(If you are using an ExScanner, certain of the following inspection workorder routines
related to the processing of barcodes are omitted.)
1) Generate Inspection Workorders (Before Inspection)
Inspections are automaticaly scheduled by Exteris for each site based on the following factors:
•
•
•
•
Requirements of the Labyrinth Termite Bait Label (the label designates maximum
intervals between station inspections).
Whether or not you have reduced the length of the default check periods. These are set
from the Main Menu when you choose Alter Station Inspection Scheduling.
Presence or Absence of Termite Activity at Site at time of Installation (entered at the time
the site was initially input into Exteris). This affects station inspection scheduling for only
first 90 days after installation.
Whether or not the Period of Predicted Limited Activity is occuring and you have elected
to adhere to the suspension of station inspections provided for by this Period for all sites
or for individual sites. Modifications to the Period of Predicted Limited Activity are made
from the Main Menu by choosing Alter Station Inspection Scheduling.
A proper inspection of an Exterra site involves three things:
• Proper use of Exterra components.
• Review and recording of information for each site inspected.
• Use of an inspection verification method that reasonably assures that inspections are in
fact being done.
Exteris helps increase the likelihood that the firs item is being done by providing you with a easy
to use summary of station information collected during prior visits to the site (Inspection
Workorder), a place to efficiently record current conditions in the station (Inspection Workorder)
and a selection of inspection verification methods (barcodes or ExScanner). The inspection
process begins with the generation of the Inspection Workorder as explained below.
37
Call 1-888-Exterra for support
Generate Inspection Work Orders and Barcodes
Today's date 03/13/2000
Generate workorders due on or before: 03/13/2000
Generate work for All routes or Individual route (A/I):
Route to generate work for:
Generate for ExScanner field barcode scanner (Y/N)?
Number of Zip+4 digits to do route prediction on (0-4)? 2
Number of days to look ahead for route prediction (0-9)? 5
Do you wish to print site plan scans (Y/N)? N
First barcode roll --> first unused barcode:
last barcode:
Second barcode roll --> first unused barcode:
last barcode:
Third barcode roll --> first unused barcode:
last barcode:
Number of barcodes
available:
needed:
Number of sites
new inspect:
expired:
Are you ready to generate the work orders? (Y/N)
Please be sure the first barcode available on the first barcode roll is
correct
Today's date: If today's date is not correct, do not proceed! Exit Exteris and set the date in your
computer. In Windows 95/98 this can be done by clicking on the time in the lower right hand
corner.
Generate workorders due on or before: Exteris uses this date to select sites for which to
generate inspection workorders. All sites due for their next inspection on or before this date have
workorders generated for them. If you enter a future date from today, all sites due for inspection
between the last time workorders were generated and the date you enter will be generated.
Using a future date may be particularly convenient if you have a service technican who comes
into the office on an irregular basis.
Generate work for All routes or Individual route (A/I): You can choose to generate work for a
single route or generate all workorders for the time period you enter.
Route to Generate Work for: Enter the number of the route for which you want to generate
Workorders.
Generate for ExScanner Field Barcode Scanner: If you make this choice, an Inspection
Workorder is created, however no barcodes are assigned to the stations. (This field appears on
the screen only if you have told Exteris that you have an ExScanner. To do this go to the Main
Menu and select the Utility Menu. From this menu select ExScanner configuration.)
38
Call 1-888-Exterra for support
Number of Zip+4 digits to do route prediction on (0-4): Exteris will make your site checks
more efficient by helping you inspect sites that are close together at the same time. It uses the
last 4 digits of the zip code to determine which sites are in close proximity with one another. You
tell Exteris how large of a geographic area to search by selecting how many of the Zip+4 digits to
use. The more Zip+4 digits you enter, the smaller the search area will be. For example, if you
enter "2", Exteris will search sites located in the zip codes 64631-4300 through 64631-4399.
Number of days to look ahead for route prediction (0-9): The next step is to decide the
number of days ahead that you would like Exteris to consider moving up inspection due dates.
You do this by entering a value (number of days), not to exceed 9. For example, you enter a
number of days value of 5. Based on this value, Exteris would then take the sites located in the
zip codes 64631-4300 through 64631-4399 and determine if they had an inspection due within 5
days of the date for which you are generating workorders. Though the other sites are not due for
inspection today, you may inspect them a few days early to cut down on the amount of driving
between sites.
(This feature will be most valuable after you have developed a large number of sites.)
Do you wish to print site plan scans (Y/N): ExScan users may print site plans at this point.
(See ExScan section for a complete explanation of ExScan.)
Barcodes: Verify barcode information as it appears on the screen. It is very important to verify
the number of the first barcode you are planning to use. This ensures that the barcodes will be
assigned to the stations correctly. If you are using only ExScanners, you do not need barcodes in
order to proceed.
Are you ready to generate the work orders and labels? (Y/N): The number of the barcodes
assigned to each Workorder are printed at the bottom of each Workorder.
Remember: If the Workorders fail to print, they must be reprinted from the Inspection Menu
using either the Indivdual or Batch Inspection Workorder Reprint options
39
Call 1-888-Exterra for support
2) Reprint All Inspection Workorders (Batch – Use for Printing Problems)
This option reprints both batches of Installation and Inspection Workorders if they failed to print
from their respective menus. When you choose this menu option, you are given a choice
between reprinting Installation Workorders or Inspection Workorders.
Reprint
Reprint
Reprint last printed:
1 for Installation Workorder Batch
3 for Inspection Workorder Batch
Remember: You cannot print a Workorder that has not been generated. Workorders
must be generated by choosing that option on the respective SubMenu.
3) Reprint Individual Inspection Workorder
Use this option to reprint individual inspection workorders (Installation workorders are not
reprinted from here. Refer to the Installation SubMenu).
Reprint ZZInspection Workorder
This routine will reprint any outstanding ZZInspection Workorder.
Installation workorders can not be reprinted from here. They must be
Reprinted as a batch from the batch reprint option.
Site to reprint workorder for: 00000000
Do you still have the barcodes for that workorder(Y/N)? N
Do you wish to print the site plan (Y/N)?
Site to reprint workorder for: Enter the site number
Do you still have the barcodes for that workorder: If a workorder is destroyed but the
barcodes are still in hand, you may answer “Y” to use the barcodes. If both the barcodes and
workorder are lost, you would answer "N" to field-assign barcodes.
Do you wish to print the site plan:
answering "Y" to this question.
ExScan users may choose to print the site plan by
40
Call 1-888-Exterra for support
4) Force Generate Inspection Workorder (Special Case - Generate Before Due
Date)
This option allows you to force a workorder to become due for a site regardless of when its next
inspection is scheduled. This means that anytime you need to perform an unscheduled
inspection of a site you can force a workorder to be generated on which you can record the
results of the inspection. Remember, you cannot force an inspection workorder to be generated if
there is currently an outstanding workorder for that site that has not been closed out.
Force Generate an Inspection Workorder
This screen will allow you to generate a forced work order for any site that exists
(meaning fully installed and not deleted) which does not currently have a workorder
outstanding for it. If you are not sure if a site currently has an outstanding workorder,
please run the Site Check Date Forecaster from the report menu and look at the
site on that report.
Site to generate work order for: 00000000
Generate work for (A)ll stations or (B)aited stations (A/B)? A
Do you wish to print the site plan (Y/N)?
First barcode roll --> first barcode: 0000000026 last barcode: 0000000500
Second barcode roll --> first barcode: 0000000501 last barcode: 0000001000
Third barcode roll --> first barcode: 0000001001 last barcode: 0000001500
Number of barcodes available: 1475
needed: 0
Site to generate work order for: Enter Site number.
Generate work for (A)ll stations or (B)aited stations (A/B)?: Select which stations for which
you wish to force generate a workorder.
Do you wish to print the site plan (Y/N): ExScan users may choose to print the site plan by
answering "Y" to this question.
Barcodes: Make absolutely sure that barcode numbers are correct before proceeding.
41
Call 1-888-Exterra for support
5) Process Inspection Data Transferred From ExScanner (After Hotsync - Before
#6 and #7)
Before ExScanner data is processed, it must be transferred from the ExScanner to the Host
Computer. If you have any questions about how this is accomplished, refer to the Uploading
ExScanner Data to the Host Computer section of this manual.
Once all data from all ExScanners has been transferred to the Host Computer, Exteris can begin
processing this data. This process is initiated when you press #3 from the Inspection SubMenu.
Exteris processes ExScanner data for sites in site number order. Each site for which ExScanner
data has been transferred will sequentially appear in the box below.
Process ExScanner Inspection Data
Site: 00000218
Stations with valid inspections: 004. 003. 002. 001
New stations: 007
Press any key to continue
The box above appears if all data for that site that has been scanned is in order and there are no
exceptions for that site. When you press any key to continue the box below appears. This box
remains on the screen for as long as it takes Exteris to record this information for that site.
Process ExScanner Inspection Data
Site: 00000218
Saving inspections
Adding new stations.
Done. Press any key to continue.
When Done. Press any key to continue appears, the data recording process is complete for that
site.
42
Call 1-888-Exterra for support
With the ExScanner there is only one possible inconsistency in data that can be pinpointed and
resolved at the time of data processing. Whenever a barcode is scanned with an ExScanner, the
technician is asked to confirm that the barcode was found within a certain station (station the
barcode is in according to the data in the Host Computer). If a barcode is scanned and is
confirmed as having been present in a station at that site and that barcode is not assigned to a
station at that site within Exteris, the following screen will appear. (When this screen appears it
means that either the technician has not been careful enough in signifying the site and station at
which the barcode was scanned or the site and station are correct but the initial installation of the
barcode in this station was not properly entered into Exteris. Regardless of the reason for the
inconsistency of the data, you are given a chance to correct the data on the following screen
which appears when Exteris finds such an inconsistency.
Process ExScanner Inspection Data
Site: 00000218
Stations with no data (Stations scheduled for inspection have an * in front of them):
*005. 006. *007
Unable to find the station for barcode 5200705870
From the station number list above pick the station with which to associate the data
collected with this barcode or enter 000 to discard the data for this barcode.
Station number to associate this data with: 000.
When this screen appears, you must attempt to correct the discrepancy by identifying which
station the barcode actual belongs to (and by association which station the data was collected
for). The first thing to notice on this screen is that the number for all stations at that site for which
data has not yet been input appear on the screen. The stations that were scheduled for
inspection during this inspection are preceded by an asterisk as these are the stations that it is
most likely the data was collected from. It is from these stations that you must choose which
station to associate the barcode and data with.
To attempt to associate the barcode and the data with the correct station, either ask the
technician for clarification or examine the workorder turned in by the technician for evidence of
what might have been the problem. If you are unable to identify the correct station, you can
discard the data by entering 000.
43
Call 1-888-Exterra for support
6) Process Turned In Barcodes (After Inspection) (not Barcode Tabs)
(If you are processing workorders generated for use with an ExScanner, this section is not
applicable to these workorders).
Barcodes can be entered into Exteris two ways:
• Scan using a barcode reader. Using this method, barcodes may need to be wiped clean
to ensure they scan properly.
• Enter the barcode number using the keyboard or keypad. This is used if you do not have
a barcode scanner or if a barcode will not scan.
All barcodes that have been turned in for all sites are scanned or keyed in a single batch at one
time. There is no need to enter the barcodes in any particular order. The barcode entry process
begins with the menu below.
Barcode Entry
Last Barcode:
Status:
Barcode:
Type or scan "END" when finished
If you attempt to enter a barcode that has not been previously entered into Exteris, it will be
rejected.
Remember: It is OK to intermingle barodes are they are input.
44
Call 1-888-Exterra for support
7) Enter Inspection Data from Inspection Workorder (Only after #5 and #6)
(If you are using an ExScanner, this section is not applicable to your use of Exteris).
The second step of entering inspection data is to enter the actual data that has been recorded on
the workorder. This is done only after the barcodes have been scanned. In order to be eligible for
inspection data input, "proof" must be turned in by the technician that an inspection actually
occurred. Absent such "proof", inspection data for a station cannot be input. This requirement is
based on a need to maintain, at the highest level possible, the integrity of the data that is input.
Ideally, when a technician visits a station, the station is found to be in place and the barcode left
in the station during the last inspection is found within the station. This barcode is removed from
the station and the new preassigned replacement barcode is left in its place. At that time the
station is serviced and the conditions found in the station are recorded on the Inspection
Workorder. If this sequence of events occurs, three pieces of evidence, in addition to the
inspection data recorded on the Workorder, should be available. These are:
1) A checkmark on the station line on the Inspection Workorder beside the old barcode
number in column 7. This signifies that the old barcode was collected from the station.
2) A checkmark on the station line on the Inspection Workorder beside the new barcode
number in column 9. This signifies that the new barcode was placed in the station.
3) Old barcode turned in and input into Exteris (scanned or keyed in).
If these three things have been done, processing of information for that station that was entered
on the Workorder by the technician (if any) can proceed normally. However, sometimes for
whatever reason, these three events do not occur. If they do not occur, this does not mean that
the technician has not done all he can to make sure the station was serviced properly. Reasons
include the technician not being able to find the station, old barcode not being found in the station
or station missing. Additionally, stations that were not scheduled for inspections but were
inspected must be dealt with. All of the different possible scenarios concerning station inspection
that must be dealt with are summarized below.
What has been entered on the Workorder
Old barcode
turned in
What is concluded
from what has been turned in
Scheduled Inspection completed
Column 7 checked
Column 9 checked
Yes
Station was checked
New barcode was installed
Unscheduled Inspection or Replacement Workorder Used
Column 7 checked
Column 9 not checked
Yes
Station was checked
Postassigned barcode in column 15
Yes
Proof station was checked
Preassigned barcode misplaced
Postassigned barcode in column 15
No
Old barcode missing
Station checked, new barcode installed
Station still in place
No
Old barcode missing
New barcode installed in new station
New station installed
Scheduled Inspection - replacement barcode lost
Column 7 checked
Column 9 not checked
Postassigned barcode used instead of new preassigned
Inspection completed - old barcode missing
Column 7 not checked
Column 9 checked
No new station serial number in column 16
Station and old barcode missing - new station installed
Column 7 not checked
Column 9 checked
New station serial number in column 16
Inspection not completed (various reasons)
45
Call 1-888-Exterra for support
Column 7 not checked
Column 9 not checked
No
Station was not checked
Barcode presumably still in station
Beginnning the Inspection Data Entry Process
Inspection Workorder Data Entry
Site to enter data for: 00000001
Date of inspection: 12/09/1998
The first step of entering data for a site is to enter the site number and the date of the inspection
as shown above.
Inspection Workorder Date Entry Screen
Enter due date from the work order you are entering: 07/02/1999
The next step is to enter the due date of the workorder. This is a way to help verify you have the
correct workorder available for data entry instead of an expired or prior workorder for this site.
Reconciling missing barcodes for stations scheduled to be inspected
Reconciling barcodes turned in for stations not scheduled for inspection
The next step is the reconciliation process. Fortunately Exteris is designed to help you quickly
sort through all the different scenarios charted above without having to think about which scenario
a station fits.
Exteris checks for stations that were scheduled to be inspected at that site during this inspection.
If a barcode for a station that was scheduled to be checked is turned in, Exteris marks that station
as eligible for inspection data input without any further reconciliation. (It is assumed that the
preassigned replacement barcode was placed in the station. If a barcode other than the
preassigned one was put in a station, this information is entered at a later time in column 15).
Exteris also makes a note of barcodes that were turned in for stations that were not scheduled to
be inspected.
If a station was scheduled to be checked and the barcode left in the station during the last
inspection was not scanned or keyed when barcodes were scanned, this must be reconciled. This
means you must either input an exception for the barcode not being retrieved or a serial number
for a replacement station (the new station serial number is assumed to be confirmation that the
old station and old barcode were lost).
In order to input data for a station that was checked that was not scheduled to be checked, the
number of a postassigned replacement barcode must be input before data input can be allowed.
Once all this is done, these stations (station scheduled for inspection for which an "old" barcode
was not input and stations not scheduled for inspection for which an "old" barcode was input) are
"cleared" for data input. If these things are not done, then data cannot be entered for these
stations.
The reconciliation process for exception stations at a site are handled on the following screen.
The station numbers are displayed along with entry area for data that will qualifiy the station for
data entry.
46
Call 1-888-Exterra for support
Inspection Workorder Exception Screen
Enter X in column 9 below if column 9 on W. O. is marked (X or checked)
Enter barcode # in column 15 only if barcode # appears at 15 on W.O.
Enter station serial # in column 16 only if serial # appears at 16 on W. O.
(01) (09)
001.
002.
003.
(15)
(16)
0000000000
0000000000
No exception
Old barcode not scanned
Old barcode not scanned
0000000
0000000
Three types of data are considered as "proof" of station inspection and are entered on the screen
as shown above.
1. A check beside column 9 signifying that a new barcode was put in station. You must
enter an “X” here if an “X” appears in this blank on the Workorder. (You cannot access
this field for a station that was not scheduled to be inspected since no replacement
barcode was printed in column 9 on the Workorder).
2. A postassigned barcode number entered in column 15.
3. A new station serial number entered in column 16.
After these entries are made, Exteris permits data entry if the data entered satisfies the
conditions. If the data is not satisfactory, data entry is not permitted for the stations for which data
is not satisfactory.
Entering Inspection Data from the Workorder
Now that you have entered and reconciled the barcodes for stations that have been checked, you
are ready to begin entering data recorded on the Inspection Workorder by the technician.
A screen as shown below will be displayed for the site that lists all of the stations at the site.
Although all stations are listed on the screen, data can be entered only for those for which a
barcode has been turned in (or the failure to turn in the barcode has been reconciled or explained
on the previous screen).
Inspection Workorder Data Entry Screen
Enter the data from the following columns on the Inspection Work Order
(or barcode tab) for site 00000001.
(01)
#001.
!#002.
! 003.
004.
(11) (12) (13) (14)
*
*
*
*
*
*
(10)
00
00
00
00
(15)
0000000000
0000000000
0000000000
0000000000
Esc to cancel without saving
(16)
0000000
0000000
0000000
0000000
(01)
001.
002.
003.
004.
Ctrl-X to skip to next line
Next, simply enter the data from the columns on the workorder. Move between the fields by
pressing the enter key. You can move to the next line by entering Ctrl-X at any time.
Symbol explanations
47
Call 1-888-Exterra for support
! - Old barcode was not turned in.
# - Data has been properly reconciled for a station and data can be entered (either barcode was
turned in or failure to turn in barcode was reconciled).
If this symbol does not appear in front of a station number, data cannot be entered unless
a postassigned barcode is placed in column 15.
* - Data can be entered.
This screen is also designed to handle odd situations you may encounter. For example, you
check a station not scheduled to be checked but the old barcode is missing from the station. You
are not given an opportunity to input the postassigned barcode on the prior screen, however you
may input the information on this screen.
When you are finished entering data for exisiting stations at a site you are then asked whether or
not you wish to add new stations or delete stations.
When you are finished with all the stations at a site, you have completed the data entry process
for that site for that inspection.
Site Discrepany Report
You can now generate a report for the site that lists all of the "exceptions" that were entered so
that you may "reconcile" the fact that the normal sequence was, for some reason, not followed for
a station.
These reports should be given to supervisory personnel for their review. If certain technicians
generate too many exceptions, this may be an indication that inspections are not being done
properly.
48
Call 1-888-Exterra for support
Site Information Editor (Modify/Del Sites and
Add/Modify/Del Stations)
This Editor is accessible from the Main Menu. It is within the Site Editor that, generally speaking,
any data that has been previously entered can be amended. Use of the Site Editor begins by
entering the site number. Once this is done and the existence of that site has been validated, you
may delete the site, modify information for the site or modify information for individual stations.
Almost any data for a site or station can be modified here including information for individual
stations.
Site Information Editor
Site Number: 00000000
Customer Name:
Phone:
Enter a site number to change information about that site
Press ENTER to return to the menu
Site Number: Enter site number for the site you wish to edit. At this time you can choose to
work with site information or individual station information. If the site has only been pregenerated
but no data has been entered, the following screen will appear:
Site Information Editor
Site Number: 00000002
Customer Name:
Phone:
Site not yet installed. You must complete installation before editing.
Do you wish to delete this site (Y/N)?
If you want to delete the site, enter "Y".
49
Call 1-888-Exterra for support
Site Information Editor
Site Number: 00000001
Customer Name: Bugs
Bunny
Phone: 910-484-5566
What do you wish to do with this site:
M to modify this site (customer information)
D to delete this site
U to suspend / unsuspend site
P to disable /enable PLA for this site
C to change station check periods for this site
S to move to Station Information Editor (add/modify/delete
stations)
W to work with another site
Choice:
Enter a site number to change information about that site
Press ESC to return to the menu
Modifying A Site: If you choose to modify this site by choosing "M", you will be taken to the site
editor screen.
Deleting A Site: You can delete a site at any time. If you are deleting a site that was
pregenerated but was not actually installed, the screen shown below will appear. Delete the site
by answering "Y".
Site Information Editor
Site Number: 00000002
Customer Name:
Phone:
Site not yet installed. You must complete installation before editing.
Do you wish to delete this site (Y/N)?
Enable/Disable PLA for the Site: If the period of limited activity (PLA) is enabled for the zip code
in which a site is located, inspections will not be scheduled for that site during the PLA for that zip
code unless you disable the PLA for that individual site by choosing this option. This feature
allows you to keep on checking selected individual sites for which you disable the PLA while
using the PLA for all other sites in that zip code.
50
Call 1-888-Exterra for support
Suspending/Unsuspending a Site: This places a site "on hold" without deleting it. No
Workorders will be generated for a suspended site as long as it is suspended. For example, you
may wish to suspend sites due to delinquent payments. You can unsuspend sites using this
same menu option. Suspended sites are listed on the Site Check Date Forecaster Report.
Configure individual check period - This option allows you to change the baited and unbaited
station check periods for a particular site. The values you choose may not exceed the maximum
check periods provided for on the Labyrinth Termite Bait label. Use this option to create shorter
check periods for jobs due to the circumstances at that individual site or contractual obligations to
perform such checks more often. The global check periods for all sites are set from and can be
changed from the Configuration option on the main menu.
Station Information Editor: If you need to modify station information (add or delete stations or
change existing information), entering S will move you to the Station Information Editor.
Exterra Station Information Editor
Site Number: 00000001
Station Number: 001.
Existing Stations: 001. 002.
What do you wish to do with this station:
M to modify this station
D to delete this station
W to work with another station
Choice:
Type 000 to create a new station with the next available
Press ENTER when done
51
Call 1-888-Exterra for support
Modify Station: The following screen allows you to modify any station information:
Station Information Editor
Site Number: 00000006
Station Number: 013.
Station Barcode: 0000000000
Station Serial Number: 0000000
Installation date: 12/02/1999
Last Inspection date: 12/02/1999
Last Service date: 12/02/1999
Record last updated: 12/02/1999 Next Inspection date: 00/00/0000
On last inspection:
Active termites? N Station baited? N Excessive moisture? N
* All barcode information up to date
* All work order information up to date
Bait Lot: 0000000
Station Type (Round/Square): S
Comments (one line):
Delete Station: Removes station information.
Work with another Station: Allows you to edit information for a different station.
52
Call 1-888-Exterra for support
Reports
The Reports Menu, accessible from the Main Menu, provides you with a wide selection printed or
screen viewable reports related to your use of Exterra. Some reports are useful in confirming the
correctness of the data you have entered into Exteris. Other reports help you configure the
intervals between station inspections. Other reports help you analyze the progress of Exterra in
helping control termites at individual sites and stations.
Exterra Information System
Report Menu
******************************************************************************
1) Site Check Date Forecaster
2) Site Discrepancy Report
3) Pending Site Installation Report (Lists open pregenerated WorkOrders)
4) Individual Site Information Report
5) Check Period Configuration Report (Display non-standard check period sites)
6) Individual Station Information Report
7) Maintenance Fee Due Date Report
8) System Use Summary Report
0) Return to Previous Menu
******************************************************************************
1) Site Check Date Forecaster
One of the most useful reports available from Exteris is this report. This report provides a listing
of all your sites sorted in one of three orders you choose.
Note: Print a copy of this report frequently to make sure inspections are current.
2) Site Discrepancy Report
Lists sites for which barcodes have been scanned but workorder information has not been input.
Print this report often to make sure that all Inspection Workorders have been processed.
3) Pending Site Installation Report (List open pregenerated workorders)
Lists sites for which a pregenerated installation workorder has been created but no installation
data has been entered. Print this report often to may sure all pregenerated sites have been
entered.
4) Individual Site Information Report
Provides a summary of the most up-to-date information for a site. Print this report anytime you
want a summary of the information for a particular site.
Note: The next inspection date in column 7 on the report for each station is according
to the Labyrinth label instructions. For this reason, there may be several different
inspection dates for baited stations (and unbaited stations if they were installed at
different times.)
53
Call 1-888-Exterra for support
Whenever the first station(s) due for inspection come due, Exteris will adjust the
inspection date of stations scheduled to be checked within the next 30 days after that
date forward so that those stations are checked at the same time as the first station(s)
to become due.
5) Check Period Configuration Report (Display non-standard check period sites)
Select this option to print out a list of sites at which the check periods have been configured
individually. Print and review this report to confirm that these individual site check periods, if any,
have been entered correctly.
6) Individual Station Information Report
Print out this report whenever you want to review in depth data on an individual station.
7) Maintenance Fee Due Date Report
Print out this report for a list of sites with their next Maintenance System Use Fee due date.
8) System Use Summary Report
Prints a report that summarizes your use of Exterra. The report is self explanatory.
54
Call 1-888-Exterra for support
Alter Station Inspection Scheduling Menu
Exterra Information System
Alter Station Scheduling Menu
***************************************************************
1) Configure check periods and work order expiration
2) Configure Period of Predicted Limited Activity
3) Colony Elimination (switch stations back to unbaited status)
4) Convert Station Only System Use to Standard System Use
0) Return to Previous Menu
****************************************************************
1) Configure Check Periods and Workorder Expiration
See the Labyrinth label to review the importance of these check periods.
Configure Exteris Check Periods and Work Order Expiration
Check Period for Baited SQUARE Stations
Check period for first 3 insp. (max 30 days) :30
Check period after first 3 insp. (max 45 days) :45
Check Period for Baited ROUND Stations
Check period for 1st inspection (max 90 days) :90
Check period after 1st inspection (max 90 days):90
Check Period for Unbaited SQUARE and ROUND Stations
Unbaited period (maximum 90 days)
:90
Work Order Expiration
Expiration in days (07-30 days)
:30
To configure check periods for or suspend individual sites use the
Site Information Editor.
Check Periods: The length of each of these three periods can be decreased, however they
cannot be increased beyond the maximum values shown above.
NOTE: Do not change these values without consulting with someone authorized to
make such a modification. Changing these values impact inspection workloads
and intervals between site inspections. Such adjustments may or may not be
applicable to your sites based on various factors.
Workorder Expiration: This is the number of days from the workorder inspection due date until
the workorder expires. Whenever a workorder expires, its can no longer be entered into Exteris.
Whenever a workorder expires, a new workorder is generated automatically whenever
workorders are generated. When the new workorder is generated, no barcodes are assigned to
the stations. Instead the barcodes must be manually assigned using unassigned barcodes. The
barcode numbers are written in column 15 of the Workorder.
55
Call 1-888-Exterra for support
2) Configure Period of Predicted Limited Activity
For an explanation of the Period of Predicted Limited Activity (PPLA) refer to the Period of
Predicted Limited Activity section towards the beginning of this manual.
Exterra Information System
Period of Predicted Limited Activity Menu
**********************************************************************
1) Enable/Disable PPLA system
2) Configure PPLA for Individual Zipcode
3) Print PPLA by Zipcode report
0) Return to Previous Menu
*********************************************************************
Select one of the options <0..3>
Periods of Predicted Limited Activity (PPLA) are globally configured from this SubMenu. PPLAs
for individual sites may be configured from the site editor.
1) Enable / Disable PPLA System
Enable/Disable Period of Predicted Limited Activity
When ENABLED the Period of Predicted Limited Activity suspends station
Inspections during the period of decreased termite activity.
When DISABLED the system will ignore the Period of Predicted Limited
Activity for all zipcodes. Inspections will be scheduled normally.
The Period of Predicted Limited Activity is currently ENABLED
Do you wish to DISABLE the PLA system (Y/N)? N
To use the PPLA system, you must enable it. Before enabling the PLA system, run the PLA by
Zip Code Report (Menu Option #3) to make sure you understand the length of the periods during
which station checks will be suspended.
Rember, you can alter the lengths of the PPLA for individual sites however this is done from the
Site Editor.
56
Call 1-888-Exterra for support
2) Configure PLA for Individual Zip Code
Period of Predicted Limited Activity Individual Zipcode Configuration
Use this screen to shorten or disable the PLA for sites within a zipcode. When
you enter a zipcode you will be given the default Beginning (Cooling) and
Ending (Warming) dates for the PLA for that zipcode and the Maximum PLA
Period Length in days. You may shorten the PLA for either or both baited
and unbaited stations for all sites in this zipcode. To do this, enter
any number less than the Maximum PLA Period Length for each type of station.
To completely disable the PLA for each type of station for that zip code
(to keep checking stations) enter a PLA of 000. You may disable PLA for
an individual site from the site editor.
Zip Code (press ENTER to exit): 00000
Beginning (Cooling) Date: 00/00/0000 Ending (Warming) Date: 00/00/0000
Maximum PLA Period Length: 000
UNBAITED STATIONS - PLA Period Length:
Beginning Date: 00/00/0000 Ending Date: 00/00/0000
BAITED STATIONS - PLA Period Length:
Beginning Date: 00/00/0000 Ending Date: 00/00/0000
Zip Code (press ENTER to exit): Enter the zip code for which you wish to adjust the PPLA
UNBAITED STATIONS – PLA Period Length: You may adjust the length to be shorter than the
default maximum PPLA but not longer. Exteris will automatically adjust the Beginning and Ending
Dates based on the length of the PPLA you enter.
BAITED STATIONS – PLA Period Length: The PPLA for baited stations must be less than or
equal to that of unbaited stations. Again, the system will adjust the Beginning and Ending Dates
after you designated a length of the period.
3) Print PLA by Zipcode Report
Print the PLA by Zipcode Report to determine what the default PLAs are for the zip codes in
which you have sites. A sample follows:
57
Call 1-888-Exterra for support
3) Colony Elimination (switch stations back to unbaited status)
According to the type of station you may be using (round or square) and/or check period settings
you may have chosen, the length of the interval between baited station inspections may be less
than that for unbaited station. If this is the case then whenever a baited station becomes
unbaited again there must be a routine to notify Exteris of this change. What follows is that
routine.
Presumed Colony Elimination or Not?
When a station is baited the length of the check period for that station is automatically changed
from that of unbaited station to baited station. Whenever termite activity disappears from a
station for more than 60 days this station will begin appearing on a Feeding Cessation Report
(you are prompted on a regular basis to print out this report). You are then asked to select
stations on this list that youi believe merit designation as stations from which colonies have been
eliminated.
Once you decide to presume colony elimination in a station, you are asked to confirm this to
Exteris. Once you have confirmed it, Exteris reverts the station back to unbaited status. Once
this is done, the check period for the station is restored to that of unbaited station.
Whenever you select this menu option from the Alter Station Inspection Scheduling Menu, the
following notice appears. It is important that you read this notice carefully before proceeding.
This notice contains information that helps you understand what you must do to correctly proceed
with the process of presumed colony elimination.
IMPORTANT INFORMATION
PLEASE READ BEFORE USING COLONY ELIMINATION MENU
On the next menu choose item number one to print the Feeding Cessation
Report to review stations at which termite activity has been previously
found, but no activity has been present for at least 60 days. After
reviewing this report select stations at which you believe presumed colony
elimination may have occurred. Then choose menu item number
two to switch the checkperiod of this station back to that of an unbaited station.
If you choose not to presume colony elimination has occurred, the
station will remain on the Feeding Cessation Report until colony
elimination is presumed or termite activity is marked on a subsequent
work order as having reappeared.
Press any key to continue
58
Call 1-888-Exterra for support
Exterra Information System
Colony Elimination Menu
**********************************************************
1) Print Feeding Cessation Report
2) Confirm Presumed Colony Elimination Screen
0) Quit
**********************************************************
Select one of the options <0..2>
1) Print Feeding Cessation Report
This option prints a list of stations that are candidates for presumed elimination based on the
absence of termite activity from the station for at least 60 days. Use the information that appears
on this report to help you decide whether you think it is reasonable to conclude that colony
elimination may have occurred. Once you have selected stations at which you believe colony
elimination has occurred, proceed to the confirm this elimination with the next routine.
2) Confirm Presumed Colony Elimination Screen
Enter the site number and station number for stations at which you believe colony elimination has
occurred. Proceed according to the directions. Once you have confirmed presumed colony
elimination, an “@” is printed next to the station number on the workorder until any
remaining bait in the station is removed and the interceptors are replaced.
4) Convert Station Only System Use to Standard System Use
This routine is accessible from the Data Entry SubMenu.
Refer to the System Use and System Use Subtypes section of this manual for an explanation of a
Station Only System Use and when it must be converted to a Standard System Use.
Convert Station Only Site
This screen will allow you to convert a station only system use to a
standard system use.
Site to convert: 00000014
Site converted successfully!
Press any key to continue.
59
Call 1-888-Exterra for support
Utility Menu
Exterra Information System
Utility Menu
**************************************************************
1) Update Your Operator Information
2) Printer Configuration
3) ExScanner Configuration
4) Turn on Technical Support Mode
5) Purge deleted data from database
6) Reset Barcode Rolls
0) Return to Previous Menu
************************************************************
Assorted miscellaneous items are handled from the Utility Submenu.
1) Update Your Operator Information
This option is used to change configuration options. The most important change made here is the
quarterly update of your Authorization Code.
Exteris Configuration
Build Number: 2678
Version: Exteris for DOS
Build Date: Mon Oct 19 19:12:59 EDT 1998 Builder: jason
Operator code: 005401
Branch number: 001
Activation code: 7121182083
Payment type: 1
Company/Partnership/Proprietorship:
abc pest control
Company name at top of Workorder: abc pest control
Address at top of Workorder:
123 smith street
City/State/Zip at top of Workorder: anywhere, usa
Shipping Address:
123 smith street
Shipping City/State/Zip: anywhere, usa
Phone Number: 111
State License/Certification Number: 123
Contact Name: john doe
60
Call 1-888-Exterra for support
2) Printer Configuration
Configure Printing System
Choose Printing System:
1 - DOS/Windows 3.11
2 - Windows 95/98/NT
System choice: 2
Select DEFAULT Printer or Compatible model:
1 - HP DeskJet (all models)
6 - HP LaserJet 4 (all models)
2 - HP LaserJet
7 - Epson Dot Matrix (all models)
3 - HP LaserJet+
8 - IBM Proprinter (or compatible)
4 - HP LaserJet 2p (all models)
9 - Canon BJ10e (or compatible)
5 - HP LaserJet 3 (all models)
0 - Postscript (all make and models)
Printer choice: 6
Select DEFAULT Printer Port:
1 - lpt1
2 - lpt2
Port choice: 1
3) ExScanner Configuration
If you are using an ExScanner, you must tell Exteris by selecting this menu item. Once this menu
item is selected, a question about whether or not you want to use an ExScanner will beginning
appear whenever you are generating Inspection Workorders.
4) Turn on technical support mode
Choose this option only if you are instructed to do so during a technical support call to Ensystex.
5) Purge deleted data from database
Choosing this option will remove any deleted items from the disk. Doing this frees up disk space.
Be careful when using this option.
Purge Deleted Data
WARNING!!! -- This will PERMANENTLY remove deleted
data from your database. Are you sure you wish to continue (Y/N)? N
6) Reset Barcode Rolls
Choose this option only if you are instructed to do so during a technical support call to Ensystex.
61
Call 1-888-Exterra for support
Export
Exterra Information System
Export Menu
***************************************************************************
1) Export Data to Ensystex (1st and 15th of Month)
2) Transfer Export Data to Ensystex (TECH SUPPORT ONLY)
3) Export Site Data to Text File (PCO use with other programs)
0) Return to Previous Menu
**************************************************************************
1) Export Data to Ensystex (1st and 15th of Month)
Exteris will prompt you to export data on the 1st and 15th of the month or the first day after these
dates that you start Exteris. Ensystex uses this exported information to bill you for your use of
Exterra. When you are prompted, you must perform the export before proceeding. If you attempt
to perform an export between the time an export has been done and the next export due date (1st
or 15th) , Exteris will warn you not to proceed. You may perform the export but you will still have
to perform another export on the 1st or 15th.
Data is sent to Ensystex either over the Internet or by mail on a floppy disk. Sending
system use data by the Internet is possible only if you have a connection to the Internet.
You must answer a number of questions before proceeding with an export. These
questions include how many uninstalled stations you have in stock. After answering
these questions the following screen will appear. (This choice is not available in
Australia. You must export by the internet).
Do you wish to export data to Ensystex via floppy or the internet?
1 - Floppy
2 - Internet
0 - Cancel
Internet
If you choose to export by the Internet, you will be prompted to connect to the Internet before
proceeding. If you are running Windows 2000 you must be logged in as Administrator for
export by Internet to function properly.
Floppy Disk
If you choose to send information by floppy be sure to place a blank formatted disk in your floppy
disk drive before proceeding.
62
Call 1-888-Exterra for support
Initial System Use Certification
This is an affirmation by the Exterra Authorized Operator that all System Use of Exterra has been
properly reported to Ensystex. The certification process begins with the printing of a report of
Initial System Uses that are being reported at this time.
Internet
When System Use data is sent over the Internet, the certification is completed by printing and
reviewing the report and then signifying that the report is correct by pressing a key on the
computer and entering the name of the person making the certification.
Floppy Disk
When System Use data is transferred to a floppy, the certification form is signed and mailed with
the floppy disk.
Failure to adhere to the export guidelines could result in your suspension or cancellation
as an Exterra Authorized Operator.
2) Copy Ensystex Export Data to Floppy Disk (TECH SUPPORT ONLY)
Perform this function only if instructed to do so by Ensystex Technical Support.
3) Export Site Data to Text File (PCO use with other programs)
This option allows you to export all site data for use in other programs of your choice.
This utility exports a copy of your site information to the file exports\sites.txt. This report
arranges data for each site as follows with a tab between each field:
Site number, customer number, name [first, last], and the date of your next inspection.
It lists all sites for an installation and can sort by name, customer number or date.
63
Call 1-888-Exterra for support
ExScan
Whenver a new site is entered, you can scan the site plan into Exteris using ExScan. Then
whenever you print a workorder for this site you can also print a copy of the site plan at the same
time. This eliminates the need for you to find a site plan every time an inspection is scheduled.
Whenever a change is made at the site (station moved, added or deleted), simply make a change
to the original site plan (keep them in a safe place such as as folder) and rescan the updated
plan. By doing this, you maintain the integrity of the site plans that are contained in Exteris.
ExScan works only on computers running Windows 95 or 98. It is automatically installed
when you install Exteris.
ExScan allows you to scan site plans into Exteris. Once they are scanned into Exteris, you can
print out site plans anytime you print workorders.
Equipment Needed to Use ExScan
Refer to the Computer Equipment Options and Configuration Section of this Manual.
Activating ExScan
To activate ExScan, click on the ExScan icon on your Windows Desktop.
Scanning Site Plans into ExScan
Acivate ExScan. Enter the number of the site you are scanning. Choose scan site plan.
Replacing an Existing Site Plan
Activate ExScan. Enter the number of the site for which you would like to replace the site plan.
Note: If you attempt to scan something too large into ExScan, you will get an error
message.
64
Call 1-888-Exterra for support
ExScanner
ExScanner is actually two different handheld computing devices as explained below that run the
same Palm Operating System.
The original ExScanner is a Palm Pilot manufactured by Symbol Technologies. The model
number of the ExScanner is the SPT1700. The SPT1700 has a built in Barcode Scanner. The
principle advantage of the SPT1700 is its ruggedness.
The newer ExScanner is a Palm Pilot Handspring Visor with a Symbol CSM150 barcode
scanning module installed in the slot in the back of the Visor. The princple advantages of the
Visor are its low cost and small size. The Visor can easily fit in a shirt pocket (A postion from
which it will invariably fall from and break if you are not careful!).
Ensystex has written software that is loaded onto the ExScanner (either model) that allows the
ExScanner to scan the station label barcodes that are placed in Exterra stations during inspection
of Exterra. Additionally, the ExScanner has has been programmed to collect data about the
station that is observed during the station inspection.
ExScanner Advantages
ExScanner changes the way you use Exteris is two simple but important ways. First, instead of
removing barcodes from the station and replacing them each time the station is inspected, the
barcode that is in the station is left in place and is instead scanned with the ExScanner.
Secondly, ExScanner electronically captures the data that is written on the workorder at the time
the data is collected. This eliminates the steps of writing the data on the workorder and keying
that data into the Host Computer back at the office.
Using ExScanner means that the handling of barcodes is substantially reduced thereby
eliminating one potentially time consuming step of using Exteris. Secondly its potentially
eliminates data transfer errors that may occur when transcribing data from the Inspectoin
Workorder to the Host Computer.
Deciding to Use an ExScanner
The decision whether or not to use an ExScanner can involve evaluating the following
advantages:
•
•
•
Substantially reduces barcode cost.
Eliminates the clerical time and cost spent transferring data from the workorder to the
host computer.
Potentially eliminates data transfer errors.
With the advent of the Handspring Visor we feel that there is no cost reason to not use the
ExScanner.
65
Call 1-888-Exterra for support
ExScanner Step by Step
Once you have made the decision to use an ExScanner, the following steps must be completed
to begin such use.
•
•
•
•
•
•
•
•
•
Purchase an ExScanner and either a cradle or cable to connect it to the Host Computer.
Choose the USB cradle if you have a USB port on your computer. Choose the serial
cradle if you do not have a USB port.
Attach the ExScanner to the Host Computer according to the instructions in this section
of the manual.
Install the ExScanner related software on the Host Computer according to the Installation
Instructions contained in the Appendix of this manual.
Install the ExScanner related software on the ExScanner according to the Installation
Instructions contained in the Appendix of this manual.
Synchronize the ExScanner with the Host Computer according to the Installation
Instructions contained in the Appendix of this manual.
Notify Exteris that you are using an ExScanner by selecting Utility Menu>Configure
ExScanner from the Main Menu.
Whenever you are generating workorders, tell Exteris that you are using an ExScanner
when asked that question on the Workorder generation screen (for those sites or route
for which you are in fact using the ExScanner.)
Transfer data from the ExScanner to the Host Computer after inspections are completed
by Hotsyncing the ExScanner to the computer according to the instructions contained in
this section of the manual.
Process this data in Exteris by selecting Inspection Menu>Process Data Transferred from
ExScanner on the Exteris Inspection Submenu as part of your normal Inspection
Workorder processing routine.
66
Call 1-888-Exterra for support
Getting Started with an ExScanner
Remember, the ExScanner has important capabilites over and above those for which for which it
is used with Exterra. However the following directions apply only to its use with Exterra. To take
advantage of these additional capabilities, refer to the manufacturer's user's manual. The
Handspring Visor comes with a User’s Manual. Print out the SPT1700 user’s manual according
to the instructions below.
Printing out the SPT1700 User's Manual
What follows is a shorthand version of the manufacturer's instructions for installing and using the
ExScanner. For more in depth instructions, the complete SPT1700 manufacturer's user's manual
can be viewed or printed out with Adobe Acrobat from the Exteris CD-ROM. To do this place the
Exteris CD-ROM in the host computer and wait for the Exteris Main Installation Screen to appear
on the monitor. If this screen does not appear automatically, go to My Computer> CD-ROM from
the Windows Desktop. To print the manual, click the Print ExScanner Manual button on the
Screen.
The SPT1700 manual is 318 pages long therefore you may prefer to view selected sections
with Acrobat on the screen instead. To view the manual on your monitor instead of printing it
out, click the View Documents button and click on the ExScanner icon. You can print out
individual pages while viewing them. Chapters 1 and 3 and pages 1-1 through 1-24 are the most
useful to view and print out.
Connecting the ExScanner to the Host Computer
In order to transfer data from the host computer to the ExScanner and vice versa, software must
be installed on the Host Computer and the ExScanner and a physical connection must be
established between the Host Computer and the ExScanner. (Directions for installing ExScanner
related software on the ExScanner and the Host Computer are contained in the Installation
Instructions in the Appendix of this manual.)
The connection is established by attaching a cradle or cable to the host computer at one end and
to the ExScanner at the other. A cable connection is the most economical method of connecting
the two however the cradle is slightly more convenient. You should have received one of these
devices with your ExScanner. If you did not you cannot proceed with an ExScanner installation.
Hook the cable/cradle to the computer based on the type of connection you have selected. (USB
vs. Serial). If you have a serial cable connect the cradle or cable to the host computer at an
available 9 pin serial port on the rear of your computer. If you only have 25 pin serial ports on
your computer you may need to get an adapter available at Radio Shack (Part Number XXXXX).
(Consult your computer manufacturer about the location of a serial port if you are having trouble
finding one.) The ExScanner must have a dedicated serial port and cannot share one.
67
Call 1-888-Exterra for support
ExScanner Basics
(not all items apply to each model of the ExScanner)
Installing the Battery in the ExScanner
Remove the panel on the rear bottom of the ExScanner. Orient the battery correctly and carefully
insert it into the opening.
Charging the Battery
Charge the battery by attaching the ExScanner to the cable or placing it in the cradle. The
battery is fully charged after approximately 2 hours. If you have a cradle, the LED on the front will
turn to green when the battery is fully charged.
Installing the CSM150 Module and choose a scanner button (Visor only)
If you are using the Visor install the CSM150 barcode scanning module in the back of the Visor.
When you snap in the module you must select a trigger to activate the barcode scanner. Select
any of the four buttons on the bottom for this purpose. The default scanner button is the calendar
button.
Powering Up the ExScanner
After you have installed the battery and fully charged the ExScanner turn on the ExScanner. If
the ExScanner does not come on you must perform a reset according to the directions in the
Resetting Your ExScanner section of this manual.
Stylus
Use only the supplied stylus or a dull object such as a finger on the screen. Never use a sharp
object such as a pen on the screen.
Scrolling the Applications Screen (SPT1700 only)
Touch the top or bottom portion of the scroll buttons on either side of the yellow button on the
front to view parts of the menu that may not be visible. Alternately, touch the top or bottom of the
vertical arrow on the right side of the screen. The screen will scroll up or down depending on if
you touch the top or bottom of the buttons or arrow.
Scrolling the Applications Screen (Visor only)
Touch one of the two center buttons below the screen to scroll the screen up or down to view
parts of the menu that may not be visible.
Applications Icon (Button with house diagram)
Touching this icon at any time will return you to the Applications Screen. If you touch this icon
whenever you are entering actual station information, this has the same effect as if you had
touched the cancel button on the screen.
Preferences Button
Pressing this button will display a selection preferences. The important preference to check is
Beam Receive. This must be set to on. If for some reason it is not set to on, touch the off beside
Beam Receive and then select on to turn on beam receive.
Time, Date and Battery Level
Set the time and date by touching the Prefs icon on the Applications screen. The time and date
and battery level are displayed in the upper left hand corner of the screen. In order to conserve
battery life, the ExScanner will power down the screen after a period of inactivity. If this occurs,
simply press the red button and the screen will reappear.
68
Call 1-888-Exterra for support
Manual Character Entry
Most entries of station data are made by scanning barcodes. Letters and numbers can also be
entered manually by either graffiti or the pop up keyboard.
Graffiti
Graffiti is a stylized from of character entry performed with the stylus in the box at the bottom of
the screen. To familiarize yourself with the graffiti characters, place you stylus at the very bottom
center of the screen and drag it straight up to the top of the screen. A chart of graffiti characters
will be displayed. Familiarize yourself with the style of each letter or number in order to efficiently
use graffiti. You can display this chart at any time in order to learn how to write graffiti.
Pop up Keyboard (Can only be activated within a program such as ExInspect)
Touch the 1,2,3 in the lower right corner of the screen next to the magnifying glass with the stylus
to enter numbers and the abc on the other side to enter letters. When finished touch the done
button, not the Applications icon (home button).
Screen Management
Usingt the Backlight Control
Holding the red button down continuously will cause the screen to invert and the back light to
illuminate. Use this as infrequently as possible as the backlight is a major battery draw.
Constrast Button
The button on the opposite side of the ExScanner from the red button is the contrast button.
Touch this button to adjust the screen contrast. Adjust the contrast with the stylus.
Barcode Scanner Activation
The barcode scanner will only work when a program designed to scan barcodes (such as the
ExInspect program) has been activated. The barcode scanner is activated by pressing one of the
yellow buttons (top or both sides). When the scanner is activated a red LED will light above the
yellow button above the screen. When a barcode has been successfully scanned the color of the
LED will change to green.
Screen Advancement
When you scan a barocode within ExInspect on a main screen and it is a correct entry, the next
screen automatically appears. However for the smaller subscreens you must hit OK.
69
Call 1-888-Exterra for support
Battery Management
The ExScanner has a sophisticated battery management system. However, it is important to
always keep the battery as fully charged as possible. Two important ways to conserve battery
power is to use the backlight feature as little as possible and to set the auto off feature to one
minute as follows.
Setting the Auto Off Feature:
• Touch the Prefs button on the Applications Screen.
• Touch the triangle after the words Auto-off After.
• Select one minute as the auto off after value. If after use you find one minute to be too
short a period of time choose two or three minutes instead.
The battery will fully charge in about two hours. Under normal conditions,the battery terminal
battery should provide approximately 8 hours of continous use before the battery requires
recharge.
If the battery becomes low while using the barcode scanner you may receive the message
“Battery low error”. The other functions will continue to work until another low battery alert
occurs. When the scanner deactivates because of a low battery condition, recharge the battery
as soon as possible. If you try to scan when your battery is low, you will receive the message
“Your battery is too low for scanning”. When you receive this message, recharge your battery
and attempt scanning again.
Similarly, if the battery becomes low in the course of normal use, an alert appears on the terminal
screen describing the low battery condition. The message you receive is, “Your batteries are low”.
If the battery becomes extremely low, you receive the message; “Your batteries are extremely
low". Recharge the battery as soon as possible in either event.
If you remove the battery, the built-in backup power maintains all data in memory for a period of
up to 2 minutes. Whenever you remove the battery, replace it with a fully charged spare battery
immediately. If you encounter any difficulites in the course of battery replacement, reinstall the
original battery and wait a few minutes for the backup power to recharge.
If the battery drains to the point where your ExScanner does not operate, it stores your data
safely for an indefinite period of time. In this case, there is enough residual energy in the battery
to store the data, but not enough to turn on the ExScanner. If you try to turn on your ExScanner
and it does not turn on, charge the battery immediately.
If you leave a drained battery in your ExScanner for an extended period of time, you can lose all
of the stored data. If this happens, charge the battery immediately. If it does not turn on after
charging, perform a reset according to the instruction in the Resetting Your ExScanner section of
this this manual.
70
Call 1-888-Exterra for support
Resetting the ExScanner
Under normal circumstances you will never have to reset your ExScanner. However on rare
occasions the ExScanner may "hang" (no longer respond to buttons on the screen). In this case
(and sometimes when the ExScanner is first used) you must perform a reset to get the
ExScanner running again).
If you are confronted with the need to perform a reset, perform a soft reset first. If that does not
work then perform a hard reset.
Soft Reset
A soft reset resets the ExScanner without erasing any of your user installed software or data. To
perform a soft reset:
1. Remove the battery cover from the back of the ExScanner (SPT1700 only).
2. Turn on the ExScanner but do not hold down the power button.
3. Use the tip of the stylus to gently press the reset button on the back of the terminal (the
reset button is the button to the right of the battery compartment - if you look hard you
can see the words reset above it - you may be able to hold it down with your finger
instead of the stylus).
Hard Reset
A hard reset tells your ExScanner to start all over again and erase all user installed software and
data stored in the ExScanner. Therefore, never perform a hard reset unless a soft reset does not
solve your problem. (If you do have to perform a hard reset, any data previously synchronized
with the Host Computer will be restored after you have reinstalled ExInspect and you have
reidentified the ExScanner as part of the installation process). To perform a hard reset:
1. Remove the battery cover from the back of the ExScanner (SPT1700).
2. Hold down the red power button on the front of the ExScanner.
3. While holding down the power button use the tip of the stylus to gently press the reset
button on the back of the terminal (the reset button is the button to the right of the battery
compartment - if you look hard you can see the words reset above it - you may be able to
hold it down with your finger instead of the stylus).
4. Release the reset button.
5. Release the power button.
6. A message will appear on the screen asking you whether or not you want to erase all
data in the ExScanner.
7. To erase all data in the ExScanner press the upper half of one of the scroll buttons (the
buttons on either side of the yellow button on the front of the ExScanner). To preserve
the data (perform a soft reset instead of a hard reset), hit any other key.
8. After a hard reset you will be prompted to recalibrate the screen.
If you have performed a hard reset and you have already loaded ExInspect on the ExScanner,
treat the ExScanner as a new ExScanner and go back to the ExScanner software Installation
Instructions in the Appendix of this manual and start completely over.
71
Call 1-888-Exterra for support
Installing ExScanner Related Software
Install Exteris related software on the ExScanner and ExScanner related software on your Host
Computer according to the Software Installation Instructions contained in the Appendix of this
manual.
Configuring Exteris for an ExScanner
If you are using an ExScanner, you must configure Exteris to recognize this. From the Main
Menu go to the Utility Menu > ExScanner Configuration. Doing this will cause a question to
begin appearing on the Workorder Generation screen regarding your intentions to use or not use
an ExScanner.
72
Call 1-888-Exterra for support
ExScanner in Use
(If you are reading this, it is assumed that you have already connected the ExScanner to the Host
Computer, have charged the Exscanner battery, have familiarized yourself with its basic
operation and have installed all ExScanner related software on the Host Computer and the
ExScanner and have notified Exteris that you are using an ExScanner).
Generating Workorders for Use With an ExScanner
Printing and using workorders when you use an ExScanner is optional. When you are using an
ExScanner, workorders are generated from the same screen and in the same fashion as when
you swap barcodes and are not using an ExScanner. If you have configured Exteris to recognize
that you are using an ExScanner, you will be asked whether or not you want to use it on the
Inspection Workorder generation screen.
Transfer of Station History Data from Exteris to the ExScanner
Up to date station history on every station is automatically transferred from Exteris to the
ExScanner anytime the ExScanner is Hotsynced. Hotsyncing is normally done whenever it is
necessary to transfer inspection data from the ExScanner to the Host Computer to process this
data. At the same time inspection data is being transferred to the Host Computer, the most up to
date station history is transferred to the ExScanner. (If you have questions about the HotSync
process refer to the next section of the manual).
You may Hotsync the ExScanner at any time and anytime you Hotsync the most up to date
station history data will be transferred to the ExScanner. To have the most up to date station
history on an ExScanner, it should be Hotsynced again after the latest data transferred to the
Host Computer is processed.
Using the ExScanner in the Field
The Exteris related software on the ExScanner is referred to as ExInspect. ExInspect allows you
to electronically collect and view all of the information that appears on the printed workorder
except for comments.
To start ExInspect, click on the ExInspect icon on the Applications screen (It looks like a minature
Exterra logo and on the screen below appears in the left column second from the top however
this may vary.) You may have to touch the scroll bar on the right side of the screen to bring this
icon into view.
73
Call 1-888-Exterra for support
The screen below will appear after you press the icon.
From this screen you can enter new sites or enter inspection information for existing sites. (Skip
to the Installing A New Site section below for information on entering a new site into your
ExScanner).
Accessing Data on the ExScanner
ExScanner takes advantage of the built in pull down menu system built into Exteris. Taking a few
moments to understand this will greatly increase you ease of ExScanner use. Pulldown menus
are available when you press the More Site Information button whenever it appears on a screen
as shown below.
More Site Information Button
When you press the More Site Information button, pull down menus appear as shown on the next
screen.
74
Call 1-888-Exterra for support
ExScanner Pull down Menus
Note the two menu options, Reports and CheckPeriods at the top of the next screen that have
appeared after the More Site Information button has been pressed.
Reports Pull Down Menu
The first pulldown menu is Reports, highlighted at the top left of the screen below. Below reports
you are given two options, customer information and station information.
Customer Information
Below is the Customer Information Screen. You cannot edit this screen. It is informational only.
75
Call 1-888-Exterra for support
Station Information
Next is the station information screen. In addition to being accessible from a pulldown menu, this
screen also appears whenever you enter a new site number. This is a screen that is seen
frequently. You are given the ability to access it from as a pulldown in the event you want to alter
the selection of stations you have chosen to inspect during the current inspection. For example
you may have chosen to inspect only the stations due now at the beginning of the inspection
process but mid inspection you want to change to checking all stations.
Whenever you are at this screen, you can change the selection of stations that are in the
inspection queue by pressin the black downward triangle. When you press the triangle, the
following screens appears.
You change the selection of stations you are inspecting by clicking on the appropriate choice.
After you have done this, a list of the stations that meet the selected inspection criteria will be
displayed. You then must click on the Return to Inspection Screen button to begin or continue
the inspection process.
76
Call 1-888-Exterra for support
CheckPeriods Pull Down Menu
When the CheckPeriod pulldown menu is selected (as shown on the screen below) you can then
choose to view your Global check period configuration or configure site check periods for the
current site.
Global Check Period Configuration
Below is the global check period screen. This screens allows review of values for check periods
that has been set in you host computer. These values cannot be altered in the ExScanner.
77
Call 1-888-Exterra for support
Individual Site Check Period Configuration
This is the only pull down menu item from which you can currently make changes. From here
you can change or activate check periods for the current site. This screen is also viewed at the
end of the new site installation process if you choose to active individual site check periods for the
newly installed site.
From this screen you can active and deactivate site check periods specific to the current site. If
you deactivate check periods, the global check periods will instead apply during the next
inspection.
Beginning the Inspection Process
You can access existing sites either by entering a site number if you know it or alternately
searching for a site by pressing the Site Search button.
78
Call 1-888-Exterra for support
When you press the Site Search button you are given the option of searching for a site based on
customer name, telephone number, customer number and street address as shown on the
screen below.
If you already know the site number you should enter it directly by either scanning the barcode at
the top of the Inspection Workorder or entering the site number with graffiti or the pop up
keyboard. You are then taken to the Station Information screen as shown below. On this screen,
you can choose which stations you would like to inspect. You can choose to inspect only stations
due today or alternately you can choose to check all stations or alternately stations due within
next 30, 60 or 90 days, etc.
As explained earlier, you can access this screen at any time when you are inspecting stations by
clicking on the more station information button as shown on the next screen.
Once you have selected the stations to inspect you must press the Return to Inspection Screen
button, you are then taken to the station information screen shown next on which you begin the
process of entering individual station information.
79
Call 1-888-Exterra for support
Entering Station Data into the ExScanner
To enter new data for a station or edit previously entered data, scan a
barcode (or enter it with graffiti/keyboard and press Enter Inspection
Data). The barcode is normally one you found in the station however if
the barcode on the workorder is missing from the station postassign a
new barcode (you must supply) by entering it. In this case you will be
asked on the next screen the number of the station the new bacode
was assigned to.
Select Add/Replace Station or Cover if you are adding a station or
replacing a cover.
Help button to press if you get confused as to what to do.
On this screen you can choose to do the following:
1) Enter or edit data for a station found in place. To do this simply scan the barcode you have
found in the station or if the barcode is missing, scan a new one and place it in the station.
2) Add/replace a station or replace a cover on an existing station. To make this choice, simply
press the Add/replace Station or Cover button on the screen.
Below is the data entry screen that appears after a station barcode has been entered and you
have verified that the barcode is in the proper station.
From this screen you mayalso:
1) Manually Schedule Next Station Inspection
2) View Station Inspection History
80
Call 1-888-Exterra for support
Manually Scheduling Next Station Inspection
From the last screen you can select to manually enter the next inspection date for the station. Do
this only if needed.
Exteris will normally automatically set the next inspection date therefore you need to do this only
if you want to manually pick the next inspection date. The screen below appears after you have
pressed the Manually Schedule Next Inspection button.
You can schedule inspections manually either by calendar or number of days. To schedule by
calendar press the Schedule on Calendar button.
Viewing Station History
Below is the Station History screen that appears when you press the View Station History button.
This screen is informational only and no changes can be made to the information.
81
Call 1-888-Exterra for support
This screen appears when the view legend button on the last screen is touched.
Editing or Deleting Data Entered into the ExScanner
You can edit or delete any station data you have entered up to the moment it is transferred to the
Host Computer by reentering the site and station number.
When you are finished entering station data at a site, press the Done button.
To exit ExInspect, press the Applications icon (home button).
82
Call 1-888-Exterra for support
Install New Site
Begin the new site installation routine by pressing the Install New Site button.
When this button is pressed the next screen will appear.
From this site you can begin installation of a new site or you can edit data for a new site that was
installed earlier and is still resident in the ExScanner because its data has not been transferred to
the host computer.
83
Call 1-888-Exterra for support
Begin a new site installation by pressing the Begin Installation button at which time the following
screen appears.
You can optionally enter customer data at the beginning of the new site installation process on
the next four screens. You can also choose to enter this information on the host computer after
you have transferred the new site data back to this computer. If you want to enter the customer
information in the field, press the Yes button after which the next four screens will appear in
sequence. If you press no the next four screens are skipped.
84
Call 1-888-Exterra for support
After you have entered customer information (or chosen to enter it on the host computer) the
following screen will appear
Enter all newly installed station information from this screen and the screens that follow it. Station
information can also be edited from this screen.
85
Call 1-888-Exterra for support
Edit Newly Installed Site
You can edit information you have entered concerning a new site up until the time the site
information is transferred to the host computer. Do this by pressing the Edit Installation button.
Uploading ExScanner Data to the Host Computer
The transfer of data from the ExScanner to the Host Computer occurs independent of Exteris as
part of the HotSync process. Every time you want to transfer data from the ExScanner to the
Host Computer all you have to do is HotSync the ExScanner. After this is done, the data is then
present on the Host Computer in a form that Exteris can use. (If you have questions about the
HotSync process refer to the next section of the manual).
Processing ExScanner Data on the Host Computer
Exscanner collected data is now on the Host Computer in a form that Exteris can use.
ExScanner data is processed by Exteris as part of the Inspection Workorder processing process.
Refer to the Inspection SubMen Main Menu>Data Entry Menu>Inspection Menu>#4 Process
Inspection Data transferred from ExScanner.
HotSyncing the ExScanner
Hotsync is the computer utility that transfers inspection data to the Host Computer and Station
History data back to the ExScanner. Make sure Hotsync is running on your Host Computer by
checking for the HotSync icon next to the clock in the Windows Desktop tray. If it is not there
refer to the next section of this manual for directions on getting Hotsync running.
If you are using a cradle:
• Place the ExScanner in the cradle.
• Press the button on the cradle.
• When the large HotSync icon appears in the middle of the screen and the words HotSync
operation complete appear on the screen (or words to that effect depending on the model
of ExScanner you have), all ExInspect data on the ExScanner has been successfully
transferred from the ExScanner to the Host Computer and the newest set of station
history is transferred from the host computer to the ExScanner.
If you are using a cable:
• Make sure the ExScanner is turned on.
• Connect the ExScanner to the Host Computer.
• Go to the ExScanner Applications Screen. To get to the Applications Screen on the
ExScanner, touch the stylus to the Applications icon (button with house on it).
• Touch the HotSync icon on the Applications Screen with the stylus. You may need to
scroll the screen in order to find it.
• When the larger Hotsync icon appears in the middle of the screen touch this icon with the
stylus.
• When the words HotSync operation complete appear on the screen (or words to that
effect depending on the model of ExScanner you have), all ExInspect data on the
ExScanner has been successfully transferred from the ExScanner to the Host Computer.
86
Call 1-888-Exterra for support
If you have more than one ExScanner, repeat the HotSync process for each of them in order to
move their inspection data to the Host Computer.
Whenever you upload inspection data to the Host Computer, this information is removed from the
ExScanner. This removal occurs only after both computers have signified that the transfer was
complete and successful.
Starting or Restarting Hotsync on the Host Computer
Starting Hotsync
Hotsync is a program that is automatically loaded onto your Host Computer when you load
ExScanner related software onto it. Once it is loaded it normally starts whenever you start your
computer and continuously runs in the background waiting for you to download data from the
ExScanner. You know it is running when you see a circle with a blue and a red inward pointed
arrow in the lower right corner of your Windows desktop screen next to the clock. If you click on
this icon and then click on exit you will stop Hotsync from running meaning that you have stopped
the program which transfers data from the ExScanner to the Host Computer. There is no need to
stop HotSync manager at any time as it takes up a minimal amount of computer resources.
Restarting Hostsync Manager
Hotsync Manager will be restarted automatically whenever you restart your computer. You can
also restart it from the Windows Desktop by clicking on Start>Programs>Palm Desktop>Hotsync
Manager. If when you attempt to Hotsync your ExScanner and nothing happens the reason may
be that HotSync manager is not running on your computer.
87
Call 1-888-Exterra for support
Documents on Exteris CD- ROM
In addition to Exteris, the CD-ROMs you are sent on a regular basis contain serveral different
documents that are central to your use of Exterra. Always refer to your latest Exterra Operator
Update for the latest listing of these documents.
Installing Adobe Acrobat Reader
When you install Exteris, you should also install the Adobe Acrobat Reader. Several important
files such as service and sales manuals that are on this disk can only be accessed with Acrobat.
All of these documents have file names that end in .pdf. (The Acrobat Reader will only run on
Windows computers).
To install the Adobe Acrobat Reader, click on the button labeled Install Acrobat Reader on the
Main Installation Screen that appears when you load the CD-ROM into your computer.
Documents on the Exteris CD-ROM accessible with the Adobe Acrobat Reader
After you have installed the Acrobat Reader, you can print out several different manuals on the
software. To do this install the CD-ROM in your computer.
To access the documents, lick on the View Documents button on the Main Installation Screen
that appears in the middle of the screen. Buttons that allow you to print out the documents also
appear on the Main Installation Screen for several of the more important documents.
Documents that you do not need to use the Adobe Acrobat Reader to access
Certain documents that are displayed when you press View Documents on the Main Installation
Screen are not stored as pdf documents and are not accessible with the Acrobat Reader. These
include contract language documents and certain images. Access these with the appropriate
software program. If you click on the icons for these documents they will open if you have
software installed on your computer that is able to open them.
88
Call 1-888-Exterra for support
Helpful Hints
Take a few minutes to read and understand these helpful hints. Doing this will result in big
savings of time anytime you use Exteris. Also be sure to read and understand the shortcut
keystrokes contained in the next section.
Today's date
Exteris deals with date sensitive information, most important of which is scheduling site
inspections. For this reason it is absolutely critical that the date you have set in your computer is
always correct. If the computer date is incorrect, critical tasks such as Workorder generation will
not proceed properly.
Documents contained on your Exteris CD-ROM
The Exteris CD-ROM contains several important documents that you can print out locally. The
documents on this disk are updated and supplemented on a regular basis. Consult the latest
Authorized Operator Update you receive with each new CD-ROM for a listing of new and updated
documents on this disk. See the Documents on the Exteris CD-ROM Section for a complete
explanation of how to access these documents.
Placing Exteris in a Windows Screen Box in Windows 95/98
If Exteris occupies the entire screen (you cannot see the Windows bar at the bottom of the
screen), you can place it in a Box similar to a Windows program by pressing <Alt> then <Enter>.
Buttoning Down Exteris in Windows 95/98
You can minimize the Exteris screen like any other window by clicking on the minimize icon in the
upper right hand corner of the window (the underline character) after you have placed it in a box.
Exiting Exteris in Windows 95/98
Because Exteris is a DOS program, you cannot close it down by clicking on the "X" close
program icon in the upper right hand corner of the Exteris Box. To close Exteris, you must
enter 0 or press Esc as instructed on the initial Exteris screen. When you enter 0 or press Esc,
Exteris shuts down and the Window containing Exteris disappears.
Whenever you exit Exteris, all of your records are reverified. Occasionally this may result in
Exteris finding errors in your data due to bugs in Windows. If this occurs, all of the data you have
entered since Exteris was last started will be lost. Any workorders printed this session will be lost
and any data entered during this session will be lost. If this occurs call Exteris technical support
at 1-888-398-3772.
Deleting Sites
Sites are deleted with the site editor however site numbers are never reused. This helps keep
your billing for Exterra use straight.
Station Numbering and Limitation on Number of Sites
Any individual site can have up to 150 stations. Station numbers are followed by a period. For
example station #1 appears on the screen as "001.". The period after the station number is
necessary because of the way alpha stations are entered as explained below.
89
Call 1-888-Exterra for support
Alpha Station Numbering
When, for whatever reason, a new station is placed in the ground between existing stations, that
station is numbered as an "alpha" station. Alpha simply means that the station number is the
same number as the previously installed station that it is closest to plus a letter of the alphabet.
The alpha character in the station number is separated from the numbers by a period.
For instance a station physically installed between station 13 and 14 would be called 013.A. A
station physically installed between 013.A and 014 would be 013.B. This method of station
numbering assures that stations are listed on the Inspection Workorder in the same order they
are physically found in the ground around the structure.
Printing Inspection Workorders in advance of due date
Whenever you print Inspection Workorders, you are asked for a date for which to print the
Workorders. The default is today's date however you can also enter a date up to 9 days in the
future. This allows you to print work for a future date. This is most useful if you have inspection
technicians that do not come into the office every day. If you select a future date for which to
print Inspection Workorders, all Workorders due for inspection between today's date and
that future date you select will be printed at that time.
Reprinting Inspection and Installation Workorders
Because of the way that Windows and DOS programs communicate, Exteris cannot fully
supervise the entire Workorder printing process. Exteris does know when you signal the printing
process to begin. However, if for some reason a Workorder is not successfully printed, Exteris
cannot detect this print failure. For this reason, once you signal that a Workorder is to be printed,
Exteris assumes that the printing occurred successfully. Exteris records the print job as having
been successful and records the Workorder as printed.
If for some reason a Workorder does not print properly, you can reprint it. However, to do this you
must reprint it from the Reprint Screen.
Reprinting Inspection Workorders - Inspection Workorders can be reprinted from the Inspection
SubMenu.
Reprinting Installation Workorders - Installation Workorders can only be reprinted in batches from
the Installation SubMenu.
Configuring Station Check Periods
The Labyrinth label provides that inspections of stations must occur within a designated
maximum period of time. The default inspection period lengths are as follows:
Unbaited Station Inspections - Within 90 days of last inspection for round and square stations.
Baited Station Inspections - 30 and 60 days after the initial installation of bait and within 45 days
of last check thereafter for square stations. Within 90 days for round stations.
These periods of time between inspections can be decreased if desired, however they cannot be
increased in length beyond these maximums. The check periods are configured by selecting the
Configure Check Periods option on the Configuration Menu.
These periods of time can be increased or decreased at any time. However, remember that any
time you do this, Exteris recalculates station check times for all stations at all sites. Bear in mind
that anytime you decrease these intervals and have a large number of sites, you may
cause a large number of inspections to come due at one time.
90
Call 1-888-Exterra for support
Configuring Check Periods for Sites Individually
Under certain circumstances, it may be necessary to check the stations at a site more or less
often that the default values you have entered for your sites. You can set the check periods for
an individual site from the Site Editor.
Period of Predicted Limited Activity
The concept of the PLA is explained in the Labyrinth label under the "Adjustments to In Ground
Station Inspection Scheduling". Exteris is designed to give you total flexiblity with respect to the
PLA. You can disable PLA for all your sites if you choose to continue to check all sites normally
during the PLA. You can also enable the PLA for all of your sites but disable it for individual sites
from the Site Editor. This may be necessary if, for instance, you are contractually obligated to
continue to check a particular site during the PLA but want to use the PLA on most of your sites.
You can also choose to have different PLAs for baited stations and unbaited stations. This
means baited station checks will continue to be scheduled during the PLA you have chosen for
baited stations. The limited activity period for baited stations must be less than or equal to that
for unbaited stations.
Anticipating next number to be entered in a data field
In certain fields you are supplied with what Exteris anticipates will be your next barcode number.
Examples of this are where the technician has postassigned barcodes during an installation.
Exteris anticipates that the barcode put in the next station is the one that is numerically next in
succession. If this number is not correct simply erase it by pressing the space bar to erase certain
digits or enter Ctrl K to clear the entire field. Then enter the correct number.
Managing Preprinted Barcodes
To correctly assign preprinted barcodes to stations, Exteris must know the numbers of the
barcodes you have in stock. You are asked to enter or update this information anytime you
pregenerate Installation Workorders or generate Inspection Workorders. Exteris can keep track of
up to three rolls of barcodes at any one time.
Barcodes should be folded in an accordion fashion as they are removed from the roll. When all
the barcodes for a single site have been removed from the roll, place a paperclip on the folded
batch of barcodes. Attach the barocodes to the workorder with the paperclip.
The number of the last barcode on a roll is printed on the tab for every barcode on the roll.
Entering Barcodes
Exteris contains a database of barcodes that are in use (have been previously entered into
Exteris as being in a station). This information is used to prevent the duplicate entry of a
barcode.
If you attempt to enter a barcode (enter it as having been also put in another station) that
is already in use, you will be stop from proceeding with this entry.
Site and Station Information Editors
Site and station information can be changed or added at any time from these two editors. You
can only access the station editor from within the site editor.
General site information, such as customer's phone numbers, are changed with the site editor.
Individual station information is changed by first entering the site at which the station is in place
and then choosing to enter the station editor.
91
Call 1-888-Exterra for support
Suspending a Site
It may at times become necessary to suspend a site. For instance, a customer may not pay an
annual renewal on time. For this reason, you can suspend a site's inspections at any time from
the site editor. When a site is suspended it will noted on the Site Check Date Forecaster with the
word suspended instead of a next scheduled inspection date.
You can also unsuspend a site (reinstate it). When a site is reinstated, Exteris will recompute the
inspection due date for all stations from the date they were last inspected (without regard to how
long it was suspended) and print a workorder if one is due.
Workorder expiration
After a certain number of days after the inspection due date, workorders that have not been
completed will expire. The default value is the same interval you have assigned between
inspections of baited stations however it may be any value between 7 and 30 days. When a
workorder expires a replacement workorder is automatically printed. No replacement barcodes
are assigned with the replacement workorder. You must postassign barcodes for this site.
Entering barcodes after inspections
You must enter barcodes before you begin the process of entering inspection data.
Barcodes can be entered either by scanning them with a barcode scanner or keying them in on
the keyboard. If you have a barcode scanner attached, you can still enter barcodes from the
keyboard. This may be necessary if a barcode will not scan properly.
There is no need to enter barcodes in any particular order after inspections. For instance, you
may enter a barcode for one site and then a barcode for another site and then another barcode
for the first site.
Entering Inspection Information for Individual Stations after Inspections
Inspection information can be entered for a station whether it is actually due for inspection or not.
However, if a station is inspected that is not scheduled for inspection, you must also turn
in the old barcode for that station and postassign a new barcode for that station. If a
barcode is not scanned for a station, you are barred from entering inspection information
for that station.
This feature helps maintain the integrity of the data that is entered into Exteris.
Colony Elimination
Whenever a station is initially baited, the interval between its inspections is reduced in order that
closer attention is paid to the station. Once a termite colony is eliminated from a station, it is
permissible to resume checking the station less often. Whenever an export is performed, you will
be prompted to review stations for possible elimination status. If you believe a station warrants
the presumption of colony elimination, you are given the option of converting the station back to
unbaited status.
Reports on Screen
Whenever you print a report you are given a choice between printing the report to the printer or
the screen. If you print to the screen, the report will appear on the screen identical to how it
appears in printed form.
92
Call 1-888-Exterra for support
Shortcut Keystrokes
Take a few minutes and learn these important shortcuts. Doing so can result in big time
savings benefit in your use of Exteris.
Escaping from a page - save no changes to screen
By entering <Esc> or <~> , you can escape from almost any screen you are currently in. When
you do this, the information you just entered will not be saved. When you exit, any old data
entered during previous sessions is preserved unaltered.
Clearing current field - erase all data from current field
You can clear the information currently in a field two ways. To remove only certain data in a field,
position the cursor over the character you want to erase and press the space bar. To clear the
entire field, hold down the <Ctrl> key and press <K>.
Save data and exit
Pressing <Ctrl><D> allows you to stop editing the current screen and save the material you have
changed up to that point. This shortcut is most useful when you are editing existing information
and want to skip over the remaining fields on the screen. <Ctrl><D> will not work if you do not
have data in all the required fields on the screen.
Data - Optional or Required
You are required to enter data into certain fields. In these fields, you will not be allowed to
continue until the correct data has been entered.
Anticipating Next Station or Barcode Number
In some cases, such as when you are entering barcodes and station serial numbers from an
Installation Workorder, Exteris anticipates what the next number will be. It places this number in
the entry field. If the number placed in the field is correct, simply press enter to enter the barcode
number. If it is incorrect, simply type over it with the correct number.
93
Call 1-888-Exterra for support
Using Windows Microsoft Backup to Backup Exteris
Data
It is important that you backup your Exteris files on a regular basis. A minimum of one backup
every week is recommended. Exteris files are backed up with Microsoft Backup. The following
instructions explain how to use Microsoft Backup whenever you wish. These instructions are
consistent with Microsoft Backup as contained in Windows 98. If you are using Windows 95 there
may be some slight differences in this routine.
Selecting Your Backup Media
The choice of media onto which you backup your data is yours. Microsoft Backup can backup
data onto floppy disk, zip disk or tape. If you have a large number of sites it may take more than
one floppy disk however because it compresses backup data a single floppy can hold a large
number of sites.
Creating a Microsoft Backup Job of Your Exteris Data
(If Microsoft Backup is not installed on your computer, refer to the Installing Microsoft Backup
section of this manual. If you attempt to start Microsoft Backup as instructed below and you
cannot find it, it is probably not installed on your computer.)
The first time you use Microsoft Backup you must create your backup job. Once this is complete
you will be able to select to use this job in the future to quickly backup your Exteris Data.
Creating a Microsoft Backup Job
To begin the process, open Microsoft Backup by selecting the Start Menu then clicking on
Programs, then selecting Accessories, then selecting System Tools, and then finally selecting
Backup as illustrated below. If Backup is not an option refer to the Installing Microsoft Backup
section of this manual.
94
Call 1-888-Exterra for support
The following dialog box will appear on the screen. Select No to continue.
On the next screen, select Create a new backup job and then press OK.
95
Call 1-888-Exterra for support
On the next screen select Back up selected files, folders and drives and then press the Next
button.
This will bring up the screen with which you select the files you want to backup which in this case
is your Exteris data. To do this click the + (plus) symbol next to your C: drive. Then click the +
(plus) symbol next to the EXTERIS folder. Finally click the empty box next to the DATA
folder. A blue check will then appear in the box next to the DATA folder as shown below.
Once this is selected press the Next button to continue.
96
Call 1-888-Exterra for support
On the next screen select to backup All selected files. Then press the Next button.
Next you must select where you which to store the backup data. Please place a disk in the
floppy or zip drive you wish to use for the backup at this time. You do this by selecting the
folder icon (cartoon that looks like a file folder) next to the name MyBackup.qic.
97
Call 1-888-Exterra for support
At this time the following box appears in which you should select your floppy drive or zip drive.
Press the down arrow next to Look in to pull down the drive listing.
The next step is to name the backup file. You do this by typing the name Exteris in the File
name box as you see below. Once this is done press the Open button.
98
Call 1-888-Exterra for support
This will return us to the following screen on which the correct file name and the drive letter of the
medium on which you are backing up data is displayed. Press the Next button to continue.
You will now see the backup options screen. Please make sure that both options are selected
(checks are in both boxes). Press the Next button to continue.
99
Call 1-888-Exterra for support
Finally we arrive at the backup naming screen. Please name the job Exteris as you see in the
window below, and then press the Start button to make your backup.
Once the backup is complete you will see a screen similar to the next. You may press the OK
button on both confirmation screens, and then click the close button (X in the top right corner) to
close te Microsoft Backup program.
.
100
Call 1-888-Exterra for support
You will have now successfully completed a backup of your Exteris Data. Please remove the
backup disk and store it in a safe location. It is recommended that you keep two or more backups
of your data in safe locations in case one of the floppy disks ever fail.
101
Call 1-888-Exterra for support
Backing Up an Existing Exteris Backup Job
(You should be here only if you have already created an Exteris backup job as explained in the
last section).
Once you have created an Exteris backup job using the steps above, you will be able to backup
your Exteris data in just a few short steps.
Using an Existing Backup Job to Backup Exteris Data
Open Microsoft Backup by selecting the Start Menu then clicking on Programs, then selecting
Accessories, then selecting System Tools, and then finally selecting Backup.
102
Call 1-888-Exterra for support
On the next screen select Open an existing backup job and then pressing OK.
Next select the existing backup job named Exteris by clicking on it and then clicking on the
Open button.
103
Call 1-888-Exterra for support
When the screen below appears insert the floppy or zip disk on which you wish to backup your
data, and press the Start button to perform the backup.
When the backup is complete you will see a screen similar to the following screen. Press the OK
button on both confirmation screens, and then click the Close button (X in the top right corner)
on Microsoft Backup to close Microsoft backup.
.
104
Call 1-888-Exterra for support
Installing Microsoft Backup
If you are reading this section, it is most likely because you failed to find Microsoft Backup when
you searched for it on your computer. If this is the case, you will need to install Backup using the
procedure below. Please note that this procedure may prompt you to insert your Windows
installation media. Windows installation disks are provided with your computer at the time of
purchase. Please contact your computer manufacturer if you do not have the necessary disks.
Installing Microsoft Backup
Open the Control Panel by selecting the Start Menu > Settings > Control Panel.
Next double click on the Add/Remove Programs selection in the Control Panel.
105
Call 1-888-Exterra for support
This will bring up the following box. Please click on the Windows Setup tab to bring up the list of
Windows Components.
106
Call 1-888-Exterra for support
Scroll to the bottom of the Components list until you find System Tools.
following three options based on the following.
Select from the
1) Box besides System Tools contains check and gray background (This means that only some
system tools are presently installed on your computer. This procedure will install all of the system
tools).
a) Click on the check mark. Check will disappear and box background will turn white.
b) Click on box again and check will appear in the box on white background.
c) Click ok to install the components. Go to the next section sentence below #3.
2) Box does not contain check (No System Tools are installed on your computer. This procedure
will install all of the system tools.
a) Click on the box and a check will appear in the box on a white background.
b) Click ok to install components. Go to the sentence below #3.
3) Box contains check and white background (Your system already has Microsoft Backup
installed. Cancel and go back to the correct section of the Backup procedure.
When you have clicked OK, Windows may prompt you to insert the Windows Installation Disk (as
supplied to you by the computer manufacturer - not your Exteris Installation Disk.
Microsoft Backup is now loaded on your computer. Once this process is complete, close the
Control Panel and go to the Creating a Microsoft Backup Job section of this manual.
107
Call 1-888-Exterra for support
Index
, 20
expiration of, 21
Adobe Acrobat Reader, 75
Alpha Stations, 31, 32, 77
Authorization Code
quarterly update, 60
backup data, 62
Installation Workorders
reprinting, 77
Job Type, 26
lost workorder, 47, 61
Main Meu, 24
Manuals
printing, 75
Modifying A Site, 49
, 20
Pending Site Installation Report, 53
Perimeter Linear Feet, 27
Period of Predicted Limited Activity, 78
configure period length, 57
enable/disable by site, 49
report by zipcode, 57
PLA. See Period of Predicted Limited Activity
Post-assigned Barcode
definition, 7
Pre-assigned Barcode
definition, 7
Pregenerate Installation Workorder, 25
printer configuration, 22, 61
printing documents from CD, 75
Purge data, 61
Rebuild barcode database, 61
Reports, 53
reprinting workorders, 35, 47, 61
route prediction, 38
serial numbers
entering, 31
Site Check Date Forecaster, 53
Site Discrepancy Report, 53
Site Discrepany Report, 46
Site Information Editor, 48
Site Information Rreport, 53
site plan
printing, 38, 39, 51
station comments, 33
Station comments, 32
Station Information, 34
Station Information Editor, 50
Station Only System Use
converting, 52
Suspending/Unsuspending a Site, 50
Symbol explanations
inspection data entry, 46
, 20
technical support mode, 61
assigning, 27
entering, 31
, 17
processing, 41
reconciling, 44
Check Period Configuration Report, 54
check periods
configure by site, 50
configuring, 55, 77
Colony Elimination
confirming, 59
configuration, 60
Deleting A Site, 49
Deleting a Station, 51
Export data, 22, 62
to text file, 63
, 64
, 20
ExScanner, Activating Exteris, 61
ExScanner, Preferences Button, 68
ExScanner, Printing User's Manual, 67
Exteris, Activating Beam Receive, 68
Feeding Cessation Report, 59
Individual Site Information Report, 35
Individual Station Information Report, 54
Inspection Data
entering, 45
Inspection Workorder
entering data from, 43
expiration, 55
force generating, 39, 51
reprinting, 35, 47, 61
Inspection Workorders
printing before due, 77
reprinting, 77
, 20
Installation Workorder
entering data, 28
field generated, 33
printing, 28
reprinting, 35, 47, 61
108
Call 1-888-Exterra for support
Initial Installation Instructions for EXTERIS and/or
ExScanner Software (1.90)
Operator Name _________________________________________________________
Operator Code_________________ Activation Code____________________________
Exteris can only be installed on a
personal computer running Windows 95
or later with a CD-ROM drive. In addition
to Exteris and ExScanner software,
Adobe Acrobat Reader and documents
that can be read with Adobe Acrobat
Reader are also included on the CD-ROM.
Be sure to terminate any other
applications that are running when you
are installing new software.
Exteris starts by first taking you to the
Configuration Screen shown below.
Host Computer Exteris and ExInspect
Installation
The following instructions assume that A is a
3 1/2” floppy drive and C is your hard drive.
All host computer and ExScanner software
are contained on the Exteris CD-ROM.
Place the CD-ROM in your host computer
CD-ROM reader. Make sure you install the
CD-ROM with the correct side facing up.
(Side with writing or label on it should be
facing up). Within a few moments a screen
will appear that prompts you to transfer
software from the CD ROM to your
harddrive. If this screen does not appear,
click on My Computer > CD-ROM Drive from
the Windows desktop.
Follow the
instructions for installing the software on
your computer. When you have done this,
you will have transferred all related Exteris
programs onto your computer’s hard drive.
Exteris has also now been installed on your
computer. You must now enter personalized
information to begin use of Exteris as
explained in the manual under Starting
Exteris and also explained below.
Enter your Operator Code and Activation
Code along with the other information you
are prompted to enter. After you enter this
information, you will be taken to the data
export routine where you will be required to
peform an initial data export. Follow the
instructions to perform an export. You must
have an active internet connection to
successfully perform an internet export.
Installation of Exteris on your host computer
is now complete. Exit Exteris by pressing
the Esc key. In the future you restart Exteris
by clicking on the Exteris Shortcut Icon on
the Windows Desktop Screen.
Configuration Screen
Start Exteris. Click on the Exteris icon that
has been installed on your Desktop. You
can also start Exteris by going to Start >
Programs > Exterra > Exteris.
109
Call 1-888-Exterra for support
The screen pictured above and other
screens similar in appearance will appear.
You will be asked a series of questions the
answer to which is usually next. You will
also be asked to choose between a typical
and custom installation. Choose typical.
After this you are prompted for your
name. Instead of your name enter Palm1
for your first ExScanner.
The software will then attempt to confirm
which host computer COM port you have
attached the cradle or cable to. If you are
using a cable instead of a cradle you may
receive an error that the software cannot
detect the cradle (the software is not
designed to properly detect the cable). If
this happens you will then be asked to tell
the computer which COM port the cable is
attached to. Click on the number of the
COM port to which you have attached the
cable. If you do not know, enter COM 1. (If
you make an error in selecting the COM port
see the instructions for correcting the error
at the end of the Installation Instructions.
At the end of the installation process you will
be asked whether or not you want to install
Mail software. Answer no to this question
unless you plan to utilize the ExScanner for
this non-Exterra purpose.
Synchronizing and Installing ExInspect
Software on the ExScanner
Power up the ExScanner, calibrate the
screen as directed and enter the correct
date and time. Once this is done, click the
Home button on the ExScanner with the
stylus to go to the ExScanner Home Screen
as pictured below. Refer to the Quick
Reference manual that came with the
ExScanner if you have any questions.
Connecting ExScanner to Host
Computer
(Refer to the Getting Started with an
ExScanner section of the Exteris User's
Manual for instructions on attaching the
ExScanner to your Host Computer and
actually using the ExScanner).
Installing ExScanner Related Software on
the Host Computer
Do not proceed unless you have:
1) attached the cable or cradle to the host
computer as explained in the Getting Started
with an ExScanner section of this manual.
2) put the batteries in your ExScanner and
fully charged the ExScanner.
(Begin the installation process by installing
Hotsync. This process differs depending on
which type of ExScanner you are using as
explained below.)
Installing Hotsync on the ExScanner
Handspring Visor Hotsync Installation
If you are installing a Handspring Visor
install Hotsync on the host computer
according to the instructions in the
Handspring supplied instruction manual.
After finishing this skip to the Synchronizing
and Installing ExInspect Software on the
ExScanner section in the next column.
SPT1700 Hotsync Installation
Begin installation of the ExScanner related
software on the host computer by inserting
the Exteris CD-ROM in your CD-ROM drive.
Wait for the Main Installation Screen to
appear. Once it appears click on the Install
HotSync Software button on the Main
Installation Screen.
110
Call 1-888-Exterra for support
is nomally Palm1, the name you had entered
earlier during the Hotsync installati process,
however it may be different if you chose
another name or are syncing more than one
ExScanner).
If this is not the only ExScanner you are
synchronizing, you will need to enter a
different name for each ExScanner by
pressing the new button on the screen and
entering the name of each ExScanner one
at a time. Once you have entered names for
the additional ExScanners, such as Palm2,
etc., you must then select that name and
press OK to sync that ExScanner. Be sure
that each time you HotSync a different
ExScanner that the ExScanner attached
to the cable/cradle is the one whose
name you have selected to HotSync.
(If you have any questions about the
HotSync
process,
refer
to
the
manufacturer's users manual.)
HotSyncing the Host Computer and the
ExScanner for the first time
If you are using a cradle:
Place the ExScanner in the cradle. Press
the button on the cradle. The ExScanner
has been automatically hotsynced with the
Host Computer when the words HotSync
operation complete (or words to that effect
depending on the model of your ExScanner)
appear above the large Hotsync icon that
appears on the ExScanner screen.
If you are using a cable:
Attach the ExScanner to the cable. Turn the
ExScanner on by pressing the red button.
Go to the home screen by touching the
house icon with the stylus. Select HotSync
on the ExScanner Home Screen by touching
the Hotsync icon with the stylus (find the
HotSync icon on the screen - a circle with
two arrows pointing inward).
A large
HotSync icon will then appear in the middle
of the screen. Touch this button with the
stylus.
The ExScanner has been
automatically hotsynced with the Host
Computer when the words HotSync
operation complete (or words to that effect
depending on the model of your ExScanner)
appear above this button on the ExScanner
screen.
Identifying ExScanner to Host Computer
Once you have done either of the above, a
companion HotSync program will be
launched on the Host Computer after a few
moments.
This program will ask you to select a user (to
identify this specific ExScanner). Select the
name you wish to use with the ExScanner
that is attached to the host computer. (This
111
Call 1-888-Exterra for support
appear above the large Hotsync icon that
appears on the ExScanner screen.
If you are using a cable:
Attach the ExScanner to the cable. Turn the
ExScanner on by pressing the red button.
Go to the home screen by touching the
house icon with the stylus. Select HotSync
on the ExScanner Home Screen by touching
the Hotsync icon with the stylus (find the
HotSync icon on the screen - a circle with
two arrows pointing inward).
A large
HotSync icon will then appear in the middle
of the screen. Touch this button with the
stylus.
The ExScanner has been
automatically hotsynced with the Host
Computer when the words HotSync
operation complete (or words to that effect
depending on the model of your ExScanner)
appear above this button on the ExScanner
screen.
Installing ExInspect on your
ExScanner including updated
Versions
Now that you have established the identity
of the ExScanner and communication
between the ExScanner and the Host
Computer, the next step is to transfer the
ExInspect software from your host computer
to the ExScanner.
Initiate this process by going to Start >
Programs > Exterra > Install ExInspect on
ExScanner.
When this process is initiated, a small box
will appear on the screen. In this box, you
must select the name of the ExScanner to
which you want to download the ExInspect
software at this time. Once you have done
this, another box will appear confirming the
software has been installed. When this
screen appears all you must do is press the
Done Button.
If you have registered multiple ExScanners,
you will have to repeat the entire process
over again from the Main Installation Screen
for each ExScanner by pressing the Install
ExScanner Software button.
HotSyncing ExScanner to ExInspect
Software Again
The ExScanner software has now been
installed. You must now transfer initial data
from your host computer to your ExScanner.
If you are using a cradle:
Place the ExScanner in the cradle. Press
the button on the cradle. The ExScanner
has been automatically hotsynced with the
Host Computer when the words HotSync
operation complete (or words to that effect
depending on the model of your ExScanner)
Notifying Exteris that you are using
an ExScanner
Restart Exteris by clicking the Exteris icon
on your Windows desktop. From the Exteris
Main Menu select Utility Menu>ExScanner
Configuration. Answer yes to the question
that appears.
This end the installation
process for the ExScanner.
Correcting COM Port Selection
If you have selected the wrong COM Port for
your cable or cradle, find the red and blue
circle with two inward pointing arrows at the
lower right corner of your Windows desktop
(Close to the clock). Click on this circle.
A vertical bar will appear. Select Setup on
this bar. Then click on the Local tab on the
screen that appears. Finally, select the
number of the correct COM port and click
OK.
112
Call 1-888-Exterra for support