1
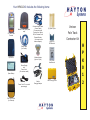
Your HPK012 Kit includes the following items:
SPT1800 Palm
Terminal
Modem Cradle (with phone
cord)
Communication Cable:
(Comm Cable)
For connecting the
Terminal to a Laptop
OR the Terminal to an
External Modem
(this requires the
modem adapter)
(5) Spare Stylus
Pole Track
LinksPoint
GPS Module
Serial Cable
(for Cradle)
Spare Battery
Soft Carry Pouch
(for Terminal)
Pole Track
User Manual
H
K
0
Power Supply
with
Power Cord
(For modem cradle)
Power Cord: For use with
power supply
Contractor Kit
P
Modem Adapter
(9 pin to 25 pin)
Hip Pouch
Verizon
1
Vehicle
Charging Adapter
Hard Carrying Case
2
QUICK START INSTRUCTIONS FOR HPK012
If you are a new user to Palm based computers, see your ATS User Manual or Symbol Quick Reference Guide for guidance on entering text.
1. Plug one end of the phone cord into the Line-In
port on the back of the cradle. Plug the other end of
the phone cord into a telephone wall jack.
11. Tap on Digitizer and follow the on-screen instructions
to align the touch screen digitizer. It is extremely
important that this is completed accurately.
2. Plug a Power Supply into the 9 VDC plug on the
back of the cradle. Connect one end of the power
cord to the power supply and plug the other end of
the power cord into a wall outlet.
12. Tap the Application Launcher
icon until the All
category name shows on the upper right corner
of the screen.
3. Place the spare battery pack into the charging slot
on the top of the cradle (contacts down and facing
the back of the cradle). Gently push the battery pack
until the charging light illuminates (leftmost light on
the cradle). A red light means the battery is charging
and green means it is fully charged.
4. Remove the terminal from the yellow carry
pouch. Place it in the cradle for approximately 30
minutes to charge the battery fully. The status light
for the battery being charged inside the terminal is
the rightmost light on the cradle. Again, red means
charging, green means fully charged.
13. Using the vertical scroll bar on the screen if
necessary, find the Restorer
icon then tap OK
.
icon. Tap the Restorer
14. Once Restorer has finished running , it may
automatically launch ATS Register. If it does launch it,
tap on Cancel to go back to the Application Launcher.
15. At the Application Launcher, using the vertical scroll
bar on the screen if necessary, find the ATSync
and tap it. Next, tap on the Pull down Menu
(just below the Application Launcher icon).
icon
icon
5. Once the battery in the termnal is fully charged you
are ready to start setting up the terminal. Press the
red button on the terminal to turn it on.
16.Tap Configure. This brings up the ATSync Settings
screen. You will now need to change some settings to
reflect the following:
6. Remove the yellow stylus from the back of the
terminal.
8. Using the vertical scroll bar on the screen if
a. Logon: floyd
b. Password: floyd
c. Server: 143.091.038.150
d. Alt Server: should be blank.
e. Port: 4040
f. LoadBal: box should be unchecked
g. Resource: gps
h. Autoconn: should be unchecked
necessary, find the Prefs
Prefs icon.
17. Tap OK and this will take you back to the original
ATSync screen. Place the terminal in the cradle. Tap
7. Using the stylus, tap the Application Launcher
icon until the All category name shows on the
upper right corner of the screen.
icon. Tap on the
9. Set the date and time (if they are not correct) by
tapping the desired “outlined” item on the screen then
selecting the correct settings.
10. Pull down the drop menu by tapping on the
General category in the top right corner of the
screen.
18. Once the download is complete, tap OK (session
complete). You will then be back at the main ATSync
screen. Tap the Application Launcher icon.
IMPORTANT!!
If your terminal is an SPT1700* you are done.
If your terminal is an SPT1800* you must complete
the following steps before using Pole Track or GPS
Check:
a. At the Application Launcher, tap on the Pull Down
Menu icon.
b. On the App menu, tap on Delete.
c. On the list of applications, tap on PwrDvr35 (you
may have to scroll down to see it).
d. Tap on the Delete button.
e. Tap on the Done button.
* The model number appears in the battery well.
Remove the battery and quickly note whether
the model number says SPT1700-xxxxxx or
SPT1800-xxxxx. The x’s represent several different
configuration numbers and are not important to this
task. Do not leave the battery out any longer than
necessary or loss of programs and data will occur.
connect
. NOTE: To set a pre-dialing string,
contact Hayton Systems and we will walk you through that
process.
For additional support call:
1-800-990-8360