1
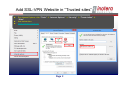
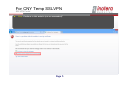
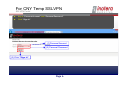
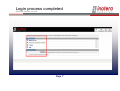
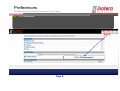
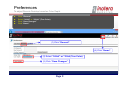
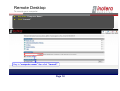
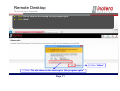
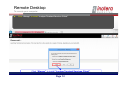
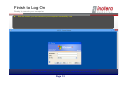
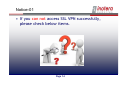
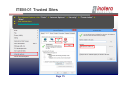
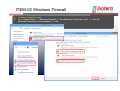
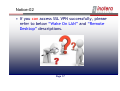
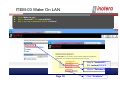
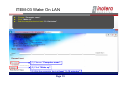
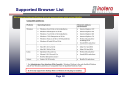
IMI. SSLVPN For CNY Temp
SSLVPN User Manual
Page 1
Add SSL-VPN Website in “Trusted sites”
Run Internet Explorer, click “Tools” “Internet Options” “Security” “Trusted sites” “Sites”
Add below sites:
https://inovpn.inotera.com
Page 2
Enable ActiveX Component.
Run Internet Explorer, click “Tools” “Internet Options” “Security” “Trusted sites” “Custom level” ”ActiveX controls and plug-ins “ ”Allow previously unused ActiveX
controls to run without prompt “”Enable”
Click “OK”.
Page 3
For CNY Temp SSLVPN
SSLVPN Portal
Run Internet Explorer and connect to http://www.inotera.com/vpn IMI VPN portal.
Click hyper link “Temp SSLVPN”
Page 4
For CNY Temp SSLVPN
SSLVPN Portal
Click “Continue to this website (not recommended)”
Page 5
For CNY Temp SSLVPN
SSLVPN Portal
Key in “Personal Account” and “Personal Password”
Click “Sign In”
(1) Personal Account
(2) Personal Password
(3) Click “Sign In”.
Page 6
Login process completed
Now we can do our job
Page 7
Preferences
To adjust Remote Desktop Launcher Color Depth
Click ”Preferences “.
Click “Preferences”.
Page 8
Preferences
To adjust Remote Desktop Launcher Color Depth
Click “General” .
Select “24-bit” or “32-bit” (True Color).
Click “Save Changes”.
Click “Home”.
(1) Click “General”.
(4) Click “Home”.
(2) Select “24-bit” or “32-bit (True Color).
(3) Click “Save Changes”.
Page 9
Remote Desktop
To remote your computer
Key in the ”Computer Name“.
Click “Launch”.
Key in “computer name” then click “Launch”.
Page 10
Remote Desktop
To remote your computer
Click ”Do not show me the warning for this program again“
Click “Allow”.
(2) Click “Allow”.
(1) Click “Do not show me the warning for this program again”.
Page 11
Remote Desktop
To remote your computer
Click “Always” to install “Juniper Terminal Services Client”.
Click “Always” to install “Juniper Terminal Services Client”.
Page 12
Finish to Log On
Ready to remote your computer
See the screen, you can remote to your computer successfully now.
See the screen, you can remote to your computer successfully now.
Page 13
Notice-01
• If you can not access SSL VPN successfully,
please check below items.
Page 14
ITEM-01 Trusted Sites
Run Internet Explorer, click “Tools” “Internet Options” “Security” “Trusted sites” “Sites”
Add below sites:
https://inovpn.inotera.com
Page 15
ITEM-02 Windows Firewall
To disable Windows Firewall.
Click “Control Panel” “Windows Firewall” “Turn Windows Firewall on or off” “Turn off
Windows Firewall (not recommended)” “OK”
Page 16
Notice-02
• If you can access SSL VPN successfully, please
refer to below “Wake On LAN” and “Remote
Desktop” descriptions.
Page 17
ITEM-03 Wake On LAN
Click “Wake On Lan”.
Key in “inotera\ID”, EX: inotera\Q00812.
Key in your log on password Click “Continue”.
Key in “inotera\ID”,
EX: inotera\Q00812
Key in “Password”.
Page 18
Click “Continue”.
ITEM-03 Wake On LAN
Choose “Computer name”.
Click “Wake up”.
Wait the computer boot at least “5~10 minutes”.
(1) Choose “Computer name”.
(2) Click “Wake up”.
(3) Wait the computer boot at least “5~10 minutes”.
Page 19
Supported Browser List
We recommend Internet Explorer 9 for get least problems while using SSLVPN.
Page 20


![ccc china compulsory certification [en] [eusmecentre]](http://vs1.manualzilla.com/store/data/005895639_1-4460a1644c2b8bcf262561010344a9d8-150x150.png)

![FCB Modem Software User Manual [ 002706 ]](http://vs1.manualzilla.com/store/data/005828465_1-1c68a7b174dea68ac1a15f0d4e9b2df8-150x150.png)