1
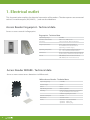
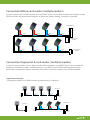
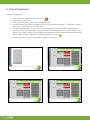
&
User Manual
Access control
V 0.2
®
Last update: July 2012
All software-related descriptions refer to the software V1279. We recommend to update older versions of the system.
Small deviations in the description because of software changes are possible.
All listed brands and logos are registered trademarks of their respective owners.
Copyright
All rights reserved. Without the the prior written permission of the publisher, no part of this document for any purpose, be reproduced or transmitted, and regardless of any form or by any means, electronic or mechanical, this is
happening.
If this publication is made available on media by Ekon GmbH, GmbH Ekon grant permission, copies of the information
contained in this file is only for private use and not to download or print for redistribution. No part of this publication
may be changed, modified or used for commercial purposes. Ekon is not liable for damages resulting from the use of
an illegal modified or altered publication.
The devices comply with the relevant guidelines and standards of the EU.
2
Table of Content
1. Electrical outlet. . . . . . . . . . . . . . . . . . . . . . . . . . . . . . . . . . . . . . . . . . . . . . . . . . . . . . . . . . . . . . 4
2. Software activation at the myGEKKO . . . . . . . . . . . . . . . . . . . . . . . . . . . . . . . . . . . . . . . . . 8
3
3
1. Electrical outlet
This characterisation explains the electrical connection of the readers. The door openers are connected
to the I/O module outputs (RIO, WAGO,…) and not described here.
Access Reader Fingerprint - Technical data
Serves as access control via fingerprint.
Fingerprint - Technical data
Input voltage range
8-24 VDC
Biometric characteristics
FAR 1 x 10⁻⁶ / FRR 1,4 x 10⁻²
Mounting
surface-mounted / flush-mounted box
Degree of protection
IP 44 – Surface-mounted model 2.0
IP 33/44/64 Flush-mounted model 2.0
(depending on switch ranges)
Operating temperature
-25° - +75° C - Surface-mounted model 2.0
-30° - +70° C - Flush-mounted model 2.0
Dimensions
45 x 81,6 x 60,3 mm Surface-mounted model 2.0
50,4 x 50,4 x 30,1 mm Flush-mounted model 2.0
Art. Nr.
ACC-ACC50 (Surface-mounted model 2.0)
ACC-ACC55 (Flush-mounted model 2.0)
Access Reader MIFARE - Technical data
Serves as non-contact access detection via Mifare cards.
Mifare Access Reader - Technical data
Input voltage range
9-12 VDC
Function range
70 mm
Colour
black
Chip/Reading standard
Mifare 13,56 Mhz
Mounting
flush-mounted box with device screws spacing 60 mm (Example Kaiser 1055-04)
2 LEDs for signalling door status
4
Current consumption
110 mA
Dimensions
108 x 86 x 12 mm
Art. Nr.
ACC-ACC01 Access Reader black
QU000401 Mifare card
QU000402 Mifare keyring
Connection fingerprint (1 reader) flush-mounted
If there is only one reader a terminating resistor is not required.
Interface converter
RS232/RS485
Optional power
supply: 7-12VDC
PWR+
RX-
Pin assignment:
1 = TRX2 = TRX+
3 = GND
4 = +9-24VDC
Art. ACC-RS401
PWRJumper SW1 (485-2W)
must be in position ON!
RX+
+9-24VDC
GND
TRXTRX+
Recommended cable for RS485 bus line:
Profibus L2FIP 1x2x0,65
Connection fingerprint (1 reader) surface-mounted
If there is only one reader a terminating resistor is not required.
Interface converter
RS232/RS485
Optional power
supply: 7-12VDC
PWR+
PWRRX-
Pin assignment:
1 = TRX 2 = TRX +
3 = GND
4 = +12 VDC
Art. ACC-RS401
Jumper SW1 (485-2W)
must be in position ON!
RX+
+12 VDC
GND
TRXTRX+
Recommended cable for RS485 bus line:
Profibus L2FIP 1x2x0,65
Connection MIFARE Reader (1 Reader)
If there is only one reader a terminating resistor is not required.
Optional power
supply: 7-12VDC
Interface converter
RS232/RS485
PWR+
Art. ACC-RS401
PWRRXRX+
TRX-
Pin assignment:
Pin 2: +9-12VDC
Pin 3: GND
Pin 6: TRXPin 7: TRX+
Jumper SW1 (485-2W)
must be in position ON!
TRX+
GND
+9-12VDC
Recommended cable for RS485 bus line:
Profibus L2FIP 1x2x0,65
5
Interfaces
The access readers are connected to an RS485
interface. Therefore, use an RS232/RS485 interface
converter. The interface converter can either be
connected directly to the free myGEKKO Touch
interface or to the interface distributor USB/quadruple RS232 (Art. Nr. ACC-RS201). You have a
maximum of 5 interfaces on a myGEKKO Touch
with distributor.
Connection via
Inteface
COM 1
with interface converter RS485 / RS232
RS485
USB-COM 1-4
with USB interface distributor and interface converter RS485 / RS232
Connection fingerprint (multiple readers)
You can connect up to 8 fingerprint readers to a myGEKKO Touch (divided among 2 RS485 interfaces).
A maximum of 4 fingerprint readers can be connected to an RS485 interface.
Interface 1
PWR+
PWRRX-
120 OHM
+24VDC
GND
+24VDC
GND
+24VDC
GND
RX+
+24VDC
GND
TRXTRX+
120 OHM
Terminating resistor
120 OHM
Terminating resistor
120 OHM
Interface 2
PWR+
PWR-
120 OHM
RX-
6
+24VDC
GND
+24VDC
GND
RX+
+24VDC
GND
TRXTRX+
120 OHM
Terminating resistor
120 OHM
+24VDC
GND
Terminating resistor
120 OHM
Connection Mifare card reader (multiple readers)
You can connect up to 8 Mifare readers to a myGEKKO Touch. It is possible to connect all 8 readers to one
RS485 interface. We recommend, however, to divide the readers among 2 interfaces if possible.
Interface 1
PWR+
PWRRX+9-12VDC
GND
+9-12VDC
GND
+9-12VDC
GND
RX+
+9-12VDC
GND
TRXTRX+
120 OHM
+9-12VDC
GND
+9-12VDC
GND
+9-12VDC
GND
120 OHM
+9-12VDC
GND
Terminating resistor
120 OHM
Terminating resistor
120 OHM
Connection fingerprint & card reader (multiple readers).
A total of 8 access readers (access doors) can be administrated by a myGEKKO Touch. You may operate
fingerprint and Mifare readers simultaneously on a myGEKKO Touch. Mifare and fingerprint readers
have to be connected to separate interfaces and a total number of 8 readers may not be exceeded.
Application example:
5 fingerprint readers and 3 Mifare readers divided among 3 interfaces
Interface 1
PWR+
PWRRX+24VDC
GND
120 OHM
+24VDC
GND
+24VDC
GND
RX+
+24VDC
GND
TRXTRX+
120 OHM
Terminating resistor
120 OHM
Terminating resistor
120 OHM
Interface 3
Interface 2
PWR+
PWR-
PWR+
RX-
RX+24VDC
GND
RX+
TRX-
120 OHM
PWR+9-12VDC
GND
+9-12VDC
GND
RX+
+9-12VDC
GND
TRXTRX+
TRX+
120 OHM
Terminating resistor
120 OHM
Terminating resistor
120 OHM
7
2. Software activation on the myGEKKO
1. Reader activation
1.1 Fingerprint reader activation
Caution!
To operate more fingerprints on one port only one fingerprint may be connected for initial allocation. All others have to be disconnected in the meantime!
Log in as configurator. The green/red LED on the fingerprint starts flashing.
1. Select access in the system menu and tap
2. Push ‘NC’ (1) on the first reader and select ‘fingerprint’ as reader. Select the used interface in
the port section.
3. Push ‘>>’ on the right-hand side and select ‘initialise’. The serial number is being readout. The
serial number will be displayed if the readout works properly.
4. Repeat these steps for all other fingerprint readers.
Please note that only one fingerprint per port (RS232)may be connected. Otherwise, the
serial number cannot be read out correctly!
After reading in the fingerprints all readers may be connected. The LED has stopped flashing.
1
8
Overview Access reader
Select fingerprint reader
Read-out of serial number
Correct allocation – Serial number is being displayed
1. 2 Mifare reader activation
The Mifare readers are assigned the same way as the fingerprint readers. The only difference is that the
serial number of the Mifare reader is not read out automatically. Save it manually in the ‘serial number’
box. The serial number can be found on the backside of the Mifare reader. To activate the reader select
‘initialise’ subsequently.
2. Door assignment
Log in as configurator.
1.
2.
3.
4.
Select the first free door (1) in the access main menu
Select IO configuration (2).
Tap the title bar and save the designation of the door (3)
Define the card reader as ‘connected’ (4). Select the installed reader (5) and the desired LED
scheme (see page 14).
5. Now assign the switching output to the door (6). Depending on manufacturer and model the
door opener may be controlled differently. It can be distinguished between open, keep open,
pulse open and pulse close. The ‘impulse duration’ (7) can be saved on the 2nd level (Parameter).
3
1
2
IO configuration Front door
Main menu Access
7
6
4
Assignment card reader
5
Definition pulse time
9
3. User assignment
Log in as configurator.
1.
2.
3.
4.
Select the ‘user’ symbol in the main menu
Select the first free card.
Save the cardholder’s name in the ‘person’ section.
Activate the authorisation via tapping the key of the respective door (1). If the key is yellow
they card is activated for this/these door/s.
5. You have the possibility to set a time limit for the access. For this purpose, define the access time of the individual doors via a time clock. This limitation holds only for ‘normal users’.
Persons with admin rights are excluded from limitations and may open the door at any time.
Admin rights can be assigned via tapping the admin user (2).
6. Now scan the access card or the fingers (siehe 3.1 bzw. 3.2)
1
2
Overview access cards
Display access card
4
3
Display access card with activated rights
10
Scan card or finger
3.1 Scanning of fingers
Log in as configurator.
Caution: Since the data is saved directly on the reader, the finger/fingers have to be scanned separately for any fingerprint reader!
1.
2.
3.
4.
5.
6.
7.
8.
Select the desired user in the access card overview (menu – user).
Tap the red ‘scan’ button next to the finger menu item (3).
Select the finger you want to scan.
The LED display on the fingerprint laser starts flashing. Swipe the selected finger top down
over the reader.
If the Led is green the finger has been scanned correctly. Each finger has to be scanned 3
times.
If the Led is red the finger was not scanned. Swipe the finger oncemoreover the reader.
Assign a different finger to the function ‘keep open’. Scan the finger as described above and
select the finger via the ‘keep open’ button.
Repeat these steps for any finger you want to scan.
3.2 Scanning of a Mifare card
Log in as configurator.
You can scan the Mifare card once for all readers.
1. Select the desired user in the access card overview (menu – user).
2. Tap the red ‘scan’ button next to the menu item (4).
3. The card may be scanned now if the red and green LEDs on the reader start flashing.
Hold the card in front of the reader.
4. If the card has been scanned correctly the LEDs stops flashing and the ID number of the Mifare
card is displayed in the green area below ‘card’.
5. Moreover, you may activate the ‘keep open’ function. The commands keep open or lock are
executed if the card is hold in front of the reader for an extended time.
6. Repeat these steps for any user you want to assign a card.
3.3 Deleting users
Log in as configurator.
Caution: It is not possible to delete only one of a user’s fingers. Hence, the entire user profile has to be
deleted and recreated if desired!
1. Go to access cards overview (menu - user)
2. Delete the user by tapping the ‘delete’ button.
11
4. Time-controlled access control
Log in as configurator.
Sie können über eine Zeituhr den Zugang zeitlich beschränken. Diese Beschränkung gilt nur für “normalen Benutzer”. Personen mit Admin-Rechten sind von der Beschränkung ausgeschlossen und können
die Tür jederzeit öffnen.
1. You may set a time limit for the access via a time clock. This limitation holds only for ‘normal users’. Persons with admin rights are excluded from limitations and may open the door at any time.
2. Select the first free time clock (1) in the time clock menu.
3. Tap the first selection box and under access select the corresponding door (2).
4. Select between (3) open, keep open, lock, enable card reader and disable card reader and define
the desired weekday as well as starting time (4). .
2
1
Overview time clocks
3
4
Setting of the time clocks
5. Zutrittsprotokoll
Any movement of the reader gets logged. Hence, you can control who used which reader at what time.
1. Tap the ‘printer’ symbol in the access menu
2. All movements can be controlled in the access log.
3. We recommend to save the access log (and all other files) on a USB flash drive or externally (NAS
with enabled NAF). The access log can thus be analysed on a PC.
If the access log does not show any files the list buffer has to be defined.
For this purpose, go to main settings
-> data / log -> storage lists the location for all lists (access,
Overview access log
12
6. Actions
6.1 Actions at reading events
Actions may be assigned to any door opener. These may be defined for: open, keep open, lock or not
authorised. Hence, it is possible to e.g. turn off the entire house lighting via the door action ‘lock’.
Log in as configurator.
1. Select the desired door opener in the access menu.
2. Change to the parameterisation level
3. Select the desired action (1) for each door authorisation.(1)
Select under “Event at card lenghty” from which actions are enabled:
•
Not enable: The actions “Open” and “Not enable” are available.
The actions “Hold open” and “Lock” are locked.
•
Enable/Lock:The actions “Open” , “Hold open”, “Lock” and “Not enable” are available.
Action Lock: The actions “Open”, “Lock” and “Not enable” are availble.
The action “Hold open” is locked.
•
1
Parameterisation door
13
6.2 User actions
In addition to the general actions which hold for any authorised user there are user-specific actions.
Therein, you may assign an action to any finger or a user-specific action to any door.
Action per door
Log in as configurator.
1.
2.
3.
4.
Change to system menu -> rights/ level
Select action per door in the ‘access actions’ section
Change to main menu
-> user
Tap the hand icon and select an action for the desired door. Action 1 applies to door 1, action
2 applies to door 2, …
Action per finger
Log in as configurator.
1.
2.
3.
4.
14
Change to system menu -> rights/ level
Select action per finger in the ‘access actions’ section
Change to main menu
-> user
Tap the hand icon and select an action for the desired finger. Action 1 applies to finger 1, action 2 applies to finger 2, …
Selection menu in system menu
Overview access cards/user
Action per door
Action per finger
7. LED schemes on Mifare readers
When using MIFARE card readers you may choose among several LED schemes (1) for the respective
door in the configuration level
Scheme 1:
No LED is active when the door is locked.
At open red LED lights shortly.
At keep open green LED stays alight.
Scheme 2:
Red LED is active when door is locked.
At open green LED lights shortly.
At keep open green LED stays alight, red LED turns off.
Scheme LED-Red
Scheme LED-Green:
An output can be assigned to the section ‘indication contact LED’ (1).
If this output is activated the LED on the card reader lights red or green according to the chosen
scheme
1
Configuration level door
Scheme selection
15
www.my-gekko.com
A first class product of Europe!
The result of a close collaboration between
Italy, Switzerland and Germany
16