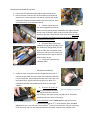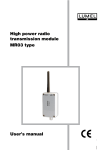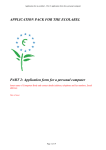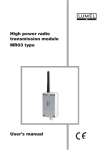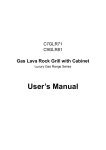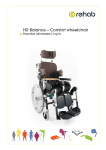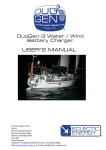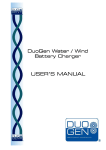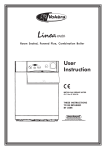
1
 Assembly Instructions and User’s Manual XT‐15 solo and XT‐16 double Assembly Instructions and User’s Manual for XT‐15 and XT‐16. Content: 1.
2.
3.
4.
5.
6.
7.
8.
General Frame Installing Frame in Skin Installing Seat Installing Deck Disassemby/packing Preparing for first time assembly Repair and Maintenance GENERAL Your new Pakboats XT series kayak includes many unique features to help you enjoy a high‐performance touring kayak that packs into a single, compact bag. The key to making a sleek, full‐length folding kayak with excellent performance is to give the hull the right stiffness. The XT accomplishes this by connecting the frame’s gunwale‐ and chine rods to form an I‐
beam on each side of the kayak. The I‐beams are formed by several 22‐inch sections that are firmly locked together by steel pins attached to each cross rib. Each cross rib connects to both I‐beams, and together they form a lightweight frame with integrity that is unique in such a light hull. Because the hull is completely symmetrical, it is almost impossible to assemble the frame incorrectly. Place the smallest cross ribs closest to each end and the widest at the center, then install the cross ribs on the I‐beams with the flat slats facing into the boat. The end‐to‐end tension of the skin is made by identical tensioning stems at each end. Simply clip the stems into the ends of the skin and operate the tensioning handles. Here are all the parts you need. Cross ribs and stems on the left, keel and side beams folded at the top center. Black skin and seat, red deck, and the pretzel next to the deck is the cockpit coaming. You will need the blue pump too. Figure 1 All the parts THE FRAME 1. To assemble the frame, start by unfolding the side beams. Remove the strap from each beam and connect the shock corded sections. See picture. 2. Place one of the beams on the ground with the flat slats facing up. Lay out the cross ribs with the widest ones at the center, narrowest at each end. Figure 2 Unfolding Lay out the keel (long single rod with plastic latch clips) next to the beam. I‐beams 3. The plastic clip at the center of each cross rib will connect to a corresponding latch clip at the keel (see Figure 5). Starting from one end of the beam, turn one end cross rib so that the open side of the plastic clip faces into the latch clip on the keel. This is just to get the right orientation. Do not connect to the keel yet. 4. There are holes drilled in the tubes at each joint where I‐beam modules come together. The holes face the other parallel rod. Insert the steel pin at the tip of the cross rib into the hole in the rod that is away from you. Another steel pin is attached to the lever that is about 5 inches from the tip of the cross rib. Make sure the lever is in the open position, insert its steel pin into corresponding hole in the rod closest to you, and snap the lever closed against the cross rib. DO NOT FORCE THE PINS. They should go in easily. 5. Repeat with the rest of the cross ribs. Please note that one latch clip on the end of the keel faces the opposite direction of the others. 6. Starting from the center, connect the other I‐beam to the cross ribs. 7. Lay out the frame with the cross rib centers facing up. 8. Starting with the latch clip that faces the opposite direction of the others, connect the keel to the cross ribs and secure the latches with the elastic bands. To connect each latch, separate the keel joint just enough to get the Figure 4 Adding the other end of the latch past the cross rib. I‐beam Figure 3 Installing cross rib Figure 5 Adding the keel 9. Insert the ends of each beam through the fabric loops on the stems as shown in Figure 6. 10. THE FRAME IS NOW COMPLETE. Turn it right side up. Figure 6 Connecting the stems to the frame INSTALLING THE FRAME IN THE SKIN 1. Lay out the skin and fold out the sides to expose the bottom. 2. Place the frame inside the skin, lift the handle at the bottom of each stem to a vertical position. Clip the top of each stem to the small piece of aluminum tube bolted to the tips of the skin. Press the handles down to a horizontal position. 3. Fold the sides of the skin Figure 7 Clip the stem to the skin over the top (gunwale) rod of the frame. Secure by pulling strings (attached to the edge of the skin at each cross rib position) down under the hook at the bottom of each rib pin lever, one half loop at the time. Note: Each string forms a complete loop. Both halves must be under the hook to provide the correct tension. Figure 8 Hook string loops to the frame Figure 10 Inflate the upper cells 4. At each end there are straps instead of strings. With the edge of the skin folded over the gunwale, pull the strap end with the male buckle under the bottom rod to the skin side and up to the female buckle. Tighten. Repeat with the other straps. 5. Inflate the top cells of the inflatable tubes. Figure 9 Securing the straps
INSTALLING THE SEAT(S) 1. Locate the seat. It should have shock corded aluminum rods in channels across under the seat. Locate short aluminum rods with C‐clips at each end. These rods connect the seat’s cross rods. The thick side of the C‐clips should face up (Figure 11). Note: The inflatable end of the seat should face forward. It is your thigh support. 2. (In the XT‐15 and XT‐16 Figure 11 Adding the seat side rails solo) Place the seat in the kayak with the forward cross tube end clips resting on the lower (chine) rod inside the ‘X’ formed by the flat braces at the center of the kayak. (In XT‐16 double) Place the bow seat with the forward cross tube end clips inside the 3rd ‘X’ from the bow. Place the stern seat with the rear cross tube just in front of the 2nd cross rib from the stern. Pull each seat strap under the chine rod, over the seat side rod and to the buckle under the seat. Repeat at the Figure 12 Securing seat straps other corners and tighten the straps. The seat is now secure. Inflate the thigh support (fill but do not pressurize). You can let air out to make the seat comfortable later. 3. Inflate the remaining 4 cells of the inflatable side tubes. They can be as hard as is fairly easy to do with the pump that comes with the kayak. INSTALLING THE DECK Figure 13 The deck Figure 15 Secure the end Figure 16 Compressing the hull to match Velcro 1. Lay out the deck upside down. Insert the diagonal rods into sleeves on the underside of the deck in front of the cockpit and close with Velcro tabs. A peaked aluminum cross piece should be in place just in front of the cockpit. Make sure it will point up once the deck is installed. A back band should be in place at the rear of the cockpit. Note: If you have thigh straps, they should remain permanently installed under the deck. The self inflating hip pads attach with snaps each time the kayak is assembled. 2. Hook the bow end of the deck over the bow. Make sure none of the Velcro deck seal is touching the outside of the hull. Move to the stern, and with your foot against the stern end of the hull, pull hard on the deck so it is quite tight. Then secure part of the Velcro seal. Secure the stern end of the deck with end straps. Figure 14 Stretch and secure the deck at the stern 3. Line up one side of the deck with the hull Velcro strip and press against it to secure. 4. Pull the deck tight across the boat and set the Velcro seal on the other side. It is easiest if the kayak is on its side and you can press down on the side to compress the hull slightly. 5. Unfold and assemble the shock corded cockpit rim. Insert the wide end of the cockpit rim under the deck to the rear, far enough to get the pointed bow end into place. Set the snap. Set the other two snaps (one on each side of the cockpit). Pull the cockpit rim up so it is snug against the top of the cockpit sleeve. 6. Locate the elastic cord under the stern end of the cockpit sleeve. Pull it forward around the cockpit, pull tight and run it back so it loops around the cockpit twice. 7. Tighten the elastic cord at the back of the back band. 8. Attach the self inflating hip pads if you have them. Figure 18 Tighten back band cord Your kayak is ready to go on the water. Get into the seat and let air out of the thigh support until it feels comfortable. Figure 17 Elastic cord around cockpit DISASSEMBLY/PACKING This is pretty straight forward. It is more or less the same as the assembly process – in reverse. But it may be helpful to point out some details. 1. Remove the inflatable hip pads (if you have them). Open the valves and roll the pads up tight. Close the valves. 2. Loosen the back band cord to make it easier to roll up the deck. Undo the elastic cord around the cockpit. Remove the cockpit rim. Fold up the cockpit rim by stepping on the stern end and lifting the bow end. Make sure all the parts are disconnected from each other. Twist the bow end 180 degrees and move it down to the stern end. This folds the cockpit rim as small as it can get. 3. Undo the straps at the back of the deck and peel the deck off the hull. Turn the deck upside down. Remove the straight rods in front of the cockpit (but leave the aluminum cross piece in place), place the self inflating hip pads (oriented across the deck) next to the back band and roll up the deck. Note: Back band, peaked aluminum cross piece, and thigh straps can stay permanently installed in the deck to make assembly/disassembly quicker and easier. 4. Open all the air valves to let air out of the hull side tubes and undo all the strings and straps securing the hull skin to the aluminum frame. Pull up the handles on the tightening stems to relieve the tightness of the skin. Unhook the skin from the frame and remove the frame from the skin. 5. Fold the skin lengthwise. The first fold along the edge of the keel reinforcement strip. Then fold in half (also lengthwise). Starting from the end opposite the air tube valves, fold the skin into a length that just fits inside the bag. 6. Remove the seat and open the thigh support valve. Remove the stems from the frame. Remove the cross ribs from the frame. Fold up the keel and side I‐beams, and secure the folded side beams with the short straps. PREPARING FOR FIRST TIME ASSEMBLY Your XT kayak may arrive without the back band and angled cross brace in front of the cockpit preinstalled in the deck. Figure 13 will help you install these parts correctly. The following will help you along. Back Band. 1. Locate the back band, the elastic cord, and the cord lock. See Figure 13. 2. Locate the two web loops at one edge of the back pad and insert the elastic cord through both loops with the mid‐point of the cord between them. Place the back band on the (upside down) deck as shown in Figure 13. Insert an end of the elastic cord through the forward grommet on the flap under the deck on the same side, then through the rear grommet, then through the D‐
ring on the back pad. Repeat on the opposite side of the back pad and deck. Insert both ends of the elastic cord through the cord lock. 3. Thread the straps attached to the flaps under the deck through the buckles on the ends of the back pad. Thigh Strap (this is an optional accessory). With the deck placed upside down as shown in Figure 13, place the thigh straps with the mesh side facing up and the hooks close to the bow. Thread webbing at each end of the thigh straps into buckles on the flaps under the deck. Attach the hooks on the inside of the thigh straps to the elastic cord loop under the front of the cockpit. Hip Pad (this is an optional accessory). Attach the hip pads to the snaps on the flaps under the deck. Each pad fits on both sides of the deck. It is most convenient to place the hip pads with the valves facing forward. Please note: If the pads have been stored empty of air, you may need to blow them up by mouth. They will self inflate if they have recently been inflated. REPAIR AND MAINTENANCE The most common repairs will be abrasions or punctures to the boat skin. Those are easily repaired with the supplied repair kit. 1. Cut a patch large enough to cover the damaged area plus a ¾” (2 cm) area around the damage. Round the corners. Make sure the repair area and the patch are clean. Cover both with a thin layer of adhesive. Wait for the adhesive surfaces to feel dry to the touch. Apply patch. The boat can go back on the water immediately, but the bond will continue to cure for about 24 hours. 2. For temporary frame repairs we recommend duct tape – with wooden splints as needed. 3. Do NOT use duct tape on fabric surfaces unless you have to. It makes a real mess, and permanent patches are really easy. There is no regular maintenance needed, but we recommend that you let the kayak dry before putting it in long term storage. The kayak can be stored packed or assembled. The best is a cool and dry place. Cold and dry is fine too – even well below freezing. But we avoid handling the boat when it is extremely cold. WE HOPE YOU WILL HAVE MANY YEARS OF PLEASURE WITH YOUR PAKBOATS XT. SCANSPORT, INC. P.O.BOX 700 (234 MAY STREET) ENFIELD, NEW HAMPSHIRE 03748, USA PHONE: (603) 632‐9500 E‐MAIL: [email protected] WWW.PAKBOATS.COM