1
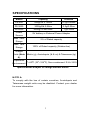
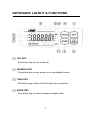
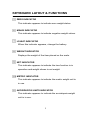
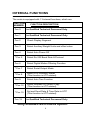
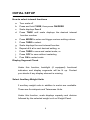
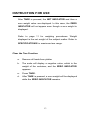
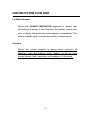
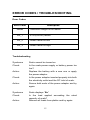
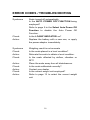
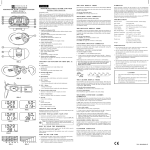
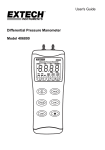
Intelligent Weighing Technology, Inc.
ZS Series
ELECTRONIC WEIGHING SCALE
OPERATION MANUAL
A Higher Level of Precision…
A higher Level of Performance™
INDEX
Installation
Specifications
Keyboard Layout & Functions
Internal Functions
Initial Setup
Instructions for Use
Error Codes / Troubleshooting
Daily Care & Maintenance
© Intelligent Weighing Technology, Inc.
1
2
3
4
6
8
11
15
17
All rights reserved worldwide.
INSTALLATION
1. Check and make sure that the following accessories are
included:
Operation Manual X 1
ZS Scale X 1
Stainless Steel Platter X 1
Power Adaptor X 1
Contact your dealer if any item is missing.
2. Install stainless steel platter.
3. Power up the scale:
Insert one 9V battery (not supplied) into the battery
compartment or apply the external power adaptor. The
power adaptor jack is inside the battery compartment.
Before plugging the power adaptor into the electricity
outlet, check and make sure the input voltage of the
power adaptor matches with the output voltage of the
outlet.
If they do not match, please do not plug in the adaptor
and contact your dealer for a replacement.
** When the power adaptor is being used, please remove
all the batteries from the battery compartment. Failure to
do so might cause a battery leak/explosion or damage to
the scale. Do not use any rechargeable battery. This
scale does not recharge any batteries.
2
SPECIFICATIONS
Model
Capacity
Division
ZS-600
600g/1lb 5.195oz
0.1g/0.005oz
ZS-3000
3000g/6lb 9.98oz
0.5g/0.02oz
ZS-6000
6000g/13.4lb.00oz
1g/0.05oz
Power
9V battery or External Power Adaptor
Source
Max. Zero
2% of Rated capacity
Range
Max. Tare
100% of Rated capacity (Subtractive)
Range
Weight
Units (Note Metric (g), Avoirdupois (lb & oz) & Taiwanese (tg)
A)
Operation
Environment
o
o
o
o
0 ~40 C (32 ~104 F), Non-condensed. R.H.≤85%
Specifications subject to change without notice
NOTE A:
To comply with the law of certain countries, Avoirdupois and
Taiwanese weight units may be disabled. Contact your dealer
for more information.
3
KEYBOARD LAYOUT & FUNCTIONS
OFF KEY
Press this key to turn scale off.
ON/ZERO KEY
Press this key to turn scale on or set weight to zero.
TARE KEY
Press this key to tare off the weight of a container.
MODE KEY
Press this key to switch between weight units.
4
KEYBOARD LAYOUT & FUNCTIONS
ZERO INDICATOR
This indicator appears to indicate zero weight status.
MINUS INDICATOR
This indicator appears to indicate negative weight values.
LO-BAT INDICATOR
When this indicator appears, change the battery.
WEIGHT INDICATOR
Displays the weight of the item placed on the scale.
NET INDICATOR
This indicator appears to indicate the tare function is in
operation and weight shown is net weight.
METRIC INDICATOR
This indicator appears to indicate the metric weight unit is
in use.
AVOIRDUPOIS UNITS INDICATOR
This indicator appears to indicate the avoirdupois weight
unit is in use.
5
INTERNAL FUNCTIONS
The scale is equipped with 13 internal functions, which are:
FUNCTION
NUMBER
FUNCTION DESCRIPTION
Fun 0
For Qualified Technical Personnel Only
Fun 1
For Qualified Technical Personnel Only
Fun 2
Check Display Segment
Fun 3
Select Auxiliary Weight Units and offset value
Fun 4
Select Auto Power Off
**Fun 5
Select Rs-232 Baud Rate & Protocol
Fun 6
Select Digital Motion Filtering Function
**Fun 7
Select Serial Output Mode
**Fun 8
Select UTP Printout Format
(This function is UTP related)
Fun 9
Select Auto Tare Function
**Fun 12
Select Number Of Printout Copy
(This function is UTP related)
**Fun 15
Set and Send Date & Time Data to UTP
(This function is UTP related)
Fun 19
For Qualified Technical Personnel Only
** Only installed with RS232 option.
6
INTERNAL FUNCTIONS
Do not alter any parameters set in Fun 0, 1 & 19, which may
cause system instability, error, or non accurate weighing result.
If entered by mistake, press OFF immediately. Contact your
dealer for more information.
7
INITIAL SETUP
How to select internal functions
a. Turn scale off
b. Press and hold TARE, then press ON/ZERO
c.
Scale displays Fun-0
d. Press TARE until scale displays the desired internal
function number
e. Press MODE to enter and trigger various setting values.
f.
Press TARE to select
g. Scale displays the next internal function
h. Repeat d & e for next desired setting, or
i.
Press TARE to save and restart scale, or
j.
Press OFF to save without restarting
k.
Pres ON to restart scale
Display Segment Check
Under this function, backlight (if equipped) functional
indicators and display segments will be lit up. Contact
your dealer if any display element is missing.
Select Auxiliary Weight Units
2 auxiliary weight units in addition to metric are available.
These are Avoirdupois and Taiwanese Units.
Under this function, scale displays capacity and division
followed by the selected weight unit on Weight Panel.
8
INITIAL SETUP
The example below
600.1 is the capacity and division of
ZS-600 (600g x 0.1g), which is used for illustration.
600.1 g (metric only)
600.1 g lb/oz (metric and Avoirdupois weight unit
enable)
6.0.0.1 g lb/oz (metric, Avoirdupois and Taiwanese
weight units all enable)
Select Auto Power Off Function
5 parameters are available: 0oFF (Auto Power Off Function disabled)
4oFF (Auto off when left idle for 4 min)
10oFF (Auto off when left idle for 10 min)
20oFF (Auto off when left idle for 20 min)
30oFF (Auto off when left idle for 30 min)
** Under the Auto Power Off function mode, the scale will
turn off automatically when it is left idle for the selected
time.
9
INITIAL SETUP
Select Digital Motion Filtering Function
3 parameters are available:
Filt.0 (filtering function disable)
Filt.1 (filter 1)
Filt.2 (filter 2)
Use digital motion filtering function when the operating
environment is subject to disturbances like vibration, wind
flow, etc.
Select higher filter values for worse
environments. Filt2 gives the slowest response compared
with other 2 parameters.
Select Auto Tare Function
2 parameters are available:
Tr-On (Auto Tare Function enable)
Tr-OFF (Auto Tare Function disable)
Under the Auto Tare Function, the first load applied to
scale will be treated as a container an d will be tared off
automatically.
10
INSTRUCTION FOR USE
Before Weighing
Make sure that
1-
The scale is placed on a level and stable surface.
2-
The stainless steel platter is placed correctly on top
of load receptor.
3-
The scale is turned on.
4-
The ZERO INDICATOR
is on. If not, press
ON/ZERO to set display to zero.
Weighing
1-
Always place an object onto the platter gently.
Excessive force applied to platter may cause
damage to the sensor inside the scale.
2-
The
weight
of
the
object
will
be displayed
automatically.
3-
It is a good practice to remove all loads from platter
after weighing. It will prolong the life of the scale.
11
INSTRUCTION FOR USE
Selecting Weight Unit
Press MODE to shift among various weight units (gram,
lb/oz and Taiwanese) with or without backlight if required.
Refer to page 8 for internal setting procedures. (For
backlight, just keep pressing the mode until the display is
backlit)
The weight unit used before power off will be employed
when the scale is turned on again.
Set Display Value to Zero when Unloaded
Press ON/ZERO to set weight displayed to zero when
unloaded. Refer to SPECIFICATIONS for maximum zero
range.
Tare off the Weight of a Container
When a container is used, follow the steps below to tare off
the weight of it and to obtain a net weight result.
a. Remove all loads away from platter
b. Make sure that zero weight and the ZERO INDICATOR
appear. If not, press ON/ZERO to set it to zero weight.
c.
Place the container on the platter.
d. Press TARE.
12
INSTRUCTION FOR USE
After TARE is pressed, the NET INDICATOR and then a
zero weight value are displayed. In this case, the ZERO
INDICATOR will not appear even though a zero weight is
displayed.
Refer to page 11 for weighing procedures. Weight
displayed is the net weight of the subject matter. Refer to
SPECIFICATIONS for maximum tare range.
Clear the Tare Function
a.
Remove all loads from platter.
b.
The scale will display a negative value, which is the
weight of the container, and the ZERO INDICATOR
appears.
c.
Press TARE.
d.
After TARE is pressed, a zero weight will be displayed
while the ZERO INDICATOR remains.
13
INSTRUCTION FOR USE
Lo-Bat Indicator
When the LO-BAT INDICATOR appears, it means that
the battery is power is low. Replace the battery with a new
one, or ap ply the external power adaptor immediately. The
power adaptor jack is inside the battery compartment.
Caution
When the power adaptor is being used, remove all
batteries from the battery pack. Failure to do so may
cause battery leak/ explosion or damages to the scale.
14
ERROR CODES / TROUBLESHOOTING
Error Codes
Error Code
Description
Nostbl
Calibration weight is not stable
Err_1
IC U2(93C46) failure
Err_2
Offset Value too low
Err_3
Offset Value too high
Troubleshooting
Syndrome
Scale cannot be turned on
Check:
Is the scale power supply or battery power too
low?
Action:
Replace the battery with a new one or apply
the power adaptor.
Check:
Is the power adaptor inserted properly into both
the electricity outlet and the DC inlet of scale.
Action:
Secure both ends of the power adaptor and try
again.
Syndrome
Scale displays “Err”
Check:
Is the load applied exceeding the rated
capacity of scale?
Action:
Remove all loads from platter and try again.
15
ERROR CODES / TROUBLESHOOTING
Syndrome
Scale turned off automatically
Is the AUTO POWER OFF FUNCTION being
employed?
Refer to page 9 in the Select Auto Power Off
Function to disable the Auto Power Off
Function.
Check:
Is the LO-BAT INDICATOR on?
Action:
Replace the battery with a new one, or apply
the power adaptor immediately.
Syndrome
Weighing result is not accurate
Check:
Is the scale placed in a level condition?
Action:
Relocate the scale to obtain a level condition.
Check:
Is the scale affected by airflow, vibration or
RFI?
Action:
Place the scale away from all disturbances.
Check:
Is the scale calibrated correctly?
Action:
Contact your dealer.
Check:
Is the correct weight unit employed?
Action:
Refer to page 12 to select the correct weight
unit.
16
DAILY CARE & MAINTENANCE
1-
Clean the scale with a soft and damp cloth. If
necessary, apply a mild detergent. Do not allow
water anywhere near the scale.
2-
Do not use any harsh, abrasive material, acetone,
volatile solvent, thinner or alcohol for cleaning.
3-
Verify
the
accuracy
of
scale
periodically.
Re-calibrate the scale if necessary.
4-
Remove weights from the platter when not in use.
5-
Remove the battery when the scale will not be used
for an extended period.
www.intelligentwt.com
17
Intelligent Weighing Technology has more than 50 years combined
experience in the weighing industry, both in the USA and worldwide.
With contacts in over 50 countries including the USA, we provide you
with the weighing equipment you need. When you invest in weighing
equipment from Intelligent Weighing Technology, you’re really buying
peace of mind.
Quality - Scales and balances solidly built from the ground up with
superior engineering and components for exacting results.
Value - From bench scales to analytical balances, weighing equipment
priced for real-world business applications, with superior service and
support.
Experience - Expert advice to help you choose just the right product
for your application.
Quality + Value + Experience…it adds up to the Intelligent Investment.
Intelligent Weighing Technology, Inc.
www.intelligentwt.com
© Intelligent Weighing Technology, Inc. All rights reserved worldwide.
The information contained herein is the property of Intelligent Weighing
Technology, Inc. and is supplied without liability for errors or omissions.
No
part may be reproduced or used except as authorized by contract or other
written permission. The copyright and the foregoing restriction on
reproduction and use extend to all media in which the information may be
embodies.
18