1
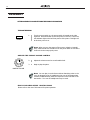
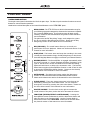
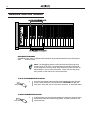
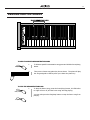
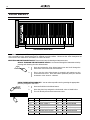
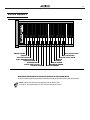
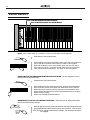
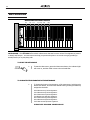
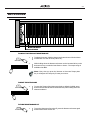
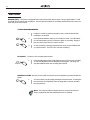
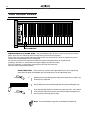
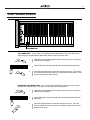
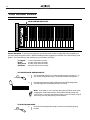
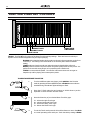
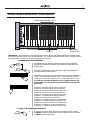
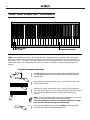
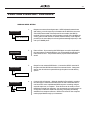
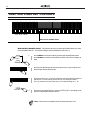
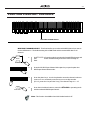
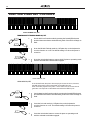
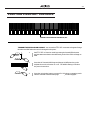
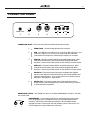
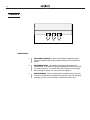
STN-1000
digital piano
User’s Manual
2
User’s Manual STN-1000
WELCOME!
WELCOME!
We would like to express our appreciation and congratulate you for purchasing this Suzuki
HP-3 Digital Piano.
STN-1000
This piano has been designed to provide you with years of musical enjoyment. State of the art electronics are
combined with an elegant cabinet that will add beauty and sophistication to any home environment.
Below are just a few of the functions that your new piano is equipped with:
Grand Piano Sound with Stereo Sample Resonance for Expressive Playing
Our stereo Sampling Technique realistically reproduces complete sound
of an acoustic grand piano
Keyboard with Three Pedals that faithfully reproduce the acoustic
Grand Piano Experience. The piano’s keyboard has a graded hammer action which
duplicates the touch of the acoustic grand pianos feel. There is a heavier touch in the
lower register and progressively lighter touches as you proceed up the keyboard
just like an acoustic grand piano.
The three pedal functions allows for subtle performance nuances to be expressed.
Elegant Home Decor Cabinet Styling that adds beauty and sophistication to
any home environment. While the compact design ensures the use of minimal
space.
USB Port for easy connection to your laptop or desktop computer. Depending on your
accessory package you may have received exciting software that can be easily used with
your piano to compliment your learning and musical enjoyment experience.
Additional Features
• 16 stereo sampled instrument voices with acoustic realism response
• 64 note polyphony ensures that you can use the pedal freely without dropping notes
• a Lesson Function to learn to play over 50 Popular Play Along Songs
• vocal grading of your lesson performance - like a built in music teacher!
• digital reverb and chorus to further enhance the keyboard voices
• a built in metronome with range from 40 to 240 BPM
• a transpose function that allows you to play in your favorite piano key
• USB port for easy connection to your laptop or desk top computer
• MIDI Ports and controls to access connections with other MIDI musical instruments
You will find many more functions listed within this owners manual. In order to fully appreciate all the
impressive functions of this digital piano, please take a few minutes to read the following pages of instruction.
We will cover general precautions, assembly, the function of each control button, and warranty information.
For further information please visit our web site at www.suzukipianos.com/C-11
or call toll free 800-854-1594.
SUZUKI
3
3
User’s Manual STN-1000
GENERAL PRECAUTIONS
GENERAL
CAUTION
RISK OF ELECTRIC SHOCK
DO NOT OPEN
!
CAUTION: TO REDUCE THE RISK OF ELECTRIC SHOCK,
DO NOT REMOVE COVER OR BACK
NO USER-SERVICEABLE PARTS INSIDE
REFER SERVICING TO QUALIFIED SERVICE PERSONNEL
INSTRUCTIONS PERTAINING TO A RISK OF FIRE, ELECTRIC SHOCK OR INJURY:
The lightning flash with arrowhead symbol, within an equilateral triangle, is intended to alert the user to the
presence of noninsulated or “dangerous voltage” within the product’s enclosure that may be of sufficient
magnitude to constitute a risk of electric shock to persons.
The exclamation point within an equilateral triangle is intended to alert the user to the presence of important
operation and maintenance or servicing instructions.
!
CAUTION - Any changes or modifications in construction of this device which are not expressly approved by the party responsible for compliance could void the user’s authority to operate the
equipment.
NOTE - This equipment has been tested and found to comply with the limit for a Class A digital device,
pursuant to part 15 of the FCC rules. These limits are designed to provide reasonable protection
against harmful interference when the equipment is operated in a noncommercial environment.
This equipment generates, uses, and can radiate radio frequency energy and if not installed and
used in accordance with the instruction manual, may cause harmful interference to radio communications. Operation of this equipment in a residential area is likely to cause harmful interference in
which case the user will be required to correct the interference at his own expense.
4
4
User’s Manual STN-1000
TAKING CARE OF YOUR DIGITAL
TAKING
DIGITALPIANO
PIANO
This Suzuki
Arius digital piano will supply you with years of musical enjoyment if you follow the simple rules listed below.
IMPORTANT SAFETY INSTRUCTIONS
WARNING - When using electrical products,
basic safety precautions should always be
followed.
SAFETY - The product should always be
connected to a power supply only of the type
described in the operating instructions or as
marked on the product.
• Carefully check the amplifier volume control
before starting to play. Excessive volume can
cause permanent hearing loss.
POWER - The power-supply cord of the product
should be unplugged from the outlet when left
unused for a long period of time.
• Turn the power switch off when the instrument
is not in use.
• To avoid damage to the instrument and other
devices to which it is connected, turn the power
switches of all related devices off prior to
connection or disconnection of MIDI cables.
• Turn the power off if the main cable is damaged or the instrument is spattered with liquid.
• Do not switch the unit on and off in quick
succession, this places an undue load on the
electronic components.
• Unplug the AC power cord during an electrical
storm.
• Avoid plugging the AC power cord into the
same AC outlet as appliances with high power
consumption, such as electric heaters or
refrigerators.
SERVICE AND MODIFICATION - This
product should be serviced by qualified
service personnel when,
• the power supply cord or the plug has been
damaged,
• liquid has been spattered into the unit or it has
been exposed to rain,
• the instrument does not appear to operate
normally or exhibits a marked change in
performance, or
• the instrument has been dropped or the cabinet
has been damaged.
• Do not attempt to open the piano or make any
change in the circuits or parts of the unit.
HANDLING AND TRANSPORT
• Never apply excessive force to the controls,
connectors or other parts of the instrument.
• Always unplug cables by gripping the plug
firmly, not by pulling on the cable.
• Disconnect all cables before moving the instrument.
• Physical shocks caused by dropping, bumping,
or placing heavy objects on the instrument can
result in scratches and/or more serious damage.
• Avoid placing vinyl objects on top of the instrument, vinyl can stick to and discolor the surface.
LOCATION - Do not expose the instrument to
the following conditions to avoid deformation,
discoloration, or more serious damage:
• Direct sunlight (near a window)
• High temperatures (near a heat source, outside, or near a window)
• Excessive humidity
• Excessive dust
• Strong vibration
• Leave enough space around the piano for it to
be properly ventilated.
• This instrument contains digital circuitry and
may cause interference if placed too close to
radio or television receivers. If interference
occurs, move the instrument further away from
the affected equipment.
CLEANING
• Clean the cabinet and panel with a soft nonabrasive dry cloth. A wax based polish may
be used on the cabinet. Do not use paint
thinner or petrochemical based polishes.
• To maintain the luster of the keys and buttons
wipe with a clean, slightly damp cloth, and then
polish with a soft dry cloth.
5
7
User’s Manual STN-1000
TABLE OF CONTENTS
ASSEMBLY ............................................................ 7
Unpacking Your New Digital Piano ........................... 8
Attaching Stand Legs to Pedal Board ..................... 10
Attaching the Privacy Board .................................. 11
Attaching the Piano to the Stand ........................... 12
Connections & Power .......................................... 13
Enjoy your new SUZUKI
Arius Digital Piano ..................... 14
CONTROL PANEL (KEYBLOCK ) .............................. 15
DEMONSTRATION SONGS ...................................... 16
VOICE SELECT .................................................... 18
Scroll Through Voice Select ................................. 18
Piano Key Voice Select ......................................... 18
Key Voice List ..................................................... 19
Dual Voice Select ................................................ 20
Dual Voice Volume Adjustment ............................. 20
Hard Reset ......................................................... 20
REVERB AND EFFECT ............................................ 21
METRONOME ..................................................... 22
RECORD ............................................................. 24
Record a Performance ......................................... 24
Playback ............................................................ 24
Erasing a Song ................................................... 24
PLAY ALONG SONGS ......................................... 25
Selecting a Song ................................................ 25
Listen to the Song .............................................. 25
Right Hand Test ................................................. 26
Left Hand Test ................................................... 27
Right and Left Hand Test .................................... 27
Vocal Grading .................................................... 28
Stopping the Song Mode ...................................... 28
6
FUNCTION PIANO KEY CONTROLS .......................... 29
Function Mode .................................................... 29
Resetting to Default Settings ................................ 29
Touch ................................................................ 30
Transpose .......................................................... 31
Tune ................................................................. 32
Duet .................................................................. 33
MIDI .................................................................. 34
MIDI Terminals ............................................. 34
Various MIDI Setups ...................................... 35
MIDI Output Channel Select ............................ 36
MIDI Input Channel Select .............................. 37
Turning Multi-Timbral Mode On/Off ................. 38
Transmit MIDI Programs Change ..................... 39
MIDI IMPLEMENTATION CHART ...................... 40
CONNECTOR PANEL .......................................... 41
HEADPHONES ....................................................... 41
PEDALS .............................................................. 42
Soft Pedal .......................................................... 42
Sustain Pedal ..................................................... 42
VOICE DESCRIPTION ........................................ 43
PLAY ALONG SONG LIST .................................. 44
SPECIFICATIONS .............................................. 45
WARRANTY ........................................................ 46
8
User’s Manual STN-1000
ASSEMBLY
ASSEMBLY
Please take a few moments to follow the simple assembly steps listed below.
UNPACKING YOUR NEW DIGITAL PIANO
1.
Carefully unpack the Piano components and set them aside.
Note: IMPORTANT! Be sure to unpack the Hardware and Power
Supply from the protective foam pieces.
2.
Using two people, lift your new piano out of the carton and place on a
soft surface such as a carpet or blanket.
3.
Remove the protective outer packing materials from the Piano.
Note: Use only your hands to remove the protective materials. Sharp
tools may damage the piano.
Take care not to let foreign objects come into contact with the Piano.
8
9
User’s Manual STN-1000
ASSEMBLY
4.
Parts enclosed:
Piano
Pedal Board
Privacy Board
Two (2) Stand Legs
Power Cord
Hardware and Phillips Screw Driver
Piano
Pedal Board
Privacy Board
Stand Leg
Stand Leg
Hardware
and Phillips Screw Driver
Power Cord
5.
Hardware enclosed:
A - Eight (8) 3/4” Machine Screws
B - Two (2) 1/2” Machine Screws
C - Four (4) 1/2’ Wood Screws
D - Phillips Screw Driver
E - Cord Clip to hold Pedal Cable in place (4)
F - Headphone Holder and Screws
EE
D
D
A
A
B
B
F
F
C
C
9
10
User’s Manual STN-1000
ASSEMBLY
ASSEMBLY
ATTACHING STAND LEGS TO PEDAL BOARD
1.
Slide the Pedal Board over the “L” Bracket on the bottom of the Stand Leg
and align the holes.
“L” Bracket
Pedal Board
2.
10
Attach the Pedal Board to the Stand Legs using four (4) of the longer 3/4”
Machine Screws.
11
User’s Manual STN-1000
ASSEMBLY
ASSEMBLY
ATTACHING THE PRIVACY BOARD
1.
Slide the Privacy board into the Slots on the backside of the Leg Stands.
2.
Align the holes in the Privacy Board with the Threaded Holes of the Leg
Bracket. Install the two (2) shorter 1/2” Machine Screws into the Privacy
Board.
Note: Do not tighten the screws at this time.
3.
Align the four small holes at the bottom of the Privacy Board with the
holes in the Pedal Board. Install all four (4) Wood Screws prior to
tightening them.
Now tighten the two Privacy Board Machine Screws (from step 2).
Note: Do not over tighten the screws.
11
12
User’s Manual STN-1000
ASSEMBLY
ASSEMBLY
ATTACHING THE PIANO TO THE STAND
1.
Using two people, lift the Piano onto the Leg Stands and Pedal Board
assembly.
2.
Slide the Piano onto the Stand so the Position Pin is in the Slot of the
Rear Stand Bracket.
PIANO BOTTOM
Rear Stand Bracket
PIANO STAND
Position Pin
3.
Align the Bracket Holes with the Threaded Inserts.
Bracket Holes
4.
12
Secure the Piano to the Stand using four (4) of the longer 3/4” Machine
Screws.
13
User’s Manual STN-1000
ASSEMBLY
ASSEMBLY
CONNECTIONS & POWER
1.
Piano bottom Attachments and Connections.
Stand Positioning Pin
BACK
Stand Positioning Pin
Connection Jacks
Power Receptacle
Headphone Jacks
FRONT
Holes for Headphone
Hanger Clip to
attach to the
bottom of the piano
2.
Place the piano in its final position, on the bottom the pedal board is a
turn down knob. Turn the Pedal Brace Knob down to firmly touch the
floor.
3.
Locate the Power Cord and plug it into the Receptacle on the bottom of
the Piano. Plug the Power Cord into an appropriate wall socket.
13
14
User’s Manual STN-1000
ASSEMBLY
ASSEMBLY
AFTER ASSEMBLY IS COMPLETE AND THE PIANO IS PLUGGED IN
TURN ON THE PIANO
1.
POWER
Turn the power switch on, the power switch is located on the right
keyblock. Press the button to turn the power on and off. There is an
LED indicator light on the left front portion of the piano. This light will
be lit when power is on.
Note: When you turn the power off, do not turn it back on immediately. Wait at least five seconds to turn the power back on so that the
electronic circuits can properly reset.
ADJUSTS THE PIANO’S VOLUME CONTROL
2.
Adjust the volume control to a comfortable level.
3.
Begin to play the piano.
MASTER VOLUME
Note: You can play in total silence without disturbing other in the
room by plugging a set of headphones into one of the appropriate
sockets, located directly under the keyboard on the left side of the
instrument. Two sets of headphones may be used.
ENJOY YOUR NEW SUZUKI DIGITAL PIANO!
Please refer to the rest of this manual for piano operation.
QUESTIONS?
Visit www.suzukipianos.com/C-11
or call 1-800-854-1594
14
15
User’s Manual STN-1000
CONTROLPANEL
PANEL
CONTROL
CONTROL PANEL BUTTONS
The simple control panel is located to the left of the piano keys. The Piano Keys themselves functions as control
buttons for various function operations.
STN-1000
Listed below is a brief description of the Control Panel Buttons on the Suzuki
HP-3 piano.
1.
DEMO/SONG - The HP-3
piano has 10 built in demonstration songs for
STN-1000
your listening enjoyment designed to showcase the instrument’s capabilities. Press the DEMO button. The first demo song will begin to play
instantly. Please see the Demonstration Song section of this manual for
more information.
The piano also has 58 “Play Along” songs, each assigned to a piano
key for use with the Play Along Song function. Please see the Play
Along Songs section of this manual for more information.
2.
REC (RECORD) - The record button allows you to record your
performance for future playback. Please see the Record section of this
manual for more information.
3.
PLAY/STOP - This button starts and stops the recording in the music
recorder, the Demonstration Songs, the Play Along Songs or other items.
Press the Play/Stop Button to engage or terminate your selected function.
4.
REVERB/EFFECT - The Reverb/Effect is engaged automatically when
the power is turned on. Reverb simulates the effect of playing in a big
room or hall where the sound reverberates off the walls and ceiling.
Effects will add chorus or delay to the instrument voice. The Reverb/
Effect button toggles the Reverb/Effect function on and off and is used
to access the Reverb/Effect Select function. Please see the Reverb/
Effect section of this manual for more information.
5.
METRONOME - The Metronome button toggles the Metronome
function on and off and accesses the Metronome Select function.
Please see the Metronome section of this manual for more information.
6.
VOICE SELECT - There are sixteen instrument voices that can be
accessed by pressing the Voice Select button. You can sequence
through the voice list by pressing the Voice Select button. Please see
the Voice Select section of this manual for more information.
7.
MASTER VOLUME - Turn this knob to the right to increase the
overall volume of the piano, and to the left to decrease the volume.
8.
FUNCTION (REVERB/EFFECT & METRONOME) - Pressing the
Reverb/Effect button simultaneously with the Metronome button will
place the piano in the Function Mode. Use the Function Mode to
access the functions of the HP-3
piano. Please see the Function Piano
STN-1000
Key Controls section of this manual for more information.
1
DEMO/SONG
2
REC
3
PLAY/STOP
4
REVERB/
EFFECT
5
METRONOME
F
U
N
8 C
T
I
O
N
6
VOICE SELECT
7
MASTER VOLUME
15
16
User’s Manual STN-1000
DEMONSTRATION SONGS
DEMONSTRATION
SONGS
BLACK DEMO SONG KEYS
DEMO/SONG
REC
PLAY/STOP F
U
N
C
T
I
O
METRONOME N
REVERB/
EFFECT
VOICE SELECT
C#1
C1
D#1
D1
E1
F#1
F1
G#1
G1
A1
MASTER VOL
WHITE DEMO SONG KEYS
DEMONSTRATION SONGS
This Arius
Suzuki piano offers 10 different demonstration songs that demonstrate many of the pianos
different instrument voices.
Note: The Demo/Song button is also used with the Play Along Song
function of the HP-3
piano. The Play Along Song function includes 58
STN-1000
songs assigned to the Play Along Song function keys that can also be
played back for your musical enjoyment. Please see the Play Along
Song section of this manual for more information.
TO PLAY THE DEMONSTRATION SONGS
1.
DEMO/SONG
Press the Demo/Song button and the first demonstration song will start
to play. When the demo song is finished, the HP-3
piano will play the
STN-1000
next Demo Song and one at a time they will follow in sequential order.
TO SKIP A DEMONSTRATION SONG
1.
VOICE SELECT
16
To Skip a Demo song and continuing playing in sequence, press the Voice
Select button while in the Demo Song mode. The piano will skip to the
next demo song.
17
User’s Manual STN-1000
DEMONSTRATION
DEMONSTRATIONSONGS
SONGS
BLACK DEMO SONG KEYS
DEMO/SONG
REC
PLAY/STOP F
U
N
REVERB/ C
EFFECT
T
I
O
METRONOME N
C#1
C1
VOICE SELECT
D#1
D1
E1
F#1
F1
G#1
G1
A1
MASTER VOL
TO SELECT A SPECIFIC DEMONSTRATION SONG
1.
To Select a specific Demonstration song press and hold the Demo/Song
button.
2.
Then press a Demo song piano key shown above. The piano will play
the song assigned to that key after you release the piano key.
DEMO/SONG
TO STOP THE DEMONSTRATION SONG
1.
DEMO/SONG
To Stop the Demo Song, press the Demo/Song button, it’s LED indicator light will turn off, and the Demo song will stop playing.
You may also press the Play/Stop button to stop the Demo song from
playing.
PLAY/STOP
17
18
User’s Manual STN-1000
VOICE SELECT
SELECT
VOICE
DEMO/SONG
REC
PLAY/STOP F
U
N
C
T
I
O
METRONOMEN
REVERB/
EFFECT
VOICE SELECT
A0
B0
C1
D1
E1
F1
G1
A1
B1
C2
D2
E2
F2
G2
A2
B2
MASTER VOL
VOICE SELECT PIANO KEYS
Your Arius
Suzuki Piano has 16 different digitally sampled instrument voices. Each of these sampled instruments
were recorded from the actual instrument to maintain acoustic realism. Please see the Voice Description list
at the back of this manual for information on each instrument.
SELECTING AN INSTRUMENT VOICE -There are two ways of selecting an instrument voice.
SCROLL THROUGH THE INSTRUMENT VOICES - You can scroll through the instrument voices by
pressing and releasing the Voice Select button.
1.
Press and release the Voice Select button once and it will change the
instrument voice to the next voice selection.
2.
Every time the Voice Select button is pressed it will sequence to the
next instrument voice. Press the button repeatedly until your desired
instrument voice sound is selected.
VOICE SELECT
PRESS THE RELATED PIANO KEY - You can select a specific voice by pressing the appropriate
piano key assigned to that voice.
1.
Press and hold the Voice Select button.
2.
Press the piano key assigned to the desired voice as listed below.
This will directly access that instrument voice.
VOICE SELECT
18
Voice #
01
02
03
04
05
06
07
08
Key
A0
B0
C1
D1
E1
F1
G1
A1
Voice Name
GRAND PIANO
PIANO 2
ELEC. PIANO 1
RHODES PIANO
HARPSICHORD
VIBRAPHONE
MUSIC BOX (GLOCK)
CHURCH ORGAN 1
Voice #
09
10
11
12
13
14
15
16
Key
B1
C2
D2
E2
F2
G2
A2
B2
Voice Name
CHURCH ORGAN 2
HAMMOND ORGAN
ROCK ORGAN
STRINGS
CHOIR
CHOIR VOICE OOHS
NYLON GUITAR
ACOUSTIC BASS
19
User’s Manual STN-1000
VOICE
VOICE SELECT
SELECT
DEMO/SONG
REC
PLAY/STOP F
U
N
C
T
I
O
METRONOMEN
REVERB/
EFFECT
VOICE SELECT
A0
B0
C1
D1
E1
F1
G1
A1
B1
C2
D2
E2
F2
G2
A2
B2
MASTER VOL
GRAND PIANO
PIANO 2
ELECTRIC PIANO
ELEC. RHODES PIANO
HARPSICHORD
VIBRAPHONE
MUSIC BOX (GLOCK)
CHURCH ORGAN
ACCOUSTIC BASS
NYLON GUITAR
CHOIR VOICE OOHS
CHOIR
STRINGS
ROCK ORGAN
HAMMOND ORGAN
CHURCH ORGAN 2
INDIVIDUAL INSTRUMENT VOICE SELECT PIANO KEYS ARE SHOWN ABOVE
You can scroll through the instrument voices by pressing and releasing the Voice Select button.
Note: Please see the Voice Description list at the back of this
manual for a brief description of each of these instrument voices.
19
20
User’s Manual STN-1000
VOICE SELECT
VOICE
SELECT
DUAL TONE INSTRUMENT VOLUME DECREASE
DUAL TONE INSTRUMENT VOLUME INCREASE
DEMO/SONG
REC
PLAY/STOP F
U
N
C
T
I
O
METRONOME N
REVERB/
EFFECT
A#0
C#1
VOICE SELECT
MASTER VOL
DUAL - In the Dual mode, you combine or mix, two instrument sounds together.
1.
Hold down the Voice Select button.
2.
While holding down the Voice Select button press and hold release the
first of the two instrument voices that you want to mix together.
While still holding the voice select button down and the first Instrument voice Key down, press the second instrument voice piano key.
Then release all keys and button, the piano is now tone mixed.
VOICE SELECT
ADJUSTING THE VOLUME BALANCE IN THE DUAL PLAY MODE - You can change the volume
between the two layered sounds.
1.
Hold down the Voice Select button.
2.
While holding down the Voice Select button, press the A#0 black piano
key to lower the volume of the layer tone instrument voice or the C#1
black piano key to raise the volume of the layer tone instrument voice.
Press both the A#0 and the C#1 piano keys simultaneously to recall the
default volume setting.
Please see the Diagram Shown Above.
VOICE SELECT
HARD RESET TO THE FACTORY DEFAULT SETTINGS - At any time you can easily put the piano
back to its default factory settings.
DEMO/SONG
20
REVERB/
EFFECT
1.
With the piano power off, press and hold both the Demo/Song button and
the Reverb/Effects buttons and turn the power switch on. This will reset
the HP-3 to its original default factory settings. The Concert Grand Piano
STN-1000
Voice is now engaged.
21
User’s Manual STN-1000
REVERB AND
AND EFFECT
EFFECT
REVERB
DEMO/SONG
REC
PLAY/STOP F
U
N
REVERB/ C
EFFECT
T
I
O
METRONOMEN
VOICE SELECT
C1
D1
E1
F1
G1
MASTER VOL
TYPE 2 CHORUS
TYPE 1 CHORUS
HALL REVERB
STAGE REVERB
ROOM REVERB
REVERB/EFFECT - The STN-1000
HP-3 piano has three types of Reverb, and two types of Effect or Chorus,
functions.
1.
To change the selected Reverb type press and hold the Reverb/Effect
button down.
2.
While holding the Reverb/Effect button select the piano key of your
desired Reverb type. The selected function will be engaged after you
release the Reverb/Effect button is released.
Please see the Diagram Shown Above.
C1 - for Room type Reverb
D1 - for Stage type Reverb
E1 - for Hall type Reverb
F1 - for Chorus type 1
G1 - for Chorus type 2
REVERB/
EFFECT
Note: The default setting for the Reverb/Effect function is Reverb
Stage type.
TO TURN OFF JUST THE REVERB
1.
To turn the Reverb function off, press the Reverb/Effect button so the
LED indicator light goes off. The Chorus will stay on if selected.
TO TURN OFF JUST THE CHORUS
1.
To turn the Chorus function off, select a Reverb Piano Key while
holding down the Reverb/Effect Button. Whenever engaging a Reverb
type it will automatically turn off the Chorus effect.
TO TURN THE REVERB AND CHORUS EFFECT FUNCTION OFF
1.
Select a Reverb Function Piano Key while holding down the Reverb/
Effect Button. This will turn the Chorus function off,
REVERB/
Next turn the Reverb/Effect Button off (its LED will turn off).
EFFECT
Now both the Reverb and Chorus effect have been disengaged.
21
22
User’s Manual STN-1000
METRONOME
METRONOME
METRONOME TIME SIGNATURE KEYS
1/4
2/4
3/4
4/4 5/4 3/8
A#0
C#1
D#1
F#1
6/8
DEMO/SONG
REC
PLAY/STOP F
U
N
REVERB/ C
EFFECT
T
I
O
METRONOMEN
G#1
A#1
C#2
VOICE SELECT
MASTER VOL
METRONOME - This HP-3
piano offers a built-in Metronome that can be set to various Time Signatures (meters
STN-1000
or beats) and Tempos. The metronome can help you practice the piano or to record a song by providing a
steady beat for you to play along with.
TO START THE METRONOME
1.
METRONOME
To start the Metronome, press the Metronome button, the indicator light
will come on, and then flash in time to the selected beat.
TO CHANGE THE TIME SIGNATURE OF THE METRONOME
1.
To change the beat or time signature, of the metronome, hold down the
Metronome button, and select the desired beat by pressing the black key
assigned to that beat.
A#0 Metronome 1/4 time signature.
C#1 Metronome 2/4 time signature.
D#1 Metronome 3/4 time signature.
F#1 Metronome 4/4 time signature.
G#1 Metronome 5/4 time signature.
A#1 Metronome 3/8 time signature.
C#2 Metronome 6/8 time signature.
PLEASE SEE DIAGRAM SHOWN ABOVE.
22
23
User’s Manual STN-1000
METRONOME
METRONOME
DEMO/SONG
REC
PLAY/STOP F
U
N
C
T
I
O
METRONOMEN
REVERB/
EFFECT
VOICE SELECT
A0
B0
MASTER VOL
TEMPO INCREASE
TEMPO DECREASE
TO ADJUST THE TEMPO OF THE METRONOME
1.
To adjust the tempo, hold the Metronome button down while the Metronome button is in the off mode (LED is off).
2.
While holding down the Metronome button use the increase B0 key or the
decrease A0 key to make the beat faster or slower. The tempo range is
40 BPM to 240 BPM.
METRONOME
Note: Every time you press the Increase or Decrease Tempo piano
key it will adjust the Tempo by 5 beats per minute.
TO RESET THE METRONOME
METRONOME
1.
To reset the Tempo of the Metronome back to default 120 BPM, press
both the A0 and the B0 buttons simultaneously while holding down the
Metronome button.
TO TURN THE METRONOME OFF
1.
METRONOME
To turn the Metronome function off, press the Metronome button again
and the Metronome will turn off.
23
24
User’s Manual STN-1000
RECORD
RECORD
RECORD (REC) - This piano is equipped with a real time recorder, able to store a song or performance. It will
record all note events as they are played. This recorded information is nonvolatile and therefore will not be lost
when the power is turned off.
TO RECORD A PERFORMANCE
1.
Prepare to record by selecting the piano voice, reverb level and other
parameters as desired.
2.
Press the Record button when you are ready to record. The LED indicator will start flashing to tell you that the piano is recording. Begin to
play the piano piece that you wish to record.
3.
To stop recording, press the Record button when you are finished with
your performance. The HP-3
piano will stop recording.
STN-1000
REC
REC
PLAYBACK - To listen to the recorded performance.
1.
PLAY/STOP
Press the Play/Stop button to play back the song you have just recorded.
To stop the playback press the Play/Stop button again. The song will
stop automatically when the recording has finished.
ERASING A SONG - Be sure you are ready to erase the current song before pressing the Record
button.
1.
REC
You can erase a song by simply pressing the Record button. Pressing the
Record button will completely erase the song that is currently stored in
the song memory.
Note: The contents will be erased as soon as you press the Record
button, replaced by the new data that the user is recording.
24
25
User’s Manual STN-1000
PLAY ALONG
ALONG SONGS
SONGS
BLACK PLAY ALONG SONG PIANO KEYS
C#3 D#3
F#3 G#3 A#3
C#4 D#4
F#4 G#4 A#4
C#5 D#5
F#5 G#5 A#5
C#6 D#6
F#6 G#6 A#6
C#7 D#7
F#7 G#7
C3 D3 E3 F3 G3 A3 B3 C4 D4 E4 F4 G4 A4 B4 C5 D5 E5 F5 G5 A5 B5 C6 D6 E6 F6 G6 A6 B7 C6 D7 E7 F7 G7 A7
WHITE PLAY ALONG SONG PIANO KEYS
PLAY ALONG SONGS -This piano includes 58 different songs covering a variety of genres that are enjoyable
to listen to, or to play along with. You can begin practicing one hand at a time, and you can practice at your
own tempo. This instrument will even evaluate and grade your performance for you!
Note: Please see the list of play along songs at the back of this manual.
TO SELECT A SONG - The 58 Play Along songs are each assigned to a key. There are children’s
songs, American classics and Christmas songs, as listed in the Play Along Song list at the back of
this manual.
DEMO/SONG
1.
Hold down the Demo/Song button.
2.
Press the piano key to which your desired song is assigned while
holding down the Demo/Song button.
TO LISTEN TO A SONG - To only listen to a Play Along Song.
1.
PLAY/STOP
2.
Press the Play/Stop button after completing steps 1 and 2 shown above.
The HP-3 will start playing back the selected song.
STN-1000
When you are finished listening to the song, press the Play/Stop
button to stop the song.
If you want to listen to a different song then repeat the step shown
above to select the new song.
25
26
User’s Manual STN-1000
PLAY
PLAY ALONG
ALONG SONGS
SONGS
DEMO/SONG
REC
PLAY/STOP F
U
N
REVERB/ C
EFFECT
T
I
O
METRONOMEN
VOICE SELECT
A0
B0
MASTER VOL
RIGHT HAND TEST
LEFT HAND TEST
PERFORMING A PLAY ALONG SONG - The Demo/Song button will access the play along music lesson
guide. There are over 50 songs built into this piano for your musical enjoyment.
These songs have separate left and right hand parts that can be turned on and off as required so you can
practice the corresponding part on the keyboard.
You can test yourself on the right hand melody, the left hand accompaniment or on both hands.
The Right - Hand Test is accessed by selecting the Right Hand Test Piano Key.
The Left -Hand Test is accessed by selecting the Left Hand Test Piano Key.
Please see the Diagram Shown Above.
RIGHT HAND TEST - In this mode you will play the Right Hand Portion of the Play Along
Song while the piano will playback the Left Hand Portion of the Play Along Song.
DEMO/SONG
PLAY/STOP
1.
Hold down the Demo/Song button and press the piano key to which your
desired song is assigned
2.
Keep holding down the Demo/Song button and press the B0 piano key.
3.
Press the Play/Stop button to start the song and your test. There will be
a one measure metronome lead in, then play the right hand portion of
the song as the left hand portion plays.
Note: The Demonstration songs are not available for Play Along.
26
27
User’s Manual STN-1000
PLAY ALONG
ALONG SONGS
SONGS
PLAY
DEMO/SONG
REC
PLAY/STOP F
U
N
REVERB/ C
EFFECT
T
I
O
METRONOMEN
VOICE SELECT
A0
B0
MASTER VOL
RIGHT HAND TEST
LEFT HAND TEST
LEFT HAND TEST - In this mode you will play the Left Hand Portion of the Play Along Song
while the piano will playback the Right Hand Portion of the Play Along Song.
1.
Hold down the Demo/Song button and press the piano key to which your
desired song is assigned
2.
Keep holding down the Demo/Song button and press the A0 piano key.
3.
Press the Play/Stop button to start the song and your test. There will be
a one measure metronome lead in, then play the left hand portion of the
song as the right hand portion plays.
DEMO/SONG
PLAY/STOP
RIGHT AND LEFT HAND TEST - Turn off the left and right hand piano parts of the song, to
playback the complete song. Therefore you will play both hands together.
1.
Hold down the Demo/Song button and press the piano key to which you
desired song is assigned.
2.
Keep holding down the Demo/Song button and press the A0 and the B0
piano keys.
3.
Press the Play/Stop button to start the song and your test. There will
be a one measure metronome lead in, then play the right and left hand
portions of the song.
DEMO/SONG
PLAY/STOP
27
28
User’s Manual STN-1000
PLAY ALONG
ALONG SONGS
SONGS
PLAY
VOCAL GRADING ON/OFF KEY
DEMO/SONG
REC
PLAY/STOP F
U
N
REVERB/ C
T
EFFECT
I
O
METRONOME N
A#0
VOICE SELECT
MASTER VOL
VOCAL GRADING - To check your progress you can set the piano to offer a vocal grade at the completion of
your Play Along Song performance. With the Grading function engaged you will hear one of the following vocal
grades. The vocal instructor will evaluate your performance as follows:
“Try Again”
“Good”
“Very Good”
“Excellent”
0-40% of the notes correctly.
41-60% of the notes correctly.
61-85% of the notes correctly.
86-100% of the notes correctly
TO TURN THE VOCAL GRADING ON/OFF
1.
The Vocal Grade function is on when he piano power is turned on. To
turn off the Vocal grade function, hold down the Demo/Song button.
2.
Press the A#0 piano key while holding down the Demo/Song button.
This will toggle the Vocal Grade function on and off.
DEMO/SONG
Note: If the piano is not in the Play Along Song function mode when
changing the Vocal Grade function, the first Demonstration song may
begin to play. Press the Demo/Song button to turn the Demo song off
and set up your Play Along Song test as desired.
TO STOP THE SONG MODE
1.
DEMO/SONG
28
Press the Demo/Song button again to exit from the Play Along Song
function.
29
FUNCTION PIANO KEY CONTROLS
User’s Manual STN-1000
FUNCTION
FUNCTIONPIANO
PIANOKEY
KEYCONTROLS
CONTROLS
C1
FUNCTION PIANO KEY CONTROLS
C2
C1
C3 D3 E3 F3 G3 A3 B3 C4
C5
C6
C7
PIANO TOUCH
TRANSPOSE
C2
C3 D3 E3 F3 G3 A3
B3 C4
C5 CHANGE ON/OFF
C6
TRANSMIT
PROGRAM
TUNING
DUET PIANO LESSON MODE
MULTI TIMBRAL MODE ON/OFF
C1
MIDI INPUT CHANNEL SELECT
PIANO TOUCH
MIDI
OUTPUT CHANNEL SELECT
TRANSPOSE
C2
C3 D3 E3 F3 G3 A3 B3 C4
C5
TRANSMIT PROGRAM CHANGE ON/OFF
TUNING
DUET PIANO LESSON MODE
MULTI TIMBRAL MODE ON/OFF
C8
C7
C6
C8
C7
C8
PIANO TOUCH MIDI INPUT CHANNEL SELECT
FUNCTION MODE - The Function mode gives
youMIDI
access
to these
other features
TRANSPOSE
OUTPUT
CHANNEL
SELECT of the HP-3 piano.
TUNING
DUET PIANO LESSON MODE
TRANSMIT PROGRAM CHANGE ON/OFF
MULTI TIMBRAL MODE ON/OFF
FUNCTION MODE - To enter into the Function
MIDIMode:
INPUT CHANNEL SELECT
F
MIDI
CHANNEL
SELECT
FUNCTION MODE
- The Function mode gives you access
toOUTPUT
these other
features
of the STN-1000
HP-3 piano.
U
1.
Press the Reverb/Effect button and the Metronome button simultaneously.
REVERB/
N
EFFECT
C
The LED’s for both buttons will begin to flash.
T
FUNCTION
MODE - To enter into the Function Mode:
I
O
FUNCTION
MODE
- The Function
mode the
gives
youisaccess
to these
other
features
of the HP-3 piano.
Note: When
HP-3
in Function
Mode
with
both Reverb/Effect
and
METRONOME
F
N
U
1.
Press
the
Reverb/Effect
button
and
the
Metronome
button
simultaneously.
Metronome
button
Led’s
flashing,
there
will
be
no
sound
from
the
piano
REVERB/
N
EFFECT
C
keys.The LED’s for both buttons will begin to flash.
T FUNCTION MODE - To enter into the Function Mode:
METRONOME
I
O
N
REVERB/
2.
EFFECT
F
U
N
C
T
I
O
N
Note:
When the piano
HP-3 is
in or
Function
with
both
Reverb/Effect
and
Press
the designated
key
keys toMode
change
the
value
for the
1.
Press the Reverb/Effect button and the Metronome button simultaneously.
Metronome
button
flashing,
there willlisted
be noabove.
sound from the piano
selected
function.
See Led’s
the various
Functions
The LED’s for both buttons will begin to flash.
keys.
Note: When the HP-3 is in Function Mode with both Reverb/Effect and
METRONOME
TO EXIT
THE FUNCTION
MODE
2.
Press
the designated piano key or keys to change the value for the
Metronome button Led’s flashing, there will be no sound from the piano
selected
function.Mode
See the
various
Functions
above.
1.
To exit
the Function
press
the Voice
Select listed
button.
The Reverb/
keys.
Effect
button
will
stop
flashing
but
remain
on.
The
Metronome
button
VOICE SELECT
will turn off.
2.
Press the designated piano key or keys to change the value for the
TO EXIT THE FUNCTION MODE
selected function. See the various Functions listed above.
the Function
Mode
the Voice
button.
The
2. 1. PlayTo
theexit
piano,
you should
hearpress
the piano
notesSelect
play with
your
se-Reverb/
Effect
button
will
stop
flashing
but
remain
on.
The
Metronome
button
lected
function
engaged.
It
may
be
necessary
to
increase
or
decrease
VOICE SELECT
will
turn
off.
your
selected
function.
TO EXIT THE FUNCTION MODE
UPDATE
1.
To exit the Function Mode press the Voice Select button. The Reverb/
2.
Play the piano, you should hear the piano notes play with your seEffect
button
will stop
flashing
remain
on. The
Metronome button
RESETTING
TO DEFAULT SETTINGS
- When
the power
is turned
on,but
these
functions
are always
VOICE SELECT
lected function engaged. It may be necessary to increase or decrease
will
turn
off.
set to the default settings.
your selected function.
UPDATTING THE TABLE ON PAGE 29:
1.
At any
theshould
piano hear
back the
to itspiano
default
factory
2. time you
Playcan
theeasily
piano,put
you
notes
play with your sesettings.
Hold
down
the
Demo/Song
button
and
the
Reverb/Effects
DEMO/SONG
lected
function
engaged.
It
may
be
necessary
to
RESETTINGTO
TO
DEFAULT
SETTINGS - When the power is turned on, these functions increase
are
always
RESETTING
DEFAULT
SETTINGS
have
the or decrease
button
and
the
piano
will
reset
to
the
default
settings
below.
your
selected
function.
set to the values
defaultengaged.
settings.
following
1. Touch
At any time you can easily putNormal
the piano back to its default factory
RESETTINGTranspose
TOsettings.
DEFAULT
SETTINGS
When0the power
is turned
on,Reverb/Effects
these functions are always
and the
Hold
down the- Demo/Song
button
set to the default
settings.
Tuning
to the default settings below.
button
and the piano will resetA4=440.0Hz
Reverb
On
1.Piano Lesson
At any time you can easily
put the piano back to its default factory
Duet
Off Normal
Touch
REVERB/
settings.
Hold
down
the
Demo/Song
button and the Reverb/Effects
EFFECT DEMO/SONG
MIDITranspose
Channel Select
Channel
0 1
button
and
the
piano
will
reset
to
the
Multi-Timbral
Off A4=440.0Hz default settings below.
Tuning Mode On/Off
Transmit
MIDI Program Change On On
Reverb
29
Touch
Normal
REVERB/
Off
Duet
Piano Lesson
EFFECT
Transpose
0
MIDI Channel Select
Channel 1
Tuning
A4=440.0Hz
Off
Multi-Timbral Mode On/Off
On
Reverb
On
Transmit MIDI Program Change On
29
Duet Piano Lesson
Off
Local Mode On/Off
On
MIDI Channel Select
Channel 1
Multi-Timbral Mode On/Off
Off
MIDI Program Change On
UPDATING THE FIGURE ON PAGE Transmit
31:
REVERB/
EFFECT
DEMO/SONG
29
NO KEY CONTROLS
30
User’s Manual STN-1000
FUNCTION PIANO
PIANO KEY
FUNCTION
KEY CONTROLS
CONTROLS
C3 D3 E3 F3 G3 A3 B3 C4
OUCH
NSPOSE
TUNING
ESSON MODE
C5
C6
C7
C8
TRANSMIT PROGRAM CHANGE ON/OFF
DEMO/SONG
MULTI TIMBRAL MODE ON/OFF
REC
MIDI INPUT CHANNEL
SELECT
MIDI OUTPUT CHANNEL
SELECT
PLAY/STOP F
U
N
C
T
I
O
METRONOMEN
FUNCTION PIANO KEY CONTROLS
REVERB/
EFFECT
n mode gives you access to these other features of the HP-3 piano.
VOICE SELECT
C1
D1
E1
F1
C3
E - To enter into the Function Mode:
MASTER VOL
C1
C2
C3 D3 E3 F3 G3 A3 B3 C4
Press the Reverb/Effect button and the Metronome button simultaneously.
The LED’s for both buttons will begin to flash.
FIXED TOUCH
PIANO TOUCH
HEAVY
TOUCH
TRANSPOSE
Note: When the HP-3 is in Function Mode with both Reverb/Effect
and
NORMAL
TOUCH
TUNING
Metronome button Led’s flashing, there will be no sound from the piano
DUET PIANO LESSON MODE
LIGHT TOUCH
keys.
C5
C6
C7
PIANO TOUCH
KEY
TRANSMIT FUNCTION
PROGRAM CHANGE
ON/OFF
MULTI TIMBRAL MODE ON/OFF
MIDI INPUT CHANNEL SELECT
MIDI OUTPUT CHANNEL SELECT
Press the
designated
key orfour
keystypes
to change
the value
for Sensitivity
the
TOUCH
- The piano
HP-3 offers
of keyboard
Touch
settings. These are known as velocity or
selected
function.
See and
the various
Functions
dynamic
curves
are designed
to suitlisted
your above.
style of playing.
FUNCTION PIANO KEY CONTROLS
NORMAL is the standard setting which produces volume in direct proportion to the force
on
the keys. This
setting
the mostmode
similar
to an
acoustic
and
is the
defaultof the HP-3 piano.
FUNCTION
MODE
- TheisFunction
gives
you
access piano
to these
other
features
NCTION MODE
setting.
To exit the Function Mode press
the Voice
Select
button.
The even
Reverb/
LIGHT
produces
a louder
sound
when the piano is played with a soft touch.
Effect button will stop flashingHEAVY
but remain
on.
The
Metronome
button
FUNCTION
MODE
- To
enter
theis Function
Mode:
produces a softer sound even
when
theinto
piano
played with
a heavy touch. It is
will turn off.
F
perfect for those with strong
fingers
or
for
practicing
with
a
hard
touch.
U
1.
Press the Reverb/Effect button and the Metronome button simu
REVERB/
N keyboard. It is used for instrument voices such as organ or
FIXED is a nonsensitive
EFFECT
C
for both buttons will begin to flash.
Play the piano, you should hear
the piano and
notes
withsome
your contemporary
se- The LED’s
harpsichord,
forplay
playing
T
C1
C2 music.
C3 D3 E3 F3 G3 A3 B3 C4
C5
lected function engaged. It may be necessary to increase
or decrease
I
O
Note: When the HP-3 is in Function Mode with both Reverb/E
your selected function.
METRONOME N
Metronome
button
Led’s flashing, there will be no sound from
PIANO
TOUCH
TRANSPOSE
keys.
DIFFERENT
TOUCH
TYPEare always
EFAULT SETTINGS - WhenTO
theSELECT
power isAturned
on, these
functions
TRANSMIT PROGRAM CHANGE
ettings.
TUNING
DUET PIANO LESSON MODE
MULTI TIMBRAL MODE ON/OFF
1.
To select a different
touch
put the piano
HP-3 into
Function
2. piano
Press
thetype,
designated
key the
or
keys
to change the value for
MIDI
INPUT
CHANNEL
SELECT
mode
by
pressing
the
Reverb/Effect
button
and
the
Metronome
button
selected
function.
See
the
various
Functions
listed
above.
At any time you can easily put the piano back to its default factory
MIDI
OUTPUT
CHANNEL
SELECT
simultaneously,
the
indicator
lights
will
begin
to
flash.
settings. Hold down the Demo/Song button and the Reverb/Effects
button and the piano will reset to the default settings below.
TO EXIT THE FUNCTION MODE
2.
Press the C3 Touch
holdpress
it down
put the
1. piano
To key
exitand
the continue
Function to
Mode
thetoVoice
Select button. The
Touch
Normal
FUNCTION MODE - The Function mode gives you access to these other features
keyboard
in
Touch
selection
Function
mode.
Effect
button
will
stop
flashing
but
remain
on.
The Metronome
Transpose
0
VOICE SELECT
will
turn
off.
Tuning
A4=440.0Hz
Reverb
On
FUNCTION MODE - To enter into the Function Mode:
Press the Piano 2.
key of your
Pianoyou
Touch
key hear
type.the piano notes play with yo
PlayFdesired
the piano,
should
Duet Piano Lesson
Off 3.
U
1.
Press
the
Reverb/Effect
button
and the M
lected
function
engaged.
It
may
be necessary
to increase
o
REVERB/
MIDI Channel Select
Channel 1
N
EFFECT
C
The
LED’s
for
both
buttons
will
begin
to
fl
C1
selects
the
Light
Touch
type
your
selected
function.
Multi-Timbral Mode On/Off
Off
T
D1
selects
the
Normal
Touch
type
Transmit MIDI Program Change On
29OI
Note: When the HP-3 is in Function Mod
E1 - selects the Heavy
Touch
type
METRONOME
N
RESETTING TO DEFAULT SETTINGS
- When the power is turned on, these functions ar
Metronome button Led’s flashing, there w
F1 - Selects the Fixed Touch type
set to the default settings.
keys.
1.
At any time you can easily put the piano back to its default fact
VOICE SELECT
2. down
Press
thetodesignated
keyReverb/Ef
or keys to
4.
To exit the Touch mode press
the Voice
Selectthe
button
return
the piano
HP-3
settings.
Hold
Demo/Song
button
and the
DEMO/SONG
selected
function.
See
the
various
Funct
to
normal
operating
mode
with
your
Touch
Sensitivity
setting
selected.
30
button and the piano will reset to the default settings below.
F
U
REVERB/
N
EFFECT
C
T
I
O
METRONOME N
REVERB/
EFFECT
Touch
Normal
TOTranspose
EXIT THE FUNCTION MODE 0
Transpose
Tuning
Reverb
Duet Piano Lesson
MIDI Channel Select
Multi-Timbral Mode On/Off
Transmit MIDI Program Change
Local Mode On/Off
0
A4=440.0Hz
On
Off
Channel 1
On
On
On
31
User’s Manual STN-1000
FUNCTION PIANO KEY CONTROLS
FUNCTION PIANO KEY CONTROLS
FUNCTION PIANO KEY CONTROLS
UPDATING THE FIGURE ON PAGE 31:
BLACK TRANSPOSE SELECT KEYS
BLACK TRANSPOSE SELECT KEYS
C1
C2
C3 D3 E3 F3 G3 A3 B3 C4
C5
C6
C7
C8
DEMO/SONG
DEMO/SONG
REC
PIANO TOUCH
REC
PLAY/STOP F
TRANSPOSE
U
NF
PLAY/STOPTUNING
REVERB/ CU
TN
EFFECT
DUET PIANOREVERB/
LESSON
MODE
IC
OT
EFFECT
METRONOMEN
I
O
METRONOME N
VOICE SELECT
TRANSMIT PROGRAM CHANGE ON/OFF
MULTI TIMBRAL MODE ON/OFF
C#1
D#1
F#1
G#1
A#1
MIDI INPUT CHANNEL
F#1 G#1 SELECT
A#1
MIDI OUTPUT CHANNEL SELECT
C1
D1
E1
F1
G1
A1
C#2 D#2
B1
D3
VOICE SELECT
MASTER VOL
F1
G1
A1
B1
C2
D2
E2
F2
FUNCTION MODE - The Function mode gives you access to these other features of the HP-3 piano.
D3
MASTER VOL
FUNCTION MODE - ToWHITE
enter into
the Function
Mode:
TRANSPOSE
TRANSPOSE
SELECT
KEYS RESET KEY
F
TRANSPOSEKEY
WHITE TRANSPOSE SELECT KEYS
FUNCTION
U
1.
Press the Reverb/Effect button and
the Metronome
button simultaneously.
REVERB/
FUNCTION KEY
RESET
KEY
N
EFFECT
C
The LED’s for both buttons will begin to flash.
T
I
TRANSPOSE
- The transpose function is designed to make it easier to play difficult signatures by adjusting the
O
Note: When the HP-3 is in Function Mode with both Reverb/Effect and
METRONOME
keyboard
N to play in the key that you are familiar with. The Transpose function lets you raise or lower the piano’s
there will be no sound from the piano
key in half steps. One halfMetronome
step on thebutton
piano Led’s
equalsflashing,
one semitone.
keys.
TO TRANSPOSE TO A DIFFERENT KEY
UNCTION PIANO KEY CONTROLS
2.
REVERB/
EFFECT
C1
F
U
N
C
T
I
O
N
Put the piano
HP-3 into
Function
modethe
by value
pressing
Press 1.
the designated
key the
or keys
to change
for the
the Reverb/Effect
button
and
the
Metronome
button
at the
same time, both LED’s will
selected function.
See
the
various
Functions
listed
above.
begin to flash.
TO EXITMETRONOME
THE FUNCTION MODE
2.
Press the D3 Transpose Function piano key to put the keyboard into
Transpose
Select
Function
mode.
1.
To exit the Function
Mode
press
the Voice
Select button. The Reverb/
Effect
button
will
stop
flashing
but
remain
on.
The Metronome button
VOICE SELECT
C2
C3 D3 E3 F3 G3 A3 B3 C4
C5
C6
C7
C8
3. off. Press the key on the keyboard corresponding to the desired transposed
will turn
setting. The default piano setting is to “C”. The piano can be transposed
up to 5hear
half the
steps
higher
to play
“F”, or
6 half
2.
Play
the
piano,
you should
piano
notes
with
yoursteps
se- lower to “F#”.
PIANO TOUCH
TRANSPOSE lected function
Toengaged.
reset the
function
to its original
setting of 0
It Transpose
may be necessary
to increase
or decrease
TRANSMIT PROGRAM CHANGE ON/OFF
TUNING your selected
transposition,
press the function button then press the C2
function.
DUET PIANO LESSON MODE
MULTI TIMBRAL
MODE ON/OFF
-2piano key.
MIDI INPUT CHANNEL SELECT
RESETTING TO DEFAULTMIDI
SETTINGS
-CHANNEL
When theSELECT
power is turned on, these functions are always
OUTPUT
Transpose
-6 semitones press the F#1 piano key.
set to the default settings.
Transpose -5 semitones press the G1 piano key.
Transpose
-4put
semitones
press
pianofactory
key.
1.
At any time you
can easily
the piano
backthe
to G#1
its default
Transpose
-3
semitones
press
the
A1
piano
key.
settings.
Hold to
down
the
Demo/Song
and the
Reverb/Effects
NCTION MODE
- The Function mode gives
you access
these
other
features button
of the HP-3
piano.
DEMO/SONG
semitones
press the
A#1 piano
button and theTranspose
piano will-2
reset
to the default
settings
below.key.
Transpose -1 semitones press the B1 piano key.
Transpose
reset press
the C2 piano key.
Touch
Normal
FUNCTION
MODE - To enter
into the Function
Mode:
REVERB/
EFFECT F
Transpose +1 semitones
press the C#2 piano key.
Transpose
0
U
1.
Press
the
Reverb/Effect
button
and
the
Metronome
button
simultaneously.
Transpose
+2
semitones
press
the
D2 piano
key.
Tuning
A4=440.0Hz
REVERB/
N
EFFECT
C
The Reverb
LED’s for bothTranspose
buttons will
to
+3begin
semitones
press the D#2 piano key.
Onflash.
T
Transpose +4 semitones
Duet Piano Lesson
Off press the E2 piano key.
I
O
Note:
When
the HP-3
Mode
with
Transpose
+5 semitones
press
theReverb/Effect
F2 piano key.and
MIDI
Channel
Selectis in Function
Channel
1 both
METRONOME N
Metronome
buttonMode
Led’sOn/Off
flashing, there
Multi-Timbral
Offwill be no sound from the piano
TO EXIT THE TRANSPOSE FUNCTION
keys.Transmit MIDI Program Change On
29
1.
To exit the Transpose mode, press the Voice Select button to return
2.
Press the designated
key
or keys
to change
the value
the piano
HP-3 to
normal
operating
mode.
Play for
thethe
piano and you will notice
VOICE SELECT
selected function.the
Seepiano
the various
Functions
listed above.
has been
transposed.
HP3
31
ANO KEY
CONTROLS
32
User’s Manual STN-1000
FUNCTION PIANO
PIANO KEY
FUNCTION
KEY CONTROLS
CONTROLS
C3 D3 E3 F3 G3 A3 B3 C4
C5
C6
C7
C8
FUNCTION PIANO KEY CONTROLS
O TOUCH
TRANSPOSE
TUNING
O LESSON MODE
TRANSMIT PROGRAM CHANGE ON/OFF
MULTI TIMBRAL MODE ON/OFF
MIDI INPUT CHANNEL SELECT
MIDI OUTPUT CHANNEL SELECT
C1
C2
C3 D3 E3 F3 G3 A3 B3 C4
C5
C6
C7
ction mode gives you
access
to these other features of the HP-3 piano.
A0
B0
ODE - To enter
1.
PIANO TOUCH
TRANSPOSE
TUNING
into the Function Mode:
DUET PIANO LESSON MODE
C8
E3
TRANSMIT PROGRAM CHANGE ON/OFF
MULTI TIMBRAL MODE ON/OFF
Press the Reverb/Effect button and theMIDI
Metronome
button simultaneously.
INPUT CHANNEL
SELECT
The LED’s for both buttons will begin
to flash.
MIDI
OUTPUT CHANNEL SELECT
TUNE + 1 CENT
TUNE
- 1 CENT
Note: When the HP-3
is in Function Mode with both Reverb/Effect and
TUNINGFUNCTIONKEY
Metronome button Led’s flashing, there will be no sound from the piano
UNCTION
MODE - The Function mode gives you access to these other features of the HP-3 piano.
keys.
FUNCTION PIANO KEY CONTROLS
Press
the designated
key
or keys
change
the value
the
TUNE
- When the piano
HP-3 is
turned
on,tothe
keyboard’s
pitchfor
is automatically
set to Standard A440 concert pitch.
FUNCTION MODE - To enter into the Function Mode:
selected
function.
See thepitch
various
Functions
above.
However
if a different
is desired,
thelisted
piano’s
tuning range can be adjusted in one cent increments. It
F
has a range
of +1.to - 50 Press
cents.the
The
pitch is adjusted
one
cent
increments
every
time the key is pressed.
U
Reverb/Effect
buttoninand
the
Metronome
button
simultaneously.
REVERB/
N
EFFECT
This function
allows
you
to
adjust
the
piano’s
pitch
to
match
a
recording
or
another
instrument in an enC
The LED’s for both buttons will begin to flash.
FUNCTIONsemble.
MODET
I
1.
To exit theOFunction Mode press
theWhen
Voicethe
Select
The Reverb/
Note:
HP-3button.
is in Function
Mode with both Reverb/Effect and
METRONOME N
C1 remain on. The
C2
D3 E3 F3 G3 A3 B3 C4
C6
Effect button will stop flashing
but
Metronome
button
Metronome button Led’s flashing,C3there
will be no sound from C5
the piano
will turn off.
TO ADJUSTkeys.
THE TUNING OF THE PIANO
2.
2.
C7
PIANO TOUCH
Play the piano, you should
hear
the
notes
with
se- tomode
U
Press
thepiano
designated
piano
keyyour
or keys
change
valuethe
for Reverb/Effect
the
TRANSPOSE
1.
Put
theplay
HP-3
into
Function
by the
pressing
button
REVERB/2. N
TRANSMIT PROGRAM CHANGE ON/OFF
lected functionEFFECT
engaged.
It
may
be
necessary
to
increase
or
decrease
TUNING
selected function.
SeeMetronome
the variousbutton
Functions
listed
above.
and the
simultaneously,
both respective LED’s will
C
DUET PIANO LESSON MODE
your selected function. T
MULTI TIMBRAL MODE ON/OFF
begin to flash.
F
I
O
METRONOME N
MIDI INPUT CHANNEL SELECT
MIDI OUTPUT CHANNEL SELECT
TO EXIT -THE
FUNCTION
O DEFAULT SETTINGS
When
the power isMODE
turned on, these functions are always
1.
To exit2.the Function
Mode
Voice Select
Thewill
Reverb/
Press the
E3 press
Tuningthe
Function
Piano button.
key , this
put the piano into
lt settings.
Effect
button
will
stop
flashing
but
remain
on.
The
Metronome
button
Tuning
Function
mode.
VOICE SELECT
1.
At any time you can easily putwill
theturn
piano
off.back to its default factory
MODEand
- The
Function
mode gives you access to these other features of the HP-3 piano.
settings. Hold down the FUNCTION
Demo/Song button
the
Reverb/Effects
button and the piano2.will reset
to the
settings
below.
Play
the
piano,Press
you
should
hear theIncrease
piano notes
your
3. default
the
B0
Tuning
Pianoplay
key,with
or the
A0seTuning Decrease
lected function
engaged.
It release
may
necessary
toFunction
increase
orpitch
decrease
Piano
keyMODE
and
it,
tointo
raise
or
lower
theMode:
of the piano by one
FUNCTION
- Tobe
enter
the
Touch
your Normal
selected cent.
function.
These keys adjust the pitch by 0.5Hz each time they are
F
Transpose
0 REVERB/pressed.
U
1.
Press the Reverb/Effect button and the Metronome button simultan
N
EFFECT
Tuning
A4=440.0Hz
C
The LED’s for both buttons will begin to flash.
RESETTING TO DEFAULT SETTINGS
- When
the power is turned on, these functions are always
T
Reverb
On
Note:
To hear a noticeable pitch change we suggest that you press and
I
to the
default settings.
Duetset
Piano
Lesson
Off
O
release
the selected Note:
value button
about
twenty
times. Mode with both Reverb/Effec
When the
HP-3
is in Function
METRONOME
N
MIDI Channel Select
Channel 1You
restore
tuning
default
setting
by will
pressing
Metronome
button
Led’sfactory
flashing,
there
be no sound from the
1.
At any time you cancan
easily
put thethe
piano
back toto
itsits
default
Multi-Timbral Mode On/Off
Off
both
the
A0, and the
B0, and
keysthe
simultaneously.
keys.
settings.
Hold
down
the
Demo/Song
button
Reverb/Effects
DEMO/SONG
Transmit MIDI Program Change On
29settings below.
button and the piano will reset to the default
4.
Press the Voice
button
return the piano
HP-3 to
normal
operating
2. SelectPress
thetodesignated
key
or keys
to change the value for the
VOICE SELECT
mode
with
the
selected
Tuning
adjustment.
selected
function.
See
the
various
Functions
listed above.
Touch
Normal
REVERB/
EFFECT
Transpose
0
Tuning
A4=440.0Hz
32
TO EXIT THE FUNCTION
Reverb
On MODE
1.
To exit the Function Mode press the Voice Select button. The Re
Duet Piano Lesson
Off
Effect button
will stop flashing but remain on. The Metronome bu
MIDI
Channel
Select
Channel
1
VOICE SELECT
will turn off.
Multi-Timbral Mode On/Off
Off
33
User’s Manual STN-1000
FUNCTION
KEY
FUNCTION
PIANO
KEYCONTROLS
CONTROLS
FUNCTION
PIANOPIANO
KEY CONTROLS
C1
C2
C3 D3 E3 F3 G3 A3 B3 C4
PIANO TOUCH
TRANSPOSE
TUNING
DUET PIANO LESSON MODE
A0
C5
C6
C8
TRANSMIT PROGRAM CHANGE ON/OFF
MULTI TIMBRAL MODE ON/OFF
MIDI INPUT CHANNEL SELECT
MIDI OUTPUT CHANNEL SELECT
B0
C7
F3
FUNCTION PIANO KEY CONTROLS
FUNCTION MODE - The Function mode gives you access to these other features of the HP-3 piano.
ON
DUET PIANO LESSON
OFF
MODE KEY
FUNCTION MODE - To enter into the Function Mode:
F
U
N
C
T
I
O
N
1.
C1
C2
C3 D3 E3 F3 G3 A3 B3 C4
C5
C6
Press the Reverb/Effect button and the Metronome button simultaneously.
The LED’s for both buttons will begin to flash.
DUET - This Suzuki
Arius piano offers a function that will aid Teacher/Student activity or duet performances. The
PIANO TOUCH
Duet
function
actually splits
the When
88 note
two
44 note
pianos.
Splitting
the keyboard
TRANSPOSE
Note:
thepiano
HP-3into
is in
Function
Mode
with both
Reverb/Effect
and allows for two
METRONOME
TRANSMIT PROGRAM CHANGE ON/OFF
TUNING
people to perform in the Metronome
same register
at the
same
piano.
button
Led’s
flashing,
there will be no
sound from the piano
DUET PIANO LESSON MODE
MULTI TIMBRAL MODE ON/OFF
keys.
TO PUT THE PIANO INTO DUET MODE
MIDI INPUT CHANNEL SELECT
REVERB/
EFFECT
F
U
N
C
T
I
O
METRONOME N
2.
REVERB/
EFFECT
C7
MIDI
OUTPUT
CHANNEL
SELECT
Put thepiano
HP-3 into
Function
by the
pressing
the
button and
Press 1.
the designated
key or
keys tomode
change
value
for Reverb/Effect
the
the Metronome
buttonFunctions
simultaneously,
both respective LED’s will begin to
selected function.
See the various
listed above.
flash.
FUNCTION MODE - The Function mode gives you access to these other features of the HP-3 piano.
TO EXIT THE FUNCTION MODE
Press the
F3 Duet
modeSelect
piano key
to put
theReverb/
keyboard into Duet
1.
To exit2.the Function
Mode
pressPiano
the Voice
button.
The
Piano
Function
mode.
Effect
button
will
stop
flashing
but
remain
on.
The
Metronome
button
FUNCTION MODE - To enter into the Function Mode:
VOICE SELECT
will turn off.
F
U
1.
Press the Reverb/Effect button and the Metronome button simulta
REVERB/
N
C
The
LED’s
for both
willsebegin to flash.
2.
Play theEFFECT
piano, you
should hear the
piano
notes
play buttons
with your
T
lected
function
engaged.
It
may
be
necessary
to
increase
or
decrease
I
TO ENGAGE OR DISENGAGE
THE PIANO IN DUET MODE
O
Note: When the HP-3 is in Function Mode with both Reverb/Effe
your selected
function.
METRONOME
N
1.
Press the on or the offMetronome
to engage button
or disengage
the Duetthere
function.
Led’s flashing,
will be no sound from the
keys.
RESETTING TO DEFAULT SETTINGS - When the power is turned on, these functions are always
set to the default settings.
2.
Press the Voice
button
return thepiano
HP-3 to
operating
mode
withthe value for th
2. SelectPress
thetodesignated
key
or keys to
change
the
selected
Duet
function
engaged.
selected
function.
See
the
various
Functions
listed above.
1.
At any time you can easily put the piano back to its default factory
settings. Hold down the Demo/Song button and the Reverb/Effects
VOICE SELECT
DEMO/SONG
button and the piano will reset to the default settings below.
TO EXIT THE FUNCTION MODE
Normal 88-note Keyboard
1.
To exit the Function Mode press the Voice Select button. The R
Touch
Normal
REVERB/
EFFECT
Effect button will stop flashing but remain on. The Metronome bu
Transpose
0
VOICE SELECT
will turn off.
Tuning
A4=440.0Hz
C1 Reverb
C2
C3
C4
C5On
C6
C7
C8
2.
Play
the
piano,
you
should
hear the piano notes play with your
DuetTwo
Piano
Lesson
Off
44-note Keyboard sections for Duet performances
lected function
engaged. It may be necessary to increase or d
MIDI Channel Select
Channel
1
your selected function.
Multi-Timbral Mode On/Off
Off
Transmit MIDI Program Change On
33
29
C3
C4
C5
C6
C3
C4
C5
C6
RESETTING TO DEFAULT SETTINGS - When the power is turned on, these functions are a
set to the default settings.
34
User’s Manual STN-1000
FUNCTION PIANO
FUNCTION
PIANO KEY
KEY CONTROLS
CONTROLS
C1
C2
C3
G3 A3 B3 C4
C5
C6
C7
C8
12 3 45 6 78 90
TRANSMIT PROGRAM CHANGE ON/OFF
MULTI TIMBRAL MODE ON/OFF
MIDI INPUT CHANNEL SELECT
MIDI OUTPUT CHANNEL SELECT
MIDI - MIDI stands for Musical Instrument Digital Interface. This is a world wide standard communication
interface that enables musical instruments of all brands and computers to communicate so that instructions
and other data can pass between them. This exchange of information makes it possible to create a “system”
of MIDI instruments and equipment that offer greater musical versatility and control than what would be
available with just isolated instruments. Whether you interface with computers, sequencers, expanders or
other keyboards you musical horizons will be greatly enhanced. For further information on MIDI and MIDI
equipment that is available please contact your local Suzuki
Arius music store.
MIDI TERMINALS - The MIDI terminals are located underneath the piano on the connector
panel.
MIDI
IN
1
1
34
OUT
2
2
1.
The MIDI In connector receives MIDI data from an external MIDI device
which can then be used to control the piano.
2.
The MIDI Out connector transmits MIDI data generated by the piano, the
note and velocity data produced by playing the piano.
35
User’s Manual STN-1000
FUNCTION
FUNCTION PIANO
PIANOKEY
KEYCONTROLS
CONTROLS
VARIOUS MIDI SETUPS
Arius PIANO
SUZUKI
PIANO
1.
Output
to an external
sound generator
- MIDI keyboards transmit note
FUNCTION
PIANO
KEY
CONTROLS
and velocity, or touch response, information via the MIDI Out connector.
If the MIDI Out terminal of the keyboard is connected to the MIDI In
terminal of a tone generator (tone generators usually offer 128 different
voices), piano sound module or another external device, it will respond
precisely to the notes played on the original transmitting keyboard, in this
Arius piano.
case your Suzuki
MIDI
OUT
MIDI
IN
TONE GENERATOR
C1
C2
C6
C7
MIDI INPUT
CHANNEL
SELECT
instruments at once. This provides
a thick,
layered
multi-instrument
MIDI
OUTPUT
CHANNEL
SELECT
sound.
MIDI
OUT
MIDI
MIDI PIANO
PIANO
MIDI
IN
C5
PIANO TOUCH
TRANSPOSE
TRANSMIT PROGRAM CHANGE ON/OFF
Piano to Piano -TUNING
By connecting this
Suzuki
Arius piano to another keyboard in
DUET PIANO LESSON MODE
MULTI
MODE ON/OFF
the same matter as described aboveTIMBRAL
you will essentially
be playing two
2.
SUZUKI
PIANO
Arius PIANO
C3 D3 E3 F3 G3 A3 B3 C4
FUNCTION MODE - The Function mode gives you access to these other features of the HP-3 piano.
3. FUNCTION
Output MODE
from an-external
- Connect
the MIDI In terminal of
To enterMIDI
into device
the Function
Mode:
the
F piano and the MIDI Out terminal of an external device. Data generU
other device
passed
through button
the piano’s
sound
delivery button simultane
Press is
the
Reverb/Effect
and the
Metronome
REVERB/ ated on the1.
N
EFFECT
C
system.
The LED’s for both buttons will begin to flash.
SUZUKI
PIANO
Arius PIANO
MIDI
IN
MIDI
OUT
EXTERNAL DEVICE
METRONOME
T
I
O
N
Note: When the HP-3 is in Function Mode with both Reverb/Effect
Metronome button Led’s flashing, there will be no sound from the pi
keys.
4.
Arius PIANO
SUZUKI
PIANO
MIDI IN
MIDI
OUT
MIDI IN
MIDI
OUT
COMPUTER
Connect with
- Although
thepiano
HP-3 offers
builttoinchange
recorder,
2. a Computer
Press the
designated
key orakeys
the value for the
the same type of musical
information
is described
above
selected
function. transfer
See the that
various
Functions
listed above.
can be used for more sophisticated MIDI sequence recording using an
external sequencer or computer. These devices can be used to record
TO EXIT
MIDI THE
data FUNCTION
received fromMODE
the piano. You can transmit your performance to
a computer1.to utilizeTothe
advanced
recording,
exit
the Function
Modecomposing
press the and
Voiceediting
Select button. The Rev
available
from
computer
software.
MIDI
music
stored
on
the
computer
Effect
button
will
stop
flashing
but
remain
on.
The Metronome butt
VOICE SELECT
can be played back will
through
your instrument
turn off.
2.
Play the piano, you should hear the piano notes play with your se
lected function engaged. It may be necessary to increase or decr
your selected function.
RESETTING TO DEFAULT SETTINGS - When the power is turned on, these functions are alwa
set to the default settings.
1.
DEMO/SONG
REVERB/
EFFECT
At any time you can easily put the piano back to its default factory
settings. Hold down the Demo/Song button and the Reverb/Effects
button and the piano will reset to the default settings35
below.
Touch
Transpose
Tuning
Normal
0
A4=440.0Hz
FUNCTION PIANO KEY CONTROLS
36
User’s Manual STN-1000
FUNCTION PIANO
PIANO KEY
FUNCTION
KEY CONTROLS
CONTROLS
C1
C2
C3 D3 E3 F3 G3 A3 B3 C4
PIANO TOUCH
TRANSPOSE
TUNING
DUET PIANO LESSON MODE
C1
C2
C5
C6
C7
C8
TRANSMIT PROGRAM CHANGE ON/OFF
MULTI TIMBRAL MODE ON/OFF
MIDI INPUT CHANNEL SELECT
C3
G3
C4
MIDI OUTPUT
CHANNEL
SELECT
C5
C6
C7
C8
12 3 45 6 78 90
FUNCTION MODE - The Function mode gives you access to these other features of the HP-3 piano.
MIDI OUTPUT CHANNEL SELECT
FUNCTION MODE - To enter into the Function Mode:
REVERB/
EFFECT
METRONOME
F
U
N
C
T
I
O
N
1.
Press the Reverb/Effect button and the Metronome button simultaneously.
The LED’s for both buttons will begin to flash.
MIDI OUTPUT
CHANNEL
- This
function
allow
youboth
to select
which MIDI
channel you want
Note:
When theSELECT
HP-3 is in
Function
Mode
with
Reverb/Effect
and
to transmitMetronome
MIDI data on.
The Led’s
default
settingthere
to transmit
data from
is Channel
1.
button
flashing,
will beMIDI
no sound
the piano
keys.
2.
REVERB/
EFFECT
F
U
N
C
T
I
O
N
Put the piano
HP-3 into
by the
pressing
button
Press 1.
the designated
key Function
or keys tomode
change
valuethe
for Reverb/Effect
the
and the
simultaneously,
both of the LED’s will begin to
selected function.
SeeMetronome
the variousbutton
Functions
listed above.
flash.
TO EXITMETRONOME
THE FUNCTION MODE
1.
To exit the Function Mode press the Voice Select button. The Reverb/
Effect button will stop flashing but remain on. The Metronome button
VOICE SELECT
2. off. Press the G3 MIDI Output Channel Select piano key to put the piano into
will turn
MIDI Output Channel Select mode.
2.
Play the piano, you should hear the piano notes play with your selected function engaged. It may be necessary to increase or decrease
your selected function.
3.
Press the piano key 0 - 9 on the keyboard to enter the channel number to
RESETTING TO DEFAULT SETTINGS - When the power is turned on, these functions are always
transmit on. You can directly enter it as a one or two digit number.
set to the default settings.
(EX: 12, press the 1 key and the 2 key). The channel range is 0 – 15.
1.
At any time you can easily put the piano back to its default factory
settings.
Hold down the Demo/Song button and the Reverb/Effects
DEMO/SONG
button and the piano will reset to the default settings below.
VOICE SELECT
REVERB/
EFFECT
36
Press the Voice Select
button to return the HP-3
piano to operating mode
STN-1000
Touch4.
Normal
with the selected MIDI
Transpose
0 Output Channel.
Tuning
A4=440.0Hz
Reverb
On
Duet Piano Lesson
Off
MIDI Channel Select
Channel 1
Multi-Timbral Mode On/Off
Off
function
is off.
Transmit MIDI Note:
ProgramThis
Change
Onis available when Multi-timbral mode29
37
User’s Manual STN-1000
FUNCTION
FUNCTIONPIANO
PIANOKEY
KEYCONTROLS
CONTROLS
C1
C2
C3
A3
C4
C5
C6
C7
C8
12 3 45 6 78 90
MIDI INPUT CHANNEL SELECT
MIDI INPUT CHANNEL SELECT - This function allow you to select which MIDI channel you want to
receive MIDI data on. The default setting is the OMNI mode which receives MIDI data on all
channels.
REVERB/
EFFECT
METRONOME
VOICE SELECT
F
U
N
C
T
I
O
N
1.
Put STN-1000
the HP-3 into Function mode by pressing the Reverb/Effect button and
the Metronome button simultaneously, both of the LED’s will begin to
flash.
2.
Press the G3 MIDI Input Channel Select piano key to put the piano into
MIDI Input Channel Select mode.
3.
Press the piano key 0 - 9 on the keyboard to enter the channel number to
receive on. You can directly enter it as a one or two digit number.
(EX: 12, press the 1 key and the 2 key). The channel range is 0 – 15.
4.
Press the Voice Select button to return the HP-3
piano to operating mode
STN-1000
with the selected MIDI Output Channel.
Note: This function is available when Multi-timbral mode is off.
37
FUNCTION PIANO KEY CONTROLS
38
FUNCTION PIANO KEY CONTROLS
User’s Manual STN-1000
FUNCTION PIANO KEY CONTROLS
C1
C2
B3 C4
C3
C5
C6
C7
C8
C6
C7
C8
UPDATE
C1
MULTI-TIMBRAL ON / OFF
C2
B3 C4
C3
C5
UPDATING A NEW MIDI FUNCTION: THE LOCAL MODE
1. Change the Figure on Page 31:
MULTI-TIMBRAL ON / OFF
TURNING MULTI-TIMBRAL MODE ON / OFF
C1
Put the HP-3 into Function mode by pressing the Reverb/Effect button
and the Metronome button
simultaneously,
both ofC7the LED’s will begin
to
C3 D3 E3 F3 G3 A3 B3 C4 D4
C5
C6
C8
flash.
TURNING MULTI-TIMBRAL MODE ON / OFF
F
U
N
C2
C
T
I
O
METRONOME N
F
U
REVERB/
N
EFFECT DUET
C
T
I
O
METRONOME N
1.
REVERB/
EFFECT
PIANO TOUCH
TRANSPOSE
1.
TUNING
2.MODE
PIANO LESSON
MIDI OUTPUT CHANNEL SELECT
VOICE SELECT
2.
3.
Press the B3 Multi-Timbral mode On / Off piano key on the keyboard to
turn the
on orbutton
off. The
setting
on when
the powermode
is
Press
thefunction
Voice Select
todefault
return the
HP-3ispiano
to operating
on
Page
38:Multi-Timbral Mode engaged.
turned
withthe
theon.
selected
3.
Press the Voice Select button to return the HP-3 piano to operating mode
with the selected Multi-Timbral Mode engaged.
2. Add the Following Contents
VOICE SELECT
C1
LOCAL
ON/OFF
Put the HP-3
intoMODE
Function
mode by pressing the Reverb/Effect button
TRANSMIT PROGRAM CHANGE ON/OFF
and the
buttonmode
simultaneously,
bothkey
of the
will begin
Press
theMetronome
B3 Multi-Timbral
On / Off piano
on LED’s
the keyboard
toto
MULTI TIMBRAL MODE ON/OFF
flash.the
turn
function on or off. The default setting is on when the power is
MIDI INPUT CHANNEL SELECT
turned on.
C2
C3
B3 C4 D4
C5
C6
C7
C8
LOCAL MODE ON / OFF
LOCAL MODE ON / OFF
In the local off mode, the piano does not play the internal voices, however,
the MIDI information is still transmitted via the MIDI Out port
when notes are played on the piano. At the same time, the internal tone
generator can respond to MIDI data received via the MIDI In port.
REVERB/
EFFECT
38
METRONOME
F
U
N
C
T
I
O
N
1.
Put the piano into the Function mode by pressing the Reverb/Effect button
and the Metronome button simultaneously, both of the LED’s will begin to
flash.
2.
Press the D4 Local mode On / Off piano key on the keyboard to
turn the function on or off. The default setting is off when the power is
turned on.
3.
Press the Voice Select button to return the piano to operating mode
with the selected Local Mode engaged.
38
VOICE SELECT
39
User’s Manual STN-1000
FUNCTIONPIANO
PIANOKEY
KEYCONTROLS
CONTROLS
FUNCTION
C1
C2
C3
C4
C5
C6
C7
C8
TRANSMIT MIDI PROGRAM CHANGE ON/OFF
TRANSMIT MIDI PROGRAM CHANGE - You can set the STN-1000
HP-3 piano to transmit a Program Change
Numbers via MIDI when the sound is changed on the piano.
REVERB/
EFFECT
METRONOME
VOICE SELECT
F
U
N
C
T
I
O
N
1.
Put STN-1000
the HP-3 into Function mode by pressing the Reverb/Effect button
and the Metronome button simultaneously, both of the LED’s will begin to
flash.
2.
Press the C4 Transmit MIDI Program Change On/Off piano key on the
keyboard to turn the function on or off. The default setting is off when
the power is turned on.
3.
Press the Voice Select button to returnSTN-1000
the HP-3 piano to operating mode
with the selected Transmit MIDI program change mode engaged.
39
40
User’s Manual STN-1000
MIDI IMPLEMENTATION
MIDI
IMPLEMENTATIONCHART
CHART
Function
Transmitted Recognized Remark
Basic Channel
1 CH
1-16 CH
Channel changed
1-16 CH
1-16 CH
Default Mode
3
3
Note Number
9-120
0-127
Velocity: Note On
�
�
Velocity: Note Off
X
�
Pitch Bender
�
�
Control Change: 0
�
X
1
X
X
5
X
X
7, MIDI
10
�
�
IMPLEMENTATION CHART
11
X
�
64, 66, 67
�
�
65
X
X
80, 81
�
�
91
�
�
98, 99
X
X
100 ,101
X
X
121
�
�
123
�
�
Program Change
0-127
0-127
System Exclusive
X
X
Sys. Common: Song Select
X
X
Sys. Common: Song Position
X
X
System: Clock
X
X
Real Time: Commands
X
X
40
Variation page
Modulation
Portamento value
Volume, Pan
Expression
Sustain, Sostenuto, Soft Pedal
Portamento yes/no
Reverb, Chorus program
Reverb, Chorus send level
NRPNL, NRPHH
RPNL, RPNH
Reset all controllers
All notes off
41
User’s Manual STN-1000
CONNECTOR
CONNECTOR PANEL
PANEL
MIDI
AUDIO
PEDAL JACK
USB
11
2
2
IN
33
OUT
IN
OUT
44
5
5
6
6
CONNECTOR JACKS - These connector jacks are located underneath the piano.
1.
PEDAL JACK - Plug the Pedal cable into this connector.
2.
USB - The USB connector allows you to connect the piano directly to your
computer’s USB port. Do not turn on the piano with the USB cable
connected to the computer to avoid having to restart your computer.
3.
MIDI IN - This piano contains MIDI Input and MIDI Output ports. MIDI
jacks allow communication with other products equipped with MIDI
interfaces. Please see the MIDI section of this manual for further details.
4.
MIDI OUT - This piano contains MIDI in and MIDI output ports. MIDI
jacks allow communication with other products equipped with MIDI
interfaces. Please see the MIDI section of this manual for further details.
5.
AUDIO IN - These stereo audio input jacks will amplify the supplied
signal of other electronic instruments through the internal amplifier and
speakers within the piano. They can be used to hook up items such as
CD players, MP3 players or Tape players.
6.
AUDIO OUT - These stereo audio output jacks supplies the piano’s
output signal to external amplification, such as home stereo, PA system
or other stand alone amplifiers.
HEADPHONE JACKS - The Headphone jacks are located UNDERNEATH the piano, beneath
the control panel.
PHONES
2
1
HEADPHONES - You can play in total silence, without disturbing others in the
room, by plugging a set of headphones into one of the appropriate sockets
located on the left side underneath the keyboard. When headphones are
plugged into either of these jacks the main speaker system is turned off. Two
sets of headphones may be used at the same time.
41
42
User’s Manual STN-1000
PEDALS
PEDALS
11
2
2
33
PIANO PEDALS
42
1.
SOFT PEDAL (VOLUME ) - When the left pedal is engaged the piano
volume is reduced and the timbre slightly altered on the notes that are
played.
2.
SOSTENUTO PEDAL - The Sostenuto pedal functions similar to the
Sustain pedal. If the Sostenuto pedal is engaged while notes are played,
the notes will sustain. The sustain effect will not apply to notes played
after pressing the pedal, even if the peal is still engaged.
3.
SUSTAIN PEDAL - When the right pedal is engaged the piano keys will
continue to sustain as they are played. Thereby the piano note will decay
gradually, as if you were continuing to hold down the piano keys.
43
User’s Manual STN-1000
VOICE
VOICE DESCRIPTIONS
DESCRIPTIONS
VOICE DESCRIPTIONS - Each of the 16 instrument voice samples on this piano are described below to offer
both information ideas on how to use them.
Voice #-Key
Voice Name
01 - A0
GRAND PIANO - This is a 6’ Bosendorfer Grand Piano. The stereo sample of
this world class piano was taken in Paris, France. Perfect for classical compositions as well as any other style that requires acoustic
piano.
02 - B0
PIANO 2 - This is a 7 foot Grand Piano sampled with popular music in mind.
This piano is great for Elton John and rhythmic playing. The sound is
crisp and spacious. The 3D samples were taken from the position of
the player at Sony studios L.A.
03 - C1
ELEC. PIANO - An electronic piano sound created by FM synthesis. This
sound is useful for popular music as well as smooth Jazz.
04 - D1
ELEC. RHODES PIANO - A very natural Rhodes warm and rich with slight
vibrato. Great for 70’s ballads and R&B. The samples were taken
from a vintage Fender Rhodes piano. The same instrument which
was used on the famous pop/rock song “Dreamweaver”.
05 - E1
HARPSICHORD - This authentic single string Italian Harpsichord is the
definitive instrument for Baroque music. The 3D samples were taken
from the position of the player at Sony studios L.A.
06 - F1
VIBRAPHONE - A wonderful instrument for Jazz and smooth Jazz. These
amazing 3D samples are taken from the position of the player.
07 - G1
MUSIC BOX (Glockenspiel) - Great for Christmas and Mozart. The sweet
and tender tone of these 3D samples will enchant your audience.
08 - A1
CHURCH ORGAN 1 (Pipe Organ 1) - This is a warm organ stop consisting
of Principals and Flaute useful for accompaniment.
09 - B1
CHURCH ORGAN 2 (Pipe Organ 2) - his is a full tutti Principal stop with 16,
8, 4, and 1 1/3 pipes. This massive stop is great for Bach’s “Toccatta
and Fugue”.
10 - C2
HAMMOND ORGAN - Made for Jazz solos and accompaniment. The sound
has the typical Hammond key clicking and a fast Leslie effect.
11 - D2
ROCK ORGAN - Great for Emerson, Lake and Palmer, Rock and Pop music.
The organ was run through tube distortion and a tube Leslie.
12 - E2
STRINGS - Velocity attack strings, good for fast string lines in pop and
classical music. The 3D samples reflect the seating positions of the
players in a real orchestra and also contain the typical natural vibrato
of string instruments. The basses are to the right, cellos are center
right, violas center and violins to the center left and left.
13 - F2
CHOIR - Mixed choir with an emphasis on Baritones. Spacious 3D samples
great for pads and ballads.
14 - G2
CHOIR (VOICE OOHS) - Mixed choir. Velocity adds a “DOOO” articulation.
Played softly it makes for wonderful voice pads and accompaniments.
Very 3D stereo!
15 - A2
NYLON GUITAR - A beautifully engineered guitar sample. Great for musical
styles from country and pop to classical.
16 - B2
ACOUSTIC BASS - Warm electric bass sound for pop and ballads. Great for
Bee Bop and Blues. Walk it for Jazz!
43
44
User’s Manual STN-1000
PLAY ALONG
ALONG SONG LIST
PLAY
44
Voice# - Key Song Title
Voice# - Key Song Title
01 - C3
Allegro
30 - F5
Habarnera
02 - C#3
Anchors Awgh
31 - F#5
Hail to Chief
03 - D3
Annie
32 - G5
Happy Farmer
04 - D#3
Old Macdonald had a Farm
33 - G#5
Hatikvah
05 - E3
On Wisconsin
34 - A5
The Camptown Races
06 - F3
Auld Lang Syne
35 - A#5
Irish Eyes
07 - F#3
Beautiful Dreamer
36 - B5
Jingle Bells
08 - G3
I’m Called Little Buttercup
37 - C6
La Paloma 1
09 - G#3
Bach F Minor
38 - C#6
Brahm’s Lullaby
10 - A3
Blue Danube
39 - D6
Scarborough Fair
11 - A#3
Alouette
40 - D#6
Mingling
12 - B3
American Patrol
41 - E6
La Paloma 2
13 - C4
Away in a Manger
42 - F6
My Country
14 - C#4
She’ll be Coming Around the Mountain
43 - F#6
London Bridge
15 - D4
Marines Hymn
44 - G6
Rest Ye Merry Gentlemen
16 - D#4
Chopin
45 - G#6
Itsy-bitsy Spider
17 - E4
Chopin C
46 - A6
Silent Night
18 - F4
Danny Boy
47 - A#6
Twinkle, Twinkle Little Star
19 - F#4
Deck the Hall
48 - B6
Mary had a Little Lamb
20 - G4
Billyboy
49 - C7
Michael Row the Boat Ashore
21 - G#4
The Glowworm
50 - C#7
Nearer, My God, to Thee
22 - A4
Greensleeves
51 - D7
This Old Man
23 - A#4
I’ve Been Working on the Railroad
52 - D#7
Turkey in the Straw
24 - B4
First Noel
53 - E7
Whole World in His Hands
25 - C5
Frerea Jacque
54 - F7
When In Love
26 - C#5
Little Brown Jug
55 - F#7
Wild Horses
27 - D5
When Johnny Comes Marching Home
56 - G7
Yellow Rose of Texas
28 - D#5
Home on the Range
57 - G#7
My Bonnie Lies Over the Ocean
29 - E5
Home Sweet Home
58 - A7
Yankee Doodle
45
User’s Manual STN-1000
SPECIFICATIONS
SPECIFICATIONS
KEYBOARD
88 Graded Hammer Action Keyboard
64 Note polyphony
DIGITAL EFFECTS
Digital Reverb: Room, Stage, Hall
Digital Chorus: Chorus Type 1, Chorus Type 2
KEYBOARD VOICE
16 sampled instrument voices including,
4 MB Stereo Grand Piano
Dual (layered) Voice option
METRONOME
Tempo range from 40 to 240 bpm
FUNCTIONS
Tune: + or - 50 cents
Touch: Light, Normal, Heavy or Fixed
Duet: Splits the keyboard into two 44 note keyboards
Transpose: from -6 to +5 steps
MIDI
Output Channel Select
MIDI Input Channel Select
MIDI Local On/Off
Multi-Timbral On/Off
Transmit MIDI Program Change On/Off
DEMONSTRATION SONGS
10 Demo songs
PLAY ALONG SONGS
Lesson Function with Right Hand, Left Hand or Both
Hands testing
58 Play Along Songs
Vocal Grading
CONTROLS
Power: On/Off
Master Volume Control
Play/Stop
Demo/Song
Record
Reverb/Effect
Metronome
Voice Select
PEDALS
Soft
Sostenuto
Sustain
BUILT IN REAL TIME RECORDER
SPEAKERS
4 X 2 Full dynamic range
POWER OUTPUT
15 watt +15 watt (per side)
CONNECTORS
Headphone
Audio In (Left/Right)
Audio Out (Left/Right)
MIDI In/Out
USB
FINISH
Dark Rosewood /
Dark Mahogany
DIMENSIONS
53 1/2” w 20 7/8 ”d X 31” h
WEIGHT
79 lbs (including stand)
45