1
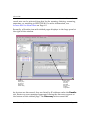
Titlepage
AutoDiscovery User’s
Guide
SPECTRUM Enterprise Manager
Network Management
Notice
Aprisma Management Technologies, Inc. (Aprisma) reserves the right to make changes in
specifications and other information contained in this document without prior notice. The reader
should in all cases consult Aprisma to determine whether any such changes have been made.
The hardware, firmware, or software described in this manual is subject to change without notice.
IN NO EVENT SHALL APRISMA, ITS EMPLOYEES, OFFICERS, DIRECTORS, AGENTS, OR
AFFILIATES BE LIABLE FOR ANY INCIDENTAL, INDIRECT, SPECIAL, OR CONSEQUENTIAL
DAMAGES WHATSOEVER (INCLUDING BUT NOT LIMITED TO LOST PROFITS) ARISING OUT
OF OR RELATED TO THIS MANUAL OR THE INFORMATION CONTAINED IN IT, EVEN IF
APRISMA HAS BEEN ADVISED OF, KNOWN, OR SHOULD HAVE KNOWN, THE POSSIBILITY
OF SUCH DAMAGES.
Copyright © June 2000 by Aprisma Management Technologies, Inc. All rights reserved.
Printed in the United States of America.
Order Number: 9030727-01
Aprisma Management Technologies, Inc.
121 Technology Drive
Durham NH 03824
SPECTRUM, the SPECTRUM IMT/VNM logo, DCM, IMT, and VNM are registered trademarks,
and SpectroGRAPH, SpectroSERVER, Inductive Modeling Technology, Device
Communications Manager, and Virtual Network Machine are trademarks of Aprisma or its
affiliates.
cisco and Cisco are trademarks of cisco Systems, Inc.
Virus Disclaimer
Aprisma makes no representations or warranties to the effect that the Licensed Software is virusfree.
Aprisma has tested its software with current virus checking technologies. However, because no
anti-virus system is 100% reliable, we strongly caution you to write protect and then verify that the
Licensed Software, prior to installing it, is virus-free with an anti-virus system in which you have
confidence.
AutoDiscovery User’s Manual
Page 2
Restricted Rights Notice
(Applicable to licenses to the United States Government only.)
1. Use, duplication, or disclosure by the Government is subject to restrictions as set forth in
subparagraph (c) (1) (ii) of the Rights in Technical Data and Computer Software clause at
DFARS 252.227-7013.
Aprisma Management Technologies, Inc.
121 Technology Drive
Durham New Hampshire 03824
2. (a) This computer software is submitted with restricted rights. It may not be used, reproduced,
or disclosed by the Government except as provided in paragraph (b) of this Notice or as
otherwise expressly stated in the contract.
(b) This computer software may be:
(1) Used or copied for use in or with the computer or computers for which it was acquired,
including use at any Government installation to which such computer or computers may
be transferred;
(2) Used or copied for use in a backup computer if any computer for which it was acquired is
inoperative;
(3) Reproduced for archival or backup purposes;
(4) Modified, adapted, or combined with other computer software, provided that the modified,
combined, or adapted portions of the derivative software incorporating restricted
computer software are made subject to the same restricted rights;
(5) Disclosed to and reproduced for use by support service contractors in accordance with
subparagraphs (b) (1) through (4) of this clause, provided the Government makes such
disclosure or reproduction subject to these restricted rights; and
(6) Used or copied for use in or transferred to a replacement computer.
(c) Notwithstanding the foregoing, if this computer software is published copyrighted computer
software, it is licensed to the Government, without disclosure prohibitions, with the minimum
rights set forth in paragraph (b) of this clause.
(d) Any other rights or limitations regarding the use, duplication, or disclosure of this computer
software are to be expressly stated in, or incorporated in, the contract.
(e) This Notice shall be marked on any reproduction of this computer software, in whole or in part.
AutoDiscovery User’s Manual
Page 3
Contents
Quick-Start Instructions
6
Introduction ..................................................................................................................6
The Basic Discovery & Modeling Procedure ................................................................6
Expanded Instructions for Discovery and Modeling .....................................................8
Overview
11
What Is AutoDiscovery? .............................................................................................11
What Are Configurations? ..........................................................................................11
Discovery Configurations ........................................................................................12
Modeling Configurations .........................................................................................12
Discovery and Modeling Configurations .................................................................12
Why Use Different Types of Configurations? ......................................................13
Methods of Discovery .................................................................................................13
IP List ......................................................................................................................13
Range .....................................................................................................................14
Router .....................................................................................................................14
What Are Result Sets? ...............................................................................................14
Device Information ..................................................................................................16
Main Window Layout ..................................................................................................18
Menu Bar ................................................................................................................18
File ......................................................................................................................18
Edit ......................................................................................................................19
View ....................................................................................................................20
Configurations .....................................................................................................20
Result Sets ..........................................................................................................21
Tools ...................................................................................................................22
Window ...............................................................................................................22
Help .....................................................................................................................22
Tool Bar ..................................................................................................................23
How To ...
24
… Create a Configuration ..........................................................................................24
… for Discovery by IP List ......................................................................................25
AutoDiscovery User’s Guide
Page 4
… for Discovery by Range ......................................................................................30
… for Discovery by Router .....................................................................................32
… for Modeling to SPECTRUM ..............................................................................38
… Access and Use Stored Configurations .................................................................41
… Schedule a Configuration ......................................................................................43
… Access and Use Result Sets .................................................................................45
… Sort Results ...........................................................................................................46
… Filter Results ..........................................................................................................47
… Export Results .......................................................................................................49
… Compare Results ...................................................................................................50
Index
AutoDiscovery User’s Guide
53
Page 5
Quick-Start Instructions
This section introduces the current version of AutoDiscovery and provides quick
instructions for running a combined discovery and modeling session. New users are
advised to begin with the Overview section, which offers a more extensive description
of the product and how to use it.
Introduction
Welcome to AutoDiscovery, the automated discovery and modeling system
for SPECTRUM 6.0.
This version of AutoDiscovery offers numerous improvements over
previous versions and has a significantly different look and feel. So even if
you are an experienced user, you will probably want to refer to Overview
on Page 11 for a review of current AutoDiscovery functionality, a
description of the graphical user interface, and links to step-by-step
instructions on “How To” perform specific tasks.
However, if you are already familiar with SPECTRUM and want to use this
new version of AutoDiscovery to start discovering and modeling your
network right now, the basic steps are listed below, immediately followed
by expanded instructions that provide cross-references to more detailed
explanations of key terminology and graphical user interface compo
nents.
The Basic Discovery & Modeling Procedure
AutoDiscovery works by executing “configurations” that you create to
specify how devices will be discovered and modeled (see What Are
Configurations? on Page 11). If you want to perform a network inventory,
you can create and execute a discovery configuration that will attempt
to identify all devices meeting your search criteria. Or you can use the
resulting list of discovered devices as input for the execution of a
modeling configuration. Software models of the discovered devices will
AutoDiscovery User’s Guide
Page 6
Qu ic k -S t art I n s tru c ti o ns
T he B as i c Di s c o v er y & M od e li n g P r o c e du r e
then be created and placed within your network map according to the
parameters you supplied.
Note:
Note:
It is recommended that you perform an online database backup
via the SPECTRUM Control Panel both before and after
executing a modeling configuration. This is especially important
to keep both primary and secondary SpectroSERVERs
synchronized in a fault tolerant environment.
Here is the basic procedure for creating and executing a single
configuration that combines discovery and modeling operations:
1
Start AutoDiscovery.
2
From the main window’s Configurations menu, open the New
Discover & Model Configuration submenu and select the discovery
method you want to use (Router, Range, or IP List—for descriptions,
see Methods of Discovery on Page 13). This brings up a tabbed dialog
for creating a configuration.
3
Enter or adjust the settings under the Discovery tab to specify the
kinds of devices you want to discover and the boundaries and other
limitations for the search.
4
Enter or adjust the settings under the Modeling tab to specify how
and where discovered devices will be modeled.
5
Execute the combined discovery and modeling configuration by
clicking Save & Start at the bottom of the Modeling tabbed page.
6
Monitor the progress of the discovery and modeling operations in the
Results window.
7
Access newly created models through icons that appear in
SpectroGRAPH Topology views in accordance with the modeling
configuration you created.
AutoDiscovery User’s Guide
Page 7
Qu ic k -S t art I n s tru c ti o ns
Ex p a nd e d I ns t ruc t i on s fo r Di s c o v ery a n d M od e li n g
Expanded Instructions for Discovery and
Modeling
The following scenario assumes that you want to discover only those
devices within a certain range of IP addresses and then immediately
model them in SPECTRUM.
1
Start AutoDiscovery from the Tools menu in any SpectroGRAPH view.
2
From the AutoDiscovery main window’s Configurations menu, select
the type of configuration to be created (see What Are Configurations?
on Page 11) and the method of discovery to be used (see Methods of
Discovery on Page 13). In this case, you would select New Discover
and Model Configuration > Range / SPECTRUM. This will display a
configuration creation dialog labeled “Untitled - 1.”
3
Under the configuration creation dialog’s Discovery tab, the Custom
option will be selected by default (since no other configurations exist
yet). Enter or adjust the following settings as desired (for more
information on individual settings, see … for Discovery by Range on
Page 30):
a Define one or more ranges of IP addresses to be searched by
entering the lowest address in the range in the From field and the
highest address in the To field then clicking the Add button to add
the pair of addresses to the IP Range Boundary List.
b Enter additional values to the Community String List as desired
by typing the string in the text entry box and clicking Add. Note
that the default string of “public” can be deleted by selecting it and
clicking Del (for “Delete”).
c In the Attempt panel, use the up and down arrows to adjust the
default values for Timeout and Retries as desired.
d In the Attributes panel, click the Use ICMP check box if you want
AutoDiscovery to attempt to discover all pingable devices within
the range.
AutoDiscovery User’s Guide
Page 8
Qu ic k -S t art I n s tru c ti o ns
e Now you have completed the discovery part of the configuration;
click on the Modeling tab at the top of the page.
4
Under the Modeling tab, the Custom option will be selected by default
(since no other modeling configurations exist yet) and the following
settings apply (for more information on individual settings, refer to …
for Modeling to SPECTRUM on Page 38):
a If the Landscape field does not show the server you wish to create
models in, click on the Servers button to display a list of other
available servers and select the one you want.
b If you want to use the default Logical IP Based modeling option,
you can also select settings for the following:
• Arrangement (Logical or Flat)
• Placement (None, Radial, or Tree)
• Layer 2 Options (at least one of: Cisco Discovery Tables,
Cabletron Switch Tables, Source Address Tables, or Spanning
Tree)
• Whether to create models for LANs (IP Subnets), Physical
Addresses, and/or Pingables.
If you select the Container Based modeling option, a list of available container model types is displayed, with “Universe” as the
default. All models will be placed in the selected container.
c Adjust the Activation setting as desired using the up/down
arrows. (The default value of 5 minutes is the minimum
AutoDiscovery will wait for a model to go active before placing it
and attempting to obtain connectivity information.)
5
Click Save & Start at the bottom of the Modeling tabbed page. This
displays a message box asking you to enter a name for the
configuration.
6
Enter a name for the configuration and click OK. This will bring up a
Results view labeled with the name you supplied in the previous step.
The progress of the discovery and modeling sessions will be displayed
dynamically in this view. Icons representing modeled devices will
AutoDiscovery User’s Guide
Page 9
Qu ic k -S t art I n s tru c ti o ns
appear in your SpectroGRAPH Topology view(s) according to the
modeling configuration settings you saved in Step 5.
Caution:
You can halt discovery or modeling sessions via the STOP button
that displays at the lower right corner of the Results view while
the session is in progress. However, it is strongly recommended
that you do not stop a modeling session during the model
activation phase, as this can cause incomplete or inconsistent
modeling of discovered devices and their connectivity.
Note that the configuration creation dialog also includes tabs for Filtering
and Scheduling. Refer to the corresponding “How To” section of this
documentation for detailed instructions on using these functions (…
Schedule a Configuration on Page 43 and … Filter Results on Page 47).
AutoDiscovery User’s Guide
Page 10
Ov e rv ie w
W ha t Is A ut oD i s c ov e r y ?
Overview
This section provides a general description of AutoDiscovery functionality, explains key
terminology, and provides links to detailed instructions for performing specific tasks.
What Is AutoDiscovery?
AutoDiscovery is actually an automated discovery and modeling system.
Using only the discovery functionality, you can perform network
inventories and export the resulting data to various display formats for
distribution across your organization. Or you can use discovery
capabilities in conjunction with SPECTRUM’s patented modeling
technology to create and maintain an accurate software model of your
network—not only the individual devices, but their connections and
relationships as well. This intelligent network model is what enables
SPECTRUM to determine actual points of failure and suppress
superfluous downstream alarms.
Before using AutoDiscovery, you will need to be familiar with three key
terms:
• Configurations (see What Are Configurations? on Page 11)
• Discovery Methods (see Methods of Discovery on Page 13)
• Result Sets (see What Are Result Sets? on Page 14)
Note:
Note:
AutoDiscovery uses a high percentage of resources on the
machine hosting SpectroSERVER. Other client applications may
have reduced performance when AutoDiscovery is running.
What Are Configurations?
Both discovery and modeling operations are executed according to sets of
user-specified guidelines called “configurations.” You create these
AutoDiscovery User’s Guide
Page 11
Ov e rv ie w
W h a t A re C on f ig u rat i on s ?
reusable configurations via dialogs accessed from the AutoDiscovery main
window’s Configurations menu. Once a configuration is saved, a
corresponding entry is added to the appropriate folder in the main
window’s Stored Configurations panel, where the configuration can then
be accessed for modification, deletion, duplication, or execution (see …
Access and Use Stored Configurations on Page 41).
There are three basic types of configurations:
• Discovery
• Modeling
• Discovery and Modeling.
Discovery Configurations
These configurations determine the focus and scope of a discovery
session. Depending on the method selected (IP Address, Range, or
Router— see Methods of Discovery on Page 13 for detailed explanations),
you specify individual addresses and/or ranges of addresses to be queried
and set other parameters to further limit or expand the discovery
operation. You can run the discovery session at the time you create the
configuration or schedule it for execution at a later time. Each time a
discovery configuration is executed, a “result set” is generated and a
corresponding entry is added to the Results list in the AutoDiscovery
main window.
Modeling Configurations
These configurations specify how and where models of discovered devices
will be represented in SpectroGRAPH Topology views. Modeling
configurations are only executable in conjunction with a result set
generated by execution of a discovery configuration.
Discovery and Modeling Configurations
These configurations combine a particular set of discovery guidelines with
a particular set of modeling guidelines. As with “discovery-only”
AutoDiscovery User’s Guide
Page 12
Ov e rv ie w
M e th o ds of Di s c o v er y
configurations, you can run a combined discovery and modeling session
at the time the configuration is created or schedule it to run at a later
time. Execution of a discovery and modeling session also adds an entry to
the main window’s Results list.
Why Use Different Types of Configurations?
By allowing discovery configurations and modeling configurations to be
created independently and stored for future use, AutoDiscovery offers
mix-and-match flexibilty that lets you customize the discovery/modeling
process to more efficiently meet the unique and dynamic requirements of
your network. For example, if you wish to see the results of particular
discovery session modeled in different ways, you can execute it multiple
times, specifying a different modeling configuration each time. Or you can
re-use the same modeling configuration with different discovery
configurations.
Methods of Discovery
Whether you are creating a plain discovery configuration or a combined
discovery and modeling configuration, there are three discovery methods
to choose from:
• IP List
• Range
• Router
IP List
When this method is used, AutoDiscovery will attempt to contact and
identify only those devices at the IP addresses you specify when you
create the configuration.
AutoDiscovery User’s Guide
Page 13
Ov e rv ie w
W h a t A re R es u l t S et s ?
Range
When this method is used, AutoDiscovery will attempt to contact and
identify devices at each IP address within the range(s) bounded by the
pair(s) of low and high addresses you specify.
Router
Router discovery configurations require both a range of IP addresses (to
establish the boundaries of the discovery) and one or more IP addresses
for routers that AutoDiscovery will use as “seed” routers. The route
information table and/or the routing neighbor tables of each seed router
will then be queried to determine the addresses of neighboring routers. If
these addresses are within the specified range, they too are queried, and
the process is repeated until all known neighbors within the range(s) have
been queried.
What Are Result Sets?
Each time you start a discovery session (by executing a particular
configuration), a “result set” is automatically created to store:
• the configuration that was used
• status and error messages generated during the session
• a list of all discovered devices called the “discovered data set”
The “discovered data set” is the exportable part of the result set and the
main input for subsequent modeling in SPECTRUM. It catalogs all the
devices that were discovered and provides location, contact, port, and
other information (see Device Information on Page 16) as applicable.
Creation of a new result set has two effects on the AutoDiscovery main
window, as shown in the following figure. First, a new entry is added to
the scrollable Results list at the lower left of the window. Each entry in
this list uniquely identifies a particular result set by the name of the
configuration that was used plus the date and time the session was
started. The entry also shows the current status of the session. Individual
AutoDiscovery User’s Guide
Page 14
Ov e rv ie w
W h a t A re R es u l t S et s ?
result sets can be selected from this list for opening, deleting, renaming,
exporting, or modeling to SPECTRUM. For more information, see …
Access and Use Result Sets on Page 45.
Secondly, a Results view with tabbed pages displays in the large panel at
the right of the window.
+
Results list
showing entry
for result set
displayed in
Results dialog
Results dialog
with tabs for
accessing
associated
discovery and
modeling
configurations
As devices are discovered, they are listed by IP address under the Results
tab. Status or error messages generated during the discovery appear at
the bottom of this tabbed page. The Discovery tab accesses the
AutoDiscovery User’s Guide
Page 15
Ov e rv ie w
W h a t A re R es u l t S et s ?
associated discovery configuration. For combined discovery and modeling
configurations, the Results view also includes a Modeling tab, which
accesses the associated modeling configuration.
Device Information
When a discovery configuration is executed, the Results view displays a
table listing each of the discovered devices and providing the following
information: IP Address, Name, Vendor, Description, Location, and
SysOID. You can rearrange the column order by grabbing and moving
column headers with your mouse. To see the rest of the information in the
discovered data set for a particular device, double-click in any cell in that
row. This will display the Device Information dialog shown below.
The Device Information dialog lists agent information in the top panel
and presents port information in table format in the bottom panel.
Individual data elements are described below:
AutoDiscovery User’s Guide
Page 16
Ov e rv ie w
W h a t A re R es u l t S et s ?
Agent Information
• Name - The name of the device.
• Password - For SNMP devices, the community name assigned to
control acess.
• Description - Narrative description of the device. May include vendor
and model name or other designation.
• Contact - Authorized contact person for the device (e.g., System
Administrator).
• Location - Physical location of the device (e.g., “Quality Assurance
Lab).
• # Ports - The number of ports on the device.
• Protocol - The networking protocol that was used to discover the
device.
• OID - The Object Identifier for the device.
• Services - A number whose binary bits represent the services
supported by the device.
Ports Information
• IF# - Sequential number identifying the interface on the device.
• Type & Description - The type of interface and the interface’s type
description.
• MAC Address - The Media Access Control or physical address of the
port.
• IP Address - The primary IP address of the interface.
• Netmask - The netmask associated with the primary IP address of the
interface.
AutoDiscovery User’s Guide
Page 17
Ov e rv ie w
M ai n W i nd o w La y ou t
Main Window Layout
AutoDiscovery’s main window consists of a menu bar and a tool bar (both
described in the following sections) plus the three panels described below:
• The Stored Configurations panel (in the upper left area of the
window) lists and provides access to each of the discovery/modeling
configurations you have created and saved. For more information on
using this panel, refer to … Access and Use Stored Configurations on
Page 41.
• The Results list (in the lower left area of the window) lists and provides
access to each of the result sets generated by executing configurations.
For more information on using this panel, refer to … Access and Use
Result Sets on Page 45.
• The large work area on the right side of the window displays the
dialogs you use to create/modify configurations and to view/filter/
export result sets.
Menu Bar
The menu bar in AutoDiscovery’s main window offers the following eight
pull-down menus, which are described individually in following sections:
•
•
•
•
•
•
•
•
File (Page 18)
Edit (Page 19)
View (Page 20)
Configurations (Page 20)
Result Sets (Page 21)
Tools (Page 22)
Window (Page 22)
Help (Page 22)
File
The main window’s File menu offers the following four options:
AutoDiscovery User’s Guide
Page 18
Ov e rv ie w
M ai n W i nd o w La y ou t
• Open - Opens any configuration file selected from the Stored
Configurations panel or any result set selected from the Results list.
• Close - Closes a configuration creation dialog, reopened configuration,
or result set in the main window’s work area. If there are multiple
displays open, this option closes the one in the foreground.
• Scheduled jobs - Opens the Scheduled jobs dialog which lists
configurations that have been scheduled for future execution. (See …
Schedule a Configuration on Page 43)
• Exit - Closes the main window and exits AutoDiscovery.
Edit
The main window’s Edit menu offers the following six options:
• Cut - Removes selected text from text entry boxes in dialogs and stores
it in the paste buffer.
• Copy - Copies selected text from text entry boxes in dialogs into the
paste buffer.
• Paste - Places the current contents of the paste buffer into a text box
where the cursor is positioned or overlays selected text with paste
buffer contents.
• Delete - Removes a selected configuration from the Stored
Configurations panel or a selected result set from the Results list.
• Rename - Displays a dialog allowing you to enter a new name for an
existing configuration or result set.
• Preferences - Displays the tabbed dialog shown below. Under the
General tab, the Cascade windows check box can be deselected if you
want dialogs to be stacked directly on top of each other in the main
window’s work area. You can also edit the ICMP daemon Port Number
text box to change the server port used when attempting to discover
pingable devices. The Default Filter tabbed page lets you establish
default settings for all filtering operations (see … Filter Results on
Page 47).
AutoDiscovery User’s Guide
Page 19
Ov e rv ie w
M ai n W i nd o w La y ou t
View
The main window’s View menu offers the following three check box
options:
• Toolbar - Displays/hides a tool bar that provides icon access to
frequently used options that are also available from pull-down menus
(for description of individual tool icons, see Tool Bar on Page 23).
• Toolbar Labels - Displays/hides labels for tool bar icons.
• Tool Tips - Activates/deactivates short descriptions that are displayed
temporarily when your mouse pointer is placed over a tool bar icon.
Configurations
The main window’s Configurations menu offers the following seven
options:
• Duplicate - Creates a duplicate of any configuration file selected from
the Stored Configurations panel. The duplicate is named “Copy of
<configuration name>” and can be opened and used as a starting point
for creating a new configuration that would contain all or part of the
settings from the original one.
AutoDiscovery User’s Guide
Page 20
Ov e rv ie w
M ai n W i nd o w La y ou t
• Start - Executes the selected configuration (or adds it to the pending
queue if another configuration is in progress). Note that this option is
grayed out for modeling configurations, which can only be executed in
conjunction with discovery configurations.
• Export Configuration - Displays the same Save dialog used for
exporting result sets (see … Export Results on Page 49) and lets you
save the currently displayed configuration to a file on disk.
• Import Configuration - Displays an Open dialog (similar to the Save
dialog used for exporting), which allows you to retrieve a configuration
file stored on disk and add it to the list of Stored Configurations.
• New Discovery Configuration - Opens a submenu for accessing three
types of discovery-only configuration creation dialogs (IP List, Range,
or Router). For more information, see … Create a Configuration on
Page 24.
• New Modeling Configuration - Currently there is only one option on
the submenu opened by this option: SPECTRUM. For more
information, see … Create a Configuration on Page 24
• New Discover and Model Configuration - Opens a submenu for
accessing three types of discovery and modeling configuration creation
dialogs (IP List, Range, or Router). For more information, see …
Create a Configuration on Page 24.
Result Sets
The main window’s Result Sets menu offers the following three options:
• Delete Rows - Prompts you for confirmation, then deletes a selected
row of device information in an open Results dialog.
• Export - Lets you save all or part of the currently selected or currently
open result set to a file on disk. For more information, see … Export
Results on Page 49.
AutoDiscovery User’s Guide
Page 21
Ov e rv ie w
M ai n W i nd o w La y ou t
• Model to SPECTRUM - Displays the Modeling Configuration dialog,
which lets you specify how you want the currently selected or
currently open result set to be modeled to SPECTRUM. For more
information, see … for Modeling to SPECTRUM on Page 38.
Tools
The main window’s Tools menu offers a single option, Device
Differencing, which displays a dialog allowing you to compare any two
result sets. For more information on using this panel, refer to … Compare
Results on Page 50.
Window
The main window’s Window menu offers the following three options:
• Cascade - If dialogs/windows are overlaid directly on top of each other
in the main window’s work area, this option rearranges them so that
the upper left corner of each one is visible.
• Cycle - Brings the bottom dialog/window to the top of the stack.
• Close All Windows - Closes all dialogs/windows launched from the
main window.
Help
The main window’s Help menu offers the following three options:
• Contents - Opens the Table of Contents for AutoDiscovery’s modular
online documentation. Click on any topic in the left panel to display
the associated text in the right panel.
• What’s This? - Converts the mouse pointer to a plus symbol. Click on
any area of AutoDiscovery’s user interface to display the associated
online documentation.
• About AutoDiscovery - Displays AutoDiscovery copyright
information.
AutoDiscovery User’s Guide
Page 22
Ov e rv ie w
M ai n W i nd o w La y ou t
Tool Bar
The main window’s tool bar includes four icons that provide alternative
access to some of the frequently used menu bar options:
Click the New icon to display the same three new configuration
options available from the Configurations pull-down menu.
Click the Open icon to open any selected entry from the Stored
Configurations panel or the Results list.
Click the Delete icon to delete any selected entry from the Stored
Configurations panel or the Results list.
Click the Scheduled Jobs icon to display a dialog showing all
configurations currently scheduled for execution.
Click the What’s This? icon to activate single-click access to
online documentation for objects within the main window.
AutoDiscovery User’s Guide
Page 23
Ho w To . ..
… Cre a te a Co n fi g ura ti o n
How To ...
This section provides detailed instructions for performing specific tasks with
AutoDiscovery.
… Create a Configuration
All AutoDiscovery configurations (see What Are Configurations? on
Page 11) are created via tabbed dialogs within the main window. You can
open a discovery creation dialog in any of the following ways:
• From the main window’s Configurations menu, select the desired type
of configuration (and discovery method, if applicable).
• On the main window’s tool bar, click the New icon. (Note: tool bar icon
labels can be hidden/displayed via the View menu.) This will display
the relevant options from the Configurations menu.
• In the main window’s Stored Configurations panel, right-click one of
the configuration types (i.e, the second-level folders: IP List, Range,
etc.).
The discovery creation dialog opened by any of the above varies in
appearance and function according to the type of configuration/discovery
method selected. Currently there are seven different possible
combinations of configuration type and discovery method:
•
•
•
•
•
•
•
Discover
Discover
Discover
Model to
Discover
Discover
Discover
by IP List
by Range
by Router
SPECTRUM
by IP List and Model to SPECTRUM
by Range and Model to SPECTRUM
by Router and Model to SPECTRUM
AutoDiscovery User’s Guide
Page 24
Ho w To . ..
… Cre a te a Co n fi g ura ti o n
Note that each of the three “discover and model” configurations simply
combines a modeling configuration with one of the three types of
discovery-only configurations. Thus there are only four basic procedures
involved. For detailed instructions, refer to the following four topics:
… for Discovery by IP List (Page 25)
… for Discovery by Range (Page 30)
… for Discovery by Router (Page 32)
… for Modeling to SPECTRUM (Page 38)
… for Discovery by IP List
When you select a “discovery by IP List” option (using any of the methods
described under … Create a Configuration on Page 24), a tabbed
configuration creation dialog will appear in the right side of the main
window with the IP List tabbed page in the foreground and the Schedule
tabbed page in the background, as shown below. If you are creating a
combined discovery and modeling configuration, the foreground page will
AutoDiscovery User’s Guide
Page 25
Ho w To . ..
… Cre a te a Co n fi g ura ti o n
be labeled “Discovery” instead of “IP List,” and Filtering and Modeling
tabs will also be visible.
To create a discovery configuration using the IP List method of discovery,
follow these steps:
1
If you are creating a discovery-only configuration, go directly to
Step 2. For a combined discovery and modeling configuration,
however, you have the following two options:
• The Custom option (selected by default) lets you create a new
discovery configuration from scratch by performing Step 2 through
Step 5 below.
AutoDiscovery User’s Guide
Page 26
Ho w To . ..
… Cre a te a Co n fi g ura ti o n
• The Existing option lets you select and import a previously created
discovery configuration from the adjacent list then skip to Step 6.
(NOTE: this option button and list box will be grayed out if there
are no configurations of the desired type available in the Stored
Configurations panel).
2
In the Community String List panel, specify the Community Strings
(passwords) for the devices you want discovered. By default,
AutoDiscovery will attempt to discover devices at the IP addresses you
specify (see Step 5) if they have a Community String of “public.” You
can enter additional strings one-at-a-time by typing in the text entry
box and clicking Add. Use the Del (for “Delete”) and Mod (for “Modify”)
buttons to remove or change any strings in the list.
3
In the Attempt panel, click the up-down arrows as necessary to
adjust the default settings. The Timeout setting specifies the number
of seconds AutoDiscovery will spend per attempt at contacting an
address. The Retries setting specifies the number of additional
attempts AutoDiscovery will make if the first one times out before
contact is established.
4
In the Attributes panel, select the Use ICMP check box if you want
pingable devices to be discovered.
5
In the IP Address List panel, specify the IP addresses you want
AutoDiscovery to attempt to contact. You can enter address two ways:
• one address at a time, by typing in the text entry box and clicking
Add.
• one file at a time, by clicking the Browse button to access the
Open dialog shown below. Select a file containing a list of IP
addresses, then click Open to add those addresses to the list for
this configuration.
AutoDiscovery User’s Guide
Page 27
Ho w To . ..
… Cre a te a Co n fi g ura ti o n
6
The rest of the procedure varies depending on whether the
configuration you are creating is for discovery-only or for discovery
and modeling. For a discovery-only configuration, at this point you
can do any of the following:
• If you want to set a time for execution of the configuration, click
the Schedule tab (see … Schedule a Configuration on Page 43 for
detailed instructions).
• If you want to execute the configuration immediately, click the
Save & Start button. After you provide a name for the
configuration, it will be added to the IP List folder in the Stored
Configurations panel, a corresponding entry will be added to the
Results list, and a Results dialog will replace the configuration
creation dialog.
• If you want to save the configuration for later use, click Save. You
will be prompted to provided a name, and then the configuration
will be added to the IP List folder in the Stored Configurations
panel.
• If you want to dismiss the creation dialog without saving the
configuration, click Cancel.
AutoDiscovery User’s Guide
Page 28
Ho w To . ..
… Cre a te a Co n fi g ura ti o n
If you are creating a combined discovery and modeling configuration,
click the Modeling tab to see the default settings and adjust them as
desired using the instructions under … for Modeling to SPECTRUM on
Page 38. You can also click the Filtering tab, which lets you
predetermine which of the discovered devices will be displayed in the
Results dialog and modeled to SPECTRUM when the configuration is
executed. For detailed instructions, see … Filter Results on Page 47.
When you are satisfied with the settings on all four tabbed pages, use
the Save or Save & Start buttons as described above.
AutoDiscovery User’s Guide
Page 29
Ho w To . ..
… Cre a te a Co n fi g ura ti o n
… for Discovery by Range
When you select a “discovery by range” option (using any of the methods
described under … Create a Configuration on Page 24), a tabbed
configuration creation dialog will appear in the right side of the main
window with the Range tabbed page in the foreground and the Schedule
tabbed page in the background, as shown below. If you have selected an
option to create a combined discovery and modeling configuration, the
foreground page will be labeled “Discovery” instead of “Range,” and the
Filtering and Modeling tabs will also be visible.
To create a discovery configuration using the Range method of discovery,
follow these steps:
AutoDiscovery User’s Guide
Page 30
Ho w To . ..
… Cre a te a Co n fi g ura ti o n
1
If you are creating a discovery-only configuration, go directly to
Step 2. For a combined discovery and modeling configuration, you
have the following two options:
• The Custom option (selected by default) lets you create a new
discovery configuration from scratch by performing Step 2 through
Step 5 below.
• The Existing option lets you select and import a previously created
discovery configuration from the adjacent list then skip to Step 6.
(NOTE: this option button and list box will be grayed out if there
are no configurations of the desired type available in the Stored
Configurations panel).
2
In the IP Range Boundary List panel, define one or more ranges of IP
addresses to be searched by entering the lowest address in the range
in the From field and the highest address in the To field. Then click
the Add button to add the pair of addresses to the list.
3
In the Community String List panel, specify the Community Strings
(passwords) for the devices you want discovered. By default,
AutoDiscovery will attempt to discover devices at the IP addresses
within the range(s) you specify if they have a Community String of
“public.” You can enter additional strings one-at-a-time by typing in
the text entry box and clicking Add. Use the Del (for “Delete”) and
Mod (for “Modify”) buttons to remove or change any strings in the list.
4
In the Attempt panel, click the up-down arrows as necessary to
adjust the default settings. The Timeout setting specifies the number
of seconds AutoDiscovery will spend per attempt at contacting an
address. The Retries setting specifies the number of additional
attempts AutoDiscovery will make if the first one times out before
contact is established.
5
In the Attributes panel, select the Use ICMP check box if you want
pingable devices to be discovered.
6
The rest of the procedure varies depending on whether the
configuration you are creating is for discovery-only or for discovery
AutoDiscovery User’s Guide
Page 31
Ho w To . ..
… Cre a te a Co n fi g ura ti o n
and modeling. For a discovery-only configuration, at this point you
can do any of the following:
• If you want to set a time for execution of the configuration, click
the Schedule tab (see … Schedule a Configuration on Page 43 for
detailed instructions).
• If you want to execute the configuration immediately, click the
Save & Start button. After you provide a name for the
configuration, it will be added to the Range folder in the Stored
Configurations panel, a corresponding entry will be added to the
Results list, and a Results view will replace the configuration
creation dialog.
• If you want to save the configuration for later use, click Save. You
will be prompted to provided a name, and then the configuration
will be added to the Range folder in the Stored Configurations
panel.
• If you want to dismiss the creation dialog without saving the
configuration, click Cancel.
If you are creating a combined discovery and modeling configuration,
click the Modeling tab to see the default settings and adjust them as
desired using the instructions under … for Modeling to SPECTRUM on
Page 38. You can also click the Filtering tab, which lets you
predetermine which of the discovered devices will be displayed in the
Results dialog and modeled to SPECTRUM when the configuration is
executed. For detailed instructions, see … Filter Results on Page 47.
When you are satisfied with the settings on all four tabbed pages, use
the Save or Save & Start buttons as described above.
… for Discovery by Router
Once you have selected a “discovery by router” option (using any of the
methods described under … Create a Configuration on Page 24), a tabbed
configuration creation dialog will appear in the right side of the main
AutoDiscovery User’s Guide
Page 32
Ho w To . ..
… Cre a te a Co n fi g ura ti o n
window with the Router tabbed page in the foreground and the Schedule
tabbed page in the background as shown below. If you have selected an
option to create a combined discovery and modeling configuration, the
foreground page will be labeled “Discovery” instead of “Router,” and the
Filtering and Modeling tabs will also be visible.
To create a discovery configuration using the Router method of discovery,
follow these steps:
1
If you are creating a discovery-only configuration, go directly to
Step 2. For a combined discovery and modeling configuration, you
have the following two options:
• The Custom option (selected by default) lets you create a new
discovery configuration from scratch by performing Step 2 through
Step 6 below.
AutoDiscovery User’s Guide
Page 33
Ho w To . ..
… Cre a te a Co n fi g ura ti o n
• The Existing option lets you select and import a previously created
discovery configuration from the adjacent list then skip to Step 7.
(NOTE: this option button and list box will be grayed out if there
are no configurations of the desired type available in the Stored
Configurations panel).
2
In the IP Range Boundary List panel, define one or more ranges of IP
addresses to establish the boundaries of the discovery by entering the
lowest address in the range in the From field and the highest address
in the To field. Then click the Add button to add the pair of addresses
to the list. Use the Del (for “Delete”) and Mod (for “Modify”) buttons to
remove or change any entries in the list.
3
In the IP Address List panel, specify one or more routers for
AutoDiscovery to use as “seed” routers, whose route and/or neighbor
information tables will be queried to determine addresses of
neighboring routers. If the neighbors are within the boundaries
specified in the previous step, they too will be queried and the process
repeated until all known neighbors within the boundaries have been
queried. You can enter addresses for seed routers two ways:
• one address at a time, by typing in the text entry box and clicking
Add.
• one file at a time, by clicking the Browse button to access the
Open dialog shown below. Select a file containing a list of IP
addresses, then click Open to add those addresses to the list for
this configuration.
AutoDiscovery User’s Guide
Page 34
Ho w To . ..
… Cre a te a Co n fi g ura ti o n
4
In the Community String List panel, specify the Community Strings
(passwords) for the devices you want discovered. By default,
AutoDiscovery will attempt to discover devices within the IP address
boundaries you have specified if they have a Community String of
“public.” You can enter additional strings one-at-a-time by typing in
the text entry box and clicking Add.
5
In the Attempt panel, click the up-down arrows as necessary to
adjust the default settings. The Timeout setting specifies the number
of seconds AutoDiscovery will spend per attempt at contacting an
address. The Retries setting specifies the number of additional
attempts AutoDiscovery will make if the first one times out before
contact is established.
6
The default settings in the Attributes panel are recommended for
most networks; however, you can adjust them as follows:
AutoDiscovery User’s Guide
Page 35
Ho w To . ..
… Cre a te a Co n fi g ura ti o n
• Deselect the Use Route Tables option for discovery of networks of
all “server” hardware using only the CDP (Cisco Discovery Protocol)
routing table.
Note:
Note:
The Use CDP Tables setting cannot be deselected. Since the
CDP tables include switches such as the Catalyst 5000 and
5505, these devices will also be included in router discovery
results if they are connected to a Cisco router. If you do not want
these devices included for exporting or modeling purposes, you
can remove them from the result set via the Filter button (see …
Filter Results on Page 47).
• For discovery of networks with routing tables of more than 1,000
entries, select a Throttle value to stagger the processing workload
by pausing for one second after reading every 50 entries (High),
100 entries (Medium), or 250 entries (Low).
7
The rest of the procedure varies depending on whether the
configuration you are creating is for discovery-only or for discovery
and modeling. For a discovery-only configuration, at this point you
can do any of the following:
• If you want to set a time for execution of the configuration, click
the Schedule tab (see … Schedule a Configuration on Page 43 for
detailed instructions).
• If you want to execute the configuration immediately, click the
Save & Start button. After you provide a name for the
configuration, it will be added to the Router folder in the Stored
Configurations panel, a corresponding entry will be added to the
Results list, and a Results dialog will replace the configuration
creation dialog.
• If you want to save the configuration for later use, click Save. You
will be prompted to provided a name, and then the configuration
will be added to the Router folder in the Stored Configurations
panel.
AutoDiscovery User’s Guide
Page 36
Ho w To . ..
… Cre a te a Co n fi g ura ti o n
• If you want to dismiss the creation dialog without saving the
configuration, click Cancel.
If you are creating a combined discovery and modeling configuration,
click the Modeling tab to see the default settings and adjust them as
desired using the instructions under … for Modeling to SPECTRUM on
Page 38. You can also click the Filtering tab, which lets you
predetermine which of the discovered devices will be displayed in the
Results dialog and modeled to SPECTRUM when the configuration is
executed. For detailed instructions, see … Filter Results on Page 47.
When you are satisfied with the settings on all four tabbed pages, use
the Save or Save & Start buttons as described above.
AutoDiscovery User’s Guide
Page 37
Ho w To . ..
… Cre a te a Co n fi g ura ti o n
… for Modeling to SPECTRUM
Once you have selected one of the options for creating a new modeling
configuration (using any of the methods described under … Create a
Configuration on Page 24), a configuration creation dialog will appear in
the right side of the main window as shown below. If you have selected an
option to create a combined discovery and modeling configuration, a
tabbed dialog will appear with the foreground page labeled “Discovery”
and the Filtering and Modeling tabs in the background.
Note:
Note:
It is recommended that you perform an online database backup
via the SPECTRUM Control Panel both before and after
executing a modeling configuration. This is especially important
to keep both primary and secondary SpectroSERVERs
synchronized in a fault tolerant environment.
AutoDiscovery User’s Guide
Page 38
Ho w To . ..
… Cre a te a Co n fi g ura ti o n
To create a modeling configuration, follow these steps:
1
If you are creating a modeling-only configuration, go directly to
Step 2. For a combined discovery and modeling configuration, click on
the Modeling tab and note the following two options:
• The Custom option (selected by default) lets you create a new
modeling configuration from scratch by performing Step 2 through
Step 5 below.
• The Existing option lets you select and import a previously created
modeling configuration from the adjacent list then skip to Step 5.
(NOTE: this option button and list box will be grayed out if there
are no modeling configurations available in the Stored
Configurations panel).
2
If the Landscape field does not show the server you wish to create
models in, click on the Servers button to display a list of other
available servers and select the one you want.
3
In the Modeling Types panel, you can choose between the following
two options:
• Logical IP Based - This option, selected by default, will model and
place discovered devices according to the other settings you can
select in this panel, as follows:
• Arrangement - (Logical or Flat)
• Placement (None, Radial, or Tree. Note that models will only be
autoplaced in a radial or tree arrangement if new models are
created when this configuration is executed. If you are
rediscovering part of your network and did not select one of
these options originally, selecting them for a subsequent
modeling session will not have any effect unless new devices
have been found and modeled in the interim. You can, however,
use SpectroGRAPH’s Edit > Auto Place option at any time.)
• Layer 2 Options - Select at least one of the following device
information tables for AutoDiscovery to use in determining
device connectivity: Cisco Discovery Tables, Cabletron Switch
Tables, Source Address Tables, or Spanning Tree.
AutoDiscovery User’s Guide
Page 39
Ho w To . ..
… Cre a te a Co n fi g ura ti o n
• Whether to Read IP Route Tables (see Note below) and whether
to create models for LANs (IP Subnets), Physical Addresses,
and Pingables.
Note:
Note:
The Read IP Route Tables option is deselected by default, since
these tables can be very large and very time-consuming for
AutoDiscovery to read. If you do not select this option,
AutoDiscovery will use the IP Address Table to map routers, but
will not be able to map unnumbered IP interfaces (0.0.0.0). If you
want to have these interfaces mapped, you can either select the
Read IP Route Tables option, or, after the configuration has
been executed, reconfigure the modeled router or click Discover
LANs in the router’s Device Configuration view.
• Container Based - This option displays a list of available container
models on the selected server or “Universe” if no container models
currently exist. When the configuration is executed, all models
created will be placed in the container you select, or in the
Universe view by default. AutoDiscovery will not model
connections between models when this option is used.
4
Adjust the Activation Time as desired using the up/down arrows.
This value determines the number of minutes AutoDiscovery will wait
for new models to activate before placing them and attempting to
obtain connectivity information. The timer is reset to the specified
value each time a new model activates within the allotted time. When
the time expires without any new models activating, connectivity is
established insofar as possible, regardless of whether all discovered
models have activated. The minimum possible activation time is the
AutoDiscovery User’s Guide
Page 40
Ho w To . ..
… A c c es s a nd Us e S to red Co n fi g ura ti o n s
default value of 5 minutes; the maximum is 15 minutes.
Caution:
5
Even though you can halt discovery or modeling sessions via the
STOP button that displays at the lower right corner of the
Results view while the session is in progress, you should NOT
stop a modeling session during the model activation phase, as
this can cause incomplete or inconsistent modeling of discovered
devices and their connectivity. The modeling activation phase
begins when the message “Model creation finished ...” is
displayed in the Modeling Status Information panel under the
Results view’s Modeling tab. When this phase is completed,
either the message “All models are active” or the message
“Finished processing inactive models” will be displayed.
If you are creating a modeling-only configuration, click the Save
button at the bottom of the page. This displays a message box asking
you to enter a name for the configuration, which will then be added to
the Model Configurations/SPECTRUM folder in the Stored
Configurations panel.
If you are creating a combined discovery and modeling configuration,
and the settings under all four tabs are to your satisfaction, you can
save the configuration, as described above, or click Save & Start to
execute the configuration immediately. In addition to adding the
configuration to the appropriate Stored Configurations file, Save &
Start will add an entry to the Results list and replace the
configuration creation dialog with the Results view.
… Access and Use Stored Configurations
Whenever you create and save an AutoDiscovery configuration, a
corresponding entry is added to the appropriate folder in the main
window’s Stored Configurations panel, shown below.
AutoDiscovery User’s Guide
Page 41
Ho w To . ..
… A c c es s a nd Us e S to red Co n fi g ura ti o n s
Configurations are displayed in a standard tree arrangement with folders
for the three basic configuration types at the first (leftmost) level, folders
for discovery methods at the second level (except for modeling
configurations), and individual configurations at the rightmost or “leaf”
level. Click on folders to expand or collapse them. Single-click individual
configurations to select them, double-click to open them, or right-click to
display a pop-up menu with the following options:
• Open - displays the selected configuration’s tabbed dialog in the work
area to the right of the Stored Configurations panel, allowing you to
modify discovery, modeling, filtering, or scheduling settings as
applicable.
• Delete - permanently removes the selected configuration from the
system after prompting you for confirmation.
• Rename - displays a dialog that lets you change the selected
configuration’s name.
AutoDiscovery User’s Guide
Page 42
Ho w To . ..
… S c he d ul e a Co n fi g ura ti o n
• Duplicate - creates a copy of the selected configuration (named “Copy
of <configuration name>”), which you can then open and use as a
starting point for creating a new configuration.
• Start - executes the selected configuration or adds it to the pending
queue if another configuration is in progress. Note that this option is
grayed out for modeling configurations, which can only be executed in
conjunction with discovery configurations.
… Schedule a Configuration
You can schedule single or periodic executions of discovery-only or
discovery and modeling configurations at the time you create them or you
can re-open stored configurations and schedule them at a later time. In
either case, you perform the scheduling using the configuration creation
dialog’s Schedule tabbed page as shown below.
AutoDiscovery User’s Guide
Page 43
Ho w To . ..
… S c he d ul e a Co n fi g ura ti o n
To schedule a configuration for execution, follow these steps:
1
Click the Scheduled button to activate the page, the rest of which is
grayed out when the Not Scheduled button is selected.
2
In the middle of the page, click the Schedule configuration on
button (which shows either the date and time the configuration was
created or a previously scheduled execution time). This will display
the Select Date & Time dialog shown below.
3
In the Select Date & Time dialog, adjust the following settings as
necessary:
a Select a month from the pull-down list in the upper left corner.
b Use the up-down arrows to select a year in the upper right corner.
c Select a day of the month by clicking a square in the calendar.
d Use the up-down arrows to select a time of day in the digital clock
display at the bottom of the dialog.
e Click OK to dismiss the dialog and transfer the selected date and
time to the Schedule configuration on button.
4
Specify whether you want to configuration to run once or at regular
intervals using the pull-down lists and text entry box immediately
AutoDiscovery User’s Guide
Page 44
Ho w To . ..
… A c c es s a nd Us e Re s ul t Se t s
below the Schedule configuration on button. The default is to run
the configuration at the date and time you specified and at the same
time every day thereafter.
5
Click Save & Schedule to close the configuration and schedule it for
execution at the time(s) you have specified. Once scheduled, the
configuration is added to the Scheduled Jobs dialog (shown below),
which can be accessed either from the File menu or the tool bar. You
can remove any job from the schedule by selecting it and clicking
Delete. You can also override the schedule by re-opening the
configuration’s Schedule tabbed page and selecting the Not
Scheduled option.
Clicking Save on the Schedule tabbed page closes the configuration
and saves the scheduling information without actually scheduling the
job.
… Access and Use Result Sets
Whenever an AutoDiscovery configuration is executed, a corresponding
entry is added to the Results list at the lower left corner of the main
window. Each entry shows the name of the configuration, the date and
time it was executed, and its current status. Once an entry has a status of
“Discovered” or “Modeled,” you can select it by single-clicking, open it by
double-clicking, or right-click it to display a pop-up menu with the
following options.
AutoDiscovery User’s Guide
Page 45
Ho w To . ..
… S o rt Re s ul t s
• Open - displays the selected result set in a tabbed view to the right of
the Results list. The Results tabbed page includes buttons that access
dialogs that let you filter the results (see … Filter Results on Page 47),
export them to a file (see … Export Results on Page 49), or model them
to SPECTRUM (see … for Modeling to SPECTRUM on Page 38).
Depending on the type of configuration that was executed, there are
also tabbed pages allowing you to view the associated configuration,
filtering, or scheduling information.
• Delete - permanently removes the selected result set from the system
after prompting you for confirmation.
• Rename - displays a dialog that lets you change the selected
configuration’s name.
• Export - displays the Export Data Selection dialog that lets you
export the selected result set to a file in the format and location of your
choice (see … Export Results on Page 49). This dialog is also accessible
from the Export button when the result set has been opened.
• Model to SPECTRUM - displays the Modeling Configuration dialog
that lets you create or modify and then execute the modeling
configuration for the selected result set. This dialog is also accessible
from the Model Devices button when the result set has been opened.
For detailed instructions, see … for Modeling to SPECTRUM on Page 38.
… Sort Results
When a result set is created, the Results view lists devices under the
Results tab in the order that they were discovered. You can sort the list
by ascending or descending order with regard to the attributes identified
by the column headings. Clicking once on a column heading displays an
up-arrow next to the column name and sorts the list in ascending order
for that attribute. Clicking the column heading again displays a down
arrow next to the column name and sorts the list in descending order.
Sorts will not be saved when you close the view.
AutoDiscovery User’s Guide
Page 46
Ho w To . ..
… Fi l te r Re s ul t s
… Filter Results
In addition to the boundaries you set for any discovery configuration
(such as specifying IP address ranges, Community Strings, whether or not
to discover pingables, etc.) AutoDiscovery also provides a filtering
mechanism that lets you set further limitations on which of the
discovered devices will be displayed in the result set created when the
configuration is executed. Any filters applied to a configuration or a result
set will also apply to any subsequent exporting or modeling to
SPECTRUM.
For discovery-only configurations, filtering is applied after the
configuration has been executed. You access the Filtering dialog (shown
below) by clicking the Filter button within the Results dialog.
For combined discovery and modeling configurations, you can set up
filtering anytime before executing the configuration, either at the time you
create it, or by reopening the saved configuration and adding/modifying
filtering information. In this case, you use the configuration creation
dialog’s Filtering tabbed page, which looks and functions just like the
Filtering dialog shown above.
To filter existing discovery results or set up filtering for subsequent
execution of a combined discovery and modeling configuration, follow
these steps:
AutoDiscovery User’s Guide
Page 47
Ho w To . ..
… Fi l te r Re s ul t s
1
Establish filtering criteria by creating expressions one-at-a-time, as
follows:
a Make a selection from the Fields pull-down list—e.g., vendor.
b Make a selection from the Condition pull-down list—e.g., equals.
c Make an entry in the Value field—e.g., cisco.
d Click Add to add the expression to the list in the middle of the
dialog. (NOTE: If the expression “vendor equals cisco” is the only
filter applied, then the result set for this configuration will show
only the Cisco devices that are discovered.)
2
If you are using more than one criteria expression, select one of the
following options:
• Match all of the following (AND) - to display/model only those
devices for which EACH of the listed expressions is true.
• Match any of the following (OR) - to display/model only those
devices for which ANY of the listed expressions are true.
(NOTE: Clicking Mod allows you to modify any expression already in
the list. Remove a selected expression by clicking the Delete button.
3
Click Show Pingables if you want pingable devices included in the
filtered results.
4
If you are setting up filtering ahead of time for a combined discovery
and modeling configuration, you can click OK to save your filtering
criteria and dismiss the dialog, or Cancel to dismiss the dialog
without saving. If you are filtering an existing result set, you can also
click Apply to apply your filtering criteria temporarily while leaving
the dialog open.
AutoDiscovery User’s Guide
Page 48
Ho w To . ..
… E x p o rt Re s ul t s
… Export Results
The Export Data Selection dialog shown below lets you export selected
device information from a discovery result set to a file in the format and
location of your choice. You can access this dialog via the Export option
in the pop-up menu for a result set selected from the Results list, or via
the Export button in the Results dialog.
To export device information using this dialog, follow these steps:
1
Select a format from the Choose Export Format pull-down menu at
the top of the dialog.
2
All device information attributes (“exportable items”) are selected by
default. Click on the adjacent check boxes to deselect any you do not
want to include in the export file.
3
Click OK to bring up the Save dialog shown below.
AutoDiscovery User’s Guide
Page 49
Ho w To . ..
… C om p ar e Re s ul t s
4
Navigate to the directory where you want to store the exported file,
type in a file name, and click Save.
… Compare Results
AutoDiscovery lets you compare any two result sets generated by
executing discovery-only configurations and export the differences to a
text or html file. It is recommended that this feature not be used while
discovery or modeling sessions are in progress. To perform a comparison,
do the following:
1
From the main window’s Tools menu, select Device Differencing.
2
In the Differencing Tool dialog, select one entry from each of the two
pull-down lists labeled Select First ResultSet and Select Second
ResultSet.
3
Click the Compare button to display a table identifying devices that
are unique to either of the two result sets. As shown below, devices
that are in the first result set, but not the second, are listed by IP
address and MAC address in the leftmost two columns against a
green background. Devices that are in the second result set, but not
AutoDiscovery User’s Guide
Page 50
Ho w To . ..
… C om p ar e Re s ul t s
the first, are listed by IP address and MAC address in the rightmost
two columns against a red background. If devices appear in both
result sets but associated information has changed for one of them
(e.g., firmware may have been upgraded between discoveries), the
background will be yellow.
4
If you wish to create a file detailing the differences, click the Export
button at the bottom of the dialog.
5
In the Export Format dialog, select a format (HTML or Ascii) from the
pull-down list, then click OK.
6
In the Save dialog (the same one used for … Export Results on
Page 49), select the directory you wish to save the file in, then enter a
file name and click Save. As shown below, the “Differencing Report”
file will list the devices unique to each result set, providing descriptive
information in addition to the IP and MAC addresses.
AutoDiscovery User’s Guide
Page 51
Ho w To . ..
… C om p ar e Re s ul t s
AutoDiscovery User’s Guide
Page 52
Index
A
accessing
configurations 41
results sets 45
activation phase 10, 41
activation time 9, 40
Agent Information 17
alarms 11
Arrangement 39
B
backup 7, 38
basic procedure 6
C
Cabletron Switch Tables 9, 39
CDP (Cisco Discovery Protocol) 36
CDP Tables 36
Cisco Discovery Protocol (CDP) 36
Cisco Discovery Tables 9, 39
client applications 11
combined discovery & modeling 13
community strings 8, 27, 31, 35
comparing result sets 50
configurations
creating 24
deleting 42
discovery and modeling 12
discovery only 12
duplicating 43
AutoDiscovery User’s Guide
exporting 21
importing 21
introduced 6
modeling only 12
opening 42
renaming 42
saving 28, 32, 36
scheduling 43
use of different types 13
Configurations menu 20
Container Based 40
creating configurations 24
customization 9, 13, 26, 31, 33, 39
D
data set 14
database backup 7, 38
Default Filter 19
deleting configurations 42
Device Differencing 50
Device Information dialog 16
Differencing Tool dialog 50
discovered data set 14
Discovery and Modeling
Configurations 12
discovery by IP List 25
discovery by range 30
discovery by router 32
discovery configurations 6, 12, 24, 25,
30, 33
discovery methods
IP list 13
range 14
Page 53
router 14
duplicating configurations 43
E
Edit menu 19
error messages 14
export formats 49
exporting
configurations 21
results 49
F
fault tolerance 7, 38
File menu 18
filtering results 10, 47
H
Help menu 22
I
ICMP 8, 19, 27, 31
icons 23, 24
Import Configuration 21
Introduction 6
IP Address List 27, 34
IP address range 8
IP Range 31, 34
IP Route Tables 40
AutoDiscovery User’s Guide
M
main window
after discovery 14
illustrated 15
layout 18
menu bar 18
Results list 12
tool bar 23
menu bar 18
menus
Configuration 20
Edit 19
File 18
Help 22
Result Sets 21
Tools 22
View 20
Window 22
methods of discovery
IP list 13
range 14
router 14
model activation 41
modeling
result sets 15
status information 41
modeling configurations 6, 12, 38
Modeling to SPECTRUM 38
O
online database backup 7, 38
opening configurations 42
Overview 11
Page 54
P
S
performance 11
pingable devices 8, 19, 27, 31, 48
Placement 39
points of failure 11
Ports Information 17
Preferences 19
saving
configurations 28, 36
differencing reports 51
export files 50
schedules 45
scheduling configurations 10, 43
seed routers 34
sorting results 46
Source Address Tables 39
Spanning Tree 39
SPECTRUM Control Panel 7, 38
starting configurations 43
Status Information 41
status information 45
status messages 14
stopping a session 10, 41
Stored Configurations 18, 24, 32, 41
Stored Configurations panel 12
Q
Quick-Start Instructions
basic 6
expanded 8
R
range discovery
defined 14
renaming configurations 42
resources 11
Restricted Rights Notice 3
result sets
accessing 45
comparing 50
defined 14
exporting 49
filtering 47
introduced 12
sorting 46
Result Sets menu 21
Results list 12, 13, 14, 18, 32, 45
Results view 9, 15, 32
Retries 8, 27, 31, 35
Route Tables 36
T
Throttle value 36
Timeout 8, 27, 31, 35
tool bar icons 23
Tools menu 22
trademarks 2
U
unnumbered IP interfaces 40
V
View menu 20
AutoDiscovery User’s Guide
Page 55
W
What’s This? 23
Window menu 22
AutoDiscovery User’s Guide
Page 56