1
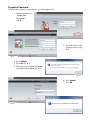
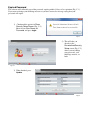
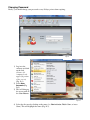
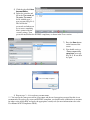
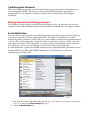
Aldelo EDC 6.2 Password White Paper
Users
By default the software comes with 3 users pre-defined with specific security roles assigned to them
(Administrator, Batch User, and POS User). Every user can have their own password and the security
roles that can be modified, changed, or added based on the Security Settings.
The PCI DSS requires that access to all systems in the payment processing environment be protected
through use of unique users and complex passwords. Unique user accounts indicate that every account
used is associated with an individual user and/or process with no use of generic group accounts used by
more than one user or process.
In order to adhere to PCI DSS standard, Aldelo EDC requires the following password complexity for
compliance:
• Passwords must be at least 7 characters
• Passwords must include alphabetic characters, at least 1 numeric character, and at least 1 special
character.
• Passwords must be changed at least every 90 days
• New passwords cannot be the same as the last 4 passwords
• If an incorrect password is provided 6 times the account will be locked out
• Account lockout duration is 30 minutes
• Sessions idle for more than 15 minutes should require re-entry of username and password to reactivate
the session.
Resetting Password
One of the key features of this version is that there is no way, or need, to reset the User Name if the
password expires or you become locked out of the software. Instead, if the user does not change the
passwords prior to the 90 day period, the software will automatically prompt the user to change the
password.
When your password has expired you will see a message that it has expired and to “Please Change
Password Immediately in the Screen That Follows” (Fig. A-1).
1) Press OK.
2) This will take you to the Reset
Expired Password screen (Fig. A-2).
3) Fill in the fields for Enter Current
Password, Enter New Password,
and Re-Enter New
Password.
4) Press Update.
Fig. A-2
Fig. A-1
Forgotten Password
When you have forgotten your password, go to the Login screen.
1) Click the link that says
“Forgot Your
Password?”
(Fig. B-1).
Fig. B-1
2) Fill in the fields for the
challenge answers (Fig.
B-2).
Fig. B-2
3) Press Validate.
4) Press OK (Fig. B-3).
5) Fill in the fields for New Password
and Confirm Password (Fig. B-4).
Fig. B-3
6) Press Update.
7) Press OK.
Fig. B-4
Fig. B-5
Expired Password
The software will still notify you of the password expiring within 14 days of its expiration (Fig. C -1).
If you want to change your challenge answers or you have received a message saying that your
password will expire.
1) Checkmark the option for Show
Security Setup Screen (Fig. C-2).
Enter in your User Name and
Password, and press Login.
Fig. C-1
2) This will take you
directly to the
Personalized Security
Setup screen (Fig. C-3),
where you can change
your password, your
challenge answers, or
both.
Fig. C-2
3) When finished, press
Update.
Fig. C-3
Changing Password
Ideally, you should change your passwords every 90 days prior to them expiring.
Fig. D-1
1) Log in to the
software and click
on the Orb,
(Picture of a
computer in the
upper left portion
of the screen)
(Fig. D-1).
2) Select User
Accounts (Fig.
D-2).
3) This will bring up
the screen with all
the User Names.
Fig. D-2
4) Select the first user by clicking on the name (i.e. Administrator, Batch User, or POS
User). This will highlight the name (Fig. D-3).
5) Click the tab called User
Account Editor.
6) Delete the asterisks and
fill in the Password and
Re-enter Password
fields with this user’s
new password (Fig. D-4).
This will be the
password used when you
try to access something
that is protected by the
security settings. Your
password must follow the PCI DSS compliancy as shown in the Users section.
Fig. D-3
7) Press the Save button
on the bottom of the
screen.
8) You should receive a
“Save successfully
completed” message
(Fig. D-5). If not, then
try again.
Fig. D-4
Fig. D-5
9) Repeat steps 3 – 8 for each user account name.
*** You can use the same password for all accounts and the card encryption password, but this is not
recommended. In order to be secure and PCI DSS compliant, you should create additional user accounts
for others using Aldelo EDC and apply the appropriate security role (for more information refer to the
User Manual or PCI Compliance Guide).
Card Encryption Password
The card encryption password is a password that protects the encrypted credit card information as it
passes through Aldelo EDC. The newest versions of Aldelo EDC will change the password
automatically. It is not suggested to change it manually, unless directed by an Aldelo Support
Technician.
Missing Password and Challenge Answers
If you happen to forget your password AND your challenge answers, you will need to create a new
database. Contact Aldelo Technical Support or your Authorized Aldelo Reseller for further assistance.
E-mail Notification
This tool contains some powerful event notification features that enable managers and tech support to
pro-actively monitor key activities within Aldelo EDC. We highly recommend the use of these
notification features as much as possible. This gives you the ability to catch possible problems before it
is too late. The e-mail notification is designed to send out e-mail alerts of success, failure, errors and
other audit trail activities. Most importantly, you will be notified of impending password expirations.
You will also be sent a new password in the event that a password has expired already.
To send notifications, you must have SMTP account and setup information from your Internet Service
Provider (ISP). If your ISP requires SMTP authentication, you will then need to fill in the
Authentication Credential fields.
Fig. E-1
1) Log in to the software and click on the Orb, (Picture of a computer in the upper left portion of
the screen), then select Store Settings (Fig. E-1).
2) Select the Notifications tab.
3) Enter in the SMTP Server
Name provided by your Email Service Provider.
4) The default SMTP Server
Port number is 25, but you
can change it to any port
number provided by your Email Service Provider.
5) If you E-mail Service
Provider requires
authentication to send emails, checkmark the option
for Authentication
Required.
Fig. E-2
6) Enter in your e-mail’s User
Name and Password in the
fields for “Authentication
User Name” and
“Authentication
Password”
(Fig. E-3).
7) The Sender Email
Address field indicates
who the sender is. Enter in
your e-mail’s address
in the Sender Email
Address field.
Fig. E-3
8) Enter in the e-mail addresses of the individuals you want to receive the notifications.
You may also want Notification Email Address 1 to be your address so you can receive the
notifications as well.
The notification feature allows up to three parties be notified of selected events, but there must
be a minimum of one notification e-mail address. We recommend one of the notified party be the
Manager, one be the Technical Person, and possibly the Merchant Service Provider (Please
receive permission first).
9) Checkmark any or all of the notification events that you wish (Fig. E-3).
10) Press Test Email to test the settings. If you received a “Failed” message, review the steps and
verify your settings.
11) Once you receive an “Email Test Successful” message (Fig. E-4), you can press the Save
button.
Fig. E-4