1
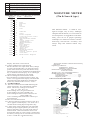
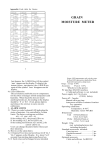
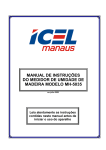
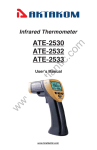
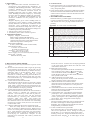
1. FEATURES
* Be a powerful and versatile instrument for
measuring and diagnosing dampness in
buildings and building materials. This product
enables building surveyors and other
practitioners to measure moisture levels of
building elements such as walls, floors and
other building materials simply by switching
between the two different modes of operation.
In this way, a detailed understanding of the
moisture condition of the property can be
obtained.
* Digital display gives exact reading with no
guessing or errors while a colour coded light
(LED) indicates the moisture condition of the
material. This combined presentation of
moisture measurement helps the user to map
the extent of problems and monitor changes in
condition precisely and reliably.
* Alarm values can be set by users.
* Automatic power off to conserve power.
2.SPECIFICATIONS
Display:4 digits, 10 mm LCD
With colour coded LED indication
Green LED represents a safe, air-dry state.
Yellow LED represents a borderline State.
Red LED represents a damp state.
Measurement Range:
0~80% (when code=cd01 in a Pin mode)
Measurement codes:
10 codes in a Pin mode
20 codes in a Search type
Accuracy: ± 0.5%n or ± 0.5%
Whichever is the greater
Power supply: 4x1.5 AA A size(UM-4) battery
Power off : 2 modes
Manual off at any time
1
6. Considerations
6.1 This instrument is of very high input resistance.
Every parts have good insulation. Please keep it in
a dry, dustproof place.
6.2 The measurement result may be different if taking
the measurement from different directions of the
surface. That is because water in the material is not
distributed evenly.
7. BATTERY REPLACEMENT
When the battery symbol appears on the display, it
is time to replace the battery. Remove the batteries
and install new ones paying careful attention to
polarity.
Appendix 1 : Code table for a Pin mode
4. MEASURING PROCEDURE
4.1 Depress the power key and release to power on the
meter.
4.2 To check if the material code is right by pressing
and releasing the Select key. Such code can be
changed by the Plus/Hold key or Minus/Zero key
when the `cdxx` is on the display. Here `cd` is
the abbreviation for `code` and `xx` is the
material no. If keep depressing the Plus/Hold or
Minus/Zero key, the material code will step into
next code about every second and releasing it till
the material code is right.
4.2.1 Code selection for the Pin mode
The material code for the Pin-type mode is listed
in the table on page 7. Please select the standard
code `cd00` if the material to be measured is not
listed in the table or to ascertain its material code
by the standard oven-drying method.
4.2.2 Code selection for the search mode
The standard material code for the search mode is
`cd10` which is suitable for measuring the
material whose density is like that of pine, fir,
oak etc. The user can carry out the accurate
measurement by selecting one material code
between `cd01` and `cd20`. The greater the
density of the material to be measured, the larger
the material code to be selected. For measuring
moisture in concrete wall, the user can select the
code around `cd18`.
4.2.3 Factors affecting the choice of material code
There are many factors to affect the material
code, for instance, different places, different soil
even if in a same place will lead to different code
for a same material. The better way to ascertain
the material code is based on standard tests by
oven-drying of commercial samples of the
material to be measured. The code by which the
measuring
3
results are closest to those of oven-drying method
is the right code. Write down the code for such
material for later uses.
4.3 Moisture measurement
Check which operational mode the instrument is
in by looking at the symbol ` `in the display.
It is in a Search mode if the symbol` ` shows
on the display. And it is in a Pin mode if without
this symbol on the LCD.
4.3.1 Measurements if in a Pin mode
Push pins firmly into the surface of the material
about 6mm deep at the required point.
4.3.2 Measurements if in a Search mode
Place the search probe against the surface of the
material such as wall, floor etc. at the point of
measurement.
4.3.3 Read the moisture level value from the display
and note the moisture condition of the material
from the colour coded LED.
4.3.4 To hold the max. value during measurements,
just depress the △/HOLD key till the symbol
`max` appears on the display. To display instant
values, just depress the △/HOLD key again till
the symbol `max` disappears on the display.
4.4 Zero calibration
The zero feature enable the user to compensate for
the effect of changes in both temperature and
humidity. Zero calibration should be carried out
independently in different modes.
4.4.1 Zero calibration in a pin mode
Press the Power key to switch the meter on. Be
sure it is in a pin mode. If not, change it to the pin
mode (See 4.5). Let the pins of the meter touch
nothing except air. And press Minus/Zero key to
make the meter display `0` if other digits on the
4
Code
Materials
Abies grandis, Acer macrophyllum, Maple, Acer saccharum, Pine(scots),
yellow Pine, Dalbergia latifolia, Dipterocarpus zeylanicus, Eucalyptus
microcorys, Fraxinus excelsior, Cupressus spp, Pinus contorta, Pterygota
Cd00 bequaertii, Quercus robur, Pinus sylvestris, Balsa, Boxwood (maracaibo),
red Gum(American), Gum spotted, Gurjun, Birch, Cypress(African) Karri,
Oak(European), Oak(Japanese), black Poplar, Redwood(Baltic European),
Rosewood (Indian), Pine(lodgepole), Tallowwood, Walnut (American),Kapur
Araucaria bidwilli, Eucalyptus crebra, Eucalyptus saligna, Flindersia
brayleyana, Fraxinus Americana, Intsia bijuga, Podocarpus dacrydioides,
Sequoia sempervirens, Pinus pinaster, Gum(southern), Mahogany (west Indian),
Cd01 Douglas fir, Maple (queensland), red (light or dark) Meranti, white Meranti,
Redwood(Californian), Walnut (new guinea), white Pine (new Zealand),
Araucaria angustifolia
Distemonanthus benthamianus, Jarrah, Endiandra palmerstonii, Erythrophleum
spp, Abies alba, Fagus sylvatica, Grevillea robusta, Juglans regia, Larix
deciduas, Larix occidentalis, Podocarpus spicatus, Picea abies, Pinus caribaea,
Pinus nigra, Pinus palustris, Pinus ponderosa, Pinus radiata, Taxus baccata,
Cd02 Thuja plicata, Tsuga heterophylla, red Cedar (western), Chestnut, Greenheart,
Hemlock (western), Larch ( European), Larch (Japanese), Queensland walnut,
red Seraya, Spruce, Silky oak( African), Silky oak( Australian), Pine (Corsican),
Pine, radiata, Walnut(European), Walnut (queensland), Whitewood, Yew,
Pine(ponderosa), Stringybark, Oak (tasmanese)
Khaya senegalensis, Podocarpus totara, Quercus cerris, Ulmus American,
Cd03 Ulmus procera, Ulmus thomasii, Afzelia, Kauri( new Zealand), Lime, Elm(
English), white Elm, Matai, Oak( Turkey), Pyinkado
Cd04 Acer pseudoplatanus, Carya glabra, Sycamore, Cassipourea elliotii, Dipterocarpus
(keruing), Teak, Cordia alliodore, Larix occidentalis, Pterocarpus soyauxii, Hickory,
Padauk( African)
6
Materials
Code
Afrormosia elata, Diospyros virginiana, Gonystylus macrophyllum,Pterocarpus
Cd05 indicus, Afrormosia, Amboyna, Basswood, Coachwood, Persimmon
Cd06 Calophyllum brasiliense, Guarea cedrata, white Guarea
Cd07
Abies procera, Agathis robusta, Betula pendula, Croton megalocarpus,
Prunus avium, Agba, Birch( European), Cedar( west lndian), black
Guarea, Kauri (queensland), Walnut( African), Cherry (european), Utile
Cd08 Chipboard, Paper
Cd09 Building, Wall, Concrete
APPENDIX 2: Density-Code table (only for reference)
Density
Materials
Code
Kg/m 3
200
1
220
2
240
3
320
4
400
5
440
6
480
7
520
8
9
600
10
800
11
1000
Foam
Soft wood,
Felt
Peat
Charcoal
Coke
12
Veneer
Timber, Chipboard
Leather, Slag, Kerosene, Alcohol
2000
17
2200
18
2500
19
Polyethylene
Soft coal, Bamboo, Paraffin
ABS
Clunch, Organic glass
Asphaltum, lime
Bakelite, fiberboard
Rubber
Stone , Sand (dry)
Clayey brick
Asbestine board
Vitriol(87%)
Sand (wet)
Bricklaying, Firebrick
Quartz glass
Concrete ,Asbestos、plaster
China, Glass
3000
20
Granite、Magnetite
Marble、
1200
13
1400
14
1600
15
1800
16
(Pin & Search type)
(Only for reference)
White lime
560
MOISTURE METER
This Moisture Meter is small in size,
light in weight, easy to carry. Although
complex and advanced, it is convenient to
use and operate. Its ruggedness will allow
many years of use if proper operating
techniques are followed. Please read the
following instructions carefully and
always keep this manual within easy
reach.
7
display. The meter is now zeroed.
4.4.2 Zero calibration in a search mode
Be sure the meter is in a pin mode. If not, change
it to the search mode (See 4.5). Keep the search
probe of the meter away from the surface of any
material at least 15cm. And then press Minus/Zero
key to make the meter display `0` if other digits
on the display. The meter is now zeroed.
4.5 How to change the measurement mode?
Press the Select key and not release it until the
letters `CH` appear on the display. The mode has
changed to the other mode after releasing the
Select key. Which mode is in now, see 4.3.
5. ALARM LIMITS
5.1 There is a coded coloured LED indicating the
status of moisture. It is controlled by 2 alarm
limits. The factory settings are as follow.
AL1 =13 and AL2 =18
If the reading<AL1, the green LED is on.
If the reading>AL2, the red LED is on.
If the reading lies between AL1 and AL2, the
yellow LED is on.
Users can change the alarm limits when as per
their intention.
5.2 How to set the alarm limits
5.2.1 Depress Select key and not release it till 'AL1'
'AL2 ' appears on the Display. It is about 7 or 9
seconds from starting depressing Select key.
5.2.2 Such value can be changed to your intended
Value by depressing the plus key or minus key.
Depress the Select key to return to the state of
measurement. If the second limit AL2 is less
than the first limit AL1, the setting is invalid and
the factory settings for AL1 and AL2 are restored
to AL1=13 and AL2=18 automatically.
5
Auto power off after 5 minutes from last key
operation
Operating conditions:
Temperature : 0-50 ℃
Humidity : below 90% RH
Dimensions: 165x62x26mm or
6.5x2.4x1.0 inch
Weight: 175g (not including batteries)
Standard accessories included :
Carrying case . ............................ .1 pc.
Operation manual ........................1 pc.
Separate probe ............................1 pc.
3. FRONT PANEL DESCRIPTIONS
3-1
3-2
3-3
3-4
3-6
3-5
3-7
3-8
3-9
3-10
3-11
2
3-1 Pin probe
3-2 Search probe
3-3 Symbol for search mode
3-4 Display
3-5 Jack for the external pin probe
3-6 Color coded LED
3-7 Plus/Hold key
3-8 Minus/Zero key
3-9 Select key
3-10 Power key
3-11 Battery compartment/ Cover
2