1
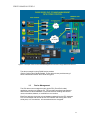
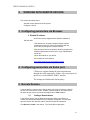
Version 2
FEL
USER MANUAL
FRONT END LOADER
Communication Devices, Inc
The Global Leader in Secure Out of Band Management
Communication Devices Inc.
85 Fulton St.
Boonton, NJ 07005
USA
Phone: +1 973 334-1980/+1 800 359 8561
Internet: [email protected]
http://www.commdevices.com/support-center/
FEL User Guide Release 1.00
Copyright © 1991, 2013 Communication Devices Inc. and/or its affiliates. All rights
reserved.
This software and related documentation are provided under a license agreement
containing restrictions on use and disclosure and are protected by intellectual property
laws. Except as expressly permitted in your license agreement or allowed by law, you
may not use, copy, reproduce, translate, broadcast, modify, license, transmit, distribute,
exhibit, perform, publish, or display any part, in any form, or by any means. Reverse
engineering, disassembly, or de-compilation of this software, unless required by law for
interoperability, is prohibited.
The information contained herein is subject to change without notice and is not
warranted to be error-free. If you find any errors, please report them to us in writing.
If this software or related documentation is delivered to the U.S. Government or anyone
licensing it on behalf of the U.S. Government, the following notice is applicable:
U.S. GOVERNMENT RIGHTS
Programs, software, databases, and related documentation and technical data delivered
to U.S. Government customers are “commercial computer software” or “commercial
technical data” pursuant to the applicable Federal Acquisition Regulation and agencyspecific supplemental regulations. As such, the use, duplication, disclosure, modification,
and adaptation shall be subject to the restrictions and license terms set forth in the
applicable Government contract, and, to the extent applicable by the terms of the
Government contract, the additional rights set forth in FAR 52.227-19, Commercial
Computer Software License (December 2007).
Communication Devices Inc. 85 Fulton Street Boonton, NJ 07005.
This software is developed for general use in a variety of information management
applications. It is not developed or intended for use in any inherently dangerous
applications, including applications which may create a risk of personal injury. If you use
this software in dangerous applications, then you shall be responsible to take all
appropriate fail-safe, backup, redundancy, and other measures to ensure the safe use of
this software. Communication Devices Inc. and its affiliates disclaim any liability for any
damages caused by use of this software in dangerous applications.
This software and documentation may provide access to or information on content,
products, and services from third parties. Communication Devices Inc. and its affiliates
are not responsible for and expressly disclaim all warranties of any kind with respect to
third-party content, products, and services. Communication Devices Inc. and its
affiliates will not be responsible for any loss, costs, or damages incurred due to your
access to or use of third-party content, products, or services.
Table of Contents
1
CDI AND NETWORK SECURITY ........................................................................1-1
1.1
1.2
1.3
2
3
CDI’s Role in Network Security ................................................................... 1-1
Device Management ...................................................................................... 1-3
Database organization.................................................................................... 1-4
WORKING WITH REMOTE DEVICES .................................................................2-1
Configuring parameters via Browser. ...............................................................3-1
3.1Default IP address: .................................................................................................. 3-1
4
5
Configuring parameters via Serial port. ............................................................4-1
Remote Devices ..................................................................................................5-1
5.1
Adding a Remote device................................................................................ 5-1
5.1.1
NAME: ....................................................................................................... 5-2
5.1.2
Device Type: .............................................................................................. 5-2
5.1.3
Device Mode: ............................................................................................. 5-2
5.1.4
MAC Address: ........................................................................................... 5-2
5.1.5
Network Address: ...................................................................................... 5-3
5.1.6
NAT Address: ............................................................................................ 5-3
5.1.7
Network Mask:........................................................................................... 5-3
5.1.8
Gateway: .................................................................................................... 5-3
5.1.9
Phone: ........................................................................................................ 5-3
5.1.10 Baud Rate: .................................................................................................. 5-3
5.1.11 BITS: .......................................................................................................... 5-3
5.1.12 Cellular Address: ....................................................................................... 5-3
5.1.13 Port Settings: .............................................................................................. 5-3
5.1.14 Name: ......................................................................................................... 5-3
5.1.15 Baud Rate: .................................................................................................. 5-3
5.1.16 BITS: .......................................................................................................... 5-4
6
7
USERS .................................................................................................................6-5
Managing users ..................................................................................................7-5
7.1Create a users .......................................................................................................... 7-5
7.1.1
UserID: ....................................................................................................... 7-5
7.1.2
Password: ................................................................................................... 7-5
7.1.3
Encryption: ................................................................................................. 7-5
7.1.4
Programming Users ................................................................................... 7-5
After any changes are made to the user database, it needs to be uploaded to each
remote device via the program device command in the devices screen. ................. 7-5
8
9
Client Devices .....................................................................................................8-6
Entering a Client device .....................................................................................9-6
9.1
9.2
9.3
9.4
9.5
9.6
NAME: .......................................................................................................... 9-6
Device Type:.................................................................................................. 9-6
Device Mode: ................................................................................................ 9-6
MAC Address: ............................................................................................... 9-6
Network Address: .......................................................................................... 9-7
NAT Address: ................................................................................................ 9-7
9.7
9.8
9.9
9.10
9.11
9.12
9.13
9.14
9.15
9.16
10
11
Soft Tokens .......................................................................................................10-9
Creating a Soft Token.......................................................................................11-9
11.1
11.2
11.3
11.4
12
Go to the “Client Devices” tab and click on “Create soft token.................. 11-9
Enter a Soft Token name ............................................................................. 11-9
Set a Pin Number ( a default is created that you can change or keep) ........ 11-9
Click OK to save the token. ......................................................................... 11-9
Programming devices in the system .............................................................12-10
12.1
12.2
12.3
13
14
15
16
17
18
19
Network Mask: .............................................................................................. 9-7
Gateway: ........................................................................................................ 9-7
Phone: ............................................................................................................ 9-7
Baud Rate: ..................................................................................................... 9-7
BITS: ............................................................................................................. 9-8
Cellular Address: ........................................................................................... 9-8
Port Settings:.................................................................................................. 9-8
Name:............................................................................................................. 9-8
Baud Rate: ..................................................................................................... 9-8
BITS: ............................................................................................................. 9-8
Programing via local serial port................................................................. 12-10
Programming clients .................................................................................. 12-10
Programming remotes................................................................................ 12-10
Reports ............................................................................................................13-11
Connecting to a remote device using the Terminal ..................................... 14-12
Overview .........................................................................................................15-12
Terminal screen features ...............................................................................16-12
Connecting to a remote device......................................................................17-13
Connecting to a device ..................................................................................18-14
Communication Settings ...............................................................................19-15
19.1
Modem: ...................................................................................................... 19-15
19.2
Network: .................................................................................................... 19-15
19.3
Direct: ........................................................................................................ 19-16
19.4
Network Dialout: ....................................................................................... 19-16
19.5
Network Tunnel: ........................................................................................ 19-16
19.6
Serial: ......................................................................................................... 19-16
19.7
Cellular: ..................................................................................................... 19-16
19.8
Direct: ........................................................................................................ 19-16
19.9
Network Tunnel: ........................................................................................ 19-16
19.10 Cell to Cell Tunnel .................................................................................... 19-16
19.11 Modem Communications .............................................................................. 19-17
19.11 Serial Communications.............................................................................. 19-18
19.12 Network Communications ......................................................................... 19-18
19.13 SSH Communications: .............................................................................. 19-19
19.14 Using a Soft Token .................................................................................... 19-19
19.14.1 Select Connect to a device ................................................................. 19-19
19.14.2 Selct how you would like to connect to the remote device. ............... 19-19
19.14.3 Check the “Enable Soft Token” box .................................................. 19-19
20
21
SYSTEM SETTINGS ........................................................................................20-21
Common Device Credentials .........................................................................21-22
21.1
21.2
21.3
21.4
21.5
21.6
22
Common Network Settings: ...........................................................................22-22
22.1
22.2
22.3
22.4
22.5
22.6
22.7
22.8
22.9
23
Client Device type: .................................................................................... 21-22
Remote Device Type: ................................................................................ 21-22
Device mode: ............................................................................................. 21-22
System Password: ...................................................................................... 21-22
System Key: ............................................................................................... 21-22
Modem AT commands: ............................................................................. 21-22
Network Mask ........................................................................................... 22-22
Gateway ..................................................................................................... 22-22
Primary RADUIS/TACACS+ Address ..................................................... 22-22
Secondary RADIUS/TACAS+ Address .................................................... 22-22
RADIUS TACACS+ Key.......................................................................... 22-22
Primary SNMP Address ............................................................................ 22-22
Secondary SNMP Address ........................................................................ 22-23
Primary Syslog address ............................................................................. 22-23
Secondary Syslog address ......................................................................... 22-23
Communications Methods .............................................................................23-23
23.1
23.2
23.3
Primary Communications .......................................................................... 23-23
Secondary Communications ...................................................................... 23-23
Serial port (if used) .................................................................................... 23-23
CDI FEL MANUAL VER 2.0
1
CDI AND NETWORK SECURITY
A network is comprised of a plurality of connections to routers, firewalls, network
switches, and other network elements. These elements are usually monitored
and maintained by the Network Operations Center (NOC) Engineers. The
engineers access the console port of the router or other network element to
perform routine maintenance or to reset the device.
Access to the console port may be by in-band (direct SSH to the network
interface) or out-of-band (through a CDI device to the serial console port)
communications. Out of band access uses connections outside the bandwidth of
the network thus security is critical to these access points.
To maintain network security, access to the console port is limited to authorized
users, and the information being sent from the Engineer to the router or other
element is protected.
CDI’s Role in Network Security
CDI devices authenticate users before allowing them access to the console port
of a network element. Each CDI device maintains a database of authorized
users and device credentials. Once an Engineer has successfully authenticated,
they are permitted to access the network element. For example, to access a
router, the Engineer first connects to a CDI device, such as a Port Authority 100
or 200 series, and authenticates.
Both in-band and out-of-band communication between the Engineer and the
network element can be used by CDI devices, providing more security and
enabling devices to be contacted even when there is a network problem. All
information is encrypted.
CDI devices may provide both authentication and encryption functions or only
authentication or encryption. PA100 series provided FIPS 140-2 encryption while
PA200 series provide AES commercial encryption.
On the NOC side, a PA100 device can be set to encryption mode only and
encrypt the information being sent by the Engineer.
1-1
CDI FEL MANUAL VER 2.0
Figure 1-1 Example of FIPS 140-2 Secure Out-of-Band Management for Routers
The above example is using FIPS 140-2 PA100 series products (Pa11,PA155,
PA199). These devices have been FIPS 140-2 validated for use in federal
government networks.
1-2
CDI FEL MANUAL VER 2.0
Figure 1-2 Example of Secure Out-of-Band Management for Routers using PA200 sereis devices
The above example is using PA200 series products
(PA211,PA222,PA24,PA244x,PA288). These devices have provides strong 2
factor authentication and/or AES 128 bit encryption
1.2
Device Management
The CDI devices are managed remotely by the FEL (Front End Loader)
application running on a Windows PC. FEL provides centralized management
and maintains a central database of users and devices enabling devices and
users to be added, deleted, or modified from one location.
Each Port Authority device has a local database updated from the FEL database.
FEL communicates with remote devices over network and dial-up phone lines,
serial ports, or IP connections. All communications are encrypted.
1-3
CDI FEL MANUAL VER 2.0
1.3
Database organization
The central database maintained by the FEL is organized into 3 parts
Remote Devices
Users who are allowed access to those remote devices
Soft Tokens and/or Client encryptors if encryption is being used.
When a change is made to the database, it may be sent to one device, selected
devices, or all devices of a group.
For example, a user is changed (ex. “NocUser’). All devices in the system need
to get this change sent out to them.
FEL is meant for smaller applications and only support 25 remote devices.
For larger installations CDI “OBM”, Out of Band Manager should be used. This is
an enterprise manager with many features required for larger enterprise
networks.
The maximum number of users associated with a device is 150
1-4
CDI FEL MANUAL VER 2.0
2
WORKING WITH REMOTE DEVICES
This section describes how to.
Add and remove devices from the system
Configure a device
3 Configuring parameters via Browser.
3.1Default IP address:
All CDI devices are shipped with a default IP address of
199.199.199.1
This address can be used to program simple network
parameters so the FEL can the communicate with the
device directly through the network interface.
More advanced version of firmware allow for programming
additional parameters such as users, keys, authentication
serves etc..
Check the manual for your device.
All manuals can be reached at
http://www.commdevices.com/support-center/
4 Configuring parameters via Serial port.
CDI devices support loading the network parameters
through the serial console port. If there is no console port on
the device, use the SERIAL PORT1 interface.
The settings are 9600 baud 8 data no parity.
5 Remote Devices
A remote device is a device in the field to which you will be connecting. Remote
devices can connected to routers, firewalls, network switches, and CDI devices.
All these devices can be access and managed via the OBM software.
5.1
Adding a Remote device
A new remote device can be added to the system. When a new device is
created, the default parameters from the Template are applied. You may then
open the Device Info and other tabs to add device-specific information.
Click Devices, Create in the toolbar. The Create Device tab opens.
5-1
CDI FEL MANUAL VER 2.0
The Device Info tab opens. A new device of the Default Device type will be listed
in the Device panel.
5.1.1
NAME:
Create name of device i.e.. Dallas_1
5.1.2
Device Type:
Select Device type from pull down menu. Note this can be
preset in “settings menu” so you do not have to select each
time.
5.1.3
Device Mode:
• Standard Device: Supports Authentication and
encryption
• Device Authentication: Tokenless Authentication
using client device for authentication and/or
encryption
• RSA – Support RSA 2 factor authentication without
a network connection (built in) and encryption
• Bypass: Turns off all security parameters
5.1.4
MAC Address:
Found on the underside barcode label of any CDI device.
Network MAC Hardware address. Only required if
programming the IP address for the very first time via
network. Otherwise this will be picked up by the FEL
during a program connection.
The Network address can be loaded via a browser to
perform the initial network config with FEL.
5-2
CDI FEL MANUAL VER 2.0
5.1.5
Network Address:
The network address for the remote device. This can be
entered by the user or picked up from the remote device
during programming over serial or telco.
5.1.6
NAT Address:
If the device is located behind a NAT firewall this would
be the public address of the device. This will default to
equal the IP address (default) if not changed.
5.1.7
Network Mask:
Defaults to 255.255.255.0
5.1.8
Gateway:
Only enter if required
5.1.9
Phone:
This is the phone number of the remote (Analog or
cellular). Include and dialing prefixes like 9 for an outside
line. A comma can be placed in the string for a pause in the
DTMFT tones, Ex. 9,12125551212.
5.1.10 Baud Rate:
This is the baud rate for the remote modem. It defaults to
9600 baud and should remain that way unless instructed
from CDI support staff.
5.1.11 BITS:
Defaults to 8 data no parity. Not recommended to change.
5.1.12 Cellular Address:
The address of the cellular modem in the remote device. Do
not enter if no cellular modem is present.
5.1.13 Port Settings:
Each remote device has one to many serial host ports. Each
port can be configured individually
5.1.14 Name:
You can give each host port a name.
5.1.15 Baud Rate:
5-3
CDI FEL MANUAL VER 2.0
Each port can have its own baud rate. MOST if not all will
be set for 9600 baud as this is the default baud rate for most
console ports being used.
5.1.16 BITS:
Each port can be set for data bits and parity. Default of 8
data no parity should suffice on most all ports.
5-4
CDI FEL MANUAL VER 2.0
6 USERS
7 Managing users
The system can support up to 150 users which will be uploaded into each remote
device.
7.1Create a users
7.1.1
UserID:
Each users can have a UserID of up to 10 characters. They
can be alpha numeric upper and lower case
7.1.2
Password:
Passwords can be up to 10 characters. They can be alpha
numeric upper and lower case
7.1.3
Encryption:
If encryption is check the system must use client devices to
encrypt the data between the NOC and the remote site.
It will be automatic after authentication.
7.1.4
Programming Users
After any changes are made to the user database, it needs
to be uploaded to each remote device via the program
device command in the devices screen.
7-5
CDI FEL MANUAL VER 2.0
8 Client Devices
Each system can have multiple client device in one or more locations to provided
encrypted access to remote devices over telco, network, or cellular connections.
Client devices are network connected and can be reached via raw TCP or SSH
connections from with FEL or using stand alone terminals like putty etc..
9 Entering a Client device
9.1
NAME:
Create name of Client i.e.. CLIENT_1
9.2
Device Type:
Select Device type from pull down menu. Note this can be
preset in “settings menu” so you do not have to select each
time. Clients are usually PA111’s or PA222’s which each
have a network interface and 1 or 2 serial ports.
9.3
Device Mode:
Fixed as CLIENT
9.4
MAC Address:
Found on the underside bar code label of the device.
9-6
CDI FEL MANUAL VER 2.0
Network MAC Hardware address. Only required if
programming the IP address for the very first time via
network. Otherwise this will be picked up by the FEL
during a program connection.
The Network address can be loaded via a browser to
perform the initial network config with FEL.
9.5
Network Address:
The network address for the Client device. This can be
entered by the user or picked up from the client device
during programming over serial or telco.?
9.6
NAT Address:
If the device is located behind a NAT firewall this would
be the public address of the device. This will default to
equal the IP address (default) if not changed.
9.7
Network Mask:
Defaults to 255.255.255.0
9.8
Gateway:
Only enter if required
9.9
Phone:
This is the phone number of the client (Analog or cellular).
Include and dialing prefixes like 9 for an outside line. A
comma can be placed in the string for a pause in the
DTMFT tones, Ex. 9,12125551212.
The phone number is usually not required for a client as it
is dialing out not receiving calls.
9.10
Baud Rate:
This is the baud rate for the client modem. It defaults to
9600 baud and should remain that way unless instructed
from CDI support staff.
9-7
CDI FEL MANUAL VER 2.0
9.11
BITS:
Defaults to 8 data no parity. Not recommended to change.
9.12
Cellular Address:
The address of the cellular modem in the remote device. Do
not enter if no cellular modem is present.
Usually not required for client devices as they are used for
outbound connections only.
9.13
Port Settings:
Port settings are typically not used on a client as most
applications use the network for dialout. Serial can be used if
connected directly to the workstation.
9.14
Name:
You can give each host port a name.
9.15
Baud Rate:
Each port can have its own baud rate. MOST if not all will
be set for 9600 baud as this is the default baud rate for most
console ports being used.
9.16
BITS:
Each port can be set for data bits and parity. Default of 8
data no parity should suffice on most all ports.
9-8
CDI FEL MANUAL VER 2.0
10 Soft Tokens
Soft Tokens can be created and sroed in the FEL database. Soft Tokens will allow the FEL to
connect to remote CDI device using Strong 2 Factor Authenitcation and/or AES 128 bit encryption.
The Soft Token Is activated using a PIN number that will be defined durin the creation of the token.
When a operator would like to connect using a soft token they should check the “Soft Token” box in
the connection menu which will pormpt them fo a PIN numnber to unlock the token.
When the FEL terminal connects to a remote PA2xx device it will send a command to the terminal
to start the strong authenitcation process. This is done cryptologially and can only be access using
the soft token(s) defined in the database.
The Soft Token casn only be used with the FEL. It will not work with any other terminal or software.
11 Creating a Soft Token
11.1
Go to the “Client Devices” tab and click on
“Create soft token.
11.2
Enter a Soft Token name
11.3
Set a Pin Number ( a default is created that you
can change or keep)
11.4
Click OK to save the token.
11-9
CDI FEL MANUAL VER 2.0
12 Programming devices in the system
After the devices are configured in the FEL they will need to have the
configurations pushed to them.
The clients should be done first followed by all the remotes.
The devices can be configured locally via serial ports before deployment (stage
the devices), or they can be deployed and then programmed via remote, telco,
network or cellular.
12.1
Programing via local serial port
If programming via the local serial port make sure all devices are set for serial
port connection in the device menu’s.
12.2
Programming clients
Open the client screen and click program all. The system will now program each
client individually with the parameters in the window. Individual devices can be
programmed by highlighting the device and right clicking to the window
12.3
Programming remotes.
Open the devices window and click program all. The system will. Individual
devices can be programmed by highlighting the device and right clicking to the
window now program each remote individually with the parameters in the
window.
12-10
CDI FEL MANUAL VER 2.0
13 Reports
Any information gathered from the remote devices will be placed in the reports
window. This can be printed or exported.
13-11
CDI FEL MANUAL VER 2.0
14 Connecting to a remote device using the
Terminal
The primary day- to- day functionality of the FEL is to allow network engineers to
easily connect via SSH to all network devices on the edge points of the network.
If these edge point devices are inaccessible, then FEL allows the engineer to
utilize the CDI device for out-of-band encrypted access from the same set of
screens. This is what we call the “cockpit” view which allows full in band and out
of band connectivity from the same set of screens.
It is not required to use the FEL to connect to remote
devices. FEL just automates this process. Devices can be
contacted directly through terminal packages like “putty”. Client
devices can be reached via SSH or RAW TCP. These devices
can then be used to dialout to remote device using a standard
dumber terminal software package and following the menus from
the device.
15 Overview
The FEL allows network engineers to access a remote CDI device from the FEL
client software running on a network connected machine. The FEL client works
in conjunction with the FEL application server which in turn talks to the FEL SQL
database contained on the server.
The FEL can use CDI client encryptors to provide FIPS-140-2 validated security
to the remote devices. If FIPS 140-2 encryption is not required, the FEL can
provide strong two-factor authentication or 128 bit AES encryption with the
commercial versions of the products.
Each FEL user has defined roles which allows or blocks certain functions. For
instance a NOC engineer will typically be allowed access to remote device but
will not be able to view or modify security credential for those devices. A security
administrator will typically be able to view and modify security credentials but will
not have access to remote devices. A project manager may only be able to add
or delete devices from the database.
16 Terminal screen features
The terminal screen allows you to interface with CDI via telco/telnet/Cellular or
SSH.
16-12
CDI FEL MANUAL VER 2.0
17 Connecting to a remote device
This can be done in 2 different ways.
Goto the device menu and high the selected device.
Right click the device and select connect
Goto the terminal
Direct to device
Use Client for network dialout
Use client for network hardware encryption
window and select the device from the connect winow
Modem
Network
Serial
Cellular
Remote devices
Use client list (or select client individually), use
SSH or RAW TCP to client
Client list
Use these credential for automatic logon to device
You will get a screen preset for the connection setup of that device. You may
change the connection method by changing “select communication Type”. Once
you press “OK” you will be passed to the terminal screen and your keyboard will
be directly mapped to the connection.
The terminal will echo back all the commands being sent to the client device and
connection commands to the remote device. The terminal will automatically enter
17-13
CDI FEL MANUAL VER 2.0
IP addresses, phone numbers, and credentials (if checked) until the device is
handed off to the user for use.
The buttons at the top of the screen allow you to perform the following
operations:
Connect: Connect displays the Communication Center screen. In this screen
you select the communication method and the device to which you want to
connect.
Disconnect: Drops the connect between the device and the FEL computer.
Clear: Clears the terminal screen.
18 Connecting to a device
18-14
CDI FEL MANUAL VER 2.0
19 Communication Settings
Figure 19-1 Communication options for FEL and OBM
Select the Communication Type. The communication types
displayed depend on the device selected.
19.1
Modem:
This will use a standard modem either internal to the client
machine or connected to a serial port of the client machine.
19.2
Network:
Can be used in conjunction with the buttons below:
19-15
CDI FEL MANUAL VER 2.0
19.3
Direct:
Will be a direct network connection from the workstation
to the remote device w/wo SSH if checked/unchecked
19.4
Network Dialout:
Will use a network connected CDI client to dialout to a
remote device.
19.5
Network Tunnel:
Will use a CDI network connected client to establish a
hardware encrypted tunnel from the CDI client to the
remote device.
19.6
Serial:
Will use a local serial port on the workstation to connect to
the CDI device.
19.7
Cellular:
Can be used in conjunction with the buttons below.
19.8
Direct:
The FEL will use a direct network connection to establish
a TCP connection to the remote cellular device. The remote
cellular device has a TCP address for connection.
19.9
Network Tunnel:
The FEL will use a local CDI client to establish a secure
Network tunnel from the CDI client to the remote Cellular
device using a network TCP connection from the client to a
cellular TCP connection on the remote.
19.10
Cell to Cell Tunnel
The FEL will use a local cellular CDI client to establish a
secure cellular Network tunnel from the CDI client directly
to the remote Cellular device using the cellular radio in the
local device. Ie total cellular connection.
After you select the communication type and select the select the Device.
19-16
CDI FEL MANUAL VER 2.0
19.11 Modem Communications
(Does not match picture- where are these options?)
Inactivity Timeout: This value is defined in minutes. The default value is 0
(Disabled). When the value is set to greater than 0 minutes and there is no
activity (transmit and receive data) during the inactivity timeout period, the
session will be dropped (disconnected automatically).
Comms Devices: Select the modem that will be used for communication from
the drop down list.
Use Dial Options: Use the Dial Options that have been defined in System
Settings / Global System Settings tab.
The Modem Properties and Dialing Options that have been defined in System
Settings / Global System Settings will be used. If it is necessary to change the
modem properties, click Modem Communication Preferences.? (Modem
Properties) Click Dialing Properties to change dialing options.
19-17
CDI FEL MANUAL VER 2.0
19.11
Serial Communications
Serial communications allows the FEL to communicate to a device through the
com port.
Serial port: Select the com port through which the FEL will communicate with a
device.
Baud Rate: Allows you to change com port settings, such as baud rate and
handshaking.
Send AT Initialization Commands: This option is used for only Serial
communication type. This option sends (user) pre-defined AT commands to the
modem before the dialing process is initiated.
19.12
Network Communications
Use network Dialout Address List: The IP Dialout allows access to a modem
for Dialout purposes but first connects to the modem via a Network IP Address
(virtual modem port, e.g. Terminal Server).
Select the Communication mode from the list.
Direct: Connects directly to the selected device via the network (no client).
Network-Dialout – Uses a network connected client to “dialout” to a remote CDI
“modem enabled” device for OOB access.
19-18
CDI FEL MANUAL VER 2.0
Network Tunnel: - Uses a network connected client to establish a hardware
encrypted network tunnel with a remote CDI “network enabled” device. This will
provide hardware level AES encryption up to 256 bit.
The remote’s and client devices are now grouped in the connection list.
Select the Group to which the devices and client devices belong.
Select the device (upper pane).
Select a client device (lower pane).
19.13
SSH Communications:
If SSH is checked the communication to the local client will use SSH encryption.
If no client is used (DIRECT), the direct network connection will use SSH
encryption.
Refer to SSH section for detailed information about field entries.
19.14
Using a Soft Token
19.14.1 Select Connect to a device
19.14.2 Selct how you would like to connect to the remote
device.
In this example we are using a direct cellular connection to the remote
device.
19.14.3 Check the “Enable Soft Token” box
Enter the PIN Number to enable the token
19-19
CDI FEL MANUAL VER 2.0
When the device connects you will see the ?Client ID?
Prmpt. This will be responded to by the Soft Token in the
backround using cryptogsrphy to authenticae. If encryptin is
enable d the device will also go into AES 128 encryption mode.
The screen will trun red and you will be prompted for a
USER ID. If you have preselcted you USERID the terminal will
automaitcally enter it. Else enter your user ID andf log onto the
remote device securlty.
19-20
CDI FEL MANUAL VER 2.0
20
SYSTEM SETTINGS
The options of the Settings menu allow you to specify FEL system-wide settings
and to perform system wide functions.
20-21
CDI FEL MANUAL VER 2.0
21 Common Device Credentials
21.1
Client Device type:
Select from pull down. This will select a default client device
a=for all new client entries.
21.2
Remote Device Type:
Select from pull down. This will select the default remote
device for an y new device entries.
21.3
Device mode:
Select from pull down
21.4
System Password:
This password is used for FEL to program remote devices
along with an encryption key.
21.5
System Key:
An encryption key used to encrypt all management data from
the FEL to the remote device.
21.6
Modem AT commands:
Default AT commands that will be sent to all remote devices.
22 Common Network Settings:
22.1
Network Mask
Default netmask
22.2
Gateway
Default Gateway
22.3
Primary RADUIS/TACACS+ Address
This is the address that will be loaded in the CDI device for
RADIUS/TACAC+ authentication.
22.4
Secondary RADIUS/TACAS+ Address
This is the address that will be loaded in the CDI device for
RADIUS/TACAC+ authentication.
22.5
RADIUS TACACS+ Key
This is the key for the RADIUS/TACACS+ server.
22.6
Primary SNMP Address
This is the address that will be loaded in the CDI device for
SNMP alert messages.
22-22
CDI FEL MANUAL VER 2.0
22.7
Secondary SNMP Address
This is the address that will be loaded in the CDI device for
SNMP alert messages.
22.8
Primary Syslog address
This is the address that will be loaded in the CDI device for
Syslog messages.
22.9
Secondary Syslog address
This is the address that will be loaded in the CDI device for
Syslog messages.
23 Communications Methods
These are the default methods for access remote devices
23.1
Primary Communications
The primary method FEL will use to program a remote
device.
Modem – locally connected modem
Network – a direct network connection to the device.
Serial – a local connected serial port (normally used for staging device prior
to deployment)
Client (network Dialout) – A network connected client is used to dialout to
the remote device. The FEL will SSH/RAW TCP to the local client and select
dialout through the menus for telco access to the remote.
Cellular – FEL will use the address of the cellular module for access to the
device.
23.2
Secondary Communications
If the primary connection can not reach the device it will then
try the secondary method. An example would be to use
network for primary and network dialout for secondary.
23.3
Serial port (if used)
The COM port used for direct connection to the workstation
to program a CDI device. (typically used in staging devices
locally prior to deployment.
23-23
CDI FEL MANUAL VER 2.0
23-24
CDI FEL MANUAL VER 2.0
APPENDIX A Cabling Diagrams
Port Authority Master-Slave Cabling Diagrams
**For PA111, PA155, PA199 ONLY
The cable connection shows a Master Port Authority connected to two Port
Authority Slave units. The interconnecting cables, Part # CBL CAT5 Yellow, are
yellow to distinguish them from other cables can be obtained from CDI.
NOTE MAINT (Maintenance) port is changed to Serial Port (this is a running
change).
.
23-1