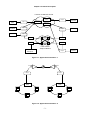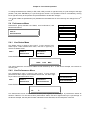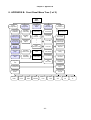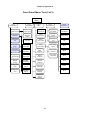
1
LOOP-T FT1 CSU/DSU MODEL 2500/ MODEL 500 (Stand Alone) USER'S MANUAL LOOP TELECOMMUNICATION INTERNATIONAL, INC. 8F, NO. 8, HSIN ANN RD. SCIENCE-BASED INDUSTRIAL PARK HSINCHU, TAIWAN Tel: +866-3-578-7696 Fax: +866-3-578-7695 2002 Loop Telecommunication International, Inc. All rights reserved. Loop-T is a trade mark of Loop Telecommunication International, Inc. Hayes is a trade mark of Hayes Microsystems. P/N: 51.FT100L.500 09/2002 Version 1.3 TABLE OF CONTENTS 1. PRODUCT DESCRIPTION...............................................................................................1 1.1 Description ..........................................................................................................1 1.2 Applications.........................................................................................................1 2. INSTALLATION .................................................................................................................4 2.1 Site Selection.......................................................................................................4 2.2 Mechanical and Electrical Installation ..............................................................5 2.2.1 Mechanical Installation.............................................................................5 2.2.2 Electrical Installation ................................................................................6 2.3 Configuration Setting .......................................................................................14 2.3.1 Hardware Configuration Setting .............................................................14 2.3.2 Software Configuration Setting ..............................................................14 3. OPERATION....................................................................................................................16 3.1 Quick Start for Loop-T FT1 CSU/DSU .............................................................16 3.1.1 Power On ...............................................................................................16 3.1.2 Return to Default Setting........................................................................16 3.1.3 Using Front Panel ..................................................................................16 3.1.4 Using Terminal.......................................................................................17 3.2 System Operation .............................................................................................17 3.2.1 Date........................................................................................................17 3.2.2 Master Clock ..........................................................................................17 3.2.3 Console Port ..........................................................................................18 3.2.4 Menu Lock .............................................................................................18 3.2.5 Logon, Logoff, and Password ................................................................18 3.2.6 Configuration..........................................................................................18 3.3 DS0 Channel Map..............................................................................................18 3.4 DS1 Network Line Configuration.....................................................................19 3.4.1 Frame Format Mode ..............................................................................19 3.4.2 Line Code Mode.....................................................................................19 3.4.3 Line Build Out.........................................................................................19 3.4.4 Yellow Alarm ..........................................................................................19 3.4.5 Inband Signaling ....................................................................................19 3.4.6 Address ..................................................................................................19 3.4.7 Idle Code................................................................................................20 3.5 DTE Configuration ............................................................................................20 3.5.1 Rate........................................................................................................20 3.5.2 Clock Polarity .........................................................................................20 3.5.3 Data Polarity...........................................................................................20 3.5.4 RTS ........................................................................................................20 3.5.5 TTM........................................................................................................20 3.5.6 Interface .................................................................................................20 3.5.7 V.54........................................................................................................21 3.6 Alarm and Reports ............................................................................................21 3.6.1 Alarms ....................................................................................................21 3.6.2 Report ....................................................................................................22 3.6.3 Requesting Report .................................................................................24 3.7 LED Operation ...................................................................................................24 3.8 Error Message ...................................................................................................25 3.9 Embedded SNMP Agent (Optional) .................................................................25 4. MAINTENANCE...............................................................................................................27 4.1 Self-Test .............................................................................................................27 4.2 Diagnostics........................................................................................................27 4.3 Near End Loopback ..........................................................................................27 -i- 4.3.1 Local Loopback ......................................................................................27 4.3.2 Line Loopback........................................................................................28 4.3.3 Payload Loopback..................................................................................28 4.3.4 DTE Port Loopback................................................................................28 4.4 Far End Loopback.............................................................................................28 4.4.1 Remote Line Loopback ..........................................................................29 4.4.2 Remote Payload Loopback ....................................................................29 4.4.3 Remote Channel Loopback ...................................................................29 4.4.4 V.54 Loopback .......................................................................................31 4.5 Test Pattern .......................................................................................................31 4.5.1 3-in-24 Pattern .......................................................................................31 4.5.2 1-in-8 Pattern .........................................................................................31 4.5.3 2-in-8 Pattern .........................................................................................31 4.5.4 1:1 Pattern..............................................................................................31 4.6 Verifying Loop-T Operations ...........................................................................32 4.6.1 Quick Test..............................................................................................32 4.6.2 Substitution ............................................................................................32 4.6.3 Using Loopback Plugs ...........................................................................32 4.6.4 Using Bert Test Set................................................................................33 5. FRONT PANEL OPERATION .........................................................................................34 5.1 Configuration Menu .........................................................................................34 5.1.1 DS0-Map Menu ......................................................................................35 5.1.2 Line Menu ..............................................................................................36 5.1.3 DTE-1 Menu...........................................................................................38 5.1.4 Master Clock Menu ................................................................................41 5.1.5 Save System Configuration Menu..........................................................42 5.1.6 Restore System Configuration Menu .....................................................42 5.1.7 Console Port Menu ................................................................................42 5.1.8 Date Menu..............................................................................................45 5.1.9 Time Menu .............................................................................................45 5.2 Diagnostics Menu ............................................................................................46 5.2.1 Near Loopback Menu.............................................................................46 5.2.2 DTE-1 Loopback Menu ..........................................................................46 5.2.3 Remote Loopback Menu........................................................................47 5.2.4 RemDTE Loopback Menu......................................................................47 5.2.5 RemV54 Loopback ................................................................................47 5.2.6 Testing Pattern Menu.............................................................................48 5.3 Alarm Menu........................................................................................................48 5.3.1 Alarm Queue Menu................................................................................48 5.3.2 Alarm History Menu................................................................................49 5.3.3 Alarm Clear Menu ..................................................................................49 5.3.4 Alarm Setup Menu .................................................................................49 5.4 Performance Menu............................................................................................51 5.4.1 Line Status Menu ...................................................................................51 5.4.2 Line Performance Menu.........................................................................51 5.4.3 Reset Performance Menu ......................................................................52 5.5 Miscellaneous Menu .........................................................................................52 5.5.1 Miscellaneous Menu ..............................................................................52 6. TERMINAL OPERATIONS..............................................................................................53 6.1 One Hour Performance Report ........................................................................54 6.2 Twenty Four Hour Performance Report..........................................................54 6.3 Line Availability Report ....................................................................................55 6.4 System Setup Report........................................................................................55 6.5 System Description Report ..............................................................................56 6.6 ESF Error Count Report ...................................................................................56 6.7 Alarm History Report ........................................................................................57 6.8 System Status Report.......................................................................................57 6.9 Alarm Queue Report .........................................................................................58 - ii - 6.10 Logoff .................................................................................................................58 6.11 V54 Setup...........................................................................................................58 6.12 Logon .................................................................................................................59 6.13 Loopback Test Menu ........................................................................................59 6.14 Alarm Setup Menu.............................................................................................60 6.15 Password Setup Menu......................................................................................60 6.16 Retrieve Last Stored Configuration ................................................................60 6.17 System Setup Menu ..........................................................................................61 6.18 Change Date and Time .....................................................................................61 6.19 Store Current Configuration ............................................................................61 6.20 Send Active DS0 Map to Far-end.....................................................................61 6.21 Synchronize Far-end System Time .................................................................62 6.22 Clear Alarms ......................................................................................................62 6.23 Clear ESF Error Count ......................................................................................62 6.24 Clear Performance Data ...................................................................................62 6.25 System Reset.....................................................................................................62 7. APPENDIX A: QRSS (QUASI-RANDOM SIGNAL SEQUENCE) ...................................63 8. APPENDIX B: FRONT PANEL MENU TREE (1 OF 2)..................................................64 9. APPENDIX C: GLOSSARY OF ABBREVIATIONS .......................................................66 10. APPENDIX D ...............................................................................................................67 - iii - FIGURES Figure 1.1 Application Illustration -1 ------------------------------------------------------------------ 2 Figure 1.2 Application Illustration -2 ------------------------------------------------------------------ 2 Figure 1.3 Application Illustration -3 ------------------------------------------------------------------ 3 Figure 1.4 Application Illustration -4 ------------------------------------------------------------------ 3 Figure 3.1 SNMP Connection ---------------------------------------------------------------------------25 Figure 4.1 Loopback Block Diagram ------------------------------------------------------------------28 Figure 5.1 Loop-T FT1 CSU/DSU Front Panel ------------------------------------------------------34 TABLES Table 1- 1 Loop-T FT1 CSU/DSU Product Family ----------------------------------------------- 1 Table 2- 1 RJ11 Console Port-------------------------------------------------------------------------- 6 Table 2- 2 RJ11 to DB25P (Male) Conversion Cable ------------------------------------------- 6 Table 2- 3 RJ11 to DB9S (Female) Conversion Cable------------------------------------------ 6 Table 2- 4 RJ48CC Line Connector ------------------------------------------------------------------ 7 Table 2- 5 V.35/M34 DTE Port Pin Definition ------------------------------------------------------ 8 Table 2- 6 V.35/DB25 DTE Port Pin Definition ---------------------------------------------------- 9 Table 2- 7 EIA530/DB25 DTE Port Pin Definition -----------------------------------------------10 Table 2- 8 X.21/DB15 DTE Port Pin Definition ---------------------------------------------------11 Table 2- 9 RS232/DB25 DTE Port Pin Definition ------------------------------------------------12 Table 2- 10 RS449/DB37 DTE Port Pin Definition----------------------------------------------13 Table 2- 11 Default Software Configuration -----------------------------------------------------15 Table 3 - 1 Console Port Default Setting ----------------------------------------------------------18 Table 3 - 2 T1 Line Default Setting ------------------------------------------------------------------20 Table 3 - 3 DTE Port Default Setting ---------------------------------------------------------------21 Table 3 - 4 Alarm Type Table--------------------------------------------------------------------------22 Table 3 - 5 Performance Parameter List-----------------------------------------------------------23 Table 3 - 6 Performance Report Options----------------------------------------------------------23 Table 3 - 7 Front-Panel LED Table ------------------------------------------------------------------24 Table 3 - 8 Error Message Table ---------------------------------------------------------------------25 Table 4 - 1 In-band Control Codeword-------------------------------------------------------------29 Table 4 - 2 AT&T ESF Data-Link Codeword ------------------------------------------------------29 Table 4 - 3 ANSI T1.403 Bit-Oriented ESF Data-Link Codeword ---------------------------29 Table 4 - 4 Remote Channel Loopback Activate Request Message----------------------30 Table 4 - 5 Remote Channel Loopback Activate Response Message -------------------30 Table 4 - 6 Remote Channel Loopback Deactivate Request Message ------------------30 Table 4 - 7 Remote Channel Loopback Deactivate Response Message ----------------30 - iv - _______________________ FCC Requirements, Part 15 ________________________ This equipment has been tested and found to comply with the limits for a Class A digital device pursuant to Part 15 of the FCC Rules. These limits are designed to provide reasonable protection against harmful interference when the equipment is operated in a commercial environment. This equipment generates, uses, and can radiate radio frequency energy and if not installed and used in accordance with the instruction manual may cause harmful interference to radio communications. Operation of this equipment in a residential area is likely to cause harmful interference, in which case the user will be required to correct the interference at the user's own expense. -v- _________________________ FCC Requirements, Part 68 _________________________ This equipment complies with Part 68 of the FCC rules. On the bottom cover of this equipment is a label that contains, among other information, the FCC registration number and ringer equivalence number (REN) is not used for this digital equipment. If requested, this information must be provided to the telephone company. Loop-T FT1 CSU/DSU registration number and REN is as follows: FCC 68 Registration Number:2PUTAI-30893-DE-N REN: 0.0B FACILITY INTERFACE CODE FOR DIGITAL SERVICES CODE 04DU9-BN 04DU9-DN 04DU9-1KN 04DU9-1SN DESCRIPTION 1.544 Mbps Superframe Format (SF) without line power. 1.544 Mbps SF and B8ZS without line power. 1.544 Mbps ANSI ESF without line power. 1.544 Mbps ANSI ESF and B8ZS without line power. SERVICE ORDER CODES FOR DIGITAL SERVICES CODE 6.0N DESCRIPTION Does not provide billing and encoded analog protection. Uses either an integrated or external CSU. Affidavit to telco is required. Loop-T FT1 CSU/DSU connect to the network using a RJ48CC connector. If this equipment cause harm to telephone network, the telephone company will notify you in advance that temporary discontinuance of service may be required. If advance notice isn't practical, the telephone company will notify the customer as soon as possible. Also, you will be advised of your right to file a compliant with the FCC if you believe it is necessary. The telephone company may make changes in it's facilities, equipment, operations, or procedures that could affect the operation of the equipment. If this happens, the telephone company will provide advance notice in order for you to make the necessary modifications in order to maintain uninterrupted service. - vi - Normally, this equipment will be used in conjunction with FCC registered equipment that limits the Encoded Analog Content and provides the required Billing Protection. If the connected equipment is not of this type, an affidavit must be supplied to the telephone company where the network connection is to be made. The affidavit is to be notarized, and is to be filed at least ten days before the initial connection. An affidavit, which the customer is required to fill out, is included at the end of this practice. If trouble is experienced with this equipment, please contact Loop Telecommunication America Service Facility for repair and warranty information. If the trouble is causing harm to the telephone network, the telephone company may request you remove the equipment from the network until the problem is resolved. All repairs should be handled by authorized Loop Telecommunication Service Personnel. Service can be facilitated through our office at: Loop Telecommunication International 8 Carrick Road Palm Beach Gardens, FL 33418 U.S.A. (Tel ) 561-627-7947 (Fax) 561-627-6615 This equipment cannot be used on telephone company-provided coin service. Connection to Party Line Service is subject to state tariffs. - vii - _________________________ Safety Requirements _________________________ CAUTION: • Never install telephone wiring during a lightning storm. • Never install telephone jacks in wet locations unless the jack is specifically designed for wet locations. • Never touch un-insulated telephone wires or terminals unless the telephone line has been disconnected at the network interface. • Use caution when installing or modifying telephone lines. Refer to the installation chapter in this manual for a safe and proper installation procedure. All wiring external to this equipment should follow the current provision of the National Electrical Code. _______________________________________ National Electrical Code Requirements _______________________________________ The Loop-T FT1 CSU/DSU including this equipment, is ETL certified, and is in compliance with UL 1459. The ETL control number for Loop-T FT1 CSU/DSU is 75425. - viii - ___________________________ DOC CS-03 Requirements ____________________________ NOTICE: The Canadian Department of Communications label identifies certified equipment. This certification means that the equipment meets certain telecommunications network protective, operational and safety requirements. The Department does not guarantee the equipment will operate to the user's satisfaction. Before installing this equipment, user should ensure that it is permissible to be connected to the facilities of the local telecommunications company. The equipment must also be installed using an acceptable method of connection. In some cases, the company's inside wiring associated with a single line individual service may be extended by means of a certified connector assembly (telephone extension cord). The customer should be aware that compliance with the above conditions may not prevent degradation of service in some situations. Repairs to certified equipment should be made by an authorized Canadian maintenance facility designated by the supplier. Any repairs or alternations made by the user to this equipment, or equipment malfunctions, may give the telecommunications company cause to request the user to disconnect the equipment. User should ensure for their own protection that the electrical ground connections of the power utility, telephone lines and internal metallic water pipe system, if present, are connected together. This precaution may be particularly important in rural areas. Caution: User should not attempt to make such connections themselves, but should contact the appropriate electric inspection authority, or electrician, as appropriate. The Load Number (LN) assigned to each terminal device denotes the percentage of the total load to be connected to a telephone loop which is used by the device, to prevent overloading. The termination on a loop may consist of any combination of devices subject only to the requirement that the total of the Load Number of all the devices does not exceed 100. - ix - ________________________ CSA 22.2 Requirements _________________________ The Loop-T FT1 CSU/DSU including this equipment, is ETL certified, and is in compliance with CSA std 22.2 No. 225. The ETL control number for Loop-T FT1 CSU/DSU is 75425. _________________________ Standard Lists _________________________ Loop-T FT1 is designed to meet the following standards: • AT&T TR 54016 Requirements for interfacing digital terminal equipment to services employing the extended superframe format. • AT&T TR 54019 International ACCUNET digital services description and network interface specifications. • AT&T TR 54019A Addendum to TR54019. • AT&T TR 62411 specification. • ANSI T1.403-1989 Carrier to customer installation - DS1 metallic interface. • ITU-T V.35, ISO 2593, EIA RS449, ISO 4902 ACCUNETT1.5 -x- service description and interface Chapter 1 Product Description 1. PRODUCT DESCRIPTION 1.1 Description Loop-T FT1 is a family of intelligent Fractional T1 Channel Service Unit and Data Service Unit (CSU/DSU) products as shown in Table 1.1. This product family provides DS-1 network interface, DS0 channel multiplexing, and direct connections to data, and video DTE (Data Terminal Equipment). This manual applies only to the Stand-Alone model. Table 1 - 1 Loop-T FT1 CSU/DSU Product Family Model NI (Network Interface) Physical DTE Port 2500-S 500-S (Old Model No.) DS-1 Stand-Alone V.35 / M34 V.35 / DB25 EIA530 / DB25 X.21 / DB15 RS232 / DB25 RS449 / DB37 2500-R 500-R (Old Model No.) DS-1 Rack-Mount Same as above Loop-T FT1 CSU/DSU can be configured via a front panel interface, local terminal (RS-232) control, or through the use of a Simplified Network Management Protocol (SNMP) management system. 1.2 Applications The Loop-T FT1 CSU/DSU application example is illustrated in FIGURE 1.1. Via DACS (Digital Access Cross-Connect System), the Loop-T interfaces various applications such as LAN (Local Area Network) to WAN (Wide Area Network) communications, Host to workstation communications, video conferencing, and data communication. (The user can apply integrate different data applications into a single communication link and utilizing only part of the available bandwidth). Furthermore, this allows the user to expand bandwidth, up to 24 DS0 channels, on demand without additional physical links because they are already available. Data and video applications may include equipment such as video conferencing, bridge, router, gateway, workstation, host computer, and various high-speed data terminal equipment. FIGURE 1.2 to FIGURE 1.4 illustrates some of these applications. -1- Chapter 1 Product Description Fractional T1 Network & Services Bridge/ Router Loop-T Video Conference Loop-T CAD/ CAM Loop-T Digital CrossConnect Digital CrossConnect Loop-T Video Conference Loop-T CAD/ CAM Digital CrossConnect Modem Modem Modem Modem Public switched Telephone Network Loop-T Network Management Loop-T Figure 1.1 Application Illustration -1 T1 T1 Loop-T Loop-T Bridge/ Router Bridge/ Router Figure 1.2 Application Illustration -2 -2- Front End Processor Chapter 1 Product Description T1 Loop-T Loop-T Bridge/ Router Bridge/ Router Figure 1.3 Application Illustration -3 T1 Loop-T Loop-T HOST COMPUTER CLUSTER CONTROLLER Figure 1.4 Application Illustration -4 -3- Chapter 2 Installation 2. INSTALLATION CAUTION: • Never install telephone wiring during a lightning storm. • Never install telephone jacks in wet locations unless the jack is specifically designed for wet locations. • Never touch un-insulated telephone wires or terminals unless the telephone line has been disconnected at the network interface. • Use caution when installing or modifying telephone lines. 2.1 Site Selection The following are guidelines for site selection. These guidelines must be followed to ensure a proper installation site. • The installation site should have an AC power receptacle. • The following are the maximum suggested cable lengths: 1. V.35 2. RS449 3. RS232 4. EIA530 5. X.21 200 Feet 200 Feet 50 Feet 200 Feet 200 Feet NOTE: If longer distance is desirable, a lower than maximum speed with proper cabling and grounding is advisable. For more information, please contact Loop Service Representative. • The installation site should provide space for adequate ventilation and cable routing. Reserve at least 5 inches at the rear of the unit for cables and air flow. • The site should provide a stable environment. The operating area should be clean and free from extremes of temperature, humidity, shock, and vibration. • Relatively humidity should stay between 0 and 95%. Do not operate the unit at an altitude greater than 10,000 feet. -4- Chapter 2 Installation 2.2 Mechanical and Electrical Installation 2.2.1 Mechanical Installation Figure 2.1 Loop-T FT1 CSU/DSU Front Panel View Figure 2.2 Loop-T CSU/DSU Rear Panel - Three versions shown Loop-T FT1 CSU/DSU is a desk top unit. Loop-T FT1 CSU/DSU desk-top unit is stackable. The front panel is shown in Figure 2.1, and the rear panel is shown in Figure 2.2. -5- Chapter 2 Installation 2.2.2 Electrical Installation Loop-T FT1 CSU/DSU Stand-Alone version is AC powered. Use the far right power connector to connect to an AC power outlet. Console port can be connected via RJ11 interface. For this interface, the Loop-T FT1 CSU/DSU is configured as a DTE using the supplied conversion cable. A modem or a null modem is used to connect to a VT-100 terminal. Pin definition and pin connection are listed in the following tables. Table 2- 1 RJ11 Console Port Pin Number 1 2 3 4 5 6 Signal Source Unassigned Data Carrier Detect Transmit Data Receive Data Signal Ground Data Terminal Ready DCE DTE DCE DTE Table 2- 2 RJ11 to DB25P (Male) Conversion Cable RJ11 Connector Pin Number DB25 Connector Pin Number 1 2 3 4 5 6 -8 2 3 7 20 Note: The following pins on the DB25P should be paired (connected) together: Pin 4 (RTS) to Pin 5 (CTS). Table 2- 3 RJ11 to DB9S (Female) Conversion Cable RJ11 Connector Pin Number 1 2 3 4 5 6 DB9S Connector Pin Number 2 3 5 - Note: On the RJ11 side, Pin 6 (DTR) and Pin 2 (DCD) are connected. On the DB9 side, Pin 1 (DCD), Pin 4 (DTR), and Pin 6 (DSR) are tied, Pin 7 (RTS) and Pin 8 (CTS) are tied. NOTE: Pin 4 (RTS) and Pin 5 (CTS) of DB25 are connected. Network connection is supported by RJ48C connector. The line interface is labeled with LINE. Connector pin definition is listed in Table 2.4. -6- Chapter 2 Installation Table 2- 4 RJ48CC Line Connector Pin Number 1 2 3 4 5 6 7 8 Signal Receive Ring Receive Tip Unassigned Transmit Ring Transmit Tip Unassigned Shield Ground Shield Ground Signal Direction From DS1 Network From DS1 Network To DS1 Network To DS1 Network The DTE port is configured as a DCE device. There are 6 different DTE boards: V.35/M34, V.35/DB25, EIA530/DB25, X.21/DB15, RS232/DB25, and RS449/DB37. Pin definitions are defined in the following tables. -7- Chapter 2 Installation Table 2- 5 V.35/M34 DTE Port Pin Definition Pin Number A B C D E F H J K L M N P R S T U V W X Y Z AA BB CC DD EE FF HH JJ KK LL MM NN Signal Source Cable Shield Signal Ground Request To Send Clear To Send Data Set Ready Data Carrier Detect Data Terminal Ready Unassigned Unassigned Local Loopback Unassigned Remote Loopback Transmit Data Receive Data Transmit Data Return Receive Data Return External Clock Receive Clock External Clock Return Receive Clock Return Transmit Clock Unassigned Transmit Clock Return Unassigned Unassigned Unassigned Unassigned Unassigned Unassigned Unassigned Unassigned Unassigned Unassigned Test Mode DTE DCE DCE DCE DTE DTE DTE DTE DCE DTE DCE DTE DCE DTE DCE DCE DCE DCE -8- Chapter 2 Installation Table 2- 6 V.35/DB25 DTE Port Pin Definition Pin Number 1 2 3 4 5 6 7 8 9 10 11 12 13 14 15 16 17 18 19 20 21 22 23 24 25 Signal Source Cable Shield Transmit Data Receive Data Request To Send Clear To Send Data Set Ready Signal Ground Data Carrier Detect Receive Clock Return Unassigned External Clock Return Transmit Clock Return Unassigned Transmit Data Return Transmit Clock Receive Data Return Receive Clock Local Loopback Unassigned Data Terminal Ready Remote Loopback Unassigned Unassigned External Clock Test Mode DTE DCE DTE DCE DCE DCE DCE DTE DCE DTE DCE DCE DCE DTE DTE DTE DTE DCE -9- Chapter 2 Installation Table 2- 7 EIA530/DB25 DTE Port Pin Definition Pin Number 1 2 3 4 5 6 7 8 9 10 11 12 13 14 15 16 17 18 19 20 21 22 23 24 25 Signal Source Cable Shield Transmit Data Receive Data Request To Send Clear To Send Data Set Ready Signal Ground Data Carrier Detect Receive Clock Return Data Carrier Detect Return External Clock Return Transmit Clock Return Clear To Send Return Transmit Data Return Transmit Clock Receive Data Return Receive Clock Local Loopback Request To Send Return Data Terminal Ready Remote Loopback Data Set Ready Return Data Terminal Ready Return External Clock Test Mode - 10 - DTE DCE DTE DCE DCE DCE DCE DCE DTE DCE DCE DTE DCE DCE DCE DTE DTE DTE DTE DCE DTE DTE DCE Chapter 2 Installation Table 2- 8 X.21/DB15 DTE Port Pin Definition Pin Number 1 2 3 4 5 6 7 8 9 10 11 12 13 14 15 Signal Source Cable Shield Transmit Data Control Receive Data Indication Signal Timing External Clock Signal Ground Transmit Data Return Control Return Receive Data Return Indication Return Signal Timing Return External Clock Return Unassigned DTE DTE DCE DCE DCE DTE DTE DTE DCE DCE DCE DTE - 11 - Chapter 2 Installation Table 2- 9 RS232/DB25 DTE Port Pin Definition Pin Number 1 2 3 4 5 6 7 8 9 10 11 12 13 14 15 16 17 18 19 20 21 22 23 24 25 Signal Source Cable Shield Transmit Data Receive Data Request To Send Clear To Send Data Set Ready Signal Ground Data Carrier Detect Unassigned Unassigned Unassigned Unassigned Unassigned Unassigned Transmit Clock Unassigned Receive Clock Local Loopback Unassigned Data Terminal Ready Remote Loopback Unassigned Unassigned External Clock Test Mode DTE DCE DTE DCE DCE DCE DCE DCE DTE DTE DTE DTE DCE - 12 - Chapter 2 Installation Table 2- 10 RS449/DB37 DTE Port Pin Definition Pin Number 1 2 3 4 5 6 7 8 9 10 11 12 13 14 15 16 17 18 19 20 21 22 23 24 25 26 27 28 29 30 31 32 33 34 35 36 37 Signal Source Cable Shield Unassigned Unassigned Transmit Data Transmit Clock Receive Data Request To Send Receive Clock Clear To Send Local Loopback Data Set Ready Data Terminal Ready Data Carrier Detect Remote Loopback Unassigned Unassigned External Clock Test Mode Signal Ground Unassigned Unassigned Transmit Data Return Transmit Clock Return Receive Data Return Request To Send Return Receive Clock Return Clear To Send Return Unassigned Data Set Ready Return Data Terminal Ready Return Data Carrier Detect Return Unassigned Unassigned Unassigned External Clock Return Unassigned Unassigned - 13 - DTE DCE DCE DTE DCE DCE DTE DCE DTE DCE DTE DTE DCE DTE DCE DCE DTE DCE DCE DCE DTE DCE DTE Chapter 2 Installation 2.3 Configuration Setting 2.3.1 Hardware Configuration Setting All configurations are software programmable. No DIP switches are available. Users should not need to open the case for modifications. 2.3.2 Software Configuration Setting There are three system configurations: ! Factory default ! Current working ! User-stored Factory default configurations are not changeable. Each Loop-T FT1 CSU/DSU is shipped with all three configurations set to the factory default configuration. The current working configuration can be changed at any time. The system automatically stores the current working configuration into nonvolatile memory. When the system is turned off and then turned back on again, the previous working configuration is retrieved as the current working configuration. The current working configuration may also be saved into nonvolatile memory as a user-stored configuration. The user-stored configuration may be retrieved at any time. Retrieving the user-stored configuration overwrites the current working configuration. The user can view the stored configuration in the System Setup Report [C] before retrieving it. The following steps can be used to restore the factory default configuration: 1. Press the ESC key during power-up. 2. Press ENTER while SELF TEST is being displayed on the front panel 3. Verify that LOAD DEFAULT CONFIGURATION is being displayed on the front panel to indicate that the operation was successful. - 14 - Chapter 2 Installation Table 2- 11 Default Software Configuration Console Port Default Baud Rate Data Bit Stop Bit Parity Bit XON-XOFF Interface 9600 8 1 NONE OFF TERMINAL T1 Line Item Frame Format Mode Line Code Mode Line Build Out Yellow Alarm Inband Signaling TABS Address Idle Code DTE Port Rate Clock Data RTS TTM V54 RL LL Active Map MAP1 MAP2 Switch MAP1: MAP2: Master Clock 2nd Clock Password lock Alarm Threshold Alarm Enable Alarm Dial-out BPV, Line ES, Line UAS, Line CS, Line Dial Out Primary Dial String Start Time Stop Time Secondary Dial String Start Time Stop Time Inactivity Time-out Password Device Name Default ESF & T1.403 B8ZS 0 dB ON ON CSU FF Default 64KxN NORMAL NORMAL PERMANENT OFF OFF OFF OFF Default all idle all idle (00:00 - 12:00) (12:00 - 00:00) Line Clock Line Clock Disable Default Disable Disable 10E- 5 1 1 1 Default ATDT 08:00 07:59 ATDT 08:00 07:59 0 Minutes LOOP LOOP-T-01 - 15 - Chapter 3 Operation 3. OPERATION This chapter describes the Loop-T FT1 CSU/DSU configuration options and operational functions. User should refer to CHAPTER 5: FRONT PANEL OPERATION and CHAPTER 6: TERMINAL OPERATION for detailed operational procedures. 3.1 Quick Start for Loop-T FT1 CSU/DSU After installation, the user may want to familiarize with the equipment immediately. The following abbreviated instructions will give the user a quick start. 3.1.1 Power On Turn power on by attaching power cable at the rear of the unit and then push ON/OFF switch. On the LCD, unit will first display SELF TEST followed by the main menu. 3.1.2 Return to Default Setting The unit is shipped with factory default setting. To restore the factory default configuration, press and hold the ESC key during power up, until the display of “TESTING” changes to “TESTING PASS 108”, then press ENTER. 3.1.3 Using Front Panel To use the front panel to configure the unit, use the four keys to the right of the LCD. The menu is tree structured, with the main menu at the root of the tree. The ESC key brings the user towards to root. The ENTER key is used (a) to descend to branches of the menu, or (b) to confirm a selection. The left and right arrow keys is used to move the selection left or right. 3.1.3.1 Review of Default Settings All the default settings can be reviewed or changed. This is done by selecting the menu item. Either a submenu is shown or the selected setting is indicated with an asterisk. 3.1.3.2 Line After power up, the main menu is set to configuration. Press ENTER to go to sub-menus. Use arrow keys to select LINE. Then press ENTER. Under LINE, further sub-menus can be selected. For each sub-menu, the default LINE parameters are shown. The actual settings are shown for each parameter, which can be changed by arrow keys. To change the settings, use ENTER key to select the parameter, use arrow key to select the new setting, and then press ENTER again. If ESC is pressed before ENTER, the setting will not be changed. 3.1.3.3 DTE To review or change DTE settings, use arrow keys to display DTE. Then press ENTER. The default DTE parameters are shown. The actual settings are shown for each parameter, which can be selected by arrow keys. To change the settings, use ENTER key to select the parameter, use arrow key to select the new setting, and then press ENTER again. If ESC is pressed before ENTER, the setting will not be changed. 3.1.3.4 Map Setup To review or change MAP settings, use arrow keys to display DS0-MAP. Then press ENTER. The current active map is indicated. To review or change MAP1 settings, use arrow keys to move cursor to MAP1. Then press ENTER. The current active map is indicated. To change the settings, use ENTER key to select MAP1, use arrow key to select the DS0 channel number for new assignment, and then press ENTER again. Then select IDLE, DTE, etc., for the new channel assignment. Press ENTER. If ESC is pressed before ENTER, the setting will not be changed. - 16 - Chapter 3 Operation 3.1.4 Using Terminal To use the RS232 interface to configure the unit, connect a VT100 terminal to the RS232 connector using a null modem” cable. The VT100 terminal can be a PC running a VT100 emulator software. The unit is configured as a DTE. Thus a null modem is needed for direct connection to a VT100. Upon connection, press ENTER and ESC alternately to bring the main menu into view. Press O (Log On) to see the full menu. Press S (System Setup) to review or change the configuration. 3.1.4.1 Review of Default Settings The entire configuration is shown when S is pressed. To change any setting, use the arrow keys to move to the target setting. Then press the TAB key repeatedly to cycle to the desired setting for any selected parameter. 3.1.4.2 Line Use arrow keys to move cursor to the target LINE parameter. Then use TAB key to change the parameter setting. When satisfied, press ESC. Confirm with Y (yes). 3.1.4.3 DTE Use arrow keys to move cursor to the target DTE parameter. Then use TAB key to change the parameter setting. When satisfied, press ESC. Confirm with Y (yes). 3.1.4.4 Map Setup Use arrow keys to move cursor to the target MAP parameter. Then use TAB key to change the parameter setting. When satisfied, press ESC. Confirm with Y (yes). 3.2 System Operation 3.2.1 Date This product is equipped with a RTC (Real Time Clock). User can change the current date and time as necessary. The RTC is activated by the manufacturer before shipping. This is to save RTC battery life. The RTC battery has a 10 years power off life cycle. 3.2.2 Master Clock This product has a system clock PLL (Phase Lock Loop) which may be phase locked to the T1 line clock, DTE clock, or internal clock. The T1 line clock and internal clock are all 1.544 Mbps. The DTE clock is either 56KxN or 64KxN bps (N is 1 to 24) as per the DTE rate configuration. The default master and 2nd clock source are the T1 line clock. When the master clock source is lost, the system will automatically switch to the 2nd clock source. This is to provide an alternative clock source when the primary clock source is lost. The current active clock source is shown by the LCD "MCLK"” command and terminal "S" and "C" commands. NOTE: If a 2nd clock source is not available, the user MUST set the 2nd clock source and master clock source to the same value. If the 2nd clock source is lost as well, Loop-T FT1 will automatically switch to the internal clock source. Loop-T FT1 will automatically switch back to the 2nd clock source when it returns. When the master clock source returns, the CSU/DSU may or may not return to the master clock source, depending on the master clock source. If the master clock source is LINE or DTE, the CSU/DSU returns to the master clock source one minute after the master clock is recovered. If the master clock source is any other source, the CSU/DSU does not return to the master clock, but instead remains with the 2nd clock source, or free-runs at its internal clock rate if the 2nd clock source is not present. In order to switch back to - 17 - Chapter 3 Operation the master clock source, the clock must be reselected as the master clock source via the front panel MCLK command or the terminal [S] command. 3.2.3 Console Port The console port allows the user either to use a local VT-100 terminal via null-modem connection or use a remote VT-100 terminal via modem for system configuration, diagnostics, polling status reports, etc.. The console port must be set to a proper operational mode. If necessary, the user must use the Front Panel to set up the console port to use either a local or a remote terminal. The console port baud, data bit length, stop bit length, parity bit length, XON-XOFF flow control, and interface type set as shown in TABLE 3.1. Table 3 - 1 Console Port Default Setting Item Baud Data Bit Stop Bit Parity Bit XON-XOFF Interface Options 9600, 38400,19200, 2400, 1200 8, 7 bit per byte 2, 1 bit NONE, EVEN, ODD ON, OFF TERMINAL, MODEM, SNMP-SLIP Default 9600 8 1 NONE OFF TERMINAL NOTE: For optimum operation, T2500 & async server should be set to 9600. 3.2.4 Menu Lock The LCD front panel and terminal are used to read alarms, system configurations, and system status. The also can be used to change system configurations and clear the alarm queue, etc.. By enabling the menulock, only read operations are allowed. Modifications to the current status are not allowed. Users may not change system configurations or clear performance data. • Password and menu-lock options are disabled by default. • The default terminal access password is LOOP”. 3.2.5 Logon, Logoff, and Password Logoff prevents system configuration changes at the terminal, while logon allows system configuration changes. The password feature is used to augment lock control against unauthorized terminal users. With password enabled, logon requires entering the correct password. If password is disabled, no password is required to logon. • The default option of the password is disabled. 3.2.6 Configuration User can save the current configurations onto a non-volatile memory. This allows user to retrieve the last stored configuration. 3.3 DS0 Channel Map DS0 channel multiplexing is done by the DS0-MAP command. A map contains 24 DS0 channels where a single DS0 channel can be assigned to any one of the DTE ports. An idle code is transmitted on all unused channels. Two maps are available to store different DS0 channel assignments: MAP1 and MAP2. • The default active map is MAP1. • The default DS0 channel assignment of both MAP1 and MAP2 is idle channel. - 18 - Chapter 3 Operation When two CSU/DSU units are used in an end-to-end application, there are two ways to configure both units to use the same DS0 channel assignment. One way is to send the current active map from the local CSU/DSU to the remote unit using the SEND command. Another way is to set up the local CSU/DSU to automatically alternate between the two DS0 channel assignments (MAP1 and MAP2). The latter method allows, for example, one channel map to be used during business hours and another map to be used after business hours. To configure the local CSU/DSU to automatically switch between the two maps, first set the SWITCH time. Next, select SWITCH as the active DS0 map. The current map associated with the SWITCH time is shown at the local CSU/DSU and sent to the remote CSU/DSU. NOTE: For DS1 network interface with B8ZS coding or all DTE port with all 24 channels are available for DS0 multiplexing configuration. 56KxN bps, NOTE: For DS1 network interface with AMI coding and DTE port with 64KxN bps, only alternate odd or even DS0 channels should be used. This is required to guarantee one's density requirement. 3.4 DS1 Network Line Configuration A detailed option list of T1 line configuration is in Table 3.2. The following paragraph will describe each item. 3.4.1 Frame Format Mode This equipment can be used in T1/D4 and ESF frame format DS1 network interface. In ESF frame format mode, user can choose either AT&T or ANSI facility data link protocol. ESF & T1.403 chooses ANSI ESF data link protocol and one second performance report will be sent to the network every second automatically. Also, ANSI and AT&T data link message is acceptable in ANSI ESF frame format mode. However, AT&T ESF frame format mode only accept AT&T ESF data link protocol. 3.4.2 Line Code Mode This equipment can be used in AMI (Alternate Mark Inverting) and B8ZS (Bipolar 8 Zero Substitution) line code format. 3.4.3 Line Build Out The T1 line long haul transmit LBO can be programmed to either 0 dB, -7.5 dB, or -15 dB relative to DSX-1. NOTE: For better performance in short-haul cases, such as a T1 line used on a test bench or within the same building, use -15 dB or -7.5 dB LBO setting. 3.4.4 Yellow Alarm The Loop-T FT1 transmits a yellow alarm when LOS (Loss of Signal) is detected, AIS (Alarm Indication Signal) is detected, or OOF (Out of Frame) is detected for 2.5 ± 0.5 seconds. Users can disable this feature via the disable yellow alarm command. 3.4.5 Inband Signaling In T1/D4 framing format and ESF, (both ESF and ESF & T1.403), an inband loopback code recognition is used to activate remote loopback operation. 3.4.6 Address In T1/ESF framing format, TABS operation requires an address of either CSU (Channel Service Unit) or TE (Terminal Equipment) identification. - 19 - Chapter 3 Operation 3.4.7 Idle Code Any DS0 channel, which is not assigned to a DTE port, is an idle channel. An idle code is transmitted on idle DS0 channels. Users may program the idle channel to any bit pattern from 00H to FFH. NOTE: Due to ones-density requirement, it is advised that idle code to be set as FFH. Or, user must program idle code to contain at least two bits of '1'. The factory default idle code is FFH. Table 3 - 2 T1 Line Default Setting Item Frame Format Mode Line Code Mode Line Build Out Yellow Alarm Inband Signaling Address Idle Code Options D4, ESF , ESF&T1.403 AMI, B8ZS 0, -7.5, -15 dB ON, OFF ON, OFF CSU, TE 00 - FF Default ESF & T1.403 B8ZS 0 dB ON ON CSU FF 3.5 DTE Configuration This product is equipped with one DTE port. A detailed option list of DTE configuration is in Table 3.3, and the following paragraph will describe each item. 3.5.1 Rate DTE port can operate at 56KxN or 64KxN bps, (N is 1 to 24). Use Rate command to select 56K or 64K. Use DS0 MAP command to select number of DS0 channels that the DTE port is going to occupy. 3.5.2 Clock Polarity Clock polarity of DTE port is either normal or inverted and is used to drive the transmit data and to sample the receive data. 3.5.3 Data Polarity Data polarity of DTE port is either normal or inverted which is used as positive logic or negative logic. 3.5.4 RTS DTE facility can use RTS (Request To Send) to control transmission. When RTS is "ACTIVE" and in OFF state, all ones are sent to the T1 line side on the DTE port associated with the DS0 channels. When RTS is "PERMANENT", RTS signal is ignored and forced ON permanently. 3.5.5 TTM In a normal operating mode, The CSU/DSU uses the transmit clock (from CSU/DSU) to sample the transmit data sent from the DTE. In the Terminal Timing Mode (TTM), the CSU/DSU uses the external clock from the DTE to sample the transmit data. This avoids data reception problems due to phase delay caused by long cables. If the DTE cable is too long, the transmit data, after traversing the cable, may not be in-phase with the transmit clock. By using this feature the transmit data will be in phase with the sampling clock, which in this case will be the external clock from the DTE. Note that the “external clock” from the DTE can also be used as the CSU/DSU system clock. This choice is independent of the TTM option. See the section on Master Clock for details. 3.5.6 Interface The DTE port interface type can be either V.35, RS449, RS232, EIA530, and X.21. User must specify the proper interface type when ordering. The user can read the interface type from LCD or terminal. - 20 - Chapter 3 Operation Table 3 - 3 DTE Port Default Setting Item Rate Clock Data RTS TTM Options Default 56K, 64KxN (N=1 ~ 24) NORMAL, INVERTED NORMAL, INVERTED ACTIVE, PERMANENT ON, OFF 64KxN NORMAL NORMAL PERMANENT OFF 3.5.7 V.54 Remote channel loopback can be activated and deactivate by V.54 loopback protocol. User can select ITU V.54 or ANSI T1.403. 3.5.7 RL If RL (Remote Loopback) is set to ON and received remote loopback signal from DTE, the remote unit performs DTE port TO_LINE Loopback by activating V.54 protocol. 3.5.8 LL If LL (Local Loopback) is set to ON and received local loopback signal from DTE, the local unit performs DTE port TO_DTE Loopback 3.6 Alarm and Reports 3.6.1 Alarms Loop-T FT1 has many types of alarm as listed in Table 3.4. Also, Loop-T FT1 has alarm queue which record the latest 40 alarms with time stamp. Loop-T FT1 also has alarm history and alarm status registers which is used to track the alarm count. Each alarm can be individually enabled or disabled. When disabled, no action is taken. When enabled, alarm counter increments on the occurrence of the specific type of alarm. When alarm occurs or the counter threshold exceeds, alarm is triggered. When alarm is triggered, a dial-out is activated if it is enabled. Otherwise, no action is takes and only the specific alarm count is incremented. Dial-out is to dial out through modem to a remote terminal. When threshold level is implemented, it is based on the 15 minutes alarm count register. All alarms are disabled by default. The dial-out is also disabled by default. Hayes compatible AT dialing commands are recommended for both primary and secondary dial-out strings. The Loop-T FT1 will send the following AT commands to initialize the modem when the modem interface type is selected. Users may add specific command in the dialing string to suit their environment. 1. Auto answer, S0=1. 2. Ignore DTR signal, &D0. 3. Track carrier, &C1. 4. Echo off, E0. 5. Display result codes in verbose form, V1 6. Return result code, Q0. 7. Wait time for carrier 30 sec, S7=30. 8. Save, &W0 &Y0. - 21 - Chapter 3 Operation Inactivity timeout can be programmed by "S" command. After alarm message is sent, Loop-T FT1 waits for specific number of inactivity timeout second and then disconnect modem. If a new alarm is sent during that period, the timeout counter is reset. Inactivity timeout of 0 second will immediate disconnect modem after alarm message is sent. Individual fault counts are updated every second. Bipolar Violation (BPV) counts are updated every second, but the BPV alarm is based on an average Bit Error Rate (BER) that is calculated over a 15-minute interval. Therefore, BPV alarm status is updated every 15 minutes after the average BER is calculated. If the average -9 -5 BPV rate exceeds the preset threshold i.e., from 10 up to 10 , an alarm can be declared (assuming BPV alarm is enabled). ES and UAS employ threshold-triggered alarms, but these alarms are declared as soon as the recorded account exceeds the preset threshold. The 15-minute integration interval does not apply to ES and UAS alarms. Alarm register states are reset every 15 minutes, but preserved in the Alarm History display. Table 3 - 4 Alarm Type Table ALARM TYPE "MAST-CLK LOSS" "YEL, LINE" "AIS, LINE" "LOS, LINE" "LOF, LINE" "BPV, LINE" "ES, LINE" "UAS, LINE" "CSS, LINE" "DTE1 ALARM" ALARM DESCRIPTION Master Clock Loss T1 Line Yellow Alarm T1 Line Alarm Indication Signal T1 Line Loss of Signal T1 Line Loss of Frame T1 Line Bipolar Violation 10E- (5, 6, 7, 8, 9) T1 Line Error Second (0 to 900) T1 Line Unavailable Second (0 to 900) T1 Line Control Slip Second (0 to 900) DTE1 RTS loss or clock loss in TTM THRESHOLD no no no no no yes (default 5) yes (default 1) yes (default 1) yes (default 1) no 3.6.2 Report Loop-T FT1 has three sets of performance registers. These are line, user, and far-end. The line performance register tracks the line receiver performance status. The user performance register tracks the line receiver as well, but user may clear at any time. The far-end performance register tracks the far-end Loop-T receiver status. The performance parameters are listed in Table 3.6. While, user performance register have two additional parameters. One is BPV register to count bipolar violation in both D4 and ESF modes. The other is ESF to track framing error and CRC error in ESF frame format mode only. Each performance parameter has ninety six sets of registers to record 24 hours history in 15 minute interval. - 22 - Chapter 3 Operation Table 3 - 5 Performance Parameter List Performance Parameter Description Definition (T1/D4) Definition (ESF) ES Error Second BPV≥1, OOF≥1, or CS≥1. BES SES CSS OOF Bursty Error Second Severe Error Second Controlled Slip Second Out of Frame LOFC UAS BPV ESF Loss Of Frame Count Unavailable Second Bipolar Violation CRC6 Error, or Out Of Frame 1 < BPV < 1544 BPV ≥ 1544, or OOF ≥ 1 frame slip ≥ 1 2 frame bit error in 6 consecutive frame bits OOF for 2.5 ±0.5 sec ≥ 10 consecutive SES Bipolar Error Count (not used, always 0) CRC6 ERROR ≥ 1, OOF ≥1, or CS ≥1. 1 < CRC6 < 320 CRC6 ≥ 320, or OOF ≥ 1 frame slip ≥ 1 2 frame bit error in 6 consecutive frame bits OOF for 2.5 ±0.5 sec ≥ 10 consecutive SES Bipolar Error Count CRC6 error or OOF Table 3-6 lists the types of reports available, performance parameters provided by each report, and the reset commands for each report. Table 3 - 6 Performance Report Options Report Type Category [Menu Command] Front Reports Report ES Panel USER [Network] UAS BES SES CSS LOFC BPV ESF Y Y Y Y Y Y Y 1-Hour Terminal USER [Network] Y Y Y Y Y Y Reports LINE [Network] N/C N/C N/C N/C N/C N/C Menu Option [1] FAR-END N/C N/C N/C N/C N/C N/C 24-Hour Terminal USER [Network] Y Y Y Y Y Y Y Y Reports LINE [Network] N/C N/C N/C N/C N/C N/C N/C N/C Menu Option [2] FAR-END N/C N/C N/C N/C N/C N/C CRC Error Count USER [Network] Y X Terminal Reports LINE [Network] N/C Menu Option [E] FAR-END N/C Y = Report available and can be cleared by front panel “RESET” or admin terminal command “Y”. X = Report available and can be cleared by front panel “RESET” or admin terminal command “X”. N/C = No clear. Report available, but counts cannot be cleared y the user. ─ = Report not available. - 23 - Chapter 3 Operation 3.6.3 Requesting Report In both T1/D4 and ESF frame format mode, the performance report can be accessed from local terminal directly or from remote terminal via modem. Also, in ESF mode, performance report can be accessed via data link. User will choose either AT&T or ANSI T1.403 data link operation in DS1 network line interface configuration. AT&T TR 54016 should be referred to as how the performance report request message and response message are structured. ANSI T1.403 should be referred to how the one second performance report message structured. Loop-T FT1 supports both AT&T TR 54016 and ANSI T1.403 performance report message. 3.7 LED Operation The front panel has 10 LEDs for operation and error indications. Table 3.8 lists each LED and its color and indications. Table 3 - 7 Front-Panel LED Table LED POWER L SYNC/TEST I N E LOF BPV YEL/AIS D TEST T E TD RD RTS CLK-LOSS Color Green Off Off Green Flashing Green Off Red Off Red Off Amber Flashing Amber Off Flashing Green Flickering Green Flickering Green Green Off Off Red Indication Powered on and operational Power off, self-test failure, or during initialization T1 line frame not in sync T1 line frame in sync A line-side test is in progress Normal Loss of Frame Sync (LOFS) or Loss of Signal ( LOS) Normal T1 line has bipolar violation Normal Receive yellow alarm from T1 line Receive AIS from T1 line Normal DTE in test Transmit data present Receive data present Request to send signal-on Reguest to send signal-off Normal Loss of external clock from DTE - 24 - Chapter 3 Operation 3.8 Error Message Loop-T FT1 provides various error messages on LCD display to indicate abnormal condition as listed in Table 3.8. Table 3 - 8 Error Message Table ERROR CODE ERROR01 ERROR02 ERROR04 ERROR05 ERROR06 ERROR07 ERROR08 ERROR09 ERROR10 ERROR11 ERROR DESCRIPTION A loopback is in effect ESF or ESF&T1.403 mode is required DTE can't be in TTM if MCLK=DTE Cannot confirm due to alarms Can't change active map of SWITCH No DS0 channel is assigned Modem error A diagnostic test is in progress DTE local loopback is in progress SNMP_SLIP mode is in progress 3.9 Embedded SNMP Agent (Optional) The optional embedded SNMP agent for Loop-T FT1 CSU/DSU offers standard RFC 1213 MIB II and RFC 1406 DS1 MIB as well as Loop Telecom's enterprise MIB. Although Loop does not endorse any one Network Management product, the following products have been tested. For workstation, HP J6700 HPUX version 11.0 running under SLIP command “pppd 140.28.1.23:140.28.1.17 slip dedicated / dev/tty0p0 38400 mru 576 netm ask 255.255.255.0 extra-slip-end &”. For network management system, HP OpenView, SUN workstation, and SNMPc running in PC to monitor and control Loop-T FT1 CSU/DSU. This enables user to integrate WAN equipment management with LAN SNMP network management systems. The embedded SNMP agent also includes Telnet implementation to allow user to access Loop-T FT1 CSU/DSU terminal interface from any workstation in the network. Loop-T Loop-T SLIP SLIP Async Port Work Station NMS Terminal Server Ethernet Figure 3.1 SNMP Connection The Loop-T FT1 CSU/DSU uses the console port to provide the embedded SNMP agent functionality. Typically, a workstation can be configured to run SLIP protocol on its a sync ports. If there is only few Loop-T that needs SLIP interface, no dedicated terminal server is needed. Before SNMP is enabled, make sure the IP address for Loop-T FT1 CSU/DSU is configured correctly and the communication parameters match the Terminal server port. Once the SNMP agent is activated, user can verify whether the Loop-T FT1 CSU/DSU is running successfully by using ping command to check if Loop-T FT1 CSU/DSU is responding or not. e.g. $ ping 192.1.100.45 - 25 - Chapter 3 Operation 192.1.100.45 is alive Please refer to each respective SNMP manager operation instruction to incorporate the Loop-T enterprise MIB to the system. Telnet capability comes with embedded SNMP agent. Once SNMP agent is running, user can use telnet program that is simulated a VT-100 to access Loop-T FT1 CSU/DSU command screen. The most popular Telnet utility in the public domain is provided by NCSA. It can maintains several telnet connections simultaneously. It is recommended to set the CONSOLE port running at the highest speed to reduce the jittery output on terminal. The Loop-T FT1 CSU/DSU can run reliably at 38.4K bps. - 26 - Chapter 4 Maintenance 4. MAINTENANCE 4.1 Self-Test At system power up, a complete self-test routine is run to check all I/O ports, read/write memory, and data paths to validate system integrity. During the system self test, "SELF TEST" message is shown on the upper line of the LCD display. The software release version and date code is shown on the lower line of the LCD display. If an error is found, FAIL is shown in the upper right corner of the LCD display and a dedicated error message is shown on the lower line. Users may press ESC, left arrow ( < ), right arrow ( > ), and ”ENTER” key in this order to read a specific error code. If no error is found, the LCD display will show "PASS" in the upper right corner of the LCD display followed by a Main Menu as FIGURE 5.2. Various system diagnostic methodology can be found in the following paragraphs. 4.2 Diagnostics A 20-bit register QRSS (Quasi-Random Signal Sequence) patterns, is used in Loop-T FT1 CSU/DSU. The QRSS test pattern is used to test local Loop-T FT1 CSU/DSU system integrity by local loopback test. It can also be used to measure the T1 line quality. The diagnostics scenario is as follows: 1. First, send a remote loopback command to cause the remote facility to loopback DS0 channels. 2. Then, activate the local QRSS diagnostics operation, use Test command to enable QRSS and choose tested DS0 channel in a bundle of DTE, all 24 channels, or only idle channels. 3. The FULL QRSS diagnostic uses a framed pattern. This is useful for testing full T1 loopbacks at the farend. When the QRSS pattern sync is found, a bit error counter tracks total bit errors. It is advised to send QRSS for more than 15 minutes interval to evaluate the quality of loop condition and facility reliability. In both front panel and terminal operation, user may utilize '>' key to inject single error, '<' key to reset error counter, and 'ESC' key to terminate QRSS test. User may also read performance report to understand type of error occurs. 4.3 Near End Loopback The near end loopbacks such as local loopback, line loopback, payload loopback, DTE port loopback, are activated by the local Loop-T T1. The loopbacks are at the near end facility. The following paragraph describes each loopback in detail. NOTE: Deactivate the near-end loopbacks from the front panel or the terminal, depending on where it was activated. 4.3.1 Local Loopback Local loopback is illustrated in FIGURE 4.1. The outgoing signal is looped back through the T1 PCM transceiver. All 24 DS0 channels are looped back to the receiver path. This loopback test is activated by the Test command. This loopback test can be used with the QRSS diagnostic test pattern to validate the local Loop-T T1 CSU/DSU's integrity. An AIS (Alarm Indication Signal) is sent to the network during the local loopback test. The local loopback test can be activated from the front panel and terminal. - 27 - Chapter 4 Maintenance Line Driver D S 1 DTE port (e.g., V.35) 1 2 3 4 5 Multiplexer 5 4 3 F r a m e r 2 1 Line port (T1) Line Receiver Local loopback Line loopback (LLB) Payload loopback (PLB) DTE port TO-LINE loopback DTE port TO-DTE loopback Figure 4.1 Loopback Block Diagram 4.3.2 Line Loopback Line loopback is illustrated in Figure 4.1. The incoming T1 line signal is looped back to the outgoing T1 signal before the T1 transceiver framer. This loopback is used to isolate the local equipment from a troubled T1 transmission line. Line loopback test can be activated from the front panel and terminal. 4.3.3 Payload Loopback Payload loopback is illustrated in Figure 4.1. The incoming signal is loopback to the outgoing T1 signal after the T1 transceiver framer. This loopback is used to isolate the DTE port from the troubled T1 transmission line. Payload loopback test can be activated from the front panel and terminal. 4.3.4 DTE Port Loopback DTE port loopback is illustrated in Figure 4.1. There are two types of loopback as TO-DTE and TO-LINE. TODTE is that DTE incoming signal is loopback to the DTE outgoing signal. TO-LINE is that DTE PCM outgoing signal is loopback to the DTE PCM incoming signal. This loopback is used to validate the system integrity of DTE facility. DTE loopback test can be activated from the front panel and terminal. While in TO-DTE loopback, all ones are send to T1 network line outgoing direction on DTE associated DS0 channels. NOTE: DTE loopbacks work only when one or more DS0 channels are mapped to the DTE port 4.4 Far End Loopback Far-end loopbacks (remote line loopback, remote payload loopback, remote channel loopback, and V.54 loopback) can be activated by the local CSU/DSU to cause a remote facility to perform the loopbacks. Inband codes, AT&T and ANSI FDL protocols, and proprietary codes are utilized to send remoter loopback commands to the far-end facility. Inband codewords are supported by D4, ESF, or ESF&T1.403 framing format. When using AT&T FDL messages, the Line port must be set for ESF or ESF&T1.403 framing format. When using ANSI FDL messages, the Line port must be in ESF&T1.403 framing format. All remote loopback can be activated from the front panel or the terminal. If the remote facility responds to a remote loopback activate command, a LOOPED message appears in the lower left corner of the display. If the remote facility responds to a remote loopback deactivate command, a NOLOOP message appears. If the remote activation/deactivation fails, an error message appears. It is best to use remote loopbacks in conjunction with QRSS diagnostics testing to measure the T1 network line integrity. The procedure is as follows: 1. Send a remote loopback command to cause the remote facility to perform a loopback. 2. Activate the QRSS diagnostics test. - 28 - Chapter 4 Maintenance NOTE: Deactivate the far-end loopbacks from the front panel or the terminal, depending on where it was activated. Following are descriptions for each type of far-end loopback. 4.4.1 Remote Line Loopback Remote line loopback is illustrated in Figure 4.1. The remote line loopback is initiated by the remote equipment through inband signal or ESF data link message with AT&T or ANSI protocol. Table 4.1 shows the inband remote line loopback code. Table 4.3 shows the ANSI T1.403 ESF data link remote line loopback code. Remote line loopback test can be activated from the front panel and terminal . Table 4 - 1 In-band Control Codeword Remote LLB Codeword Activate Deactivate 10000, receive 5+/-0.5 second 100, receive 5+/-0.5 second 4.4.2 Remote Payload Loopback Remote payload loopback is illustrated in Figure 4.1. The remote payload loopback is initiated by the remote equipment through ESF data link message with AT&T or ANSI protocol. Table 4.2 shows the AT&T ESF T1.403 ESF data link remote payload loopback code. Remote payload loopback test can be activated from the front panel and terminal . Table 4 - 2 AT&T ESF Data-Link Codeword Remote PLB Activate Deactivate Codeword ESF-DL SX.25 Request Message #1 ESF-DL SX.25 Request Message #2 Table 4 - 3 ANSI T1.403 Bit-Oriented ESF Data-Link Codeword Remote LLB Activate Deactivate Codeword 0 000111 011111111 repeat at least 10 times 0 011100 011111111 repeat at least 10 times Remote PLB Activate Deactivate Codeword 0 001010 011111111 repeat at least 10 times 0 011001 011111111 repeat at least 10 times 4.4.3 Remote Channel Loopback Remote channel loopback is illustrated in Figure 4.1. The remote channel loopback is initiated by the local equipment through following methods: 1. In-band remote channel loopback code. In-band activate and deactivate codes are used to enable and disable DTE to a TO-LINE loopback. This loopback provides an unique way to isolate problems of a specific data path from T1 network line toward remote DTE. Activate code, 11110111 rotate left in 10 Hz for 5 ± 0.5 sec. Deactivate code, 11011011 rotate left in 10 Hz for 5 ± 0.5 sec. 2. ESF and ESF&T1.403 facility data link remote channel loopback code. A proprietary protocol in ESF facility data link is used to enable and disable remote DTE port to perform TO-LINE loopback. This loopback provides an unique way to isolate problems of a specific data path from T1 network line toward remote DTE port. - 29 - Chapter 4 Maintenance Remote channel loopback command uses ESF data link message. The ESF data link message to activate request and response are in Table 4.4 and Table 4.5 and the data link message to deactivate request and response are listed in Table 4.6 and Table 4.7. Table 4 - 4 Remote Channel Loopback Activate Request Message Octet No. 1 2 3 4 5~28 Label Command # Originate Unit Add Target Unit Add Request # DS0~DS23 Contents 0 to 255 (A or Z) or (B or Y) (A or Z) or (B or Y) 249 0: no action. 1: DTE activate loopback Table 4 - 5 Remote Channel Loopback Activate Response Message Octet No. 1 2 3 4 5 Label Command # Status Originate Unit Add Target Unit Add Current Status Contents 0 to 255 0000U000 ** (A or Z) or (B or Y) (A or Z) or (B or Y) FU0000L0 ** **NOTE: F=1, if U or L=1. U=1, if an unavailable signal state exists, L=1, if the PLB is activated. 0 (reserved) Table 4 - 6 Remote Channel Loopback Deactivate Request Message Octet No. 1 2 3 4 5~28 Label Command # Originate Unit Add Target Unit Add Request # DS0~DS23 Contents 0 to 255 (A or Z) or (B or Y) (A or Z) or (B or Y) 249 0: no action. 1: DTE activate loopback Table 4 - 7 Remote Channel Loopback Deactivate Response Message Octet No. 1 2 3 4 5 Label Command # Status Originate Unit Add Target Unit Add Current Status Contents 0 to 255 0000U000 ** (A or Z) or (B or Y) (A or Z) or (B or Y) FU0000L0 ** **NOTE: F=1, if U or L=1. U=1, if an unavailable signal state exists, L=1, if the PLB is activated. 0 (reserved) - 30 - Chapter 4 Maintenance 4.4.4 V.54 Loopback Loop-T FT1 CSU/DSU also supports V.54 loopback protocol. See ITU V.54 standards for details. Refer to ANSI T1.403-1995 Annex B. 4.5 Test Pattern Four test patterns are available to determine faults such as deficient clock recovery, fault ALBO level recovery, inadequate jitter margin, presence of bridge taps, and mis-optioned network interface. These four patterns are framed pattern with proper D4 of ESF frame pattern as described in the following paragraph. 4.5.1 3-in-24 Pattern This framed 3-in-24 pattern is aligned with the frame bit so as not to transmit a false yellow alarm. It tests the consecutive zeros requirement and useful to test AMI circuits. Framed 3-in-24 pattern sequence is as follows, F 01000100 00000000 00000100 01000 . . . . . (Left to Right) F indicates frame bit. 4.5.2 1-in-8 Pattern This framed 1-in-8 pattern tests the ability of a circuit to support a pattern having the minimum ones density. It is useful to reveal a timing recovery problem. The bit set to one must be set to bit 2 to avoid false yellow alarm. Framed 1-in-8 pattern sequence is as follows, F 01000000 01000000 0100 . . . . . (Left to Right) F indicates frame bit. 4.5.3 2-in-8 Pattern This framed 2-in-8 pattern, in conjunction with the 1-in-8 Pattern, is useful when performing tests to reveal the presence of equivalent mis-optioned for B8ZS. Use of 2-in-8 pattern will confirm the circuit's ability to support error free transmission when B8ZS substitution do not occur. A framed 1-in-8 will contain 8 consecutive zeros around a zero frame bit causing a B8ZS substitution. Framed 2-in-8 pattern sequence is as follows, F 01000010 01000010 01 . . . . (Left to Right) F indicates frame bit. 4.5.4 1:1 Pattern This framed 1:1 pattern tests AMI circuits. It will cause false yellow alarm in D4 frame format mode. Framed 1:1 pattern sequence is as follows, F 10101010 10101010 10 . . . . . (Left to Right) F indicates frame bit. - 31 - Chapter 4 Maintenance 4.6 Verifying Loop-T Operations The purpose of this section is not to help the user determine where a possible fault in the network may lie. For this, the user needs to know the exact geometry of the network. Then standard network trouble shooting procedures should be followed, which involve sectionalizing the network and performing loopback tests on pieces of the network. The purpose here is to help the user determine whether the Loop-T equipment is at fault after tests have pointed a suspicious finger at this equipment. The procedures outlined here depend on test equipment and other equipment the user may have on hand. The organization of these procedures start from the simple to the complex. The procedure ends when a definitive conclusion is made that the Loop-T equipment is at fault. To verify that the Loop-T equipment is not at fault, specialized equipment such as a BERT (bit error rate test) set is needed. 4.6.1 Quick Test See if the LCD display on the Loop-T has normal text. If not, Loop-T has failed. Remove all line and DTE connections to Loop-T. Remove power. After a few seconds, re-apply power. Observe the power-up self-test sequence. If this fails, then Loop-T has failed. See if the LEDs show any abnormal displays. If yes, use the LED indications to guide the user to test other parts of the network, such as the T1 line, or DTE equipment. Especially during initial installation, excessive errors may be due to (a) incorrect configuration of either LoopT or of the equipment at the other end of the line, or (b) due to faulty line installation, which results in excessive noise, cross talk, or impedance mismatch. Especially in electrically noisy environments, such as central offices, use of shielded cables are mandatory. 4.6.2 Substitution If a spare Loop-T is available, then replace the working one with the spare. The user must carefully configure the spare exactly as the working one. If the substitution clears the problem, then the original working one is suspect. Note that this is not definitive as other reasons may cause the same symptom. A good practice is to reconfigure the original one and swap once more. If both units behave the same, then the problem is probably elsewhere. 4.6.3 Using Loopback Plugs Without a spare, loopback plugs are handy for diagnosis. Note that internal loopback facilities of the Loop-T does not include the interface circuitry. Thus a set of plugs, one for each of the interfaces, line and DTE, are needed for complete tests. These plugs are wired such that signals from the Loop-T are loopback by hard wire back to the receive pin of the same plug. Replace the line connector with a loopback plug. Observe if the line is in sync. If not then loop-T has failed. Then perform a QRSS test towards the line. If this fails, then Loop-T has failed. For the DTE ports, a loopback plug must be used in concert with a far end Loop-T if such a terminal is available, then a QRSS test will determine if that DTE port is at fault. Note that if a far end terminal is available, the first test should be a local line loopback to see if the line is good. If the local DTE has diagnostic capabilities, then a loopback plug towards the DTE would help determine if the line to the DTE is good. This can further help isolate the problem. If tests with loopback plugs all pass, then the problem is probably elsewhere. - 32 - Chapter 4 Maintenance 4.6.4 Using Bert Test Set If a BERT (bit error rate test) set is a available, such as the Fireberd 6000, then a comprehensive suite of tests are available to examine the health of the Loop-T. With a BERT, each of the ports of the Loop-T can be tested individually. The user must configure the BERT in the exact way the Loop-T is configured. This is easily done by comparing each of the options one by one. After checking that the configuration matches, if any one of the ports fails, then Loop-T has failed. - 33 - Chapter 5 Front Panel Operation 5. FRONT PANEL OPERATION The front panel operation utilizes a two by sixteen (2 X 16) characters LCD display window and four keypads each labeled with ESC, ENTER, left arrow '<', and right arrow '>', as shown in Figure 5.1. ENTER key is used to move down the menu tree or to enable a selection. LEFT and RIGHT arrow keys show other menu item in the same level. ESC key returns the operation to an upper layer menu up to the main menu. NOTE: The ENTER key must be used to confirm a change. Where YES is shown at the lower right corner, it must be selected to enable a change. Figure 5.1 Loop-T FT1 CSU/DSU Front Panel Each display only shows one menu item. The main menu is shown in Figure 5.2. It is the first menu displayed after power up. LOOP-T Configuration Figure 5.2 LCD Main Menu The first tier menu includes Configuration, Diagnostics, Alarm, Performances, and Miscellaneous. Each submenu is further broken down into sub-level menus. Subsequent chapters give detailed information regarding these menus. To change selection, use left and right arrow key to a proper selection and then press the ENTER key. NOTE: The current selected items are highlighted by an ∗ 5.1 Configuration Menu Configuration group includes DS0-Map, Line, DTE, Master Clock, Save Config, Restore Config, Console Port, Date, and Time Menu. LOOP-T Configuration Configuration Diagnostics Alarm Performance Miscellaneous - 34 - Chapter 5 Front Panel Operation 5.1.1 DS0-Map Menu DS0-Map DS0-Map menus are used to configure DS0 channel assignment for DTE port. It is also used to program MAP1 and MAP2 schedule as well as to enable SWITCH function. DS0 channel assignment can be sent to the remote end by SEND command. Under configuration menu, use left or right key to select DS0-Map menu. Line DTE -1 Master Clock 5.1.1.1 Active Map Menu Save Config Restore Config Console Port Date Time Path : LOOP-T Configuration DS0-Map Configuration DS0-Map Active Map To change the MAP simply use left or right arrow key cycle through to a proper MAP or SWITCH and press ENTER. While the SWITCH is selected, the current active map is shown inside the bracket. Active Map *SWITCH<MAP1> This switch menu uses proprietary ESF data link message, and is only available in ESF or ESF&T1.403 frame format mode. Otherwise, error message will indicate. If far end facility acknowledge this command an "ACK" will be shown on the LCD display. Otherwise, a "FAIL" message is shown on the LCD display. 5.1.1.2 Map1 Menu Path : LOOP-T Configuration DS0-Map Configuration DS0-Map Map1 Map1 menu is used to change the port assignment for each DS0 channel. To change a specific DS0 channel port assignment, press ENTER form Map1 menu. For example, to change Channel-1 port assignment : Path : LOOP-T Configuration DS0-Map Map1 Configuration DS0-Map Map 1 Channel-1 use left or right arrow key cycle through to a proper designated port and press the ENTER key to select. Ch-1 2:128K *DTE-1 As the above example indicates, channel-1 is assigned to DTE port, right top corner 2:128K indicates there are two DS0 channels assigned to DTE port and corresponds to 128 Kbps of total 1536 Kbps bandwidth currently. NOTE: Map2 Menu operation is similar. - 35 - Chapter 5 Front Panel Operation 5.1.1.3 Switch Time Menu Path : LOOP-T Configuration DS0-Map Configuration DS0-Map Switch Time Switch Time menu shows the current MAP1 and MAP2 schedule as the following display. In this case, MAP1 is scheduled START from 23:00 and END at 12:00 and MAP2 is scheduled START from 12:00 and END at 23:00. To change MAP1 and MAP 2 schedule, use left or right arrow key to the digital position, and press ENTER key to cycle through the time number. This operation must be concluded by moving left or right arrow key to OK position and press ENTER to enable the changes. Switch Time *23:00-12:00 OK 5.1.1.4 Send Map Menu Path : LOOP-T Configuration DS0-Map Configuration DS0-Map Send Map Under Send Map menu and press ENTER to Send Map Confirm ? At this menu, press ENTER will send the current working DS0 map information to the far end. It will overwrite the current far end working DS0 map. Otherwise press ESC to exit without any action. This Send Map menu uses proprietary ESF data link message, and is only available in ESF or ESF&T1.403 frame format mode. Otherwise, error message display. If far end facility acknowledges this command, an ACK is shown on the LCD display. Otherwise, a FAIL message is shown on the LCD display. 5.1.2 Line Menu DS0-Map Line menus are used to configure T1 line operation mode such frame format, line code, Line Build Out (LBO), yellow alarm transmission when LOF and LOS, inband loopback code recognition, FDL address code, and transmission idle code. Under configuration menu, use left or right key to select Line menu. 5.1.2.1 Frame Format Menu Line DTE - 1 Master Clock Save Config Restore Config Console Port Date Time Path : LOOP-T Configuration Line Configuration Line Frame Press ENTER from Line Frame menu - 36 - Chapter 5 Front Panel Operation Line Frame *D4 To change the frame type, use left and right arrow key to cycle through to a proper selection and press ENTER. ESF&T1.403 indicates ESF frame format is chosen and facility data link message follows ANSI T1.403 standard. While ESF indicates ESF frame format is chosen and facility data link follows AT&T PUB 54016 standard. 5.1.2.2 Code Format Menu Path : LOOP-T Configuration Line Configuration Line Code Press ENTER from Line Code menu Line Code *AMI To select the coding scheme, use left and right arrow key cycle through to a proper selection and press ENTER. 5.1.2.3 Line Build Out (LBO) Menu Path : LOOP-T Configuration Line Configuration Line LBO Press ENTER from Line LBO menu Line LBO *0 dB To change the LBO, use left and right arrow key to cycle through to a proper selection and press ENTER. 5.1.2.4 Yellow Alarm Menu Path : LOOP-T Configuration Line Configuration Line YEL Press ENTER from Line YEL menu Line YEL *ON Yellow alarm menu shows the current yellow alarm transmission state when Loop-T loss of signal and loss of frame sync. To enable yellow alarm being automatically send out when loss of signal and loss of frame sync, use left and right arrow key to cycle through to ON and press ENTER. To disable yellow alarm sending, use left and right arrow key cycle through to OFF and press ENTER. 5.1.2.5 Inband Menu Path : LOOP-T Configuration Line Configuration Line Inband Press ENTER from Line Inband menu - 37 - Chapter 5 Front Panel Operation Line Inband *ON Inband menu shows the remote inband loopback diagnostics code recognition. To enable or disable, use left and right arrow key to cycle through to ON or OFF and press ENTER. 5.1.2.6 Address Menu Path : LOOP-T Configuration Line Configuration Line Address Press ENTER from Line Address menu Line Address *CSU Address menu shows the current Loop-T address in FDL is CSU or TE when ESF frame format mode is selected. To change, use left and right arrow key to cycle through to a proper selection and press ENTER. 5.1.2.7 Idle Menu Path : LOOP-T Configuration Line Configuration Line Idle Code Press ENTER from Line Idle Code menu Line Idle Code *0xff OK Idle menu shows the transmission idle code when DS0 channel is in idle mode. To change idle code, press ENTER key to cycle through the idle code. This operation must be concluded by moving left or right arrow key to OK position and press ENTER to enable the changes. NOTE: Due to one′s density requirement, it is advised that idle code to be set as FFH. Also, user must program idle code to contain at least two bits of 1. The factory default idle code is FFH. 5.1.3 DTE-1 Menu DS0-Map Note in what follows, the notation DTE-1 will be used for the DTE port. This is for compatibility with Loop products where more than one DTE port is provided. Line DTE menu is used to configure DTE port operation mode such as data rate, clock mode, data mode, interface type, RTS mode, and TTM (Terminal Timing Mode). Under configuration menu, use left or right key to select DTE menu. 5.1.3.1 Rate Menu DTE - 1 Master Clock Save Config Restore Config Console Port Date Time - 38 - Chapter 5 Front Panel Operation Path : LOOP-T Configuration DTE-1 Configuration DTE-1 Rate Press ENTER from DTE-1 Rate menu DTE-1 Rate 64K*N To change the DTE data rate, use left and right arrow key to cycle through to a proper selection and press ENTER. 5.1.3.2 Clock Menu Path : LOOP-T Configuration DTE-1 Configuration DTE-1 Clock Press ENTER from DTE-1 Clock menu DTE-1 Clock *NORMAL To change the DTE clock polarity to NORMAL or INVERTED, use left and right arrow key to cycle through to a proper selection and press ENTER. 5.1.3.3 Data Menu Path : LOOP-T Configuration DTE-1 Configuration DTE-1 Data Press ENTER from DTE-1 Data menu DTE-1 Data *NORMAL To change the DTE data polarity to NORMAL or INVERTED, use left and right arrow key to cycle through to a proper selection and press ENTER. 5.1.3.4 Interface Menu Path : LOOP-T Configuration DTE-1 Configuration DTE-1 Interface To view the DTE-1 Interface, press ENTER DTE-1 Interface *V.35 5.1.3.5 RTS Menu Path : LOOP-T Configuration DTE-1 Configuration DTE-1 RTS Press ENTER from DTE-1 RTS menu - 39 - Chapter 5 Front Panel Operation DTE-1 RTS *ACTIVE To change the DTE RTS operation mode to ACTIVE or PERMANENT, use left and right arrow key to cycle through to a proper selection and press ENTER. 5.1.3.6 TTM Menu Path : LOOP-T Configuration DTE-1 Configuration DTE-1 TTM Press ENTER from DTE-1 TTM menu DTE-1 TTM *OFF To change the DTE terminal timing mode, use left and right arrow key to cycle through to a proper selection and press ENTER. 5.1.3.7 Path : V54 Menu LOOP-E Configuration DTE-1 Configuration DTE-1 V54 Press ENTER from DTE-1 V54 menu. DTE-1 RV54 *OFF To change the V.54 protocol type, use left and right arrow key to cycle through to a proper selection and press ENTER. 5.1.3.8 Path : RL Menu LOOP-E Configuration DTE-1 Configuration DTE-1 RL Press ENTER from DTE-1 RL menu. DTE-1 RL *OFF To enable or disable the RL (remote loopback), use left and right arrow key to cycle through to a proper selection and press ENTER. 5.1.3.9 Path : LL Menu LOOP-E Configuration DTE-1 Configuration DTE-1 LL Press ENTER from DTE-1 LL menu. - 40 - Chapter 5 Front Panel Operation DTE-1 LL *OFF To enable or disable the LL (local loopback), use left and right arrow key to cycle through to a proper selection and press ENTER. 5.1.4 Master Clock Menu DS0-Map Master clock menus are used to configure the master clock source and clock rate. Under Configuration menu, use left or right key to select Master Clock menu. Line DTE - 1 5.1.4.1 Master Clock Menu Master Clock (note: Secondary Clock Menu operation is similar.) Save Config Restore Config Console Port Date Time Path : LOOP-T Configuration Master Clock Configuration Master Clock Primary Clock Press ENTER from Master Clock Primary Clock Primary Clock *INTERNAL To change the clock source to LINE, INTERNAL, DTE-1, use left and right arrow key to cycle through to a proper selection and press ENTER. 5.1.4.2 Current Active-Clock Menu Path : LOOP-T Configuration Master Clock Configuration Master Clock Curr Clk: 2nd Current Active clock menu shows the current active clock source is PRIMARY master clock or 2nd master clock. - 41 - Chapter 5 Front Panel Operation 5.1.5 Save System Configuration Menu Save system configuration menu is used to store system configuration. Under Configuration menu, use left or right key to select Save Config menu. Path : DS0-Map Line LOOP-T Configuration DTE - 1 Configuration Save Config Master Clock Press ENTER from Configuration Save Config Save Config Restore Config Save Config Confirm ? Console Port Date At this menu, press ENTER will store the current working configuration onto user stored configuration. A WAIT...OK” is shown on the LCD display. Otherwise press ESC to exit without any action. 5.1.6 Restore System Configuration Menu DS0-Map Restore system configuration menu is used to retrieve system configuration. Under Configuration menu, use left or right key to select Restore Config menu. Path : LOOP-T Configuration Configuration Restore Config Time Line DTE -1 Master Clock Save Config Press ENTER from Configuration Restore Config menu Restore Config Restore Config Confirm ? Console Port Date At this menu, press ENTER will retrieve the user stored configuration to the current working configuration. A WAIT...OK” is shown on the LCD display. Otherwise press ESC to exit without any action. Time NOTE: When the user stored configuration is retrieved, all loopback tests will be terminated, and all alarm queue and alarm history are reset. The current working configuration will be overwritten. DS0-Map 5.1.7 Console Port Menu The menus are used to configure console port to select data rate, data bits, stop bits, parity bit, XON-XOFF control, interface type, and SNMP control as the following paragraph. Under Configuration menu, use left or right key to select Console Port menu. NOTE: The front panel must be used to set up the Console interface type. port Line DTE - 1 Master Clock Save Config Restore Config Console Port Date Time - 42 - Chapter 5 Front Panel Operation 5.1.7.1 Baud Rate Menu Path : LOOP-T Configuration Console Port Configuration Console Port Baud Rate Press ENTER from Console Port Baud Rate menu Baud Rate *9600 bps To change data speed, use left and right arrow key to cycle through to a desired selection and press ENTER. 5.1.7.2 Data Length Menu Path : LOOP-T Configuration Console Port Configuration Console Port Data Length Press ENTER from Console Port Data Length menu Data Length *8 bits To change data bits, use left and right arrow key to cycle through to a desired selection and press ENTER. 5.1.7.3 Stop Bit Menu Path : LOOP-T Configuration Console Port Configuration Console Port Stop Bit Press ENTER from Console Port Stop Bit menu Stop Bit *1 bit To change stop bits, use left and right arrow key to cycle through to a desired selection and press ENTER. 5.1.7.4 Parity Menu Path : LOOP-T Configuration Console Port Configuration Console Port Parity Press ENTER from Console Port Parity menu Parity *NONE To change data parity, use left and right arrow key to cycle through to a desired selection and press ENTER. NOTE: User MUST use front panel to set up console port configuration properly in order to use terminal and modem mode. - 43 - Chapter 5 Front Panel Operation 5.1.7.5 Xon-Xoff Menu Path : LOOP-T Configuration Console Port Configuration Console Port Xon-Xoff Press ENTER from Console Port Xon-Xoff Xon-Xoff *OFF To change, use left and right arrow key to cycle through to a desired selection and press ENTER. NOTE: Xon-Xoff flow control will be terminated when SNMP mode is selected 5.1.7.6 Interface Menu Path : LOOP-T Configuration Console Port Configuration Console Port Interface Press ENTER from Console Port Interface menu Interface *TERMINAL To change the console port interface type to TERMINAL, MODEM, or SNMP-SLIP, use left and right arrow key to cycle through to a desired selection and press ENTER. In modem mode, a modem initialization routine is run to establish the connection. The initialization routine must be run each time the modem is installed. SNMP-SLIP item is only available when SNMP feature is purchased. This is an optional feature. When SNMP-SLIP is selected, communication port must connect to a Terminal Server for operation. NOTE: For optimum operation, T2500 & async server should be set to 9600. 5.1.7.7 My IP Address Menu (SNMP Option) Path : LOOP-T Configuration Console Port Configuration Console Port My IP Press ENTER from Console Port My IP menu My IP 192.209.200.010 OK My IP Address menu shows the current IP address of Loop-T. To change IP address, use left or right arrow key to select the position, and press ENTER key to cycle through the number. This operation must be concluded by moving left or right arrow key to OK position and press ENTER to enable the changes. 5.1.7.8 Trap IP Menu (SNMP Option) Path : LOOP-T Configuration Console Port Configuration Console Port Trap IP Press ENTER from Console Port Trap IP menu - 44 - Chapter 5 Front Panel Operation Trap IP 255.255.255.255 OK Trap IP Address menu shows the current destination IP address of Loop-T used to send an SNMP trap. The default Trap IP address is broadcast address (255.255.255.255). To change Trap IP address, use left or right arrow key to cycle through to the position, and press ENTER key to cycle through the number. This operation must be concluded by moving left or right arrow key to OK position and press ENTER to enable the changes. NOTE: My IP and Trap IP menu only available when SNMP feature is purchased. 5.1.8 Date Menu Date menu is used to reset new RTC date. Under Configuration menu, use left or right key to select Date menu. Path : LOOP-T Configuration Configuration Date DS0-Map Line DTE - 1 Master Clock Press ENTER from Configuration Date menu Save Config Data *01/01/97 Restore Config OK Console Port To change date, use left or right arrow key to move to the digital position, and press ENTER key to cycle through the number. This operation must be concluded by moving left or right arrow key to OK position and press ENTER to enable the changes. Date Time 5.1.9 Time Menu DS0-Map Time menu is used to set new system time. Under Configuration menu, use left or right key to select Time menu. Line Path : LOOP-T Configuration Configuration Time DTE - 1 Master Clock Press ENTER from Configuration Time menu Save Config Data *13:23:02 Restore Config OK To change time, use left or right arrow key to move to the digital position, and press ENTER key to cycle through the number. This operation must be concluded by moving left or right arrow key to OK position and press ENTER to enable the changes. - 45 - Console Port Date Time Chapter 5 Front Panel Operation 5.2 Diagnostics Menu Diagnostics group includes Near Loopback, DTE Loopback, Remote Loopback, RemoteDTE Loopback, Testing Pattern Menu. If a remote loopback is in session, the front panel RLB LED is flashing green. LOOP-T Diagnostics Configuration Diagnostics Alarm Performance Miscellaneous 5.2.1 Near Loopback Menu Near Loopback menus are used to control near end T1 line side loopback operation such as local loopback test, payload loopback test, and line loopback test. Under Diagnostics menu, use left or right key to select Near Loopback menu. Path : LOOP-T Diagnostics Diagnostics Near Loopback Press ENTER from Diagnostics Near Loopback menu Near Loopback *OFF Near Loopback DTE-1 Loopback Remote Loopback RemDTE Loopback RemV54 Loopback Testing Pattern To select a loopback type, use left or right arrow key to cycle through to a desired selection and press ENTER. LOCAL to start local loopback test, PLB to start payload loopback test, and LLB to start line loopback test. Select OFF to end the loopback test. 5.2.2 DTE-1 Loopback Menu DTE Loopback is used to perform DTE loopback test. Under Diagnostics menu, use left or right key to select DTE Loopback menu. Path : LOOP-T Diagnostics Diagnostics DTE-1 Loopback Near Loopback DTE-1 Loopback Remote Loopback Press ENTER from Diagnostics DTE-1 Loopback menu RemDTE Loopback DTE-1 Loopback *OFF RemV54 Loopback Testing Pattern To select DTE loopback type, use left or right arrow key to cycle through to a desired selection and press ENTER. TO-DTE to loop the DTE incoming data back to DTE, TO-LINE to loop the outgoing data back to the incoming direction. Select OFF to end the loopback test. - 46 - Chapter 5 Front Panel Operation 5.2.3 Remote Loopback Menu Remote Loopback is used to activate T1 line remote loopback test. There are three remote loopback types such as inband, AT&T 54016, and ANSI T1.403. Under Diagnostics menu, use left or right key to select Remote Loopback menu. Path : LOOP-T Diagnostics Diagnostics Remote Loopback Press ENTER from Diagnostics Remote Loopback menu Near Loopback DTE-1 Loopback Remote Loopback RemDTE Loopback RemV54 Loopback Testing Pattern Remote Loopback *ACTIVATE INBAND To activate or deactivate remote T1 line loopback, use left or right arrow key cycle through to a desired selection and press ENTER. INBAND for remote line loopback inband coding, AT&T-P for remote payload loopback AT&T FDL coding, ANSI-P for remote payload loopback ANSI FDL coding, ANSI-L for remote line loopback ANSI FDL coding. 5.2.4 RemDTE Loopback Menu RemDTE Loopback is used to control remote DTE channel loopback test. Under Diagnostics menu, use left or right key to select RemDTE Loopback menu. Near Loopback DTE Loopback Remote Loopback RemDTE Loopback RemV54 Loopback Testing Pattern Path : LOOP-T Diagnostics Diagnostics RemDte Loopback Press ENTER from Diagnostics RemoteDTE Loopback menu Remote Loopback *ACTIVATE ALL To activate or deactivate remote DTE channel loopback, use left or right arrow key to cycle through to a proper DTE port, and press ENTER. This RemDTE loopback test uses a proprietary message. If the remote facility responds to this command a LOOPED message will be shown on the LCD display. Otherwise, a NOLOOP message will be shown. 5.2.5 RemV54 Loopback Loop-T FT1 CSU/DSU also supports V.54 Loopback protocol. See ITU V.54 standards for details. Refer to ANSI T1.403-1995 Annex B. - 47 - Chapter 5 Front Panel Operation 5.2.6 Testing Pattern Menu Testing Pattern menu is used to perform QRSS diagnostics or select a variety of test pattern. Under Diagnostics menu, use left or right key to select Testing Pattern menu. Path : LOOP-T Diagnostics Diagnostics Testing Pattern Near Loopback DTE-1 Loopback Remote Loopback RemDTE Loopback RemV54 Loopback Press ENTER from Diagnostics Testing Pattern menu Testing Pattern Testing Pattern *TESTING OFF Use left or right arrow key cycle through to a desired test pattern, and press ENTER. QRSS is used to perform QRSS (Quasi Random Signal Sequence) test. QRSS test channel is selected by a bundle of designated DTE, IDLE, or FULL (all 24 DS0 channels). When QRSS is activated, the LCD display shows the results of pattern synchronization, test DTE channel, and errors count. If QRSS pattern is received, QRSS SYNC is shown on the LCD display. Else, QRSS UNSYNC is shown and bit error count is displayed which counts all single error. User may use > key to inject single bit error, < key to reset error counter, and ESC key to quit QRSS test. QRSS FULL BIT ERROR=0 SYNC In above example, QRSS test status shows the result of the test continuously with the test channel FULL, pattern synchronization SYNC, the bit error count BIT ERROR= 0”. The test pattern is used to transmit on all 24 channels to the T1 line. Four test patterns such as 3-IN-24, 1-IN8, 2-IN-8, and 1:1 are available. To terminate pattern transmit, press ESC key. TRANSMITTING... 3-IN-24 PATTERN 5.3 Alarm Menu Alarm group includes Alarm Queue, Alarm History, Alarm Clear, and Alarm Setup. Alarm menu is used to view alarm queue and alarm history, to clear alarm queue, alarm history, and alarm relay, as well as setup alarm threshold, etc. as in the following paragraph. Configuration Diagnostics Alarm LOOP-T Alarm Performance Miscellaneous 5.3.1 Alarm Queue Menu Alarm Queue menu is used to view alarm queue. Under Alarm menu, use left or right key to select Alarm Queue menu. Path : LOOP-T Alarm Alarm Alarm Queue Alarm Queue Alarm History Alarm Clear Alarm Setup Press ENTER from Alarm Queue menu - 48 - Chapter 5 Front Panel Operation 1: “LOS,LINE” 08:28:46 01/01/97 Alarm Queue menu shows the alarm queue of last 10 alarms. To view any one of the ten alarm queue, use left or right arrow key cycle through and the alarm status is shown on. In the above example, "LOS, LINE" , first part shows alarm type is LOS (Lost Of Signal), second part shows where the alarm occurs is LINE port. It also shows time and date when the alarm took place. 5.3.2 Alarm History Menu Alarm History menu is used to view alarm history. Under Alarm menu, use left or right key to select Alarm History menu. Path : Alarm Queue Alarm History LOOP-T Alarm Alarm Alarm History Press ENTER from Alarm History menu Alarm Clear Alarm Setup Alarm History MAST-CLK OK 0 Alarm History menu shows the alarm history of various type of alarm as shown in Table 3.5. To view alarm history, use left or right arrow key to cycle through and the alarm history is shown. In the above example, the first part MAST-CLK which indicates master clock loss, the second part OK shows the current status, and the last part 0 is the total error count. 5.3.3 Alarm Clear Menu Alarm Clear menu is used to clear alarm queue and history. Under Alarm menu, use left or right key to select Alarm Clear menu. Path : Alarm Queue Alarm History LOOP-T Alarm Alarm Alarm Clear Press ENTER from Alarm Clear menu. Alarm Clear Alarm Setup Alarm Clear Confirm ? At this menu, press ENTER to confirm clear alarm queue and history. Otherwise press ESC to exit without any action. 5.3.4 Alarm Setup Menu Alarm Setup menu is used to set up the threshold level of each alarm type as listed in Table 3.5, and enable alarm relay and auto dial out function. Some type of alarm does not have threshold level. Under Alarm menu, use left or right key to select Alarm Setup menu. Alarm History Alarm Clear 5.3.4.1 Alarm Menu Path : Alarm Queue LOOP-T Alarm Alarm Setup Alarm Alarm Setup Alarm - 49 - Alarm Setup Chapter 5 Front Panel Operation To set up each alarm type as listed in Table 3.5 is similar. Use left and right arrow key to cycle through to select a particular alarm type. For example, to set up T1 Line Yellow Alarm : Path : LOOP-T Alarm Alarm Setup Alarm Alarm Alarm Setup Alarm YEL, LINE and press ENTER. YEL,LINE Alarm *DISABLE To enable or disable alarm error count, use left and right arrow key to cycle through to a desired selection and press ENTER. 5.3.4.2 Dial-Out Menu Path : LOOP-T Alarm Alarm Setup Alarm Alarm Setup Dial-Out To set up each alarm dial out type as listed in Table 3.5 is similar. Use left and right arrow key to cycle through to select a particular dial out type. For example, to setup T1 Line Loss of Frame dial out type : Path : LOOP-T Alarm Alarm Setup Dial-Out Alarm Alarm Setup Dial-Out LOF, LINE and press ENTER. LOF,LINE Dial-Out *DISABLE To enable or disable dial out function when alarm occurs or error count exceed threshold level, use left and right arrow key cycle through to a desired selection and press ENTER. NOTE: Disabling an alarm reporting automatically disables the modem dial out features, even it these features are individually enabled. 5.3.4.3 Threshold Menu Path : LOOP-T Alarm Alarm Setup Alarm Alarm Setup Threshold To setup ES, UAS, CS, and BPV is similar. For example, to setup T1 Line Bipolar Violation threshold level : Path : LOOP-T Alarm Alarm Setup Threshold Alarm Alarm Setup Threshold BPV, LINE and press ENTER. BPV,LINE *10E-5 (5-9) - 50 - OK Chapter 5 Front Panel Operation To change threshold level of BPV (or ES, UAS, CSS), use left or right arrow key to cycle through to the digit position, and press ENTER key to cycle through the number. This operation must be concluded by moving left or right arrow key to OK position and press ENTER to enable the changes. The number inside the parenthesis (5-9) indicates the threshold level of error rate only can change from 10 -9 to 10 . -5 5.4 Performance Menu Performance group includes Line Status, Line Performance, and Reset Performance. LOOP-T Performance Configuration Diagnostics Alarm Performance Miscellaneous 5.4.1 Line Status Menu Line Status menu is used to view Loop-T T1 line receiver error status report. Under Performance menu, use left or right key to select Line Status menu. Path : LOOP-T Performance Performance Line Status Line Status Line Performance Reset Performance Press ENTER from Line Status menu LINE: LOS *YEL LOF AIS RED BPV This menu shows the current error status of line receiver by an receiving YEL. ∗. In the above example, line receiver is 5.4.2 Line Performance Menu Line Performance menu is used to view Loop-T T1 line receiver performance status report. Under Performance menu, use left or right key to select Line Performance menu. Path : LOOP-T Performance Performance Line Performance Line Status Line Performance Reset Performance Press ENTER from Line Performance menu. Line Performance ES: 2 Line Performance menu shows the line receiver (user register) of various type of performance status as shown in Table 3.6. To view line receiver performance status, use left or right arrow key to cycle through. In the above example, the first part ES which indicates Errored Seconds, the second part 2 is two ES. - 51 - Chapter 5 Front Panel Operation 5.4.3 Reset Performance Menu Reset Performance menu is used to clear Loop-T T1 line receiver (user register) performance status report. Under Performance menu, use left or right key to select Reset Performance menu. Path : LOOP-T Performance Performance Reset Performance Line Status Line Performance Reset Performance Press ENTER from Reset Performance menu. Reset Performance Confirm ? At this menu, press ENTER to confirm clear T1 line receiver (user register) performance status report. Otherwise press ESC to exit without any action. 5.5 Miscellaneous Menu Configuration 5.5.1 Miscellaneous Menu Miscellaneous menu is used to view Loop-T firmware EPROM version. From following display, Diagnostics Alarm Performance LOOP-T Miscellaneous Miscellaneous and press ENTER. Miscellaneous ROM Ver:1.14 02/15/97 - 52 - Chapter 6 Terminal Operations 6. TERMINAL OPERATIONS Loop-T FT1 CSU/DSU provides comprehensive report and enhanced configuration capability through the console port. A VT100 type terminal or a modem can be connected to the console port in the front of Loop-T FT1. Using single-character commands and arrow keys, Loop-T FT1 can be configured and monitored. The single-character command is not case sensitive. On each screen, the available commands and the configurable fields are highlighted. Alarm messages are also sent to the console port and are shown on the top of the screen in blinking mode. Upon Loop-T FT1 power up, a main menu is shown. NOTE: On the upper right corner of the screen, a time-of-day display indicates the time the current screen is shown. User may press any key other than ESC to update the screen. NOTE: ONLY in ESF frame format mode, far-end operation is accessible. Loop-T FT1 CSU/DSU V1.14 [DISPLAY] 1 -> 1-Hour Perf. Report 2 -> 24-Hour Perf. Report A -> Line Availability C -> Loop-T System Setup D -> Loop-T Description E -> ESF Error Count H -> Alarm History I -> Loop-T Status Q -> Alarm Queue [ACCESS] F -> Log Off [SETUP] and [CLEAR & RESET] menu O -> Log On [SETUP] and [CLEAR & RESET] menu === Main Menu === 15:35:01 02/15/97 [SETUP] [CLEAR & RESET] >>Enter command ? If the terminal screen is illegible, press "Enter↵" key and "Esc" key alternatively to bring out the main menu. If all efforts fail, check if the right cable is used, and if the console port parameter setting is matched with the terminal using the front panel "Console" command. The main menu consists of four groups of commands, Display, Access, Setup and Clear & Reset. Initially, only Display and Access commands are available. To enable Setup and Clear commands, user has to log on using "O" command. - 53 - Chapter 6 Terminal Operations Loop-T FT1 CSU/DSU V1.14 [DISPLAY] 1 -> 1-Hour Perf. Report 2 -> 24-Hour Perf. Report A -> Line Availability C -> Loop-T System Setup D -> Loop-T Description E -> ESF Error Count H -> Alarm History I -> Loop-T Status Q -> Alarm Queue [ACCESS] F -> Log Off [SETUP] and [CLEAR & RESET] menu O -> Log On [SETUP] and [CLEAR & RESET] menu === Main Menu === 10:51:45 02/15/97 [SETUP] -> V.54 Setup -> Loopback Test -> Alarm Setup -> Password Setup -> Retrieve Last Stored Configuration -> System Setup -> Change Date and Time -> Store Current Configuration -> Send Active DS0-MAP to Far-end -> Synchronize Far-end System Time [CLEAR & RESET] U -> Clear Alarms X -> Clear ESF Error Count Y -> Clear Performance Data Z -> System Reset K L M P R S T V W N >>Enter Command ? 6.1 One Hour Performance Report To show 1 hour performance report, enter "1". A prompt asking for the type of report is shown at the bottom of the screen. Four choices are available. >>Select Register Type? *USER LINE FAR-END ( <- , -> , ENTER ) Use cursor keys to select a desired type of report and "Enter↵" key to view the report as follows. === 1-Hour Performance Report === 15:35:08 02/13/97 USER ESF AMI DS1 -- Valid Seconds in Current 15-Min Interval : 236 seconds (ES) (UAS) (BES) (SES) (CSS) (LOFC) Current 15-Min Interval : 0 236 0 0 0 1 1st Nearest 15-Min Interval : 0 0 0 0 0 0 2nd Nearest 15-Min Interval : 0 0 0 0 0 0 3rd Nearest 15-Min Interval : 0 0 0 0 0 0 4th Nearest 15-Min Interval : 0 0 0 0 0 0 -- Valid 15-Min Intervals in Current 24-Hour Interval : 0 (ES) (UAS) (BES) (SES) (CSS) (LOFC) Current 24-Hour Interval : 0 0 0 0 0 0 << Press ESC Key to Return to Main Menu >> Second line of the screen shows the type of the performance register set, frame format type, line code type and line type of current report. 6.2 Twenty Four Hour Performance Report To show the 24 hour performance report, enters "2". A prompt asking for the type of report and performance data is shown at the bottom of the screen. >>Select Register Type? *USER >>Select Perf Para.? *ES UAS LINE FAR-END ( <- , -> , ENTER ) BES SES CSS LOFC BPV, ESF ( <- , -> , ENTER ) Use cursor keys to select a desired type of report and "Enter↵" key to view the report as follows. - 54 - Chapter 6 Terminal Operations === 24-Hour Performance Report === 15:35:13 02/13/97 USER ES ESF AMI DS1 -- Valid Seconds in Current 15-Min Interval : 241 seconds (ES) (UAS) (BES) (SES) (CSS) (LOFC) Current 15-Min Interval : 0 241 0 0 0 1 -- Valid 15-Min Intervals in Current 24-Hour Interval : 0 (ES) (UAS) (BES) (SES) (CSS) (LOFC) Current 24-Hour Interval : 0 0 0 0 0 0 -- USER, ES, Last 96 15-Min Interval : 01-08 > 0 0 0 0 0 0 0 0 09-16 > 0 0 0 0 0 0 0 0 17-24 > 0 0 0 0 0 0 0 0 25-32 > 0 0 0 0 0 0 0 0 33-40 > 0 0 0 0 0 0 0 0 41-48 > 0 0 0 0 0 0 0 0 49-56 > 0 0 0 0 0 0 0 0 57-64 > 0 0 0 0 0 0 0 0 65-72 > 0 0 0 0 0 0 0 0 73-80 > 0 0 0 0 0 0 0 0 81-88 > 0 0 0 0 0 0 0 0 89-96 > 0 0 0 0 0 0 0 0 << Press ESC Key to Return to Main Menu >> Second line of the screen shows the type of the performance register set, performance register, frame format type, line code type and line type of current report. 6.3 Line Availability Report To show the line availability report, enter "A". The information, based on user performance register set, includes the valid seconds, available seconds, unavailable seconds and line availability. === Line Availability during Last 24-Hour === Valid Seconds : 247 seconds Available Seconds : 0 seconds Unavailable Seconds : 247 seconds Line Availability : 0.0 % 15:35:19 02/13/97 << Press ESC Key to Return to Main Menu >> 6.4 System Setup Report To show the system configuration report, enter "C". A prompt asking for the type of report at the bottom of the screen. >>Select Type? *LOCAL STORED FAR-END ( <- , -> , ENTER ) Use cursor keys to select a desired type of report and "Enter↵" key to view the report as follows. - 55 - Chapter 6 Terminal Operations === Loop-T System Setup === 15:35:24 02/15/97 LOCAL DS0-MAP:ACTIVE MAP = MAP1 MAP1=[iiiiiiiiiiiiiiiiiiiiiiii] MAP2=[iiiiiiiiiiiiiiiiiiiiiiii] SWITCH TIME = MAP1 00:00-12:00 MAP2 12:00-00:00 LINE:FRAME=ESF CODE=AMI LBO=0.0 YEL=ON INBAND=ON ADDR=CSU IDLE=FF (RATE) <MAP1> <MAP2> (CLOCK) (DATA) (INTERFACE) (RTS) (TTM) DTE1: 64K 0: 0K 0: 0K NORMAL NORMAL V.35 ACTIVE OFF MAST-CLOCK: LINE 2nd-CLOCK:LINE CURRENT=2nd-CLOCK RS-232 PORT: BAUD=9600 DATA=8 STOP=1 PAR=NONE XON-XOFF=OFF INTERF=TERMINAL DIAL-OUT SETUP: PRIMARY DIALSTRING: ATDT START TIME 08:00 STOP TIME 07:59 SECONDARY DIALSTRING: ATDT START TIME 08:00 STOP TIME 07:59 INACTIVITY TIMEOUT: 0 MINUTES DEVICE NAME: LOOP-T-01 MY IP ADDRESS : 000.000.000.000 TRAP IP ADDRESS: 255.255.255.255 COMMUNITY NAME: public << Press ESC Key to Return to Main Menu >> 6.5 System Description Report To show the system description report, enter "D". A prompt asking for the type of system description report at the bottom of the screen. The report shows the detail information about the Loop-T. If you contact our customer service concerning the Loop-T product, please have those information ready. >>Select Type? *LOCAL FAR-END ( <- , -> , ENTER ) Use cursor keys to select a desired type of report and "Enter↵" key to view the report as follows. === Loop-T Description LOCAL Serial Number : Main Board Version : ROM Version : Configuration : === 15:35:29 02/13/97 001001 096 Loop-T V1.14 02/15/1997 DTE1-DS1-SNMP << Press ESC Key to Return to Main Menu >> 6.6 ESF Error Count Report To show the ESF error report, enter "E". A prompt asking for the type of report at the bottom of the screen. >>Select Register Type? *USER LINE FAR-END ( <- , -> , ENTER ) Use cursor keys to select a desired type of report and "Enter↵" key to view the report as follows. - 56 - Chapter 6 Terminal Operations === ESF Error Count === USER Start Time : 23:42:34 09/20/UU ESF Errors : 0 15:35:34 02/13/97 << Press ESC Key to Return to Main Menu >> For user performance register set, the ESF error count is the number of ESF error since the reset ESF error count command is executed. 6.7 Alarm History Report To show the alarm history report, enter "H". A prompt asking for the type of alarm history report at the bottom of the screen. >>Select Type? *LOCAL FAR-END ( <- , -> , ENTER ) Use cursor keys to select a desired type of report and "Enter↵" key to view the report as follows. === Alarm History Report === LOCAL Start Time = 23:42:34 09/20/UU (ALARM-TYPE) (THRESHOLD) (CUR-STA) (COUNT) MAST-CLK LOSS DISABLE 0 YEL,LINE DISABLE 0 AIS,LINE DISABLE 0 LOS,LINE DISABLE 0 LOF,LINE DISABLE 0 BPV,LINE 10E-5 DISABLE 0 ES,LINE 1 DISABLE 0 UAS,LINE 1 DISABLE 0 CSS,LINE 1 DISABLE 0 DTE1 ALARM DISABLE 0 15:35:39 02/13/97 (ALARM) DISABLE DISABLE DISABLE DISABLE DISABLE DISABLE DISABLE DISABLE DISABLE DISABLE (DIALOUT) DISABLE DISABLE DISABLE DISABLE DISABLE DISABLE DISABLE DISABLE DISABLE DISABLE << Press ESC Key to Return to Main Menu >> 6.8 System Status Report To show the Loop-T FT1 status report, enter "I". A prompt asking for the type of system status report at the bottom of the screen. >>Select Type? *LOCAL FAR-END ( <- , -> , ENTER ) Use cursor keys to select a desired type of report and "Enter↵" key to view the report as follows. - 57 - Chapter 6 Terminal Operations === Loop-T Status === LOCAL -- LINE -LOS : Yes LOF : Yes RCV AIS : No RCV YEL : No XMT AIS : No XMT YEL : Yes BPV ERROR COUNT : 0 ES ERROR COUNT : 0 -- DTEn -DTE1 RTS LOSS : Yes DTE1 CLOCK LOSS : No 15:35:45 02/13/97 -- TEST -PATTERN TRANSMITTED QRSS CHANNEL NEAR-END LOOPBACK DTE1 LOOPBACK : : : : OFF OFF OFF TO-DTE << Press ESC Key to Return to Main Menu >> In the example, DTE1 port is looping back DTE port signal to DTE. Yellow alarm is sending out to the line. 6.9 Alarm Queue Report To show the alarm queue report, enter "Q". === Alarm Queue === ----- Page 1 ----- 15:35:50 02/13/97 << Press ESC Key to Return to Main Menu >> The latest 40 alarm entries are shown on the terminal as above in two pages of 20 entries each. If there are more than 20 entries, press any key other than "ESC" to view the 2nd page. To return to main menu, press "ESC" key. 6.10 Logoff After completing the system setup or clear history data, user should log off to prevent accidentally changing the system configuration. Enter "F" to Logoff. 6.11 V54 Setup To show the V.54 setup, press K from main menu. A pormpt asking for the type of system setup menu at the following screen. >>Select Type? *LOCAL FAR-END ( <- , -> , ENTER ) Cursor keys are used to select the field to be changed. As the cursor moves from field to field, the second line on the screen shows the available input for the field. After making all the changes, enter "ESC" key and answer yes to take the change into effect. - 58 - Chapter 6 Terminal Operations === Local V.54 Setup === ARROW KEYS : CURSOR MOVE , TAB : ROLL UP V.54 : OFF RL : OFF LL : OFF 11:36:47 06/11/99 << Press ESC Key to Return to Main Menu >> 6.12 Logon To show a full menu, user has to Logon. If the password option is turned on, a prompt asking for password is shown. ==>> Enter Password ? Only after a valid password is entered, the full menu is shown, otherwise user is asked to enter the correct password again. >>Invalid Input of Password ! Try Again ?[y/n] 6.13 Loopback Test Menu To enter the loopback test menu, enter "L". To initiate the loop back test, select the desired options and enter "Enter↵" key to start. The loop back tests can be performed simultaneously on the T1 line, and DTE ports. At the bottom of the screen, information about the loop back test is shown. === Loopback Test Menu === ARROW KEYS : CURSOR MOVE 15:35:55 02/13/97 , ENTER : SELECT - NEAR-END LOOPBACK : *OFF LOCAL PLB LLB - DTE1 LOOPBACK : *OFF TO-DTE TO-LINE - SEND LOOPBACK ACTIVATE CODE TO FAR-END : *IN-BAND AT&T-P ANSI-P ANSI-L - SEND LOOPBACK DEACTIVATE CODE TO FAR-END : *IN-BAND AT&T-P ANSI-P ANSI-L - SEND CHANNEL LOOPBACK ACTIVATE CODE TO FAR-END : *ALL DTE1 - SEND CHANNEL LOOPBACK DEACTIVATE CODE TO FAR-END : *ALL DTE1 - SEND V54 LOOPBACK ACTIVATE CODE TO FAR-END : *DTE1 - SEND V54 LOOPBACK DEACTIVATE CODE TO FAR-END : *DTE1 - SEND QRSS : *OFF FULL DTE1 IDLE - SEND TEST PATTERN : *OFF 3-IN-24 1-IN-8 2-IN-8 1:1 Status : << Press ESC Key to Return to Main Menu >> To initiate the QRSS test, choose the test port(s) and press ENTER. When QRSS pattern synchronization is acquired, a bit error counter, an erred second counter, and an elapsed second counter are displayed on the terminal. Press the right arrow key to inject an error, the left arrow key to reset the counters, or the ESC key to terminate the QRSS test. In order for the QRSS BERT to work, a far-end loopback (compatible with the type of QRSS pattern selected), or other means of returning the transmitted pattern back to the Line port receiver, must be active. (This restriction does not apply to the other test pattern diagnostics.) - 59 - Chapter 6 Terminal Operations Status : QRSS SYNC ,CHANNEL=FULL,BIT ERR= 65535 ERROR SECONDS= 20 ,ELAPSED SECONDS= 139027 To transmit test pattern continuously, choose one of the 4 patterns and press "Enter" key to start the test. Enter "Esc" key to stop the test. Status : "Transmitting 3-in-24 test pattern" 6.14 Alarm Setup Menu To enter the alarm setup menu, enter "M". A prompt asking for the type of alarm setup menu at the bottom of the screen. >>Select Type? *LOCAL FAR-END ( <- , -> , ENTER ) For each type of alarm, three choices of setup are available. "ALM" is to set whether this alarm register counter to be enable or disable while "DIAL" and "RELAY" is to activate or deactivate the alarm reporting function. When alarm exceed threshold, DIAL is to dial out from the console port, and RELAY is to engage the alarm relay. === Local Alarm Setup === ARROW KEYS : CURSOR MOVE , TAB : ROLL UP (TYPE) (THRESHOLD)(ALM) MAST-CLK LOSS DIS YEL,LINE DIS AIS,LINE DIS LOS,LINE DIS LOF,LINE DIS BPV,LINE 10E-5 DIS ES,LINE 1 DIS UAS,LINE 1 DIS CSS,LINE 1 DIS DTE1 ALARM DIS 15:36:06 02/13/97 (DIAL) DIS DIS DIS DIS DIS DIS DIS DIS DIS DIS << Press ESC Key to Return to Main Menu >> NOTE: Disabling an alarm automatically inhibits DIAL OUT and RELAY, EVEN if DIAL OUT and RELAY are enabled. 6.15 Password Setup Menu To change the password setup, enter "P". A prompt asking for action is shown. === Password Setup === Password ? *DISABLE ENABLE CHANGE 15:36:12 02/13/97 ( <- , -> , ENTER ) To enable the password, select "ENABLE". The previous entered password is used. The password itself is not case sensitive. If you want to select your own password, select "CHANGE". A prompt asking the original password and new password are shown. Enter CURRENT Password: Enter NEW Password: Re-Enter NEW Password: 6.16 Retrieve Last Stored Configuration In case configuration changes cause unexpected problems, enter "R" to restore the user stored configuration. The system will prompt the following message. Enter "Y" to retrieve, and "N" to quit. =>> Retrieve Last Stored Configuration (Y/N)? - 60 - Chapter 6 Terminal Operations 6.17 System Setup Menu Enter "S" to show and configure the Loop-T. A prompt asking for the type of system setup menu at the bottom of the screen. >>Select Type? *LOCAL FAR-END ( <- , -> , ENTER ) Cursor keys are used to select the field to be changed. As the cursor moves from field to field, the second line on the screen shows the available input for the field. After making all the changes, enter "Esc" key and answer yes to take the change into effect. NOTE: Certain settings cannot be modified in the FAR-END System Setup menu (i.e., Line frame format cannot be changed to D4 framing). === Local System Setup === 15:36:27 02/13/97 ARROW KEYS : CURSOR MOVE , TAB : ROLL UP DS0-MAP:ACTIVE MAP = MAP1 MAP1=[iiiiiiiiiiiiiiiiiiiiiiii] MAP2=[iiiiiiiiiiiiiiiiiiiiiiii] SWITCH TIME = MAP1 00:00-12:00 MAP2 12:00-00:00 LINE:FRAME=ESF CODE=AMI LBO=0.0 YEL=ON INBAND=ON ADDR=CSU IDLE=FF (RATE) <MAP1> <MAP2> (CLOCK) (DATA) (INTERFACE) (RTS) (TTM) DTE1: 64K 0: 0K 0: 0K NORMAL NORMAL V.35 ACTIVE OFF MAST-CLOCK: LINE 2nd-CLOCK:LINE CURRENT=2nd-CLOCK RS-232 PORT: BAUD=9600 DATA=8 STOP=1 PAR=NONE XON-XOFF=OFF INTERF=TERMINAL DIAL-OUT SETUP: PRIMARY DIALSTRING: ATDT (32 char) START TIME 08:00 STOP TIME 07:59 SECONDARY DIALSTRING: ATDT (32 char) START TIME 08:00 STOP TIME 07:59 INACTIVITY TIMEOUT: 0 MINUTES DEVICE NAME: LOOP-T-01 (20 char) SNMP ACTIVATION CODE: (16 char) << Press ESC Key to Return to Main Menu >> 6.18 Change Date and Time Enter "T" to change the system date and time. The date and time are shown with the cursor on the hour field. Use the arrow keys to select the field to be changed and enter the correct information. 15:36:41 02/13/97 ( <- , -> : CURSOR MOVE , 0~23 : INPUT ) Press the "Esc" key after making the necessary changes and confirms the changes with "Y". Input is checked for validation. Invalid information is discarded and the original value is shown. >>Save DATE & TIME Setup (Y or N) ? 6.19 Store Current Configuration Enter "V" to save the working configuration to the user stored configuration so that it can be retrieved using "R" command. System will prompt with the following message. Enter "Y" to store, and "N" to quit. =>> Store Current Configuration (Y/N)? 6.20 Send Active DS0 Map to Far-end Enter "W" command to send current active DS0 map information to far-end Loop-T CSU/DSU. Since the notification procedure is implemented in proprietary format, only Loop Telecommunication's CSU/DSU product family would interpret the message correctly. Loop-T has to be in ESF frame format mode to send the active DS0 map to far-end. An "ACK" or "FAIL" is shown depending on whether far-end accept the DS0 map or not. =>> Send Active DS0-MAP to Far-end ... ACK - 61 - Chapter 6 Terminal Operations 6.21 Synchronize Far-end System Time Enter "N" command to synchronize far-end Loop-T CSU/DSU system time's minutes and seconds. Due to the time zone difference, hours is not updated by this command. Since the notification procedure is implemented in proprietary format, only Loop Telecommunication's CSU/DSU product family would interpret the message correctly. An "ACK" is shown if the far-end acknowledges this command; otherwise, a "FAIL" is shown. =>> Synchronize Far-end System Time .ACK 6.22 Clear Alarms Enter "U" to clear alarm history and queues. 6.23 Clear ESF Error Count Enter "X" to reset user ESF error counter. The ESF error count start time is reset. See Table 3.7 for what reports will be cleared. 6.24 Clear Performance Data Enter "Y" to reset user performance registers. This command does not affect the contents of the performance register set. This command includes the functions of ”. See Table 3.7 for what reports will be cleared. 6.25 System Reset Enter "Z" to reset the system without power down the unit. Upon this command, system will restart from init routine and perform all power-up diagnostics procedures. System will prompt the following message and user must enter a valid password to execute this command. ==>> Enter Password - 62 - Chapter 7 Appendix A 7. APPENDIX A: QRSS (Quasi-Random Signal Sequence) QRSS Quasi-Random Signal Sequence is defined in ANSI T1.403 - 1989, consists of a PRBS with 20-stage shift register modified to limit the maximum number of sequential zeros transmitted to 14. The QRSS generates every combination of 20-bit words, repeats every 1,048,575 bits and contains high density sequences, low density sequences, and sequences that change from low density to high density, and vice versa. When framed, the QRSS meets the pulse density criteria to provides no more than 15 zeros in a sequence. The pattern is generated in a twenty-stage register whose 17th and 20th stage outputs are added in a modulo-two addition stage, and the result fed back to the input of the first stage. An output bit is forced to be a ONE when the next 14 bits are all ZERO. This test pattern can be used in conjunction with local loopback to test local Loop-T FT1 CSU/DSU integrity. It can also be used in conjunction with remote loopback to test remote Loop-T FT1 CSU/DSU and DS1 network line quality. - 63 - Chapter 7 Appendix A 8. APPENDIX B: Front Panel Menu Tree (1 of 2) Main Menu Loop-T Configuration Loop-T Diagnostics Loop-T Alarm Loop-T Performance Loop-T Miscellaneous Configuration DS0-Map DS0-Map Active Map Select Active Map Line Frame Configuration Master Clock DS0-Map Map 1 Map 1 Channel - 1 Line Code Console Port Baud Rate Configuration Save Config DS0-Map Map 2 : : : Line LBO Console Port Data Length Map 1 Channel 1-24 Line YEL Console Port Stop Bit Configuration Restore Config Display ROM Version Configuration Date DS0-Map Switch Time Map1 Map2 Time Line Inband Console Port Parity Configuration Time DS0-Map Send Map Sending Active Map Line Address Console Port Xon-Xoff Line Idle Code Console Port Interface Configuration Line Configuration Console Port Console Port My IP Configuration DTE-1 Console Port Trap IP DTE-1 Rate DTE-1 Clock DTE-1 Data DTE-1 Interface DTE-1 RTS - 64 - DTE-1 TTM DTE-1 V54 DTE-1 RL DTE-1 LL Chapter 8 Appendix B Front Panel Menu Tree (2 of 2) Main Menu Loop-T Configuration Configuration Master Clock Loop-T Diagnostics Master Clock Primary Clock Loop-T Alarm Loop-T Performance Loop-T Miscellaneous Alarm Alarm Queue Performance Line Status Shows Line Status Configuration DS0-Map Master Clock Secondary Clock Alarm Alarm History Performance Reset Performance Reset Performance Configuration Line Shows Curr Clk Alarm Alarm Clear Performance Line Performance ES: Alarm Alarm Setup Alarm Setup Alarm UAS: Configuration DTE-1 DS0-Map Active Map Configuration Console Port DS0-Map Send Map Diagnostics Near Loopback Alarm Setup Dial-Out BES: Configuration Save Config DS0-Map Switch Time Diagnostics DTE-1 Loopback Alarm Setup Threshold SES: Configuration Restore Config DS0-Map Send Map Diagnostics Remote Loopback Configuration Date DS0-Map Map 1 Diagnostics RemDTE LOFC: Configuration Time DS0-Map Map 2 Diagnostics RemV54 BPV: Diagnostics Testing Pattern - 65 - CSS: Chapter 9 Appendix C 9. APPENDIX C: Glossary of Abbreviations A AIS AMI ANSI Q Alarm Indication Signal QRSS Alternate Mark Inverting American National Standards Institute B B8ZS Bipolar 8 Zero Substitution C CSU D D&I DACS Channel Service Unit Clear to Send DSR DSU DTE DTR Drop and Insert Digital Access Cross-Connect System Data Set Ready Data Service Unit Data Terminal Equipment Data Terminal Ready E ESF Extended Super Frame L LAN LBO LLB LOFS LOS Local Area Network Line Build Out Line Loopback Loss of Frame Sync Loss of Signal N NI Network Interface O OOF Out of Frame P PBX PLB PLL Private Branch Exchanges Payload Loopback Phase Lock Loop R RTC RTS S SNMP T TE TTM Quasi-Random Signal Sequence Real Time Clock Request to Send Simplified Network Management CTS Protocol Terminal Equipment Terminal Timing Mode W WANWide Area Network - 66 - Chapter 10 Appendix D 10. APPENDIX D AFFIDAVIT FOR CONNECTION OF CUSTOMER PREMISES EQUIPMENT TO 1.544 MBPS AND/OR SUBRATE DIGITAL SERVICES For the work to be performed in the certified territory of Telco's Name: S State of: S Country of: S I, , of S (Name Authorized Repressentative) (Customer Name) , (Customer's Address) J (Telephone Number) being duly sworn, state: I have responsibility for the operation and maintenance of the terminal equipment to be connected to 1.544 Mbps and/or subrate digital service. The terminal equipment to be connected complies with Part 68 of the FCC rules except for the encoded analog content and billing protection specifications. With respect to encoded analog content and billing protection: " I attest that all operations associated with the establishment, maintenance and adjustment of the digital CPE, with respect to the analog content and encoded billing information, continually complies with Part 68 of the FCC Rules and Regulations. " The digital CPE does not transmit digital signals containing encoded analog content or billing information which is intended to be decoded within the telecommunications network. " The encoded analog content and billing protection is factory set and is not under the control of the customer. - 67 - Chapter 10 Appendix D I attest that operator(s)/maintainer(s) of the digital CPE responsible for the establishment, maintenance and adjustment of the encoded analog content and billing information has (have) been trained to perform these functions by successfully having completed one of the following: (Check appropriate blocks) # (a) A training course provided by the manufacturer/grantee of the equipment used to encode analog signals; or # (b) A training course provided by the customer or authorized representative, using training materials and instructions provided by the manufacturer/grantee of the equipment used to encode analog signals; or # (c) An independent training course (e.g., trade school or technical institution) recognized by the manufacturer/grantee of the equipment used to encode analog information; or # (d) In lieu of the proceeding training requirements, the operator(s)/maintainer(s) is (are) under the control of a supervisor trained in accordance with (circle one) above. I agree to provide (Telco's name) with the proper (Telco's Name) documentation to demonstrate compliance with the information as provided in the preceding paragraphs, if so requested. (Signature) (Title) B) (Date) Subscribed and sworn to before me this day of B Notary Public My commission expires: d - 68 - , B