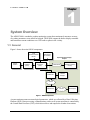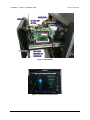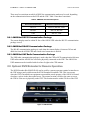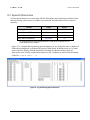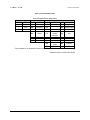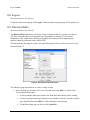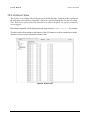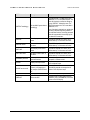
1
Automated Weather Observing System User’s Manual 3000-001 × FAA APPROVED ECP180 — 2011 May 5 NOT FAA APPROVED Rev. C All Weather Inc. • 1165 National Drive • Sacramento, CA 95834 • USA • 800.824.5873 • www.allweatherinc.com Copyright © 201, All Weather, Inc. All Rights Reserved. The information contained herein is proprietary and is provided solely for the purpose of allowing customers to operate and/or service All Weather, Inc. manufactured equipment and is not to be released, reproduced, or used for any other purpose without written permission of All Weather, Inc. Throughout this manual, trademarked names might be used. Rather than put a trademark (™) symbol in every occurrence of a trademarked name, we state herein that we are using the names only in an editorial fashion and to the benefit of the trademark owner, and with no intention of infringement. All Weather, Inc. and the All Weather, Inc. logo are trademarks of All Weather, Inc. Disclaimer The information and specifications described in this manual are subject to change without notice. Latest Manual Version For the latest version of this manual, see the Product Manuals page under Reference on our web site at www.allweatherinc.com/. All Weather, Inc. 1165 National Drive Sacramento, CA 95834 Tel.: (916) 928-1000 Fax: (916) 928-1165 Contact Customer Service • Phone support is available from 8:00am - 4:30pm PT, Monday through Friday. Call 916-928-1000 and ask for “Service.” • Online support is available by filling out a request at www.allweatherinc.com/customer/support.html • E-mail your support request to [email protected] C O N T E N T S AWOS 3000 USER’S MANUAL Table of Contents 1. SYSTEM OVERVIEW ............................................................................................................................................................. 1 1.1 General........................................................................................................................................................................... 1 1.2 Sensor Station ................................................................................................................................................................ 2 1.3 Data Collection Platform (DCP)...................................................................................................................................... 2 1.3.1 DCP Display Screens .......................................................................................................................................... 3 1.4 Central Data Processor (CDP) ....................................................................................................................................... 3 1.4.1 Voice Output........................................................................................................................................................ 3 1.4.1.1 VHF Radio.................................................................................................................................................. 3 1.4.2 Data Reduction .................................................................................................................................................... 3 1.4.3 Data Archiving ..................................................................................................................................................... 4 1.5 Remote Display Options................................................................................................................................................. 4 1.5.1 Web Displays ...................................................................................................................................................... 5 1.6 AWOS Configurations .................................................................................................................................................... 6 1.6.1 AWOS I ............................................................................................................................................................... 6 1.6.2 AWOS II .............................................................................................................................................................. 6 1.6.3 AWOS A-V .......................................................................................................................................................... 7 1.6.4 AWOS III ............................................................................................................................................................. 7 1.6.5 AWOS III-P .......................................................................................................................................................... 8 1.6.6 AWOS III-T .......................................................................................................................................................... 8 1.6.7 AWOS III-PT........................................................................................................................................................ 9 1.6.8 AWOS III-PTZ ..................................................................................................................................................... 9 1.7 Sensor Reporting Table ............................................................................................................................................... 10 1.8 AWOS Output Modes ................................................................................................................................................... 12 1.8.1 Mode 1—Full-Time Automated Operation......................................................................................................... 12 1.8.2 Mode 2—Full-Time Automated Operation with Local Notice to Airmen (NOTAM) ............................................ 12 1.8.3 Mode 3—Full-Time Automated Operation with Manual Weather Augmentation and Local NOTAM Option .... 12 1.8.4 Mode 4—Part-Time Manual Operation ............................................................................................................. 12 2. CENTRAL DATA PROCESSOR .......................................................................................................................................... 13 2.1 CDP Rack Layout ......................................................................................................................................................... 14 2.2 Back Panel Connections .............................................................................................................................................. 14 2.3 CDP Top-Shelf Components ........................................................................................................................................ 14 2.3.1 CPU Board ........................................................................................................................................................ 16 2.3.2 Hard Drive ......................................................................................................................................................... 16 2.3.3 Interface Board .................................................................................................................................................. 16 2.3.4 Power Supply .................................................................................................................................................... 16 2.3.5 Communications................................................................................................................................................ 16 2.3.6 VHF Ground-to-Air Radio .................................................................................................................................. 16 2.3.7 Voice Modem .................................................................................................................................................... 16 2.3.8 Monitor Volume Controls ................................................................................................................................... 16 2.4 CDP Bottom-Shelf Components................................................................................................................................... 17 2.4.1 AWOS Net ......................................................................................................................................................... 17 2.5 UPS .............................................................................................................................................................................. 17 2.6 GPS Receiver............................................................................................................................................................... 18 2.7 NADIN Connection ....................................................................................................................................................... 18 C O N T E N T S AWOS 3000 USER’S MANUAL 2.8 Remote Displays Using AWOS Net ............................................................................................................................. 18 2.8.1 AWOS Net RS-232 Communication Package ................................................................................................... 19 2.8.2 AWOS Net RS-485 Communication Package ................................................................................................... 19 2.8.3 AWOS Net UHF Radio Communication Package ............................................................................................. 19 2.9 Optional KVM Extender for Remote Operation ............................................................................................................ 19 2.9.1 KVM Extender Operation .................................................................................................................................. 22 2.10 Optional AWOS/ATIS Interface .................................................................................................................................. 23 2.10.1 Remote Switch ................................................................................................................................................ 25 2.10.2 ATIS Interface Cable ....................................................................................................................................... 25 2.11 CDP Block Diagram ................................................................................................................................................... 25 3. AWOS 3000 SOFTWARE VIEWS........................................................................................................................................ 27 4. ALARMS............................................................................................................................................................................... 28 4.1 Alarms List.................................................................................................................................................................... 29 4.1.1 Acknowledging and Deleting Alarms ................................................................................................................. 29 4.2 Blink Alarm ................................................................................................................................................................... 30 5. TOWER VIEW ...................................................................................................................................................................... 31 5.1 Special Characters ....................................................................................................................................................... 32 5.2 Winds ........................................................................................................................................................................... 33 5.2.1 Wind Speed ....................................................................................................................................................... 34 5.2.2 Wind Direction ................................................................................................................................................... 34 5.2.3 Wind Direction Range ....................................................................................................................................... 34 5.2.4 Wind Gust.......................................................................................................................................................... 34 5.2.5 Variable Wind Direction ..................................................................................................................................... 34 5.3 Visibility ........................................................................................................................................................................ 35 5.4 Present Weather .......................................................................................................................................................... 36 5.5 Sky Condition ............................................................................................................................................................... 38 5.6 Temperature ................................................................................................................................................................. 39 5.6.1 Air Temperature ................................................................................................................................................ 39 5.6.2 Dew Point .......................................................................................................................................................... 39 5.6.3 Relative Humidity .............................................................................................................................................. 39 5.7 Air Pressure.................................................................................................................................................................. 40 5.7.1 Altimeter Setting ................................................................................................................................................ 40 5.7.2 Density Altitude ................................................................................................................................................. 40 1.1.2 Air 40 1.1.3 Pressure ............................................................................................................................................................ 40 5.8 Precipitation.................................................................................................................................................................. 41 5.9 Variable Visibility .......................................................................................................................................................... 42 1.1.1 Variable Visibility ............................................................................................................................................... 42 5.10 Lightning ..................................................................................................................................................................... 43 5.11 Remark ....................................................................................................................................................................... 45 6. NAVIGATING THE MENUS ................................................................................................................................................. 46 C O N T E N T S AWOS 3000 USER’S MANUAL 7. RESTRICTED FUNCTIONS ................................................................................................................................................. 47 7.1 Edit Menu ..................................................................................................................................................................... 47 7.1.1 Configuration > Airport > General Tab .............................................................................................................. 47 7.1.1.1 Barometric Pressure Offsets .................................................................................................................... 48 7.1.2 Configuration > Sensors Tab............................................................................................................................. 49 7.1.3 Alarm Configuration Menu................................................................................................................................. 50 7.1.3.1 Setting Range Alarm Values .................................................................................................................... 51 7.1.3.2 Setting Static Alarm Values...................................................................................................................... 51 7.1.4 Configuration > Voice Tab ................................................................................................................................. 52 7.1.5 Voice Remark .................................................................................................................................................... 53 7.1.5.1 Recording the Airport Name..................................................................................................................... 53 8. FILE MENU........................................................................................................................................................................... 54 8.1 Login............................................................................................................................................................................. 54 8.2 Logout .......................................................................................................................................................................... 55 8.3 Historical Data .............................................................................................................................................................. 55 8.4 Printer Setup ................................................................................................................................................................ 57 8.4.1 Automatic Printing ............................................................................................................................................. 57 8.4.2 Printer Status..................................................................................................................................................... 57 8.4.3 Print Test Page.................................................................................................................................................. 57 8.4.4 Set Top of Form ................................................................................................................................................ 58 8.5 Minimize ....................................................................................................................................................................... 58 8.6 Exit ............................................................................................................................................................................... 58 9. EDIT MENU .......................................................................................................................................................................... 59 9.1 Group and User Authorizations .................................................................................................................................... 60 9.2 Group Authorizations.................................................................................................................................................... 61 9.2.1 Adding a Group ................................................................................................................................................. 62 9.2.2 Editing a Group ................................................................................................................................................. 63 9.2.3 Deleting a Group ............................................................................................................................................... 63 9.3 User Authorizations ...................................................................................................................................................... 64 9.3.1 Adding a User.................................................................................................................................................... 65 9.3.2 Editing a User .................................................................................................................................................... 66 9.3.3 Deleting a User.................................................................................................................................................. 66 9.4 Configuration ................................................................................................................................................................ 67 9.4.1 Airport Tab......................................................................................................................................................... 68 9.4.1.1 General .................................................................................................................................................... 68 9.4.1.2 Runways .................................................................................................................................................. 69 9.4.2 Reports Tab....................................................................................................................................................... 70 9.4.2.1 METAR Tab ............................................................................................................................................. 70 9.4.2.2 NADIN Tab ............................................................................................................................................... 71 9.4.3 Sensors Tab ...................................................................................................................................................... 71 9.4.4 Voice Tab .......................................................................................................................................................... 72 9.4.4.1 Status ....................................................................................................................................................... 72 9.4.4.2 Playback Mode ........................................................................................................................................ 72 9.4.4.3 Enabling Phone Output ............................................................................................................................ 73 9.4.4.4 Enabling VHF Radio Output ..................................................................................................................... 73 9.4.4.5 Voice Test Mode ...................................................................................................................................... 73 C O N T E N T S AWOS 3000 USER’S MANUAL 9.4.5 Misc Tab ............................................................................................................................................................ 74 9.4.5.1 General Tab ............................................................................................................................................. 74 9.4.5.2 Time Tab .................................................................................................................................................. 75 9.5 Alarm Configuration...................................................................................................................................................... 76 9.6 Turn On/Off Sensors .................................................................................................................................................... 76 9.7 Handling Archive Data.................................................................................................................................................. 77 9.8 Voice Remark ............................................................................................................................................................... 77 9.8.1 Recording a Voice Remark ............................................................................................................................... 77 9.8.2 Playback Mode .................................................................................................................................................. 78 9.8.3 Enabling Voice Output....................................................................................................................................... 78 9.8.4 Voice Remark Expiration ................................................................................................................................... 78 9.8.5 Telephone Access to Voice Remarks ............................................................................................................... 78 10. VIEW MENU ....................................................................................................................................................................... 80 10.1 Selecting the Data View ............................................................................................................................................. 80 10.2 Tower View................................................................................................................................................................. 81 10.3 Diagnostics View ........................................................................................................................................................ 82 10.3.1 System Diagnostics ......................................................................................................................................... 82 10.3.2 DCP Diagnostics ............................................................................................................................................. 84 10.3.2.1 Statistics ................................................................................................................................................. 85 10.3.2.2 Status ..................................................................................................................................................... 87 10.3.2.3 Sensor Data ........................................................................................................................................... 88 10.3.2.4 Recent Reponses................................................................................................................................... 88 10.3.3 Cloud Height Indicator Diagnostics ................................................................................................................. 89 10.3.4 Freezing Rain Diagnostics .............................................................................................................................. 91 10.3.5 Lightning Diagnostics ...................................................................................................................................... 93 10.3.6 Precipitation Identification/Intensity Diagnostics ............................................................................................. 95 10.3.7 Visibility Diagnostics ........................................................................................................................................ 97 10.3.7.1 Configuration .......................................................................................................................................... 98 10.3.7.2 Mode ...................................................................................................................................................... 98 10.3.7.3 Emitter/Detector ..................................................................................................................................... 99 10.3.7.4 Other .................................................................................................................................................... 100 10.3.8 GPS Diagnostics ........................................................................................................................................... 101 10.4 Archives View ........................................................................................................................................................... 103 10.4.1 Navigation and Data Panes........................................................................................................................... 104 10.4.2 Snap Shot Archive......................................................................................................................................... 104 10.4.3 Delete Archive ............................................................................................................................................... 104 10.4.4 Save Archive ................................................................................................................................................. 105 11. MANUAL OBSERVATIONS MENU ................................................................................................................................. 106 11.1 Manual Observations and Automatic Data ............................................................................................................... 106 11.2 Manual Observation Text Colors .............................................................................................................................. 107 11.3 Air Pressure Manual Observation ............................................................................................................................ 108 11.4 Air Temperature Manual Observation ...................................................................................................................... 109 11.5 Clouds Manual Observation ..................................................................................................................................... 110 11.6 Lightning Manual Observation.................................................................................................................................. 111 11.7 Precipitation Manual Observation ............................................................................................................................ 112 11.8 Present Weather Manual Observation ..................................................................................................................... 113 11.9 Visibility Manual Observation ................................................................................................................................... 114 C O N T E N T S AWOS 3000 USER’S MANUAL 12. REPORTS MENU ............................................................................................................................................................. 115 12.1 Entering a METAR Remark ...................................................................................................................................... 115 13. SYSTEM STATUS MENU ................................................................................................................................................ 117 13.1 Alarms... ................................................................................................................................................................... 117 13.1.1 Acknowledging and Deleting Alarms ............................................................................................................. 118 13.2 Blink Alarm ............................................................................................................................................................... 118 14. HELP MENU ..................................................................................................................................................................... 119 14.1 About ........................................................................................................................................................................ 119 15. MAINTENANCE ............................................................................................................................................................... 120 16. REMOTE MAINTENANCE MONITORING (RMM) ........................................................................................................... 121 16.1 Hardware Requirements .......................................................................................................................................... 122 16.2 Establishing Communication with the AWOS........................................................................................................... 122 16.3 AWOS RMM Commands ......................................................................................................................................... 123 16.4 Password Processing ............................................................................................................................................... 125 16.5 $OPENFIL: Entering Filenames ............................................................................................................................... 125 16.5.1 Retrieving Data Files ..................................................................................................................................... 125 16.6 $ONLINE and $OFFLINE: Specifying Sensor Names ............................................................................................. 126 16.7 RMM Command Processing and Command Responses ......................................................................................... 126 16.8 Terminating the RMM Session ................................................................................................................................. 127 16.8.1 Automatic Termination .................................................................................................................................. 127 APPENDIX A — DCP MESSAGE FORMAT ........................................................................................................................... 128 APPENDIX B — DRAWINGS .................................................................................................................................................. 131 S Y S T E M AWOS 3000 USER’S MANUAL O V E R V I E W 1 Chapter System Overview The AWOS 3000 is a modular weather monitoring system that continuously measures an array of weather parameters at an airfield or helipad. The AWOS outputs the data to display terminals and broadcasts current conditions over VHF radio to pilots in the vicinity. 1.1 General Figure 1 shows the main AWOS components. Local Operator Interface Device Sensor Station Data Collection Platform (DCP) Data Output & Archiving Optional Remote Display Outputs Central Data Processor (CDP) KVM Extender AWOS Net Console (Operator Interface Device) Remote Displays Internet AWOS Web Internet Web Displays Figure 1. AWOS Components A sensor station measures meteorological parameters, which are collected by a Data Collection Platform (DCP). Data processing, communications, and overall system operation is controlled by the Central Data Processor (CDP), which also archives and outputs the weather observations. 1 S Y S T E M AWOS 3000 USER’S MANUAL O V E R V I E W Optional remote display interfaces are also possible. • The KVM Extender can be used for a remote operator terminal to interface to the CDP using a patch cord between the KVM Extender units. • AWOS Net can be used to broadcast data via an Ethernet connection to all active remote displays or via the Internet to allow remote users to view the AWOS data on any compatible computer using a standard Web browser. A NADIN connection is possible via a direct connection to the CDP or via a Virtual Private Network using the AWOS Net and AWOS Web interface. 1.2 Sensor Station The sensor station measures a full array of meteorological parameters using a configurable suite of sensors. Available sensors include wind speed, wind direction, barometric pressure, air temperature, dew point temperature, relative humidity, rainfall, cloud height and sky condition, visibility, present weather, thunderstorm detection, and freezing rain. The standard configurations are listed later in this chapter. A self-supporting tower is used as the mounting platform for the basic sensor suite. Tilt-over towers can be provided as required. When included, the ceilometer, visibility sensor, thunderstorm/lightning detector, and freezing rain sensor are mounted on separate foundations. All outdoor enclosures meet IP65 (NEMA 4X) specifications. The AWOS is protected by a comprehensive network of lightning and transient surge protection components. Tranzorbs, MOVs, and resistors protect all sensor lines, power lines, telephone lines, and communication lines against lightning-induced surges and power line transients and surges. 1.3 Data Collection Platform (DCP) The sensor station is paired with a Data Collection Platform (DCP). Located on the sensor tower, the DCP collects data from the sensors, performs error detection on the received information, converts the sensor data into engineering units, and transmits message packets containing sensor data and status information to the Central Data Processor (CDP) every 5 seconds. Communications between the DCP and CDP can be accomplished via RS-485 landline or UHF radio link. The DCP data packets contain a cyclic redundancy check (CRC) that allows the CDP to determine if any transmission errors have occurred. The CDP ignores data that is not received correctly. The dual barometric pressure sensor is housed within the DCP. A keypad and display built into the DCP allow for on-site viewing of data and sensor maintenance. 2 S Y S T E M AWOS 3000 USER’S MANUAL O V E R V I E W 1.3.1 DCP Display Screens A keypad and LCD display screen are located inside the DCP enclosure, and are used to view sensor data and to perform maintenance checks. The * and # keys on the keypad are used to move through the screens. To move to a higher numbered screen, press the # key. To move to a lower numbered screen, press the * key. The DCP screens are explained in the Model 1190 Data Collection Platform User's Manual. 1.4 Central Data Processor (CDP) Data processing, communications, and overall system operation is controlled by the Central Data Processor (CDP). The CDP is mounted in an industrial-grade rack along with a UPS. The rack also houses the VHF ground-to-air radio and any of the CDP options, including UHF data link radio, and AWOS Net. These options are explained in Chapter 2. 1.4.1 Voice Output A VHF transmitter broadcasts AWOS data in voice format to aircraft in the vicinity. Remote users can also listen to weather information over a phone line or, using the optional AWOS Net, access the data over the Internet. The voice output is generated automatically using collected AWOS data. Custom voice remarks can be added to the voice output by the operator when conditions warrant (see Chapter 2). 1.4.1.1 VHF Radio The VHF transmitter operates in the 118–136 MHz band, with the following specifications. Channel Spacing 25 kHz RF Power Output 10 W maximum Frequency Stability ±0.001% (-30°C to +60°C) Emission Type 6A3 Spurious and Harmonic Emissions 80 db minimum up to 90% modulation 1.4.2 Data Reduction The CDP data reduction software performs quality control checks on the data prior to meteorological algorithm processing to ensure that the data received is accurate and complete, and that the associated equipment is working properly. If data from any sensor is erroneous or missing (e.g. sensor power loss), the parameter and all other parameters derived from the missing parameter are reported “missing” in the weather observation. The CDP continues to sample data, and if the error condition is corrected, the weather parameter is restored in the AWOS report. The CDP sets upper and lower limits on the sensor output corresponding to the normal operating limits of the sensor. 3 S Y S T E M AWOS 3000 USER’S MANUAL O V E R V I E W The CDP sets upper and lower limits on the sensor output corresponding to the normal operating limits of the sensor. 1.4.3 Data Archiving The CDP stores collected AWOS data in a series of data logs covering all aspects of AWOS operation. The logs can be viewed in Archives View (see Section 10.4 ), and are organized as follows. • • • • • • • Alarms Communication Status DCP Message METAR One Minute Data Printer System Status Historical data can also be viewed and saved using the Historical Data option on the File menu (see Section 8.3 ). 1.5 Remote Display Options Two types of optional remote display interfaces are available. • The KVM Extender can be used for a remote operator terminal to interface to the CDP using a patch cord between the KVM Extender and the CDP. The KVM Extender consists of a local unit, located near the CDP, and a remote unit, located near the remote operator interface, and the distance between the local and the remote units can be up to 700 feet. This is useful when the CDP is installed in an equipment room and the actual operator of the AWOS is located elsewhere, such as in the observation tower. • AWOS Net can be used to broadcast data via an Ethernet connection to all active remote displays or via the Internet to allow remote users to view the AWOS data on any compatible computer using a standard Web browser. The KVM Extender uses a proprietary bidirectional communication protocol, while AWOS Net is restricted to relaying data provided by the CDP. 4 S Y S T E M AWOS 3000 USER’S MANUAL O V E R V I E W Voice Output • VHF radio • Modem Data Collection Platform (DCP) RS-485 or UHF proprietary protocol Central Data Processor (CDP) KVM Extender RS-232 RS-485 or UHF t erne Eth Console (Operator Interface Device) Remote Display AWOS Net Inte rnet Web Display Figure 2. CDP Interfaces with DCP and Optional Remote Stations The remote console (Operator Interface Device) connected to the CDP by the KVM Extender has complete bidirectional communication capability to interact with the CDP. Remote displays are display-only stations that use AWOS Net to obtain their data from the CDP. The AWOS Net consists of an AWOS Net Controller and a communication interface communicating with the CDP using an RS-232 or an RS-485 landline, or a UHF radio link. The AWOS Net Controller acquires the data via the CDP communication interface, then encapsulates it and broadcasts it via Ethernet connection to all active remote connections. This permits AWOS Net Remote Displays to receive current data within milliseconds of the CDP broadcasting the update. To ensure the reliability of the data, all communications are validated for timeliness and correctness before display to the user. The AWOS Net cannot send any information to the AWOS, and therefore cannot distort or otherwise alter the AWOS data. The remote displays mirror the data displayed at the CDP following processing and application of the AWOS algorithms. 1.5.1 Web Displays Web displays allow remote users to view the AWOS data on any compatible computer using a standard Web browser. 5 S Y S T E M AWOS 3000 USER’S MANUAL O V E R V I E W 1.6 AWOS Configurations AWOS systems are available in several configurations. The configurations differ primarily in the sensors included and the communication output mode used (landline or radio). 1.6.1 AWOS I AWOS I systems provide data for the following parameters. • • • • • • • • Wind Speed and Gust Wind Direction and Variable Wind Direction Temperature Relative Humidity Dew Point Barometric Pressure Altimeter Setting Density Altitude 1.6.2 AWOS II AWOS II systems add a visibility sensor, rain gauge and day/night detector to the AWOS I array. The system provides data for the following parameters. • • • • • • • • • • • Wind Speed and Gust Wind Direction and Variable Wind Direction Temperature Relative Humidity Dew Point Barometric Pressure Altimeter Setting Density Altitude Visibility and Variable Visibility Rainfall Day/Night Detection 6 S Y S T E M AWOS 3000 USER’S MANUAL O V E R V I E W 1.6.3 AWOS A-V AWOS A-V is a minimal system requiring only Barometric Pressure and Visibility sensors. The FAA has certified the AWI AWOS II as an AWOS A-V. The AWI AWOS A-V provides FAA certified data for the following parameters. Barometric Pressure Visibility and Variable Visibility The remaining parameters reported by the AWOS A-V are considered to be advisory. Wind Speed and Gust Wind Direction and Variable Wind Direction Temperature Relative Humidity Dew Point Density Altitude Rainfall Day/Night Detection There are two ways to calculate the Altimeter Setting — with and without temperature. If the calculation uses the advisory Temperature with the certified Barometric Pressure, the resulting Altimeter Setting is considered to be advisory. If the calculation uses only the certified Barometric Pressure, the resulting Altimeter Setting is considered to be certified. This is the calculation that must be used for the AWOS A-V to be FAA certified. 1.6.4 AWOS III AWOS III systems add a ceilometer to the AWOS II array. The system provides data for the following parameters. Wind Speed and Gust Wind Direction and Variable Wind Direction Temperature Relative Humidity Dew Point Barometric Pressure Altimeter Setting Density Altitude Visibility and Variable Visibility Rainfall Day/Night Detection Sky Condition and Cloud Height, up to 3 layers 7 S Y S T E M AWOS 3000 USER’S MANUAL O V E R V I E W 1.6.5 AWOS III-P AWOS III-P systems add a present weather sensor to the AWOS III array. The system provides data for the following parameters. • • • • • • • • • • • • • Wind Speed and Gust Wind Direction and Variable Wind Direction Temperature Relative Humidity Dew Point Barometric Pressure Altimeter Setting Density Altitude Visibility and Variable Visibility Rainfall Day/Night Detection Sky Condition and Cloud Height, up to 3 layers Present Weather (rain, snow, drizzle, mist, fog, freezing fog, haze) 1.6.6 AWOS III-T AWOS III-T systems add thunderstorm detection to the AWOS III array. The system provides data for the following parameters. • • • • • • • • • • • • • Wind Speed and Gust Wind Direction and Variable Wind Direction Temperature Relative Humidity Dew Point Barometric Pressure Altimeter Setting Density Altitude Visibility and Variable Visibility Rainfall Day/Night Detection Sky Condition and Cloud Height, up to 3 layers Thunderstorm/Lightning Detection 8 S Y S T E M AWOS 3000 USER’S MANUAL O V E R V I E W 1.6.7 AWOS III-PT AWOS III-PT systems add thunderstorm detection to the AWOS III-P array. The system provides data for the following parameters. • • • • • • • • • • • • • • Wind Speed and Gust Wind Direction and Variable Wind Direction Temperature Relative Humidity Dew Point Barometric Pressure Altimeter Setting Density Altitude Visibility and Variable Visibility Rainfall Day/Night Detection Sky Condition and Cloud Height, up to 3 layers Present Weather (rain, snow, drizzle, mist, fog, freezing fog, haze) Thunderstorm/Lightning Detection 1.6.8 AWOS III-PTZ AWOS III-PTZ systems add a freezing rain sensor to the AWOS III-PT array. The system provides data for the following parameters. • • • • • • • • • • • • • • • Wind Speed and Gust Wind Direction and Variable Wind Direction Temperature Relative Humidity Dew Point Barometric Pressure Altimeter Setting Density Altitude Visibility and Variable Visibility Rainfall Day/Night Detection Sky Condition and Cloud Height, up to 3 layers Present Weather (rain, snow, drizzle, mist, fog, freezing fog, haze) Thunderstorm/Lightning Detection Freezing Rain 9 S Y S T E M AWOS 3000 USER’S MANUAL O V E R V I E W 1.7 Sensor Reporting Table Table 1 shows reporting criteria for each of the AWOS sensors. • The Reporting Units column shows the units in which the sensor data is reported. • The Sliding Window size shows the size of the sliding window used for data averaging. All sensors, with the exception of precipitation, use a sliding window average. Precipitation reports accumulation from the top of the current hour, and is reset to 0 at the top of the next hour. • The Time to First Report after CDP Power Up shows the length of time before data appears on the display following power-up or restart of the CDP. 10 S Y S T E M AWOS 3000 USER’S MANUAL O V E R V I E W Table 1. Sensor Reporting Table Sensor Sliding Window Size Reporting Units Time to First Report after CDP Power Up Wind Speed Knots 2 min 90 s Wind Gust (last 10 minutes) Knots 10 min 90 s Wind Direction Nearest 10° magnetic 2 min 90 s Variable Wind Direction Nearest 10° magnetic 10 min 90 s Temperature °C 5 min 4 min Dew Point °C 5 min 4 min Altimeter Setting InHg 1 min 1 min Density Altitude Feet 5 min 4 min (not reported if <1,000’ above field elevation) Visibility Statute miles 10 min 8 min Variable Visibility Statute miles 10 min 8 min Precipitation 0.01 inches Up to 1 h <1 min Sky Condition (up to 3 cloud layers) 100 feet 30 min 28 min Clear (SKC/CLR): no clouds below 12,500 feet Few: ≥6% to 24% sky cover Scattered (SCT): ≥25% to 49% sky cover Broken (BKN): ≥50% to 87% sky cover Overcast (OVC): >87% sky cover Obscured (VV): cloud bases at surface/fog Thunderstorm/Lightning Nautical miles 15 min 1 min At airport: 0–5 nautical miles In vicinity: 5–10 nautical miles Distant: 10–30 nautical miles. In addition to distance, octant directions are provided for lightning detected in this distance range. Present Weather Precipitation type and rate 10 min 8 min Freezing Rain Freezing rain 15 min 8 min 11 S Y S T E M AWOS 3000 USER’S MANUAL O V E R V I E W 1.8 AWOS Output Modes The output of the AWOS weather observation can be classified into one of four modes of operation. The mode in effect is dependent on the extent to which voice remarks and manual observations are used. 1.8.1 Mode 1—Full-Time Automated Operation In this mode, the AWOS operates 24 hours a day without any manual input. The automated weather observations are updated on a minute-by-minute basis. There is no weather observer input to the AWOS. However, a manual observing capability may be maintained as a backup, provided that an agreement with the National Weather Service (NWS) to maintain a manual observing capability exists. 1.8.2 Mode 2—Full-Time Automated Operation with Local Notice to Airmen (NOTAM) Operation in this mode is the same as Mode 1, with the addition of the capability to append a manually recorded NOTAM to the automated voice reports. The airport manager is responsible for the NOTAM information. The NOTAM information is heard on the local voice broadcast; it is not transmitted longline. There is no weather observer input. To operate the AWOS in Mode 2, enter a voice remark using the Voice Remarks option on the Edit menu. 1.8.3 Mode 3—Full-Time Automated Operation with Manual Weather Augmentation and Local NOTAM Option Operation in this mode provides the capability for a weather observer to manually augment the automated observation by appending a weather entry to the observation during the published weather observer duty hours. The observer duty hours should be published in the Airport/Facility Directory. The addition of a local NOTAM is also permitted in this mode of operation, provided there is no interference with the observer augmentation. The weather observer is responsible for the accuracy and timeliness of the added weather information. Manual observations are entered using the Manual Observations menu. Any information that cannot be entered through a manual observation can be appended using the Edit > Voice Remarks and Reports > METAR Remark menu options. 1.8.4 Mode 4—Part-Time Manual Operation Operation in this mode, normally used for backup, permits a weather observer to enter a complete manual observation into the system. The procedures in Federal Meteorological Handbook 1 (FMH-1) or Federal Meteorological Handbook 9 (FMH-9) apply to the recording and formatting of these manual observations. When operating in Mode 4, all sensors should be turned off using the Turn On/Off Sensors option on the Edit menu. Manual observations can then be entered using the Manual Observations menu. Any information that cannot be entered through a manual observation can be appended using the Edit > Voice Remarks and Reports > METAR Remark menu options. 12 C E N T R A L D A T A P R O C E S S O R 2 Chapter Central Data Processor The CDP is mounted in an industrial-grade rack (Figure 3), along with an Uninterruptible Power Source (UPS), VHF ground-to-air radio, voice/RMM modem, and any of the CDP communication options. The available options include RS-485 data link, UHF radio data link, and AWOS Net. Figure 3. AWOS 3000 CDP Rack 13 C E N T R A L D A T A AWOS 3000 USER’S MANUAL P R O C E S S O R 2.1 CDP Rack Layout The CDP components are housed on two shelves inside the rack’s lockable enclosure. The shelves can be accessed via the front door or either of the side doors. The easiest entry point will depend on the component being accessed. 2.2 Back Panel Connections The back panel (Figure 4) is where connections to external devices and data sources (such as the AWOS DCP, GPS Receiver, and printer), as well as internal components (such as VHF Radio and Modem) are made. All connections are surge protected. The back panel is located inside the CDP rack, just above the bottom shelf (see Figure 7). External cables are routed to the back panel through an access hole located in the right rear corner at the top of the rack enclosure. Access to this panel is through the side doors. Figure 4. CDP Back Panel Connectors Other components and the optional ATIS/AWOS Interface are connected to the Interface Board (Section 2.3.3 ). 2.3 CDP Top-Shelf Components The top shelf (Figure 5) is attached the back of the CDP monitor and contains the CPU/Hard Drive assembly, Power Supply, Interface Board, Voice Modem, and communication interface (RS-485 converter or UHF radio). The shelf can be accessed by removing four screws from the corners of the front panel (Figure 6) and sliding the entire shelf, with the monitor, forward. 14 C E N T R A L D A T A AWOS 3000 USER’S MANUAL P R O C E S S O R Figure 5. CDP Top Shelf Figure 6. Four Screws Securing Top Shelf 15 C E N T R A L D A T A AWOS 3000 USER’S MANUAL P R O C E S S O R 2.3.1 CPU Board The CPU Board is the CDP’s main processor. The operating system and AWOS 3000 software are stored on a read-only flash drive mounted to this board. 2.3.2 Hard Drive The hard drive is used to store archive data, group and user information, and the site-specific configuration data only. It does not contain the operating system or AWOS software. 2.3.3 Interface Board The Interface Board provides interconnections for the CDP components. The individual connections are shown on wiring diagram 3000-019 in Appendix B. 2.3.4 Power Supply The Power Supply is a minimum 300 W power supply that provides power to all the CDP components. 2.3.5 Communications Communication between the DCP and CDP can be accomplished using RS-485 landline or UHF radio data link. The method used will depend on several site factors, including the distance between the DCP and CDP, landline feasibility (trenching issues, cable installation, etc.), and unobstructed line-of-sight for radio use. The hardware for the communication options—RS-485 converter or UHF radio—mounts to the top shelf in front of the CPU Board/Hard Drive assembly. 2.3.6 VHF Ground-to-Air Radio The Model 1792 VHF Ground-to-Air Radio transmits the AWOS voice message to aircraft in the vicinity. The radio is a low-power VHF/AM transceiver that operates in the frequency range 118.000 MHz to 136.000 MHz with 25 kHz spacing. The radio is mounted on the underside of the top shelf of the AWOS rack (see Figure 7), and is installed at the factory. 2.3.7 Voice Modem An M406159-00 voice modem is mounted to the top shelf below the Interface Board (see Figure 6). The modem is used for Remote Maintenance Monitoring (RMM) and for dial-up access to the AWOS voice message. It is installed at the factory. 2.3.8 Monitor Volume Controls The AWOS voice output can be heard through the monitor’s built-in speakers. To adjust the speaker volume, use the monitor’s Volume Up (+ or >) and Volume Down (- or <) controls, located on the monitor bezel below the screen. 16 C E N T R A L D A T A AWOS 3000 USER’S MANUAL P R O C E S S O R 2.4 CDP Bottom-Shelf Components The CDP rack’s bottom shelf (Figure 7) is fixed in place. Components are accessible through the rack’s front or side doors. The bottom shelf holds the optional AWOS Net and VPN router. Figure 7. CDP Bottom Shelf Components The UPS is housed in the base of the rack, beneath the bottom shelf. The CD drive rests on the UPS. When not in use, the keyboard is stowed on top of the UPS as well. The back panel, where cable connections are made to the major components, is mounted to the back of the rack just above the bottom shelf. The CDP’s ground cables connect to the ground bar, which is mounted to the rear of the rack just above the back panel. 2.4.1 AWOS Net AWOS Net is a data-dissemination device that receives AWOS data from the CDP and outputs it to a display or local network. AWOS Net is only capable of receiving data from the AWOS system. It cannot send any information to the AWOS, and therefore cannot distort or otherwise alter the AWOS data. 2.5 UPS Continuous power to the CDP equipment is ensured by an Uninterruptible Power Source (UPS) housed in the base of the rack (Figure 7). If main power is lost, the backup power system will provide a minimum of 45 minutes of backup power to the CDP equipment. 17 C E N T R A L D A T A AWOS 3000 USER’S MANUAL P R O C E S S O R 2.6 GPS Receiver A GPS receiver (Figure 8) is used to provide time synchronization for the CDP, which displays UTC and logs events with their UTC time stamp. The receiver, housed in a small, oval package, is installed outside the CDP. It can often be affixed to the top of the rack, depending on satellite reception. The GPS receiver presently used is approved only for use at an indoor location. Figure 8. GPS Time Standard Receiver 2.7 NADIN Connection If NADIN is used with the AWOS 3000, the NADIN serial cable is routed into the CDP and connected to the back panel. This is a serial one-way connection used to send METARs. METARs are sent as they are generated, so changing the METAR frequency (Edit > Configuration > Reports > METAR) will affect the NADIN interface as well. 2.8 Remote Displays Using AWOS Net Remote displays can be used to view AWOS data at remote locations using an AWOS Net interface. Three AWOS Net modes are available for remote display applications, with each mode using a different method for communicating with the CDP. • The 2210 is the standard AWOS Net with RS-232 communication to the AWOS where the remote display is located within 50 feet of the AWOS. • The 2210-R uses RS-485 communication to the AWOS for hard-wired connections from 50 feet to 4000 feet. • The 2210-U uses a UHF radio for communication to the AWOS when landline connections are not feasible. When RS-232 communication is used, the AWOS Net controller connects directly to the CDP and is located in the CDP rack. In RS-485 and UHF applications, a second small enclosure, the Communication Interface, houses the hardware for the communication link. 18 C E N T R A L D A T A AWOS 3000 USER’S MANUAL P R O C E S S O R There may be restrictions on which AWOS Net communication mode may be used, depending on the communication between the DCP and the CDP. Table 2 lists these restrictions Table 2. AWOS Net Communication Options DCP to CDP Communication AWOS Net Communication Options RS-232 RS-232, RS-485, UHF RS-485 RS-232, RS-485 UHF RS-232, UHF 2.8.1 AWOS Net RS-232 Communication Package The remote display must be within 50 feet of the AWOS CDP when the RS-232 communication package is used. 2.8.2 AWOS Net RS-485 Communication Package The RS-485 communication package is used when the remote display is between 50 feet and 4000 feet from the AWOS CDP and a hard-wired connection is desired. 2.8.3 AWOS Net UHF Radio Communication Package The UHF radio communication package is used when the CDP-to-DCP communication link uses UHF radios and the AWOS Net will not be physically connected to the CDP. The AWOS Net UHF antenna must he installed with clear line-of-sight to the CDP antenna. 2.9 Optional KVM Extender for Remote Operation The KVM Extender Kit (M488342-00) can be used for a remote operator terminal to interface to the CDP using a patch cord between the KVM Extender Kit and the CDP. This is necessary when the CDP is installed in an equipment room and the actual operator of the AWOS is located elsewhere, such as in the observation tower. The remote location will allow the same access to the CDP as if the user is physically at the CDP. This location must be within 700 feet of the CDP. Figure 9. KVM Extender 19 C E N T R A L D A T A AWOS 3000 USER’S MANUAL P R O C E S S O R The KVM Extender (M406245-00) consists of the following parts. 1. Local Unit – This unit connects to the CDP. The top unit in Figure 9 is a front view of the Local Unit. 2. Remote Unit – This unit is located where the operator terminal is desired. The bottom unit in Figure 9 is a front view of the Remote Unit. Note that the Local Unit and the Remote Unit are a matched set. If the need arises to replace either unit, they must be replaced as a set. 3. Two grounding cables — One grounding cable for the Local Unit, one grounding cable for the Remote Unit. The grounding cables are used to connect the ground posts of the Local Unit and the Remote Unit to their respective devices, the CDP and the remote operator terminal. 4. KVM cable assembly – This cable connects the Local Unit to the CDP’s monitor and audio speaker/microphone jacks. 5. USB cable – This cable connects the Local Unit to the USB keyboard port on the CDP. 6. One power cable — The M491908-00 power cable is used to power the Local Unit from the CDP. 7. One Y-cable power adapter — The Y-cable is used to make it possible for the Local Unit to get power from the CPU board if another device such as the AWOS Net or VPN is already connected to the power connector on the CPU board. 8. Two power supplies – One power supply will power the Remote Unit... Since the Local Unit is powered from the CDP, the second power supply may be kept as a spare. 9. Remote Operator Interface — Monitor, keyboard, mouse, speaker, and microphone. A customer-supplied standard CAT6 Ethernet cable built to standard TIA/EIA-568-B.2-2001 with RJ-45 connectors wired to the T568B scheme is used to connect the Remote Unit to the Local Unit. Figure 10 shows a wiring diagram for the cable end. This cable may be up to 700 feet long and must be a straight-through cable, not a crossover cable. Figure 10. RJ-45 Connectors Wired to T568B Scheme 20 C E N T R A L D A T A AWOS 3000 USER’S MANUAL P R O C E S S O R Figure 11 illustrates the connection of the KVM extender units using the Ethernet cable. Figure 11. Topology of Local and Remote KVM Extender The Ethernet cable between the two KVM extender units must not be connected to an Ethernet network or any other connections. There must be no other connections between the two KVM extender units. 21 C E N T R A L D A T A AWOS 3000 USER’S MANUAL P R O C E S S O R 2.9.1 KVM Extender Operation The link light on the front of the Remote Unit should be on to indicate the link is made between the local and remote units. For proper operation, the KVM extender should be in AUTO mode. This mode is controlled by the buttons on both the Remote Unit and Local Unit. On the Local Unit, this button is labels AUTO/REMOTE and on the Local Unit it is labeled AUTO/LOCAL. Pressing these buttons will switch between AUTO mode and the mode for that unit. AUTO mode allows both locations to be used. LOCAL mode (activated by pressing the button on the Local Unit) locks out the remote user. The remote location will not be able to access the CDP until the switch is pressed again to return to AUTO mode. REMOTE mode is activated by pressing the button on the Remote Unit. This locks out the local user (at the CDP). The user at the CDP will not be able to access the CDP until the Remote Unit is placed back into AUTO mode. There are LEDs near the mode buttons to indicate the operational status of the KVM extender units. On the Local Unit, there are two LEDs, remote and local. If they are flashing, the KVM extender is in AUTO mode. If one LED is on with the other off, that unit has control. There is only one mode LED on the Remote Unit. If this LED is flashing, the KVM extender is in AUTO mode. If it is on, the Remote Unit has control, and if it is off, the Local Unit has control. When the LEDs indicate a unit has control, this may be that there is a user actively using the CDP and not that the KVM extender is in that particular mode (local or remote). Only one user can access the CDP at a time. The KVM extender will wait a few seconds once activity has stopped at one unit (remote or local) before it allows the other unit to access the CDP. 22 C E N T R A L D A T A AWOS 3000 USER’S MANUAL P R O C E S S O R 2.10 Optional AWOS/ATIS Interface FCC Title 47 (regulation 87.527c) only allows one VHF frequency for sites that have both ATIS and AWOS systems. The AWOS/ATIS Interface connects the VHF and telephone modem outputs of both of these systems to one VHF transmitter and one telephone modem (Figure 12). A switch controls the mode of the VHF transmitter and modem. Power (+12 V DC) is supplied by the CDP. The ATIS/AWOS Interface is installed outside the CDP rack. Figure 12. AWOS/ATIS Interface Block Diagram 23 C E N T R A L D A T A AWOS 3000 USER’S MANUAL P R O C E S S O R Two enclosure models are available for the ATIS Interface. • The Model 2940 is a 19" rack-mountable enclosure (see Figure 13). This model fits into the standard ATIS communication rack or any other standard 19" rack. The 2940 is a one rack unit (1RU) enclosure. There is no external mode switch on the 2940, therefore a Remote Switch (Model 2941) is required. Figure 13. Model 2940 Rack-Mount ATIS Interface • The Model 2942 (Figure 14) is a desktop version of the ATIS Interface. This model has an LED and mode switch on the front of the enclosure, and so does not require the Remote Switch. The Remote Switch can still be used with this model, however, if desired. Important: When the Remote Switch is used with the Model 2942 desktop interface, the selection switch on the Model 2942 must always be in the ATIS position. Figure 14. Model 2942 Desktop ATIS Interface 24 C E N T R A L D A T A AWOS 3000 USER’S MANUAL P R O C E S S O R 2.10.1 Remote Switch The Model 2941 Remote Switch (Figure 15) can be up to 1000 feet away from the ATIS Interface, and is connected to the interface with a CAT6 patch cord. The Remote Switch has a switch guard over the switch to prevent accidental switching of the ATIS Interface. The switch guard must be lifted before the switch can be changed to AWOS mode. When the switch guard is closed, the switch is automatically switched to ATIS mode. An LED indicator is illuminated when the switch is in AWOS mode. Important: When the Remote Switch is used with the Model 2942 desktop interface, the selection switch on the Model 2942 must always be in the ATIS position ( ) — if the 2942 AWOS/ATIS Interface is left in the AWOS position, the Remote Switch will not be able to toggle between the AWOS and ATIS options. When using the ATIS/AWOS switch, also set the VHF Radio to Enable on the Edit > Configuration > Voice tab with the AWOS software. Figure 15. Model 2941 AWOS/ATIS Remote Switch 2.10.2 ATIS Interface Cable The ATIS Interface Cable (Model M491838-00) is included with both enclosure models, and enables all the required connections inside the CDP: Power supply, modem audio, and VHF radio outputs. 2.11 CDP Block Diagram A block diagram of the CDP components is shown in Figure 16. The colors in the diagram are used to group certain common components and are intended to make reading easier. 25 D A T A AWOS 3000 USER’S MANUAL P R O C E S S O R Figure 16. AWOS 3000 CDP Block Diagram C E N T R A L 26 A W O S 3 0 0 0 S O F T W A R E 3 Chapter AWOS 3000 Software Views The AWOS 3000 software displays AWOS data in a combination of text and graphics in three selectable views, with each view geared toward a specific user group. The current view is selected by the user via the View menu. Tower View The Tower View presents a view of weather parameters of interest to Tower operations, including a graphic display of wind conditions. See Chapter 5. Diagnostic View The Diagnostic View is used by maintenance personnel to maintain and troubleshoot the system. This display provides a comprehensive view of system and sensor status. See Chapter 10. Archives View The Archives View provides access to stored data logs. See Chapter 10. A series of menus allows administrators and users to control the data displayed, and enables the generation and transmission of reports, recording voice remarks, and access to archive data. User and group access is controlled by restricted Administrator menus, providing for controlled customization of the data display and software operation. The specific menu availability and the extent of customizability are controlled by the administrator, and depend on permission settings. The following chapters explain each of the views and the available menu options in detail. 27 A L A R M S 4 Chapter Alarms The AWOS 3000 software includes an extensive alarm system to alert the user when specific conditions of concern are detected. A red Alarm warning will be shown at the top of the display when alarm conditions exist. When the alarm is “New”—hasn’t yet been acknowledged or deleted—the color of the warning is bright red. Once the alarm has been acknowledged, the color will change to a lighter red. If the alarm is deleted, the Alarm warning will disappear. If the problem has not been corrected before deleting the alarm, however, the alarm will reappear. There are two types of alarms: warnings and errors. The type of alarm depends on the severity of the detected condition. Alarms can be based on several criteria, including • a certain status bit being repeated several times (for example, a visibility sensor power supply failure), • a certain number of occurrences within a time window (for example, CRC errors), and • a comparison between two values (for example, DCP polls and responses) within a time window. Using time windows and repeated occurrences helps eliminate accidental alarms. 28 AWOS 3000 USER’S MANUAL A L A R M S 4.1 Alarms List Clicking the Alarms... option on the System Status menu calls up a list of current and past alarms, such as that shown in Figure 17. Each alarm entry in the list shows the date and time of the alarm, its status (New or Acknowledged), the type of alarm, and a brief description of the nature of the alarm. The time shown for the alarm is the time when the alarm condition was first met. The time is not updated when the alarm condition is met again. You can acknowledge or delete active alarms from the Alarms list. Figure 17. Alarms List 4.1.1 Acknowledging and Deleting Alarms When an alarm is triggered, it will remain active (its status will show New) until either acknowledged or deleted by the user. No further entries for an active alarm will be added to the alarm list until it is acknowledged or deleted. To acknowledge an alarm, click the alarm on the list to highlight it, then click the Acknowledge button at the bottom of the screen. • "Ack" will be displayed in the Status column on the Alarms list • The color of the Alarm text will change to a lighter red once all alarms have been acknowledged or deleted. The Alarm warning will continue to be displayed after the alarm is acknowledged (in the lighter color) even when alarm conditions no longer exist in order to keep an operator alert to intermittent problems. To delete an alarm, click the alarm on the list to highlight it, then click the Delete button at the bottom of the screen. • All visual warnings will stop and the Alarm notice on the main display will be removed • The alarm will be deleted from the Alarms list; a record of the alarm will still be maintained in the Alarms Log 29 AWOS 3000 USER’S MANUAL A L A R M S • If the conditions that triggered the alarm are not addressed before the alarm is deleted, the alarm will reappear Click Close to close the Alarms list. 4.2 Blink Alarm The Blink Alarm option controls the alarm's visual appearance on the display. If the box is checked, the Alarm notice on the main display will blink when active. If the box is unchecked, the Alarm notice on the main display will remain steadily on. Regardless of the setting, all alarms will appear on the Alarms list explained above. 30 T O W E R V I E W 5 Chapter Tower View The Tower View is shown in Figure 18. This is the default view and does not require login. The screen is divided into sections, with each section showing a group of related values. Only sensors installed on a given system will be shown on the display. When an alarm is present, an Alarm notice will appear at the top of the display (refer to Chapter 4 for details on alarm behavior). Figure 18. Tower View 31 T O W E R AWOS 3000 USER’S MANUAL V I E W 5.1 Special Characters Several special characters are used in the AWOS 3000 display and in data logs to indicate when data are missing, when sensors are offline or not installed, and when data have been entered manually. Condition Missing Data Sensor Turned Off Sensor Not Installed Data Entered Manually 1 Display Reports // // blank # field removed 1 blue text * <> The Present Weather field will be displayed whenever a visibility sensor is installed, even if no Present Weather sensor is installed Figure 19 is a sample data log showing special characters in use. In the first entry, a number of fields show missing data, as indicated by slashes (Wind Speed, Wind Direction, etc.). Farther down in the file, Density Altitude and Altimeter Setting are shown as being turned off, indicated by ####. Finally, manual observations for Sky Condition are shown near the bottom of the file (<FEW040 BKN075 >). Figure 19. Log File Showing Special Characters 32 T O W E R AWOS 3000 USER’S MANUAL V I E W 5.2 Winds Wind speed and wind direction (Figure 20) are two-minute running averages calculated from sensor readings taken at one-second intervals. Wind direction is in degrees relative to magnetic North, wind speed values are in knots. • The current wind direction is shown on a graphic dial that also shows the two-minute and ten-minute wind direction ranges along its rim. • Wind direction is also shown numerically in the upper text box within the dial. • Wind speed is shown in the lower text box within the dial. • Wind gust and variable winds, when present, are shown below the dial. Figure 20. Winds Display 33 T O W E R AWOS 3000 USER’S MANUAL V I E W 5.2.1 Wind Speed The most recent wind speed value is shown in the lower text box within each dial, with values ranging from 0 knots to 120 knots. Wind speed is a two-minute average calculated by the CDP, updated every 5 seconds. When speed is less than three knots, the system indicates calm wind conditions. 5.2.2 Wind Direction The most recent wind direction value is shown on a graphic 360° dial, and is displayed in the upper text box within the dial. Wind direction is a two-minute average calculated by the CDP, updated every 5 seconds. It is reported in degrees. 5.2.3 Wind Direction Range The outer rim of the wind dial shows the two-minute and ten-minute wind direction range. The two-minute range is shown in yellow bars, and the ten-minute range is shown as a solid green band. The range increases or decreases in steps of 10°, with the outermost edges showing the wind direction extremes for the averaging period. 5.2.4 Wind Gust Wind gusts are reported when the difference between the maximum and minimum wind speeds measured over the past 10 minutes is 10 knots or greater. The wind gust value, when present, is shown in a text box below the wind dial. 5.2.5 Variable Wind Direction Variable Wind Direction, when present, is shown in a text box below the wind dial. • Variable wind is reported when the wind direction varies around the two-minute average wind direction by 60 degrees or more, and the wind speed is more than 6 knots. The displayed value shows the upper and lower ends of the direction variation, separated by a "V". As an example, a displayed value of 040V130 would mean the direction is varying between 40° and 130°. The display will show simply VRB if: • Wind speed is more than 6 knots and the direction is varying by more than 180°. or • Wind speed is 3–6 knots and the direction is varying by 60 degrees or more. 34 T O W E R AWOS 3000 USER’S MANUAL V I E W 5.3 Visibility Visibility (Figure 21) is a ten-minute average calculated each minute from sensor readings taken at ten-second intervals. It is reported in statute miles. Figure 21. Visibility Display 35 T O W E R AWOS 3000 USER’S MANUAL V I E W 5.4 Present Weather The Present Weather field (Figure 22) shows the calculated present weather value. Present weather is derived from data for several parameters, including air temperature, dew point temperature, visibility, lightning (when available), and precipitation type and rate data from the present weather sensor. Present weather data in this window is averaged over a ten-minute period by the present weather sensor and updated every 5 seconds. Present weather is reported in codes. Table 3 lists the codes reportable by the AWOS. Figure 22. Present Weather Display 36 T O W E R AWOS 3000 USER’S MANUAL V I E W Table 3. Present Weather Codes Intensity light (blank) moderate Guide to Present Weather Abbreviations BC* BL* Descriptor patches blowing BR DS* + heavy DR* low drifting DU* VC in vicinity FZ freezing DZ MI* shallow FC* PR* SH* TS partial showers thunderstorm FG FU* GR GS* HZ Phenomena mist IC* dust storm PL* widespread dust PO* drizzle funnel cloud, tornado, waterspout fog smoke hail small hail/snow pellets haze RA ice crystals ice pellets well-developed dust/sand whirls rain SA* sand SG* SN SQ* snow grains snow squalls SS* sand storm VA* volcanic ash * These conditions are not automatically reported, and will only appear if entered as a manual observation. Adapted from FMH-1 and FAA Order 7900.5B. 37 T O W E R AWOS 3000 USER’S MANUAL V I E W 5.5 Sky Condition The system reports sky condition (Figure 23) based on cloud cover measurements taken by the laser ceilometer. When clouds are present, the Sky Condition field shows a cloud cover description followed by the height of the cloud base. The type of cloud cover is represented by the following codes. • CLR/SKC—sky clear (no clouds below 12,500 feet); CLR is displayed when the data are generated automatically from the ceilometer, SKC is displayed when the observation is entered manually via the Manual Observation > Clouds menu • FEW—few (≥6% to 24% sky cover) • SCT—scattered (≥25% to 49% sky cover) • BKN—broken (≥50% to 87% sky cover) • OVC—overcast (>87% sky cover) • VV—obscured (cloud bases at surface/fog) Cloud height is shown in hundreds of feet (12,000 feet, for example, is represented by “120”). Sky condition is estimated based on conditions directly above the ceilometer over a 30-minute sliding window. Figure 23. Sky Condition Display 38 T O W E R AWOS 3000 USER’S MANUAL V I E W 5.6 Temperature The Temperature section displays the most recent reportable values for Air Temperature, Dew Point, and Relative Humidity (Figure 24). 5.6.1 Air Temperature Air Temperature is a five-minute average calculated by the CDP from readings taken by the Temperature/Relative Humidity sensor at one-second intervals. It is reported in °C and is updated every 5 seconds. The reportable range is -40 to +60°C. 5.6.2 Dew Point Dew Point temperature is a five-minute average calculated by the CDP from temperature and RH sensor readings taken at one-second intervals. It is reported in °C and is updated every 5 seconds. The reportable range is -40 to +60°C. 5.6.3 Relative Humidity Relative Humidity is a two-minute average calculated by the CDP from RH sensor readings taken at one-second intervals. It is reported in percent (0-100), and is updated every 5 seconds. Figure 24. Temperature Display 39 e T O W E R AWOS 3000 USER’S MANUAL V I E W 5.7 Air Pressure The Air Pressure section (Figure 25) displays the most recent reportable values for Altimeter Setting and, if applicable, Density Altitude. These values are updated every 5 seconds. 5.7.1 Altimeter Setting Altimeter Setting is the pressure value to which the altimeter of an aircraft on the ground is set so that it will indicate the MSL (mean sea level) elevation of the airport. The two pressure sensors in the AWOS must agree to within 0.04 inHg and the temperature inside the sensor housing must be >-40°C and <60°C for altimeter setting to be reported. Units are inHg. 5.7.2 Density Altitude Density Altitude is the altitude in the standard atmosphere where air density is equivalent to that of the airport. This is used by pilots to determine aircraft performance. Density altitude is not reported if it is less than 1000’ above the field elevation. Figure 25. Air Pressure Display 40 T O W E R AWOS 3000 USER’S MANUAL V I E W 5.8 Precipitation The Precipitation section (Figure 26) shows the amount of precipitation measured during the past hour, counting from the beginning of the hour. (A measurement reported at 2:15, for example, would show the amount of precipitation measured over the past 15 minutes.) Precipitation is reported in inches and updated every 5 seconds. The precipitation value is reset to 0 at the top of every hour. Figure 26. Precipitation Display 41 T O W E R AWOS 3000 USER’S MANUAL V I E W 5.9 Variable Visibility Variable Visibility (Figure 27) is determined based on an algorithm that analyzes the one-minute average visibility values. Each one-minute average is compared to the previous one-minute average, and if the difference is greater than 0.5 miles, a positive or negative change is logged. The algorithm then evaluates the past ten minutes worth of this logged data, noting each recorded change. If three or more changes have been logged over the ten minute period, along with two or more sign changes, variable visibility is reported. Otherwise, the field is left blank. e y Figure 27. Variable Visibility Display 42 T O W E R AWOS 3000 USER’S MANUAL V I E W 5.10 Lightning When a Model 6500 Thunderstorm Detector is installed, lightning data is displayed on a graphic dial (Figure 28) and in text form below the dial. Figure 28. Lightning Display The Lightning dial is divided into octants, which indicate the direction of the lightning, and into two concentric areas (center circle and secondary ring) that indicate distance from the airport. • If strikes are detected within 0–5 nautical miles, the center circle on the dial will be illuminated. The text display will show "TS at Airport". This will be voiced in the AWOS voice message as "Thunderstorm at the airport". • If strikes are within 5–10 nautical miles, the secondary ring on the dial will be illuminated. The text display will show “Thunderstorm in Vicinity”. This will be voiced in the AWOS voice message as "Thunderstorm in the vicinity". • If strikes are detected within 10–30 nautical miles, one or more direction octants will be illuminated showing the direction in which lightning has been detected. The text display will show “LTG DSNT” followed by the direction abbreviation. The AWOS voice message will report “Lightning” followed by the direction. 43 T O W E R AWOS 3000 USER’S MANUAL V I E W • If strikes are reported in 4 or more non-contiguous quadrants, the display will show “ALQDS”. This will be voiced in the AWOS voice message as “Lightning all quadrants”. • If no strikes are detected, no part of the dial will be illuminated. The text display will be blank, and no lightning data will be included in the AWOS voice message. Figure 29. Lightning Dial 44 T O W E R AWOS 3000 USER’S MANUAL V I E W 5.11 Remark The Remark panel (Figure 30) shows any active weather remarks entered by an operator. Weather remarks are entered using the Reports > METAR Remark menu option. Figure 30. Displaying Remarks 45 N A V I G A T I N G T H E M E N U S 6 Chapter Navigating the Menus The menu categories on the menu bar at the top of the display each present a drop-down menu when clicked. Where keyboard shortcuts are available, they are noted in the text. The functions accessible from each of the menus is discussed in detail in the following chapters. 46 R E S T R I C T E D F U N C T I O N S 7 Chapter Restricted Functions Certain menu functions are available only to technicians equipped with the AWOS Security Key CD. These functions are all found on the Edit menu, and are described below. 7.1 Edit Menu 7.1.1 Configuration > Airport > General Tab The Airport tab (Figure 31) contains two sub-tabs: General and Runways. The Runways tab is available to all users. The General tab contains a number of options unique to the airport location. Figure 31. Configuration General Tab 47 F I L E AWOS 3000 USER’S MANUAL M E N U Table 4 provides further detail on the parameters displayed on the “General” tab. Table 4. Parameters on the General Tab General Airport Name The name entered here will be shown at the top of the display. Affects the displayed name only; voice output is not affected. ICAO Identifier The four-letter ICAO airport identifier or three-digit airport identifier Elevation (MSL) The elevation of the airport above mean sea level BP Sensor Elevation (MSL) The MSL elevation of the barometric pressure sensor BP 1 Offset BP 2 Offset Ceilometer Elevation (AGL) Magnetic Declination The offset value for barometric pressure sensor 1; this is a sensorspecific constant that varies from sensor to sensor The offset value for barometric pressure sensor 2; this is a sensorspecific constant that varies from sensor to sensor When the ceilometer is not located at the runway or pad, the difference in elevation between the ceilometer location and the landing surface is entered here. If the ceilometer is installed at a location higher in elevation than the landing surface, the value entered is positive; if the ceilometer is installed at a location lower in elevation than the landing surface, the value entered is negative. The magnetic declination of the airport; used to convert between True North and Magnetic North values 7.1.1.1 Barometric Pressure Offsets If the Model 7190 Dual Digital Barometer sensor unit is replaced, it will be necessary to update the BP 1 and BP 2 offsets shown in Figure 31 and described in Table 4. A keypad and LCD display screen are located inside the DCP enclosure, and are used to view sensor data and perform maintenance checks. Use the * and # keys on the keypad to move through the screens—press the # key to move to a higher numbered screen, or press the * key to move to a lower numbered screen. Screen 8 shows the readings for the two 7190 sensors using inHg units. A value of 99.999 indicates missing data. The barometric pressure is measured using a Setra Systems Model 370 Ultra-High Accuracy Setraceram™ pressure standard. Note the difference in readings for each Model 7190 sensor displayed on the DCP screen from the pressure standard reading using inHg units. If the readings differ by more than 0.05 inHg, replace the sensor. Otherwise, access the Airport > General tab, enter the two offsets, and click OK to save them. An offset will be “negative” if the sensor reading is greater than the reference pressure standard. 48 F I L E AWOS 3000 USER’S MANUAL M E N U 7.1.2 Configuration > Sensors Tab Use the Sensors tab (Figure 32) to specify the type of AWOS installed and the sensors used. The specific type of sensor for a given parameter need not be specified (for example ultrasonic wind vs. cup and vane); the AWOS software determines this internally. The selection made here determines what data modules appear on the display. If a sensor is unchecked on this list, it will not appear on the display, will not be mentioned in the voice output, and will be shown as not installed (indicated by “*”) in data logs. Table 5 provides further definition of the fields found on the Sensors tab. Figure 32. Sensors Configuration Tab Table 5. Sensors Tab Fields Sensors AWOS Type Sensors Installed Lightning Select the type of AWOS installed from the dropdown list. Selecting a specific type will automatically check and uncheck the sensors associated with that type. If your system varies from one of the pre-defined AWOS types, select CUSTOM from the list and select the installed sensors manually. Sensors are automatically selected in this panel when an AWOS Type is selected above. If a custom system is used, select CUSTOM for AWOS Type and select the installed sensors manually from this list. Check the Lightning option to add the lightning dial and text display to the Tower View. Select Local to display the data from the AWOS Thunderstorm/ Lightning sensor, or select ADAS to display data are from the ADAS network. Only the Local option is supported at this time. 49 F I L E AWOS 3000 USER’S MANUAL M E N U 7.1.3 Alarm Configuration Menu (Keyboard shortcut Alt+e then a) Sensor alarms can be set to alert the operator when a sensor is reporting values that are out of range (“Range Alarms”) or that have remained unchanged for an extended period (“Static Alarms”). The Alarm Configuration menu (Figure 33) contains tabs for each sensor for which alarms can be set. Each tab contains a set of fields (identical for each tab) that are separated into Range and Static panels. • The Range panel contains the minimum and maximum values that the sensor is able to report. These values are sensor-specific. If either of these values is exceeded, an alarm is triggered and the data are reported as missing (invalid). • The fields within the Static panel are used to set the range, number of samples, and time period over which values are considered in determining whether a sensor’s output is “static” (unchanged over an extended period) or the data are missing (invalid). Figure 33. Alarm Configuration Screen Note that the minimum shown for the Static panel on the sample screen in Figure 33 is “-1” and the maximum shown is “-2”. This is intentional to make sure that static input checking is not used by default in case the Enabled box is checked. The sensitivity entry does not affect calculations, but only influences whether an alarm is generated. The next section discusses the Alarm Configuration menu settings. 50 F I L E AWOS 3000 USER’S MANUAL M E N U 7.1.3.1 Setting Range Alarm Values 1. Click the appropriate tab at the top of the screen to select a sensor. 2. Enter the minimum value the sensor is capable of reporting in the minimum field within the Range panel. (Refer to the sensor specifications for this value.) Example: For a Model 2040 Ultrasonic Wind Sensor, you would enter a minimum value of 0 on the Wind Speed tab, since 0 knots is the minimum value the sensor is capable of reporting. 3. Enter the maximum value the sensor is capable of reporting in the maximum field within the Range panel. (Refer to the sensor specifications for this value.) Example: For a Model 2040 Ultrasonic Wind Sensor, you would enter a maximum value of 130, since130 knots is the specified top end of the sensor’s reporting range. 7.1.3.2 Setting Static Alarm Values Static Alarms are determined by calculating the standard deviation for a set of data values. The fields in the Static panel are used to specify the data set, including the range of values to be considered, the minimum number of samples required, and the time period covered. An alarm is triggered if the standard deviation for the specified data set is less than or equal to the sensitivity setting. 1. Click the Enabled checkbox to enable static alarms for the sensor. To disable static alarms, click the Enabled checkbox again. 2. Enter the lowest reported value to be considered in the data set in the minimum field. Example: For wind speed, a reasonable value would be 1. This would remove a value of 0 from consideration, which is commonly reported for long periods under calm conditions. 3. Enter the highest value to be considered in the data set in the maximum field. Example: For temperature, a reasonable value would be +60° C, the specified maximum reportable temperature for the sensor. 4. Enter the minimum number of samples required for a data set. 5. Enter the evaluation time period in hours and minutes. This is a moving window that includes the most recent group of values recorded over the specified period of time. As a new value is added to the data set, the oldest value (now falling outside the time period) is discarded. 6. Select a Sensitivity setting of Mild, Normal, or Aggressive (a more aggressive setting will cause more alarms to be triggered). Each of these settings corresponds to a numeric value that is automatically entered into the Sensitivity text box when a setting is selected. You can also enter a custom value in the text box. 7. Repeat these steps for each sensor tab. When done, click OK to save the settings, or click Cancel to discard any changes made and close the Alarm Configuration window. 51 F I L E AWOS 3000 USER’S MANUAL M E N U 7.1.4 Configuration > Voice Tab The options in the Test panel at the bottom of the Voice tab are used by technicians to test the AWOS voice output. Figure 34. Voice Configuration Tab • • • The Word option broadcasts words from the AWOS voice dictionary. This option is used in testing by AWI technicians. The 300 kHz Tone and Modulated 300 kHz Tone options transmit successive 30-second 300 kHz tones, with short pauses between the tones. This option is used to set the modulation for the voice output. The Inactive option turns off the test output. This is the setting used during normal operation. 52 F I L E AWOS 3000 USER’S MANUAL M E N U 7.1.5 Voice Remark The Voice Remark option described in Section 9.8 lets users to record up to two 90-second voice remarks to be appended to the outgoing AWOS voice message. Note: VHF radio and telephone voice outputs are suspended while the Voice Remark window is open. The administrator also has access to the Admin Remark tab shown in Figure 35, which you click on to record an administrative remark such as the airport name to be used at the beginning of the voice message. Figure 35. Administrator Voice Remark Screen 7.1.5.1 Recording the Airport Name Note that you must be logged in as the administrator or as a user with Configuration privileges (configured by the administrator via Edit > Group Authorizations) to access the Airport tab to record the airport name to be used at the beginning of the voice message. To record the airport name to be used in the outgoing voice message: 1. Click the Airport tab. 2. Click the record button to begin recording. 3. Speak the airport name clearly into the workstation or CDP microphone. 4. When done, click the stop button . Click OK to save the recording, or click Cancel to exit the Voice Remark screen without saving the recording. The Enabled and Persistent options are the same as those described in Section 9.8 for other users. 53 E D I T M E N U 8 Chapter File Menu (Keyboard shortcut Alt + f) The File menu (Figure 36) contains options for logging in and out, retrieving historical data, printing, and window control. Figure 36. File Menu 8.1 Login (Keyboard shortcut Alt+f then i) The Login option is used to log in to the system as a User. Each User has access to specific screens and functions, as set by the administrator through the User Authorizations and Group Authorizations options on the Edit menu. The use of these options is explained in detail in the next chapter. • • • To log in, select a User from the pull-down menu. Enter your password in the Password field, then click OK. The User name under which you are logged in will be shown in parentheses at the top of the screen, and all applicable menu options will now be available. 54 F I L E AWOS 3000 USER’S MANUAL M E N U 8.2 Logout (Keyboard shortcut Alt+f then o) To log out of the current group, click Logout. All menu options requiring login will be grayed out. 8.3 Historical Data (Keyboard shortcut Alt+f then h) The Historical Data option lets you call up a range of archived data for viewing or saving to a CD. Once saved, the data can be imported into a spreadsheet on another PC as a commadelimited text file, which allows the data to be graphed and analyzed. Data importing and analysis cannot be performed on the AWOS CDP. The data type and date range to retrieve are specified using the Historical Data Selection screen shown in Figure 37. Figure 37. Historical Data Selection Screen The following steps describe how to retrieve a range of data. 1. Select the data type from the left Unselected panel, then click Add>> to add it to the Selected panel on the right. • To select multiple data types from the list, hold down the Ctrl key while clicking. • To select a group of data types adjacent to one another on the list, click the first data type, then hold down the Shift key while clicking the last data type. • To add all the data types on the list, click Add All>>. 55 F I L E AWOS 3000 USER’S MANUAL M E N U 2. Choose whether you want to view the data or save it to a file. • Select View Data to have the selected data brought up in a display window (Figure 38) once selection is complete. • Select Save Data to save the selected data to a CD once selection is complete. Figure 38. View Historical Data Example 3. Set the range for the data to be retrieved by entering the date and time of the first file to retrieve in the Start window and the date and time of the last file in the End window. To change the date, click the calendar icon to call up a monthly calendar, then click the appropriate date. To change the time, click within the Hour field then click the up or down arrow to change the value. 4. Select the sampling interval: 1 Minute, 15 Minute, 30 Minute, or 1 Hour. This determines the frequency of data points within the selected date and time range. If you select 15 Minute, for instance, data values will be retrieved at 15-minute intervals. 5. Click OK to retrieve the data. Or click Cancel to close the Historical Data Selection screen without retrieving any data. The CD drive is just below the monitor in the CDP rack enclosure. Only data representing a small number of days can fit on one CD if all the sensors are selected, but considerably more data can be stored from just one sensor. The CDP will show an error message if you attempt to store more than a CD can handle, and so you can iteratively reduce the amount of data by selecting fewer logs, a shorter time length, or a reduced reporting frequency if you get the error message. 56 F I L E AWOS 3000 USER’S MANUAL M E N U 8.4 Printer Setup (Keyboard shortcut Alt+f then s) The Printer Setup option lets you set up the printer for automatic printing, check printer status, send a test page, and send a “TOP OF FORM” command. Figure 39 shows the Printer Setup dialog. The default print setting is Automatic Printing, 1 Minute Frequency. Figure 39. Printer Setup Dialog 8.4.1 Automatic Printing AWOS data can be sent to the printer automatically at a specified interval using the Automatic Printing option. • Select the On checkbox to turn automatic printing on. • Click the checkbox again to toggle the setting off. 8.4.2 Printer Status The Printer Status field shows the current status of a connected printer. This should normally read OK. If the status reads Error, follow the steps below. 1. Check the printer and fix any problems (jammed paper, etc.). 2. Click the Reset button to reset the status to OK. 3. At the printer, position the paper correctly, then click Set Top of Form. 8.4.3 Print Test Page Click Print Test Page to send test pages to the printer to check that the printer is operating properly. 57 F I L E AWOS 3000 USER’S MANUAL M E N U 8.4.4 Set Top of Form Click the Set Top of Form button to tell the software that the paper is positioned correctly and is ready for printing. This should be performed whenever paper is changed, repositioned, or following the clearing of an error. 8.5 Minimize (Keyboard shortcut Alt+f then m) Click the Minimize option to minimize the display. The software will continue running when minimized. To restore the display to full screen, click the AWI AWOS icon on the application toolbar at the bottom of the screen. 8.6 Exit (Keyboard shortcut Alt+f then x) Click the Exit option to close the AWOS 3000 display. The AWOS core software will continue to run, with weather data being collected, processed, and logged, and VHF radio and voice modem output continuing uninterrupted. After exiting, the user will have limited access to the underlying operating system. They will be able to view system files but not edit them; they will not be able to stop system services. 58 E D I T M E N U 9 Chapter Edit Menu (Keyboard shortcut Alt + e) The Edit menu (Figure 40) contains options for setting up group and user authorizations, configuring the display and alarm settings, turning AWOS sensor reporting on or off, handling archive data, and entering voice remarks. Figure 40. The Edit Menu Access to some configuration functions requires the CD security key, which is available only to certified technicians. Refer to Chapter 7 for explanations of those functions. 59 E D I T AWOS 3000 USER’S MANUAL M E N U 9.1 Group and User Authorizations The AWOS display software is highly configurable through a series of user menus. Often, though, configuration changes may best be restricted to authorized users. The Group and User structure of the software allows permission to be allocated as required to control access and maintain the integrity of system operations. Authorization menus are generally only available to Administrators, though those permissions can be given to other groups as well. • Group Authorizations allow administrative functions to be enabled or disabled, new groups to be created, and access to the three data views to be assigned. • User Authorizations grant group membership to individual users. A user can belong to one or more groups. On logging in, the user will be granted access to all the functions allowed for each group in which he has membership. • Authorization changes take effect immediately on exiting a configuration dialog and returning to the main display. • The “Admin” user is the only user entry required by the system and cannot be deleted. In the explanations used in this section, the group and user names are only examples (with the exception of the “Admin” user). Remember that Users and Groups are distinct. In Figure 44, for example, the user “Admin” is not synonymous with the group “Administrators”, though the names are similar. With the settings as shown in Figure 44, the user “Admin” and group “Administrators” do have the same privileges, since only “Group Administrators” is checked. If “Group Operators” was also checked, however, “Admin” would have all the privileges associated with the “Operators” group along with those associated with the “Administrators” group. 60 E D I T AWOS 3000 USER’S MANUAL M E N U 9.2 Group Authorizations (Keyboard shortcut Alt+e then g) The Group Authorizations... option allows administrators to set group permissions. Note: To view the entire list, you may need to resize the window or use the scroll bars. • To configure group permissions, log on as an authorized user with Admin rights and select Edit > Group Authorizations to call up the screen shown in Figure 41. Figure 41. Group Authorizations Screen The Group Authorizations screen lists all current groups and the authorized features and display views available to each. The Authorization Name shows the name of the group, followed by a series of checkboxes that shows the functions a group is authorized to access. A function is accessible when it is checked. Table 6 explains each of the functions. Table 6. Group Authorization Details Function Admin Alarms Audio Config Historical Data Manual Observations Printer Reports Archives View Diagnostics View Tower View When Checked Gives the group administrative privileges, including Group and User Authorization Lets the group acknowledge and disable alarms (System Status menu) Lets the group record voice remarks (Edit > Voice Remarks) Lets the group change configuration settings and configure alarms (Edit > Configuration) Lets the group view and retrieve data logs (File > Historical Data) Lets the group enter manual observations (Manual Observations menu) Lets the group control printer operation Lets the group enter METAR remarks Lets the group select the Archives view from the View menu Lets the group select the Diagnostics view from the View menu Always on 61 E D I T AWOS 3000 USER’S MANUAL M E N U 9.2.1 Adding a Group To add a new group, click the New button at the bottom of the screen. The screen shown in Figure 42 will be displayed. Figure 42. New Group Screen • • • • • Enter a name for the group. Select all the features from the Features panel that you want the group to have access to. Select all the views from the Views panel that you want the group to have access to. Click Save to add the group. Click Cancel to return to the Group Authorizations screen without adding the group. 62 E D I T AWOS 3000 USER’S MANUAL M E N U 9.2.2 Editing a Group To edit a group’s authorizations, highlight a group on the list and click the Edit button at the bottom of the screen. The screen shown in Figure 43 will be displayed. Figure 43. Edit Group Screen • • • Check or uncheck Features and Views to enable (check) or disable (uncheck) access. Click Save to save the changes. Click Cancel to return to the Group Authorizations screen without saving the changes. 9.2.3 Deleting a Group To delete a group, highlight the group name on the Group Authorizations screen and click the Delete button at the bottom of the screen. The group will be deleted immediately. Note: You cannot delete a group that has a user associated with it. The Administrator group cannot be deleted. 63 E D I T AWOS 3000 USER’S MANUAL M E N U 9.3 User Authorizations (Keyboard shortcut Alt+e then u) The User Authorizations... option allows authorized users to define new users and associate them with the appropriate groups. Note: To view the entire list, you may need to resize the window or use the scroll bars. • To configure user permissions, log on as an authorized user with Admin rights and select Edit > User Authorizations to call up the screen shown in Figure 44. Figure 44. User Authorizations Screen The User Authorizations screen lists all current users along the left side and all existing groups along the top. The Authorization Name shows the name of the user, followed by a checkbox for each available group. A checkmark beneath a group indicates that the user is a member of that group with access to all the features associated with the group. 64 E D I T AWOS 3000 USER’S MANUAL M E N U 9.3.1 Adding a User To add a new user, click the New button at the bottom of the screen. The screen shown in Figure 45 will be displayed. Figure 45. New User Screen • • • • • • Enter a name for the user. Enter a password for the user. Any letter and/or number combination can be used. No password strength checking is built into the system, so it is the user’s responsibility to choose a secure password. To confirm the password, re-enter it in the Retype Password field. Select each of the groups in the Groups panel to which the user will belong. Click Save to add the user. Click Cancel to return to the User Authorizations screen without adding the user. 65 E D I T AWOS 3000 USER’S MANUAL M E N U 9.3.2 Editing a User To change a user’s password or change the groups the user belongs to, highlight the user’s name on the list and click the Edit button at the bottom of the screen. A screen similar to that shown in Figure 46 will be displayed. Figure 46. Edit User Screen • • • • • To change the user’s password, enter a new password in the Password field. To confirm the password, re-enter it in the Retype Password field. Check or uncheck groups in the Groups panel to set the groups to which the user will belong. Click Save to save the changes. Click Cancel to return to the User Authorizations screen without saving the changes. 9.3.3 Deleting a User To delete a user, highlight the user’s name on the User Authorizations screen and click the Delete button at the bottom of the screen. The user will be deleted immediately. 66 E D I T AWOS 3000 USER’S MANUAL M E N U 9.4 Configuration (Keyboard shortcut Alt+e then c) When you select Configuration from the Edit menu, the main configuration screen (Figure 47) appears. The available configuration options are grouped under tabs according to the part of the system they affect: Airport Reports Sensors Voice Misc • To access a configuration category, click the appropriate tab at the top of the screen. • Most categories also provide secondary tabs that group similar options under a common heading. The Airport tab, for example, is divided into General settings and Runway settings. Figure 47. Configuration Screen 67 E D I T AWOS 3000 USER’S MANUAL M E N U 9.4.1 Airport Tab The Airport tab (Figure 48) contains two sub-tabs: General and Runways. 9.4.1.1 General The Airport > General tab contains a number of options unique to the airport location. Only the Airport Name is available for general user input. All other settings require the CD security key. Refer to Section 7.1.1 for details on those options. Figure 48. Configuration General Tab 68 E D I T AWOS 3000 USER’S MANUAL M E N U 9.4.1.2 Runways The Airport > Runways tab (Figure 49) contains a single field for specifying the number of the runway where the AWOS is installed. Figure 49. Runways Tab Table 7. Parameters on the Runways Tab Runways AWOS Enter the number/designation of the runway associated with the AWOS. The value can consist of a 2-digit number from 1–36, followed by an optional designator (R or L, for example). Up to four text characters can be entered in place of numeric values for sites such as helipads that do not have runway designations. 69 E D I T AWOS 3000 USER’S MANUAL M E N U 9.4.2 Reports Tab The Reports tab lets you specify parameters for METAR scheduling and NADIN configuration. 9.4.2.1 METAR Tab The METAR tab (Figure 50) lets you specify the scheduling of METAR report transmissions. The available reporting intervals are: • 5 minutes • 10 minutes • 15 minutes • 20 minutes This value can be changed by the site operator; the CD key is not required. The default setting is 5 minutes. Note that any changes to the METAR reporting interval must be coordinated with the FAA. Figure 50. METAR Configuration Tab 70 E D I T AWOS 3000 USER’S MANUAL M E N U 9.4.2.2 NADIN Tab The NADIN tab (Figure 51) lets you set NADIN to OFF or ON. • Set to OFF when NADIN is not installed or to disable NADIN. • Set to ON to enable NADIN. Figure 51. NADIN Tab 9.4.3 Sensors Tab Access to the options found on the Sensors tab requires the CD security key. Section 7.1.2 provides the details. 71 E D I T AWOS 3000 USER’S MANUAL M E N U 9.4.4 Voice Tab The Voice Configuration tab (Figure 52) lets you set the status of the AWOS voice message, the playback mode, and enabling or disabling the VHF radio and phone output. Figure 52. Voice Configuration Tab 9.4.4.1 Status The Status panel of the Voice tab offers two status options. • Select Commissioned for a system that has been commissioned and is in normal operation. • Select Test Mode to transmit a “test” notice in the outgoing voice message. This option is used prior to commissioning and during maintenance. 9.4.4.2 Playback Mode The Playback panel lets you select between two playback modes. • In Automatic mode the outgoing voice message includes all available AWOS weather data in addition to any manually recorded voice remarks. • In Manual mode, all automatically generated AWOS weather data is excluded from the voice output, and only manually recorded voice remarks are output. This mode should not be used for weather data, since the voice remark will not expire until playback mode is returned to Automatic. 72 E D I T AWOS 3000 USER’S MANUAL M E N U 9.4.4.3 Enabling Phone Output The Phone option at the bottom of the Voice tab lets you enable or disable voice output over a phone line. This might be used when, for example, a phone line is to be used for RMM rather than voice output. In that case, Phone would be set to Disable. Set to Enable for normal operation. Set to Disable to suspend phone output. 9.4.4.4 Enabling VHF Radio Output The VHF Radio option at the bottom of the Voice tab lets you enable or disable voice output over the ground-to-air VHF radio. This might be used when, for example, the VHF radio is malfunctioning. In that case, VHF Radio would be set to Disable. Set to Enable for normal operation. Set to Disable to suspend VHF output. When using the ATIS/AWOS switch, this should normally be set to Enable. 9.4.4.5 Voice Test Mode Access to the options found on the Voice tab requires the CD security key. Section 7.1.4 describes the details. 73 E D I T AWOS 3000 USER’S MANUAL M E N U 9.4.5 Misc Tab The Misc tab lets you specify the number of days to retain logs in the system before deleting them, set the user timeout period, and control the system’s time source (GPS or computer). 9.4.5.1 General Tab The General tab (Figure 53) lets you enter the number of days to retain logs, and to set the default time period for automatically logging out a user. • In the Number of Days to Keep Logs text box, enter the number of days the system should maintain log files before overwriting them. The value can be anywhere in the range of 4 days to 9999 days. (Note: Saved logs will be retained regardless of the value entered here.) • In the Default User Timeout text box, enter the number of minutes of inactivity before a logged-in user is automatically logged out. If a user is logged in, once this time period has elapsed (with no keyboard or mouse activity detected), the AWOS display will remain visible, but menu options requiring user login will be grayed out. • In the Pin for voice remarks over phone text box, enter a 4-digit numeric PIN. The PIN number is used to enable/disable or add voice remarks via telephone. Although the PIN may be fewer than 4 numeric digits, four digits ar recommended for maximum security. Figure 53. General Tab 74 E D I T AWOS 3000 USER’S MANUAL M E N U 9.4.5.2 Time Tab Use the Time tab (Figure 54) to set the GPS receiver as the time source for the AWOS software or to manually enter the time and date. Use GPS Time should be selected in normal operation; disable only if the GPS Receiver fails. • Select Use GPS Time to obtain time and date data from the GPS Receiver. • To specify the time and date manually, uncheck the Use GPS Time box and enter the date and time in the corresponding fields. To enter the date, click the calendar icon to the right of the date field and select the desired date. This option will use the computer’s built-in clock, which is less accurate than the GPS Receiver. Figure 54. Time Tab 75 E D I T AWOS 3000 USER’S MANUAL M E N U 9.5 Alarm Configuration Access to the options found on the Alarm Configuration menu requires the CD security key. Section 7.1.3 provides the details. 9.6 Turn On/Off Sensors The Turn On/Off Sensors option on the Edit menu allows you to specify the sensor data to include on the display and in generated reports. • When a sensor is turned ON, data for that sensor will be displayed and values will be included in logs and reports. • When a sensor is turned OFF, the sensor will appear as "missing" on the display and in reports. • When a sensor is ON, its value will be included in calculations and when it is OFF, any calculated values that are dependent on it will be appear as “missing.” The Sensor Dialog screen shown in Figure 55 is the interface for specifying the data to include. Figure 55. Sensors On/Off Screen • Select the sensors to be turned ON or OFF individually by clicking On or Off beside the sensor name. or Turn all sensors ON by clicking the All On button at the bottom of the screen. or Turn all sensors OFF by clicking the All Off button at the bottom of the screen. • When done, click OK to save the settings, or click Cancel to discard any changes made. 76 E D I T AWOS 3000 USER’S MANUAL M E N U 9.7 Handling Archive Data The three archive data options at the bottom of the Edit menu are used in conjunction with the Archives View (accessible from the View menu) to create collections of archive data. For details on using these options, refer to Section 10.4 . 9.8 Voice Remark The Voice Remark option (Figure 56) lets you record up to two 90-second voice remarks to be appended to the outgoing AWOS voice message. Note: VHF radio and telephone voice outputs are suspended while the Voice Remark window is open. Figure 56. Voice Remark Screen 9.8.1 Recording a Voice Remark The following steps describe how to record a voice remark. 1. Click the appropriate tab to select the voice remark to record (Voice Remark One or Voice Remark Two). 2. Click the record button to begin recording the remark. 3. Speak the remark clearly into the CDP microphone. 4. When done, click the stop button . 5. Click the play button to review the remark. 6. Set the status, playback mode, and enable output as described below. 77 E D I T AWOS 3000 USER’S MANUAL M E N U 9.8.2 Playback Mode The Playback panel lets you select between two playback modes. • In Automatic mode the outgoing voice message includes all available AWOS weather data in addition to any manually recorded voice remarks. • In Manual mode, all automatically generated AWOS weather data is excluded from the voice output, and only manually recorded voice remarks are output. 9.8.3 Enabling Voice Output The Enabled option at the bottom of the Voice Remark screen lets you enable or disable the voice remark. Voice Remark One and Voice Remark Two are enabled and disabled independently, so this selection must be made for each. • Select On to output the voice remark with the outgoing voice message. • Select Off to suspend output of the voice remark. 9.8.4 Voice Remark Expiration The Persistent option at the bottom of the Voice Remark screen controls whether the voice remark expires or is on continually. Voice Remark One and Voice Remark Two are enabled and disabled independently, so this selection must be made for each. Note: For remarks containing weather data, Persistent should be set to Off to prevent out-ofdate information being broadcast. • Select On to have the remark output continually without expiring. • Select Off to set the remark to expire at 1 second past the top of the hour. With this option selected, the weather remark will have to be re-enabled to be output again after it has expired. 9.8.5 Telephone Access to Voice Remarks Voice remarks may be enabled/disabled or edited by telephone. To use this feature, use the dialin telephone number that you would normally use to access the telephone voice output. 1. Press 5 to access the Telephone Access Menu. 2. Enter the PIN (the PIN was created as described in Section 9.4.5.1 followed by the # sign when prompted. 3. Choose a selection from those offered. • • • Press 1 to listen to the current voice remark(s). Press 2 to record a new voice remark with a length up to 90 seconds (this will be Voice Remark 1). Press 4 to exit the system. 78 E D I T AWOS 3000 USER’S MANUAL M E N U 4. If you selected 1 to listen to the current voice remark, you will hear the remark and whether it is active. • If you are advised the remark is not active, press 1 to make the remark you just heard active. You will also have the choice to press 2 to create a new voice remark or press 4 to exit. • If you are advised the remark is active, press 1 to make the remark you just heard inactive. You will also have the choice to press 2 to record a new voice remark or press 4 to exit. • The system will exit automatically once you are done if you selected 1 or 2. 5. If you selected 2 to record a new remark, you will be prompted to record the remark after the tone. The remark will be played back shortly after you finish making it. • You will be asked to press 1 to accept the remark or to press 2 to record a new voice remark. • You will be advised that the remark is not active, to press 1 to make the remark you just heard active, or to press 4 to exit. • The system will exit automatically. Any remarks activated via the Telephone Access Menu will become inactive automatically 1 second past the top of the hour. 79 V I E W M E N U 10 Chapter View Menu (Keyboard shortcut Alt+v) The View menu (Figure 57) lets you select the data view (Tower, Diagnostics, or Archives). Figure 57. The View Menu 10.1 Selecting the Data View The three options on the View menu let you select the data view. Each view contains different sets of data, and displays that data in different formats. • To select a view, click the view name on the View menu. In the example above, the Archives view is selected. • Not all views may be selectable. The views available to each user are controlled by the Administrator. 80 V I E W AWOS 3000 USER’S MANUAL M E N U 10.2 Tower View Figure 58 shows the Tower View. This display is geared toward control tower use, with wind data shown on graphic dials and essential parameters organized visually for quick identification. Figure 58. Tower View 81 V I E W AWOS 3000 USER’S MANUAL M E N U 10.3 Diagnostics View The Diagnostics View is shown in Figure 59. The Diagnostics view provides access to system and sensor level status information. The display is divided into two panes. • • • • The narrow pane on the left side is the navigation pane, which lists the components with status information available. To select a component, click its name in the navigation pane. The main pane shows the status information for the selected component. Within any screen, warning conditions are shown in YELLOW and failures are shown in RED . Sensors that are not installed will still appear in the navigation pane, but all fields in the main pane will be blank. DCP status bits applying to uninstalled sensors will also be blank, as will relevant fields in the Sensor Data pane. No alarms will be triggered for uninstalled sensors. 10.3.1 System Diagnostics The System Diagnostics screen (Figure 59) is the default screen to which the display opens. • • • • • • • If new, unacknowledged alarms exist, a blinking red ALARM indicator is shown in the is shown in the navigation pane beside System Status box. A red alarm indicator System Diagnostics. If all alarms have been acknowledged, the ALARM indicator turns a lighter red (as in Figure 59), and the navigation pane’s System Diagnostics alarm indicator turns yellow . Running counts of Acknowledged Alarms and Unacknowledged Alarms are shown in two text boxes. The text boxes will change color to correspond with the state of existing alarms. If a sensor or DCP failure occurs, a red alarm indicator will be shown in the navigation pane beside the affected component. If a sensor or DCP warning is present, a yellow alarm indicator will be shown in the navigation pane beside the affected component. The On or Off status of the sensors is shown in the Sensor Status panel. The System Info panel shows the time at which the system was last started. 82 V I E W AWOS 3000 USER’S MANUAL M E N U Figure 59. Diagnostics Display 83 V I E W AWOS 3000 USER’S MANUAL M E N U 10.3.2 DCP Diagnostics Click the DCP heading in the list pane to call up the display shown in Figure 60. The display is divided into four panels. Statistics The Statistics panel provides a summary of DCP behavior, focused mainly on communications integrity. Status The Status panel shows the current status of several DCP operating parameters. Sensor Data The Sensor Data panel shows the most recent data received for each parameter. Recent Responses The Recent Responses panel shows a real-time record of incoming DCP poll responses in a scrolling list. The entries will scroll as new data is received, with the most recent response at the top of the list. The format of the DCP message is explained in Appendix A. Figure 60. DCP Diagnostics Screen 84 V I E W AWOS 3000 USER’S MANUAL M E N U 10.3.2.1 Statistics Statistics for a number of operational parameters are shown in Table 8 to assist the maintenance technician in isolating a problem. The Total values represent data logged since power was last cycled on the DCP. Table 8. Definitions for the Statistics Tab Up Time Shows the time elapsed since the AWOS 3000 server software was last started. All the values in this section are in relation to this Up Time. Request Count Shows the number of poll requests sent by the CDP. Response Count Shows the number of poll responses received from the DCP. Average Response Rate (ms) Shows the average time taken for a CDP poll request to be responded to by the DCP. Response to Request (%) Shows the percentage of poll requests that have received responses out of the total sent. CRC Error Count Shows the number of CRC errors detected in responses from the DCP CRC Error Rate (%) Shows the percentage of DCP responses containing CRC errors out of the total received CRC Errors / minute Shows the average number of CRC errors per minute detected in responses from the DCP 85 V I E W AWOS 3000 USER’S MANUAL M E N U The Test panel (Table 9) allows a technician to view only current data by resetting all values with a click of the Reset button. Table 9. Definitions for the Test Panel Elapsed Time Shows the time elapsed since the Reset button was last clicked. All values in this panel are in relation to this Elapsed Time. Request Count Shows the number of poll requests sent by the CDP. Response Count Shows the number of poll responses received from the DCP. Average Response Rate (ms) Shows the average time taken for a CDP poll request to be responded to by the DCP. Response to Request (%) Shows the percentage of poll requests that have received responses out of the total sent. CRC Error Count Shows the number of CRC errors detected in responses from the DCP CRC Error Rate (%) Shows the percentage of DCP responses containing CRC errors out of the total received CRC Errors / minute Shows the average number of CRC errors per minute detected in responses from the DCP Reset Time of Last Message Click to reset the Test panel values to zero. Does not affect the values in the Total panel. Shows the time at which the last response from the DCP was recorded. 86 V I E W AWOS 3000 USER’S MANUAL M E N U 10.3.2.2 Status The Status panel shows the current status of a number of DCP components (Table 10). When a warning condition exists, the status will be shown in YELLOW. If a failure occurs, the status will be shown in RED . Table 10. DCP status Indications Field Indications Description -5 VDC Reference OK or Failed Shows the current status of the DCP power supply's -5 V DC reference Error +5 VDC Reference OK or Failed Shows the current status of the DCP power supply's +5 V DC reference Error Restarted in Last Minute Yes or No Shows whether the DCP has been restarted in the past minute Warning Running on Battery Yes or No Indicates whether the DCP is running on battery or line power. Yes indicates the DCP is running on battery power; No indicates it is running on line (AC) power Warning Maintenance Switch Pressed Yes or No Indicates whether the maintenance switch within the DCP has been pressed. Warning MARS Fan OK or Failed Indicates Failed when the fan within the MARS unit is not working correctly. When the MARS fan fails, all temperature and RH values will be shown as missing. Error Wind Sensor OK or Failed Shows Failed if no data is received from the wind sensor Error BP Sensor Low Temperature OK or Failed Indicates Failed if the BP sensor's temperature drops below the minimum operational tolerance Error BP Sensor High Temperature OK or Failed Indicates Failed if the BP sensor's temperature rises above the maximum operational tolerance Error BP Sensor Communication OK or Failed Shows Failed if no data is received from the BP sensor Error Ceilometer Sensor Communication OK or Failed Shows Failed if no data is received from the ceilometer Error Freezing Rain Sensor Communication OK or Failed Shows Failed if no data is received from the freezing rain sensor Error Lightning Sensor Communication OK or Failed Shows Failed if no data is received from the lightning detector Error Precipitation Sensor Communication OK or Failed Shows Failed if no data is received from the present weather (precipitation ID & intensity) sensor Error Visibility Sensor Communication OK or Failed Shows Failed if no data is received from the visibility sensor Error 87 Warning or Error V I E W AWOS 3000 USER’S MANUAL M E N U 10.3.2.3 Sensor Data The Sensor Data panel (Figure 61) shows the most recent data received from each of the sensors. These values are updated each time a new message is received from the DCP. Figure 61. Sensor Data Panel When data from a sensor is missing, it is represented in the Sensor Data panel by a blank entry, as opposed to the slashes (//) used in the Tower View. Slashes are only used in this panel when communication between the DCP and CDP has been lost. 10.3.2.4 Recent Reponses The Recent Responses panel displays all incoming poll responses from the DCP as they are received. Once the list is full, the entries will scroll, with the most recent response at the top of the list. • The Time field shows the time at which the response was received • The Delta (ms) field shows the elapsed time between the selected response and the response of the same type preceding it. • The Message field shows the raw data message. The format of the DCP message is explained in Appendix A. 88 V I E W AWOS 3000 USER’S MANUAL M E N U 10.3.3 Cloud Height Indicator Diagnostics The Cloud Height Indicator diagnostics screen (Figure 62) shows the individual components of the Model 8339 Ceilometer’s status word, which is transmitted in each data packet. Figure 62. Cloud Height Indicator Diagnostics Screen A brief explanation of each of the status fields shown on the diagnostics display is given in Table 11. Detailed explanations of each of these status items are provided in the Model 8339 Laser Ceilometer User's Manual, 8339-F-001. When a warning condition exists, the status will be shown in YELLOW . If a failure occurs, the status will be shown in RED . Since the ceilometer is capable of discerning levels of error, any of the ceilometer status fields can indicate either a warning or a failure, depending on the severity of the condition. If a warning condition exists and is not addressed, it will progress to failure status. The status field will then change from YELLOW to RED. 89 V I E W AWOS 3000 USER’S MANUAL M E N U Table 11. Definitions for the Ceilometer Status Field Indications Automatic Gain Control OK or Failed Blower Heater On or Off Description Warning or Error If Failed, indicates an error in the Automatic Gain Control software. Indicates whether the Blower/Heater is currently powered on. Blower Heater OK or Failed Indicates the status of the Blower/Heater Configuration OK or Failed If Failed, indicates the configuration information has not been loaded or the firmware is corrupted Control Board OK or Failed If Failed, the Control Board must be replaced before the ceilometer can be returned to normal operation Door Open Indicates whether the ceilometer enclosure door is open (Failed) or closed (OK); triggered by the door's interlock switch. OK or Failed When the interlock switch has been placed in the bypass mode, the Door Open field would indicate the door is closed (OK). Laser Power OK or Failed Laser Temperature Control OK or Failed Indicates the status of the Ceilometer’s Peltier device Laser Temperature Low OK or Failed Indicates Failed if the laser temperature drops below the minimum operational tolerance Laser Temperature High OK or Failed Indicates Failed if the laser temperature rises above the maximum operational tolerance Missing Pulse Indicates Failed if an expected return laser pulse was not OK or Failed detected. Could be due to a number of causes; use in combination with other status conditions to determine cause Optical Module OK or Failed Optical Module Heater OK or Failed Indicates the status of the Optical Module's heater Optical Module Temperature OK or Failed If Failed, indicates the Optical Module's temperature is out of tolerance Receiver Board OK or Failed If Failed, the Receiver Board must be replaced before the ceilometer can be returned to normal operation Supply Voltage OK or Failed If Failed, indicates the main voltage supply has been lost Window Dirty OK or Failed If Yes, indicates the ceilometer lenses need cleaning Indicates Failed if laser power drops below the acceptable level. If Failed, the Optical Module must be replaced before the ceilometer can be returned to normal operation 90 Either, depending on severity V I E W AWOS 3000 USER’S MANUAL M E N U 10.3.4 Freezing Rain Diagnostics The Freezing Rain diagnostics screen (Figure 63) shows the status of the Model 6495 Freezing Rain sensor components. Figure 63. Freezing Rain Diagnostics Screen 91 V I E W AWOS 3000 USER’S MANUAL M E N U A brief explanation of each of the status fields shown on the diagnostics display is given in Table 12. When a warning condition exists, the status will be shown in YELLOW . If a failure occurs, the status will be shown in RED . Table 12. Definitions for the Freezing Rain Sensor Status Field Indications Description Normal Operation Yes or No Indicates Yes if the sensor is functioning normally Warning Field Calibration Yes or No Indicates Yes if a field calibration is in progress Warning Deicing Operation Yes or No Indicates Yes if a deicing cycle is in progress Warning Probe OK or Failed If Failed, the sensor probe is not functioning properly Error Deicing OK or Failed If Failed, a sensor deicing cycle was not completed successfully Error Electronics OK or Failed If Failed, the sensor’s electronics have reported a fault Error Sensor Reporting to Controller OK or Failed If Failed, the sensor is not reporting data and status to the controller board (located within the DCP enclosure) Error Sensor Communication to Controller OK or Failed If Failed, the DCP is unable to communicate with the controller board (located within the DCP enclosure) Error 92 Warning or Error V I E W AWOS 3000 USER’S MANUAL M E N U 10.3.5 Lightning Diagnostics The Lightning diagnostics screen (Figure 64) shows the status of the Model 6500 Thunderstorm/ Lightning Sensor components. Figure 64. Lightning Diagnostics Screen A brief explanation of each of the status fields shown on the diagnostics display is given in Table 13. When a warning condition exists, the status will be shown in YELLOW . If a failure occurs, the status will be shown in RED . 93 V I E W AWOS 3000 USER’S MANUAL M E N U Table 13. Definitions for the Thunderstorm/Lightning Sensor Status Field Status Code Indications Numeric Description Warning or Error 00 indicates normal operation; other values indicate an error, which will be denoted in one of the fields below Error Antenna OK or Failed Indicates Failed if there is an antenna or antenna wiring problem Error Antenna Change Request OK or Failed Indicates Failed if a request was received to change the antenna mount to a location that does not match the configuration jumpers Error Processor/Antenna OK or Failed Indicates Failed if there have been invalid or missing internally generated test strikes; possible causes are a noisy antenna location or antenna wiring problem Error Yes or No Indicates Yes if the antenna location (determined by processor jumpers) has changed since the system was last powered up Error Communication Buffer OK or Overload Indicates Overload if the communication buffer has become full; some data loss is likely Warning DSP Processor OK or Failed Indicates Failed if there is an error in the DSP processor Error DSP Processor Memory OK or Failed Shows Failed if there is an error in the DSP processor’s memory Error Heading Reference OK or Failed If Failed, contact AWI Customer Support Error Main Processor OK or Failed Indicates Failed if there is an error in the main processor Error Main Processor Memory OK or Failed Shows Failed if there is an error in the main processor’s memory Error Main or DSP Processor OK or Failed Shows Failed if an error has occurred in either the main or DSP processor Error Message OK or Invalid Shows Invalid if the sensor message is corrupted Warning Microphone OK or Stuck Shows Stuck if the microphone key has been asserted for 60 seconds or more Request OK or Invalid Shows Invalid if a poll command was not received properly Warning Serial Communication OK or Failed Shows Failed for communication errors, such as no data, wrong baud rate, excessive noise, etc. Error Serial Header OK or Failed Shows Failed if an error is detected in the message header Error XYZ Input OK or Failed If Failed, contact AWI Customer Support Error Configuration Changed 94 Error V I E W AWOS 3000 USER’S MANUAL M E N U 10.3.6 Precipitation Identification/Intensity Diagnostics The Precipitation Identification/Intensity diagnostics screen (Figure 65) shows the status of the Model 6490 Present Weather Sensor components. Figure 65. Present Weather Diagnostics Screen 95 V I E W AWOS 3000 USER’S MANUAL M E N U A brief explanation of each of the status fields shown on the diagnostics display is given in Table 14. When a warning condition exists, the status will be shown in YELLOW . If a failure occurs, the status will be shown in RED . Table 14. Definitions for the Present Weather Sensor Status Field Indications Automatic Gain Control Card If Failed, the Automatic Gain Control PCB must be OK or Failed replaced before the sensor can be returned to normal operation (not field-replaceable) Error Electronics Power Supply If Failed, the Electronics Power Supply must be OK or Failed replaced before the sensor can be returned to normal operation Error Heater Power Supply If Failed, the Heater Power Supply must be OK or Failed replaced before the sensor can be returned to normal operation Error Reset Yes or No Description Warning or Error Indicates Yes if the sensor has been reset in the past 5 minutes Warning Sensor Head Assembly If Failed, the sensor assembly must be replaced OK or Failed before the sensor can be returned to normal operation Error Signal Processor 1 Card If Failed, the Signal Processor 1 PCB must be OK or Failed replaced before the sensor can be returned to normal operation (not field-replaceable) Error Signal Processor 2 Card If Failed, the Signal Processor 2 PCB must be OK or Failed replaced before the sensor can be returned to normal operation (not field-replaceable) Error Transmit Modulator Card If Failed, the Transmit Modulator PCB must be OK or Failed replaced before the sensor can be returned to normal operation (not field-replaceable) Error 96 V I E W AWOS 3000 USER’S MANUAL M E N U 10.3.7 Visibility Diagnostics The Visibility diagnostics screen (Figure 66) is divided into four panels. Configuration The Configuration panel shows the current configuration of the visibility sensor. Mode The Mode panel shows OK or FAILED status for the visibility sensor’s four operating modes. Emitter/Detector The Emitter/Detector panel shows the status of each of the four sensor heads and their associated heaters. Other The Other panel contains miscellaneous status data to aid in troubleshooting problems and gauging the overall operation of the sensor. When a warning condition exists, the status will be shown in YELLOW . If a failure occurs, the status will be shown in RED . Figure 66. Visibility Diagnostics Screen 97 V I E W AWOS 3000 USER’S MANUAL M E N U 10.3.7.1 Configuration The visibility sensor has several configuration options (Table 15) that are set via the visibility controller. The Configuration panel shows the current configurations settings. Note that the settings cannot be changed through this screen; any changes must be made at the visibility controller. Table 15. Definitions for the Visibility Sensor Configuration Panel Field Description Averaging Interval The visibility calculates average values of collected data internally, then outputs the average to the DCP. This field shows the averaging interval currently in effect. Possible settings are: 3 minutes, 5 minutes, or 10 minutes. Output Interval This field shows the frequency with which data is output to the DCP. Possible settings are: 10 seconds, 1 minute, 5 minutes, or 10 minutes Output Type This field shows the type of data being output by the sensor. Data can be output either as visibility values or as extinction coefficient. Units This field indicates the units of measure for output data, and can be either miles or kilometers. Error This field shows any errors detected by the sensor's internal diagnostics. 10.3.7.2 Mode The Mode panel (Table 16) shows OK or Failed for the visibility sensor’s four operating modes. During normal operation, the visibility sensor alternates between Mode 0 and Mode 1 operation with a period of 15 seconds. Each half cycle, a new pair of detector measurements is acquired (one direct and one indirect). The measurement cycle period is 1 minute long, with 30 seconds spent in each mode. A Failed status indicates problems with one of the four heads. The source of these errors can be further narrowed down by checking status for the individual heads in the Emitter/Detector panel. If only one head has failed, the field will show a warning (YELLOW). If more than one head fails, an error (RED) will be indicated. Table 16. Definitions for the Visibility Sensor Mode Panel Field Description Indications Mode 0, Direct Direct measurement between Emitter 0 and Detector 1 OK or Failed Mode 0, Indirect Scatter measurement between Emitter 0 and Detector 0 OK or Failed Mode 1, Direct Direct measurement between Emitter 1 and Detector 0 OK or Failed Mode 1, Indirect Scatter measurement between Emitter 1 and Detector 1 OK or Failed 98 V I E W AWOS 3000 USER’S MANUAL M E N U 10.3.7.3 Emitter/Detector The Emitter/Detector panel (Table 17) shows OK or Failed for the visibility sensor’s four heads and four heaters (one in each head). A Failed status indicates a failure of the head, or dirt or contaminants on the sensor window. If only one head has failed, the field will show a warning (YELLOW). If more than one head fails, an error (RED) will be indicated. Table 17. Definitions for the Emitter/Detector Panel Field Indications Emitter 0 OK or Failed Emitter 1 OK or Failed Detector 0 OK or Failed Detector 1 OK or Failed Emitter 0 Heater OK or Failed Emitter 1 Heater OK or Failed Detector 0 Heater OK or Failed Detector 1 Heater OK or Failed 99 V I E W AWOS 3000 USER’S MANUAL M E N U 10.3.7.4 Other The Other panel (Table 18) shows status information for several parameters that can be used in the troubleshooting of sensor problems. Table 18. Definitions for the Visibility Sensor "Other" Panel Field Indications Description Warning or Error Power Supply AC or Battery Indicates whether the sensor is operating from battery or AC power Warning Complete Data Yes or No Yes indicates complete data is being received from all heads Warning Missing Data Yes or No Yes indicates incomplete data is being received from at least one head Error OK or Failed Failed indicates that contaminants (dust, etc) have accumulated on the emitter or detector windows. Cleaning the windows should clear this error Warning 4 or 3 Indicates whether the sensor is operating in 4 head (normal) mode or 3 head mode. Threeheaded operation is initiated automatically when the software determines that one of the sensor heads is not functioning properly. In this mode, special algorithms are used to determine visibility based on the outputs of the three operational heads Warning Window Dirty Operating Heads Cross Check OK or Failed Failed indicates one of the sensor heads has failed Warning ALS or Day/Night Heater OK or Failed Failed indicates the heater has failed on the Ambient Light Sensor or Day/Night Sensor, whichever is installed. Error 100 V I E W AWOS 3000 USER’S MANUAL M E N U 10.3.8 GPS Diagnostics The GPS diagnostics screen (Figure 67) shows the status of the GPS unit. Figure 67. GPS Diagnostics Screen 101 V I E W AWOS 3000 USER’S MANUAL M E N U A brief explanation of each of the status fields shown on the diagnostics display is given in Table 19 below. The only GPS field that will show an error is the GPS Error field. When an error is detected, Yes will be shown in this field in RED . If the Active field displays No continuously for longer than one hour, an alarm will be generated. The other fields are informational, and will show a current value or will be blank. Table 19. Definitions for the GPS Diagnostics Screen Field Indications Description Warning or Error Latitude Decimal Degrees Latitude of the site in decimal format None Longitude Decimal Degrees Longitude of the site in decimal format None Serial Port Number Number of the serial port the GPS is connected to None Drift Count Number Number of times the GPS clock has been automatically adjusted None Active Yes or No If Yes, the GPS is connected and reporting None GPS Error Yes or No If Yes, the GPS has reported an error Error Date and time of the last message received from the GPS None Last Updated Date & Time 102 V I E W AWOS 3000 USER’S MANUAL M E N U 10.4 Archives View The Archives view (Figure 68) provides access to stored data logs. Using the archive options on the Edit menu, you can take a “snap shot” of data at a specific point in time for later reviewing. Note: With the exception of Site ID (contained in the archive headers), site-specific parameters are not logged. Data entered manually will be displayed inside angle brackets, <KAWI 100510…>, for example. The three archive data options at the bottom of the Edit menu are used in conjunction with the Archives View to create collections of archive data. Figure 68. Archives View 103 V I E W AWOS 3000 USER’S MANUAL M E N U 10.4.1 Navigation and Data Panes The Archives view is divided into two panes—the Navigation Pane on the left, and the Data Pane on the right. • The Navigation Pane shows a hierarchy of all archived data. At the top level of the hierarchy is the Active folder, which contains all the automatically generated log files. (Manually generated Snap Shot archives—explained in the next section—are placed at the same level as the Active folder, labeled by date and time.) Beneath this top level are archive folders containing specific types of archived data logs—for example, Alarm logs, METAR logs, etc.) Archive folders can be expanded or contracted by clicking the open/close icon to the left of the folder. By navigating down through the hierarchy, the desired log file can be located. • The Data Pane shows the contents of the selected log file. To display the contents of a file, click its name in the navigation pane. Note: The data in this pane are not updated dynamically. To refresh the contents, click another archive in the navigation pane, then return to the desired archive (click it again in the navigation pane) to view the updated data. • Click Close to close the log file currently displayed. 10.4.2 Snap Shot Archive Using the Snap Shot Archive command on the Edit menu, collected data can be frozen at a specific point in time. • When you click the Snap Shot Archive option, a new archive folder is created that contains all the data logs collected up to that moment. This folder is named according to the date and time at which it was created, and is located at the top level of the hierarchy. Use the open/close icons to navigate through the archive’s subfolders. 10.4.3 Delete Archive In Archives View, the Delete Archive option on the Edit menu is used to delete a snap shot archive. You must be logged in as an Administrator to select this option. Automatically generated archives cannot be deleted manually. • To delete a snap shot archive, highlight the archive in the navigation pane, then click Delete Archive on the Edit menu. You will be asked to confirm your selection. If you click OK, the archive will be deleted. 104 V I E W AWOS 3000 USER’S MANUAL M E N U 10.4.4 Save Archive In Archives View, the Save Archive option on the Edit menu is used to back up a snap shot archive to the CD drive. Automatically generated archives cannot be selected for saving. To save a snap shot archive to CD: 1. Ensure that a CD is loaded in the CD writer. 2. Highlight the archive in the navigation pane, then click Save Archive on the Edit menu. 3. A screen will appear (Figure 69) that allows you to select the specific file types within the archive to save. To save all the files of a certain type (Alarm, for instance), click the box beside the folder; a checkmark will appear to show it is selected. To select specific files within the folder, click the open/close icon beside the folder to view the contents of the folder. Click the desired files within the folder to select them for saving; a checkmark will be shown beside selected files. 4. Click Save to copy the files to CD. 5. Click Cancel to exit without saving any files. Figure 69. Save Archive Selection Screen 105 M A N U A L O B S E R V A T I O N S M E N U 11 Chapter Manual Observations Menu (Keyboard shortcut Alt+m) The Manual Observations menu (Figure 70) lets you enter manual observations for the primary meteorological parameters. Figure 70. The Manual Observations Menu 11.1 Manual Observations and Automatic Data The AWOS 3000 software allows users to enter manual observations in place of the AWOS automatic data. When a manual observations is active, the manual data replaces the data generated automatically. When the manual observation expires, automatic data reporting resumes (unless the sensor has been turned off via the Edit > Turn On/Off Sensors option). How this transition is handled in data processing depends on the parameter. • For Precipitation and Lightning, automatic data is ignored while the manual observation is in effect. When it expires, the manual observation is discarded and automatic reporting begins from scratch. • For Clouds and Present Weather, automatic data continues to be incorporated into the algorithm (though not displayed) while the manual observation is in effect. When it expires, the manual observation is discarded and the automatic value generated by the algorithm is displayed. 106 M A N U A L • O B S E R V A T I O N S AWOS 3000 USER’S MANUAL M E N U For parameters where an average value is reported (Air Pressure, Air Temperature, and Visibility), the value displayed when the manual observation expires depends on the setting of the Clear Averages option on the Manual Observation screen: If Clear Averages is not selected, averages continue to be calculated in the background while the manual observation selection is in effect, with the manual observation treated as the sensor input. The calculated average is displayed until the manual observation expires. The displayed value will move gradually from the manual observation value toward the current automatically measured value as new data are incorporated into the average. The text color will return immediately to yellow once the manual observation expires, even though the manual observation is being included in the calculated average. If Clear Averages is selected, past data are cleared and averages are not calculated while the manual observation is in effect. When the manual observation expires, averaging of automatically measured data begins anew. The sensor will be reported as missing until sufficient data are gathered to calculate a valid average. 11.2 Manual Observation Text Colors When a manual observation is active, the value on the Tower display will be shown in BLUE text. When the manual observation expires, the text will return to the normal yellow color. If any value used in determining present weather is based on a manual observation (visibility, for example), the present weather value will also be shown in BLUE text. 107 M A N U A L O B S E R V A T I O N S AWOS 3000 USER’S MANUAL M E N U 11.3 Air Pressure Manual Observation (Keyboard shortcut Alt+m then p) The Air Pressure Manual Observation screen (Figure 71) lets you enter a manual observation for air pressure in place of the value generated automatically. Figure 71. Air Pressure Manual Observation Screen 108 M A N U A L O B S E R V A T I O N S AWOS 3000 USER’S MANUAL M E N U 11.4 Air Temperature Manual Observation (Keyboard shortcut Alt+m then t) The Air Temperature Manual Observation screen (Figure 72) lets you enter manual observations for air temperature, dew point, and relative humidity in place of the values generated automatically. Values for all three parameters must be entered manually—the system cannot calculate related values (it cannot, for example, calculate dew point from temperature and humidity values entered manually.) Figure 72. Air Temperature Manual Observation Screen 109 M A N U A L O B S E R V A T I O N S AWOS 3000 USER’S MANUAL M E N U 11.5 Clouds Manual Observation (Keyboard shortcut Alt+m then c) The Clouds Manual Observation screen (Figure 73) lets you enter manual observations for up to three cloud layers, along with sky condition and vertical visibility in place of the values generated automatically. Table 20 is a guide to the abbreviations used on the Manual Observations screen. Figure 73. Clouds Manual Observation Screen Table 20. Guide to Cloud Abbreviations FEW SCT BKN OVC Amount few (1–2 oktas) scattered (3–4 oktas) broken (5–7 oktas) overcast (8 oktas) CB TCU Cloud Type cumulonimbus towering cumulus Cloud Type is an optional field, and should only be used when a qualified observer has determined that a given cloud type is present. The cloud type (if entered manually) and heights are shown in the Tower View display under Sky Condition, and are logged. The Sky Condition field shows a cloud cover description followed by the height(s) of the cloud base. 110 M A N U A L O B S E R V A T I O N S AWOS 3000 USER’S MANUAL M E N U 11.6 Lightning Manual Observation (Keyboard shortcut Alt+m then l) The Lightning Manual Observation screen (Figure 74) lets you enter manual lightning observations in place of the automatically generated data. Figure 74. Lightning Manual Observation Screen 111 M A N U A L O B S E R V A T I O N S AWOS 3000 USER’S MANUAL M E N U 11.7 Precipitation Manual Observation (Keyboard shortcut Alt+m then n) The Precipitation Manual Observation screen (Figure 75) lets you manually enter a precipitation accumulation value in place of the value generated automatically. The precipitation entered manually should be the accumulation since the top of the hour. Figure 75. Precipitation Manual Observation Screen 112 M A N U A L O B S E R V A T I O N S AWOS 3000 USER’S MANUAL M E N U 11.8 Present Weather Manual Observation (Keyboard shortcut Alt+m then w) The Present Weather Manual Observation screen (Figure 76) lets you enter manual observations for two present weather groups in place of the values generated automatically. Table 21 contains the relevant abbreviations. Figure 76. Present Weather Manual Observation Screen Table 21. Definitions for the Present Weather Manual Observation Panel Guide to Present Weather Abbreviations Intensity light (blank) moderate Descriptor BC patches BL blowing BR DS + heavy DR low drifting DU VC in vicinity FZ freezing DZ MI shallow FC PR SH TS partial showers thunderstorm FG FU GR GS HZ 113 Phenomena mist IC dust storm PL widespread dust PO ice crystals ice pellets well-developed dust/sand whirls rain drizzle RA funnel cloud, tornado, SA sand waterspout fog SG snow grains smoke SN snow hail SQ squalls small hail/snow SS sand storm pellets haze VA volcanic ash Adapted from FMH-1 and FAA Order 7900.5B. M A N U A L O B S E R V A T I O N S AWOS 3000 USER’S MANUAL M E N U 11.9 Visibility Manual Observation (Keyboard shortcut Alt+m then v) The Visibility Manual Observation screen (Figure 77) lets you enter a manual observation for MOR in place of the value generated automatically. Note: When a visibility manual observation is active, variable visibility will be shown as missing. Figure 77. Visibility Manual Observation Screen 114 L O G S M E N U 12 Chapter Reports Menu (Keyboard shortcut Alt+r) The Reports menu (Figure 78) lets you enter a manual remark to be appended to the METAR. Figure 78. Reports Menu 12.1 Entering a METAR Remark (Keyboard shortcut Alt+r then k) Manual remarks can be appended to the METAR message using the METAR Remark option on the Reports menu. 1. Click METAR Remark on the Reports menu. The screen shown in Figure 79 will appear. Figure 79. METAR Remark Screen 2. Enter the text to be appended to the METAR report in the Remark field. The maximum number of characters is 80. 3. Click Persistent to have the remark repeat in each METAR until the Persistent checkbox is unchecked. When the Persistent checkbox is unchecked, the remark expires at the top of the hour. 115 R E P O R T S AWOS 3000 USER’S MANUAL M E N U 4. Click OK to activate the remark and return to the main display. The remark will appear in the Remark field at the bottom of the Tower Display, and will be output with the METAR report. 5. Click Cancel to exit the METAR Remark window without appending a remark. Any new text entered in the Remark field will be deleted. 116 S Y S T E M S T A T U S M E N U 13 Chapter System Status Menu (Keyboard shortcut Alt+s) The System Status menu (Figure 80) allows you to view active and past alarms, and to turn on or off the blinking alarm alert. Figure 80. The System Status Menu 13.1 Alarms... Clicking the Alarms... option on the System Status menu calls up a list of current and past alarms, such as that shown in Figure 81. Each alarm entry in the list shows the date and time of the alarm, its status (New or Acknowledged), the type of alarm, and a brief description of the nature of the alarm. The time shown for the alarm is the time when the alarm condition was first met. The time is not updated when the alarm condition is met again. You can acknowledge or delete active alarms from the Alarms list. Figure 81. Alarms List 117 S Y S T E M S T A T U S AWOS 3000 USER’S MANUAL M E N U 13.1.1 Acknowledging and Deleting Alarms When an alarm is triggered, it will remain active (its status will show New) until either acknowledged or deleted by the user. No further entries for an active alarm will be added to the alarm list until it is acknowledged or deleted. • To acknowledge an alarm, click the alarm on the list to highlight it. Multiple alarms can be highlighted and acknowledged as a group by performing a <Ctrl>-click on subsequent alarms to select once the first alarm to be acknowledged has been selected and highlighted. Then click the Acknowledge button at the bottom of the screen to acknowledge the selected alarms. • "Ack" will be displayed in the Status column on the Alarms list • The color of the Alarm text will change to a lighter red once all alarms have been acknowledged or deleted. The Alarm warning will continue to be displayed after the alarm is acknowledged (in the lighter color) even when alarm conditions no longer exist in order to keep an operator alert to intermittent problems. • To delete an alarm, click the alarm on the list to highlight it. Multiple alarms can be highlighted and deleted as a group by performing a <Ctrl>-click on subsequent alarms to select once the first alarm to be deleted has been selected and highlighted. Then click the Delete button at the bottom of the screen to delete the selected alarms. • All visual warnings will stop and the Alarm notice on the main display will be removed • The alarm will be deleted from the Alarms list; a record of the alarm will still be maintained in the Alarms Log • If the conditions that triggered the alarm are not addressed before the alarm is deleted, the alarm will reappear Click Close to close the Alarms list. 13.2 Blink Alarm The Blink Alarm option controls the alarm's visual appearance on the display. If the box is checked, the Alarm notice on the main display will blink when active. If the box is unchecked, the Alarm notice on the main display will remain steadily on. Regardless of the setting, all alarms will appear on the Alarms list explained above. 118 H E L P M E N U 14 Chapter Help Menu (Keyboard shortcut Alt+h) The Help menu (Figure 82) lets you view the current version of the AWOS 3000 software. Figure 82. The Help Menu 14.1 About (Keyboard shortcut Alt+h then a) Click the About option on the Help menu to view the installed version of the AWOS 3000 software. The license agreement can also be accessed from this display. 119 M A I N T E N A N C E 15 Chapter Maintenance Maintenance of the AWOS is divided into monthly, triannual, and annual maintenance tasks. Detailed sensor and system maintenance instructions are provided in the AWOS 3000 Maintenance Manual (3000-027). 120 R E M O T E M A I N T E N A N C E M O N I T O R I N G 16 Chapter Remote Maintenance Monitoring (RMM) The CDP can be accessed remotely from another computer to set system parameters or view system status and data. This feature is referred to as Remote Maintenance Monitoring, or “RMM”. No special software is required to access the AWOS CDP. Any terminal emulator program, such as ProComm or the Microsoft Windows Terminal Emulator program, can be used to access the AWOS for RMM. The CDP is accessed for RMM purposed through the voice telephone line. The voice modem will switch to data mode if it detects three “*” tones during the call. Once communication is established, the user can enter commands to perform the following tasks. • • • • • • • • • • • • End the RMM session Enter a password to allow access to restricted functions Get a current AWOS system status report Get the current AWOS reported weather observation Get the AWOS system configuration Open a data file for downloading Download a data file that has been opened Get or set the AWOS system time Get or set the AWOS system date Get or set sensor online/offline state Get or set the VHF voice radio or phone online/offline state Reboot the CDP 121 R E M O T E M A I N T E N A N C E M O N I T O R I N G AWOS 3000 USER’S MANUAL 16.1 Hardware Requirements The following are minimum requirements to call the AWOS for RMM. • • • Terminal emulator program such as Procomm or the Windows Terminal Emulator (terminal emulator programs are included with most operating systems) Telephone modem Dial up telephone line capable of 28.8 or higher data transmission 16.2 Establishing Communication with the AWOS The following steps are required to access the AWOS CDP via RMM: 1. Boot the computer to be used to access the AWOS. 2. Start the computer’s terminal emulator program (Procomm, Kermit, MS Terminal Emulator, etc.). 3. Configure the terminal emulator to communicate with the modem (set the comm port, baud rate, etc.). The recommended settings are 115200 bps, no parity, one stop bit. Other settings may be required, depending on the modem used. Consult the modem user’s manual for details. 4. Type “AT” followed by return and verify that the modem returns “OK.” 5. Set the duration of the “,” delay to 1 second by typing “ATS8=1” followed by return. The modem should respond with “OK”. 6. Dial the phone number by entering the following command: ATDT <number>,********<cr> In the above example, <number> is the AWOS voice telephone number with all required digits (to get an outside line, access long distance, dial the area code, dial the number). The command is followed by a carriage return. If the AWOS takes some time to connect, insert more delays in the command string by adding commas. 7. Once the AWOS recognizes the “*” tones, it will take approximately 15 seconds to connect to the calling modem. Do not type on the keyboard while the connection processing is taking place or the connection may be lost. After the modems have connected, a line of text containing the date, time, site ID, and the message CONNECT will be sent. You can then use the commands in the next section to obtain status and data. 122 R E M O T E M A I N T E N A N C E AWOS 3000 USER’S MANUAL M O N I T O R I N G 16.3 AWOS RMM Commands Table 22 describes the RMM commands available, along with their corresponding responses. The valid field entries for commands that use an accompanying variable (such as “filename” or “sensor”) are listed in individual sections following Table 22. Each command begins with a “$” character and ends with a carriage return. The commands are entered through the keyboard. Some terminal emulator programs allow macro keys to be programmed. The commands may be programmed as macro keys if desired. Refer to your terminal emulator’s user manual for information on macro keys. Table 22. RMM Command Summary RMM Command Description Response $HANGUP End the RMM session “GOOD BYE” is sent to the RMM computer and the connection is terminated $GETCUR Display the current AWOS weather report (formatted as the system printer output) Current one-minute data (same as line printer) is sent to the RMM computer $GETSTA Display the current AWOS system status report Current system status report is sent to the RMM computer $CONFIG Display the AWOS system configuration Returns the system configuration data on the RMM computer $OPENFIL filename Open a file for transmission Filename OPENED OK, or an error message is displayed $GETFIL Retrieve the contents of an open data file Sends the contents of file “filename” to the RMM computer followed by >>END OF FILE $SETIME Retrieve the AWOS system time Displays the current AWOS time on the RMM computer $SETIME hh:mm:ss Set the AWOS clock to hh:mm:ss The AWOS sends, “The time will be set to HH:MM:SS” to the RMM computer. The user will be asked to confirm the change by typing “$SETIME” followed by return. The AWOS will set the time following this user confirmation, and will respond with “The current time is HH:MM:SS” $SETDAT Retrieve the AWOS system date Displays the current AWOS date on the RMM computer 123 R E M O T E M A I N T E N A N C E RMM Command $SETDAT mm/dd/yyyy AWOS 3000 USER’S MANUAL M O N I T O R I N G Description Response Set the AWOS system date to mm/dd/yyyy The AWOS sends, “The date will be set to MMM DD, YYYY” to the RMM computer. The user will be asked to confirm the change by typing “$SETDAT” followed by return. The AWOS will respond with “The current date is MMM DD, YYYY” Note: If the date is changed to an earlier date, resulting in duplicate logs being created for the same date and time, the newly generated data will be appended to the existing log file. No data will be overwritten. $ONLINE Show display sensor online status The AWOS responds with “Offline: (list of offline sensors)” or “All sensors are online” $ONLINE sensor Set sensor "sensor name" to be online The AWOS responds with “Offline: (list of offline sensors)” or “All sensors are online” $OFFLINE Show display sensor offline status The AWOS responds with “Offline: (list of offline sensors)” or “All sensors are online” $OFFLINE sensor Set sensor "sensor name" to be offline The AWOS responds with “Offline: (list of offline sensors)” or “All sensors are online” $PASSWD password Enter a password to enable restricted functions The AWOS responds with “Password accepted” or “Please re-enter” $VOICE Display voice output status The AWOS responds with on/off status of VHF and phone output $VOICE service on/off Turn service (“VHF” or “Phone”) voice output on or off; example: “$VOICE Phone off” The AWOS responds with changed on/off status of VHF and phone output $ID Display system IP data The AWOS responds with system IP data $REBOOT Reboot the CDP Notification that a system restart has been initiated is given to the RMM user, and is also shown on the CDP display 124 R E M O T E M A I N T E N A N C E M O N I T O R I N G AWOS 3000 USER’S MANUAL 16.4 Password Processing The $PASSWD command is required to access all functions except $GETCUR, $GETSTA, and $CONFIG. 16.5 $OPENFIL: Entering Filenames The AWOS saves status and weather data in two types of files: ERRLOG files and PRINTER files. • ERRLOG files contain status information updated every hour. • PRINTER files contain a copy of AWOS weather data in the same format used in the line printer output, updated at one-minute intervals. ERRLOG and PRINTER files are maintained for the length of time specified on the Edit > Configuration > Misc > General tab. By default, this value is set to 1 year (365 days). File names for both types of files are of the format MMMDDYY where • • • MMM is a three-character month (JAN, FEB, MAR, APR, MAY, JUN, JUL, AUG, SEP, OCT, NOV, DEC) DD is a two-digit day (01 through 31) YY is a two-digit year (00 through 99) For example, to retrieve a file for March 1, 2008, the file name would be MAR0108. 16.5.1 Retrieving Data Files ERRLOG files are retrieved by entering the following with the $OPENFIL command. $OPENFIL ERRLOG\filename PRINTER files (weather archive data files) are retrieved by entering the following with the $OPENFIL command. $OPENFIL PRINTER\filename After the open command has been processed, the AWOS will respond with an acknowledgement of the file open command. An error message may be generated if the file was not opened properly. Once the file has been opened, the $GETFIL command can be used to retrieve the data. If the terminal emulator program supports data logging, enable this feature to capture the screen data as it is downloaded. ERRLOG files may take a few seconds to download; PRINTER files may take up to one minute to download (depending on the modem connection baud rate). 125 R E M O T E M A I N T E N A N C E M O N I T O R I N G AWOS 3000 USER’S MANUAL After the files have been downloaded, they can be viewed with the terminal emulator program (if it supports file viewing), or with a text editor or word processor; they can also be printed to your system printer. It is not necessary to close a file. The user can simply enter another command or disconnect from RMM. Data will continue to be logged. 16.6 $ONLINE and $OFFLINE: Specifying Sensor Names The following abbreviations are valid for AWOS sensors/devices. WS WD TP DP BP PC VI CH PW ZR LX VH GP wind speed wind direction temperature dew point barometric pressure precipitation visibility cloud height present weather freezing rain lightning VHF radio voice; (with “$VOICE service on/off” command, “VHF” is used instead) GPS Sensors that are set offline will not have their data reported in the voice message, and will not appear on the display terminal, printer, or in archive data. Turning off the VHF radio will cause voice output to the radio to stop—the radio remains powered on and keyed. The telephone voice will continue reporting—if all the sensors are offline, the AWOS will report temporarily inoperative to the voice output. 16.7 RMM Command Processing and Command Responses Table 22 lists the AWOS responses to RMM commands. If a command is valid, a response will be generated. If a command is invalid, an error message will be sent. The system will hang up if three invalid commands in a row are received. If a password is required to access a function, and a password has not been entered, the AWOS will not respond to the command even though it appears to have been typed correctly. 126 R E M O T E M A I N T E N A N C E M O N I T O R I N G AWOS 3000 USER’S MANUAL 16.8 Terminating the RMM Session Use the $HANGUP command to terminate the AWOS RMM session. If this command is not used, the telephone may be busy for up to ten minutes before the AWOS automatically terminates the call for inactivity. 16.8.1 Automatic Termination The RMM session will be automatically terminated after a given period of inactivity. • • If $PASSWD has been entered during the call, the AWOS will hang up ten minutes after the last command is entered. If $PASSWD has not been entered during the call, the AWOS will hang up within two minutes after the last command is entered. 127 D C P M E S S A G E F O R M A T A Appendix DCP Message Format The format of the input data message from the Model 1190 DCP received in response to a poll (RDCP00\r\n) is shown below. An explanation of the data field is given in Table 23. [Communications: 9600 Baud, No Parity, 8 Data Bits, 1 Stop Bit] Polled at 5-second intervals. Preface: 12 ff’s 3 syn’s (0x16) Packet: 1-5 6 7-18 19crc cr cr lf 7A000 Ascii address (from address dip switch + 0x30) 000000000000 Data (see Table 23) 4 hex-Ascii crc characters of DATA from 7A000 to the end of the DATA field 128 R E M O T E M A I N T E N A N C E AWOS 3000 USER’S MANUAL M O N I T O R I N G Table 23 DCP Data Field Format Position Contents Length 0–1 2 3–5 6 7–9 10 11–14 15 16–19 20 21–25 26 27–31 32 33–34 35 36–38 39 Seconds blank Wind Speed blank Wind Dir blank Temperature blank Dew Point blank Pressure #1 blank Pressure #2 blank Precip Ctr blank Cloud Ht Ceilometer Data Flag 2 chars 40 41–45 46 47 48 49 50–53 blank Visibility Visibility Status blank Day / Night Description Range 00 to 59 3 chars 5 sec avg wind speed 000 to 250 or MMM 3 chars 5 sec avg wind dir 000 to 360 or MMM 4 chars 5 sec avg temp 10s degF -400 to 1350 or MMMM 4 chars 5 sec avg dptp 10s degF -400 to 1350 or MMMM 5 chars inHg*1000 17000 to 34000 or MMMMM 5 chars inHg*1000 17000 to 34000 or MMMMM 2 chars tips (reset at startup) 00 to 99 3 chars 1 char cloud ht/100ft Bit 0 = 1 if clear Bit 1 toggles every new output 000 to 125 or MMM Bit 2 = 1 for 8339 Bit 2 = 0 for 8329 0, 5,,or 7 (0, 1, or 3 for 8329) 5 chars 1 char extinction coeff *1000 counts from 0 to 7 SIP Status 1 char 1 char 4 chars 54–57 8329 Status 4 chars 58–65 VIS Status 8 chars 66–69 RH 4 chars Day/Night D, N, or M 0 SIP Status 4 hex Ascii characters Bit 1 = (0002) 1 if -5 V DC reference error Bit 2 = (0004) 1 if +5 V DC reference error Bit 3 = (0008) 1 if BP sensor temp lo Bit 4 = (0010) 1 if BP sensor temp hi >+55C) Bit 5 = (0020) 1 if MARS Fan Failure Bit 6 = (0040) 1 if Startup in last minute Bit 7 = (0080) 1 if On Battery Power Bit 9 = (0200) 1 if No comm, Visibility sensor Bit A = (0400) 1 if No comm, Ceilometer Bit B = (0800) 1 if Maint Sw prsd in last 5 min Bit C = (1000) 1 if No comm, Present Weather sensor Bit D = (2000) 1 if No comm, BP sensor 8329 Ceilometer Status 4 hex Ascii characters from 8329 Visib Stat 8 hex Ascii characters from Visibility Sensor 5 sec avg RH *10 0000 to 1000 or MMMM 129 00000 to 99999 or MMMMM (x30 to x37) R E M O T E M A I N T E N A N C E AWOS 3000 USER’S MANUAL M O N I T O R I N G Table 23 DCP Data Field Format Position Contents 70 71–75 76 77–89 blank Aux Voltage blank PresentWx 90 91 92–96 97–98 99 100–104 blank blank ALS VIS #1 BP Temp blank LTX Length Description Range 5 chars 5 sec avg AuxPort V 0.000 to 9.999 or MMMMM 13 chars Present Weather Msg WwwPppppSssss or WMMPMMMMSMMMM 5 chars 2 chars ALS 8364-E in Cd BP Temp °C 00000 to 99999 or MMMMM 00 to 99 (bp temp + 40°C) 5 chars Lightning sensor data First character: 0 = no lightning 1 = lightning at the airport 2 = lightning in vicinity 105 106–110 111 112–113 blank Freezing Rain Freq blank Freezing Rain Stat 114 115–120 blank 8339 Status 121 122–126 127 128–131 blank Software Version blank CRC Second and third characters: sensor status decimal range 00–54 Fourth and fifth characters: distant lightning. hex range 00–FF. 5 chars Freezing rain frequency Up to 40 kHz 2 chars Freezing rain status 2 char status report, one character for status, one character for status descriptor 6 chars 8339 Ceilometer Status 6 hex Ascii characters from 8339 5 chars Software Version 5 character free form 4 chars CRC 4 hex characters 130 D R A W I N G S B Appendix Drawings The following pages contain supplemental installation drawings and wiring diagrams. They are arranged in the same order as the chapters of this manual, according to the sensor or component to which they pertain. 3000-019 AWOS 3000 CDP Wiring Diagram 131 All Weather Inc. 1165 National Drive Sacramento, CA 95834 USA 800.824.5873 www.allweatherinc.com 3000-001 Revision C March, 2011