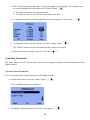
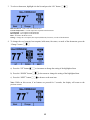
1
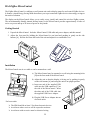
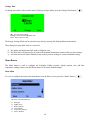
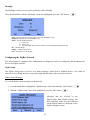
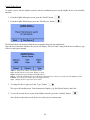
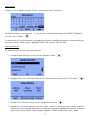
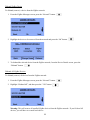
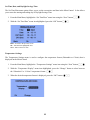
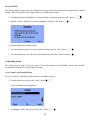
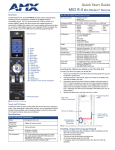
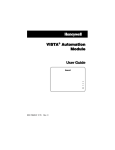
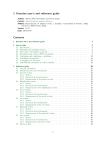
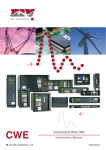
ZigBee MicroControl Operation Manual Document Number 81R00-2ZB, Rev A, July 2011 Copyright © 2011 Home Automation, Inc. 1 HAI ZigBee MicroControl The ZigBee MicroControl is a tabletop or wall mount unit used to display status for and control ZigBee devices. It features a timed Energy Saving Mode that allows you to put connected ZigBee devices into energy savings at the touch of a button. The display on the MicroControl allows you to easily set up, install, and control the wireless ZigBee system. The environmentally-friendly internal backup battery in the MicroControl provides approximately 4 hours of active use power and up to 24 hours of power in sleep mode. Getting Started 1. Unpack the MicroControl. Includes: MicroControl, USB cable and power adapter, and this manual. 2. Adjust the foot stand by holding the MicroControl in one hand and pushing in gently on the side buttons [A]. Pull the foot from the back of the unit and adjust for a comfortable view. A A Installation The MicroControl can sit on a table or can be mounted on a wall. a) The MicroControl may be mounted to a wall using the mounting holes [B] on the foot stand of the MicroControl. B b) Adjust the unit so that the display is facing you by pushing in gently on the side buttons [A] and swing the unit to an upright position. c) Insert one end of the supplied USB cable into the USB connector [C] on the side of the MicroControl. Insert the other end of the USB cable into the supplied USB Power Adapter. d) Plug the USB Power Adapter into an electrical outlet. For best results: The ZIM should be at least 5 feet from electronic devices Avoid areas where receiver will be exposed to moisture Avoid areas with excessive metal or electrical wiring 2 C Sleep Mode When AC power is lost or if the MicroControl is unplugged, the MicroControl will remain operational using the internal backup battery. However, while operating on battery power, the MicroControl will enter sleep mode 30 minutes after the last button is pressed. To use the display on the MicroControl while it is in sleep mode, you must first wake it up by using the Wakeup Button located on the top edge of the MicroControl. To wake up the MicroControl, press and hold the Wakeup Button for three seconds. Home Screen The Home screen shows the current time and allows you to access menus for controlling loads, controlling temperature devices, configuring the display, and configuring the ZigBee network. After loads and temperature devices have been configured, the Home screen can also display the status of up to three ZigBee loads and/or temperature devices. Wakeup Button Energy Saving Mode The MicroControl has an Energy Savings Mode that can be used to put all connected ZigBee devices into an energy savings state for a specified time period. To activate the Energy Savings Mode, from the Home Screen, press the Wakeup Button momentarily. Task Buttons Press to select the task that is displayed above the respective button. Press the Task Button on the left. Press the Task Button in the middle. Press the Task Button on the right. When the Energy Savings Mode is activated: a) b) c) d) The display backlight turns green. The remaining number of days and time for Energy Savings Mode is displayed (default 4 hours). The Heat and Cool setpoints for all connected Omnistat2 thermostats are offset by 4 degrees. All connected Load Control Modules are turned off. 3 Change Time To change the number of days and/or time for Energy Savings Mode, press the Change Time button. Ok – Save the current settings Change – Increment the highlighted value Next – Move to the next value The Energy Savings Mode can be canceled at any time by pressing the Wakeup Button momentarily. When Energy Savings Mode ends or is canceled: a) The display backlight turns back to the configured color. b) The Heat and Cool setpoints for all connected Omnistat2 thermostats return to their previous settings. c) All connected Load Control Modules return to their previous settings or current scheduled settings. Menu Button The Menu button is used to configure the backlight, ZigBee network, display options, time and date, temperature settings, and to reset the MicroControl to its factory default settings. Main Menu To view or configure the items in the main menu, from the Home screen, press the “Menu” button. The items in the Main Menu are: a) b) c) d) e) f) Backlight ZigBee Setup Display Options Set Time/Date Temperature Settings Factory Defaults 4 Backlight The Backlight screen is used to set the parameters of the backlight. From the Main Menu, with the “Backlight” menu item highlighted, press the “OK” button. Color – Displays the value for the current color of the backlight (1-100) Brightness – Brightness of the backlight (1-10) Status – Sets the backlight options: a) Always on b) Always off c) Auto (backlight turns on when a button is pressed and automatically turns off) Ok – Confirm change Change – Change selected item Next – Select next item in the table Configuring the ZigBee Network The MicroControl is equipped with configuration and diagnostic tools for configuring and monitoring the devices on ZigBee network. ZigBee Setup The ZigBee Setup menu is used to view status messages, enroll devices, disband devices, view status of network devices, change the device type, and assign and edit names of devices on the network. ZigBee Status Messages To view the ZigBee status messages on the network: 1. From the Main Menu, highlight the “ZigBee Setup” menu item using the “Next” button. 2. With the “ZigBee Setup” menu item highlighted, press the “OK” button. Messages that are received by the MicroControl from ZigBee devices, the HAI controller, and/or over the USB port on the MicroControl are displayed on the ZigBee Messages screen. 5 Enroll ZigBee Device To enroll a device into the ZigBee network, start the enrollment process on the ZigBee device to be enrolled, and then: 1. From the ZigBee Messages screen, press the “Enroll” button. 2. From the ZigBee Enroll menu, press the “Find Device” button. The MicroControl will attempt to find the device that has been put into enroll mode. Once the device has been enrolled, the screen will display “Device Found” along with the device address, type of device, and signal strength. Address – Displays the address of the ZigBee Device Type – Displays the device type: Tstat, Display, or Load Signal – Displays the signal strength of the ZigBee device Cancel – Cancel the enrollment process for the device found (the device will not be saved as part of the ZigBee network) Confirm – Saves the device found as part of the ZigBee network Type – Changes the device type of the device found 3. To change the device type, press the “Type” button. The type will switch between Tstat (thermostat), Display (e.g. HAI MicroControl), and Load. 4. To save the current device as part of the ZigBee network, press the “Confirm” button. Once the device has been saved, the device can be given a custom name. 6 Name Device Each device on the ZigBee network can have a custom name up to 15 characters. By default, the device is given a name. To save the device with the default name, with “DONE” highlighted, press the “Select” button. To name the device use the down-arrow and right-arrow buttons to highlight the character or function and press the “Select” button. When complete, highlight “DONE” and press the “Select” button. Edit Named Device To change the name of a previously named device: 1. From the ZigBee Messages screen, press the “Network” button. 2. Highlight the device to be renamed from the list of network devices and press the “Ok” button. 3. From the Device Details screen, press the “Change Name” button. 4. Highlight the left-arrow function press the “Select” button to delete previously entered characters. Rename the device using the down-arrow and right-arrow buttons to highlight the character or function and press the “Select” button. When complete, highlight “DONE” and press the “Select” button. 7 Disband ZigBee Device To disband (remove) a device from the ZigBee network: 1. From the ZigBee Messages screen, press the “Network” button. 2. Highlight the device to be removed from the network and press the “Ok” button. 3. To disband the selected device from the ZigBee network, from the Device Details screen, press the “Disband” button. Disband All ZigBee Devices To disband (remove) all devices from the ZigBee network: 1. From the ZigBee Messages screen, press the “Network” button. 2. Highlight “Disband All”, and then press the “”Ok” button. Warning: This will remove all enrolled ZigBee devices from the ZigBee network. If you Disband All devices, you will have to re-enroll each device. 8 Display Options The Display Options menu option allows you to choose which, if any, ZigBee loads and/or temperatures show up on the Home screen of the MicroControl. You can select up to three devices to be displayed. 1. From the Main Menu, highlight the “Display Options” menu item using the “Next” button. 2. With the “Display Options” menu item highlighted, press the “OK” button. Back – Go back to the previous screen Toggle – Place or remove an “X” mark from the box next to the selected device Next – Select the next device in the list 3. To display a device on the Home screen, highlight the desired device and put an “X” mark in the box by pressing the “Toggle” button. The status of the selected ZigBee device will be displayed on the Home screen. 4. To remove a device from the Home screen, highlight the device and remove the “X” mark from the box by pressing the “Toggle” button. The status of the selected ZigBee device will no longer be displayed on the Home screen. 9 Set Time, Date, and Daylight Savings Time The Set Time/Date menu option allows you to set the current time and date in the MicroControl. It also allows you to enter the starting and ending day of Daylight Savings Time 1. From the Main Menu, highlight the “Set Time/Date” menu item using the “Next” button. 2. With the “Set Time/Date” menu item highlighted, press the “OK” button. Back – Go back to the previous screen Ok – Increment the highlighted value Next – Move to the next value Temperature Settings The Temperature Settings menu is used to configure the temperature format (Fahrenheit or Celsius) that is displayed on the MicroControl. 1. From the Main Menu, highlight the “Temperature Settings” menu item using the “Next” button. 2. With the “Temperature Display” menu item highlighted, press the “Change” button to select between the “Fahrenheit” or “Celsius” temperature format. 3. When the desired temperature format is displayed, press the “OK” button. 10 Factory Defaults The Factory Defaults menu is used to configure all settings in the MicroControl to the original factory default settings. This will also delete all configured devices from the MicroControl. 1. From the Main Menu, highlight the “Factory Defaults” menu item using the “Next” button. 2. With the “Factory Defaults” menu item highlighted, press the “OK” button. 3. Read the displayed warning message. 4. To reset the MicroControl to its factory default settings, press the “Yes” button. 5. To cancel the factory reset and return to the Main Menu, press the “Cancel” button. Controlling Loads The Loads button is used to view the status of, view the demand of (if applicable), control, and schedule enrolled load control devices on the ZigBee network. View, Control, and Schedule Loads To view, control, and schedule available loads on the ZigBee network: 1. From the Home screen, press the “Loads” button. A list of available loads is displayed: 1. To highlight a load in the list, press the “Next” button. 11 2. To select a load, highlight it in the list and press the “Ok” button. Water Heater – Name of the selected load Current Status – Current status of the individual load Demand – Current energy demand of individual load (if available) Back – Go back to the Home screen Change – Change the current state of the load Options – Enable, disable, or change the program schedule of the load 3. To change the state of the load, press the “Change” button. The “Change” button will cycle the load through the available state options. 4. To enable, disable, or change the program schedule of a load, press the “Options” button. 5. To enable or disable the program schedule, from the Options screen, highlight “Program Enable/Disable” and then press the “Ok” button. The status of the program schedule is displayed: a) Press the “Change” button to change the status of the program schedule. The “Change” button will cycle the Program Status between Enabled and Disabled. 12 b) Press the “Ok” button to save the highlighted Program Status. Note: While on this screen, if no buttons are pressed for 5 seconds, the display will return to the previous screen. 6. To change the program schedule of the load, from the Options screen, highlight “Program Setup” and then press the “Ok” button. There are 4 time schedules that affect all loads. If you change a Time and/or Status in a schedule, it will change the Time and/or Status for all devices that use that schedule. a) To select the Schedule to be modified, press the “Next” button. The “Next” button will cycle between Schedule 1, Schedule 2, Schedule 3, and Schedule 4. b) To modify the selected schedule (with the desired Schedule listed at the top of the screen), press the “Change” button. c) Read the Warning message and then press the “OK” button. 13 d) There are four periods (Morning, Day, Evening, and Night) for each schedule. To change the time for a period, highlight the time and press the “Change” button. The time is increased in 15 minute increments To disable a period, set it and the next period to the same time e) To change the status for a period, highlight the status by pressing the “Next” button. f) To change the status for the selected time, press the “Change” button. The “Change” button will cycle the load through the available state options. g) When the schedule is complete, press the “Ok” button. Controlling Thermostats The Temps button is used to view the status of and control the supported features of enrolled thermostats on the ZigBee network. View and Control Thermostats To view and control the available thermostats on the ZigBee network: 1. From the Home screen, press the “Temps” button. A list of available thermostats is displayed: 2. To highlight a thermostat in the list, press the “Next” button. 14 3. To select a thermostat, highlight it in the list and press the “Ok” button. Hall Thermostat – Name of the selected thermostat Current Temperature – Current temperature reported on the thermostat Cool Setpoint – Cool setpoint on the thermostat Heat Setpoint – Heat setpoint on the thermostat Back – Go back to the Home screen Change – Change the cool setpoint, heat setpoint, hold status, fan status, or mode of the thermostat 4. To change the cool setpoint, heat setpoint, hold status, fan status, or mode of the thermostat, press the “Change” button. a) Press the “UP” button b) Press the “DOWN” button c) Press the “NEXT” button to increment or change the setting of the highlighted item. to decrement or change the setting of the highlighted item. to advance to the next item. Note: While on this screen, if no buttons are pressed for 5 seconds, the display will return to the previous screen. 15 Designed and Manufactured in the USA, using components sourced worldwide. FCC Statement: This device includes 65A26-1 radio module, FCC ID: HHC-65A261, IC: 1516A-65A261. This device complies with Part 15 of the FCC Rules. Operation is subject to the following two conditions: (1) this device may not cause harmful interference, and (2) this device must accept any interference received, including interference that may cause undesired operation. In the unlikely event that the device is suspected of causing interference with a radio, TV or other receiver, try relocating the device, the receiver or adjusting the antenna on the receiver. This product employs certain elements from one or more of the following U.S. Patents: IP CO, LLC: 7,089,125; 7,054,271; 6,249,516; 6,044,062. SIPCO LLC: 7,103,511; 6,914,893; 6,891,838; 5,714,931; 6,233,327; 7,397,907; 6,618,578; 7,079,810; 7,295,128; 7,263,073; 7,480,501; 6,437,692; 7,468,661; 7,053,767; 7,650,425; 7,739,378 16