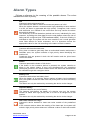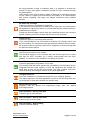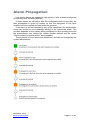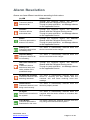
1
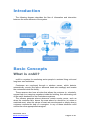
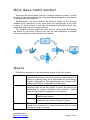
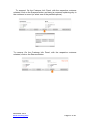
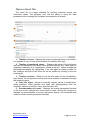
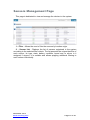
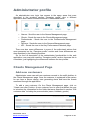
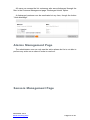
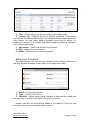
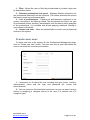
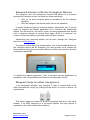
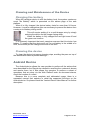
User Interface Manual
Version: 3.1.3
December 2013
www.oncaring.com
Welcome
We hope that onAll platform will be a useful tool that will allow you to offer a
better and differentiated care to your customers.
If you find things that would like to see improved in the product or if you
have any suggestions or comments, please report them to the manager of the
system or report them through the web application.
This document version applies to the Release 3.1.3 of the onAll product.
December 2013
www.oncaring.com
Page 2 of 40
Table of Contents:
Introduction .................................................................................................... 4 Basic Concepts .............................................................................................. 4 What is onAll? ........................................................................................................ 4 How does onAll works?......................................................................................... 5 Users ....................................................................................................................... 5 Events and Alarms ......................................................................................... 6 Alarm Displays ....................................................................................................... 6 Caregiver Devices ................................................................................................7 Screen Displays ................................................................................................... 7 Web Application ................................................................................................... 7 Siren ..................................................................................................................... 7 Alarm Categories ................................................................................................... 8 Alarm Priorities ...................................................................................................... 8 Alarm Types ........................................................................................................... 9 Alarm Propagation ...............................................................................................11 Alarm Resolution ................................................................................................. 12 Platform ......................................................................................................... 14 Caregiver profile................................................................................................... 14 Alarms Management Page.................................................................................15 Clients Management Page .................................................................................17 Sensors Management Page...............................................................................23 Administrator profile............................................................................................24 Clients Management Page .................................................................................24 Alarms Management Page.................................................................................26 Sensors Management Page...............................................................................26 Professionals Management Page ...................................................................... 28 Key Performance Indicators (KPI) Page ............................................................31 Devices .......................................................................................................... 33 Wrist Device/Bracelet ..........................................................................................33 Alarms ................................................................................................................33 Cleaning and Maintenance of the Device ..........................................................34 Belt Clip.................................................................................................................34 Alarms ................................................................................................................35 Cleaning and Maintenance of the Device ..........................................................36 Caregiver Device .................................................................................................. 36 Tag or Badge ..................................................................................................... 36 Android Device ................................................................................................... 40 December 2013
www.oncaring.com
Page 3 of 40
Introduction
The following diagram describes the flow of information and interaction
between the main elements of the system.
Basic Concepts
What is onAll?
onAll is a system for monitoring senior people in assisted living units and
long term care institutions.
Customers are monitored through a wireless sensor, which detects,
automatically, events (like falls or abnormal heart rate readings) and locates
the customers inside the facility.
These sensors also have a button that allows the customer to, voluntarily,
request help to a caregiver anywhere inside the building, thus eliminating one
of the major drawbacks of the fixed alarms systems.
The sensors generate alarms whenever certain events occurs, such as
when the customer falls, leaves the area where he should be (or enters a
restricted area), when the values of heart rate are abnormal or simply when a
customer requests the help of a caregiver. In any of these situations onAll
notifies the more appropriated caregiver.
December 2013
www.oncaring.com
Page 4 of 40
How does onAll works?
Whenever the sensor being used by a customer detects an event, it issues
an alarm to the onAll platform that is automatically propagated to the devices
of the appropriated caregivers.
Simultaneously, the same alarms can become visible on the screens
installed in the institutions (if any since this is an optional part of the onAll
system). In these screens it can also be displayed information about who
needs help and what kind of alarm is about.
The caregiver can then assist the client and turn off the alarm by pressing
the button on his device. Later he can use the web application to register
information about the event and about his actions.
Users
Follows the description of the intervenient people in the onAll system:
Administrator Manages the system from a back-office perspective, i.e.,
without intervening on the daily operation of the institution in
terms of customer care. He is responsible for the system’s
overall configurations. The Administrator can access a KPI
module with reports on operation’s performance.
Caregiver
Person responsible for providing the necessary care to the
customer thus will be the person to whom the alarms are
dispatched for proper verification and resolution. Usually
there are two levels of caregivers in an institution:
Nurse
Customer
A higher level of hierarchy; will only receive the
higher priority alarms.
Auxiliary Considered as the first line of customer
assistance, will receive all types of alarms.
Elderly person in the institution (also called Resident) that
needs to be monitored for some risk factors that the onAll
service can help to manage.
December 2013
www.oncaring.com
Page 5 of 40
Events and Alarms
Events that are raised from the senior devices are communicated to the
onAll system and can trigger different actions based on the preconfigured
workflow. Very commonly, the words event and alarm are used to mean the
same thing, although when we talk about high priority or emergency
situations, we should use the word alarm.
The onAll system can be configured to process different types of events,
such as button call to request help, automatic fall detection, devices being out
of range or with low battery levels.
It can also act differently depending on the location of the devices; for
example, an alarm can be sent only to the caregiver that is closer to the
location where the alarm was triggered, and it can also escalate to other
caregivers if the situation is not resolved within a defined amount of time.
There is also a third component for the alarm handling workflow definition,
which is to consider different hierarchy levels of care providers, for example,
auxiliaries and nurses; and alarms can be raised in different levels depending
on the severity of the situation. For example out-of-range events can be sent
only to auxiliaries and then escalated to nurses if the situation is not resolved
within a certain amount of time; and fall events can be sent immediately to all
hierarchy levels of care providers.
Alarm Displays
The events can be presented to the caregivers in various forms and on
various platforms. A redundancy mechanism can ensure a greater likelihood
for important events to be recognized and resolved in a timely manner.
In the case that an event is an emergency situation that requires fast
assistance of a care provider, the caregiver device notifies the care
professional providing a warning alarm with sound and light with a text
message displaying the senior that needs help and the type of event that
occurred are identified.
Lower priority events can be displayed only in the web platform to be
addressed with a longer reaction time.
December 2013
www.oncaring.com
Page 6 of 40
Caregiver Devices
The caregiver devices are portable and wireless
sensors that accompany professionals and notify,
through sound and light, about the existing alarms.
They have a screen display that identifies the
customer, the type of alarm and the location where it
happened. They can also be used to resolve or silence
active alarms.
Screen Displays
The screens are located on the wall, ceiling or other
places with high visibility. They present, with great
emphasis, the customer’s alarms and can show some
information like the type of alarm and the customer’s
bed number.
This is optional to the onAll operation; institutions can
choose not to have screen displays to avoid alarming
their customers.
Web Application
The web application is only accessible to
nurses and administrators. It shows the active
alerts, both customers and system’s alarms.
Through the application one can act on the
alerts, including resolve some of them, silence
them or manage their documentation.
Siren
Whenever an alarm occurs it can be signalled to the
caregivers through a light and/or a siren. This
mechanism does not allow identifying different types
of alarms nor the customer that triggered it, but it is
very efficient to make an emergency situation be
noticed to all the caregivers. It is also an optional part
of the onAll platform. Currently it is only used for
location alarms.
December 2013
www.oncaring.com
Page 7 of 40
Alarm Categories
There are 3 categories of events/alarms:
• Customer - Events associated with a customer requiring attention
from a caregiver. Can be shown in the caregiver devices, on the wall
screens and on the application web. On the screens and the web
application alarms are coded with colour green or orange depending
on their level of priority.
• Caregiver – Alarms that relate to the caregiver operation. An
example is the request for the assistance from one caregiver to the
others.
• System - Alarms that relate to the system hardware or to the
caregivers. Only appear in web application and are represented grey
at the top of the page of the existing alarms.
Alarm Priorities
There are two priority levels for the customer alarms, represented with
different colours on the wall screens and/or web application:
Low priority
Events that require the attention of a caregiver but should only be
addressed after the high priority are resolved.
Typically, the low priority alarms are dispatched to the auxiliaries
but then can escalate according to the description done on “Alarm
Propagation” section.
High Priority
Reserved for urgent events, these alarms require the immediate
attention of a caregiver and have precedence over the low priority
alarms.
Both nurses and auxiliaries caregivers receive this type of alarms.
December 2013
www.oncaring.com
Page 8 of 40
Alarm Types
Follows a reference to the meaning of the possible alarms. The colour
indicates the level of priority.
Fall
Customer’s device detected a fall.
Some devices are able to detect the movement patterns of a fall.
When the system detects a movement with high probability to have resulted
in a fall, an alarm is generated with high priority. Caregivers, both nurses
and auxiliaries, are notified of the occurrence and may resolve the alarm
through their devices.
The sensitivity of the fall detection method can be set, individually for each
customer, by editing the client data file on the web platform where the risk of
falling can be configured (see "Edit customer data"). If the risk of falling is
indicated as high, the system will be more sensitive, but it could generate
some false alarms for active customers, so it is important choose the
appropriate value for the risk according to the status of each customer.
Location
Customer left the authorized area.
Every time a customer gets away from an authorized location and enters a
forbidden area, the system submits a high priority alarm identifying the
location left.
Caregivers that are present in both the left location and the joined area
receive this alarm.
Button
Customer pressed the button of his device.
If the button on the customer device is pressed, the system submits an
alarm in the screen nearer (if any) and simultaneously the caregivers
(auxiliaries) present in the same location where the alarm was activated will
be notified through their caregiver device.
Battery Low
Customer’s device has low battery level.
When the battery of a customer device reaches a battery level considered
poor, the system creates an alarm with low priority and it is sent to auxiliary
caregivers.
This alarm can only be resolved by connecting the device to the charger.
Depleted Battery
Customer’s device runs out of battery.
The instance right before the battery of a device runs out, the system
creates an alarm with high priority and it is sent to all caregivers of that
location.
This alarm can only be resolved by connecting the device to the charger.
Heart rate outside the range
Customer’s device detected a heart rate value outside of the predefined
range.
If the customer device allows the reading of the heart rate, the system will
submit a high priority alarm whenever it detects a value of rate heart outside
December 2013
www.oncaring.com
Page 9 of 40
the range defined in page of customer data. It is possible to change the
interval of heart rate rhythm considered normal for each customer though
the web platform.
onAll should not be used in order to obtain a diagnosis or prescription based
on the values of signals vital collected by the system. It is recommended
that alarms regarding vital signs are always confirmed using medical
devices.
No heart rate readings
Customer’s device is not detecting heartbeat.
If the customer device allows the reading of the heart rate, the onAll system
will generate a high priority alarm of no heart beat activity is detect during a
predefined time interval.
Caregivers should always ensure that the heartbeat sensors are correctly
placed, ensuring continuing contact with the skin of the customer.
Unlock device
Customer’s device is not being used correctly.
If the customer device has a mechanism to detect if it is being used or not
by the customer, for example two springs holding the device are not closed,
the system is able to submit an alarm to the caregivers to let them know that
the device must be placed.
No signal
Device lost connection to the system.
This situation happens if the customer with the devices goes into an area
that has not Wi-Fi coverage, so it cannot communicate with the onAll
platform. A customer in this situation is not being monitored.
Fixed Button
Customer pressed the fixed button in his room.
The existing fixed call button system that is available in the institution can be
integrated with the onAll system, so that the caregivers are notified the
same way as they are for the onAll alarms. This type of alarm cannot be
resolved through the caregiver device nor the web application.
Caregiver Absence
There are customers in a location where there is no caregiver present.
This alarm appears in the web application to alert to the fact that there are
no caregivers to receive the alarms in a specific area.
Escort taking too long
Indication that the alarms are suspended longer than the default
preconfigured time.
Fall Prevention – Get up from bed
Customer got up from the bed.
Fall Prevention – Get up from chair
Customer got up from a chair.
Fall Prevention – Start walking
Customer started walking.
December 2013
www.oncaring.com
Page 10 of 40
Alarm Propagation
Low priority alarms are updated to high priority if after a determined period
of time they have not been resolved.
If these alarms are still active after the configured period of time they are
then propagated in terms of location so that the caregivers of the other
locations are also notified and can assist the situation.
If the alarm is still not handled by any of the caregivers, the administrator
users can receive an sms message alerting to the unresolved alarm. This
situation depends on the system being configured to allow sending sms and
the administrator user having the mobile number defined and the option
“Receive alerts via mobile phone” being enabled.
These periods of time values are predefined, and can be changed by the
system administrator.
December 2013
www.oncaring.com
Page 11 of 40
Alarm Resolution
Alarms can have different resolutions according to their nature:
ALARM
RESOLUTION
Fall
Customer’s device
detected a fall.
Through
Location
Customer left the
authorized area.
Through
Button
Customer pressed the
button of his device.
Through
Battery Low
Customer’s device has
low battery level.
The alarm is automatically resolved when the
device connected to the charger.
Depleted Battery
Customer’s device ran
out of battery.
The alarm is automatically resolved when the
device connected to the charger.
Heart rate outside the
range
Customer’s device
detected a heart rate
value outside of the
predefined range.
Through
No heart rate readings
Customer’s device is not
detecting heartbeat.
The alarm is automatically resolved when the
device is correctly put into contact with the
customer skin and starts receiving heart rate
readings.
Unlock device
Customer’s device is not
being used correctly.
The alarm is automatically resolved when the
device is properly locked.
No signal
Device lost connection to
the system.
The alarm is automatically resolved when the
customer with the device returns to a location with
Wi-Fi coverage.
Fixed Button
Customer pressed the
fixed button in his room.
The alarm cannot be resolved through onAll but
only using the fixed call button system.
December 2013
www.oncaring.com
see Resolve
Alarms with the Caregiver Device section
Through the web application: see Manage alarms
on the application section
the
caregiver
device:
the caregiver device: see Resolve
Alarms with the Caregiver Device section
Through the web application: see Manage alarms
on the application section
the caregiver device: see Resolve
Alarms with the Caregiver Device section
Through the web application: see Manage alarms
on the application section
the caregiver device: see Resolve
Alarms with the Caregiver Device section
Through the web application: see Manage alarms
on the application section
Page 12 of 40
Caregiver Absence
There are customers in a
location where there is
no caregiver present.
The alarm is automatically resolved when a
caregiver enters the location.
Escort taking too long
Indication that the alarms
are suspended longer
than the default.
The system alarm is automatically resolved when
the customer returns from escorting mode.
Fall Prevention – Get
up from bed
Customer got up from
the bed.
Through
Fall Prevention – Get
up from chair
Customer got up from a
chair.
Through
Fall Prevention – Start
walking
Customer started
walking.
Through
December 2013
www.oncaring.com
see Resolve
Alarms with the Caregiver Device section
Through the web application: see Manage alarms
on the application section
the
caregiver
device:
the caregiver device: see Resolve
Alarms with the Caregiver Device section
Through the web application: see Manage alarms
on the application section
the caregiver device: see Resolve
Alarms with the Caregiver Device section
Through the web application: see Manage alarms
on the application section
Page 13 of 40
Platform
The web platform is very easy and intuitive to use and it is accessible via
an Internet browser (Chrome, Firefox or Safari). The url to access it must be
provided by the system administrator. It can be used in different languages;
the current version supports English, Dutch, German and Portuguese (same
to the browser’s settings).
The application allows the identification and resolution of alarms, their
documentation (to add further information about the event, for instance the
description of the situation and the actions that were taken to resolve it) and
the analysis of the evolution of the parameters collected by sensors from
customers and passing of information between caregivers. It also allows the
configuration the items related to caregivers, customers and the sensors in
the system.
There are two distinctive profiles to access the platform: Caregiver (only
Nurse type) and Administrator. According to the user profile the actions that
can be performed are different.
The login page has the following aspect:
Caregiver profile
Once a caregiver user logs into the platform, there is an overall navigation
menu that offers 3 choices.
The navigation menu is available on all pages and allows the user to move
between the main areas of application. The menu is typically retracted on the
left margin of the screen. To open the menu and access the options, click on
the right arrow (1) and to collapsing the control back to the side click the left
arrow (2).
1
2
December 2013
www.oncaring.com
Page 14 of 40
When choosing a menu option the user will be sent to the corresponding
area of the application:
• Alarms - Sends the user to the Alarms Management page.
• Clients - Sends the user to the Clients Management page.
• Sensors - Sends the user to the Sensors Management page.
Alarms Management Page
This page is dedicated to view and manage the active alarms via web
application.
In this page the user can:
• Resolve alarms;
• View the list of active customer and system events;
• Filter active events by its origin location;
• Silence and temporarily suspend customer alarms;
• Open a form with the information of the customer that has an alarm
occurring.
1 – Filter - Allows the user to filter the alerts by the origin location.
2 – List of system events - Displays all active system events, according to
the filtering criteria. The list is normally retracted and the user needs to click
on it to open it.
3 – List of customer active alarms - Displays all active customer alarms,
according to the filtering criteria and order by priority. When the user clicks on
an alarm appears the actions that he can perform on it.
December 2013
www.oncaring.com
Page 15 of 40
Manage alarms on the application
To handle an alert, the user must click on it to open the action toolbar
exposing the buttons with the available options that can be performed on the
alarm. If the user clicks again on an alarm with the open action bar, it will be
closed. The action bar is open only for one alarm at a time, so if the user
clicks on another active alarm the previous action bar is closed.
Depending on the type of alarm and the user profile, the option that are
available can be:
• open the data file of the associated customer,
• temporarily suspend the alarms for that customer,
• mute, resolve or document the alarm
1 – Alarm type
2 – Customer identification – name of the customer, additional relevant
information and the location where the alarm was triggered.
3 – Customer’s bed/room number
4 – Symbol of the alarm type – in a big size for better view
5 – Action toolbar with options:
5.1 – Open customer’s data file
5.2 – Temporarily suspend the alarms for a customer - marks the
customer, to whom the alarm refers, in escort mode suspending the
creation of new alarms for that person until they are resumed. The user
is asked to insert a comment or select a prefilled one to justify the
suspension of alarms for that customer. Note that current existing alarms
will remain as active until they are resolved. Only users with the profile
Nurse can suspend alarms for a customer.
5.3 – Silence the alarm - leaves the alarm active in the system but it
does not notify caregivers. The user is asked to insert a comment
explaining the reason for silencing the alarm.
5.4 – Resolve the alarm - removes the alarm from the list and marks it
as handled. Only some alarm types can be resolved in the application
because they do not require ensuring that the caregiver is near the
customer. Once the Resolve action is selected, the user must insert a
comment or select on of the prefilled options available.
5.5 – Document the alarm - allows inserting comments about the
alarm, and does not remove it from the list.
December 2013
www.oncaring.com
Page 16 of 40
Clients Management Page
This page is dedicated to view and manage customers via web application.
In this page the user can:
• View and edit customer data
• Assign devices
1 – Filter - Allows the user to filter customers by location and discharged
customers.
2 – Selected Customer Info Panel - Displays detailed information for the
customer selected from the list below. The toolbar presents the actions that
can be made on customer data.
3 – Customer List - Displays the list of customers registered in the system
according to the selected filter criteria. The list presents the name of the
customer, the number of his bed, dependency level profile, assigned device
unique identifier, status of the assigned device, battery level of the assigned
device, fall risk and if the customer has configured alarm generation activated
or not. It is sortable and allows applying additional filtering to each column
individually.
Edit customer data
The information about a customer can be updated in this page, but the user
profile determines the type of information that can be changed. Caregivers are
allowed to update the system configuration but cannot change the customer’s
personal data. If any error is detected in the name, gender, birthdate it must
be requested to the administrator to correct it.
December 2013
www.oncaring.com
Page 17 of 40
When the user selects a customer and clicks on the “Edit client file” button,
the editable data form opens allowing the user to change the allowed data
and save. There are two tabs: one with more personal information about the
customer and the other with the settings for his alarms configuration with the
ability to enable or disable any given events depending on a schedule.
Follows a description of the fields that a caregiver user can change:
December 2013
www.oncaring.com
Page 18 of 40
1 – Customer personal data that cannot be changed by the caregiver
user profile. The user is unable to write in these fields.
2 – Location/Room/Bed – Local inside the institution where the customer
is accommodated (named original location).
3 – Profile – 3 levels of dependency. This field prefills some other data
fields with default values that can be changed manually by the user (Fall risk,
Client Permissions, Allowed areas, Active Alarms).
4 – Relevant information – Customer’s additional information.
5 – Disallowed areas - Allows the definition of the areas that are restricted
to the customer, i.e., where the customer should not have access and an
alarm is generated in case he goes there and sets the time period that the
restrictions apply during the day (for example, the customer may leave the
building during the time there is a guard in the front desk from 9:00 to 17:00).
Note that the customer’s original location is always considered an authorized
location, so it is not possible to configure it as a disallowed area.
6 – Client permissions for not wearing the device – Allows tor forbids
he customer to remove his sensor and sets the time period that the
restrictions apply during the day.
7 – Call Button – Allows or forbids the customer to use the call button to
ask for help to the caregivers and the sets the time period that the the
functionality is active during the day.
8 – Fall detection setup – Allows to define if the fall detection is active for
the customer, and if active sets the sensitivity of the fall detection mechanism,
wherein greatest risk, means higher sensitivity of the system. It also sets the
time period the functionality is active during the day.9 – Fall prevention
setup – Allows define the fall prevention movement detection that are active
for the customer and sets the time period the functionality is active during the
day.
If the device that is assigned to the customer does not support any of the
possible functionalities, the correspondent configuration will be disabled.
Assign/Un-assign devices
All users can assign or un-assign devices to customers in the clients page.
To assign a device: On the Customer Info Panel, with the respective
customer selected, click on Assign button (it will only be enabled if the
customer does not have a device already assigned).
It opens a new page with the list of available devices so that one can be
chosen for assignment, then click on the Assign Sensor button. To confirm
that the correct device is being assigned, check the device’s unique identifier
(in a label on the back of the physical device).
December 2013
www.oncaring.com
Page 19 of 40
To un-assign a device: On the Customer Info Panel, with the respective
customer selected, click on Unassign button (it will only be enabled if the
customer has a device already assigned).
Suspend/Resume alarms on clients page
The caregiver user can temporarily suspend the alarms of a customer.
In certain situations (going to physical therapy, taking bath, etc.) it can be
useful to suspend the alarms generation for a customer. By suspending
alarms, the client will be "on escort" mode, not being generated new alarms
until a caregiver decides to resume them again. Once it is resumed, the
system recovers the ability to generate alarms to that customer.
Suspending and resuming alarms can be done via web platform or through
the Caregiver device.
December 2013
www.oncaring.com
Page 20 of 40
To suspend: On the Customer Info Panel, with the respective customer
selected, click on the Suspend button and insert a comment explaining why is
the customer in escort (or select one of the prefilled options).
To resume: On the Customer Info Panel, with the respective customer
selected, click on the Resume Button.
December 2013
www.oncaring.com
Page 21 of 40
Open client file
The client file is a page intended for tracking customer events and
monitored values. The caregiver user has the ability to query the data
presented and to manage the complete documentation of events.
1 – Timeline of event - Displays the event log through icons on a timeline.
It is possible to turn on and off the display of events by their type.
2 – Timeline of monitored values – Displays the values of the vital signs
that can be captured by the sensor worn by the customer (e.g., heart rate), or
registered manually (e.g., temperature, blood pressure). Values outside the
preconfigured ranges are highlighted. If no vital signs are being monitor for
the customer this part of the client file can be hidden by clicking on the box
heading (6).
3 – Timeline controls - Allows to set the time scale for the visualization,
skip directly for the present moment and move forward or backward through
the timeline arrows.
4 – Add vital signs – Allows to manually register values of temperature,
blood pressure, blood glucose and heart rate (distinguishing from the
automatic capture in timeline, if any, with the letter "M").
5 – Documentation of events - Displays the events represented timeline
in the form of list, ordered from most recent to older. Allows the caregiver to
manage all documentation of events (document alarms, edit comments and
create or delete events generated manually).
December 2013
www.oncaring.com
Page 22 of 40
Sensors Management Page
This page is dedicated to view and manage the devices in the system.
1 – Filter - Allows the user to filter the sensors by location origin.
2 – Sensor List - Displays the list of sensors registered in the system
according to the selected filter criteria. The list presents the unique identifier of
each sensor, its type, state, battery condition, brand and to whom is it
assigned if anyone. It is sortable and allows applying additional filtering to
each column individually.
December 2013
www.oncaring.com
Page 23 of 40
Administrator profile
An administrator user login has access to the same areas that were
described in the previous section “Caregiver profile” plus a different
application area named Professionals that it is described below.
•
•
•
•
•
Alarms - Send the user to the Alarms Management page.
Clients - Sends the user to the Clients Management page.
Professionals - Sends the user to the Professionals Management
page.
Sensors - Sends the user to the Sensors Management page.
KPI – Sends the user to the Key Performance Indicators page.
There are also some differences in some of the authorized actions that
were presented on the “Caregiver profile” section and those differences are
also described in the following sections.
So, for the full description of the administrator functionalities in the web
application, one must also read the “Caregiver profile” section, because this is
cumulative, just highlighting the differences between the two profiles.
Clients Management Page
Add new customers
Administrator users can add new customer records to the onAll platform in
the Clients Management page. Once the customer is registered in the system
he can have a sensor assign, start generating alerts and have the events
monitored through the application.
To add a new customer: On the Clients Management page, click on
“Create new client” button. A new customer form is open that allows the user
to introduce the information for the fields that were described in section “Edit
customer data” including the personal data (name, birthdate, gender).
December 2013
www.oncaring.com
Page 24 of 40
Note: Customers can only be created if associated to a location. If there
aren’t locations defined in the system, the onCaring support team must be
contacted.
Discharge a customer
Administrator users are able to discharge registered customers in the
system, so that no they do not appear as active and visible in the list of
customers.
To discharge a customer, in the toolbar that appears in the Info Panel of
the selected active customer, there is a button “Discharge client”, once
clicked, it is requested for the user to insert a comment.
December 2013
www.oncaring.com
Page 25 of 40
All users can access the list customers who were discharged through the
filter in the Customer Management page “Discharged clients” option.
A discharged customer can be reactivated at any time, though the button
“Undo discharge”.
Alarms Management Page
The administrator user can only see the active alarms but he is not able to
perform any action on an alarm in order to resolve it.
Sensors Management Page
December 2013
www.oncaring.com
Page 26 of 40
1 – Filter - Allows the user to filter the sensors by location origin.
2 – Sensor List - Displays the list of sensors registered in the system
according to the selected filter criteria. The list presents the unique identifier of
each sensor, its type, state, battery condition, brand and to whom is it
assigned if anyone. It is sortable and allows applying additional filtering to
each column individually.
3 – Add sensor – Insert new devices in the system.
4 – Edit – Update device information.
5 – Delete – Remove devices from the system.
Add new sensors
The administrator user can add new caregivers and customer devices, so
that they became available in the system to be assigned to users.
1 – Device – Brand of the device.
2 – Type – Format of the device.
3 – Identifier – Unique device (MAC address) id that must be copied from
the label that is usually on the back of the physical device.
Sensors can also be automatically added to the platform if they are new
and when they first communicate with the system.
December 2013
www.oncaring.com
Page 27 of 40
Edit a sensor
The information about the devices that are not assigned to any user can be
updated. If an assigned device needs to be updated it has to be un-assigned
before.
Delete a sensor
Only devices that are not assigned to any user can be removed from the
system. If an assigned device needs to be deleted it has to be un-assigned
before.
Professionals Management Page
This page is dedicated to view and manage (disable or change the
settings) all professionals of the institution: Caregivers (nurses and auxiliaries)
and Administrators.
In this page the administrator user can:
• View the list of professionals registered in the system;
• Filter the list of professionals;
• Register new professionals;
• Disable active professionals;
• Correct the information data of the professionals;
• Assign and remove the devices assign to the caregivers.
December 2013
www.oncaring.com
Page 28 of 40
1 – Filter - Allows the user to filter the professionals by location origin and
by deactivated status.
2 – Selected professional info panel - Displays detailed information for
the professional selected from the list below. The toolbar presents the actions
that can be made on professional data.
3 – List of professionals - Displays all professionals registered in the
system, according to the filtering criteria. The list presents the name, the type
of professional (nurse, auxiliary, administrator) and the device that is assigned
to the professional. It is sortable and allows applying additional filtering to
each column individually.
4 – Create new user – Allow the administrator to insert new professional
records in the system.
Create new user
To add a new user to the system: On the Professional Management page,
click on “Create new user” button. The new user form is open that allows the
user to introduce the necessary information.
1 – Information to fill about the user including the type (nurse, auxiliary,
administrator), name and the login and password (for nurses and
administrators).
2 – You can just save the information and leave it or you can save it and go
directly to assigning a caregiver device to the user (if it created user is a
caregiver type).
December 2013
www.oncaring.com
Page 29 of 40
Edit user
The administrator user can update all the information from a user. To
change the user information, on the Professional Info Panel, with the
respective professional selected, click on “Edit user” button, change the
values of fields that need to be updated and save.
Deactivate professional
To deactivate a professional record and be able to filter
professionals’ list, on the Professional Info Panel, select the
professional and click on “Deactivate professional” button, change
of the fields that need to be updated and confirm with the yes
change (or ignore the changes using the cancel button).
it on the
respective
the values
button the
Assign/Un-assign a device to a professional
Only professionals of caregiver type (nurse and auxiliary) can have
assigned devices.
To assign a device, on the Professional Info Panel, with the respective
professional selected, click on “Assign” button (it will only be enabled if the
professional does not have a device already assigned).
It opens a new page with the list of available caregiver devices so that one
can be chosen for assignment and click on the “Assign Sensor” button. To
confirm that the correct device is being assigned, check the device’s unique
identifier (usually in a label on the back of the physical device).
To un-assign a device, select the professional and on the Professional Info
Panel, click on “Unassign” button (it will only be enabled if the customer has a
device already assigned) and confirm.
December 2013
www.oncaring.com
Page 30 of 40
Key Performance Indicators (KPI) Page
On the KPI module page, the user can access the reports that are
automatically generated, and made available by the system on a daily basis at
3am, and any past date can be consulted.
Performance indicators, like the Resolution Time, can be seen at a glance.
It also allows the user to understand if there are outlier values that can, for
instance, compromise the added value of the service.
These values and reports that are available on this page can also be used
to provide the institution’s customers and families with valuable information
about the quality of the service that is being provided.
The available reports are very intuitive and easy to understand.
Follow some examples of the reports that can be seen in the application
and some of its details:
December 2013
www.oncaring.com
Page 31 of 40
December 2013
www.oncaring.com
Page 32 of 40
Devices
Wrist Device/Bracelet
The wrist device is a portable and wireless sensor that must be used by the
customer in the wrist at all times.
The bracelet allows the system to locate the customer anywhere in the
facility covered by Wi-Fi network, and has a button that generates alarms
whenever it is pressed.
A – Removable bracelet – Allows attaching the sensor on the wrist of the
customer so that the device is used as a clock.
B – Sensor – Allows locating the customer in the facility and provides the call
button.
C – Button – When the user pushes the button it generates an alarm in the
system of type "Button". The device vibrates and the customer will see a
red light on the button.
Alarms
The wrist device is able to trigger the following alarms:
Location
Customer left the authorized area.
Button
Customer pressed the button of his device.
Battery Low
Customer’s device has low battery level.
Depleted Battery
Customer’s device runs out of battery.
No signal
Device lost connection to the system.
For further details on the alarms check section Alarm Types.
December 2013
www.oncaring.com
Page 33 of 40
Cleaning and Maintenance of the Device
Charging the battery
After being issued a low battery level alarm, the device should be,
immediately, connected to the charger to prevent the customer from not being
monitored.
Place it in the individual
charger as in the image:
Or
Place it in a multi-charger:
Cleaning the device
To clean the device just pass a cleaning wipe, avoiding the pass on top of
the identification label to prevent damage.
Belt Clip
The belt clip device is a portable and wireless sensor that must be used by
the customer in the waist at all times. It can be attached to the waistband of
his pants or her skirt, or to a belt.
The belt clip allows the system to locate the customer anywhere in the
facility covered by Wi-Fi network, and has a button that generates alarms
when it is pressed. It also detects falls and the movements that can lead to a
fall.
The sensor will beep every time it detects an alarm so that the customer is
aware of if.
December 2013
www.oncaring.com
Page 34 of 40
A – Battery LED – Turns on the green light while charging and turns it off
when charge is complete. Turns on a red flashing light when the battery is
in low level.
B – Status LED – Blue light that indicates that the device is connected.
C – Button – When the user pushes the button it generates an alarm in the
system of type "Button". The device vibrates and the customer will see a
red blinking light on the button.
D – Belt clip – Clip to attach the device to the waistband or to a belt. It has a
mechanism that allows the system to identify if the device is being worn.
Alarms
The belt clip device is able to monitor and trigger the following alarms:
Fall
Customer’s device detected a fall.
Unlock device
Customer’s device is not being
used correctly.
Location
Customer left the authorized area.
No signal
Device lost
system.
Button
Customer pressed the button of
his device.
Fall Prevention – Get up from
bed
Customer got up from the bed.
Battery Low
Customer’s device
battery level.
Fall Prevention – Get up from
chair
Customer got up from a chair.
has
low
Depleted Battery
Customer’s device runs out of
battery.
connection
to
the
Fall Prevention – Start walking
Customer started walking.
For further details on the alarms check section Alarm Types.
December 2013
www.oncaring.com
Page 35 of 40
Cleaning and Maintenance of the Device
Charging the battery
To charge the device, plug it to the to the socket using the supplied cable.
•
•
•
While the device is charging there is a green light.
When the device is fully charged the green light turns off.
After removing the sensor from the charger if it is connected, all the
LEDs will light up.
Cleaning the device
To clean the device just pass a cleaning wipe, avoiding the pass on top of
the identification label to prevent damage.
Caregiver Device
There are two types of caregiver devices: Tag (or Badge) and the Android
device.
In the following sections you can find the detailed information of each
devices’ possible functionalities.
Tag or Badge
The Tag or also called Badge, allows the care provider to receive the
customer’s alarms and resolve them. It can also be used to request help other
caregivers.
December 2013
www.oncaring.com
Page 36 of 40
A – When the device is in a considered normal state, within
wireless range, with enough battery and without active
alarms, a green light on the left side flashes. If the device is
out of wireless range, it flashes with red light colour.
B – Yank button – is used to request help to other
caregivers by pulling the tab.
C – Alarm light – When an alarm is received, both lights,
left and right of the tab, flash rapidly with red colour.
D – Up / down - The arrow buttons go up and down on the
selection on the screen.
E – Confirm / Wake screen / Menu:
• This button allows the caregiver to confirm the option
highlighted on the screen, resolving the selected
alert.
• If the screen is in standby, a quick press of this
button can reactivate it.
• A long press of this button,opens the menu options of
the device.
F – Screen – Displays text notifications related to the alarms
and to the device.
In a normal state of the device, within network coverage, with
battery and no active alarm, it presents a flashing green light.
If a caregiver device is not under wireless coverage, the left
light flashes with red colour. And Out-of-range alarm will appear
in web application (It is considered a system alarm).
It is extremely important that the device is within wireless network because
otherwise, the caregiver will not be notified of any event, including alarms.
Receive Alarms on the Caregiver Device
Whenever there is an alarm in the onAll system, it is forwarded to the
appropriate caregiver(s) according to the defined propagation rules.
The caregiver device notifies the professional providing a warning sound, a
text message in the screen and a flashing light red, blinking rapidly.
Alarms are usually dispatched to the caregivers that are in the same
location where it occurred. If an alarm is not handled in a predefined period of
December 2013
www.oncaring.com
Page 37 of 40
time, it is then propagated to other locations or other hierarchy levels of the
care providers.
When the caregiver enters a different location, he will also receive the
active alarms relating to the new location.
The message received in the screen of the caregiver device has the
following format:
«Name of the customer» «Location where it happened» «Alarm type»
where Alarm Type is a single letter identifying what happened, for example:
(B) – Button
(F) – Fall
(L) – Location
(U) – Device not being worn
(0) – Depleted battery
…
This can be configured in each installation of the product.
Resolve Alarms with the Caregiver Device
Customer Alarms
To resolve a customer alarm using the caregiver the device, the care
provider must choose the desired event using the arrow buttons (D) and
confirm the resolution with the confirmation button (E). The caregiver must be
in same location as the client for that the event is resolved.
Fixed Alarms
The button alarms from the fixed call button system on the bed of the
customers cannot be resolve the through the caregiver device nor the web
application. This alarm is external the onAll system and can only be solved by
turning off the alarm directly in the bedroom of the customer.
Out-of-range Alarms
Out-of-range alarms cannot also be resolved through the caregiver device.
They are automatically resolved by the system, once the customer device is
back inside the coverage of the wireless network.
Battery Alarms
The caregiver cannot resolve battery alarms, either low battery or depleted
battery, through his device. These alarms are automatically resolved by
charging the device with battery issues.
December 2013
www.oncaring.com
Page 38 of 40
Suspend alarms with the Caregiver Device
The caregiver user can temporarily suspend the alarms of a customer
through the Caregiver device, but there are some restrictions:
• Only on an active location alarm is possible to do the suspend
operation.
• Only the caregiver with Nurse profile can do the operation.
In certain situations (going to physical therapy, taking bath, etc.) it can be
useful to suspend the alarms generation for a customer. By suspending
alarms, the client will be "on escort" mode, not being generated new alarms
until a caregiver decides to resume them again. Once it is resumed, the
system recovers the ability to generate alarms to that customer.
Suspending and resuming alarms can be done through the Caregiver
device or via web platform.
To suspend: When there is a location alarm, one of the possible actions on
the caregiver device will be Suspend, the care provider must choose the
desired action using the arrow buttons (D) and confirm the resolution with the
confirmation button (E).
To resume the alarms generation, it has to be done via web application as
explained in the “Suspend/Resume alarms on clients page” section.
Request help to other caregivers
In an emergency situation, any caregiver is able to request help to the
other professionals, simply by pulling the tab which is on top of device, as
shown below:
This action triggers an alarm to all other caregivers that are in the same
location. If no other caregiver is in the same location, the help request is
escalated to the other areas of the institution.
December 2013
www.oncaring.com
Page 39 of 40
Cleaning and Maintenance of the Device
Charging the battery
When the caregiver device is with low battery level, the system creates an
event "No Battery" which is presented on the alarms page of the web
platform.
When it is fully charged, the device battery lasts for more than 24 hours.
However, it must be charged as often as necessary to prevent the device from
running out of battery during a shift.
This will require putting it in a multi-charger entry by simply
entering the device on the charger facing down.
When the battery is fully charged the red light turns off and
the green one turns on.
It is extremely important that each caregiver ensures that his device has
battery. To ensure that the device will not run out battery in the middle of a
shift, it should be put into charge at the end of the shift.
Cleaning the device
To clean the device just pass a cleaning wipe, avoiding the pass on top of
the identification label to prevent damage.
Android Device
The Android device allows the care provider to perform all the actions that
were described for the Rag device related to receiving the customer’s alarms
and resolve them, but it also allows the caregiver to perform a subset of
operations that are done via the Web Platform such as document alarms,
check the location of a client.
Because this is a more complete and elaborated usage, there is a
separated manual that explains in detail the supported functions on the
Android device. So please check the “Android Device User Manual” for further
description.
December 2013
www.oncaring.com
Page 40 of 40