1
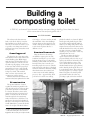
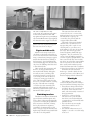
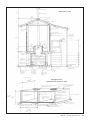
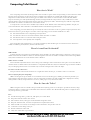
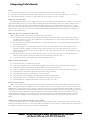
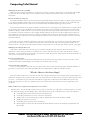
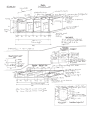
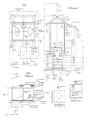
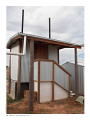
PHOTO: LYNDA WILSON
18 • TOB 142 • August/September 2007
Building a
composting toilet
In TOB 141, we featured Steve Howard’s earthen compound design dwelling. Steve shares the details
of the construction of the composting toilet with us.
BY STEVE HOWARD
The toilet was the first structure
built on the block. In fact, it was the
first building project I had ever done.
As it was to act as the site toilet as soon
as possible, some things were rushed
and there were plenty of mistakes made
along the way.
Council approval
The plans for the composting toilet
were submitted at the same time as the
overall dwelling plans. While happy
with the plans and that I knew how to
operate it safely, the councils concern
was with ongoing upkeep of the system,
in the event that I sold the property. I
suggested that I create a user manual
for the system, a copy of which would
be kept by council. This satisfied
their concerns on that matter, and
construction could go ahead.
However, this was back in 2001, and
restrictions may have tightened since then.
a bit bulgy, so at least it matches in with
the earth walls of the other buildings.
Cement slurry was later applied to the
outside of the pit for aesthetic reasons,
as each batch of plaster dried to a
different colour.
Structural framework
I dug the holes for the stirrups,
on which the cypress poles sit, next.
Somehow I managed to get one of the
holes in the wrong spot, so the whole
building is askew. I still don’t know how
I managed that, but it created some
interesting angles for eaves etc! The five
main poles were each almost 3.5m high
and about 250 mm in diameter, making
them the heaviest objects that I had
to manoeuvre in the whole building
process to date – approx 100 kg. Each
pole had to be raised on its stirrup,
plumbed, marked out, lowered, drilled,
raised again and plumbed again. This
was all done single handedly, which is
where lots of clamps and patience were
required. A water level was then used to
mark the final level for each pole, which
was then cut using a chainsaw whilst
standing on top of a ladder – I was very
glad when that was over!!
The floor is marine ply laid on
cypress bearers and joists, which
progressed fairly easily once the out of
square poles had been allowed for. The
roof is stick built from cypress. The
door is hand made from cypress and
the fixed windows have cypress frames/
jambs, which I glazed myself. The roof
is covered in Zincalume. The toilet boxes
are built of plywood, covering a cypress
frame. The plywood is built up with
papier-mâché under the toilet seat,
providing a tight seal for the standard
Pit construction
The pit was built first – I wired
together the reinforcing mesh for the
slab, the sides and roof of the pit, then
poured the slab with concrete mixed
in a barrow. The ferroconcrete sides
required a few layers of cement/sand
plaster – hessian and old chook wire
were first stapled to the reinforcing
mesh, and the bolts to hold the access
panels were also wired in beforehand.
The ferroconcreteing was tedious and I
would definitely use concrete blocks if I
were to do it again. The whole effect is
A couple of mates helped with the balustrade
– on the left is Monty who came over from
England for three weeks just to help me build!
TOB 142 • August/September 2007 • 19
Left: Seat is usually left down to help
create a seal. The condensation tube returns
moisture to the pit. Bucket contains chaff.
Top right: Removing the access panel (left pit)
exposes the baffle & aeration pipes (right pit).
Rest: the toilet at various stages of construction.
plastic toilet seat. A plastic lining joins
the toilet seats down to the pit.
Papier-mâché walls
After the roof was up I nailed old
chook wire to the frame and used hoop
iron to brace the structure. I then started
using a cement slurry/newspaper papiermâché that I had tested successfully on
the horizontal – but it failed miserably
and I eventually ripped it off. This is the
only bit of the buildings that I have had
to demolish and redo.
I then started using newspaper and
Bondcrete for the papier-mâché and
that worked well initially, although it
was still very time consuming. This
remained untreated, but after about
a year sitting in the sun the Bondcrete
contracted, causing gaps beside the
poles. This dragged the jamb from the
bottom of one of the windows, cracking
the glass. The walls were eventually
covered in Zincalume externally. The
internal walls had hessian tacked on,
which was petrified with several coats of
limewash and then painted.
Finishing touches
The flues are made from 100 mm PVC
pipe and joiners, with clear plastic tube
used to drain condensation from the flue
to prevent it re-entering the pit. Whether
this is necessary is debatable, as during
the hot, dry summers we experience
around here, I sometimes have to add
water to the pit to keep the moisture level
high enough. The flues were painted black
above the roof to help airflow.
20 • TOB 142 • August/September 2007
The stairs were then made from
concrete blocks over a concrete slab,
with preformed concrete riser/treads.
The balustrade is cypress posts
concreted in the ground, with the
corrugated Zincalume infill.
The inside of the pit was finished
off with a few coats of Bondcrete for
waterproofing and a couple of coats
of black paint (so you cannot see as
much when you look into the pit down
the toilet). The aeration pipes were
formed by splitting 90mm PVC pipe
lengthwise – they are attached at one
end to a bent nail which is attached to
an offcut of plywood liquid-nailed to the
ferroconcrete walls. The other ends fit
into holes cut in the fibre cement baffles.
The access panels are also made from
fibre cement, with ventilation panels
formed by 10mm wire mesh over flywire
(to keep insects and mice out of the pit).
A few friends assisted with the
final stages – thanks to Keith for the
guttering and eaves, and to Monty and
Peter for helping with the balustrade.
Hindsight
The building of the composting
toilet basically went ahead according to
the plans with the following exceptions:
• the walls were changed from wattle
and daub, due to my concerns about
movement of the structure in the
wind, and were initially constructed
from papier-mâché
• the Bondcrete contracted in the
sun after about a year; the walls
were then covered externally with
corrugated iron, and internally with
petrified hessian
• the toilet chutes are rectangular
rather than round for ease of
construction
• the ventilation flues were moved
slightly to one side to avoid the ridge
in the roof
insect screen
900
SECTION 1:20
150mm Ø PVC
cypress
trusses
Zincalume ridge cap
Zincalume
cypress battens
540
cypress framing
fixed
pane
wooden “wattles”
lime plaster min. 12mm
verandah
posts min.
150mm Ø
cypress
“daub” min. 30mm
1700
cypress
handrail
and
balusters
toilet seat
fibre
cement
wattle
and
daub
50mm
gap
400
1000
50 x 25
cypress
frame
rubber
seal
min.
100mm
gap
100 cypress joists
180
cypress
bearers
1000
airtight draped to shed
condensation
seal
into pit
180
composting pit
180
access panel
5mm fibre
cement
180
screed to
30mm
baffle 5mm
fibre cement
180
galvanised post
support
100
min. 200 Ø cypress
10mm
100mm thick slab
screed
F82 reinforcing
aeration pipes
100 Ø PVC
cut in half
ledges to hold
and placed
aeration pipes
upside down
in place
ground to
fall away at
minimum
1:20 slope
internal depth
180
200 x 200 x 300
concrete
400 x 400 x 300
concrete
PROJECTION
COMPOSTING PITS 1:20
1100
lip 50 high and 50 wide for attaching
rubber seal from toilet
500mm internal diameter for hole
50mm ferrocement
F82 reinforcing
50
internal
height
brass bolts embedded in
concrete for attaching
access panels
20mm ledge to
position baffle
Volume of each pit
= 1.39 m3
screed 30mm at
edges to hold any
liquid
900
slab 100mm past pits
10mm ledge to position
access panel
20mm ledge to position
baffle
100mm thick slab
F82 reinforcing
50
1400
50
slab extended 300mm further
for ease of maintenance
internal
width
TOB 142 • August/September 2007 • 21
Composting Toilet Manual
This is an extract of some of the information provided in the
‘user manual.’ The full manual can be downloaded from
The Owner Builder website (www.theownerbuilder.com.au
> Extracts > #142 Composting Toilet).
• I should have placed the light lower
on the walls, thereby keeping the pit
in shadow – it currently shines down
into the pit
• the handrail on the stairs and balcony
was filled in with corrugated iron to
satisfy building regulations – and I
like the look too, which is a bonus!
Overall I would say the toilet
looks very good from the outside,
and its height and different method
of construction adds interest to the
compound. However, if I were to build it
again I would make the pit, and possibly
the walls of the toilet room, of concrete
blocks for ease of construction. Although
I like the look and ease of the corrugated
iron walls, it would be more stable as
one structure, rather than one building
perched delicately on top of the pit. I
What I would do
differently
1. As I mentioned, I would make the
whole structure from concrete blocks.
2. I would put a side access panel
for placing food scraps in without
having to enter the toilet.
3. The front face of each toilet box
would slope back in under the seat
towards the floor, making it easier to get
off the seat.
How does it Work?
The composting toilet works by taking human waste and other organic wastes and
providing an environment in which bacteria, fungi and worms can decompose them as
quickly and completely as possible, with minimal side effects. It is important to realise that
the toilet is a living process. Most of the wastes are converted into carbon dioxide, water
vapour and other gases, which are expelled through the flue, leaving behind the compost
that is only a small fraction of the original volume of the wastes deposited. In many ways
the compost pit is like a slow burning fire, with the compost like the ash left over after the
wood has been converted to smoke.
Won’t emptying the pit be disgusting?
When we imagine the pit we think of a wet mixture of faeces and toilet paper, smelling
of ammonia, just like a pit toilet. However, after the pit has aged for a year the compost
that results is dry and crumbly with a slightly sweet earthy smell, just like ordinary
compost. There is no faeces, toilet paper or any other waste visible.
What can go into the toilet?
Basically anything that the bacteria, fungi and worms can eat, and which won’t kill
them, can be added to the pile. This is basically anything that was once alive. The most
common additions to the pile are: faeces, urine, toilet paper, straw, sawdust, shredded
newspaper, grass clippings, kitchen scraps, leaves, garden waste, meat, dust, lint, kitty
litter, disposable nappies (with plastic backing removed), sanitary pads, tampons, cold
ashes, twigs, hair. It is important to note that faeces should only contribute about 20-25%
of the material being added to the pile.
What cannot go into the toilet?
• Urine from anyone on antibiotics or the pill.
• Non-organic substances such as glass, metal and plastic, as the bacteria, fungi and
worms cannot eat them.
• Chemicals, antiseptic and antibiotics that will kill the bacteria, fungi and worms.
• Leaves or sawdust containing natural hormones or resins that stunt growth eg. pine,
eucalyptus and cypress.
• Large quantities of liquid that will drown the bacteria, fungi and worms.
• Large quantities of paper or print that can contain toxic dyes.
• Large quantities of grass clippings that will compact and become impervious.
• Large quantities of any one material, as they will take a long time to decompose.
• Hot material such as cigarette butts and hot ashes as they may cause a fire.
Available at newsagents
Australia wide
peter garrett
lifestyle 2007
Over 5000 green businesses, organisations, products and more
Build Your Own House
www.byohouse.com.au
the light at the end of the tunnel is green…
the planet we inhabit
kylie kwong
organic food tastes better
Owner builders
helping each
other
helen razer
showdown in aisle 7
Need to find
baby products,
kids clothing,
an organic snack?
Here’s your ultimate
guide to green!
tim flannery
www.greenpagesaustralia.com.au
22 • TOB 142 • August/September 2007
changing climate from
your own backyard
The #1 website for owner builders
Ask questions on our interactive online forum
Record your O.B. project online for FREE
Composting Toilet Manual
Page 1
How does it Work?
The composting toilet works by taking human waste and other organic wastes and providing an environment in which
bacteria, fungi and worms can decompose them as quickly and completely as possible with minimal side effects. It is
important to realise that the toilet is a living process. Most of the wastes are converted into Carbon Dioxide, Water
Vapour and other gases and expelled through the flue, leaving behind the compost that is only a small fraction of the
original volume of the wastes deposited. In many ways the compost pit is like a slow burning fire, with the compost like
the ash left over after the wood has been converted to smoke.
It is important to note that faeces should only contribute about 20-25% of the material being added to the pile, for
reasons listed below. The remainder of the bulk should be household and garden wastes.
The composting processes within the pit are exactly the same as those that occur in a garden compost pit. There does
however need to be a greater degree of control of the composting process and later sterilisation so that:
• The final material is free of all pathogens and parasites.
• No offensive odours are encountered either within the toilet or outside.
• The human waste is not obvious when using the toilet.
• Decomposition occurs quickly and completely.
The end product after sterilisation is a good soil amendment, with the Nitrogen converted into forms much more
readily accessible by plants (nitrites, nitrates and ammonia).
Doesn’t it smell and look awful?
Will it smell?
If all the measures given below are followed then there should be an earthy smell, with no ammonia or rotten egg gas
smells. Given that the ventilation draws air down through the toilet seat the smell is actually less than when using a flush
toilet, where smells enter the room until the toilet is flushed.
What causes it to smell?
The toilet will only smell if there is excess nitrogen (so add high Carbon materials) or if the pile is too wet (reduce the
moisture levels as outlined above). If ventilation is completely blocked there may be insufficient oxygen, but this would be
very rare. Keeping human waste covered with soil, wood ash and high carbon waste also helps.
Do I have to look at the waste?
The pit is black on the inside and there are no lights that shine into the pit, so that the waste is not obvious.
Won’t emptying the pit be disgusting?
When we imagine the pit we think of a wet mixture of faeces and toilet paper, smelling of ammonia, just like a pit
toilet. However after the pit has aged for a year the compost that results is dry and crumbly with a slightly sweet earthy
smell, just like ordinary compost. There is no faeces, toilet paper or any other waste visible.
How do I use the Toilet?
When using the toilet it is useful to keep in mind that everything you do is an attempt to provide the bacteria, fungi
and worms with food, water and a comfortable environment in which to live. All the following advice is simply the best
way to keep them in good health.
Do’s
• Provide the bugs with a good home, with plenty to eat and drink.
• Keep the lid down and the door closed.
• Put in human waste, toilet paper and household and garden wastes.
• Keep the moisture level, C:N ratio and pH level as required (see below).
• Add a tin full of wood ash, soil and high Carbon materials to the pit after each use.
• Control the insects living in the pit.
• Ensure ventilation works well.
• Only clean toilet with soap and water.
Co pyrig ht - The O wner Bu ilde r ( #14 2 Augu st/ Septe mb er 200 7) a nd Ste ve Ho wa rd
ww w.the owne rbu ilde r.com.a u, 02 4 982 8 820 (Aus tral ia )
Composting Toilet Manual
Page 2
Don’ts
• Don’t allow the conditions in the pit to become unfriendly to the bacteria, worms or fungi.
• Don’t put in anything that will either kill the organisms, that they cannot eat or that will cause a fire in the pit.
• Don’t allow pathogens to come into contact with soil, water, humans, insects or rodents.
What can go into the toilet?
Basically anything that the bacteria, fungi and worms can eat and which won’t kill them can be added to the pile. This
is basically anything that was once alive, with some limited exceptions listed below. The most common additions to the
pile are: faeces, urine, toilet paper, straw, sawdust, shredded newspaper, grass clippings, kitchen scraps, leaves, garden
waste, meat, dust, lint, kitty litter, disposable nappies (with plastic backing removed), sanitary pads, tampons, cold ashes,
twigs, hair. It is important to note that faeces should only contribute about 20-25% of the material being added to the
pile, for reasons listed below.
What is the best way to put them into the toilet?
When adding material to the pile keep the following points in mind:
• The bacteria, fungi and worms operate best in material that is damp, not soggy, so the material being added
should be neither too wet nor dry. If material is to be added which is too wet or dry then either add more dry
material with it or add water.
• The materials being added should contribute to a Carbon:Nitrogen ratio of about 30:1 and have a neutral pH, as
shown in later sections.
• The composting process is most efficient when the materials are well mixed, so add only a small amount of
material at any time. Adding a tin full of organic matter after each use of the toilet and then the occasional
addition of other material is the best way to add to the pile. Large quantities of any one material will take a long
time to decompose.
• Smaller particles compost more quickly than larger ones, so break wastes up if they are too large. Bones and
thicker branches will not decompose quickly enough and should be left out of pile.
• In general the greater variety of material that can be added the better.
What cannot go into the toilet?
• Urine from anyone on antibiotics or the pill.
• Non-organic substances such as glass, metal and plastic as the bacteria, fungi and worms cannot eat them.
• Chemicals, antiseptic and antibiotics that will kill the bacteria, fungi and worms.
• Leaves or sawdust containing natural hormones or resins that stunt growth eg. Pine, eucalyptus and cypress.
• Large quantities of liquid that will drown the bacteria, fungi and worms.
• Large quantities of paper or print that can contain toxic dyes.
• Large quantities of grass clippings that will compact and become impervious.
• Large quantities of any one material, as they will take a long time to decompose.
• Hot material such as cigarette butts and hot ashes as they may cause a fire.
How do I start a new pile?
When a new pile is to be started place a few bricks at the bottom of the pit and lay some plastic mesh over the top of
them – this will provide good ventilation to the base of the pit. On top of the mesh place a layer of organic wastes at least
200mm thick, comprising straw, grass clippings, old compost and soil. It is important that this material will not compost
quickly as it is a refuge for the worms in case the pile above becomes too hot during decomposition. This starter pile needs
to absorb excess moisture until the pile grows, and also provide the bacteria, fungi and worms to the pile to start the
composting process. During the early stages of a pile monitor the liquid level, and add more dry materials or urinate
elsewhere until the problem is corrected. The pile is most vulnerable to shocks (excess liquid in particular) when it is
small.
What sort of worms should I use and where do I get them?
The best worms for the job are manure worms, such as tiger and blue worms – basically any worms from worm farms.
Garden worms will not do the job as they require different conditions. So long as there are still worms in the old pile then
it is simplest to transfer worms to the new pit before it is sterilised.
Co pyrig ht - The O wner Bu ilde r ( #14 2 Augu st/ Septe mb er 200 7) a nd Ste ve Ho wa rd
ww w.the owne rbu ilde r.com.a u, 02 4 982 8 820 (Aus tral ia )
Composting Toilet Manual
Page 3
What happens when the pit is full?
When the pile is getting towards the top of the pit or just when you want to finish with one pile then the pile should
be covered in as much other organic waste as will fit into pit to help ensure all human waste is covered and well
composted.
How do I sterilise the compost?
The full pit should be left for at least six months but preferably until the other pit is full, to complete composting and
to age. The pit should be emptied early in the morning during hot summer weather so that flies are at a minimum and
also that during sterilisation the compost can reach temperatures that will kill all pathogens and parasites.
The ground outside the access panels should be covered in straw or grass clippings for insulation then covered in black
vapour barrier. The compost should then be shovelled over it, then more vapour barrier placed over the top. The sides
should be folded over and the whole covered in clear polycarbonate sheeting and with sides suitably covered to keep the
air around the compost hot. Bricks or other weights should be placed over the top to hold everything in place. Straw or
other insulation can be placed over the top at night for insulation. The compost is to be left in place until the internal
temperature has been measured at above seventy degrees Celsius for at least 3 hours. The compost can then be removed
and used as desired.
Before the compost is sterilised it should not come into contact with skin, eyes, mouth etc, and care should be taken
not to touch eyes, mouth or nose until the hands have been cleaned. Clothes and tools used should be sterilised as an
extra precaution – just put them in black plastic with the compost. The area around the pits must be cleaned of any spills.
What happens if the pile dries out?
If the toilet is left unused for some time, eg over Christmas holidays, the pile may have dried out and thus be
impervious to water. The best solution is to add lots more organic material to the top of pile and add water to make it
quite moist – the pile will absorb the moisture and return to normal. The bacteria, fungi and worms should reactivate but
in severe cases may need to be reintroduced.
How do I clean the toilet?
It is important that no chemicals that will kill bacteria etc be used to clean the toilet in case they enter the pit. The
insides of toilet chute should simply be washed with soap and water using a brush.
Can I use the urine separately?
Urine is acidic and high in salts and may carry disease if the donor is sick. If used separately it should be diluted to 1
part urine to 5 parts water, with a little agricultural lime (not hydrated lime) added to neutralise the pH.
Why do I have to do these things?
The above advice makes more sense when we look at the living requirements of the bacteria, fungi and worms that are
required to decompose the human and other wastes. It is important to note that there are two types of decomposition that
can occur – aerobic (with oxygen) and anaerobic (without oxygen). The composting toilet should be managed so that
aerobic decomposition occurs as it is quicker and does not smell as much, and also because worms require these same
conditions.
What conditions are required for decomposition to be aerobic?
1.
Moisture level – the pile should be damp, but not soggy, so that there is enough water to sustain life but not so much
that water fills all gaps, thus excluding oxygen. The moisture level can be controlled by any or all of the following:
• Controlling the moisture level of material entering the pile.
• Controlling ventilation to increase or decrease evaporation.
• Adding water as necessary (though generally no liquids other than urine should be added).
• Adding dry material as necessary.
• Controlling the temperature of air entering pit.
• During high use periods more dry material should be added to soak up excess liquid, especially when the
pile is small.
Co pyrig ht - The O wner Bu ilde r ( #14 2 Augu st/ Septe mb er 200 7) a nd Ste ve Ho wa rd
ww w.the owne rbu ilde r.com.a u, 02 4 982 8 820 (Aus tral ia )
Composting Toilet Manual
Page 4
2.
Carbon : Nitrogen Ratio - bacteria need about 30 parts Carbon (for energy and growth) for every 1 part of Nitrogen
(for protein synthesis and growth). Human waste has more Nitrogen than required, so other materials with higher
Carbon levels need to be added to balance the pile. If the material in the pile has more Nitrogen than required there
will be excess ammonia produced, and less importantly more oxygen will be needed for decomposition. If the pile has
too much Carbon added then decomposition will be very slow and when the compost is applied it will rob the soil of
Nitrogen so that decomposition can be completed. In general add small amounts of high Carbon materials (eg.
Sawdust, chaff, straw, rice husks) with wood ash or dirt after each use of the toilet with a variety of other household
and garden wastes added at other times. The exact ratio is not essential and need not be calculated, but should be
kept in mind if problems are noticed.
3.
Temperature - the temperatures that are experienced within the pile in this climate are generally suitable for
decomposition to continue, given the heat generated by decomposition and the insulating affect of the pile itself, and
are thus not an area of concern. The worms should have a cool section within the starter pile in case hot aerobic
compost results from material added to the pile while it is small. Note that due to the gradual addition of materials
and constant airflow the temperature of the pile will not be sufficient to sterilise the compost.
4.
Acidity - bacteria and worms are best suited to neutral pH, which is best achieved by using a variety of materials in the
pile. Since Nitrogenous materials such as human waste are generally acidic (creating a sour smell) it is possible to add
agricultural lime (not hydrated lime) to sweeten the pile, but by no means is this necessary. Avoid adding large
quantities of materials that are especially acidic or alkaline eg. Pine leaves, citrus.
5.
Oxygen Level - given adequate moisture level (and thus air gaps), worm activity and ventilation then the oxygen level
will be more than sufficient and is thus not an area of concern. Ventilation control is provided by the design of the
toilet. Turning the pile should only be considered as a last resort.
How is disease prevented?
The toilet is potentially a great health hazard if the following conditions are not met.
How is disease transmitted from the pile to people?
Pathogens can be transmitted directly to drinking water, from food grown in infected soil, from touching or working
infected soil, by insects or rodents accessing pile and spreading pathogens, or by poor hygiene practices while handling
pre-sterilised compost.
What has to be done to prevent transmission?
• Compost must be kept separate from soil and water. The construction of the pit will separate the contents from
soil and groundwater and contain all liquids from the pile, while external drainage must prevent surface water
entering pit then washing out.
• The pit must be constructed and maintained to keep compost safe from insects and rodents.
How can pathogens and parasites be reduced and killed?
• Leaving the compost to age for at least one year will significantly reduce pathogens and parasites – numbers are
reduced by a lack of food and competition and predation by other organisms.
• Heating the entire pile to at least 65 degrees Celsius for at least 20 minutes will kill all pathogens and parasites.
Note that these temperatures will not be reached within the pit under normal use as shown in this manual, and
the compost must be sterilised as outlined above.
What do I do about insects in the pit?
• Insects enter the pit with the organic materials that are added. Efforts must be taken to reduce their numbers and
keep them within the pit for both health and aesthetic reasons.
• Insects are best controlled by keeping the pile covered by high Carbon materials such as sawdust etc. Mild
insecticides as used in greenhouses can be used as a last resort, but care needs to be taken that they do not kill
beneficial organisms.
Co pyrig ht - The O wner Bu ilde r ( #14 2 Augu st/ Septe mb er 200 7) a nd Ste ve Ho wa rd
ww w.the owne rbu ilde r.com.a u, 02 4 982 8 820 (Aus tral ia )
Composting Toilet Manual
Page 5
What do I do about liquid building up under the pile?
It is best to keep moisture within the pile, as it evaporates more quickly due to the higher temperatures and larger
surface area. The solution is to add more dry materials to the pile to absorb the moisture and increase ventilation, while
temporarily urinating elsewhere may be an option. Adding extra dry materials before periods of high use is a useful
precaution, particularly when the pile is small. Note that the liquid is usually ‘compost tea’ rather than urine unless the
pile has dried out and become impervious to moisture.
How does the structure work?
Ventilation
• Air is admitted at the bottom of the access panel to help evaporate any liquid which has developed below the pile
and to help aerate the bottom of the pile. The flap is used to reduce the flow of air if required. An extra inlet can
be cut into each panel if required.
• The baffle is designed to prevent the pile sagging and blocking the flow of air from the inlet in the access panel. It
also supports the aeration pipes. Holes are cut so that air can reach the base, the middle and the sides of the pile
as well as flow over the top. It is essential for good evaporation that air can bypass the pile so that it does not have
to strain its way up through the pile.
• The aeration pipes are designed to help get oxygen into the middle of the pile and to help evaporation within the
pile. They also help break the pile up and prevent it packing down into one lump.
• The bricks and plastic mesh are designed to allow good airflow to the base of the pile to allow any liquid that
develops there to be evaporated more quickly.
• The toilet seat should be airtight when closed, and when opened air should be gently drawn into the pit, not
sucked out of it bringing odours into the room.
• The flue must be of a larger size than the inlet so that it will draw air down through seat when it opens. The flue
must extend well beyond roof to draw well, and be painted black to help it draw in still weather. Condensation on
inside of flue must be diverted away from pit, with the condensation diverter kept clear so that it drains well. The
flue exits near the seat so that it helps evaporate any condensation that develops on the seat.
Ventilation Problems
If air and/or insects are sucked into the room from the toilet then we need to reverse the air pressure by any or all of
the following: cleaning flue and insect screen of spider webs and dead insects, ensuring cap on top of flue is preventing
downdrafts, increasing height or width of flue, checking for breakages, blockages or disconnection in flue, installing fan in
flue, checking seal on toilet seat, checking rubber seal, closing windows, doors or vents in room, turning off exhaust fan in
rooms if applicable, checking toilet and pit for cracks.
General
1. The pit must be constructed to prevent insects and rodents from entering.
• All vents are screened and covered in wire to prevent insects and rodents from entering.
• All gaps are weather sealed.
• The gap between the pit and the floor is bridged with a rubber seal to prevent entry and also to direct waste
and condensation onto pile rather than onto top of pit. The seal must be constructed of a material that is
black and that will not break down in contact with urea.
• The structure must be durable enough not to crack or corrode or in any other way expose compost to the
elements.
2.
External drainage must be maintained to keep surface water away from the pit.
3.
The apron must be smooth and easily cleaned of spills after emptying the pits.
4.
Potential future additions include a light in pit to heat it during winter, insulating the pit, a fan in the flue for better
ventilation (widen flue around it to allow natural ventilation when it is off) and a flue and vents in the room to bring
more fresh air in.
Co pyrig ht - The O wner Bu ilde r ( #14 2 Augu st/ Septe mb er 200 7) a nd Ste ve Ho wa rd
ww w.the owne rbu ilde r.com.a u, 02 4 982 8 820 (Aus tral ia )