1
Ph: 770-554-1187
www.ProPackSolutions.com
Toll Free: 877-776-7225
USER MANUAL
066&//&
.D%POPVHI-BLF3PBE
$PMMJOTWJMMF*-
5FMFQIPOF
'BY
8FCTJUFXXXNTTDMMDDPN
Ph: 770-554-1187
www.ProPackSolutions.com
Toll Free: 877-776-7225
Contents
1.
Introduction .............................................................................................................................4
2.
Specifications ..........................................................................................................................5
3.
Keyboard Definition ................................................................................................................5
4.
Layout ......................................................................................................................................6
5.
Installation ...............................................................................................................................7
6.
External sensor connection ...................................................................................................11
7.
Feature menu .........................................................................................................................12
8.
First run of your Smart-Jet .....................................................................................................13
9.
Message .................................................................................................................................13
10. Operate ..................................................................................................................................14
10.1.
Install Ink Cartridge ...........................................................................................................14
10.2.
Stop printing .......................................................................................................................17
10.3.
Start printing .......................................................................................................................17
10.4.
Purge ..................................................................................................................................17
11. Settings ..................................................................................................................................17
11.1.
Speed ................................................................................................................................. 17
11.2.
Resolution...........................................................................................................................17
11.3.
Density ...............................................................................................................................18
11.4.
Printing Delay .....................................................................................................................18
11.5.
Counter...............................................................................................................................19
11.6.
Logo ...................................................................................................................................20
11.7.
Time ...................................................................................................................................20
11.8.
Date ....................................................................................................................................20
11.9.
Font ....................................................................................................................................21
11.10.
Print Side ............................................................................................................................21
11.11.
Sensor ................................................................................................................................22
11.12.
Wi-Fi ...................................................................................................................................22
11.13.
Random Jetting ..................................................................................................................22
11.14.
Direction .............................................................................................................................23
11.15.
Name ..................................................................................................................................23
11.16.
Print Mode ..........................................................................................................................23
11.17.
Shift Code ...........................................................................................................................24
11.18.
Rollover hour ......................................................................................................................24
11.19.
Printer Information ..............................................................................................................24
11.19.1. Product Count.....................................................................................................................25
Ph: 770-554-1187
www.ProPackSolutions.com
Toll Free: 877-776-7225
11.19.2. Ink Level .............................................................................................................................25
11.20.
Default ................................................................................................................................25
12. Update firmware .....................................................................................................................26
13. Important handling cautions ..................................................................................................27
14. Product Warranty ...................................................................................................................27
15. Ink Cartridges Maintenance ..................................................................................................28
15.1.
Printhead cleaning: .............................................................................................................28
15.2.
Storage procedure: .............................................................................................................30
"QQFOEJY
"DDFTTPSJFT1BSUT
Ph: 770-554-1187
www.ProPackSolutions.com
Toll Free: 877-776-7225
1. Introduction
Smart-Jet Industrial Inkjet Printer is %&
'' ' (&'' by MSSC, LLC. This compact and
lightweight printer is designed for ease of operation in the packaging industry with multiple
features:
WIFI connection via smartphones and tablets using Android and iOS operati) systems
USB keyboard direct connection without PC
SD card slot built in for easy upgrading of firmware and fonts
Built in photo-sensor
AUX I/O port for external encoder and photo-sensor connections
Nozzle switching and self-cleaning capabilities to extend the lifetime of the printhead
Auto system back-up and reset to secure data
Plug and print with HP45 printhead technology licensed by Hewlett Packard
Adjustable optical density (up to 5 levels)
Accept different ink types: water based and solvent based inks
*
/PUF4NBSU+FUDBOCFDPOUSPMMFEPWFS8J'JVTJOH"QQMFPS"OESPJEEFWJDFT5PEPXOMPBE.44$--$
"QQPOUIF"QQMF"QQTUPSFTFBSDIGPSLFZXPSET.44$PS4NBSU+FU'PSUIF"QQMFEFWJDFUIFVTFSOBNF
UPMPHJOUPUIFBQQJT"ENJOJTUSBUPSBOEUIFQBTTXPSEJTNTTD!TNBSUKFU'PS"OESPJEEFWJDFTUIF
VTFSOBNFUPMPHJOUPUIFBQQJT"ENJOJTUSBUPSBOEUIFQBTTXPSEJTNTTD!TNBSUKFU
4
!!!"#$$"$#
Ph: 770-554-1187
www.ProPackSolutions.com
Toll Free: 877-776-7225
2. Specifications
No. Description
Functions
1
Model
Smart-Jet
2
Printhead
Drop-On-Demand Thermal Inkjet: TIJ2.5
3
Printing Technology
Drop-On-Demand Thermal Inkjet
300 dpi @ 75 m/min
4
150 dpi @ 150 m/min
Resolution & Print Speed
100 dpi @ 230 m/min
5
Ink Type
Water-based and solvent-based inks
6
Dimension (L x W x H)
7
Operation Condition
05 - 400C (41 – 1040F)
8
Humidity
20 – 80%
9
Net Weight
530 g or 1.16 lbs (excluding printhead cartridge)
10
Power supply
AC: 100V - 240V, 50/60Hz, 1.6A
11
Maximum power consumption
30 watts
106 mm x 53 mm x 83 mm
(4.17 inch x 2.09 inch x 3.27 inch)
3. Keyboard Definition
No.
Key
Meaning
1
Enter
Confirm/ save
2
ESC
Turn back to previous menu
3
Left, Right
Move the menu forward or backward
4
Up, Down
Change value
5
Shift
Upper case
6
Ctrl
7
Backspace
Delete character in message
8
Backspace
Reset Ink level
Insert: Date, Time, Counter, Shift Code, Expiration date,
Advanced menu
!!!"#$$"$#
5
Ph: 770-554-1187
www.ProPackSolutions.com
Toll Free: 877-776-7225
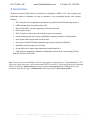
4. Layout
Skid plate
!!!"#$$"$#
6
Ph: 770-554-1187
www.ProPackSolutions.com
Toll Free: 877-776-7225
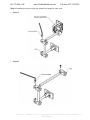
5. Installation
Insta
on
Step 1: The skid plate guide
!!!"#$$"$#
7
Ph: 770-554-1187
www.ProPackSolutions.com
Toll Free: 877-776-7225
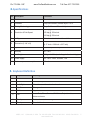
Step 2: Installing the clamps to the side of the conveyor
Step 3: Installing the clamps to the round bar
!!!"#$$"$#
8
Ph: 770-554-1187
www.ProPackSolutions.com
Toll Free: 877-776-7225
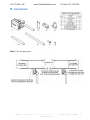
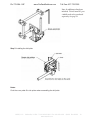
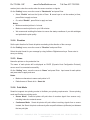
Step 4: Installing the printer, select the suitable bar length for each case
Case A
Case B
9
!!!"#$$"$#
Ph: 770-554-1187
www.ProPackSolutions.com
Toll Free: 877-776-7225
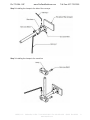
/PUF*OBEEJUJPOUPIBSEXBSF
JODMVEFE1SJOU%PXO,JUQBSU
OFFETUPCFQVSDIBTFE
TFQBSBUFMZ4FFQBHF
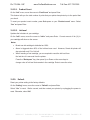
Step 5: Installing the skid plate
Notes:
Push the cover plate fit to the printer when assembling the skid plate
10
!!!"#$$"$#
Ph: 770-554-1187
www.ProPackSolutions.com
Toll Free: 877-776-7225
6. External sensor connection
Support NPN type only
Use onboard 12 VDC on pin 1, or 5 VDC on pin 2
Any external power supply is compatible, just need to ground together.
Example: 24 VDC
4321
Using onboard 12VDC (for 5VDC use pin 2 instead of pin 1)
Using external power supply
11
!!!"#$$"$#
Ph: 770-554-1187
www.ProPackSolutions.com
Toll Free: 877-776-7225
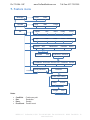
7. Feature menu
Message
Operate
Set
Line1
Line2
Stop
Start
Speed
Logo
Sensor
Purge
Res
Dens
Delay
Count
Time
Date
Font
PrintSide
WiFi
Connect
RandomJet
Info
Direction
Name
ProdCount InkLevel
PrintMode ShiftCode Rollover Info Password Default
Press Ctrl
Enter password:
“advance”
Wave form setting
Water
Voltage
Solvent
Time
Notes:
ContPrint:
Res:
Dens:
ProdCount:
Continuous print
Resolution
Density
Product count
12
!!!"#$$"$#
Ph: 770-554-1187
www.ProPackSolutions.com
Toll Free: 877-776-7225
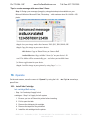
8. First run of your Smart-Jet
A password will be required to start your Smart-Jet printer for the first time. =>?G
%!&'
.
%!
Upon entering the password provided by your supplier, press Enter to log in. Now you can
change this password to your personal password with the following steps:
From the main screen, select “Setting” and press Enter
From the Setting screen, select “Password” by using the Left §or Right ¨ arrow keys,
press Enter
Enter your old password (Q, press Enter
Enter your new password, press Enter
Retype your new password, press Enter
Y)>%!&'
$#%G"Z&G$[\?&%&
G&$&'?$[!
GY\?&!
%!&'"
Notes:
The maximum password length is 15 characters
Disable your printer’s security feature by setting new password with no characters
n case you forget yourpersonal passwordGYG&%!&'G&G
"
9. Message
Create message
From the main screen, select “Message” and press Enter
Select Line1 or Line2 by using the Left §or Right ¨ arrow key, press Enter
Input your message, press Enter to save
Use Backspace key to delete the message
To insert Date, Time, Shift Code, Counter, and Expiration Date, press Ctrl and use the Up
© or Down ª arrow key to select your desired insert item. Press Enter to select.
You are required to set up Date, Time, Counter and Expiration Date before running
other operations on this printer. See Section “Setting”
Notes:
The Smart-Jet printer can print 2 lines for small fonts and 1 line (as Line 1) for big fonts.
Each message contains up to 0 characters/ line for small fonts and up to 6
characters/line for big fonts^Q, depending on the '
G\'&?G
>%&
G&"
13
!!!"#$$"$#
Ph: 770-554-1187
www.ProPackSolutions.com
Toll Free: 877-776-7225
Tips to create message with more than 2 lines:
=
)\?&#)^
#)Q(\?
)%YGY%G
(\?&
$&>G_
'!
$&>GZ
GZYGY%"""!
GY#
#?#
`_{|
%
"
4UFQ4BWFZPVSJNBHFVOEFSUIFTFGPSNBUT1/(+1(+1&(#.1(*'
4UFQ$PQZUIJTJNBHFUPZPVSTNBSUEFWJDFT
J04EFWJDFT$PQZUP1IPUP-JCSBSZPS$BNFSB3PMM
"OESPJEEFWJDFT$PQZUPGPMEFS4NBSU+FUPOZPVSEFWJDFhT4%
OFSB
DBSE5IJTGPMEFSXJMMCFBVUPNBUJDBMMZHFOFSBUFEXIFOZPVJOTUBMMFE4NBSU
+FU1SJOUFSBQQMJDBUJPOGPSZPVSEFWJDF
GVODUJPO
O
4UFQ4FOEUIJTJNBHFUPZPVSQSJOUFSCZVTJOH-PHPGVODUJPO
10. Operate
On the main screen, move the cursor to “Operate” by using the Left §or Right ¨ arrow keys,
press Enter.
10.1. Install Inks Cartridge
Ink cartridge/Bulk set up:
- Step 1 to 5 and step 8 apply for ink
cartridges - Step 1 to 8 apply for bulk system
1. Be sure you turn off Smart-Jet printer before inserting.
2. ull to open the latch
3. Remove the old/empty ink cartridge
4. Remove the tape from the printhead.
5. Install the ink cartridge into the printer.
14
!!!"#$$"$#
Ph: 770-554-1187
www.ProPackSolutions.com
Toll Free: 877-776-7225
To have crisp, sharp printed message, it is important to set the nozzle-to-paper distance
properly. Too high nozzle-to-substrate spacing will degrade print quality (fuzzy text),
because the ink droplet is less likely to hit the targeted position of the printed substrates.
MSSC, LLC recommends a nozzle-to- substrate spacing of 1.0mm to 1.5mm as using the
water-based inks.
6. Place the ink reservoir on the ink tray. The ink tray must be located 4 inches below the
printhead.
7. Insert valve into the plastic clip on the printhead.
8. Listen for a click indicating the valve has snapped into place.
The system after set up:
!!!"#$$"$#
15
Ph: 770-554-1187
www.ProPackSolutions.com
Toll Free: 877-776-7225
Important note
x It is best to place the print cartridge in the printer and locate the ink reservoir in the
appropriate tray before connecting the valve.
x Once the print head is connected to the reservoir it cannot be taken apart without
damaging the system.
Printhead removal
The ink cartridge/bulk without ink
1. Be sure you turn off Smart-Jet printer before inserting.
2. ull to open the latch.
3. Grasp both sides of the print head to remove it from the printer stall. Do not pull on the
tube or clip
Important note: if there is ink in the ink cartridge/bulk:
1. Do not raise printhead more than 10 inches above the ink reservoir or the air will be
drawn into it, damage then will result to the print head.
2. Do not position the printhead below the ink reservoir to avoid ink leakage.
16
!!!"#$$"$#
Ph: 770-554-1187
www.ProPackSolutions.com
Toll Free: 877-776-7225
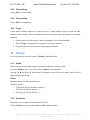
10.2. Stop printing
Select “Stop” to stop printing
10.3. Start printing
Select “Start” to start printing
10.4. Purge
If your printer remains inactive for a period of time, it might require a purge to clear out dust
particles on the nozzles. This is required when there are missing dots in the print on the printed
products.
Place a piece of lint free wipe (or absorbent paper) in front of the printhead
Select “Purge” and press Enter to push ink out from the nozzles
Every time the Enter is pressed, a single purge is activated
11. Settings
On the main menu, move the cursor to “Setting” and press Enter
11.1. Speed
Speed is a way to set printing speed to synchronize with the conveyor speed
From the “Setting” menu, move the cursor to “Speed” and press Enter
Use the Up © and Down ª arrow keys to change the value of the print speed, press Enter to
apply and save the setting
Notes:
Minimum speed: 5 m/min (meter/minute)
Maximum speed:
75 m/min at 300 dpi resolution, density = 1
150 m/min at 150 dpi, density = 1
230 m/min at 100 dpi, density = 1
11.2. Resolution
Resolution is the number of dots per inch (Unit: DPI)
On the “Setting” menu, move the cursor to “Res” and press Enter
17
!!!"#$$"$#
Ph: 770-554-1187
www.ProPackSolutions.com
Toll Free: 877-776-7225
Use the Up © or Down ª arrow keys to change value of resolution, press Enter to apply and
save the setting
Setting higher value for resolution results in higher print DPI
Notes:
The maximum printing speed is affected by the resolution setting. The speed setting must be
adjusted accordingly to correspond the resolution setting.
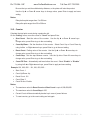
11.3. Density
Density level is set to change the optical density of the print. Higher density level may result in
bold font.
Smart-Jet supports 5 levels of density (from 1 to 5)
On the “Setting” menu, move the cursor to “Dens” and press Enter
Use the Up © or Down ª arrow keys to change value of density, press Enter to apply and save
the setting
Notes:
Every density has a maximum speed equivalent. If the maximum speed of your desired density is
lower than the actual speed, you reduce your density and reset your speed.
Table 1: Maximum speed, resolution, and density correlation
Density
1
2
3
4
5
100
230.9
119.0
80.2
60.4
48.5
150
153.9
79.3
53.4
40.3
32.3
300
76.9
39.6
26.7
20.1
16.1
Resolution
11.4. Printing Delay
Printing delay allows you to adjust the distance that the printhead delays after receiving the print
signal to position a message at a desired location on the product.
On the “Setting” menu, move the cursor to “Delay” and press Enter
Delay before print: he distance that your printer delays after receiving signal from
thesensor.
Use the Up © or Down ª arrow keys to change value, press Enter to go to the next
setting
Delay after print: fter finish printing each message, the printer will delay for a
distancebefore it allows the sensor to receive the next signal.
18
!!!"#$$"$#
Ph: 770-554-1187
www.ProPackSolutions.com
Toll Free: 877-776-7225
Be sure that you set the suitable delay distance, or the printer will miss the product
Use the Up © or Down ª arrow keys to change value, press Enter to apply and save
setting
Notes:
Delay before print ranges from 5 to 500 mm
Delay after print ranges from 50 to 500 mm
11.5. Counter
Calculate the total print counts during a production job
On the “Setting” menu, move the cursor to “Count” and press Enter
Start ount: tart the value of the counter. Use the Up © or Down ª arrow keys
to
change value, press Enter to go to the next setting
Count Up/Down: et the direction of the counter. Select Count Up or Count Down by
using Left §or Right ¨ arrow keys, press Enter to go to the next setting
Reset Count: nd
) value of the counter. Use the Up © or Down ª arrow keys to
changevalue, press Enter to go to the next setting
Count Step: Set the step between counts. Use the Up © or Down ª arrow keys to
change value, press Enter to go to the next setting
Count ill ero: utomatically add zero before the count. Select “Enable” or “Disable”
byusing Left § or Right ¨ arrow keys, press Enter to apply and save setting
Example: 001, 003, 005… 101, 001, 003, 005…
Start Count: 1
Count Up/Down: Up
Reset Count: 101
Count Step: 2
Count fill zero: Enable
Notes:
The maximum value for Reset Count and Start Count is up to 4,200,000,000
The maximum value for Count Step is 250
Current Count will be automatically backup in case of power failures
To reset counter, go to the count setting and set again
!!!"#$$"$#
19
Ph: 770-554-1187
www.ProPackSolutions.com
Toll Free: 877-776-7225
11.6. Logo
On the “Setting” menu, move the cursor to “Logo” and press Enter
Select position of logo on the message by using § or ¨ keys, press Enter to apply and save
setting
None: No logo in the message
Pref: Add logo at the begin of the message
Suff: Add logo at the end of the message
Notes:
Logos are formatted by Smart Jet v1.1 software available on your smartphone and tablet
(Android and iOS) and sent to SD card in the Smart-Jet printer
Maximum size of logo (W x H): 00 x 150 pixel
11.7. Time
Allow user to format, edit and display time.
On the “Setting” menu, move the cursor to “Time” and press Enter
Format: elect time format for the printer
Move the cursor to “Format” and press Enter
Use the Up © or Down ª keys to change value, press Enter to apply and save setting
Edit: dit Date & Time for the printer
Move the cursor to “Edit” and press Enter
Use Left §, Right ¨ ,Up © or Down ª arrow keys to edit Time and Date
Press Esc key to save and return to the “Time” menu
Show: iew Date & Time of the printer
Move the cursor to “Show” and press Enter to view
Press Esc key to return to the “Time” menu
11.8. Date
Allow user to format, edit, and display date.
On the “Setting” menu, move the cursor to “Date” and press Enter
Format: select date format for the printer.
Notes: These formats will be used for expiration date
!!!"#$$"$#
20
Ph: 770-554-1187
www.ProPackSolutions.com
Toll Free: 877-776-7225
Move the cursor to “Format” and press Enter
Date format: Select your desired date format by using Up © or Down ª arrow
keys, press Enter to go to the next setting.
Separator: Select your desired separator by using Up © or Down ª arrow keys.
Available separators include: Slash (/), Dash (-), Dot (.), !"and No separator
Expire: xpiration date
Move the cursor to “Expire” and press Enter
Expire value: Use the Up © or Down ª arrow keys to change value, press Enter to apply
and save setting
Notes:
Minimum value: 1 day
Maximum value: 3,650 days
11.9. Font
Allow user to select the font size.
On the “Setting” menu, move the cursor to “Font” and press Enter
Select your font size by using Left § or Right ¨ arrow keys, press Enter to
apply and save setting"
#
$
%&!''&(
"%()!'*"
+-./-
0
$1!("%()!%"-
$
233
!0"-
11.10. Print Side
Allows user to select the side of nozzles on the printhead to print: Odd or Even side.
Smart-Jet printer only prints on one side at a time.
On the “Setting” menu, move the cursor to “PrintSide” and press Enter
Select your print side by using Left § or Right ¨ arrow keys, press Enter to apply and save
setting
Notes:
Odd: Smart-Jet prints on the right-hand side of the printhead
Even: Smart-Jet prints on the left-hand side of the printhead
21
!!!"#$$"$#
Ph: 770-554-1187
www.ProPackSolutions.com
Toll Free: 877-776-7225
11.11. Sensor
Smart-Jet runs on two types of sensor:
Internal sensor (built-in sensor): photo sensor
External sensor: the external sensor is not included with the unit. Depending on the needs
of the production line, an external sensor may need to be installed that can detect the
product to trigger printing.
o
Smart-Jet printer only supports the NPN sensor.
On the “Setting” menu, move the cursor to “Sensor” and press Enter
Select your sensor by using Left § or Right ¨ keys, press Enter to apply and save setting
11.12. Wi-Fi
Smart-Jet printer communicates with smart devices, such as a smartphone or a tablet, via Wi-Fi
network to control the features.
On the “Setting” menu, move the cursor to “WiFi” and press Enter
Connect Smart-Jet to Wi-Fi network to operate it by the smartphone or tablet devices
Connect
Move the cursor to “Connect” and press Enter
Select “SSID” to input your Wi-Fi network name, then press Enter.
Select “Password” and press enter if your Wi-Fi network is password protected. Input
password and press enter. Otherwise, select “None”.
Smart-Jet will require your confirmation. Select “Yes” to immediately connect. Otherwise,
select “No” to automatically connect after restart the printer.
Notes:
If Smart-Jet cannot be connected within 30 seconds, you are required to connect again.
Smart-Jet works on WPA and WPA2 personal standard passwords only.
Info
Display the network name and IP address after Smart-Jet is connected successfully
Move the cursor to “Info” and press Enter
If Smart-Jet is connected successfully with your Wi-Fi network, it will show network name
and IP address. Otherwise, it shows “Not connect!”
11.13. Random Jetting
Random jet prevents the printhead from getting clogged due to the extended down time between
printings. By enabling this feature and setting random jet time, Smart-Jet will automatically fire
22
!!!"#$$"$#
Ph: 770-554-1187
www.ProPackSolutions.com
Toll Free: 877-776-7225
random jets to clear the nozzles when the sensor receives no signals.
On the “Setting” menu, move the cursor to “RandomJet” and press Enter
Select “Enable” and use the Up © or Down ª arrow keys to set the random jet time,
press Enter to apply and save
Or, select “Disable”, press Enter to apply and save
Notes:
Minimum random jet time is 1 minute
Maximum random jet time is up to 240 minutes
We recommend enabling this feature to ensure the startup readiness of your ink cartridges
and optimize the print quality.
11.14. Direction
Set the print direction for Smart-Jet printer correlating to the direction of the conveyor
On the “Setting” menu, move the cursor to “Direction” and press Enter
Select the print format for your message by using Left § or Right ¨ arrow keys. Press enter to
save your setting
11.15. Name
Name the printers on the production line.
The name of each printer will be displayed on DHCP (Dynamic Host Configuration Protocol)
server once it is connected successfully.
On the “Setting” menu, move the cursor to “Name” and press Enter. Input name for each printer
and press enter to apply and save
Notes:
Maximum characters to name each printer is 12
Default name of Smart-Jet is: Smart Jet
11.16. Print Mode
Smart-Jet supports two printing modes to facilitate your printing requirements: Sensor printing
mode and Continuous printing mode.
Sensor Mode: Smart-Jet printer will print when it receives signal from sensors only,
including internal or external sensor.
Continuous Mode: Smart-Jet printer will print without receiving signals from a sensor.
Instead, the Smart-Jet prints continuously after a specific !" between
the two print jobs
23
!!!"#$$"$#
Ph: 770-554-1187
www.ProPackSolutions.com
Toll Free: 877-776-7225
On the “Setting” menu, move the cursor to “PrintMode” and press Enter
Select “Sensor” by using Left § or Right ¨ arrow keys, press enter to apply the Sensor
Mode
Or, select “Continue” by using Left § or Right ¨ keys, press enter.
Change delay by using Up © or Down ª arrow keys, press Enter to apply
theContinuous Mode and save setting
Notes:
Minimum *'
Maximum (''
11.17. Shift Code
This feature is used to mark your products if you wish to name them by shifts.
You can set up to 5 shift codes within 1 day (from 00:00 to 23:59). One code can be input with
any character available on the keyboard. There will be a specific start time for each shift code.
On the “Setting” menu, move the cursor to “Shift” and press Enter.
Setting your shift code 1: move the cursor to “Code”, and then input code 1 with your
desired character (default set as alphabetical order). Move the cursor to “Time”, then use
Up © or Down ª arrow keys to change values of time. Press Enter to go to the next shift
code.
Follow the same steps as you do for shift code 1 to create other codes.
11.18. Rollover hour
Allows you to print different date depending on your production shift schedule
Example: Now, your printing date is 20/08/2012. Set Time to rollover at 22:00. This means that
when the system time reaches 22:00 on 20/08/2012, your printing date will be change to
21/08/2012. When system time reaches 00:00 on 21/08/2012 your printing date is still 21/08/2012.
From the “Setting” screen, move the cursor to “Rollover” and press Enter.
Press “Enable” to activate the Rollover hour feature.
Change value of the rollover time by using Up © or Down ª arrow keys. Press enter to
save your setting.
11.19. Printer Information
From the “Setting” screen, move the cursor to “Info” and press Enter.
24
!!!"#$$"$#
Ph: 770-554-1187
www.ProPackSolutions.com
Toll Free: 877-776-7225
11.19.1. Product Count
On the “Info” menu, move the cursor to “ProdCount” and press Enter.
This feature tells you the total number of prints that your printer has printed up to the period that
you check.
To reset your product count number, press Backspace on your “Product count” menu. Select
“Yes” and press Enter.
11.19.2. Ink Level
Updates the ink status in your cartridge
On the “Info” menu, move the cursor to “InkLv” and press Enter. Current amount of ink (%) in
your cartridge will show on the screen.
Notes:
Brand new ink cartridge is defaulted as 100%.
Alarm is triggered when 95% of the ink has been used. However, Smart-Jet printer will
also print with only 5% of ink left.
When inserting new cartridge, you are required to reset the ink level
Press the “Backspace” key506
67
11.20. Default
Reset your printer setting to the factory defaults
On the “Setting” menu, move the cursor to “Default” and press Enter
Select “Yes” to reset. Wait a second, and then restart your printer by unplugging the power to
reset. Otherwise, select “No”
25
!!!"#$$"$#
Ph: 770-554-1187
www.ProPackSolutions.com
Toll Free: 877-776-7225
12. Update firmware
Step 1: From your PC, remove all data on your SD Card, or format it to FAT32 format.!.2-
8"
Step 2: Copy all data from “SmartJetFirmwareV1.4.1.8” to your SD Card (7KLVFDQEHIRXQGDW
ZZZPVVFOOFFRP)
26
!!!"#$$"$#
Ph: 770-554-1187
www.ProPackSolutions.com
Toll Free: 877-776-7225
Step 3:
Unplug the power supply
Insert the SD Card into your Smart-Jet printer
Cover the sensor with your finger, then plugin the power supply
After Loading…completed, Smart-Jet will automatically go to the main menu if a password
protection was not set. Otherwise please input your password.
Update firmware succe.
13. Important handling cautions
Always disconnect the power before inserting and removing an ink cartridge.
Never drop, shake or hit the printhead to avoid damage the printhead.
Never contact the sensor with hard objects. This may damage the printer and will VOID
the warranty
For ink cartridges: lways wipe the nozzles with the lint free cloth moistenedby
de-ionized water. Paper towels are not recommended since they may cause the print
quality to suffer.
For ink cartridges: ently place the lint free cloth against the printhead
nozzles,allow the ink to soak through the wet lint free cloth, and wipe by slowly move the
lint freecloth from the surface of the nozzles in one of the lengthwise position.
Never disassemble Smart-Jet. This will automatically VOID the warranty
14. Product Warranty
The Product Warranty for Smart-Jet is effective for 12 months from delivery date. Brackets,
keyboard, power supply, and anti-shock mechanism are excluded from the warranty.
Please retain these warranties, along with the shipping documents, for future reference.
27
!!!"#$$"$#
Ph: 770-554-1187
www.ProPackSolutions.com
Toll Free: 877-776-7225
The warranty is VOID if:
1. The use of any non-original parts and unapproved OEM inks.
2. The product has been altered modified, or ed without approval of MSSC, LLC
3. The damage of the printhead arises from improper installation.
4. The damage occurs from accident, dropping objects, spaying Smart-Jet with water or
otherliquids. Others result from weather conditions while stocking and trucking.
5. The use of unapproved, wrong or unstable power supply.
15. Ink Cartridges Maintenance
15.1. Printhead cleaning:
As Smart-Jet printer is working, if the print quality is degraded, please check on the ink level in the
cartridge:
If the cartridge is out of ink, change the new cartridge.
If the cartridge isn’t out of ink, the degraded print quality may be caused by the ink-spray,
dust, and paper fiber being collected and built up on the surface of the nozzles plate. To
maintain the print quality of the cartridge do the wiping and purging tips.
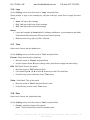
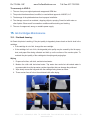
Wiping
1. Prepare a lint-free, soft cloth, and de-ionized water.
2. Moisten the cloth with de-ionized water. Tap water also works but de-ionized water is
recommended since the tap water contains impurities that can damage the printhead.
3. Wipe slowly across the long-axis with the cartridge facing down as shown.
4. There are two lines of ink on the moistened cloth after wiping.
!!!"#$$"$#
28
Ph: 770-554-1187
www.ProPackSolutions.com
Toll Free: 877-776-7225
Important notes:
Do not apply excessive force or use a dry or abrasive cloth to avoid scratching the orifice plate.
Do not use a cloth with lint and the water that contains high percentage of suspended
particles to avoid clogging the nozzles.
Do not shake the cartridge as ink pressure will damage the nozzles.
Purging
1. If the cartridge sits inactive and uncapped for a period of time, the ink may dry and form a
viscous plug at the nozzles. The dried ink plug can cause misdirected drops and
eventually block the nozzles. The white streaks will be visible in the printed text or graphic.
To fix this problem, purge the ink plug out of the nozzles. Printing alone may to remove ink plugs from the nozzles. See the description above about how to
run the Purge function in the printer (10.4).
2. Then wipe the cartridge with a moist cloth to remove the excess ink on the surface of
nozzle plate.
3. After that print a few lines of text or graphics at high resolution to exercise more nozzles
and push more ink out.
4. Finally, check the printed image. If the print quality can’t be recovered, repeat this
procedure several times. If it doesn’t work, change the print cartridge.
!!!"#$$"$#
29
Ph: 770-554-1187
www.ProPackSolutions.com
Toll Free: 877-776-7225
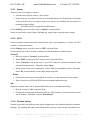
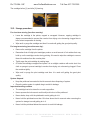
The cartridge before [1] and after [2] cleaning:
15.2. Storage procedure:
For short term storing (less than one day):
Leave the cartridge in the printer, capped or uncapped. However, capping cartridge is
always recommended to prevent the nozzles from drying out or becoming clogged due to
ink’s solvent evaporation or dusting.
Wipe and/ or purge the cartridge next time it is used until getting the good print quality.
For long term storing (more than one day):
Remove the cartridge from the printer
Remember that all inkjet print cartridges produce a small amount of ink residue that may
build up on the cartridge nozzles during printing. We need to wipe the cartridge to remove
these ink residues from the nozzles plate.
Tightly cape the print cartridge by sealing tape.
Or leave the cartridge uncapped and place it in an airtight container with moist dust- free
cloth or sponge to prevent cartridge’s nozzles from drying out or becoming clogged. Close
the container tightly.
Wipe and/ or purge the print cartridge next time it is used until getting the good print
quality.
System disposal
Keep the printhead connected to the ink reservoir when disposing of system.
Place the entire system in a plastic bag to avoid ink leakage.
Important handling cautions
The cartridge has to be stored in a nozzle-up position.
Never squeeze the ink reservoir as this will push ink out of the printhead.
Never shake, drop or hit the printhead to avoid getting air in it.
Never hold the printhead more than 10 inches above the ink reservoir when removing the
system for storage to avoid getting air in it.
Never hold the printhead below the reservoir to avoid ink leakage.
30
!!!"#$$"$#
Ph:
"QQFOEJY
770-554-1187
www.ProPackSolutions.com
Toll Free: 877-776-7225
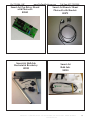
"DDFTTPSJFT1BSUTBOE*OLT
Smart-Jet
Print Down Kit:
80805
Smart-Jet
Power Supply:
80810
$SPTT#MPDL
NN#BS
Smart-Jet
Skid PlaVG:
80815
Smart-Jet
Latch & Pin:
80820
.44$--$$PMMJOTWJMMF*-64"5FM'BY3FW
XXXNTTDMMDDPN
Ph: 770-554-1187
www.ProPackSolutions.com
Smart-Jet Conveyer
MountBracketry Kit:
80825
Toll Free: 877-776-7225
5OCTV,GV5RTKPI.QCFKPI
Mounting Assembly:
80830
$SPTT#MPDLT
#BTF$MBNQ
NN#BST
NN#BS
Smart-Jet
Front Cover:
80835
6PDUW-HW
'LVSOD\DQG%RDUG
.44$--$$PMMJOTWJMMF*-64"5FM'BY3FW
XXXNTTDMMDDPN
Ph: 770-554-1187
www.ProPackSolutions.com
6PDUW-HW3HQ'ULYHU%RDUG
ZLWK3KRWRFHOO
6PDUW-HW%XON,QN
5HVWUDLQW%UDFNHWU\
Toll Free: 877-776-7225
6PDUW-HW
%XON,QN
.44$--$$PMMJOTWJMMF*-64"5FM'BY3FW
XXXNTTDMMDDPN
Ph: 770-554-1187
www.ProPackSolutions.com
2
Toll Free: 877-776-7225
Ink Cartridges
80300
80350
80400
Ink Cartridge (42cc) WB Black
Bulk Ink (370cc) WB Black
Ink Cartridge (42cc) Solvent Standard Black
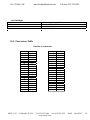
$POWFSTJPO5BCMF
Feet/min. to meters/min
fV/min
m/min
fV/min
m/min
5
10
15
20
25
30
35
40
45
50
55
60
65
70
75
80
85
90
95
100
1.5
3.0
4.6
6.1
7.6
9.1
10.7
12.2
13.7
15.2
16.8
18.3
19.8
21.3
22.9
24.4
25.9
27.4
29.0
30.5
105
110
115
120
125
130
135
140
145
150
155
160
165
170
175
180
185
190
195
200
32.0
33.5
35.1
36.6
38.1
39.6
41.1
42.7
44.2
45.7
47.2
48.8
50.3
51.8
53.3
54.9
56.4
57.9
59.4
61.0
MSSC, LLC Collinsville, IL USA
Tel: 618-343-1006 Fax: 618-343-1016
www.msscllc.com
80100
Rev 02813
34