1
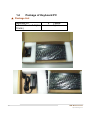
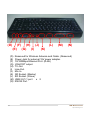
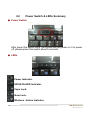
Keyboard PC
User Manual
Version 1.0
Jun. 2010
1
DMP Electronics Inc.
http://www.toypc.tw
Copyright
The information in this manual is subject to change without notice for
continuous improvement in the product. All rights are reserved. The
manufacturer assumes no responsibility for any inaccuracies that may
contain in this document, and makes no commitment to update or to
keep current information contain in this manual.
No part of this manual may be reproduced, copied, translated or
transmitted, in whole or in part, in any form or by any means without the
prior written permission of the DMP Electronics Inc.
©Copyright 2010 DMP Electronics Inc.
Manual No.: IUMeKPC-01 Ver.1.0
1st Issued Date: Jun, 17, 2010
Trademarks Acknowledgment
The Keyboard PC is the registered trademarks of DMP Electronics Inc.
Microsoft®, Windows® and AMI are registered trademarks of Microsoft
Corporation and American Megatrends Inc. in the United States and/or
other countries respectively.
Other brand names, product names or trade names appearing in this
document are the properties and registered trademarks of their
respective owners. All names mentioned herewith are served for
identification purpose only.
2
DMP Electronics Inc.
http://www.toypc.tw
Table
of
Contents
Chapter 1
Introduction....…………………….………………………..4
1.1 Specifications....…………………….…………...…..4
1.2 Safety Precaution...……………………..………......5
1.3 Notes for Keyboard PC…………………...................6
1.4 Package and options of Keyboard PC...................7
Chapter 2
Structure……………………………………….……………8
2.1 Keyboard PC Outline…………………………..…….8
2.2 Power Switch & LEDs Summary………….……….10
Chapter 3
Installation...……………………….………….….…….……11
3.1 Storage Setup………………………………………....11
3.1.1 Install SD Card………….….........…………….…....11
3.1.2 Install SATA Hard Disk and settings.……….……12
3.2 Install Windows XP…………………….……….……19
3.2.1 BIOS settings for Windows XP………….….…...19
3.2.2 Install by a USB DVD/CD ROM….……….….….20
3.2.3 Drivers download and install………………….…21
3.2.4 Optimizing Windows XP………………………...22
3.3 Switch display to TV or CRT…….……....................28
3.3.1 Switch display to TV or CRT in the BIOS settings
before installing Windows XP………………………29
3.3.2 Switch display to TV or CRT in Windows XP........31
3.3.3 Set TV resolution to 640x480 in Windows XP.......32
3.4 Boot From LAN....................………………..……….…..35
Chapter 4
Warranty………………………………………………………36
3
DMP Electronics Inc.
http://www.toypc.tw
Chapter
1
Introduction
1.1
Specifications
Processor & Chipset VortexMX+ x86 SoC, 1.0GHz
1GB DDR2
Memory
Storage
Display
Network
Audio
Wireless Network
Output Connectors
FAN
Power Input
Weight
Operating System
4
Onboard SATA connector x 1, (2.5” Bay, Internal)
SD Socket x 2
VGA & TV-Out (For KPC-T version)
VGA-Out (For KPC-C version)
10/100 Mbps Fast Ethernet
HD Audio-Realtek ALC262 CODEC With Stereo Speaker
Connector for USB WiFi (Internal; Optional for USB Dongle
802.11 b/g/n)
D-sub 15-pin for VGA
D-sub 9-pin for RS-232
RCA TV-Out (For KPC-T version)
RJ45 LAN
USB 2.0 x 2
Audio Jack, Line-out x 1, Mic-in x 1
SD Socket x 2 (Bootable only, but no Hot-Swappable
support)
Fanless Designed
DC input 15V, External Power Adapter
0.9 Kg
Support Windows XP / Linux
(Option-1: Windows XP Home Edition)
(Option-2: Ubuntu 9.04)
DMP Electronics Inc.
http://www.toypc.tw
1.2
Safety Precaution
Do not use 16Vdc or over of external AC/DC power adapter.
Do not expose Keyboard PC to rain or moisture.
Do not open the cabinet to avoid electrical shock when system is
power-on.
Do not expose dirty or dusty environment.
Do not operate during a gas leak.
Do not drop or place any object upon the top side of Keyboard PC.
Keyboard PC of the ambient temperature should be 5℃(41℉) to
35℃(95℉)
5
DMP Electronics Inc.
http://www.toypc.tw
1.3
Notes of Keyboard PC
◆ CE & FCC Class A Note
This equipment has been tested and found to comply with the limits for a
Class-A digital device, pursuant to Part 15 of the FCC Rules and CE Rules.
These limits are designed to provide reasonable protection against harmful
interference when the equipment is operated in a commercial environment.
This equipment generates, uses and can radiate radio frequency energy and, if
not installed and used in accordance with the instruction manual, may cause
harmful interference in which case the user will be required to correct the
interference at his own expense. Testing was done with shielded cables.
Therefore, in order to comply with the CE and FCC regulations, you must use
shielded cables with your installation.
◆ Operating System
Customer can order Keyboard PC with operating system of Windows
XP Home Edition or Ubuntu 9.04 as optional directly, but users must
be backup the original operating system by themselves. We
recommend customers use GHOST.EXE for Windows XP Home
Edition and R-Drive Utility for Ubuntu 9.04 to backup original
operating system with all necessary drivers installed as a GHO or
ACR file.
If users forget to backup the original operating system with all
necessary drivers installed, please contact the nearest dealers to
restore your system which may be charged the installation fee.
6
DMP Electronics Inc.
http://www.toypc.tw
1.4
Package of Keyboard PC
▲ Package List
Keyboard PC
External Power Adapter
(15Vdc)
7
x
x
1 piece
1 piece
DMP Electronics Inc.
http://www.toypc.tw
Chapter
2
Structure
2.1
Keyboard PC Outline
(A)
(C)
(B)
(A) Power Push Button
(B) Keyboard
(C) LEDs. (Please refer the page-10 for more detail information.)
8
DMP Electronics Inc.
http://www.toypc.tw
(D)
(F)
(E)
(D)
(E)
(F)
(G)
(H)
(I)
(J)
(K)
(L)
(M)
(N)
9
(H)
(J)
(G) (I)
(K)
(L)
(M)
(N)
Reserved for Wireless Antenna and Cable. (Reserved)
Power Jack for external 15V power adapter.
10/100Mbps Ethernet Port. (RJ45)
VGA/CRT output.
TV-Out.
Line-Out.
Mic-In.
SD Socket. (Master)
SD Socket. (Slave)
USB 2.0/1.1 port
x 2
RS232 Port.
DMP Electronics Inc.
http://www.toypc.tw
2.2
Power Switch & LEDs Summary
◆ Power Switch
After press this switch once, the system will be power on. For power
off, please press this switch about 6 seconds.
◆ LEDs
Power Indicator.
SD/SATA-HDD Indicator.
Caps Lock.
Num Lock.
Wireless –Active Indicator.
10
DMP Electronics Inc.
http://www.toypc.tw
Chapter
3
Installation
3.1
Storage Setup
▲ 3.1.1 Install SD Card
Please plug SD Card(s) upon Keyboard PC before power on.
Note:
(1) Keyboard PC only supports SD Card booting, but no hot swappable
support.
(2) Support SDHC-32GB or less.
11
DMP Electronics Inc.
http://www.toypc.tw
▲ 3.1.2 Install SATA Hard Disk and settings
12
(1)
Removing six screws on the back side.
(2)
Removing the iron shell.
DMP Electronics Inc.
http://www.toypc.tw
13
(3)
Taking the plastic shell out.
(4)
Pulling up jack panel to remove cable from daughter board.
DMP Electronics Inc.
http://www.toypc.tw
14
(5)
Removing 2 screws from daughter board.
(6)
Taking the silver board out from six points of daughter
board.
DMP Electronics Inc.
http://www.toypc.tw
(7)
15
Connecting SATA HD to Keyboard PC.
DMP Electronics Inc.
http://www.toypc.tw
(8)
16
Put silver board back and connect the six points with
daughter board and also put cable and screws back.
DMP Electronics Inc.
http://www.toypc.tw
(9)
Connecting plastic shell back with chassis. It must press
with “click”.
(10) Tightening six screws to complete the installation.
17
DMP Electronics Inc.
http://www.toypc.tw
(11) Power on and do the BIOS settings.
(i) Please press Power Switch to power on and then press “Del”
into the BIOS settings.
(ii)
Choose the selection of “Advanced” and “IDE Configuration”,
and set “Primary IDE Pin Select” to “Parellel IDE”.
(iii) Press “F10” to save the BIOS settings.
18
DMP Electronics Inc.
http://www.toypc.tw
3.2
Install Windows XP
▲ 3.2.1 BIOS settings for Windows XP
Please make sure three selections to be correct setting.
(1) At “IDE Configuration”, set “OnBoard IDE Operate Mode” to
“Native Mode”
(2)
19
At “USB Configuration”, set “USB 2.0 Controller Mode” to
“FullSpeed”.
DMP Electronics Inc.
http://www.toypc.tw
(3)
At “PCIPnP”, set “PCI IDE BusMaster” to “Enabled”.
(4)
Press “F10” to save the BIOS settings.
▲ 3.2.2 Install by a USB DVD/CD ROM
20
(1)
(2)
(3)
(4)
Put the Windows XP CD Disk into the USB DVD/CD ROM.
Plug in a USB DVD/CD ROM.
Power on Keyboard PC.
Press “F11” to choose USB DVD/CD ROM as a first boot
device.
(5)
Follow the steps to install Windows XP.
DMP Electronics Inc.
http://www.toypc.tw
▲ 3.2.3 Drivers download and install
(1)
(2)
(3)
(4)
(5)
(6)
(7)
Please download all drivers for Windows XP by
http://www.toypc.tw/files/Keyboard_PC_XP_Drivers.zip
Unzip and copy all drivers to a USB Mass Storage.
After system running Windows XP, please plug in that USB
Mass Storage.
For HD Audio function, please get into the folder of
“Audio-5895_PG280_UAAV10a-5013” and then run
“Setup.exe” to install the driver. You may need to reboot
after finish installing.
For Wireless function, please get into the folder of
“USB_WLAN_RTL8188” and then run “Setup.exe” to install
the driver.
For VGA function, please get into the folder of “TV-&VGA”
and then run “Setup.exe” to install the driver. After done,
please reboot the system.
For Ethernet function, please go to “Control Panel” =>
“System” => “Hardware” => “Device Manager” => Choose
unknown device => Click the right key of touchpad or mouse
=> Choose “Update Driver…” => “Yes, this time only” =>
“Install from a list or specific location (Advanced)” => Tick
“Include this location in the search” => click “Browse” and
choose the driver location => “Next” => “Finish”.
For Linux, please download the driver by
http://www.toypc.tw/files/KPC_drivers_linux.zip.
21
DMP Electronics Inc.
http://www.toypc.tw
▲ 3.2.4 Optimizing Windows XP
◆ Settings in Windows XP
● Adjust for best performance
(1) Go to “Control Panel” -> “System” -> “Advanced” -> Performance
-> Setting.
(2) Please change to "Adjust for best performance" and then "Apply"
and "OK".
22
DMP Electronics Inc.
http://www.toypc.tw
● Sounds and Audio Device Settings
(1) Go to “Control Panel” -> “Sounds and Audio Device” -> “Sounds”
-> “Sound Scheme”.
(2) Please change to "No Sound" and then "Apply" and "OK".
● Mouse Settings
(1) Go to “Control Panel” -> “Mouse” -> “Hardware” -> “Microsoft
PS/2 Mouse” -> “Properties” -> “Advanced Setting”.
(2) Please do NOT select the " Fast Initialization" and press "OK"
23
DMP Electronics Inc.
http://www.toypc.tw
● Administrative Tools and Services Settings
(1) Go to “Control Panel -> “Administrative Tools” -> “Services”
->Click "Themes" -> Press the right key of mouse -> “Properties”
-> Please "stop" the Service Status and "Disable" the Startup
type.
(2) Choose “Apply" and then "OK".
24
DMP Electronics Inc.
http://www.toypc.tw
(3) Click "Terminal Services" -> Press the right key of mouse ->
“Properties” -> Please "Disable" the Startup type.
(4) Choose “Apply" and then "OK".
25
DMP Electronics Inc.
http://www.toypc.tw
(5) Click "System Restore Service" -> Press the right key of mouse ->
“Properties” -> Please "stop" the Service Status and "Disable" the
Startup type.
(6) Choose “Apply" and then "OK".
26
DMP Electronics Inc.
http://www.toypc.tw
● Disk Cleanup
(1) Go to “My Computer” -> Local Drive (C:) -> Press the right key of
mouse -> “Properties” -> “Disk Cleanup” -> “OK”.
(2) Please be sure to clean up all the useless files and keep the
maximum free space on your Drive C:.
27
DMP Electronics Inc.
http://www.toypc.tw
3.3
Switch display to TV or CRT
The TV version of Keyboard PC includes TV-Out and CRT-Out
functions as below. The part number for order is “KPC-T”.
[If your Keyboard PC can’t switch TV or CRT in the BIOS settings
or Graphic utility of Windows XP, please make sure that you
order part number is “KPC-T”, or contact your sales direct
person. For “KPC-C” version, it supports CRT output only.]
28
DMP Electronics Inc.
http://www.toypc.tw
▲ 3.3.1 Switch display to TV or CRT in the BIOS settings
before installing Microsoft Windows XP.
(Please ignore and jump to instruction-2 if you just want to switch
display in Microsoft Windows XP. This step is just for user choosing
display output before installing Microsoft Windows XP.)
Users can choose either way to do it.
First way: Users can press key of keyboard to switch display after
power on system directly.
Press “C” key: System will display and output to “CRT” (VGA).
Press “N” key: System will display and output to “TV (NTSC)”.
Press “P” key: System will display and output to “TV (PAL)”.
29
DMP Electronics Inc.
http://www.toypc.tw
Second way: Users can go to BIOS settings as below.
(1)
Power on and press “Del” key into the BIOS settings.
(2)
Choose “Boot” and “Boot Settings Configuration” selections.
(3)
Set “TV” or “CRT” upon “Boot Display Device” selection.
(Please do not choose “VBIOS” or “Panel…” functions.)
(4)
30
Press “F10” to save the BIOS settings and exit.
DMP Electronics Inc.
http://www.toypc.tw
▲ 3.3.2 Switch display to TV or CRT in Windows XP.
(1) Please download all drivers for Windows XP by
http://www.toypc.tw/files/Keyboard_PC_XP_Drivers.zip
(2) Unzip and install all drivers and then reboot the system.
(3) After system rebooting, you will watch an icon upon the
bottom of desktop. Please just click that icon by a USB
mouse.
(4) You can plug in a CRT (VGA) Monitor and choose “CRT” to
display and choose “Apply” and “OK” to be CRT (VGA)
Output. Certainly, you can switch back to “TV” for TV output.
31
DMP Electronics Inc.
http://www.toypc.tw
▲ 3.3.3 Set TV resolution to 640x480 in Windows XP.
For smaller TV monitor, we suggest user to adjust the resolution to
640x480 for bigger words in Windows XP. Please look at the steps to
adjust it as below.
(1) In desktop of Windows XP, please click the right key of USB
mouse and choose “Properties”.
(2) Go to “Settings” and choose “Advanced”.
(3) Choose “Adapter” and “List All Modes…”.
32
DMP Electronics Inc.
http://www.toypc.tw
(4) Choose “640 by 480, High Color (16 bit), 60 Hertz” and
“OK”.
(5) Choose “Apply” and “OK”.
33
DMP Electronics Inc.
http://www.toypc.tw
(6) Choose “OK” and exit Display Properties.
(7) For Internet Explorer, you can download IE7.0 (or above
version) by Microsoft Website and extend the webpage from
100% to 150% for getting bigger words.
34
DMP Electronics Inc.
http://www.toypc.tw
3.4
Boot From LAN
User can choose the Keyboard PC to boot from LAN. Please press
“Del” key to get into the BIOS settings after power on, and then
choose “Boot” and “Boot Settings Configuration” selections and set
“Boot From LAN” immediately.
After settings, please press “F10” to save the BIOS settings.
35
DMP Electronics Inc.
http://www.toypc.tw
Chapter
4
Warranty
This product is warranted to be in good working order for a period of one
year from the date of purchase except SD card which only has 3 months
of the warranty. Should this product fail to be in good working order at
any time during this period, we will, at our option, replace or repair it at no
additional charge except as set forth in the following terms. This warranty
does not apply to products damaged by misuse, modifications, accident
or disaster. Vendor assumes no liability for any damages, lost profits, lost
savings or any other incidental or consequential damage resulting from
the use, misuse of, originality to use this product. Vendor will not be liable
for any claim made by any other related party. Return authorization must
be obtained from the vendor before returned merchandise will be
accepted. Authorization can be obtained by calling or faxing the vendor
and requesting a Return Merchandise Authorization (RMA) number.
Returned goods should always be accompanied by a clear problem
description.
36
DMP Electronics Inc.
http://www.toypc.tw