1
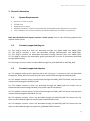
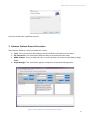
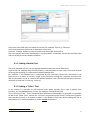
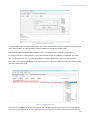
WP4 Software Platform
User’s Manual
Version 1.1.368
Table of Contents
1.
WP4 Software Platform User’s Manual
General Information .................................................................................................................................. 3
1.1.
System Requirements............................................................................................................................ 3
1.2.
Currently supported plug-ins................................................................................................................. 3
1.3.
Currently supported adapters ............................................................................................................... 3
1.4.
Currently supported external tools ....................................................................................................... 4
2.
Installation ................................................................................................................................................. 4
3.
Software Platform General Description .................................................................................................... 6
4.
Software Platform Detailed Description ................................................................................................... 7
4.1.
Tools ...................................................................................................................................................... 7
4.1.1.
Adding a Graphic Tool ....................................................................................................................... 8
4.1.2.
Adding a Matlab Tool ........................................................................................................................ 9
4.1.3.
Adding a “Other” Tool ....................................................................................................................... 9
4.1.4.
Launching a Matlab tool .................................................................................................................. 10
4.2.
File Conversion .................................................................................................................................... 10
4.3.
PNML analysis ...................................................................................................................................... 11
4.4.
Script Manager .................................................................................................................................... 11
4.4.1.
4.5.
Creating a Script .............................................................................................................................. 11
Other Tab Area .................................................................................................................................... 13
2
WP4 Software Platform User’s Manual
1. General Information
1.1.
•
•
•
•
•
System Requirements
Pentium 4 1 GHz or upper
512 Mb ram
Windows Xp or upper
Windows Installer 3.1 (will be automatically downloaded and installed if not present)
.Net framework 3.0 (will be automatically downloaded and installed if not present)
Note that the Matlab tool Hypens requires a 32 bit system, since it uses the library glpkmex that
requires 32 bit system.
1.2.
Currently supported plug-ins
P1: This plug-in converts a Petri net described through the Pipe2 PNML into PNML_DISC.
P2: This plug-in converts a Petri net described through MATLAB_DISC into PNML_DISC.
P3: This plug-in converts an Automaton described through Desuma (fsm) into PNML_DISC.
P7: This plug-in converts the reachability graph generated by Tina into an Automaton described
through Desuma (fsm).
P9: This plug-in converts a Petri net described through PN_DIAG MATLAB to MATLAB_DISC
1.3.
Currently supported adapters
A1: This Adapter performs the opposite job of the P2 plug-in. It converts a Petri net described
through the PNML_DISC file format into the same net described through the MATLAB_DISC.
A2: This adapter converts a Petri net described through the PNML_DISC file format into the same
net described through the MATLAB_DISC.
A3: This adapter converts a Petri net described through the PNML_DISC file format into an
Automaton described through Desuma (fsm) (under specific conditions).
A4: This adapter converts a Petri net described through the PNML_DISC file format into the same
net described through the PM Editor 3.1 rdp.
A8: This adapter converts a Petri net described through the MATLAB_DISC file format into the
same net described through the specific Hypens MATLAB file format.
A9: This adapter converts a Petri net described through the MATLAB_DISC file format into the
same net described through the specific PN_DIAG MATLAB file format.
3
WP4 Software Platform User’s Manual
1.4.
•
•
•
•
•
•
Currently supported external tools
Matlab
Pipe2
Tina
Desuma
Hypens (it requires 32 bit systems)
Pn_Diag
2. Installation
The WP4 Software platform can be downloaded from:
http://www.disc-project.eu/software_platform.html .
Figure 1 - Software Platform download link
The following file will be downloaded and saved: SoftwarePlatformInstallationNoFramework.zip.
Unzip it and launch the setup.exe.
Figure 2 - Software Platform Setup files
Follow the standard installation instructions.1
1
If needed, the Installer will download all the necessary packages, included the .NET framework.
4
WP4 Software Platform User’s Manual
Figure 3 - .NET Framework license agreement
Accept the .NET Framework license agreement.
Click next.
Accept the default installation folder and click next.
5
WP4 Software Platform User’s Manual
Click next to start the installation process.
3. Software Platform General Description
The Software Platform is mainly divided into 4 areas:
1. Tools: This area has been developed to transfer different techniques to end users.
2. File Conversion: This area allows different tools to communicate each other.
3. PNML Analysis: This area helps the user to verify the Petri net structure described through
PNML.
4. Script Manager: This area allows rigorous comparison of method and algorithms.
Figure 4 - Main application window with tools area selected
6
WP4 Software Platform User’s Manual
The others three tabs (areas) Conversion Matrix, Plugins/Adapers and File Formats are just user
information tabs and will be described later.
Starting the Software Platform for the first time may show a couple of warnings:
1. If Matlab is not installed the platform will detect it. Matlab is necessary for many purposes, so
it is better to have it installed in the system.
2. A warning about a software called Tina will pop-up. Tina is necessary to the software platform
but cannot be distributed with that. Tina is necessary when converting a Petri Net into an
automata described through the fsm (Desuma) file format and also when using the Pnml
Analysis area.
In section [3.5] the procedure to install an external tool is shown.
4. Software Platform Detailed Description
4.1.
Tools
The tools area allows the user to add/remove external tools to/from the software platform. This
will create a unique place where the user can see and launch all the available tools. It is divided
itself into 3 sub-areas:
a) graphic tools;
b) Matlab tools;
c) other Tools.
Note that, this division has not theoretical relevance and has only been used to separate the
different tools present in the platform from an usability point of view.
The graphic tools sub-area handles all the external tools which usually have a graphical user
interface and then they can be simply used by launching the GUI and interacting with that.
The Matlab tools sub-area handles the Matlab-based tools and has an additional field for the input
file. This is necessary because usually a Matlab tool needs and input file to work with, and that file
can be selected by the user.
The other tools sub-area has been created in order to integrate tools not having a GUI, for
example command line tools. This section has characteristics similar both to the graphic tools and
the Matlab tools sub-areas.
For example a command line tool can be added to the platform in this area and launched from
there passing the parameters through the means of an input file.
7
WP4 Software Platform User’s Manual
Below each sub-area there is a box for the description of the corresponding tool.
Figure 5 - Example: Matlab tools sub-area and tool description
At the bottom of the window there is the output console. This area is common to all tabs in the
application.
It shows useful information to the user according to the current selected tool or area. For example
if the user launches a Matlab tool from the Tools area, the result will be showed in the output
console.
4.1.1. Adding a Graphic Tool
Click the “Add new tool” button in the Graphic Tools sub-area. This brings-up a windows allowing
the user to enter the new tool details.
8
WP4 Software Platform User’s Manual
Figure 6 - Adding a new tool
In the tool name field enter the name of the tool, for example “Pipe3” or “Desuma”.
In the tool description field enter a description of the tool.
Press the “browse” button to select the main tool executable and confirm.
The new tool will be visible immediately in the drop down combo box and can be launched from
now on directly from the software platform.
4.1.2. Adding a Matlab Tool
The same procedure [3.5.1] can be applied to Matlab Tools with a few differences.
In particular, for a Matlab tool to work properly, it will be better to have a main tool script instead
of having that working as a collection of separate Matlab files.
For example, if the Matlab tool is composed by the functions function1.m, function2.m and
function3.m, it is better to create a single script function.m calling the 3 separate functions and
add this function.m script as a tool to the software platform. Also, the tool may have the input as a
collection of matrices in a file (e.g. input.m).
4.1.3. Adding a “Other” Tool
In this section it is possible to add external tools which typically don’t have a graphic user
interface, are not Matlab based, and are, for example, command line tools.
This is the case of Tina 2. Tina is composed by a collection of executables. In particular it is possible
to add in the “Other Tools” section the “tina.exe” command line tool. Since Tina has also a graphic
user interface (nd.exe), it is possible to add it in the Graphic Tools area. When adding tina.exe to
the platform (it is almost mandatory), please restart the platform.
2
http://homepages.laas.fr/bernard/tina//
9
WP4 Software Platform User’s Manual
4.1.4. Launching a Matlab tool
In order to launch a Matlab tool it is necessary to provide (at least for Hypens and Pn_Diag) an
input file. In this case an input file is a Matlab file containing the necessary input matrices.
To this aim it is possible to create the Petri Net in many different ways (file formats) and use the
“File Conversion” section [4.2] to convert it to “Matlab Hypens” file format. The same applies to
PN_Diag which has its own “Matlab PN_diag” file format.
Other Matlab tools, such as SimHPN don’t need any input file since have a Matlab graphic user
interface which starts automatically when starting the tool.
4.2.
File Conversion
The file conversion area is the place where the user can select and convert a file produced by a
tool into another file format compatible with a different tool. In this area the user can also edit
both the source file and the target file.
Figure 7 - File Conversion Area
In order to convert a file the user can select the source file on the left side (the file format will be
automatically detected by the platform in most cases, if not, the user must select the input file
type manually before proceeding to the conversion) and then press the button “convert” and
select the target file format. Pressing the button “OK” the file conversion automatically starts.
The result of the conversion is presented in the output console at the bottom of the main window
and in the “Target File” text box. The editor for the source and target file is also user-selectable.
10
WP4 Software Platform User’s Manual
4.3.
PNML analysis
The PNML analysis area is dedicated to the analysis of the properties of a Petri net described with
the common interchange format called PNML_DISC.
Figure 8 - Pnml Analysis example
Opening a PNML file in this area starts two processes: the first one extracts the properties which
are explicitly present in the PNML file as the number of places and transitions of the Petri net,
while the second one uses a third party tool Tina in order to perform a more detailed analysis like
the boundedness of the net. Also in this case the result is presented in the output console at the
bottom.
4.4.
Script Manager
The fourth area is the script manager. It is a place where the user can create and run scripting files
(e.g. batch files, Matlab files, sh scripts). This area is really useful when the user wants to take
advantage of the modularity of the software platform. For example, when performing a file format
conversion, the platform combines a number of plugins and/or adapters in order to go from the
original file format to the target file format. This sequence is normally embedded into a conversion
matrix (see also the fifth tab). But if the user wants to combine the plugins and the adapters in a
custom way, he/she can create a script to solve the problem. Furthermore, the user can combine
conversions sequence and tool launching all in the same script, making possible the creation of
repetitive and complex tasks.
4.4.1. Creating a Script
In order to create a script click the “new” button.
11
WP4 Software Platform User’s Manual
Figure 9 - Creating a new script
A popup window asks for a new script project. This means that a folder for the script will be created, as well
as the script inside it. It i salso possible to choose between a matlab and a batch script.
After having created the folder and the blank script it is possible to start typing the script content.
As an important aid, on the right side, a listo f the platform plugins and adapters is displayed. This is not
only an information list, it is possible to drag&drop the plugin/adapter from the list to the script box.
This action causes the plugin/adapter to be copied into the script project folder and also the creation of the
necessary code in the script.
Figure 10 - Drag&Drop example
In [Figure 10 - Drag&Drop example] the pluginP1.exe is draghe into the script. Since the script is a Matlab
script, the syntax is Matlab style. The “input file name” and “output file name” placeholders mean that the
12
WP4 Software Platform User’s Manual
user ha sto specify an input file. To this purpose, the “add file” button allows the user to add an input file to
the script project, then using cut&paste it is possible to modify the placeholders with the actual file name.
The file i salso copied to the project folder.
Using the “add file” button it is possible to add also different command line tools.
After creating the script it is possible to save it and execute it using the dedicated buttons.
4.5.
Other Tab Area
The remaining 3 areas are:
• Conversion Matrix
• Plugins/Adapers
• File Formats
They have currently only descriptive purposes. The conversion matrix shows the combination of
plugins and adapters necessary to go from a file format to another. The file formats are described
in the last tab. The Plugins/Adapers (P/A) tab contains a list of the available plugins and adapters
and the directory path where the P/A are located.
13