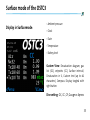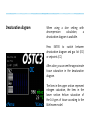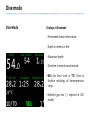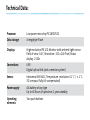
1
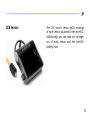
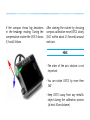
User Manual
Your OSTC3
Thank you for choosing a heinrichs weikamp dive computer.
Using open source software for full
transparency, combined with state-ofthe-art hardware and robust design,
OSTC3 is your instrument of choice for
technical diving.
For any questions or queries relating
to your OSTC3 dive computer please
contact your local heinrichs weikamp
dealership or we can be contacted directly via the following...
• internet forum:
www.heinrichsweikamp.com
We hope you enjoy diving with your
new OSTC3 dive computer.
• e-mail:
[email protected]
To become familiar with the functions
of OSTC3 and to use it correctly, it is recommended that you read this manual
carefully.
• mail:
heinrichs weikamp
Adlerstraße 7
79098 Freiburg im Breisgau
Germany
3
Contents
Your OSTC3..................................................... 3
About this Manual....................................14
Contents......................................................... 4
Precautions..................................................15
Plan your dive........................................17
Functions Overview..................................10
Display.....................................................10
Planning..................................................11
Record.......................................................11
Technical Status.........................................12
User Settings...............................................13
Special Markings..................................14
Terms of Use..........................................14
Before Every Dive.......................................17
Take a backup system with you.......20
While Diving................................................20
Do not modify the hardware............22
Keep your OSTC3 out of children’s
reach.........................................................22
Safe Use of OSTC3......................................22
Environmental Conditions.....................23
Preparations for first use........................24
OSTC3 Modes of Operation....................27
Surface Mode.........................................28
Dive Mode...............................................28
Sleep Mode.............................................30
OSTC3 Dive Settings.................................31
Dive settings with decompression
calculation..............................................32
Dive settings without
decompression calculation...............33
Display in Surfacemode:....................35
Surface mode of the OSTC3...................35
Desaturation diagram .......................36
Gaslist......................................................38
Setpoints.................................................39
Dive Setting Display............................40
5
Dive Setting Display.................................40
Menu Functions in Surface Mode..43
Menu Functions in Surface Mode........43
Logbook...................................................45
Memory...................................................45
Logbook........................................................45
Displaying details.................................47
OC Gas Setup.........................................48
OC Gas Setup...............................................48
Setup Gas-Type:....................................50
Setup Mix:..............................................51
Setting the operation depth:...........52
Examples:................................................52
CCR Setup................................................54
CCR Mode:..............................................54
CCR Setup.....................................................54
CCR Sensor:............................................55
Diluent Setup:.......................................56
Setup Diluent Type:.............................56
Diluent Setup..............................................56
Fixed Setpoints:....................................58
Fixed Setpoints...........................................58
Deco Planner...............................................60
Simulator......................................................63
Deco Mode...................................................65
Deco Parameter..........................................66
Alternative GF:......................................68
Settings....................................................70
Settings Menu............................................70
Display Settings.........................................72
Brightness:..............................................72
Units:........................................................73
Salinity:....................................................74
Language.................................................75
Compass calibration.................................75
Reset menu..................................................77
Reboot:.....................................................78
Reset Deco:.............................................79
Reset all:..................................................79
Time and Date............................................71
7
Dive mode....................................................80
Menu in Dive mode.............................82
Dive mode menu.......................................82
Decoplan ................................................83
Gas change...................................................84
Set Gas.....................................................86
Setpoint change.........................................87
Bailout...........................................................88
Reset Avr..................................................90
Stopwatch....................................................90
Average depth.......................................90
Time in dive mode.....................................91
Tissues...........................................................92
EAD/END......................................................92
Future TTS.....................................................93
Wristband.....................................................94
Replacing the battery...............................95
Spare parts.............................................97
Installing the driver..................................97
The USB interface......................................98
Data transfer..........................................99
Updating the firmware......................... 101
Technical Data:........................................ 102
Disposal:.................................................... 102
9
Functions Overview
The Open Source Dive Computer OSTC3
assists you with the following functions:
• Bottom time
• Duration and
decostops
depth
of
planned
Display
• Time to desaturation based on diving
depth and duration
• Diving depth and duration according
to EN 13119
• ppO2 in CCR diving (using the optional
hw HUD)
• Maximum diving depth
• Additional information (e.g. average
depth, stopwatch, ppO2, time of day,
CNS)
• Ambient temperature
• Ambient pressure
• Tilt-compensated
80° tilt)
compass
(up
to
Planning
Record
Set and retrieve gas mixtures and
setpoints matching the scuba set
Time,
duration,
depth
profile,
temperature, reference pressure and
time to desaturation
Calculate a decoplan in the simulator
11
Technical Status
This manual corresponds to the technical
status of OSTC3 and its firmware as of
April, 2013.
OSTC3,
its
firmware
and
the
documentation are subject to technical
changes without notice.
OSTC3 firmware (integrated software) is
being continually improved. To make the
best use of OSTC3, we advise you to use
the latest stable firmware available on
the heinrichs weikamp website:
http://www.heinrichsweikamp.com
When updating the firmware, please
refer to section USB Interface: Updating
the Firmware.
User Settings
Unless noted differently, the information
in this manual refers to OSTC3 standard
settings.
For important settings, the OSTC3 shows
an asterisk * behind the current setting if
the current setting is different from the
default setting.
13
About this Manual
Hint
Special Markings
!! Warning
indicates a situation that carries a
significant risk of injury.
indicates additional information for
advanced OSTC users.
Terms of Use
Copyright © heinrichs weikamp
Caution
indicates a situation that carries a risk of
damage to the device.
Copying or reusing this manual, or
parts of this manual, is not allowed
without the written permission of
heinrichs weikamp
Precautions
!! Warning
For your own safety, follow the safety
advice given below.
The most important factor in diving
safely is a competent and well trained
diver, diving within his or her abilities.
This dive computer is intended for
experienced divers. That implies:
A diving education incorporating
decompression diving is mandatory.
Sufficient knowledge about the laws of
physics in diving is required.
Relying on a wrongly configured dive
computer might harm health.
15
Do not use this dive computer if you are
not familiar with or don’t understand
the settings and displayed information
of OSTC3.
If necessary, you must be able to finish
your dive safely without the aid of a dive
computer.
Do not adjust decompression parameters
unless your are aware of their meanings.
Before Every Dive
Plan your dive.
Stable Firmware?
Set up a dive plan independently from
OSTC3, and take it with you when diving.
Use only firmware provided by heinrichs
weikamp which is marked as “stable”. It
has been tested and allows for a reliable
performance of OSTC3
Make sure that your OSTC3 is ready for
use and correctly configured.
Always confirm the following questions
before diving:
Configured Correctly?
Check the settings of your OSTC3. If
necessary, adjust the settings according
to your dive plan and equipment.
17
Battery status?
Device waterproof?
Check the battery status using the
battery indicator on the display. To
ensure reliable performance throughout
your dive, the battery level must be
sufficiently high. A new Saft LS14500
(Lithium primary cell) allows up to
60hours of diving, a quality Alkaline AA
battery (e.g. Duracell Ultra Power) about
30hours, a Lithium 1,5V Battery (e.g.
Energizer E2) about 40hours.
Ensure that both the USB connector
cap and the battery compartment are
properly closed and watertight. Check
the housing for cracks or damages which
might allow water to intrude.
Safely attached?
Make sure OSTC3 can be fastened safely
using either the bungee or a suitable
alternative.
Display messages?
Check the display of OSTC3 for warnings
or other signals. Do not dive if the OSTC3
displays a warning, e.g. the warning
symbol. Check the cause for the warning.
19
While Diving
Take a backup system with you.
While diving, always carry a backup
system to measure duration and diving
depth independently from OSTC3
Take the OSTC3 with you on every repeat
dive – don’t lend it to anyone.
A correct calculation of tissue saturation
requires that OSTC3
• is configured correctly
• is used on every dive
• is only used to record data during your
own dives (and not shared with other
divers)
Take a sufficiently long surface break before diving again.
The OSTC3 does not explicitly indicate
how long to wait before the next dive.
Please adhere to the guidelines you were
taught during your diver’s training.
Caution
Saturation data is lost when updating
the OSTC3 firmware or in the unlikely
event of a failure. In these cases, do not
dive any further until tissue saturation
has returned to normal.
21
Safe Use of OSTC3
Do not modify the hardware.
Keep your OSTC3 out of children’s reach.
Modifications to the hardware of OSTC3
can negatively impact its reliability and
the leak tightness of its housing. Only
the caps of the battery compartment,
the USB connector and the housing
backplate holding the bungees can be
removed. There is no other way to open
the housing without damaging the
device.
Small parts such as the USB connector
cap may represent a choking hazard
and configuration may be inadvertently
altered without the divers knowledge.
It is imperative that the o-rings on the
USB cap are kept clean and free of hair,
grit, dirt, lint etc. Open the battery
compartment only when the battery has
to be replaced.
Environmental Conditions
Store the OSTC3 in a cool, dry place.
Permissible temperature range for use
and storage: -5 °C to 40 °C
Make sure the used battery is suitable
for the ambient temperature to be
expected in your dives. For cold-water
diving (<10°C) we recommend the use of
a Lithium battery.
Decompression calculations and depth
display are always based on the actual
surface pressure (e.g. high-altitude
diving).
Maximum
water
depth:
120
m
Caution
• Surpassing the maximum water
depth may cause malfunctioning or
permanent damage of the device.
• The ZH-L16 calculation model is valid
only up to a depth of 120 m.
23
Preparations for first use
- Das verwendete Rechenmodell ZH-L16
ist nur bis Tiefen von ca. 120 m ausgelegt.
You receive your new OSTC3 ready for use
from heinrichs weikamp. If the OSTC3
has not been used for a prolonged period
of time (>1 year), it may be necessary to
replace the battery first.
Before diving, you need to adjust some
settings as described in this manual.
Familiarize yourself with the OSTC3. It is
recommended that you read this manual
carefully and entirely.
Buttons
Operate the OSTC3 using the two
buttons SET/MENU and ENTER on the
left and right side respectively. The force
required to push the buttons is ambient
pressure independent.
Menus
The basic principles of operation that are
described below apply to most functions
of the OSTC3.
If necessary, the documentation
indicates when to use these buttons
differently
Wet Connector system (optional)
Allows connection of up to three O2 cells
using the hwHUD
25
To display the menu, press SET/MENU.
The display shows the pre-menu Menu?.
Press SET/MENU again to confirm.
To select a menu entry, press SET/MENU
repeatedly until the cursor marks the
required menu item. From the item on
the bottom, the cursor jumps back to the
top with the next press.
In some menus, you will find a More
entry. Select this entry to access the next
menu page with more menu items.
To change the setting of a menu item,
press ENTER repeatedly until the
required value is displayed. You can also
hold-down the ENTER button in order to
change a value.
Hint
The pre-menu Menu? avoids that the
menu is displayed by mistake. Confirm
the pre-menu by pressing SET/MENU
again within 5 seconds, otherwise the
OSTC3 will return to the normal display.
OSTC3 Modes of Operation
OSTC3 has three modes of operation and
switches automatically between them:
27
Surface Mode
To
wake
up
press
SET/MENU
the
or
OSTC3,
ENTER.
When in surface mode, the display
shows general information – current
time, date, temperature, ambient
pressure and battery status. After a dive,
the display also shows tissue saturation
and remaining time in the no-fly period.
In surface mode, you can adjust the
settings in preparation for the next dive,
read recorded dive data and adjust the
base settings of the OSTC3
Dive Mode
The OSTC3 automatically switches into
dive mode when it is at least 1.6 m below
the surface for five seconds.
Hinweis
For a pre-dive check - we recommend to
manually power-on the computer before
each dive.
In dive mode, the display shows current
diving depth, elapsed time since starting
the dive, maximum depth since starting
the dive, the currently selected breathing
gas and decompression information.
29
Hint
It is not possible to switch underwater
from dive mode to surface mode; hence
you cannot change the base settings
while diving. Note that exceptions apply
to the Apnea mode.
Hint
The integrated simulator allows you to
get acquainted with the functions of the
dive mode.
Sleep Mode
When the OSTC3 is not operated at the
surface, it switches into sleep mode after
2 minutes to save battery.
In sleep mode, the display is turned off.
Ambient pressure is measured at regular
intervals. After a dive, decompression
calculation continues in sleep mode.
OSTC3 Dive Settings
OSTC3 Dive Settings
You can configure the OSTC3 to match
your equipment and how you intend
to use it. Furthermore, you can select a
model for decompression calculation.
Hint
The displayed information is adapted
according to the chosen dive setting. In
dive mode, menu items are adapted as
well.
To select a dive setting, select Divemode
-> Deco Mode, then choose one of the
dive settings described below.
31
Dive settings with decompression
calculation
OC: Use these dive settings with regular
(open circuit) dive equipment.
CC: Use these dive settings with a closed
circuit rebreather.
The decompression calculation model is
Bühlmann ZH-L16 for closed circuit with
or without gradient factors.. This can be
changed under Decotype.
Dive settings without
decompression calculation
Gauge: Use this dive setting if you do
not use the OSTC3 for decompression
calculation.
With this dive setting, OSTC3 serves as
a depth gauge. Additionally displayed
and recorded are ambient temperature
and elapsed time since starting the
dive. Decompression and saturation
calculation are switched off.
Apnea: Use this setting for apnea diving
or snorkeling.
With this dive setting, the OSTC3 serves
as a depth gauge. Additionally displayed
and recorded are ambient temperature
and elapsed time since starting the
dive. Decompression and saturation
calculation are switched off. With the
Apnea setting, the OSTC3 remains in dive
mode even when diving at low depths.
You can switch into surface mode at
any time by pressing SET/MENU?. Press
ENTER to confirm the Quit? question.
33
In all other modes the OSTC3 switches
automatically into surface mode after a
pre-defined delay if the OSTC3 is above
a pre-defined depth. This happens in
Apnea too but the delay is about 15
minutes in contrast to 4 mintues for all
other modes..
Surface mode of the OSTC3
Display in Surfacemode:
• Ambient pressure
• Clock
• Date
• Temperature
• Battery level
Custom View: Desaturation diagram, gas
list (OC), setpoints (CC), Surface intervall,
Desaturation in %, Custom text (up to 60
characters), Compass. Display toogled with
right button.
Dive setting: OC, CC, CF, Gauge or Apnea
35
Desaturation diagram
When using a dive setting with
decompression
calculation,
a
desaturation diagram is available.
Press ENTER to switch between
desaturation diagram and gas list (OC)
or setpoints (CC).
After a dive, you can see the approximate
tissue saturation in the desaturation
diagram.
The lines in the upper section represent
nitrogen saturation, the lines in the
lower section helium saturation of
the 16 types of tissue according to the
Bühlmann model.
The first scale division marks a
saturation of 80%. Each following
division corresponds approximately to
the decrease over the half-life for the
respective type of tissue.
Hint
The same desaturation diagram is also
available in the dive mode.
37
Gaslist
When using an open circuit dive
setting, the list of available gas mixes
can be displayed on the surface screen.
Press ENTER to switch between gas list
and further informations.
The gas used as the first gas in the dive
is additionally marked with an asterisk*.
Air means compressed air (21% oxygen,
no helium), O2 is 100% Oxygen. For
any other gas mix, the respective
percentages of oxygen and helium
fractions are displayed.
If the sum of oxygen and helium fractions
is less than 21%, the gas list shows ERR
indicating an unusual gas mix.
Setpoints
When using a closed circuit dive setting,
the list of available setpoints can be
displayed on the main surface screen.
Press ENTER to switch between setpoints
list and further informations.
The setpoints list shows the oxygen
partial pressure for the five available
setpoints (SP) .
The list of Diluents can be displayed
using the ENTER button. The first Diluent
also has an asterisk *.
39
Dive Setting Display
Dive Setting Display
In surface mode, the dive setting
displayed like this:
is
OC: Open Circuit
CC: Closed Circuit
Gauge: Gauge mode
Apnea: Apnea mode
When using O2 monitoring with the
hwHUD (optional) up to three sensors
are displayed below the dive settings
display (“---” if there is no sensor
connected)
Example: Mode ZH-L16 OC
Example: Mode ZH-L16 CC
Example: Mode ZH-L16 CC with O2
sensor monitoring
41
Example: Mode Gauge
Example: Mode Apnea
Menu Functions in Surface Mode
Menu Functions in Surface Mode
You can adjust the settings to prepare
the next dive, read recorded dive data
and adjust the base settings of OSTC3.
Logbook: Look up recorded data from
recent dives
Press SET/MENU in order to access
the menu in surface mode. The
display shows the pre-menu Menu?.
Press SET/MENU again to confirm.
43
OC Gas Setup
Set gas mixes matching the scuba set
CCR Setup
Inspect and modify closed circuit
rebreather settings
Deco Planner
Simulate dive mode; calculate
decostops
Deco Mode
Deco model settings and settings of the
dive mode of the OSTC3
Settings
Inspect and modify base settings for
OSTC3 functions
Exit
Quit menu and return to surface screen
See the following sections for more
details.
Logbook
Logbook
Memory
The OSTC3 records data during every
(real) dive. It can be retrieved from the
Logbook.
45
Logbook entries are sorted in
chronological order, starting with the
most recent entry. Every entry shows:
• Position index (01 = most recent),
• Date (month.day),
• Maximum dive depth
• Dive duration (hours and minutes)
OSTC3 stores data of up to 255 dives with
a total duration of 500-1000hours. The
actual number of records depends on
the overall size of data. If the memory is
full, existing records will be overwritten,
starting with the oldest.
Hint
If you want to secure your recorded dive
data, you can connect the OSTC3 to a
computer and read the data out.
Displaying details
To see the details of the dive, press
ENTER. The dive profile and details page
shows up.
The details page also shows position
index,
date,
maximum
diving
depth, duration, minimum ambient
temperature, ambient pressure above
water (used as reference for depth
measurement),
desaturation
time
(hours:minutes) used gases and
important dive settings used for this
dive.
47
OC Gas Setup
Hint
To display the actual number of
dives instead of the position index,
you can configure the logbook offset
under Settings > Display Settings >
Logbook-Offset
Hint
More information including Gaslist,
Salinity, CNS and Average Depth can
be found on page 2 (toggled with right
button).
OC Gas Setup
Use Gas Setup to configure presets for
up to five gas mixes. You can switch
between these presets while diving
whenever you exchange gases.
The presets are marked like this: AIR for
compressed air (21% oxygen, no helium),
O2 for Oxygen, NX for nitrox and TX for
trimix. To inspect and modify a preset,
go to the Gas Setup menu, select the
desired preset and press ENTER.
49
Setup Gas-Type:
Each mix can be set to the following
type:
First: The first gas which is used when the
dive starts. Only one gas may be marked
as “first”, if there is only one active gas it
will automatically be “first”
Travel: Gases, used for descending or at
the bottom (Bottom Gas)
Deco: Gases used for decompression
Disabled: Gas is disabled and is not taken
into account for the decompression
prognosis.
Disabled gases are shown in blue.
Hint
• The “first” gas is used when starting
the dive
• All gases (even disabled ones) can be
chosen underwater
• The OSTC3 always computes the tissue
load and the decompression scheme
using the selected gas and takes
all “Deco” gases in account for the
decompression phase
Setup Mix:
• The change of “Deco” gases with
properly configured change depth will
be advised underwater (the change
depth of “Travel” gases is only a
reminder for the diver, it is relevant for
the logbook and not for decompression
calculations.)
51
Specify the composition of a gas mix by
setting the percentage of the oxygen
and helium fraction, respectively.
Choose O2+/O2- to setup the percentage
of the oxygen and He+/He- for helium.
Repeatedly press ENTER (or hold-down
the ENTER button) until the required
value is displayed. For reference, the
OSTC3 displays the calculated Maximum
Operating Depth (MOD) and the
Equivalent Narcosis Depth (END).
Setting the operation depth:
To set the operation depth for a preset
gas mix, select Change Depth, then
select Depth + or Depth –. The current
operation depth is shown in the first
line of the display. It will turn red if
the change depth is larger then the
maximum operating depth (MOD).
Examples:
Dive with only one Gas: Configure one
gas (e.g. Gas 1) as “First” and setup the
mix using the “Setup Mix” submenu.
Disable the other four gases (Type:
Disabled).
Dive with one additional decompression
gas: Setup the “First” gas. Enable one
other gas as “Deco” and setup your
decompression gas mix. Disable the
remaining gases.
configure the second deco mix. Disable
the remaining two gases.
Dive with a Travel/Bottom Mix and two
decompression mixes: Additionally to the
“First” gas and the two decompression
gases, configure a fourth gas as “Travel”.
Deactivate the unused fifth gas.
Dive with two decompression gases:
Setup another gas to “Deco” and
53
CCR Setup
CCR Setup
When using a closed circuit rebreather,
you can set the OSTC3 to the
corresponding CCR setpoint. You can
specify setpoints in the CCR Setup Menu
CCR Mode:
Fixed SP: The OSTC3 will compute the
decompression scheme using up to five
fixed setpoints.
Sensor: Using the optional hwHUD
the digital, optical input of the OSTC3
can monitor up to three O2 sensors.
Sensor readings can be used for the
decompression calculations too.
Hint
You can switch between these two CCR
modes underwater.
CCR Sensor:
The CCR sensor shows ppO2 readings
of each sensor attached to the hwHUD.
Additionally, you can read mV voltages
out of each sensor and the hwHUD
battery level.
55
Diluent Setup
Diluent Setup:
In the diluent setup, the five diluents
are named as Gas6 to Gas10 indicating
that these diluents are completely
independent from the OC gases. The
starting Diluent (“First”) is marked with
an asterisk *.
Setup Diluent Type:
Each diluent can be of one of the
following type:
First: The starting diluent which is used
in the loop when starting the dive. Only
one diluent can be marked as “First”. If
you use one diluent only, it is marked
“First” automatically.
Normal: Additional diluents which can
be chosen underwater.
Disabled: Not taken into account for
decompression calculations (but can be
chosen manually underwater too).
Disabled diluents are shown in blue.
Setup of the diluents is the same as for
OC Gases.
57
Fixed Setpoints
Fixed Setpoints:
Here, up to five Setpoints can be
configured in mode “Fixed-SP”. Each
setpoint can be between 0.5bar and
1.6bar in 0.1bar increments. Change
depth (if more then one setpoint is going
to be used) can be set independently for
each setpoint too.
Calculations in mode “Fixed-SP” always
start with SP1. SP1 is marked additionally
with an asterisk *..
59
Deco Planner
Deco Planner
Use the deco planner to simulate the
dive mode of the OSTC3 or calculate the
decoplan for the specified maximum
depth and bottom time.
Calculate Decoplan
As a planning aid, OSTC3 can calculate
decompression stops in advance to a
planned dive. Hereby all settings of the
OSTC3 and the tissue load of previous
real dives are taken into account.
If you are planing a delayed repetitive
dive, setup the surface interval in
minutes.
Interval: Increase interval in 10min steps
up to 240 minutes
First, set the desired values for bottom
time and maximum depth. Select the
respective menu entry and press ENTER
(Or hold-down the ENTER button) until
the required value is displayed.
• Bottom Time can be increased in steps
of 2 minutes up to a maximum of 59
minutes.
Hint
If you accidentally exceed the desired
value, select Exit to leave the simulator
menu. Select the simulator again and set
the correct values.
To start calculation, select Calculate
Deco and press ENTER.
• Max. Depth can be increased in steps
of 3 meters up to a maximum of 120
meters
61
Hint
Please wait for completion of the
calculation of the decompression plan.
Calculation may take a while depending
on the specified bottom time. During
calculations the green LED is blinking.
When the calculation is done, the
decoplan is displayed with the
decompression plan including duration
and depth of the planned decompression
stops.
Simulator
Depth is displayed in meters, duration
is displayed in minutes. Duration is
additionally represented by the width of
the respective bar. If there are more then
eight stops, more stops can be shown
with the ENTER button.
Simulating Dive Mode
The simulator allows you to simulate the
diving mode to become familiar with its
functions. Simulated dives can be max.
90min and are not stored in the logbook
and do not affect the tissue loads from
real dives.
Select Start Dive to start the simulator.
The value specified for Max. Depth is
adapted as current diving depth.
63
Changing diving depth: unlike the dive
mode, the simulator has an additional
menu for diving depth, where you can set
the simulated diving depth. Press SET/
MENU to display the depth menu. Use
SET/MENU to select the desired change
in depth, then press ENTER to confirm:
Sim: -1m,: Descend 1m
Sim: +1m,: Ascend 1m
QUIT: Quit dive mode simulation. The
dive mode simulation will stop after a
short delay.
Deco Mode
Hint
Deco Mode
Both in dive mode and during a
simulation, the OSTC3 cannot switch to
sleep mode. Remember to quit the dive
mode simulation when you’re done,
otherwise you might exhaust the battery
capacity.
All other available functions are similar
to the ones in dive mode and are
described there.
65
Deco Parameter
You can configure OSTC3 to match your
equipment and how you intend to use it.
Furthermore, you can select a model for
decompression calculations.
Dive mode: Select the required dive
setting and the type of decompression
calculation.
OC: Open Circuit
CC: Closed Circuit
Gauge: Gauge mode
Apnea: Apnea mode
Decotype:
Toggles
between
decompression calculation using the
Bühlmann ZH-L16 algorithm with
(ZH-16+GF) or without (ZH-L16) gradient
factors.
PpO2 Max: Setting for maximum ppO2
(1.20 – 1.60bar). This value is used for
warnings and computing of EAD/END in
gas setup.
PpO2 Min: Lower threshold for ppO2
warnings. Can be set between 0.16bar
and 0.21bar. Used for warnings in
divemode.
Future TTS: Can be set between zero
(Disabled) and 10 minutes. Future TTS
shows the TTS if staying at the current
depth for another xx minutes during
divemode.
Deco Parameters:
The sub-menu Deco Parameters contains
settings for gradient factors GF_low and
GF_high (when using decompression
calculations +GF) as well as the
saturation and desaturation multipliers
in percentage when using the standard
Bühlmann model.
GF low: Lower value of the GF-pair in
percent (10-100%, default 40%)
GF high: Upper value of the GF-pair in
percent (70-110%, default 85%)
Saturation: multiplier for saturation
processes in the standard Bühlmann
model. (100-140%, Default 110%)
67
Desaturation: multiplier for desaturation
processes in the standard Bühlmann
model (60-100%, Default 90%)
Alternative GF:
Setting for an alternative GF-pair which
can be switched to underwater
aGF Selectable: = Yes: The GF-pair can be
toggled underwater. No: The GF-pair can
not be toggled underwater
Last Deco:
Setting for depth of last decompression
stop. Choose here if the OSTC3 should
compute its last stop at 3, 4, 5 or 6m
depth (Default: 3m)
aGF low: alternative value for GF_low in
percent (60-100%, default 60%)
aGF high: alternative value for GF_high
in percent (80-120%, default 85%)
69
Settings Menu
!! Warning
Settings
Be careful when changing parameters
in the Deco Parameters menu. Do not
change any value unless you are aware of
its meaning. Changes here influence the
decompression calculations and modify
the conservatism of the Bühlmann
model. Combinations as last stop at
6m, a low GF_High (e.g. 70%) require
a matching diveplan (e.g. suitable
decompression gases)
Confgurations
menu
for
basic
configurations and resetting of settings.
Time and Date
Hint
Information:
Shows some device-specific settings
(e.g. serial number, number of total
dives) and shows information about the
currently installed firmware.
Time and Date can also be synchronized
with an attached
Set Time & Date:
Allows setup of time and date.
PC.
71
Display Settings
Date:
Display Settings:
Set the displayed date format:
Setup the display of OSTC3.
• YYMMDD: year, month, day
• DDMMYY: day, month, year
• MMDDYY: month, day, year
Brightness:
Display brightness in OSTC3 is controlled
automatically with a ambient light
sensor. The three settings Eco, Medium
and High set different max. and min.
values for this control loop. In most cases
the default Eco is recommended. Only
if OSTC3 is used often in low depths
and bright sunlight a higher setting is
recommended.
A higher setting results in higher current
consumption and short battery life.
Logbook-Offset:
Units:
Display of depth/temperature in metric
(m/°C) or imperial (ft/°F) units.
73
With the logbook-offset you can adjust
the dive number shown in the logbook
to match your actual number of dives.
In the detail view of the logbook the
last dive is not shown as dive no. 1 but
as no. 349 what makes sense if you have
made 349 dives in total yet. This value
will be increased after every real dive
automatically (and not for simulated
dives).
Salinity:
This setting allows you to adjust salinity,
used for calculating both current and
maximum depths.
The default salinity is 1.00 kg/l = 0%. To
increase this value, select the Salinity
entry and press ENTER repeatedly until
the required value is displayed. The value
range is 0%-4%
Compass calibration
Hint
Decompression information is based
upon absolute pressure and not depth in
meter. Therefore salinity does not effect
this calculation.
Language:
OSTC3 can be setup in four languages:
English, German, French and Italian.
Choose the desired language with the
ENTER button.
Compass Calibration
OSTC3 has a tilt-compensated electronic
compass. Like all other electronic
compasses the OSTC3 compass must
be calibrated to compensate iron
interferences near the compass chip. As
an example, the battery interferes with
the Earth’s magnetic field and causes
compass deviations.
Important: For an exact heading,
the compensation of the compass is
absolutely necessary.
It is recommended to compensate the
compass after every battery change or
75
if the compass shows big deviations
in the headings reading. During the
compensation routine the OSTC3 shows
X,Y and Z-Values.
After starting the routine by choosing
compass calibration move OSTC3 slowly
(360° within about 15 Seconds) around
each axis.
Hint
• The order of the axis rotation is not
important
• You can rotate OSTC3 by more then
360°
• Keep OSTC3 away from any metallic
object during the calibration process
(at least 50cm distance)
Reset menu
• Finalize the calibration mode using the
left button. OSTC3 will then store the
calibration values.
Reset Menu
Hint
To compensate the compass deviations
OSTC3
continuously
stores
the
maximum values for each axis. For a
quicker compensation align each axis
with magnetic north until you see the
maximum value for this axis.
77
The Reset menu allow resetting options
in OSTC3 to its default values, clear the
decompression and tissue load data or
reboot your OSTC3 if necessary.
To quit the Reset menu, choose Exit.
Reboot:
Reboots the OSTC3. During a firmware
update it may be required to reboot your
OSTC3.
Choose Reboot OSTC and press ENTER.
You’ll be prompted to confirm the action.
Caution
A reboot also deletes the current tissue
load data.
Reset Deco:
Reset all:
To delete the current tissue load and
decompression data, choose Reset
Decodata and press ENTER. You’ll be
prompted to confirm the action. For the
next dive, OSTC3 assumes your N2 and
He tissue load is completely leveled to
normal / surface conditions without any
dives in the past two days.
Resets all settings (except time and date)
to factory defaults. You will be prompted
to confirm the action. Dive records in the
logbook and the dive counter will not be
reset.
Caution
Reset All does reset ALL settings in
OSTC3 to their factory defaults (except
time and date) Once confirmed this can
not be undone!
Use Reboot and Reset Decodata only, if
no repetitive dives are planned within
the next 48hours.
Caution
79
Dive mode
Dive Mode
Displays in Divemode
• Permanent shown information:
• Depth in meters or feet
• Maximum depth
• Divetime in minutes and seconds
• NDL: No Deco Limit or TTS: Time to
Surface including all decompression
stops
• Selected gas mix ( + setpoint in CCR
mode)
•W
ater temperature in °C or °F
Selectable information in the center
area of the screen:
•S
topwatch with average depth
•D
ecoplan (display of all decompression
stops)
•T
ime,
EAD/END
and
graphical
indication of tissue saturation
•G
F-pair, current gradient factor and
alternative GF-pair
•C
ompass readout
• Display of up to three sensor readings
(using the optional hwHUD)
Warnings:
Up to two warnings are shown
simultaneously. If there are more than
two warnings the warning display
toggles every two seconds. If there are
critical warnings a yellow warning sign
is displayed additionally.
• Battery level
• ppO2 (too high or too low)
81
Dive mode menu
• CNS warning
Menu in Dive mode
• Gradient factor (deco stop violations)
During dive mode you can choose from
different entries depending if you are in
OC, CC or Gauge mode:
• Warning if the decompression
calculations is based on the alternative
GF-pair.
• Future TTS (@+xx): Display of TTS if
staying xx minutes more on the current
depth
Gas changes (OC, Gauge) or setpoint
change and bailout gases (CC)
Using the O2 sensor readings for
decompression calculations
Resetting the stopwatch with the
stoppable average depth
Switching to the alternative GF-pair
Hint
During
Apnea
underwater
menu
mode
no
is
accessible.
To enter the menu during dive mode
press SET/MENU. Display shows Menu,
press ENTER to confirm
83
Gas change
Decoplan
Choose Decoplan, to show time and
depth of all decompression stops.
Planned decompression stops are shown
with their depth in meters or feet as well
as time in minutes.
If there are no stops in the decoplan “---”
is shown.
If there are decompression stops
planned, the first stop (ceiling) is shown
on the main dive screen permanently.
Gaslist
Available in Open Circuit, Gauge
Choose the currently used gas mix
here. The gaslist contains the five mixes
previously set in Gas Setup (surface
mode). The fraction of Oxygen and
Helium of the currently used gas can be
seen in the maindive screen permanently.
85
Hint
Hint
• Gases in red have either too high or
too low ppO2 to be used in the current
depth (They can be selected by the
user, anyway).
For a planned gas change the gas that
should be used in the current depth is
highlighted and can be found quite simply.
• Gases in blue are disabled. (They
can be selected by the user anyway).
A gas will be highlighted in yellow if the
current depth is 0-3m higher then the
configured change depth of this gas.
Setpoint change
Set Gas
Available in Open Circuit, Closed Circuit,
Gauge
This setting allows you to select the
currently used gas mix. You may choose
between the presets made in Gas Setup
(in surface mode). Oxygen and Helium
fractions of the current gas mix are
displayed on the main display.
Press ENTER repeatedly (or hold-down
the ENTER button) until the required
value is displayed.
The new value is displayed in the first
line, next to GAS:
To apply the new setting, select ENTER
In order to revert to the preset gas mix,
select it again from the Gas List.
Select O2 + or O2 –, to increase or
decrease the oxygen fraction.
Select He + oder He – to increase or
decrease the helium fraction.
87
Bailout
SetPoint
For Closed Circuit
Choose between the five setpoints that
have been configured in CCR Setup
(surface mode).
When O2 sensors are connected via the
hwHUD the sensor readings can be used
for the decompression calculations too.
Choose “CCR Sensor” to select the sensor
readings as the input for the Bühlmann
algorithm.
Bailout
For Closed Circuit
Select the current bailout gas mix. You
can choose between five preset gas
mixes already configured in OC Gas
Setup (surface mode). Oxygen and
helium fraction of the current gas mix
are displayed on the main screen.
89
Stopwatch
Reset Avr (Average)
Stopwatch
Restarts the stopwatch and resets the
average depth of the stopwatch.
The stopwatch counts seconds and
minutes. The value right of the stopwatch
is the average depth since starting the
stopwatch. The stopwatch is resetted via
Menu > ResetAvr.
Average depth
Total average depth of the dive (Total
Avr) and the stoppable average depth
interval of the stopwatch (Stopped Avr)
Time in dive mode
Clock
Actual time of the day.
91
EAD/END
Tissues
Shows the tissue load of the N2- and
He-Tissues of the Bühlmann model.
The diagram visualizes the approximate
saturation values during the dive.
The lines in the upper section represent
nitrogen saturation, the lines in
the lower section show the helium
saturation of the 16 tissues according to
the Bühlmann model.
EAD/END
Equivalent Air Depth as well as Equivalent
Narcotic Depth is shown.
Future TTS
FutureTTS (@+xx):
TTS time for ascent after additional xx
minutes on the current depth.
Housing
Use freshwater to rinse OSTC3 after
every dive, particularly after diving in
seawater.
Wristband
The bungee wristband can be set to your
arm diameter individually. To tighten
the bungee make a reef-knot above the
circular cavity (Tighten knot very strong).
Cut remaining bungee after about 1cm
and use a lighter to gently melt the small
remains of nylon.
If necessary, dissolve dirt by immersing
OSTC3 into freshwater for some hours.
Do not use any cleaning agents or
solvents.
93
Wristband
OSTC3 is shipped with bungees. The
bungees can be detached, are hand
washable and can be replaced if
necessary. In order to replace the bungee
remove the four screws (2mm Allen key)
and detach the lower housing plate. Align
the new bungee in a loop around the
USB-bulkhead and put the ends through
the two holes in the lower housing
plate. Only use the screws supplied with
OSTC3. They are non-corrosive and that
is very important in that case.
Replacing the battery
Replacing the battery
Only open the battery compartment if
you want to replace the battery.
Caution
If OSTC3 is without battery and without
external power supply, it looses
the tissue saturation information
required for an repetitive dive!
1.Connect OSTC3 to an USB power supply
or USB port (PC)
2.Open the battery compartment cap
and remove the old battery
3.Insert a new battery of the size AA with
the “+” first pointing inside in the battery
compartment
4.Check the battery compartment
O-ring. From time to time apply a very
small amount of O-Ring grease to it.
5.Close the battery cap until it is
completely inserted in OSTC3 housing.
95
The menu “New Battery” will show on
the display. Select if you have inserted
the old battery again, a new LS14500
Saft battery or a new 1.5V battery. With
this information OSTC3 can compute the
remaining battery capacity much more
precise.
Important: only use good quality AA
Batteries, e.g. Lithium (“Photo”) or
Alkali-Mangan (“Alkaline”) batteries.
Simple Zinc–carbon Batteries should be
avoided. Leaking Zinc–carbon batteries
may permanently damage OSTC3
batterie compartment.
Hint
AA-Lithium batteries with 1.6 or 1.7V
Voltage can be used as well.
Spare parts
Spare parts
Bungees and Saft LS14500 3.6V batteries
are available from heinrichs weikamp or
your dealer.
Hint
Links to all mentioned software resources
can be found at http://www.heinrichsweikamp.com
The USB-Interface of OSTC3 is suitable
to download dive data from OSTC3 or
install new firmware onto OSTC3.
Installing the driver
When connecting a computer to your
OSTC3 for the first time, you will need to
install a device driver, which is available
for Windows, Mac OS X and Linux.
In most cases, the driver will install
97
The USB interface
automatically. But due to the different
configurations available it may be
required to install the driver manually:
• Download the FT232R interface driver:
http://www.ftdichip.com/
• Unpack the zip archive to a directory.
Connect the USB interface of OSTC3
to your computer. Windows will
automatically recognize OSTC3 as a new
device.
When Windows asks for a driver medium,
point to the directory containing the
unpacked driver software.
When done you can see OSTC3 interface
in the COM&LPT ports section of the
windows-device manager > USB Serial
Port (COM x)
For MAC OS X a Disk-Image-file (.dmg) is
available.
The USB-Interface
The USB cover can be easily removed and
re-installed with the help of a micro-USB
connector! Make sure to re-install the
USB-interface cover after downloading
your dive data. Do not apply force when
closing the USB cover!
!! Warning
!! Warning
If there is some moisture inside the
USB bulkhead or battery compartment,
rinse the bulkhead immediately with
freshwater and let it dry completely
before using OSTC3 again. If there was
moisture in the USB-bulkhead apply
some water dispersant (e.g. WD40) on
the contacts to avoid corrosion. Check
the cause of the flooding.
A dive without the USB cap (especially
in seawater) may permanently damage
OSTC3 internals.
99
Data transfer
Data transfer with OSTC3 is supported
by many software applications for all
common platforms. The applications
provide easy-to-operate functions for
transferring recorded dive data, and for
configuring and remotely controlling
your OSTC3.
On our website http://www.heinrichsweikamp.com/ostc you’ll find a list
of all OSTC3 supporting programs and
applications.
Updating the firmware
Hint
!! Warning
For programmers, we have OSTC3
interface description available.
Only install firmware for OSTC3 from
trusted sources. A detailed manual
how to install the OSTC3 firmware is
on our webpage http://www.heinrichsweikamp.com/ostc
Updating the firmware
OSTC3 firmware (integrated software)
is in constant process of improvement.
To make the most of your OSTC3 it
is advisable to use the latest stable
firmware that is available at the
heinrichs weikamp website at http://
www.heinrichsweikamp.com/ostc
Hint
We recommend to upgrade the firmware
regularly, at least ones a year. Updates
for OSTC3 are free of charge of course.
101
Technical Data:
Prozessor
Low power microchip PIC18F87K22
Data storage
4 megabyte Flash
Displays
High resolution IPS LCD Monitor with ambient light sensor
Field of view: 160°, Resolution: 320 x 240 Pixel, Status
display: 2 LEDs
Connections
USB
Digital optical link (wet connector system)
Sensor
Intersema MS5541C, Temperature: resolution 0.1 °C / ± 1 °C,
3D compass (fully tilt-compensated)
Power supply
AA battery of any type
Up to 60 hours of operation, 2 years standby
Operating
elements
Two push buttons
Case
Milled from a single block of alloy
Scratch resistant borosilicate-glass panel
Dimensions
64 mm x 62 mm x 22 mm
Weight
160 gr.
Operating depth
120 meters
Disposal
Dispose OSTC3 as electronic waste. Do not throw it away with regular rubbish.
You can also return OSTC3 to heinrichs weikamp for disposal.
103