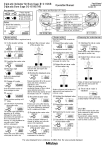
1
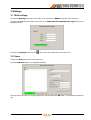
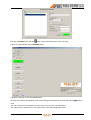
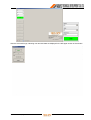
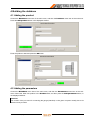
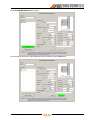
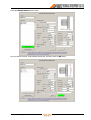
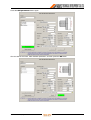
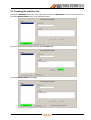
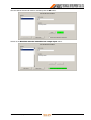
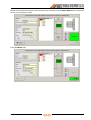
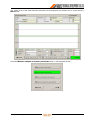
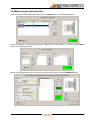
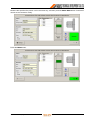
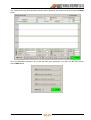
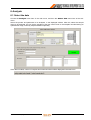
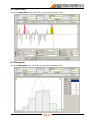
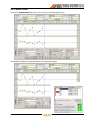
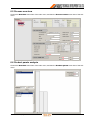
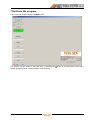
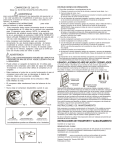
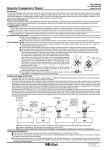
Tutorial
to know the program
Tutorial to know the program
2009 September 25
HNS SPCea
Statistical process and quality control
Without the prior written permission of HNS Ltd., no part of this documentation may be reproduced, or transmitted, in any form or by any
means, unless this activity is in connection with the legal use of HNS SPCea software.
The Author made the documentation with the greatest care. The Author assumes no responsibility and makes no warranty with respect
to content and completeness of the documentation. The Author assumes no liability for damages resulting from the use of this
documentation.
HNS word and coloured emblem are HNS Technical Development Ltd.’s registered trademarks.
Copyright © 2009
HNS Technical Development Co. Ltd.
H-9027 Győr, Gesztenyefa u. 4., Hungary
Phone: +36 96 506-930
Fax: +36 96 506-931
E-mail: [email protected]
Contents
1 Content of the tutorial ............................................................................................................................. 2
2 Installation of the required environment............................................................................................... 3
2.1 Installation of the program ............................................................................................................................... 3
2.2 Creating the pictures to be displayed.............................................................................................................. 3
2.3 Connecting the gauges ..................................................................................................................................... 3
2.4 Starting the program ......................................................................................................................................... 3
3 Settings..................................................................................................................................................... 4
3.1 Shift settings...................................................................................................................................................... 4
3.2 Users................................................................................................................................................................... 4
4 Building the database ............................................................................................................................. 7
4.1 Adding the product............................................................................................................................................ 7
4.2 Adding the parameters...................................................................................................................................... 7
4.3 Creating the machine list ................................................................................................................................ 12
5 Measuring............................................................................................................................................... 14
5.1 Measuring the total length .............................................................................................................................. 14
5.2 Measuring the head length ............................................................................................................................. 18
5.3 Measuring the head diameter ......................................................................................................................... 21
5.4 Measuring the stalk diameter ......................................................................................................................... 24
6 Analysis.................................................................................................................................................. 27
6.1 Select the data ................................................................................................................................................. 27
6.2 Value chart ....................................................................................................................................................... 28
6.3 Histogram......................................................................................................................................................... 28
6.4 Control chart .................................................................................................................................................... 29
6.5 Process overview ............................................................................................................................................ 30
6.6 Product pareto analysis .................................................................................................................................. 30
7 Exit from the program ........................................................................................................................... 31
Tutorial to know the program
1
1 Content of the tutorial
This tutorial presents
creating the database needed to the measuring of the part,
measuring the parameters prescribed in the control plan,
analysing the recorded data,
step by step, by the example of the steel rivet, which can be seen in the following picture.
The tutorial contains the preparations required to make the steps above (for example installation of the
measuring workplace).
Further knowledge about the several functions can be found in the user’s manual of the program.
CONTROL PLAN
Part’s name: Steel rivet
Drawing nr.: S 49548-T
Operation: Final inspection
Material: QSt 36-2
Weight: 1,6 gr / pc
Nr.
Parameter
Specification
Based on
Gauge
Sampling
frequency
1.
Total length
6,4 ± 0,3
Drawing
Caliper
5 pcs/4 hours
2.
Head length
1,6 ± 0,1
Drawing
Caliper
5 pcs/4 hours
3.
Head diameter
∅ 9,5 ± 0,3
Drawing
Micrometer
5 pcs/4 hours
4.
Stalk diameter
∅ 4,95 ± 0,1
Drawing
Micrometer
5 pcs/4 hours
The product is produced on two turning-machines - one with the ID A-11 and the other with the ID A-12.
Tutorial to know the program
2
2 Installation of the required environment
2.1 Installation of the program
See the chapter 1.3 Installation of the program in the User’s manual.
2.2 Creating the pictures to be displayed
The BMP files, which are in the Tutorials\Pictures directory of the installation CD, should be copied into an
optional directory (the pictures can be downloaded from the page www.hns.eu/spc, too). C:\Tutorial\Pictures
directory is used to store the pictures in this example. In case of using another directory, the actual path of
the pictures should be selected in the Image field at creating the product and the parameters - contrary to the
path in the screen-images in this tutorial.
2.3 Connecting the gauges
Required equipment:
HNS SMUX-4 / HNS USBMUX-4 (MITUTOYO Digimatic-compatible interface),
Mitutoyo Digimatic caliper (type: 500-161U),
Mitutoyo Digimatic connecting cable for the caliper (type: 959149, 959150),
Mitutoyo Digimatic micrometer (type: 293-521-30),
Mitutoyo Digimatic connecting cable for the micrometer (type: 937387).
Steps of the connection of the gauges:
connecting the HNS SMUX-4 interface to the COM1 serial port of the computer,
or connecting the HNS USBMUX-4 interface to one of the USB ports of the computer (this interface
requires to install a driver program - if it has not been installed yet -, see the chapter 1.3.1 Installation of
the interface in the User’s manual)
connecting the connecting cable (959150 or 959149) into the data output of the caliper („ABSOLUTE”
DIGIMATIC caliper / 500-161U),
connecting the connecting cable to the CH0 channel of HNS SMUX-4 / HNS USBMUX-4 interface,
connecting the connecting cable (937387) into the data output of the micrometer (DIGIMATIC
micrometer 0-25 mm / 293-521-30),
connecting the connecting cable to the CH1 channel of HNS SMUX-4 / HNS USBMUX-4 interface,
switching on and testing the gauges.
2.4 Starting the program
See the chapter 2.2 Starting the program in the User’s manual.
Tutorial to know the program
3
3 Settings
3.1 Shift settings
Choose the Settings menu item of the main menu, and then the Shifts menu item of the sub-menu.
Give the shift identifiers to be used, and switch on the Shift must be indentified on login switch in the
displayed window.
Exit from the Settings menu with the
button, which is the last button of the sub-menu.
3.2 Users
Choose the Users menu item of the main menu.
Press the Add user button in the displayed window.
Add yourself to the users on engineer rights level, and then press the Ok button. Yours password should be
spc.
Tutorial to know the program
4
Exit from the Users menu with the
button, which is the last button of the sub-menu.
Logout from the program with the Logout button.
Log into the program as the user added before.
Give the user’s name, the identifier of the current shift and the password, and then press the Login button.
Note
The user’s name can be selected out of the users occurred in the user registration.
The shift ID can be selected out of the values given in the shift settings menu item.
Tutorial to know the program
5
After the successful login, following user and shift data are displayed in the left-upper section of the window.
Tutorial to know the program
6
4 Building the database
4.1 Adding the product
Choose the Database menu item of the main menu, and then the Products menu item of the sub-menu.
Press the Add product button in the displayed window.
Enter the product’s data and press the Ok button.
4.2 Adding the parameters
Choose the Database menu item of the main menu, and then the Parameters menu item of the submenu. Select the Steel rivet product in the Product field, and then press the Add parameter button, in
the displayed window.
Attention!
The number of the port used for connecting the gauge (interface) on the given computer actually has to be
selected in the port field.
Tutorial to know the program
7
Give the data of the first, Total length parameter, and then press the Ok button.
Tutorial to know the program
8
Press the Add parameter button again.
Give the data of the second, Head length parameter, and then press the Ok button.
Tutorial to know the program
9
Press the Add parameter button again.
Give the data of the third, Head diameter parameter, and then press the Ok button.
Tutorial to know the program
10
Press the Add parameter button again.
Give the data of the fourth, Stalk diameter parameter, and then press the Ok button.
Tutorial to know the program
11
4.3 Creating the machine list
Choose the Database menu item of the main menu, and then the Machines menu item of the sub-menu.
Press the Add machine button, in the displayed window.
Give the data of the first machine, and then press the Ok button.
Press the Add machine button again.
Tutorial to know the program
12
Give the data of the second machine, and then press the Ok button.
Switch on the Machine must be indentified on sample input switch.
Tutorial to know the program
13
5 Measuring
Choose the Measuring menu item of the main menu. Select the Steel rivet product, and then press the
Next button, in the displayed window.
5.1 Measuring the total length
Select the Total length parameter, and then press the Next button, in the displayed window.
Enter the identifiers to record with the sample, and then press the Next button, in the displayed window.
Note
Sampling time and Shift fields are filled in automatically (the shift identifier is the value given at the login).
Machine ID can be selected out of the machines recorded in the database.
Optional value can be entered as LOT ID.
Tutorial to know the program
14
Measure the total length of the first part with the caliper, and then press the Measure button.
Comment
If the gauge is off, program will display an error message about it. After turning on the gauge, the Switch
on the gauge button has to be pressed to check the gauge again.
Tutorial to know the program
15
Measure the specified five pieces in all in the same way, and then press the Save data button if measured
values are not wanted to modify.
Press the Next button.
Tutorial to know the program
16
The control chart of the Total length parameter will be displayed, this window can be closed with the Next
button.
Press the Measure sample of another parameter button, in the displayed window.
Tutorial to know the program
17
5.2 Measuring the head length
Select the Head length parameter, and then press the Next button, in the displayed window.
Enter the identifiers to record with the sample - likewise for the Total length -, and then press the Next
button, in the displayed window.
Measure the head length of the first part with the caliper, and then press the Measure button.
Tutorial to know the program
18
Measure the specified five pieces in all in the same way, and then press the Save data button if measured
values are not wanted to modify.
Press the Next button.
Tutorial to know the program
19
The control chart of the Head length parameter will be displayed, this window can be closed with the Next
button.
Press the Measure sample of another parameter button, in the displayed window.
Tutorial to know the program
20
5.3 Measuring the head diameter
Select the Head diameter parameter, and then press the Next button, in the displayed window.
Enter the identifiers to record with the sample - likewise for the Total length -, and then press the Next
button, in the displayed window.
Measure the head diameter of the first part with the micrometer, and then press the Measure button.
Tutorial to know the program
21
Measure the specified five pieces in all in the same way, and then press the Save data button if measured
values are not wanted to modify.
Press the Next button.
Tutorial to know the program
22
The control chart of the Head diameter parameter will be displayed, this window can be closed with the
Next button.
Press the Measure sample of another parameter button, in the displayed window.
Tutorial to know the program
23
5.4 Measuring the stalk diameter
Select the Stalk diameter parameter, and then press the Next button, in the displayed window.
Enter the identifiers to record with the sample - likewise for the Total length -, and then press the Next
button, in the displayed window.
Measure the stalk diameter of the first part with the micrometer, and then press the Measure button.
Tutorial to know the program
24
Measure the specified five pieces in all in the same way, and then press the Save data button if measured
values are not wanted to modify.
Press the Next button.
Tutorial to know the program
25
The control chart of the Stalk diameter parameter will be displayed, this window can be closed with the Next
button.
All of the parameters specified in the control plan have been measured, so go back into the main window
with the Exit button.
Tutorial to know the program
26
6 Analysis
6.1 Select the data
Choose the Analysis menu item of the main menu, and then the Select data menu item of the submenu.
Select the product and parameter to be analysed, in the displayed window. After this, select the sample
range to be analysed, this can be the samples of the last control chart or the samples recorded during an
optional time range, sorted by sample identifiers optionally.
If the data is loaded, number of samples and measured values will be displayed in the status row.
Tutorial to know the program
27
6.2 Value chart
Choose the Value chart menu item of the sub-menu after selecting the data.
6.3 Histogram
Choose the Histogram menu item of the sub-menu after selecting the data.
Tutorial to know the program
28
6.4 Control chart
Choose the Control chart menu item of the sub-menu after selecting the data.
It is possible to display the measured values of the appointed sample.
Tutorial to know the program
29
6.5 Process overview
Choose the Overview menu item of the main menu, and then the Process states menu item of the submenu.
6.6 Product pareto analysis
Choose the Overview menu item of the main menu, and then the Product pareto menu item of the submenu.
Tutorial to know the program
30
7 Exit from the program
Log out from the program with the Logout button.
The program can be closed by the usual way, by pressing the
window (program can be closed at anytime, without logout).
Tutorial to know the program
button in the right-upper corner of the
31