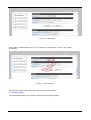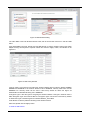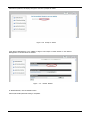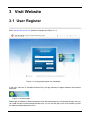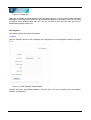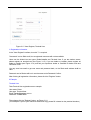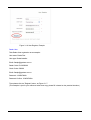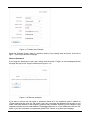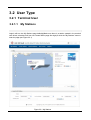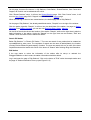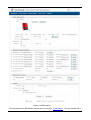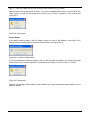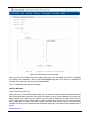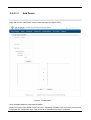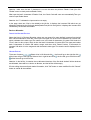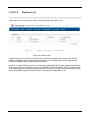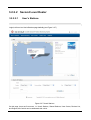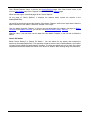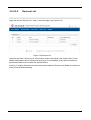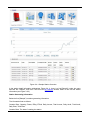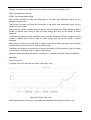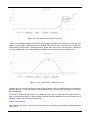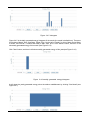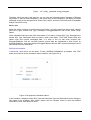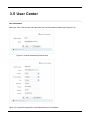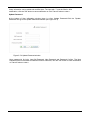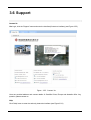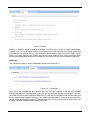
1
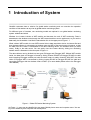
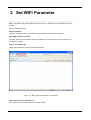
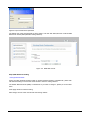
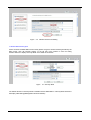
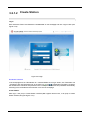
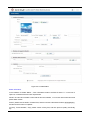
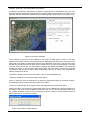
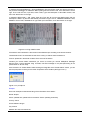
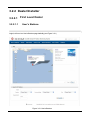
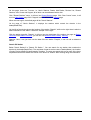
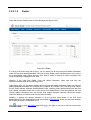
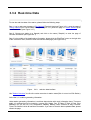
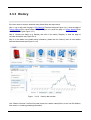
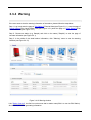
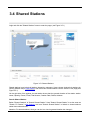
Global PV Station Monitoring System
User Manual
1 Introduction of System
GoodWe customers have a solution for global station monitoring and can overview the operation
condition of their stations at any time by global station monitoring system.
For different types of inverters, two monitoring models are optional in our global station monitoring
system: wireless and wired.
Wireless: the inverter includes a WIFI module and becomes the end of WIFI monitoring. Data is
transmitted to the wireless router through the WIFI network and then sent to web server, so you can the
data easily via the website. Just like the transmission link in the upper part of Figure 1.1.
Wired: without WIFI module, the non-WIFI inverter links to data acquisition device via internet first and
then the data collector is connected to a wireless router via WIFI or the wired router via internet, so that
the data from the inverter is transmitted to the data collecting device, the wireless router (or wired
router), finally to the web server. You can easily view the inverter data by visiting our monitoring
website which is illustrated in the other part of Figure 1.1.
The data collector can be divided into two types: EzLogger and EzLogger WIFI. Without WIFI module
inside, the data chain of EzLogger is formed by linking inverter RS-485 to EzLogger RS-485 via cable
and connecting EzLogger network port with the wired router via cable. However, With WIFI, the data
chain of EzLogger WIFI is constructed by linking inverter RS-485 to EzLogger RS-485 via cable and
connecting EzLogger with the wireless router via WIFI. (For more details please refer to the EzLogger
User Manual)
Figure 1.1 Global PV Station Monitoring System
As Figure 1.1, users can be classified into two types: Mobile phone users and computer users. You can
log in our website by both computer and mobile phone.
2 Set WIFI Parameter
Before using WIFI inverter, WIFI parameter must be correct, or data can not be transmitted or received
normally.
How to Set WIFI Parameter:
Step 1,Preparation
First of all, a wireless router, a pc with WIFI and a powered-on inverter should be prepared.
Step 2,WIFI inverter Connection
Secondly, searching for the wireless network GoodWe-HF sent by the WIFI inverter and connects to it
(no password needed)
Step 3,10.10.100.254 login
Thirdly, Open the browser and enter http://10.10.100.254.
Figure 2.1 Enter http://10.10.100.254 in the browser
Step 4,Input username and password
Then, input the username and password in the login window.
Figure 2.2 Input username and password
The default user name and password are both "admin", and click "OK" button,and then it will be M2M
Web Server window (WIFI parameter setting interface).
Figure 2.3 M2M Web Server
Step 5,WIFI Parameter Setting
i. Change Network Name
If there are other GoodWe Inverters nearby or wireless networks similar to "GoodWe-HF", please click
"AP Interface Setting" on the left side of the window to enter the setting interface.
The default "Network Name (SSID)" is Goodwe-HF. If you want to change it, please put a new name
there.
Click "Apply" button to finish the setting.
After change, the new name must choose when linking network.
Figure 2.4 Wireless Access Point Setting
ii. Wireless Network Encryption
If there are other GoodWe WIFI inverters nearby, please encrypt the wireless network generated by the
WIFI inverter. Click "AP Interface Setting" on the left side of the window to enter the setting
interface.And then it displays "Security Mode" in the middle of the window.
Figure
2.5 Security Mode
The default selection of "Security Mode" is Disable.Choose "WPA2-PSK" in "Security Mode".And then it
will display "WPA setting(WPA Algorithms and Pass Phrase)".
Figure 2.6 WPA Setting
Select "AES" in "WPA Algorithms", and put in a password in "Pass Phrase", and then click "Apply"
button below.
Figure 2.7 WPA Setting 2
After encryption, password need to be put in when linking the wireless network.
iii. STA Interface Setting
Click "STA Interface Setting" on the left part of window to enter the setting interface.
Figure 2.8 STA Interface Setting
The "AP's SSID" is the local wireless network name, and the inverter will connect to it and send data
with it.
If the default SSID is incorrect, please enter the SSID directly or click the "Search" button.In the search
AP(Site Survey) window,pick the required network and click the "Apply" button, as illustrated in the
Figure 2.9.
Figure 2.9 Site Survey Window
"Security mode" is the mode for encrypting the wireless network with four options- OPEN, SHARED,
WPAPSK and WPA2PSK. If the mode in wireless router is WPA2PSk, "Security mode" here must be
WPA2PSK too. "Security mode" can be seen in Site Survey window as shown the Figure 2.9
Authentication for Goodwe-Wireless_Test is WPA2PSK.
"Encryption Type" is also the type for encrypting the wireless network. If the type in wireless router is
AES, "Encryption Type" here must be AES too. "Encryption Type" can be seen in Site Survey window
as shown the Figure 2.9 the Encryption for Goodwe-Wireless_Test is AES.
"Pass Phrase" is also the password to linking to the wireless network.
After reset, please click the "Apply" button.
iv. Reset the WIFI module
After above operation,it will display as Figure 2.10.There it prompts to restart.
Figure 2.10 Prompt to restart
Click "Device Management" in the middleo of Figure 2.10 Prompt to restart window or click "Device
Management" on the left side of the window.
Figure 2.11 Restart Module
In "Restart Module", click the "Restart" button.
After that,all of WiFi parameter setting is completed.
,
3 Visit Website
3.1 User Register
Enter www.goodwe-power.com website homepage.(see Figure 3.1.1)
Figure 3.1.1 www.goodwe-power.com homepage
In the right, there are 2 GoodWe EzViewer.They are app softwares of Apple telephone and Android
telephone.
Figure 3.1.2 Android app
Android app is software for Android telephone.Click the Android app icon to download the app, then you
can install the app to Android telephone.After that, you can use the app to look over the data, just like
the website(www.goodwe-power.com).
Figure 3.1.3 Apple app
Apple app is software for Apple telephone.Click the Apple app icon, it will turn into GoodWe EzViewer
app page of iTunes App store, where you can download the app(this is a free app).Then you can install
the app to Apple telephone.After that, you can use the app to look over the data, just like the
website(www.goodwe-power.com).
User Register
You need to register when enter the website.
i. Register
Click the "Register" button on the homepage, and it will jump to the "User Register" interface, as Figure
3.1.4.
Figure 3.1.4 User Register, Dealer/Installer
Change User Type, from Dealer/Installer to Terminal User, it will get to Terminal User user register
interface, as Figure 3.1.5.
Figure 3.1.5 User Register, Terminal User
ii. Registration information
In the "User Register" interface, box with "*" is required.
"Username" can be filled at will, but a registered username will not be available.
Users can be divided into two types: Dealer/Installer and Terminal User. If you are stations owner,
please register as terminal user (see Figure 3.1.5). If you are dealer or installer, please register as
dealer or installer (see Figure 3.1.4) and ask your supervisor dealer or GoodWe for dealer code and
verification code.
You may need use email to get user name and password back, so the filled email address shall be
valid.
Password can be filled at will but it must be same as the Password Confirm.
After finishing all registration information, please click the "Register" button.
iii.Example
Terminal User
Take Terminal User registration as an example:
User name: Demo
User type: Terminal User
Email: [email protected]
Password: 1234567890a
Then please click the "Register" button, as Figure 3.1.6.
(This example is just for your reference rather than copy, please fill in based on the practical situation.)
Figure 3.1.6 User Register, Example
Dealer User
Take Dealer User registration as an example:
User name: DealerTest
User type: Dealer/Installer
Email: [email protected]
Dealer Code: D123456000
Check Code: 030906
Email: [email protected]
Password: 1234567890a
Password Confirm: 1234567890a
Then please click the "Register" button, as Figure 3.1.7.
(This example is just for your reference rather than copy, please fill in based on the practical situation.)
Figure 3.1.7 Dealer User, Example
Below the "Register" button, there is a sentence saying "If you already have an accout, click here to
login! ", click it to go back the homepage.
Retrieve Password
If you forget the password or user name, please click the button "Forget" on the homepage and then
the page will jump to the "Forget" interface.(see Figure 3.1.8)
Figure 3.1.8 Retrieve password
If you want to retrieve the user name or password, please fill in the registered email in mailbox on
"Forget" page and then click the "OK" button, then your user name and password will be sent to your
email. If the email address is also forgotten, please contact GoodWe. Referring to the example in user
registration please input the email address "[email protected]" in the mailbox and click the "OK"
button. If you don't want back your password, please Click "Cancel" to go back the homepage.
3.2 User Type
3.2.1 Terminal User
3.2.1.1 My Stations
Login,it will turn into My Stations page defaultly.(Make sure there is a station created in the terminal
user at last, otherwise it will turn into Create Station page afer login)Or click the "My Stations" menu to
enter the page.(see Figure 3.2.1)
Figure 3.2.1 My Stations
On this page, there are five menus, i.e. My Stations, Creat Station, Shared Stations, User Center and
Support, all of which can be addressed with a click.
Click "Shared Stations" menu, it will turn into Shared Stations page. Click "User Center" menu, it will
turn into User Center page.Click "Support" menu, it will turn into Support page.
When the user logs in after he has created stations, the default page will be "My Stations".
On the page of "My Stations", the already established station, "Sample" is on the right of the window.
Click the station hyperlink "Sample", it will turn into the detail data of the station, the page as Station
Overview.From Station Overview, you can turn into Real-time Data, History, Warning.
On the left of the window shows the location of the station "Sample", while on the right there is also the
basic information of the station. Under the "Sample" on the right, there are two buttons, "Edit" and
"Delete", which are used to edit or delete the station.
Search PV Station
Below "My Stations " is "Search PV Station ". The user can search for any station that he creates but
not established by other users. The requisites of search are the name of station(Name), the location
(Country,Province/State,City)and capacity of station. The user can search with one or more of the three
requisites and start the search with a click of the button of "Search" after finishing filling the information.
Edit Station
If the user wants to revise the information of the station after its set-up or maintain the
Ezlogger/EzMonitor or the inverter, the station information should be edited.
Log in and enter the page of "My Stations". Click on the button of "Edit" under the sample station and
the page of "Station Information" turns up.(see Figure 3.2.2)
Figure 3.2.2 Edit Station
The requirements for "Edit Station" are the same as those for "Creat Station". The input frames with a
sign of "*" have to be filled and you can revise any item according to your needs.
After the revise, click on the button of "Save". If no revise is needed, please click on "Cancel".After click
"Save" button, you will see the prompt box to inform you the result of operation of the creation.(see
Figure 3.2.3)
Figure 3.2.3 prompt box
Delete Station
If you want to delete a station, click on "Delete" button in the list of "My Stations".( see Figure 3.2.1)
and you will see the dialog box of "confirm to delete station".(see Figure 3.2.4)
Figure 3.2.4 confirm to delete station
If you are determined to delete the station, click on "OK" and after the deletion you will see the prompt
box to inform you the result of operation of the deletion.(see Figure 3.2.5) If not, click on "Cancel".
Figure 3.2.5 prompt box
Attention: on the page of "My Stations", all the stations you creat including the shared stations can be
edited or deleted.
3.2.1.2 Create Station
Log In
Enter Username "Demo" and Password "1234567890a" on the homepage and click "Login" button.(see
Figure 3.2.6)
Figure 3.2.6 login
Remember Password
In the homepage,there is a "Remember me " checkbox.Before click "Login" button, click "Remember me
" checkbox to pick it(if "Remember me" is set, there is a in the of "Remember me")and the computer
will remember the username and password.Then it will input the username and password automatically
according to the remembered next time when come into the homepage.
Create Station
After login, it will jump to Create Station interface.(After register terminal user, it will jump to Create
Station interface,too.)(see Figure 3.2.7)
Figure 3.2.7 Create Station
Station Information
In the interface of "Create Station ", much information needs to be filled. If there is "*" in the rear of
input box, it means that this item is a required item.
"Name": the user cannot create a name that he has used it before, i.e. one user cannot have two same
power station names.
"Photo": please click the button of "Select" first, and then choose a file whose format is gif/jpg/jpeg/png,
and then click the button of "Upload".
"Country", "Province/State", "City": please choose country first, and then province (state), and finally
city.
"Address": please fill in the actual address of the station.
"Longitude" and "Latitude": write directly. For instance: longitude 120.41 and latitude 31.36. If you don't
know the longitude and latitude where the station is located, please click the button of "Location" on the
right side, and then choose the coordinate in the window of google map (as shown in the Figure 3.2.8).
Figure 3.2.8 choose coordinate
In the interface of Figure 3.2.8, input address in the column of "Map Search" which is in the right
topside of the window, such as "China Jiangsu Suzhou".Separately input the name of country, province
(state) and city, and leave a blank space between them. Afterwards, click "GO!" in the rear of the input
box and then prompt box which will show you the location which you have input will appear on the map
in the left side of the window, and this location's longitude and latitude will appear in the nethermost
"Present coordinate" on the right side of the window. After that, click "Select", and then the longitude
and latitude in the Figure 3.2.7 will be filled automatically. If there is no need to input longitude and
latitude, please click "Cancel".
"Time Zone": set the local time zone of the station, such as: China Standard Time.
" Capacity": please fill in the installed capacity of the station.
"Price": it means the price per kilowatt-hour of electricity, please fill according to the actual condition.
This parameter will be used to calculate the profit of the station.
"Currency": it indicates the currency type used for calculating the profit of the power station.
"Shared" checkbox: if you tick this, it means all the users log in this website can view the introduction of
the station in the menu of "Shared Stations".Otherwise, only you can view the information.When click
the "Shared" checkbox, it will turn into a prompt box in which it needs to confirm whether share the
station to all users or not.(see Figure 3.2.9)
Figure 3.2.9 prompt to confirm sharing
In "Maintain EzLogger/EzMonitor", EzLogger/EzMonitor S/N and Check Code are all from the tags in
the products of EzLogger or EzMonitor. After inputting S/N and Check Code, click "Add" button on the
right. Then under this line, input S/N, Check Code, Type and Description of Non-WIFI Inverter, and
then click "Add" button on the right.
In "Maintain WIFI-Inverter ", S/N, Check Code and Type are all from the tags WIFI-Inverter and the
description is filled in by the user itself willfully. As shown in Figure 3.2.10, 13000SSU13400016 is S/N,
002203 is Check Code, GW3000-SS is Type. After input information, click "Add" button on the right.
Figure 3.2.10 Tag of WIFI Inverter
"First Name" and "Last Name" is the name of owner.Please input according to the actual condition.
"International Code": the international code of the country or distinct where the station is.
"Phone": please fill in the actual condition of the owner of the station.
"whether you receive SMS" checkbox:If you check it,it shows you receive SMS(Short Message
Service).Then if some particular thing occured,it will send message to the phone(according to the
photonumber in "Phone" item).
Click the button of "Create Station" after finishing the filling.After click "Create Station" button, you will
see the prompt box to inform you the result of operation of the creation.(see Figure 3.2.11)
Figure 3.2.11 prompt box
Example
Here is an example to illustrate the filling of the information of the station:
Name: Sample
Photo: (Omitted here, please refer to the above "Photo" operating instruction)
Country: China
Province/State: Jiangsu
City: Suzhou
Address: No 189, Kunlunshan Rd
Longitude: 120.41
Latitude: 31.36 (You can also refer to the above "Longitude" and "Latitude" operating instruction)
Time Zone: China Standard Time
Capacity: 15.00
Price: 1.28
Currency:
Shared: Check
Maintain EzLogger/EzMonitor:
EzLogger/EzMonitor S/N: 21000REN12100005, Check Code: 049385, then click "Add" button on the
right.
Non-WIFI Inverter S/N: 13000SSU11A00002, Check Code: 008301, Type:GW3000-SS, Description:
@EzLogger WIFI, then click "Add" button on the right.
Non-WIFI Inverter S/N: 13000SSU12300888, Check Code: 008122, Type:GW3000-SS, Description:
@EzLogger WIFI, then click "Add" button on the right.
Non-WIFI Inverter S/N: 14600SSU12300292, Check Code: 065323, Type:GW4600-SS, Description:
@EzLogger WIFI, then click "Add" button on the right.
Non-WIFI Inverter S/N: 14600DSU11111111, Check Code: 002176, Type:GW4600-DS, Description: a,
then click "Add" button on the right.
Non-WIFI Inverter S/N: 1017KDTU12B00030, Check Code: 033058, Type:GW17K-DT, Description: b,
then click "Add" button on the right.
Non-WIFI Inverter S/N: 14200DSU13021111, Check Code: 027477, Type:GW4200-DS, Description:
@EzLogger WIFI, then click "Add" button on the right.
Maintain WIFI-Inverter:
S/N: 13600DSU13038888, Check Code: 000411, Type:GW4600-DS, Description: With WiFi
First Name: Dvid
Last Name: Chari
International Code: 0086
Phone: 512162397998
Click the button of "Create Station" as shown in Figure 3.2.12.
(This example is just an illustration, please don't copy and fill according to the fact)
Figure
3.2.12
example of station information
View user information
After log in, you can see the icon
on the top right of the window.
Click on the icon, and it comes to the page of "User Center".
On the right, you can see the word "Demo" which is the user name. Click it, and it also comes to the
page of "User Center".
Log Out
When you log in, you can find the button "Logout" on the right top. Click it, and you can log out and
return to the homepage.
3.2.2 Dealer/Installer
3.2.2.1 First Level Dealer
3.2.2.1.1
User's Stations
Login,it will turn into User's Stations page defaultly.(see Figure 3.3.1)
Figure 3.3.1 User's Stations
On this page, there are 7 menus, i.e. User's Stations, Dealer, Add Dealer, Devices List, Shared
Stations, User Center and Support, all of which can be addressed with a click.
Click "Shared Stations" menu, it will turn into Shared Stations page. Click "User Center" menu, it will
turn into User Center page.Click "Support" menu, it will turn into Support page.
When the user logsin, the default page will be "User's Stations".
On the page of "User's Stations", it displays the stations which contain the deveice in the
dealer(DealerTest).
On the left of the window shows the location of the station "Sample", while on the right there is also the
basic information of the station. Under the "Sample" on the right.
Click the station hyperlink "Sample", it will turn into the detail data of the station, the page as Station
Overview.From Station Overview, you can turn into Real-time Data, History, Warning.
Attention: Here, it can just look over the data of the the station "Sample", it can not edit or delete the
station.
Search PV Station
Below "User's Stations" is "Search PV Station ". You can search for any station that contains the
deveice in the dealer(DealerTest). The requisites of search are the name of station(Name), the location
(Country,Province/State,City)and capacity of station. The user can search with one or more of the three
requisites and start the search with a click of the button of "Search" after finishing filling the information.
3.2.2.1.2
Dealer
Login and click the "Dealer" menu to enter the page.(see Figure 3.3.2)
Figure 3.3.2 Dealer
It is Query area under menu bar.In Query, you can search for all the second level dealer information
under the first level dealer(Dealertest).There are 2 items: Dealer Code and Name.Input one or two of
the 2 items(Dealer Code, Name) and then click "Search" button to search for dealer information.The
result of searching is displayed in List area.
Attention: if you input both Dealer Code and Name information, make sure that they are
matched.Otherwise,it will be no searching result.
Under Query area, it is List area.It displays all the second level dealer information under the first level
dealer(Dealertest) defaultly.In the List,there are 9 columns: NO, Dealer Code, Checking Code, Name,
Phone, Email, Address, Amounts, Add/Edit.Dealer Code, Checking Code, Name and Amounts are from
input related information when add or edit second level dealer.Phone, Email and Address are from
inputing related information when the second level dealers register.In Amounts column,the number
means the amount of inverters under the second level dealer.
Attention: It displsys the devices allocation in all the Second Level Dealer of the First Level
Dealer(DealerTest).The detail allocation can be checked in Devices List, where you can check whether
the devices have been not allocated or not.
Click
or
to enter Add Dealer page.Click
dealer information.
in the right of one line to edit the second level
Equipment View
Click the number in Amounts column, it will display the detail inverters information.For example, click "2"
in Amounts column and the last line,it will get to Equipment View and displays the S/N of the 2
inverters.(see Figure 3.3.3)
Figure 3.3.3 Equipment View
Edit second level dealer
Click
in the right of last line, and then it will get to the second level dealer(dddaf) page, where you
can edit the related information.(see Figure 3.3.4)
Figure 3.3.4 Edit the second level dealer
Here, you can edit the dealer name.In the page, there are 2 list in the middle.In the left list, it displays
the inverters S/N contained by the first level dealer(DealerTest).And in the right list, it displays the
inverters S/N contained by the second level dealer(dddsf).
The "*" indicates the input must be not empty.
Devices Allocation
Search Not Allocated Devices
Above the lists, it is Devices Allocation, where you can search for some defined inverters from the left
list.In Devices Allocation, there are 2 S/N input.The upper one is the front 8 characters of inverter S/N,
which indicates the inverter type.The nether one is the back 8 characters of inverter S/N.Under the
"From", there is also an input, which is also the back 8 characters of inverter S/N.The upper and nether
back 8 characters of inverter S/N make a range, and when click "Search" button, it will search for
inverters S/N which is in the range and with the same inverter type.The search result is displayed in the
left list.
Allocate Devices
There are 4 buttons: , , , .Select a line in left list and click , the line will go to the right list.click ,
all the lines will go to the right list.Select a line in right list and click , the line will go to the left list.click
, all the lines will go to the left list.
If finish editing the second level dealer information, click "OK" button to save modified.Or click "Cancel"
button to cancel all the modified.
3.2.2.1.3
Add Dealer
Login and click the "Add Dealer" menu to enter the page.(see Figure 3.3.5)
Figure 3.3.5 Add Dealer
Here, the added dealer is a second level dealer.
Firstly, you need to input Dealer Code.The front 7 characters of Dealer Code is set, and you just need
to input the last 3 characters which must be not other characters but numeric characters.
Attention: make sure the last 3 characters is not as the same as previous Dealer Code.(You click
"Dealer" menu to check previous Dealer Code)
After input the last 3 characters of Dealer Code, the Check Code will come out automatically.Then you
need to input Dealer Name.
Attention: the "*" indicates the input must be not empty.
In the page, there are 2 list in the middle.In the left list, it displays the inverters S/N which are not
allocated contained by the first level dealer(DealerTest).And in the right list, it displays the inverters S/N
contained by the second level dealer.
Devices Allocation
Search Not Allocated Devices
Above the lists, it is Devices Allocation, where you can search for some defined inverters from the left
list.In Devices Allocation, there are 2 S/N input.The upper one is the front 8 characters of inverter S/N,
which indicates the inverter type.The nether one is the back 8 characters of inverter S/N.Under the
"From", there is also a input, which is also the back 8 characters of inverter S/N.The upper and nether
back 8 characters of inverter S/N make a range, and when click "Search" button, it will search for
inverters S/N which is in the range and with the same inverter type.The search result is displayed in the
left list.
Allocate Devices
There are 4 buttons: , , , .Select a line in left list and click , the line will go to the right list.click ,
all the lines will go to the right list.Select a line in right list and click , the line will go to the left list.click
, all the lines will go to the left list.
Attention: In the left list, it contains the not allocated deveices of the first level dealer.If all the deveices
are allocated, there will be no device to allocate, and the left list will be empty.
If finish editing the second level dealer information, click "OK" button to save modified.Or click "Cancel"
button to cancel all the modified.
3.2.2.1.4
Devices List
Login and click the "Devices List " menu to enter the page.( see Figure 3.3.6)
Figure 3.3.6 Devices List
Under the menu bar, it is Device List.The list has 4 columns: NO, Model, S/N, Check Code, 2-Level
Dealser Code.Model column indicates the device type. 2-Level Dealser Code column indicates the
second level Dealer which contains the definedn device.
In the list, it contains all the devices of the first level dealer(DealerTest).The list displays the allocation
of all the devieces of the dealer.For every first level dealer, the devices(Model, S/N) is set by GoodWe
company(accroding to the dealer's business record).From the list, you can chcek the allocation of any
device of the dealer, and you can know whether it has devices not allocated or not.
3.2.2.2 Second Level Dealer
3.2.2.2.1
User's Stations
Login,it will turn into User's Stations page defaultly.(see Figure 3.3.7)
Figure 3.3.7 User's Stations
On this page, there are five menus, i.e. User's Stations, Shared Stations, User Center, Devices List,
and Support, all of which can be addressed with a click.
Click "Shared Stations" menu, it will turn into Shared Stations page. Click "User Center" menu, it will
turn into User Center page.Click "Support" menu, it will turn into Support page.
When the user logsin, the default page will be "User's Stations".
On the page of "User's Stations", it displays the stations which contain the deveice in the
dealer(DealerTest).
On the left of the window shows the location of the station "Sample", while on the right there is also the
basic information of the station. Under the "Sample" on the right.
Click the station hyperlink "Sample", it will turn into the detail data of the station, the page as Station
Overview.From Station Overview, you can turn into Real-time Data, History, Warning.
Attention: Here, it can just look over the data of the the station "Sample", it can not edit or delete the
station.
Search PV Station
Below "User's Stations" is "Search PV Station ". You can search for any station that contains the
deveice in the dealer(DealerTest). The requisites of search are the name of station(Name), the location
(Country,Province/State,City)and capacity of station. The user can search with one or more of the three
requisites and start the search with a click of the button of "Search" after finishing filling the information.
3.2.2.2.2
Devices List
Login and click the "Devices List " menu to enter the page.( see Figure 3.3.8)
Figure 3.3.8 Devices List
Under the menu bar, it is Device List.The list has 4 columns: NO, Model, S/N, Check Code, 2-Level
Dealser Code.Model column indicates the device type. 2-Level Dealser Code column indicates the
second level Dealer which contains the definedn device.
In the list, it contains all the devices of the second level dealer.For Second Level Dealer, the devices is
from First Level Dealer allocating.
3.3 Data Overview
3.3.1 Station Overview
The user can see the data and information of the station as follows:
Step 1. Log in and enter the page of "My Stations"(Terminal User)(see Figure 3.2.1), enter the page of
"User's Stations"(Frisr Level Dealer User)(see Figure 3.3.1),enter the page of "User's Stations"(Frisr
Level Dealer User)(see Figure 3.3.7).
Step 2. Choose one station (e.g. Sample) and click on the name ("Sample") to enter the page of
concrete information.(See Figure 3.4.1)
(The station"Sample" is taken as an example.)
Figure 3.4.1 Sample Station Overview
In the station detail information window(see Figure 3.4.1), there is a line("Sample") under the menu
bar.Click the "Sample", and then it will turn into My Stations window, where it can edit the station
information.(see Figure 3.2.2)
Station Generating Information
Below the line("Sample") is station generating information.
The information lists as follows:
Creation Date, Capacity, Power, EDay, ETotal, Daily Income, Total Income, Daily Avoid, Total Avoid,
Daily Plant, Total Plant.
Creation Date: The date of creating the station.
Capacity: It comes from the capacity which is set when creat station.(see Figure 3.2.12)
EDay: The histogram of the day.
ETotal: The total generated energy.
Daily Income: According to EDay and Price(which is set when creat station(see Figure 3.2.12)),
calculate to get the value.
Total Income: According to ETotal and Price(which is set when creat station(see Figure 3.2.12)),
calculate to get the value.
Daily Avoid: the number of carbon emissions which is reduced. According to EDay, calculate to get the
number of carbides which react to make the same energy, and then get the number of carbon
emissions.
Total Avoid: the number of carbon emissions which is reduced. According to ETotal, calculate to get the
number of carbides which react to make the same energy, and then get the number of carbon
emissions.
Daily Plant: the number of cut trees which is reduced. According to EDay, calculate to get the number
of trees which is cut dowm to burn to make the same energy.
Total Plant: the number of cut trees which is reduced. According to ETotal, calculate to get the number
of trees which is cut dowm to burn to make the same energy.
Below the station generating information is four menus, i.e. Overview, RealTime, History and Warning.
Overview
Power-Time curve
It is Power-time curve under the four menus. (see Figure 3.4.2)
Figure 3.4.2 Power-Time curve
When the mouse stay on the curve, it will display the detail data of the point.(see Figure 3.4.3)
Figure 3.4.3 the data point of Power-Time curve
Figure 3.4.3 illustrates today's Power-Time curve (today is default time). Below the curve are four
buttons: Previous Day, Today, Next Day and Energy-Time. On the left of "Previous Day" is date box.
When it shows "2013-03-26", it means that today is Mar. 26th, 2013. Click "Previous Day", it will show
the curve of Mar. 25th , 2013 and the date box will also show as 2013-03-25. (see Figure 3.4.4)
Figure 3.4.4 2013-03-25 Power-Time curve
Similarly, click on "Today" and the curve will be that of today; click on "Next Day"and you will see the
curve of 2013-03-27. You can search for the power-time curve of every day by clicking on "Previous
Day"or "Next Day".
On the left of "Previous Day" button, it is a date box, where you can input the date at will. And in the
right of the date box, there is a little calendar icon.Click the little calendar icon, and it will turn into a
calendar in which you can click to choose date.
Energy-Time histogram
Click "Enerfy-Time" button, and then the Power-time curve will change to Energy-Time histogram.(See
Figure 3.4.5)
Figure 3.4.5 histogram
Figure 3.4.5 is the daily generated energy histogram of the month (the month is default time). There are
four buttons: Month, Year, OverYears, Power-Time. On the left of "month" is a list of date choice.When
it shows "2013-03-26", it means that today is Mar. 26th, 2013. Click "Month" button, and then it will
show daily generated energy of this month.(see Figure 3.4.5)
Click "Year" button, and then it will show monthly generated energy of this year.(see Figure 3.4.6)
Figure 3.4.6 monthly generated energy histogram
It will show the yearly generated energy since the station establishment by clicking "OverYears".(see
Figure 3.4.7)
Figure
3.4.7 yearly generated energy histogram
Therefore, select the date in the date box, you can view the generated energy histogram of different
day,months or years.In these histograms, if the mouse stay on the histogram, it will display the detail
generated energy of the histogram.Click "Power-Time" button, and then it will Power-time curve(default
today's Power-time curve).
Device List
Below the station overview is the device list.(see Figure 3.4.1)In the device list, there are 8 columns
(from left to right): Inverter S/N, Type, Description, EzLogger/EzMonitor S/N, ETotal, Power, EDay,
Status.
Some information has been input when creat station. For instance, Inverter S/N, Type, Description are
Inverter S/N, Type, Description which are filled in when creat station. The ETotal, Power, EDay and
Status come from inverter transmitted data. It is easy to find out that some inverters with
EzLogger/EzMonitor S/N are non-WIFI Inverters whose data are transmitted to Web Server by
EzLogger/EzMonitor, while other without EzLogger/EzMonitor S/N are WIFI inverter whose data can be
sent to web server by themselves.
Edit Device Information
In device list, each device can be edited. To take 13600DSU13038888 as an example, click "Edit"
button and comes to device information edition interface. (see Figure 3.4.8)
Figure 3.4.8 equipment information edition
In this interface, it displays inverter S/N, Type and Description.Type and Description can be changed (
S/N unable to be changed). After edition, please click the "Update" button to save the modified
information or click "Quit" button to return.
3.3.2 Real-time Data
To view the real-time data of the station, please follow the following steps.
Step 1. Log in and enter the page of "My Stations"(Terminal User)(see Figure 3.2.1), enter the page of
"User's Stations"(Frisr Level Dealer User)(see Figure 3.3.1),enter the page of "User's Stations"(Frisr
Level Dealer User)(see Figure 3.3.7).
Step 2. Choose one station (e.g. Sample) and click on the name ("Sample") to enter the page of
concrete information.(see Figure 3.4.1)
Step 3. In the middle of the detail station information, please click the "RealTime" menu on the right side
of the "Overview" menu, and then enter the real-time data page. (see Figure 3.4.9)
Figure
3.4.9
real-time data interface
Like "Station Overview", the first line under memu bar is station name(Click it to turn into Edit Station).
And under it, it is station generating information.
Under station generating information is real-time data window with much information there. There are
totally 19 columns(from left to right):No., inverter S/N, Status, Pac, E-Today, E-Total, H-Total, Error
Message, Vpv, Ipv, Vac, Iac, Fac, Temperature, VBattery, IBattery, Load, Consume of Day, Consume.
These 19 columns include all real-time information. If you want to view the latest uploaded data, please
refresh the page.
3.3.3 History
If the user wants to view the historical data, please follow the steps below:
Step 1. Log in and enter the page of "My Stations"(Terminal User)(see Figure 3.2.1), enter the page of
"User's Stations"(Frisr Level Dealer User)(see Figure 3.3.1),enter the page of "User's Stations"(Frisr
Level Dealer User)(see Figure 3.3.7).
Step 2. Choose one station (e.g. Sample) and click on the name ("Sample") to enter the page of
concrete information.(see Figure 3.4.9)
Step 3. In the middle of the detail station information, please click the "History" menu to enter station
historical data window.(see Figure 3.4.10)
Figure
3.4.10
History data window
Like "Station Overview", the first line under memu bar is station name(Click it to turn into Edit Station).
And under it, it is station generating information.
Under station generating information is historical data window. In the device list are all inverters of the
station. Every inverter is a unit with S/N, Description, Type inside.(see Figure 3.4.10) In device list,the
item of 1017KDTU12B00030 (inverter S/N) is blue and other items are white. It shows the inverter is
selected and it displays the historical data of the inverter on the right.If click other item ,it will display
the historical data of the clicked inverter.
Choose Data Item
You may not see the icon
in the upper right side of the historical data window. After the icon
, it
is "Pac(W)"(defaultly). It shows it is displaying the historical data of the item:Pac. When the mouse is on
the icon, data item will be shown below automatically. (see Figure 3.4.11)
Figure 3.4.11 Choose the Data Item
In the data item menu, if you choose one item, click "○" and you can see the item name after the icon
. The curve turns into historical data curve of this item.
The historical data curve of this item is like Power-time curve in Station Overview.The buttons(Previous
Day, Today, Next Day) and date box are like in Station Overview.
3.3.4 Warning
If the user wants to view the warning information of the station, please follow the steps below:
Step 1. Log in and enter the page of "My Stations"(Terminal User)(see Figure 3.2.1 ), enter the page of
"User's Stations"(Frisr Level Dealer User)(see Figure 3.3.1),enter the page of "User's Stations"(Frisr
Level Dealer User)(see Figure 3.3.7).
Step 2. Choose one station (e.g. Sample) and click on the name ("Sample") to enter the page of
concrete information.(see Figure 3.4.1)
Step 3. In the middle of the detail station information, click "Warning" menu to enter the warning
interface.(see Figure 3.4.12)
Figure 3.4.12 Warning window
Like "Station Overview", the first line under memu bar is station name(Click it to turn into Edit Station).
And under it, it is station generating information.
Under station generating information is Query area.In the Query area, you can search for related
warning information.There are 2 items:S/N and Status.Status contains 2 kinds:Unsolved and
Solved.Input one or two of the 2 items(S/N, Status) and then click "Search" button to search for warning
information.The result of searching is displayed in Inverter Exception area.
Under Query area is Inverter Exception area.It displays all the warning information of the station
defaultly.There are 8 columns: S/N, Type, Description, Error Code, Error Message, Error DateTime,
Status, Error Time Condition. Error Time Condition contains 2 kinds:History and RealTime. In Inverter
Exception area, it displays all related information of Error.
3.4 Shared Stations
Login and click the "Shared Stations" menu to enter the page.( see Figure 3.5.1)
Figure 3.5.1 Shared Stations
Shared stations here include all stations shared by customers. Users choose sharing their stations by
clicking Shared box(in Creat Station) and then these shared stations can be shown in this page.(see
Figure 3.5.1)
On the right side of the window, the aaa station shows that the general situation of the station: station
name, Capacity, Power, ETotal, Total Income, Creation Date, Status, Address.
Search Shared Station
Below "Shared Stations" is "Search Shared Station". Here "Search Shared Station" is as the same as
"Search PV Station" in My Stations, but here "Search Shared Station" is limited to shared stations
rather than unshared ones.
Attention: For shared stations, what you can do is to view its general situation but change it.
3.5 User Center
User Information
After login, Click "User Center" menu and enter the User Information interface.(see Figure 3.5.2)
Figure 3.5.2 Users Information(Terminal User)
Figure 3.5.3 Users Information(First Level Dealer/Second Level Dealer)
Users information can be added and modified here. The input with "*" must be filled in. After
modification, click the "OK" button to save modification or click "Cancel" button to return.
Update Password
At the bottom of User Information window, there is a line: Update Password.Click the "Update
Password" and go to the Update Password interface.(see Figure 3.5.4)
Figure 3.5.4 Update Password window
Here password is for login. Input Old Password, New Password and Password Confirm. The New
Password must be the same as Password Confirm. After that, click the "OK" button to save modification
or "Cancel" button to return.
3.6 Support
Contact Us
After login, click the "Support" menu and enter the interface(Contact us interface).(see Figure 3.5.5)
Figure 3.5.5 Contact Us
Here are provided address and contact details of GoodWe China, Europe and Australia office. Any
question, please contact us.
Help
Click "Help" menu to enter the authority instruction interface.(see Figure 3.5.6)
Figure 3.5.6 Help
Authority of different users is detailed illustrated here.There are 4 kinds of users: Administrater,
Terminal User, First Level Dealer, Second Level Dealer.There, what Terminal User can do mostly is to
creat stations, edit stations and do other operations about stations. What First Level Dealer can do
mostly is to creat Second Level Dealer, edit Second Level Dealer and do other operations about
Second Level Dealer.What Second Level Dealer can do mostly is to look over the stations under itself.
Download
Click "Download" menu to enter the download interface.(see Figure 3.5.7)
Figure 3.5.7 Download
There are 2 App software:iOS App, Android App.Click iOS App hyperlink, it will turn into GoodWe
EzViewer app page of iTunes App store, where you can download the app(this is a free app). Then you
can install iOS App to Apple Telephone.After that, you can use the iOS App to look over the data, just
like the website(www.goodwe-power.com).Click Android App hyperlink to download Android App.Then
you can install Android App to Android Telephone.After that, you can use the Android App to look over
the data, just like the website(www.goodwe-power.com).
contact us |www.goodwe.com.cn
JIANGSU GOODWE POWER SUPPLY TECHNOLOGY CO.,LTD.
ADD:NO.189 Kun Lun Shan Road,Suzhou New District.jiangsu,China
TEL: +86 512 6239 7998|FAX: +86 512 6239 7972