1
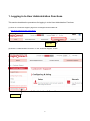
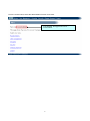
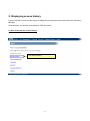
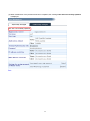
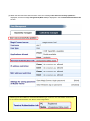
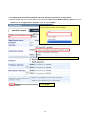
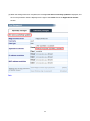
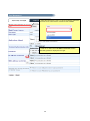
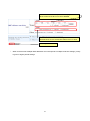
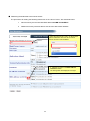
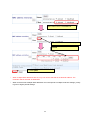
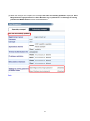
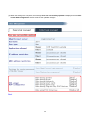
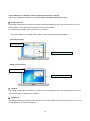
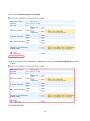
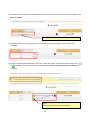
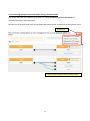
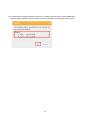
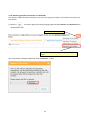
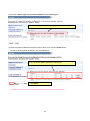
MagicConnect Cloud Service User Administration Function Manual (For Account Managers) 4th Edition ver. 1 NTT IT Corporation Table of Contents 1. LOGGING IN TO USER ADMINISTRATION FUNCTIONS .......................................................................... 2 2. DISPLAYING ACCESS HISTORY ................................................................................................................ 6 3. USER MANAGEMENT................................................................................................................................ 12 4. GROUPING ................................................................................................................................................. 55 5. SECURITY ................................................................................................................................................... 88 6. CHANGING THE PASSWORD (ACCOUNT MANAGER) .......................................................................... 91 Users planning to connect to office PCs, servers, WOL controllers (MC3000), etc., from a remote device with different account information (user IDs and passwords), must first complete the grouping settings. See "4. Grouping" for details of grouped connections. 1 1. Logging in to User Administration Functions This section describes the procedures for logging in to the User Administration Functions (1) Click our “Customer support” page from our MagicConnect website at http://www.magicconnect.net/english/ . Click here (2) Click the “Administration Functions” on the “Customer support” screen. Click here 2 (3) Input the server information of the MagicConnect server on the Server column of “For Account Managers”. Then click the Access button. The server information is written on the Account Registration Form. i. Input the host name from the server information on the Account Registration Form. E.g.: asp1 ii. Click Access (4) On the user authentication screen, enter the Account Manager's username and password from the Account Registration Form, and click the Login button. i. Enter the Account Manager’s username and password. ii. Click Login 3 From the screen below, select the administration function to be used. The logged-in Account Manager is displayed. In the example, the logged-in account is account.admin. 4 The available administration functions are shown below. Access history Account Managers can browse the access history of administered general users. User management For administered general users, Account Managers can modify passwords, modify the connection conditions of accounts, and manually release account locks. Grouping The connection configurations of administered general users can be browsed and edited. Security You can restrict the IP addresses that can log in to this account administration screen. Change password The password of the Account Manager can be changed. Logout Click to log out from the administration functions. Note: Above is the menu screen when logging in from an Account Manager. If logging in from a general user account, the screen below—with fewer functions—will be shown. Refer to the MagicConnect Cloud Service Administration Functions User's Manual (For General Users) to guide you through the user administration functions for general users. 5 2. Displaying access history Use this function to view access history for MagicConnect general users below the level of Account Manager. Access history can also be downloaded in CSV file format. 2.1 How to browse the access history (1) From the Menu screen, click Access history. Click Access history 6 (2) The Access History screen is displayed. Follow the steps i.–iii. The general user access history for the selected month will be displayed. i. Click the link for the desired month to browse. August 2014 is selected in the example. ii. Select the type/details for the access history. By default, Viewer only is selected as the Type and nothing is selected as the Details. iii. Click Update The display, from left: Connection starting time, connection finishing time, connection length, connection source address (global IP address), and MAC address of the terminal using MagicConnect. 7 ■ Browsing only the Viewer access history i. Select Viewer only ii. Click Update Only the Viewer access history is displayed 8 Browsing only the Client access history i. Select Client only ii. Click Update Only the Client connection history is displayed If the Client is currently connected, [Connecting] is displayed in bold red type. A similar display is also shown for Viewers. 9 Browsing both Viewer and Client access histories i. Select Viewer and client ii. Click Update The column Type is added as the first column and both Viewer and Client history are displayed at the same time. 10 Displaying information together with details i. Select Viewer and client ii. Check both boxes iii. Click Update Details << and >> indicates the direction of operation. >> indicates operation from the left field (viewer) to the right field (client). << indicates operation from the right field (viewer) to the left field (client). From left, the following viewer-client information is shown: - Username for the connection source viewer or the connection destination client (Displayed in bold if the connection is with a different username) - The port used by the remote operation application - The time transmission started - The time transmission ended - Global IP address for the connection source/destination Downloading access history in CSV file format i. Select the month of access history you want to download. ii. Click the link to the CSV file to be downloaded History of connections to server: Data for the above items, from "Type" to "MAC address," can be downloaded. History of viewer-to-client connections: The following data items can be downloaded: username, global IP address, and MAC address for the connection source viewer; username, global IP address, and MAC address for the connection destination client; the port used by the remote operation application; the time transmission started; and the time transmission ended. 11 3. User management Settings for general users can be changed with this function. 3. USER MANAGEMENT................................................................................................................................ 12 3.1. Changing general user passwords ........................................................................................................... 15 3.2. Changing the remote device to be used with Terminal Authentication type or Mobile type ..................... 18 3.3. Changing application use permissions ..................................................................................................... 21 3.3.1. Enabling the use of Viewers that does not have quarantining function on Plus edition ................... 22 3.3.2. Enabling use from Mobile type (iPhone/iPad or Android device) .................................................... 24 3.4. Restricting networks or terminals able to use MagicConnect .................................................................. 26 3.4.1. Restricting networks able to use MagicConnect ............................................................................. 27 3.4.2. Restricting terminals able to use MagicConnect ............................................................................. 30 3.5. Changing program function restrictions .................................................................................................... 34 3.5.1. Allowing/disallowing saved passwords on a remote device of Mobile type (for iPhone/iPad and Android device) ......................................................................................................................................... 35 3.5.2. Changing sharing settings when using XDL edition ........................................................................ 38 3.6. Manually releasing general user account locks ........................................................................................ 41 3.7. Changing settings for multiple users at the same time............................................................................. 44 3.7.1. How to display the Collectively Managed screen ........................................................................... 45 3.7.2. Selecting users to be collectively managed .................................................................................... 46 3.7.3. Changing collectively managed settings ......................................................................................... 49 3.7.4. Managing users with the Separately Managed screen ................................................................... 53 The following are for changing settings for multiple users at the same time. 3.3.1. Enabling use Viewers that does not have quarantining function ................................................... 22 3.3.2. Enabling use from Mobile type (iPhone/iPad or Android device) ................................................... 24 3.4.1. Restricting networks able to use MagicConnect ............................................................................ 27 3.4.2. Restricting terminals able to use MagicConnect ............................................................................ 30 3.5.1. Allowing/disallowing saved passwords on a remote device of Mobile type (for iPhone/iPad and Android device) ......................................................................................................................................... 35 3.5.2. Changing sharing settings when using XDL edition ....................................................................... 38 See 3.7. Changing settings for multiple users at the same time for details. 12 (1) Click "User management" from the Menu screen to display the User management screen. Click User management (2) The Separately managed tab on the User management screen will be displayed. Select the user to manage from the pull down menu. A “narrow search” function is also available. A “narrow search” function is also available. Select the user to manage. 13 (3) The Separately managed tab will be shown for the selected user. 14 3.1. Changing general user passwords Passwords must meet the following requirements: - Password length is between 8 and 255 characters - The password contains one or more half-width capital or lower-case alphabetic characters, plus one or more numerals or symbols. Examples of acceptable and unacceptable passwords Password Acceptable? Explanation abCdefg2 yes - a1234567 yes - abcdefg% yes - abc#def2 yes - 1234567# yes - Abcd2 no The password length is less than 8 characters. abCDEfgh no 12345678 no The password has a length of 8 or more characters, but is composed of only alphabetic characters. The password has a length of 8 or more characters, but is composed of only numerals. Cautions: 1. Changing a password registered on the MagicConnect server will not affect Viewers or Clients currently connected to MagicConnect. The new password will be valid from the next time connection authentication is performed. 2. When a password is changed, have the general user change the password saved in the client software to the new password. If this is not changed, the user will be unable to use MagicConnect if the machine is restarted. The procedures for changing a saved password are as follows: Right-click the MagicConnect icon appearing in the task tray on the Desktop, and from the menu that is displayed, select Settings - Authentication and input the new password. If MC Assist is being used with MagicConnect Terminal Authentication type, have the user modify the password that is saved in MC Assist. For the procedures for changing passwords saved in MC Assist, see the item "Using automatic connection tool ‘MC Assist’” in the Quick Setup manuals. 15 (1) Select the general user whose password is to be changed, and select Modify password in the Password section. New password and New password (confirmation) fields are displayed. Enter the new password into these and click the "Update" button. i. Select the general user whose password is to be changed. A “narrow search” function is also available. ii. Select Modify password iii. Enter the new password into the New password and New password (confirmation) fields iv. Click Update 16 (2) When modification of the password has been completed, the message User was successfully updated is displayed. 17 3.2. Changing the remote device to be used with Terminal Authentication type or Mobile type Terminal Authentication type and Mobile type are only available from the remote device that was used for the first time login. If you want to change the remote device, use this function in order to reset the terminal authentication information that is set on the server. Then, login from the new remote device. Note that the remote device connecting to the server during the reset can continue its use until it is disconnected. Cautions: By using this function, Mobile type account cannot be changed as follows. You need to pay a fee to change the contract. To use the account on Windows device that was used in iPhone/iPad or Android device. To use the account on iPhone/iPad or Android device that was used in Windows device 18 (1) Select the general user for which the remote device is to be changed, then check the Reset box in the Terminal authentication info section and click Update. i. Select the general user for whom the remote device is to be changed. A “narrow search” function is also available. ii. Check the Reset box in the PC field iii. The message shown below is displayed. Click the OK button. iv. Click Update If Mobile type is also available on Terminal Authentication type, 2 columns "PC" and "Mobile" will be shown on the "Terminal Authentication info" like the screen image below. If the remote device is Windows device, check "PC". If the remote device is iPhone/iPad or Android device, check "Mobile". 19 (2) When the terminal information has been reset, the message User was successfully updated is displayed, and the message Unregistered (Was reset) is displayed in the Terminal Authentication info section. If Mobile type is also available on Terminal Authentication type, 2 columns "PC" and "Mobile" will be shown on the "Terminal Authentication info" like the screen image below. 20 3.3. Changing application use permissions This function is used in the following cases: When enabling use of Viewer that does not have quarantining function in a single account (username.) (In the initial commercial shipping state, Viewer that does not have quarantining function cannot be used.) When enabling the use of Mobile type (iPhone/iPad or Android device) for USB type or Terminal Authentication type in a single account (username) when this combination is allowed. (In the initial commercial shipping state, Mobile type (iPhone/iPad or Android device cannot be used.) Settings modified with this function do not affect Viewers currently connected to the MagicConnect server. The settings will be valid from the next time connection authentication is performed. 21 3.3.1. Enabling the use Viewers that does not have quarantining function on Plus edition (1) Select the general user of Plus edition, then check the Allow to use Without Plus(*) option box in the Viewer field of the Applications allowed column and click Update. i. Select a general user who is using the Plus viewer. A “narrow search” function is also available. ii. Check the Allow to use Without Plus(*) option box iii. Click Update 22 (2) When the settings have been completed, the message User was successfully updated is displayed, and the current permission status is displayed to the right of the Viewer field in the Applications allowed section. 23 3.3.2. Enabling use from Mobile type (iPhone/iPad or Android device) (1) Select a general user for whom mobile access is also available, then check the Allow to use Mobile combination box in the Viewer field of the Applications allowed section and click Update. i. Select the general user for whom mobile use will be allowed. A “narrow search” function is also available. ii. Check the Allow to use Mobile combination iii. Click Update 24 (2) When the settings have been completed, the message User was successfully updated is displayed, and the current permission status is displayed to the right of the Viewer field in the Applications allowed section. 25 3.4. Restricting networks or terminals able to use MagicConnect This function is used to perform the following: Restrict networks able to use MagicConnect Restrict terminals able to use MagicConnect Settings modified with this function do not affect Viewers or Clients currently connected to the MagicConnect server. Changes will be valid from the next time connection authentication is performed. 26 3.4.1. Restricting networks able to use MagicConnect Networks able to use MagicConnect can be restricted for each account (username) by restricting the global IP address of the connection source. The global IP address of the connection source for each account (username) can be viewed via IP address under "2. Access history." In the access history shown below, the global IP address of the Viewer connection source of “user1” is 198.51.100.1 and the global IP address of the client connection source is 203.0.113.1. The procedures for setting the following restrictions on the client of “user1” are described below. 1. Allow connection from the network with connection source address 203.01.113.1. 2. Disallow access from networks not corresponding to the above. 27 i. Select the general user "user1" for whom IP address restrictions are to be set. A “narrow search” function is also available. ii. Click the >> button in the IP address restriction section. The setting fields are displayed to the right. 28 iii. Click the Insert button. Input fields are displayed. Enter the IP address 203.0.113.1 and the subnet mask 255.255.255.255 and select allowed. iv. Select disallowed as the setting for connections from networks other than those with the IP address set in iii. above. v. Click Update * Restrictions can be set at the network address level by setting the subnet mask. * When multiple restrictions are set for a single IP address, priority is given to higher-placed settings. 29 3.4.2. Restricting terminals able to use MagicConnect Terminals able to use MagicConnect can be restricted by restricting MagicConnect connection for each account (username) by the MAC addresses of the terminals. ■ Restricting terminals able to be used as Viewers The procedures for setting the following restrictions on the Viewer of “user1” are described below. 1. Allow access by the terminal with MAC address AA-BB-CC-DD-EE-FF. 2. Disallow access by terminals that do not have the above MAC address. i. Select the general user "user1" for whom MAC address restrictions are to be set. A “narrow search” function is also available. ii. Click the >> button in the MAC address restriction section. The setting fields are displayed to the right. 30 iii. Click the Insert button. Input fields are displayed. Enter AA-BB-CC-DD-EE-FF and select allowed. iv. Select disallowed as the setting for connections from terminals which do not have the MAC address set in iii. above. v. Click Update * When a terminal has multiple MAC addresses and corresponds to multiple restriction settings, priority is given to higher-placed settings. 31 ■ Restricting terminals able to be used as clients The procedures for setting the following restrictions on the client of “user1” are described below. 1. Allow access by the terminal with MAC address AA-BB-CC-DD-EE-FF. 2. Disallow access by terminals that do not have the above MAC address. i. Select the general user "user1" for whom MAC address restrictions are to be set. A “narrow search” function is also available. ii. Click the >> button in the MAC address restriction section. The setting fields are displayed to the right. 32 iii. Select disallowed so that the Insert button will be shown in the Client field. iv. Click the Insert button that is displayed. v. Enter AA-BB-CC-DD-EE-FF and select allowed. vi. Click Update * When multiple MAC addresses are set, only one can be selected as the allowed address. The remainder will be selected as disallowed. * When a terminal has multiple MAC addresses and corresponds to multiple restriction settings, priority is given to higher-placed settings. 33 3.5. Changing program function restrictions Use this function to change the following program function restrictions. Allowing/disallowing saving two passwords on a remote device (Android/iOS) of Mobile type In the initial commercial shipping state is as follows. Type of password MagicConnect login Windows log on Saving allowed disallowed Allowing/disallowing the device sharing in the use of XDL edition In the initial commercial shipping state is as follows (It is in the same state as NDL edition.) Type of device sharing Allow sharing printers Allow sharing drives Allow sharing clipboards Allow sharing smart cards Allow sharing serial ports Allow sharing Plug and Play (PnP) devices Allow using Print Screen key Allow sharing Disallow Disallow Disallow Disallow Disallow Disallow Allow a part of it Note that changes made with this function will not affect Viewers currently connected to MagicConnect. Changes will be valid from the next time connection authentication is performed. 34 3.5.1. Allowing/disallowing saved passwords on a remote device of Mobile type (for iPhone/iPad and Android device) Use this function to change settings for saving two passwords (a MagicConnect login password and Windows log on password) on an iPhone/iPad or Android device. This section explains the steps for changing settings for "user1." Not allowing users to save a MagicConnect login password Not allowing users to save a Windows log on password 35 (1) Select the general user able to use a Mobile type (for iPhone/iPad or Android device). Uncheck Allow to save MagicConnect login password and Allow to save Windows log on password in the Settings for saving password of Mobile Viewer section, then click Update. i. Select the general user “user1” whose saved password settings you want to change. A “narrow search” function is also available. ii. Uncheck Allow to save MagicConnect login password and Allow to save Windows log on password iii. Click Update 36 (2) When the changes are complete, the message User was successfully updated is displayed. Save MagicConnect login password and Save Windows log on password in the Settings for saving password of Mobile Viewer section will be disallowed. 37 3.5.2. Changing sharing settings when using XDL edition In the XDL edition, the remote desktop’s sharing settings can be changed. The following is an explanation of how to change settings for “user1” using the XDL edition. Allowing sharing printers Disallowing use of the Print Screen key (1) If you select a user using the XDL edition, the XDL viewer RDP configuration section will be displayed and changes can be made. i. Select the general user “user1” using the XDL edition. A “narrow search” function is also available. ii. Check the Allow sharing printers box iii. Select Disallow all under Allow using Print Screen key iv. Click Update 38 (2) When the settings are complete, the message User was successfully updated is displayed and the XDL viewer RDP configuration section will show the updated changes. 39 3.5.2.1 Differences in the three “Allow using Print Screen key” settings This section explains the differences in the three Allow using Print Screen key settings. Allow a part of it This setting activates the Print Screen key when the remote desktop screen of the remote device is on “full screen display.” Data capture from the target PC’s screen is possible. For “partial screen display,” the Print Screen key is inactive. “Full screen display” and “partial screen display” refer to the following screen displays. Full screen display On remote device Desktop of the target PC Partial screen display On remote device Desktop of the target PC Allow all This setting activates the Print Screen key when the remote desktop screen of the remote device is on either “full screen display” or “partial screen display.” Disallow all This setting deactivates the Print Screen key when the remote desktop screen of the remote device is on “full screen display” or “partial screen display.” 40 3.6. Manually releasing general user account locks When a general user's login to administration tools has been disabled (i.e., account lock is enabled), use this function if you want to manually release the lock before it is automatically released. When authentication of a user login to the administration tools fails five times in a row, that account (username) can no longer log in to the administration tools. The account will be unable to log in to the administration tools until the account lock is released automatically by the system or manually by the Account Manager using this function. Note that log in disabling (account lock) does not affect authentication of Viewer and Client connections to MagicConnect. Users can continue to use MagicConnect normally. If a general user in your company reports that an account for administration tools has been disabled without apparent reason, please contact your distributor. When the username or password is incorrect, the message "!!! Username and/or password are wrong. !!!" is displayed. Upon failing five times in a row The account is locked, and the user will be unable to log in to the administration screen until the lock is released. 41 (1) Select the username of the user whose account is locked, check the Release the lockout box in the Username section, and click the Update button. i. Select the user for whom lockout is to be released. A “narrow search” function is also available. ii. Check the Release the lockout box iii. Click Update 42 (2) When the lockout has been released, the message The lockout has been released is displayed in the Username section. 43 3.7. Changing settings for multiple users at the same time The user management steps up to this point have been “Separately managed” (settings are changed for one user at a time). The next section, however, explains the “Collectively managed” function for changing settings for multiple users at the same time. 44 3.7.1. How to display the Collectively Managed screen (1) Click the Collectively managed tab on the User management screen. (2) The screen will be switched to the Collectively Managed screen. 45 3.7.2. Selecting users to be collectively managed Select the users to be collectively managed. Note: If a new user is added after making all users collectively managed, these settings must also be carried out to make the new user collectively managed. This section explains the steps for making four users (user1, user2, user3, and user4) collectively managed. (1) At the top of the Collectively Managed screen, there is a Collectively managed tab. Select the users to be collectively managed from the user list in the Users separately managed section with the Select users to be collectively managed heading and click Select. A “narrow search” function is also available. i. Select the users (user1, user2, user3, user4) to be collectively managed ii. Click Select 46 (2) The users to be collectively managed will be shown in the Users collectively managed section. iii. “user1, user2, user3, and user4” will be shown in the Users collectively managed section. (3) Click Commit changes to the system (at the bottom of the screen) to make sure that the user information moved to the Users collectively managed section is stored on the MagicConnect server. iv. Click Commit changes to the system 47 (4) When the user information is committed to the MagicConnect server, the Collectively Managed screen will refresh. 48 3.7.3. Changing collectively managed settings You can specify settings to be applied in common to collectively managed users. After doing so, if a new collectively managed user is added, these same settings will apply to the new user. The following are the settings that can be applied in common. Please see each page for separate explanations. 3.3.1. Enabling use Viewers that does not have quarantining function .................................................... 22 3.3.2. Enabling use from Mobile type (iPhone/iPad or Android device) ................................................... 24 3.4.1. Restricting networks able to use MagicConnect ............................................................................ 27 3.4.2. Restricting terminals able to use MagicConnect ............................................................................ 30 3.5.1. Allowing/disallowing saved passwords on a remote device of Mobile type (for iPhone/iPad and Android device) ......................................................................................................................................... 35 3.5.2. Changing sharing settings when using XDL edition ....................................................................... 38 49 This section explains the steps for “Enabling use of Mobile type (for iPhone/iPad and Android device)” and “Disallowing saved passwords on remote devices of Mobile type (for iPhone/iPad and Android device.)” (1) At the bottom of the Collectively Managed screen, there is a Selection and configuration of items collectively managed area. Check the Select box in Mobile combination in the Viewer field of the Applications allowed section. (2) A settings option box will appear to the right of the Select box. Check the Allow to use combination *For user who uses mobile combination box. 50 (3) Next, check the Select box in the Settings for saving password of Mobile Viewer section. (4) A settings option box will appear to the right of the Select box. Uncheck Allow to save MagicConnect login password and Allow to save Windows log on password. 51 (5) Last, click Commit changes to the system. (6) When the changes are committed to the MagicConnect server, the Collectively Managed screen will refresh. 52 3.7.4. Managing users with the Separately Managed screen If you click the Separately managed tab, you can switch to the Separately Managed screen and verify or change settings user by user. (1) If you select a collectively managed user, i. A message will be highlighted explaining that the user is collectively managed ii. The shared settings that apply to that collectively managed user will be highlighted 53 (2) If you change the shared settings (i.e., Configuration(s)) that apply to a collectively managed user from the Separately Managed screen, the warning message below will appear. (3) If you click Update at the bottom of the Separately Managed screen, changes will be committed to the MagicConnect server. And the user in question will no longer be collectively managed. “user1” will be deleted from the Users collectively managed column and moved to the Users separately managed column 54 4. Grouping Use this feature to look up or edit connection configurations that enable transmission between a general user Viewer and Client. When a connection configuration is edited, the change is immediately committed to the Client. It will become valid for the Viewer from the next time connection authentication is performed. 4.1. Example of connection configuration .................................................................................................. 57 4.1.1. About Standard Connections and Grouped Connections ........................................................ 57 4.2. Looking up connection configurations ................................................................................................ 58 4.2.1. Displaying the list of Clients to which a Viewer can connect .................................................. 58 4.2.2. Displaying the list of Viewers able to connect to a Client ........................................................ 59 4.3. Editing connection configurations ....................................................................................................... 61 4.3.1. Enabling connection to multiple target devices (1-to-n connection) ....................................... 61 4.3.2. Enabling simultaneous connections by multiple users to a Windows server (n-to-1 connection) .............................................................................................................................................. 64 4.3.3. Configuring a connection to use “the MC3000” WOL controller (n-to-m connection) .......... 68 4.3.4. Deleting a grouped connection .................................................................................................... 73 4.4. Performing grouped connection tasks using a CSV-format file ........................................................ 76 4.4.1. Downloading grouped connection information in CSV format................................................. 78 4.4.2. Batch addition of grouped connections in CSV format ............................................................ 79 4.4.3. Batch deletion of grouped connections in CSV format ............................................................ 82 4.4.4. Restoring grouped connections in CSV format ......................................................................... 85 55 To bring up the Grouping screen, click the Grouping link from the Menu screen. Click Grouping 56 4.1. Example of connection configuration 4.1.1. About Standard Connections and Grouped Connections To easily enable a variety of connection configurations, two types of connection are available in MagicConnect. One type of connection is called a standard connection. Simply setting the same username for a Viewer and a Client enables transmission between the Viewer and Client. These connections are shown by solid black lines in the diagram below. The above is achieved through the purchase of an account known as a standard account. Viewer (remote device) Client (target device) Standard account: ID 1 Standard account: ID1 Standard account: ID 2 1 Standard account: ID2 Standard connection The other type of connection is called a grouped connection. This connection enables transmission among Viewers and Clients with different usernames, and is indicated by the dotted blue line in the diagram below. The above is achieved by registering the Viewer/Client connection configuration with the MagicConnect server using the grouping function. Viewer (remote device) Client (target device) Standard account: ID1 Standard account: ID 1 Target device dedicated account: ID2 1 Standard connection Grouped connection 57 4.2. Looking up connection configurations 4.2.1. Displaying the list of Clients to which a Viewer can connect (1) Select Show the list of clients to which the viewer can connect. A screen listing the Clients to which the Viewer can connect is displayed. The usernames to be displayed can be filtered using the filter text box. The example below shows filtering of displayed Viewers by the name “user”. Standard connections are indicated with solid black lines and grouped connections are indicated with solid blue lines. Select Show the list of clients to which the viewer can connect. The Viewers to be displayed can be filtered. Clients corresponding to the Viewer at left can be filtered. 58 4.2.2. Displaying the list of Viewers able to connect to a Client (1) Select Show the list of viewers which can connect to the client. A screen listing the Viewers that can connect to the Client is displayed. The usernames to be displayed can be filtered using the filter text box. Standard connections are indicated with solid black lines and grouped connections are indicated with solid blue lines. Select Show the list of viewers able to connect to the client. The Clients to be displayed can be filtered. Viewers corresponding to the Client at right can be filtered. 59 About the display of improper connections A connection will be considered as improper and a warning mark will be displayed ahead of the username in the following cases: 1. The connection is to a general user whose account has been suspended by NTT IT 2. The connection is to a general user for whom an account does not exist NTT IT will take the following actions toward an account for which termination of agreement was requested or for which a type change or other migration was requested: 1. Suspension of the account in the beginning part of the month following the month in which migration or termination of agreement occurred; 2. Deletion of the suspended account and grouped connections in the month following the above. For the above reason, during the period indicated in 1and 2, a warning mark will be displayed by accounts for which termination or migration was requested. The warning mark will no longer be displayed when "Deleting a grouped connection" is performed. Account Managers wishing to remove the mark should delete the grouped connection. However, note that setting (i.e., addition) of improper connections is not possible. 60 4.3. Editing connection configurations 4.3.1. Enabling connection to multiple target devices (1-to-n connection) This section describes procedures for enabling connection to multiple PCs or servers having different usernames. In the diagram below, one account that is the control device dedicated account ID1 (user1) and three accounts that are the target device dedicated accounts ID2 (user2) - ID4 (user4) are contracted and are not in a grouped connection. For this situation, this section describes the procedures for a grouped connection that enables connection to the Clients of “user2 - user4” by the Viewer of “user1”. Viewer (remote device) Client (target device) Control device dedicated account: ID 1 Target device dedicated account: ID 2 Tar Target device dedicated account: ID 3 Target device dedicated account: ID 4 Standard Connection Grouped Connection (1) To center the display on the Viewer, click Show the list of clients to which the viewer can connect and then below that, click Show all viewers. Click Show the list of clients to which the viewer can connect. Next, below that, click Show all viewers.* * Accounts and their connection configurations are displayed when standard connections or grouped connections exist. As both connection types do not initially exist in this example, the accounts of the viewers are displayed by clicking Show all viewers. 61 (2) To display all Clients which can be specified as the connection destination for the Viewer of “ user1”, click Show all clients. Click Show all clients (3) All Clients which can be specified as the connection destination for the Viewer of “ user1” are displayed. All clients for which grouped connection with “user1” is possible are displayed. (4) Click the terminal marks appearing to the side of “user2 – user4”. The terminal marks change from “ to ” and blue connection lines and the message The grouped connection has been changed are displayed. Note: At this point, the change is not committed to the MagicConnect server. Click the terminal marks appearing to the side of “user2 - user4”. Blue connection lines are displayed. 62 (5) To commit the change to the MagicConnect server, click Commit changes to the system. Click Commit changes to the system. (6) A confirmation message is displayed. Click the OK button. (7) The configuration for which connection has been enabled from the Viewer of “user1” to the Clients of “ user2 – user4” is displayed, in the form with which it was committed to the MagicConnect server. If the message below is displayed, the changes have not been committed to the MagicConnect server. This is most likely due to timeout (which occurs when no operation has been performed for a long time while logged in to the administration screen). Reload the page and, if necessary, perform the actions again, beginning from “login”, and confirm the configuration. 63 4.3.2. Enabling simultaneous connections by multiple users to a Windows server (n-to-1 connection) This section describes procedures for enabling simultaneous connection by multiple users to a single Windows server having different usernames. In the diagram below, five accounts – four accounts that are the control device dedicated accounts ID1 (user1) - ID4 (user4) and one account that is the target device dedicated account ID5 (user5) – are contracted and are not in a grouped connection. For this situation, this section describes the procedures for a grouped connection that enables connection to the Client of “user5” by the Viewers of “user1 – user4”. Viewer (remote device) Client (target device) Target device dedicated account: ID 5 Control device dedicated account: ID 1 Control device dedicated account: ID 2 Control device dedicated account: ID 3 Control device dedicated account: ID 4 Standard connection Grouped connection 64 (1) To center the display on the Client, click Show the list of viewers which can connect to the client and then below that, click Show all clients. Click Show the list of viewers which can connect to the client. Next, below that, click Show all clients. * * Accounts and their connection configurations are displayed when standard connections or grouped connections exist. As both connection types do not initially exist in this example, the accounts of the clients are displayed by clicking Show all clients. (2) To display all Viewers that can be specified as the connection source for the Client of “user5”, click Show all viewers. Click Show all viewers. (3) All Viewers that can be specified as the connection source to the Client of “user5” are displayed. All viewers for which grouped connection with the client of “user5” is possible are displayed. 65 (4) Click the terminal marks appearing to the side of “user1 – user4”. The terminal marks change from “ to ”, and blue connection lines and the message The grouped connection has been changed are displayed. Note: At this point, the change is not committed to the MagicConnect server. Click the terminal marks appearing to the side of “user1 – user4”. Blue connection lines are displayed. (5) To commit the change to the MagicConnect server, click Commit changes to the system. Click Commit changes to the system. 66 (6) A confirmation message is displayed. Click the OK button. (7) The configuration for which connection has been enabled from the Viewers of “user1 – user4” to the Client of “user5” is displayed, in the form with which it was committed to the MagicConnect server. If the following message is displayed, the changes have not been committed to the MagicConnect server. This is most likely due to timeout (which occurs when no operation has been performed for a long time while logged in to the administration screen). Reload the page and, if necessary, perform the actions again, beginning from “login”, and confirm the configuration. 67 4.3.3. Configuring a connection to use “the MC3000” WOL controller (n-to-m connection) This section describes procedures for enabling connection to the user's own office PC with the power turned off, performing remote startup using “the MC3000” WOL Controller. In the diagram below, three accounts – the two standard accounts ID1 (user1) and ID2 (user2) and the one account ID3 (user.mc3000) for MC3000 use – are contracted and are not in a grouped connection. For this situation, this section describes the procedures for a grouped connection that enables connection from the Viewers of “user1 and user2” to the account for MC3000 use (“user.mc3000”), to enable MC3000 use. Viewer (remote device) Client (target device) Standard account: ID 1 Standard account: ID1 Standard account: ID 2 Standard account: ID2 Account for MC3000 use: ID 3 Standard connection Grouped connection 68 (1) To restrict the display to the Client of “user.mc3000” and to Viewers that can be specified as the connection source to that Client, click Show the list of viewers which can connect to the client, and in the text box below that, enter “user.mc3000” and then press the "Enter" key. Click Show the list of viewers which can connect to the client. Next, enter “user.mc3000.” (2) To filter and display only the Client of “user.mc3000”, click Show all clients. *Click Shaw all clients. *Accounts and their connection configurations are displayed when standard connections or grouped connections exist. As both connection types do not initially exist in the client of “user.mc3000” in this example, the account “user.mc3000” is displayed by clicking Show all clients. 69 (3) To display all Viewers which can be specified as the connection source for the Client of “user.mc3000”, click Show all viewers Click Show all viewers. (4) All Viewers which can be specified as the connection source for the Client of “user.mc3000” are displayed. (5) Click the terminal marks appearing to the side of “user1 and user2.” The terminal marks change from “ to ,”and blue connection lines and the message The grouped connection has been changed are displayed. Note: At this point, the change is not committed to the MagicConnect server. Click the terminal marks appearing to the side of “user1 and user2”. Then the blue connection lines are displayed. 70 (6) To commit the change to the MagicConnect server, click Commit changes to the system. Click Commit changes to the system. (7) A confirmation message is displayed. Click the OK button. 71 (8) The configuration for which connection has been enabled from the Viewers of “user1 and user2” to the Client of “user.mc3000” is displayed, in the form with which it was committed to the MagicConnect server. If the following message is displayed, the changes have not been committed to the MagicConnect server. This is most likely due to timeout (which occurs when no operation has been performed for a long time while logged in to the administration screen). Reload the page and, if necessary, perform the actions again, beginning from “login”, and confirm the configuration. (9) In (8) above, only the connection configurations for the Client of “user.mc3000” are shown. To confirm the Clients to which the Viewers of “user1 and user2” can connect, click Show the list of clients to which the viewer can connect. Click Show the list of clients to which the viewer can connect 72 4.3.4. Deleting a grouped connection In the diagram below, the standard account ID1 (user1) and standard account ID2 (user2) are contracted, and the Viewer of ID1 (user1) and the Client of ID2 (user2) are in a grouped connection. Viewer (remote device) Client (target device) Standard account: ID1 Standard account: ID1 Standard account: ID2 Standard account: ID2 Standard connection Grouped connection This section describes the procedures for deleting the grouped connection from the Viewer of “user1” to the Client of “user2”. (1) To restrict the display to the Viewer of “user1” and the Clients to which it can connect, click Show the list of clients to which the viewer can connect, and in the text box below that, enter "user1" and then press the "Enter" key. Click Show the list of clients to which the viewer can connect. Next, enter "user1." 73 (2) Click the terminal marks appearing to the side of the Client of “user2.” The terminal marks change from “ to ” and dotted gray connection lines and the message The grouped connection has been changed are displayed. Note: At this point, the change is not committed to the MagicConnect server. Click the terminal marks appearing to the side of “user2”. Dotted gray connection lines are displayed. (3) To commit the change to the MagicConnect server, click Commit changes to the system. Click Commit changes to the system. 74 (4) A confirmation message is displayed. Click the OK button. (5) The configuration for the Viewer with username "user1" is displayed, in the form with which it was committed to the MagicConnect server. If the following message is displayed, the changes have not been committed to the MagicConnect server. This is most likely due to timeout (which occurs when no operation has been performed for a long time while logged in to the administration screen). Reload the page and, if necessary, perform the actions again, beginning from login, and confirm the configuration. 75 4.4. Performing grouped connection tasks using a CSV-format file This section describes the method for downloading or editing grouped connection information for contracted accounts in CSV-format files. Click the icon at the upper right of the grouping page and select the task to perform from the pull-down menu. i. Click the icon ii. Select the task to perform from the pull-down menu 76 About the CSV file format The CSV-format file is composed of only information on grouped connections, and does not contain information on standard connections. 1 row shows 1 grouped connection (1:1). Rows are listed in the format "username of the Viewer that is the connection source," followed by "," (i.e., comma), followed by "username of the Client that is the connection destination." Example of a CSV-format file The content of the CSV file corresponding to the diagram below is shown. Viewer (remote device) Client (target device) user1 user1 user2 user2 user.mc3000 Standard connection Grouped connection The first row is the title row. It appears in the file downloaded from the MagicConnect server. When creating a file on your own, this row is not necessary. source (viewer),destination (client) user1,user.mc3000 Connection from user1 to user.mc3000 user2,user.mc3000 Connection from user2 to user.mc3000 77 4.4.1. Downloading grouped connection information in CSV format The grouped connection information registered on the MagicConnect server can be downloaded in CSV format. (1) Click the icon at the upper right of the grouping page and select Download in CSV format from the pull-down menu. i. Click the icon ii. Select Download in CSV format from the pull-down menu (2) A confirmation message is displayed. Click the OK button to begin downloading the CSV file. By default, the file is named "group.csv." 78 4.4.2. Batch addition of grouped connections in CSV format The grouped connection information prepared in CSV format can be additionally registered, with the existing grouped connection information on the MagicConnect server maintained. (1) Click the icon at the upper right of the grouping page and select Add all in CSV format from the pull-down menu. i. Click the icon ii. Select Add all in CSV format from the pull-down menu. (2) A confirmation message is displayed. Click the Browse… button. iii. Click the Browse… button 79 (3) A screen for selecting a file is displayed. Select the CSV file to be uploaded and click the Open button. In the diagram below, "group-add.csv" is selected as an example. (4) The name of the selected file is displayed to the side of Browse… If there is no problem with the selected file, click the OK button. 80 (5) A confirmation message is displayed. If there is no problem with the content, click the OK button. The grouped connection information is additionally registered with the existing grouped connection information maintained. 81 4.4.3. Batch deletion of grouped connections in CSV format This operation deletes data that matches the information prepared in CSV format, from the grouped connection information on the MagicConnect server. (1) Click the icon at the upper right of the grouping page and select Delete all in CSV format from the pull-down menu. i. Click the icon ii. Select Delete all in CSV format from the pull-down menu. (2) A confirmation message is displayed. Click the Browse… button. 82 (3) A screen for selecting a file is displayed. Select the CSV file to be uploaded and click the Open button. In the diagram below, "group-delete.csv" is selected as an example. (4) The name of the selected file is displayed to the side of Browse… If there is no problem with the selected file, click the OK button. 83 (5) A confirmation message is displayed. If there is no problem with the content, click the OK button. Matching data is deleted from the grouped connection information on the MagicConnect server. 84 4.4.4. Restoring grouped connections in CSV format This operation registers information prepared in CSV format after grouped information on the MagicConnect server has been deleted. (1) Click the icon at the upper right of the grouping page and select Restore in CSV format from the pull-down menu. i. Click the icon ii. Select Restore in CSV format from the pull-down menu. (2) A confirmation message is displayed. Click the Browse… button. 85 (3) A screen for selecting a file is displayed. Select the CSV file to be uploaded and click the Open button. In the diagram below, "group-restore.csv" is selected as an example. (4) The name of the selected file is displayed to the side of Browse… If there is no problem with the selected file, click the OK button. 86 (5) A confirmation message is displayed. If there is no problem with the content, click the OK button. After the grouped information on the MagicConnect server has been deleted, the information prepared in CSV format is registered. 87 5. Security Use this function to restrict the networks from which an Account Manager can login to administration functions. Note: This function only affects login with an Account Manager’s username. It does not affect login from a general user’s username. Changes made with this function will be valid from the next time connection authentication is performed. This section explains how to restrict login to the global IP addresses 203.0.113.1 and 198.51.100.1. (1) To display the Security screen, click Security from the Menu screen. Click Security 88 (2) Check the Allow login only from the IP address of the following box. Check the Allow login only from the IP address of the following box (3) Enter the global IP address and subnet mask to allow, then click the Update button. To add an allowed global IP address, click the Add button. i. Enter the allowed global IP address and subnet mask ii. Click Update * Restrictions can be set at the network address level by setting the subnet mask. 89 (4) When successfully updated, the message Configuration has been successfully updated, will be displayed. (5) After this, login by Account Manager’s usename will only be possible from a permitted global IP address. 90 6. Changing the password (Account Manager) The password of a logged-in Account Manager can be changed. (1) From the Menu screen, click Change password. Click Change password 91 (2) Enter the current password and the new password, and click the Change button. i. Enter the current password ii. Enter the new password iii. Reenter the new password iv. Click Change (3) If the password has been changed without issue, the message Password has been changed is displayed. If the password was not successfully changed, the reason is displayed. Reenter the new password in accordance with the message. 92