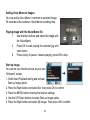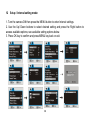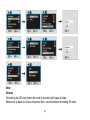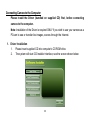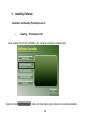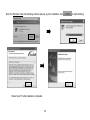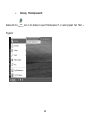
1
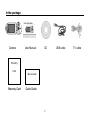
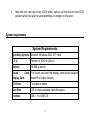
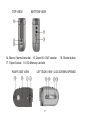
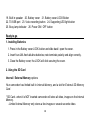
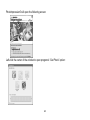
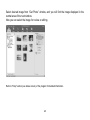
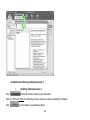
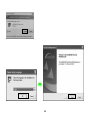
1 In the package Camera User Manual CD Warranty Card Quick Guide W arrant y Card Quick Guide 2 USB cable TV cable In the packa ge……… ……………… ………….…… .…………… ……...……… …… ………………..2 FCC statement…………………………… ……………… ...………… ……………… …………………4 Key features………………………………………………………………….5 Basic in f orm a ti on … …… … …… …… … …… … …… … …… … …… …… …… … …… .. 5 S ys t e m r e q u i r e m e n t s … … … … … … … … … … … … … … … … … … … … … … … … … … … … . . . 7 K n o w yo u r c a m e r a . . . . . . . . … … … … … … … … … … … … … … … … … … … … … … … . . 8 Re a d y t o g o …… … …… …… … …… …… … …… …… … …… … …… …… … … …… …… … .. .1 0 In s t a l l i n g B a t t e r i e s … … … … … … … … … … … … … … … … … … … … . . … . … … … … … 1 0 U s i n g t h e SD C a r d … … … … … … … … … … … … … … … … … … … … . … … … … … … … 1 0 S e l e c t t h e F o c u s i n g R a n g e … … … … … . … … … … … … … … . . … … … … . … … … … 11 P o w e r O N & O F F yo u r c a m e r a … … … … … … … … … … … … … … … … … … … … … … 1 2 S e l e c t t h e MO D E … … … . … … … … … . . … … … … … … … … . … … … … … … … … … … 1 4 Se t t i n g D a t e / T i m e … … . . … … … … … … … … … … … … … … … … … … … … … … … … . 1 4 L E D L i g h t / In d i c a t o r s … … … … … … … … … … … … … … … … … … … … … . . . . . . 1 5 Vi d e o MO D E … … … … … … … … … … … … … … … … … …… … … … … … …… … … . . 1 6 C a m e r a MO D E … … … … … … … … … … … … … … … … … . . … … … … … … … … … … . . 1 9 Vo i c e R e c o r d i n g MO D E … … … … … … … … … … … … … … … … … … … … … … … … . . 2 3 Pl aybac k MO D E… … … … … … … … … … … … … … … … … … … … … … .… … 24 Se t u p / I n t e r n a l s e t t i n g m o d e … … … … … … … … … … … … … … … … … … … . … … … 3 0 C o n n e c t i n g C a m e r a t o t h e C o m p u t e r ………………………………………………………..32 D r i ver i ns tal l ati on… … … … … … … … … … … … … … … … … … … … … … … .. … … … … 3 2 C o n n e c t i n g c a m e r a t o yo u r c o m p u t e r … … … … … … … … … … … … … … … … … … … 3 6 D ownload vi deo, picture files to the computer.…….……… ……………… … ……………….3 7 Ins talli ng s oftw are…………….…….………………………………………….38 PC C a m er a f unc ti o n … … …… … … …… … …… … .… … … …… … …… … …… … … …. . …. 4 8 How to u ploa d yo ur vid eo clips to Yo uTube … ……… …. ……… …… … ……… ……… .50 Connecting Camera to T V………… ………………. .…………… ……….……… … …………….…5 7 Te c h nic a l Sp eci fi c a ti o ns … … … … … … … … … … .. … … … … . … … … … … … … …… … … … . . … . 5 7 3 FCC part 15.21 Warning: Changes or modifications to this unit not expressly approved by the party responsible for compliance could void the user ’s authority to operate the equipm ent. FCC part 15.105 NOTE: This equipm ent has been tested and found to comply with the limits for a Class B digital device, pursuant to Part 15 of the FCC Rules. These limits are designed to provide reasonable protection against harmful interference in a residential installation. This equipm ent generates, uses, and can radiate radio frequency energy and, if not installed and used in accordance with the instructions, may cause harmful interference to radio communications. However, there is no guarantee that interference will not occur in a particular installation. If this equipm ent does cause harmful interference to radio or television reception, which can be determined by turning the equipm ent off and on, the user is encouraged to try to correct the interference by one or more of the following m easures: - Reorient or relocate the receiving antenna. - Increase the separation between the equipm ent and receiver - Connect the equipm ent into an outlet on a circuit different from that to which the receiver is connected. - Consult the dealer or an experienced radio TV technician for help. Pertinent testing docum entation is available for verification. 4 Key features Digital video camcorder – video resolution 640 X 480 @30fps Still picture capability up to 10 Mega pixel image resolution Mass Storage / PC webcam mode 4 X digital zoom TV / AV signal output 2.4inch color LCD display SD Memory card slot, up to 8GB SD card capacity Macro / Normal lens settings Driver free for Windows XP/Vista and MAC 10.4.9 or above Note: The contents of this Manual refer to the latest technical information available when the Manual was compiled. The screen display, illustrations and information shown in the manual are for detailed understanding of the camera functions. Some information & illustrations may slightly differ from your camera as a result of continuous development and improvement in production. Basic inform ation Thank you for purchasing this camcorder. Please read following operating instructions carefully in order to know and use digital video camera correctly and enjoy best performance and results. Keep this Manual handy and refer to the text anytime you need to do so. 5 Your camcorder is a complex electronic, digital device and you need to be aware of and follow simple basic rules. • Do not try to open the housing of the camcorder or attempt to modify this camcorder in any way. Maintenance and repairs should be carried only by an authorized service agent. • Keep the camcorder away from dust, sand, water and other liquids or harmful chemical substances. Do not use camcorder when your hands are wet. * Use only recommended batteries. If batteries become exhausted, remove all old and install new batteries. Dispose of old batteries according to local disposal regulations. Remove batteries if you are intended not using camcorder for the extended time. u u u u u Keep your camera away from extreme heat and do not point camera directly into strong sunlight. Check your camera and the condition of batteries after long storage period or before recording important events. Never touch the lens surface with finger, use soft cloth if necessary, or blow away any dust contamination. Do not use any solvent to clean lens or plastic housing. Format the SD memory card before using with the camera; save important records first before formatting the card, as the formatting will erase all data. Using the SD memory card: 1. Keep the card away from extreme heat or dust, do not bend or tamper with the card. 2. Do not force the card when inserting into the camera; if you feel resistance check card’s alignment and reinsert the card. 6 3. Note that the card has a tiny LOCK slide / switch; set the slide to non-LOCK position when you wish to save recordings or images on the card. System req uir emen ts System Requirements Operating System Microsoft Windows 2000, XP, Vista C PU Memory Sound Pentium III 1GHz or above 256 MB or above Card, The sound card and the display card should support Display Card DirectX8 or higher version. CD Driver 4 x speed or above Hard Disk 1GB or more available hard disk space Interface USB 1.1 or USB 2.0 7 Kn ow your camer a 1. Lens 2. Self timer LED indicator 3. LED supporting light 4. Zoom IN button 5. Zoom OUT button 6. Direction button (Up / Down / Left / Right) 7. OK button 8. Display mode button 9. MENU button 10. LCD screen 11. MODE selector 12. Hand strap anchor post 13. Hand strap attachment post 8 TOP VIEW BOTTOM VIEW 14. Macro / Normal lens dial 15. Zoom IN / OUT selector 17. Tripod Socket 18. SD Memory card slot RIGHT SIDE VIEW 16. Shutter button LEFT SIDE VIEW / LCD SCREEN OPENED 9 19. Built in speaker 20. Battery cover 21. Battery cover LOCK Button 22. TV/USB port 23. Voice recording button 24. Supporting LED light button 25. Busy lamp indicator 26. Power ON / OFF button Read y to g o 1. Installing Batteries 1. Press in the Battery cover LOCK button and slide back / open the cover. 2. Insert four AAA fresh alkaline batteries; note terminals polarity and align correctly. 3. Close the Battery cover; the LOCK will click securing the cover. 2. Using the SD Card Internal / External Memory options: Your camcorder has limited built in Internal Memory, and a slot for External SD Memory Card. * SD Card - when it is NOT inserted camcorder will store all video, images on the Internal Memory. - Limited Internal Memory only stores a few images or several seconds video. 10 - All data (in Internal Memory) is volatile and will be erased when camcorder is turned OFF or batteries disconnected. - Use the Internal Memory only to check and learn camcorder’s function; use the SD Card to store any valuable records. * SD Card - when it is INSERTED camcorder will store video, images only on the SD Memory Card - SD Card allows storage of tens minutes of recorded video or hundreds of still images. - SD Card will keep all data even when camcorder is OFF or SD Card is removed. - Use SD Card as this is convenient and reliable way to keep your records; you can review records or download records to your computer at any time. Insert / remove the SD Card 1. Insert SD Memory Card into the card slot located on the bottom of the camcorder and press it down until the Card is latched. 2. Lightly press the Card downwards to release and then eject the card when you wish to remove or replace the Card. 11 3. Select the Focusing range Slide the Macro / Normal dial to select required position; TOP VIEW 1. Macro: Set to Macro only for shooting close-up objects located 6 ~ 10 inches from camcorder. for typical records when the subject is located at 5 feet 2. Normal: Set to Normal or more from the camcorder. 4. Power ON and OFF your camera 1. Open the LCD screen 2. Press and then hold the Power button down (for one or two seconds) to turn the power ON. 12 Camcorder becomes active and the LCD will display the scene. 3. Press the Power button again (when camcorder is active) to turn the power OFF. Auto Power OFF: Your camcorder has the Auto Power OFF feature. If camcorder is unused for 1 minute, the power will turn OFF automatically to save batteries. The Auto Power OFF time may be set to 1, 3 or 5 minutes (review Setup Menu mode for details). 3. Low Power / Battery level indicator: The low power icon will appear on the LCD Screen when the batteries are exhausted and camcorder will be automatically turned OFF. 4. Replace exhausted batteries. 13 5. Select the MODE Slide the Mode Selector up or down to select desired MODE Video Mode: select this mode to record Video clips Camera Mode: select this mode to take Still Pictures Playback Mode: select this mode to playback recorded video clips or voice or review still pictures. 6. Setting Date / Time 1. Press MENU button, then select Setup to enter setting date / time adjustment mode 14 2. Use the Directional Button (Up/ Down/ Left/ Right) to select current date / time and adjust digits as needed. 3. Press OK Button to confirm setting, then press Menu button to exit. 7. LED Light / Indicators Busy light - The LED lights when camcorder is processing video or images - The LED lights indicating when camcorder is connected to TV or PC - The LED lights indicating that camcorder is active, but the LCD screen is turned OFF Display may be turned OFF (to save batteries) after pressing twice the Display mode Button. LED supporting light - Use this LED supporting light when taking images of dark or low light scenes. Press the Supporting LED button to activate this lamp. Press again to turn it OFF. Self timer LED indicator - This lamp indicates that the camcorder is active in Self-timer Mode. Refer to further chapters for Self-timer setting details. 15 8. Video MODE Preview / scene mode: The following icons / information are displayed on the LCD screen in Video MODE. 1 Video Mode icon 2 Auto White Balance icon Available: Auto/Daylight/Cloudy/Fluorescent/Tungsten Metering / exposure (multi) 3 4 640 Video resolution indicator 640x480 or 320x240. 5 00:00:00 Video recording counter; hours, min, sec. 6 SD Card icon: the icon appears when the SD card is inserted 7 the battery power indicator 8 LED Supporting light icon: the lamp is ON 9 Zoom range: numbers indicate current setting of the zoom (max. 4X available) 10 Memory Full: message indicates that the memory (internal or SD card) is full and no more recording is possible. Recording the Video clip Turn the camcorder ON and select the Video MODE Point the lens towards the subject, observing the scene appearing on the LCD screen. 16 1 2 3 4 5 Press the Shutter button to start recording video The video recording counter will start counting the elapsed recording time Press the Up button to pause recording and press again to continue Press the Shutter button again if you wish to stop recording You can zoom IN or zoom OUT of the scene while recording a Video clip; use Zoom IN / OUT buttons or Zoom IN / OUT selector to adjust the zoom. Video mode / Menu When the camcorder is in Preview / scene Mode press the Menu button to enter available settings as below: 17 Use the Up / Down buttons to browse and select available Menu options then press the Right button to review available settings. Press Up / Down button to select desired setting then press OK button to confirm your selection. Press the Menu button to exit the Video Menu mode and return to Preview / scene Mode. 18 9 Camera MODE Preview / scene Mode: The following icons and information are displayed on the LCD screen in Camera MODE. 1 Camera / still picture icon 2 Self-timer mode symbol 3 Auto White balance (Auto) 4 Metering / exposure mode 5 Exposure value 6 Picture resolution value 7 Image quality icon 8 Image counter shows number of available pictures remaining 9 Self timer / delay time in seconds 10 SD card icon; the card is inserted The SD card is locked – no storage is possible. Unlock the card to use it 11 12 13 Battery / power level status LED Supporting light ON icon 4.0 Zoom value indicator. 19 Taking Still pictures Turn the camera ON and move the Mode Selector to the Camera Mode Aim at the scene or subject visible on the LCD screen 1. Keep camera steady then press the Shutter Button to take a picture. Note: The LCD will display “Card Locked!” message if the inserted SD memory card is LOCK-ed - camera will NOT take a picture. Remove, unlock and insert the SD card to take and store pictures. Camera Mode / Menu: When the camcorder is in Preview / scene Mode press the Menu button to enter available settings as below: 20 Use the Up / Down buttons to browse and select available Menu options, then press the Right button to review available options. Press Up / Down button to select desired setting, then press OK button to confirm. Press the Menu button to exit the Camera Menu mode. 21 Driver Mode The Driver Mode will allow you to adjust / set the Self- timer, or take three consecutive pictures in the Burst Mode. - Self timer Browse and select the Driver Mode then press the Right button to access the available Self Timer options then select 2 or 10 seconds delay time. Press OK to confirm, then press MENU to exit setting. Press the Shutter button and camera “beep” while counting down the delay time, then the picture will be automatically taken. Note: You can also access the Self Timer / Setting mode when the camera is set in Camera Mode. Press the Right Button to access the Self-timer setting. - Burst / Consecutive photos: Activate the Camera, then press the MENU button. Select the Driver Mode and Set the Burst option. Press OK to confirm, then MENU to exit setting. Press the Shutter button and the camera will automatically take three consecutive pictures. 22 10 Voice Recording MODE: 1 Press the Voice Recording button to enter the Voice recording options 2 Press the Shutter button to start recording 3 Press Up button to pause recording, press again to continue recording 4 Press the Shutter button to stop recording Stop mode Recording mode 1. Voice Recording Mode icon 2. Counter showing available recording time remaining 3. SD Memory card icon 4. Actual recording elapsed time 5. Battery / power level status 23 11 Playback MODE Power the camera ON and slide the MODE selector all way down to enter the Playback mode. Use Right / Left buttons to review / select stored records; Video, Still Pictures or recorded Voice. Press OK button to play selected video, pictures or recorded voice file. You can “zoom” the displayed photo images by pressing the zoom IN / OUT buttons or sliding Zoom IN / OUT selector. When the image is zoomed IN, press OK button and you can “pan” the displayed image by pressing directional buttons. To exit from Pan and Zoom status, press OK button again. You can view other photos, AVI or WAV files by pressing Left/ Right keys 24 Thumbnail mode Press Zoom Out button to enter the Thumbnail / Playback mode. Note: : This icon indicates recorded voice (WAV) file : This icon indicates video / AVI media file. : This icon indicates photo with “voice added memo” file. You can use the direction key to select desired image file, and press OK key or Zoom IN key to exit this Thumbnail mode and return to full screen display mode. 25 Playing the AVI / WAV file Select the Video (AVI) or Voice (WAV) file then press OK button to start playing selected record. You may press Up button to pause or press OK again to stop playing. ◄►SELECT OK PLAY ▲ Stop mode ◄►SELECT ׀׀ OK ■ Playing mode OK PLAY ▲ 26 ׀׀ OK ■ Playback / Menu In Playback mode, press MENU button to enter available settings as below: Use Up / Down buttons to select desired function, use Right button to obtain access to available setting. Use Up / Down buttons to select option, then press OK to confirm. Note: The locked files can not be deleted. Unlock the file first, then delete 27 Resize function You can “resize” the image size but it can only be resized to smaller size Press Shutter key can stop the recording; Note: Some options highlighted in gray color are not available for selection. 28 Adding Voice Memo to Images You may add a Voice Memo / comment to selected image. 30 seconds is the maximum Voice Memo recording time. Playing image with the Voice Memo file 1 Use direction buttons and select the image with the Voice Memo 2 Press OK to start playing the selected jpg with voice memo 3 Press Up key to pause / resume playing, press OK to stop Start up image You can set your favorite picture as your own “Welcome” screen. 1. Scroll down Playback setting and activate Start-up Image option. 2. Press the Right button and select Set, then press OK to confirm. 3. Press the MENU button entering the Internal settings. 4. Use the UP/ Down buttons to select Start-up Image option. 5. Press the Right button and select My Image. Then press OK to confirm. 29 12 Setup / Internal setting mode: 1. Turn the camera ON then press the MENU button to enter Internal settings. 2. Use the Up/ Down buttons to select desired setting and press the Right button to access available options; see available setting options below. 3. Press OK key to confirm and press MENU key back or exit. 30 Note: Format: Formatting the SD card (when the card is inserted) will erase all data. Make sure to back up & save important files / records before formatting SD card. 31 Connecting Cam era to th e Compu ter Please install the Driver (bundled on supplied CD) first, before connecting camera to the computer. Note: Installation of the Driver is required ONLY if you wish to use your camera as a PCcam to see or transfer live images, scenes through the Internet. 1. Driver Installation 1. Please insert supplied CD into computer’s CD ROM drive. 2. The system will start CD Installer interface; see the screen shown below: 32 Note: If your computer did not start CD Installer as Auto run, please open My Computer, go to CD ROM, and select “autorun.exe” program located in the CD root directory. • Driver installation Click “Install Driver” button, follow provided steps and complete installation. • Restart computer when installation completed. For Windows Vista, the following window will pop up when the system automatically executes Installer from inserted CD. Select / click Run SoftwareInstaller.exe to start installing. 33 Select “Allow” and continue installation Restart computer when installation completed. 34 Note: The Driver (bundled on CD) is suitable for Windows 2000, Windows XP and Windows Vista systems. If the following window appears, please click “Yes” button to continue installation. 35 2. Connecting camera to your computer. Use supplied USB cable to connect camera to your computer. Connect the “computer end” of the USB cable to computer USB port and connect the “camera end” to the camera USB socket. Computer Camera Note: The camera has two USB modes; MSDC (default, when power ON) and PCCAM (when selected from Internal Setting Menu) - The default MSDC (Mass Storage / Removable Disc) is used for playback and downloading video, pictures into the computer. - The PCCAM (PC camera / webcam) can be used for transferring live images, scenes into the computer. Note: - Windows ME, 2000, XP, Vista require installing Driver only if you intend using camera in PC Cam Mode. Connecting the camera as MSDC (default) does not require installing the Driver. 36 3. Download video, picture files to the computer: - Power ON camera and connect to the computer using USB cable. - Select and open “My Computer” onto the computer’s screen. - Scroll down and open the “Removable Disc” which represents your camera in Mass Storage mode. Note: Depending on version of your camcorder the computer may display one or two "Removable Disc” units. *One (from two displayed) “Removable Disc” represents camera's EXTERNAL / inserted SD Card Memory - Open selected “Removable Disc” then select DCIM / 100MEDIA folder. - Open 100MEDIA folder to see all captured images / video files. - You can click to play / review selected records and / or store valuable records inside computer’s memory. - Copy or drag files into the folder “where” you wish to save your records. *Second (from two displayed) “Removable Disc” represents camera's INTERNAL MEMORY and may store only few images or few seconds of the recorded video. Note that the INTERNAL MEMORY does store data ONLY temporarily - when the camera is active. Turning the power OFF or removing the battery will erase all records from the Internal Memory. SO PLEASE DOWNLOAD IF REQUIRED BEFORE POWERING OFF. 37 4. Installing Software Installation and Running PhotoImpression 5: • Installing PhotoImpression5: Insert supplied CD into the CD-ROM in your computer; see start up window below: Select and click button and follow step by step instruction to complete installation. 38 Note: For Windows Vista, the following windows will pop up prior installation, click Restart your PC after installation completed. 39 to start installing. • Double-click the Running PhotoImpression5: icon on the desktop to open PhotoImpression 5, or select program from “Start → Programs” 40 PhotoImpression5 will open the following screen: Left-click the center of the window to open program’s “Get Photo” option: 41 Select desired image from “Get Photo” window, and you will find the image displayed in the central area of the next window. Now you can select the image for review or editing. Refer to "Help" section (see below screen) of the program for detailed information. 42 Installation and Running VideoImpression 2 • Click Installing VideoImpression 2 button and follow step by step instructions. Note: For Windows Vista, the following windows will pop up when installing the software. Click to start installing, see following steps: 43 44 Restart your PC after installation completed 45 • Double-click the Running VideoImpression 2 icon on the desktop, or open VideoImpression 2 from “Start→Programs” 46 Refer to "Help" section of the program for detailed information of VideoImpression 2, see the following screen below: 47 5. PC Camera function - Power ON the camera and set it at the PC Cam Mode (refer to the Manual if required). - Connect camera with your PC and open VideoImpression 2. - Click - Click in the following window (Fig. I) (Fig. II) or click icon in “MEDIA” (Fig. III) tab. ▲Fig. Ⅰ ▲Fig. Ⅱ 48 ▲Fig. Ⅲ ►Fig. Ⅳ Live images, scene will appear, see window (Fig IV) - Click button to exit or close the PC Cam if session completed. Note: If no images, scene visible; please check whether the Driver for the camera is installed properly and check whether the selected Video Camera is indicated. Refer to “VideoImpression 2 “Help” if further information required. 49 6. How to upload your video clips to YouTube Install the ArcSoft MediaImpression program Insert the CD-ROM into the computer’s CD-ROM drive. The auto-run screen will appear. Click “Install MediaImpression” ( If auto-run screen does not appear, please click on SoftwareInstaller.exe under the CD-ROM drive icon on the computer.) 50 Follow on-screen instructions and complete installation Note: For Windows Vista, the following windows will pop up prior installation, click 51 to start installing. ArcSoft MediaImpression icon will appear on computer’s desktop when installation is 52 complete. Using ArcSoft MediaImpression Connect your camcorder to the computer. Double click MediaImpression icon on the Desktop. The MediaImpression software main screen will open on the computer’s desktop: Click Import Option on the main screen and enter into “Import” screen. Then select the 53 files in the camcorder that you want to upload to the computer and click After importing the file has been completed, click on the “Importing…”window and enter into “MediaBrowser” window. Note: On the main screen, you can also click other options such as 54 Option. to enter into “MediaBrowser” window. Then select the files in the computer for uploading. Select the video you wish upload to You Tube on“MediaBrowser”screen and then click option to access your YouTube log-in screen. 55 On“Login”screen, please enter your YouTube Username and Password (you can select the corresponding option underneath to save the Username and Password so that you do not need to input these data next time). Then click option. When“Upload to YouTube”screen appears, fill in Title, Description, etc. Then click option and start uploading selected video. Click “Cancel” if you wish to stop upload, otherwise continue for successful uploading. 56 Connecting Cam era to T V You may connect camera to your TV and watch recorded video clips or view photos. Turn on the power of the camera. Use supplied AV cable and connect TV output port on your camera to Video input (yellow connector) and Audio input (red / white connector) on your TV. Set your TV to Video/ External mode. Slide the MODE selector of the camera all the way down to enter the Playback mode. Use Right / Left buttons of the camera to review / select stored Video and Photos. Press OK button to play selected video on your TV. Technical Specification s Video record resolution Still Picture resolution Lens Focal distance Digital zoom Shutter LCD display screen VGA: 640x480 (30/15 frames per second), QVGA: 320×240 (30/15 frames per second) 10MP- 3648x2736, 5MP- 2952×1944, 3MP- 2048x1536, 1.3MP- 1280x1024, VGA - 640×480 F2.8 f=9.3mm 6~10inches/15~25cm(Macro);5ft/140cm~infinity(Standard mode) 4× Electronic shutter 2.4〞TFT LCD(240x320dot) 57 Function modes White balance Exposure Self-shoot timer File format Internal Memory External Memory USB interface Power supply Dimensions (L×W×H) Weight Video record, Shoot photo and Voice record, playback, Mass storage and PC camera Auto/manual: Daylight, cloudy, Tungsten and Fluorescent Automatic/manual (-2.0EV~+2.0EV, 0.3EV/step) 2/10 seconds delay Video AVI Photo JPEG Voice WAV Volatile 8x16Mb SDRAM (can temporarily store approx. 3 to 10 sec VGA video or approx. 5 to 10 10MP photos) SD Card (maximum supports 8 GB) High Speed USB 2.0 interface Battery: 4×AAA alkaline 1.5V (not supplied) 4.5 × 1.65 × 2.45 inches 5.3oz (excluding batteries) 58