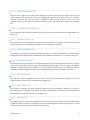
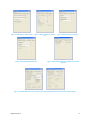
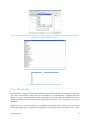
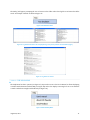
1
 RVRMEANDER–USER’SMANUAL
ArcGISVERSION
RobertoFernández1,DavideMotta2,JorgeD.Abad3,
EddyJ.Langendoen4,NilsOberg5,MarceloH.Garcia6
August29,2011
ABSTRACT
This document illustrates how to use the RVR Meander Graphical User Interface developed for ArcMap. It
providesadescriptionofthecurrentfunctionalitiesofthesoftwareandshowstheuserthestepsneededto
runasimulationandviewtheoutput.AstandaloneversionofRVRMeanderanditsUser’sManualarealso
available.
Thepresentmanualisawork‐in‐progressversionofthefinalone.
RVR Meander ßeta is in the public domain and is freely distributable. The authors and above organizations
assumenoresponsibilityorliabilityfortheuseorapplicabilityofthisprogram,noraretheyobligatedtoprovide
technicalsupport.
AuthorAffiliations:
1 Graduate Research Assistant, Dept. of Civil and Environmental Engineering, University of Illinois at Urbana‐
Champaign,Urbana,IL,61801.E‐mail:[email protected]
2 Graduate Research Assistant, Dept. of Civil and Environmental Engineering, University of Illinois at Urbana‐
Champaign,Urbana,IL,61801.E‐mail:[email protected]
3 Assistant Professor, Dept. of Civil and Environmental Engineering, University of Pittsburgh, Pittsburgh, PA,
15260.E‐mail:[email protected]
4 Research Hydraulic Engineer, US Department of Agriculture, Agricultural Research Service, National
SedimentationLaboratory,Oxford,MS,38655.E‐mail:[email protected]
5 Resident Programmer, Dept. of Civil and Environmental Engineering, University of Illinois at Urbana‐
Champaign,Urbana,IL,61801.E‐mail:[email protected]
6 Chester and Helen Siess Professor, Dept. of Civil and Environmental Engineering, University of Illinois at
Urbana‐Champaign.205N.MathewsAv.,Urbana,IL,61801.E‐mail:[email protected]
August29,2011
ii
TABLEOFCONTENTS
1.
OVERVIEW..............................................................................................................................................................................................1
2.
STANDALONEVERSION....................................................................................................................................................................1
3.
THEArcGIS‐ArcMapVERSION.......................................................................................................................................................2
3.1.
Introduction.................................................................................................................................................................................2
3.2.
FromstandalonetoGraphicalUserInterface(GUI)inArcMap............................................................................2
3.3.
TheRVRMeanderToolbar–AnOverview.....................................................................................................................2
3.4.
DetailedDescription.................................................................................................................................................................4
3.4.1. Introduction............................................................................................................................................................................4
3.4.2. LoadingtheRVRMeandertoolbarintoArcMap....................................................................................................4
3.4.3. Fromtextfile(.txt)toshapefile(.shp)........................................................................................................................5
3.4.4. theRVRMeanderUserInterface...................................................................................................................................6
3.4.4.1.
LayerDefinitionTab................................................................................................................................................7
3.4.4.2.
ChannelPropertiesTab..........................................................................................................................................7
3.4.4.3.
PreprocessingTab.....................................................................................................................................................7
3.4.4.4.
HydrodynamicsTab.................................................................................................................................................7
3.4.4.5.
BankErosionTab......................................................................................................................................................7
3.4.4.6.
MigrationTab..............................................................................................................................................................7
3.4.4.7.
SmoothingTab............................................................................................................................................................7
3.4.4.8.
OutputTab....................................................................................................................................................................7
3.4.4.9.
TheFileMenu..............................................................................................................................................................9
3.4.4.10. TheRunMenu...........................................................................................................................................................10
3.4.4.11. TheHelpMenu..........................................................................................................................................................11
3.4.5. 1DOutput...............................................................................................................................................................................12
3.4.6. 2DOutput...............................................................................................................................................................................13
3.4.7. TheCurvatureMapperTool..........................................................................................................................................19
3.5.
ExampleofPost‐ProcessedOutputUsingArcMap’sCapabilities......................................................................20
August29,2011
iii
LISTOFFIGURES
Figure1.Stand‐aloneversusGUImodediagram..............................................................................................................................2
Figure2.TheRVRMeanderToolbar......................................................................................................................................................2
Figure3.TheRVRMeanderToolbarinanutshell............................................................................................................................3
Figure4.OpenanemptymapinArcMapandaddtheRVRMeandertoolbarusingtheCustomizewindow........4
Figure5.Browsetoinstallationfolderandselectthefilewiththe“.tlb”extension(left).AddedObjectsdialog
will be shown on screen (center) and the RVR Meander Toolbar will be visible on the Customize window
(right)...................................................................................................................................................................................................................4
Figure6.RVRMeanderToolbarwith“ImageandText”(top)andwith“ImageOnly”(bottom)................................5
Figure7.Createshapefilefromatextfile.............................................................................................................................................5
Figure8.Selecteithertheriverorthevalleycenterlinetoinput.Currentlyonlyonefileatatimeissupported.
.................................................................................................................................................................................................................................5
Figure9.Browsetothefolderwheretheshapefilewillbecreated,giveitanameandselectSave.........................6
Figure10.RiverandvalleycenterlinesdisplayedinArcMap.....................................................................................................6
Figure11.OpenRVR‐GUIbyclickingontheRVRMeandercommandbutton....................................................................6
Figure12.RVR‐GUILayerDefinitiontab..............................................................................................................................................8
Figure13.RVR‐GUIChannelPropertiestab........................................................................................................................................8
Figure14.RVR‐GUIPreprocessingtab..................................................................................................................................................8
Figure15.RVR‐GUIHydrodynamicstab...............................................................................................................................................8
Figure16.RVR‐GUIBankErosiontab;Migrationcoefficientapproach.................................................................................8
Figure17.RVR‐GUIBankErosiontab;Physically‐basedapproachMainOptions(left)andAdvancedOptions
(right)...................................................................................................................................................................................................................8
Figure18.RVR‐GUIMigrationtab...........................................................................................................................................................9
Figure19.RVR‐GUISmoothingtab.........................................................................................................................................................9
Figure20.RVR‐GUIOutputtab.................................................................................................................................................................9
Figure21.RVR‐GUIFileMenu...................................................................................................................................................................9
Figure 22.After clicking the Export Configuration option the user should specify the location to save the
exportedtextfile.InthiscasethegivennameisMackinaw_Config1.txt..............................................................................10
Figure23.ConfigurationFilein.txtformat.ItcanbeopenedwiththeNotepad.............................................................10
August29,2011
iv
Figure24.ExportedRiverandValleycenterlinesin.txtformat..............................................................................................10
Figure25.RVR‐GUIRunMenu................................................................................................................................................................11
Figure26.LogFileWatcherbeforetherun(left)duringarun(center)andaftertherunfinishes(right).........11
Figure27.LogFilein.txt.format...........................................................................................................................................................11
Figure28.RVR‐GUIHelpMenu...............................................................................................................................................................11
Figure29.RVR‐GUIAboutRVRMeander...........................................................................................................................................12
Figure30.RVR‐GUISendFeedbackTo................................................................................................................................................12
Figure31.Importa1DOutputfileofMigratedCenterlines......................................................................................................12
Figure32.1DOutputuserform..............................................................................................................................................................12
Figure33.1DOutput–Nofilefoundmessage.................................................................................................................................12
Figure34.1DOutputexpandeduserform........................................................................................................................................12
Figure35.1DOutput–Statusbarmessageswhileprocessing................................................................................................13
Figure36.1Doutput‐MigratedCenterlinesshapefileaddedintoArcMap.......................................................................13
Figure37.Opensuserformtoimport2DOutputparameters.................................................................................................13
Figure38.2DOutputuserform..............................................................................................................................................................13
Figure39.2DOutput–Nofilefoundmessage.................................................................................................................................13
Figure40.2DOutputuserform–expanded.....................................................................................................................................14
Figure41.Selectiteration–numberofyearstooutput..............................................................................................................14
Figure42.2DOutput–Statusbarmessageswhileprocessing................................................................................................14
Figure43.2DOutputshapefileaddedintoArcMap.......................................................................................................................14
Figure44.AttributeTableforthe2DOutputincludingallselectedparameters.............................................................15
Figure45.2DOutputBoundaryPolygonaddedintoArcMap...................................................................................................15
Figure46.2DOutput–Closeuptoseethedetailofthecreatedshapefiles.......................................................................15
Figure47.FloodplainHeterogeneityshapefileaddedintoArcMap.......................................................................................16
Figure48.AttributeTablefortheFloodplainHeterogeneityshapefile................................................................................16
Figure49.Enablingthe3DAnalystextensionforArcMap.........................................................................................................17
Figure50.Accessingthe“CreateTinfromFeatures”windowwiththe3DAnalysttoolbar.......................................17
August29,2011
v
Figure51.RequiredparameterstoCreateaTINfromfeaturesusingthe2DOutputproducedwiththeRVR‐
GUI.......................................................................................................................................................................................................................17
Figure52.SelectfoldertoSavetheTIN..............................................................................................................................................17
Figure53.2DOutput–TINcreatedwithoutspecifyingtheboundarypolygon..............................................................18
Figure54.TINcreatedandaddedintoArcMap...............................................................................................................................18
Figure55.CreateaRasterusingtheIDWmethodfromthe3DAnalysttoolbar..............................................................18
Figure56.IDWparameterdefinitionwindowfortheFloodplainraster.............................................................................19
Figure57.FloodplainHeterogeneityRasterusingtheCriticalShearStressTauC..........................................................19
Figure58.CurvatureMapperTool........................................................................................................................................................19
Figure59.Curvaturemapperplotfortheoriginalriverreach.................................................................................................20
Figure60.CurvatureMapperwithmappingtoscreenfutureenabled................................................................................20
Figure61.Exampleofpost‐processedoutputusingRVR‐GUIandArcMap.......................................................................21
August29,2011
vi
1.
OVERVIEW
TheRVRMeanderplatformmergesthefunctionalitiesofthefirstversionofRVRMeander(AbadandGarcia,
2006) and CONCEPTS (Langendoen and Simon, 2008). It is written in C++ language and is composed by
different libraries for preprocessing, hydrodynamics, bank erosion, migration, filtering, plotting, and I/O. It
runs as stand‐alone application on Windows and Linux operating systems and needs 4 input text files,
specifyinggeneralparametersforsimulation,channelcenterline,valleycenterline,andinitialbankproperties
(geometry and erodibility). Several output files are produced, which describe the migrated centerlines, the
two‐dimensional(2D)hydrodynamicsorbedmorphodynamicsfield,andtheevolutionofbankgeometry.All
thesefilescanbevisualizedinTecplotorimportedinExcel.
RVR Meander also has an ArcGIS‐ArcMap interface, written in C # language. Its toolbar can be added to
ArcMap,andprovides same capabilitiesasthe stand‐alone version.In particular,the tab “Layer Definition”
defines channel and valley centerlines, now inputas shapefile polylines (therefore they can be createdand
editedinsidetheGISenvironment).Theothertabs“ChannelProperties”,“Preprocessing”,“Hydrodynamics”,
“Bank Erosion”, “Migration”, “Smoothing”, and “Output” specify other required parameters. A menu allows
importinginputdataintotheuserform,toexportinputdatatotextfile,toaddtheinitialbankpropertiesas
text file, to run the simulation, and to import the results in the GIS environment, in terms of migrated
centerlines(shapefile)or2Drepresentationofhydrodynamicsorbedmorphodynamics.
Intermsofunits,thestand‐aloneversionworksexclusivelywithSI(International)Units,whiletheArcGIS‐
ArcMapinterfacecaneitherworkwithSIorEnglishUnits.
2.
STANDALONEVERSION
AstandaloneversionofRVRMeanderanditsUser’sManualarealsoavailable.
August29,2011
1
3.
THEARCGIS‐ARCMAPVERSION
3.1.
INTRODUCTION
RVR Meander for ArcGIS is basically a toolbar that lets the user access forms to input parameters, run the
software andvisualize output inside ArcMap. It has been developed for ArcGIS9.3.1 and is currently being
testedonArcGIS10.0inordertosupportthenewestversionofESRI’ssoftware.TheRVRMeanderGraphical
User Interface (RVR‐GUI) provides different functionalities that facilitate the use of the RVR capabilities
availableforthestandaloneversioninsideArcMap.
3.2.
FROMSTANDALONETOGRAPHICALUSERINTERFACE(GUI)INARCMAP
RVRMeandercanbeusedintwodifferentmodes(seeFigure1).Thefirstoneisastandalonemodethatcan
be run on Linux or Windows based systems whereas the second mode is a Graphical User Interface (GUI)
built inside ArcGIS. The idea in both cases is the same; the Engine code requires input information which
comesfromtextfilesbutinthecaseoftheGUI,threeofthosefilescanbecreatedinsideArcMap.
Figure1.Stand‐aloneversusGUImodediagram.
Both codes are developed separately which allows including new functionalities in the interface until they
havebeenfullytestedinthestandaloneversion.Theybothinteractwiththesameenginecodewhichthen
producesoutputfiles.TheoutputfilesforthestandaloneversionaredesignedtobeopenedusingTecplotand
Excel.InthecaseoftheGUIthefilescanbedirectlyviewedinsideArcMapwiththeexceptionthatthecurrent
versiondoesnotsupport“Bankgeometryoutput”andthereforeExcelneedstobeusedtoviewthisfile.
3.3.
THERVRMEANDERTOOLBAR–ANOVERVIEW
The RVR Meander toolbar contains four command buttons and a tool button that provide different
functionalities(seeFigure2).
Figure2.TheRVRMeanderToolbar.
August29,2011
2
The“TexttoShapefile”commandreadsatextfileandcreatesashapefilewithitandaddsitintoArcMap(see
Figure3).TheshapefileisactuallycomposedoffivedifferentfileswhichareonlynoticeablefromWindows
Explorer.IftheuseropensArcCatalogonlytheshapefileitselfwillshowup.It’simportanttonotethatthetext
filemustfollowaspecifiedformat(seeWalkthroughDemonstrationSectionformoreinformation)andonly
polylines are created with this command. It is meant to create river and valley centerlines from (x, y)
coordinates.
Figure3.TheRVRMeanderToolbarinanutshell.
The“RVRMeander”commandprovidesaccesstotheRVR‐GUIwhichisawindowwitheighttabsinwhichthe
usercaninputtheparametersfortheanalysis(seeFigure3).
The“1DOutput”commandbuttonopensthe1Doutputdialoginwhichtheusercaninputthefolderwhere
the file to output is saved. Clicking on the “Finish” button of the 1D Output form results in a shapefile of
“MigratedCenterlines”whichisautomaticallyaddedintoArcMap.
The “2D Output” command opens a window in which the user first needs to specify the folder where the
outputfilesaresaved.Afterwards,theusercanselectwhichvariableswillbeaddedintotheattributetableof
theshapefilecreatedandtheuseralsoneedstoindicateforwhichiteration(numberofyears)theoutputwill
becreated.Ashapefilemadeofpointsisautomaticallyaddedoncetheuserclicksthe“Finish”buttononthe
2Doutputwindow.Twoshapefilesareaddedtothemap;oneisaboundarypolygonandtheotheristhepoint
shapefile with all the output values. They’re both needed to create a TIN or Raster of any of the output
parameters.
The “Curvature Mapper” tool lets the user select a polyline feature on the active map and computes the
curvaturevaluesateveryvertex.Whentheuserclicksthetoolcommandthemousechangestoacrosshair
withwhichtheusercanselectariverreach.Afterdoingsoanewplotappearsonscreenwhichdisplaysthe
August29,2011
3
curvature of the river reach as a function of stream wise distance. A checkbox on the bottom provides an
additionalcapabilitytoobservewhichspecificpointsonthereachhaveagivencurvaturevalue.
3.4.
DETAILEDDESCRIPTION
3.4.1. INTRODUCTION
ThissectionismeanttoprovideadetailedexplanationofthecomponentsanduseoftheRVR‐GUI.Itbegins
byshowinghowtoaddtheRVRMeandertoolbarintoArcMapanditthenshowsstepbystephowtouseits
menusanduserforms.ThedescriptionusesimagestakenfromtestcasesdevelopedfortheMackinawRiver
in Illinois, USA. The test cases are included in another document called RVR Meander Tutorials. All the
screenshotspresentedwereproducedwithArcGIS9.3.1.Fullsupportforversion10.0isstillnotavailable.
3.4.2. LOADINGTHERVRMEANDERTOOLBARINTOARCMAP
Open ArcMap and select “A new empty map”. Then open the Customize window (Tools menu) and in the
ToolbarstabbrowsefortheRVRMeandertoolbar.Ifthetoolbarisnotdisplayedclickonthe“Addfromfile”
buttonandbrowsefortheinstallationfolder.Selectthefilewiththe“.tlb”extensionandclick“Open”.Anew
dialogindicatingthe“AddedObjects”willappearonscreen.Click“OK”andintheCustomizewindowcheck
theboxtoincludethetoolbar.Afterclickingthe“Close”buttonthetoolbarwillbedisplayedontheArcMap
interface(seeFigure6).
Figure4.OpenanemptymapinArcMapandaddtheRVRMeandertoolbarusingtheCustomizewindow.
Figure5.Browsetoinstallationfolderandselectthefilewiththe“.tlb”extension(left).AddedObjectsdialogwillbeshownon
screen(center)andtheRVRMeanderToolbarwillbevisibleontheCustomizewindow(right).
August29,2011
4
Figure6.RVRMeanderToolbarwith“ImageandText”(top)andwith“ImageOnly”(bottom).
3.4.3. FROMTEXTFILE(.TXT)TOSHAPEFILE(.SHP)
Thefirstcommandbuttoninthetoolbarcreatesashapefilefromatextfile(seeFigure7).Itfirstdisplaysan
“OpenFileDialog”thatletstheuserbrowsefortherequiredtextfile(seeFigure8).Thenitdisplaysa“Save
FileDialog”inwhichtheuserselectsthefoldertosavethenewshapefile(seeFigure9).
Figure7.Createshapefilefromatextfile.
Figure8.Selecteithertheriverorthevalleycenterlinetoinput.Currentlyonlyonefileatatimeissupported.
August29,2011
5
Figure9.Browsetothefolderwheretheshapefilewillbecreated,giveitanameandselectSave.
Aftertheuserclicks“Save”foreithertheriverorthevalleytheshapefilewillbecreatedandaddedintothe
currentmap.Figure10showsboththeRiverandValleyshapefilesinsideArcMap.
Figure10.RiverandvalleycenterlinesdisplayedinArcMap.
3.4.4. THERVRMEANDERUSERINTERFACE
Themainuserinterfacecanbeaccessedbyclickingonthesecondbuttononthetoolbar(seeFigure11).It
loadstheRVR‐GUIwhichismadeupofeighttabsinwhichtheusercaninputthedifferentparametersforthe
analysis.
Figure11.OpenRVR‐GUIbyclickingontheRVRMeandercommandbutton.
August29,2011
6
3.4.4.1. LAYERDEFINITIONTAB
Thefirsttab(seeFigure12)isusedtoselectwhichlayersfromthecurrentmapcorrespondtotheriverand
valleycenterlines.ThemapcanbeeitherinSIorEnglishUnitsandiftheuserdoesn’tselectthe“usevalley
centerline” checkbox, the code will assume a straight line from the first to the last point of the river
centerline. This is the caseforthe example shown butthe valley centerline is notrequired to be a straight
line.
3.4.4.2. CHANNELPROPERTIESTAB
Thesecondtabisusedtoinputthechannelproperties.TheusercaninputallvaluesinSIorEnglishUnits(see
Figure13).
3.4.4.3. PREPROCESSINGTAB
The third tab has three dropdown menus for preprocessing purposes (see Figure 14). They deal with the
waysinwhichcurvatureiscomputedatthedifferentnodesoftherivercenterline.
3.4.4.4. HYDRODYNAMICSTAB
Thefourthtabcorrespondstothehydrodynamicsparameters.CurrentlyonlytheIkedaetal.(1981)modelis
implementedforthehydrodynamiccomputations.Threeadditionalparametersarerequired(seeFigure15).
3.4.4.5. BANKEROSIONTAB
Thefifthtabhastwomainoptions.Thetraditionalapproachthatusedthemigrationcoefficient(seeFigure
16)whichisempiricallybasedandaphysicallybasedapproachthatmightbeusedforanalysesofmeander
migrationinengineeringtimescales(Mottaetal.2011).Thesecondapproachhastwoadditionaltabsthat
correspondtomainandadvancedoptionsforthephysically‐basedbankerosionmodel(seeFigure17).
3.4.4.6. MIGRATIONTAB
The sixth tab is used for migration parameters. Here’s where the user indicates the length in years for the
analysisandthefrequencyforthecomputations(seeFigure18).
3.4.4.7. SMOOTHINGTAB
The seventh tab contains two main dropdown menus that allow indicating the method to be used for
smoothingpurposesduringthecomputations.Ifcenterlinesmoothingisselected,thepanelshownbelowfor
theSavitzki‐Golaymethodbecomesactive(seeFigure19).
3.4.4.8. OUTPUTTAB
Theeighttabisthelastoneanditsmainpurposeisfortheusertoindicatewhichparametersusedinsidethe
computationwillbesavedintoasoutputfiles.InthecaseoftheMigrationCoefficientapproach(see3.4.4.5)
thelastthreeoutputfileswillnotbeavailable(seeFigure20).
August29,2011
7
Figure12.RVR‐GUILayerDefinitiontab. Figure13.RVR‐GUIChannelProperties
tab.
Figure14.RVR‐GUIPreprocessingtab.
Figure16.RVR‐GUIBankErosiontab;Migrationcoefficient
approach
Figure15.RVR‐GUIHydrodynamicstab.
.
Figure17.RVR‐GUIBankErosiontab;Physically‐basedapproachMainOptions(left)andAdvancedOptions(right).
August29,2011
8
Figure18.RVR‐GUIMigrationtab.
Figure19.RVR‐GUISmoothingtab.
Figure20.RVR‐GUIOutputtab.
3.4.4.9. THEFILEMENU
TheFileMenuhasthreemainoptionsthatlettheusereitherExport/ImportorClosetheRVR‐GUI(seeFigure
21). The Exportoption displaysa sub‐menu thatprovidesthepossibility of exporting to text file either the
shapefiles(RiverandValleyCenterlines)ortheConfiguration(parametersinallthetabs).Inthecasethata
userwantstorunseveraltimesbutneedstochangeonlyfewparametersfromoneruntoanotherit’sagood
ideatoexporttheconfigurationandimportitbackagainforthenextruns.Allfieldsintheeighttabswillbe
populatedwiththeappropriatevalues.
Figure21.RVR‐GUIFileMenu.
Allexportoptionsdisplaya“SaveFileDialog”askingwherethetextfileshouldbesaved.Figure22showsthis
dialogforan“ExportConfiguration”case.Figure23showstheconfigurationfilein.txtformat.Thisfilecanbe
imported back into the RVR‐GUI with the difference that what appears on screen is an “Open File Dialog”
promptingtheusertoselectthecorrespondingtextfile.
Figure 24 shows both an exported River centerline and a Valley centerline in .txt format. That’s the same
formatrequiredtocreateashapefilefromtextfilewhenusingtheRVRToolbar.
August29,2011
9
Figure22.AfterclickingtheExportConfigurationoptiontheusershouldspecifythelocationtosavetheexportedtextfile.In
thiscasethegivennameisMackinaw_Config1.txt.
Figure23.ConfigurationFilein.txtformat.ItcanbeopenedwiththeNotepad.
Figure24.ExportedRiverandValleycenterlinesin.txtformat.
3.4.4.10. THERUNMENU
TheRunMenuisasimpleonewhichonlycontainstheoptionto“RunSimulation”(seeFigure25).Whenthe
userclicksitanewwindowappearsonscreen.Thiswindowisa“LogFileWatcher”(seeFigure26)which
displaysonscreenpreliminaryresultsfromthecomputationsofthemodel.Whenthemodelfinishestherun
theLogFileWatcherwillnotifytheuserwhichcanthenchoosewhetherto“Save”thelogfileorjust“Close”
anddeleteit.
Temporary files are created during the run and deleted immediately after it finishes. If the user wants
detailedinformationofthecomputationsit’simportanttosavethelogfile.Iftheuserdecidestosave,a“Save
August29,2011
10
FileDialog”willappearpromptingtheusertobrowsetothefolderwherethatlogfilein.txtformatshouldbe
saved.AnexampleofthisfileisshowninFigure27.
Figure25.RVR‐GUIRunMenu.
Figure26.LogFileWatcherbeforetherun(left)duringarun(center)andaftertherunfinishes(right).
Figure27.LogFilein.txt.format.
3.4.4.11. THEHELPMENU
TheHelpMenuhasthreeoptions(seeFigure27).ItprovidesaccesstotheUser’sManual,itallowsdisplaying
awindowwithinformationAboutRVR(seeFigure28)anditalsodisplaysamessageboxonscreenwiththe
e‐mailstowhichusersmightsendfeedback(seeFigure29).
Figure28.RVR‐GUIHelpMenu.
August29,2011
11
Figure29.RVR‐GUIAboutRVRMeander.
Figure30.RVR‐GUISendFeedbackTo.
3.4.5. 1DOUTPUT
The“1DOutput”command(seeFigure31)displaysawindowthatwilllettheuserspecifyinwhatfolderis
thefilewiththeoutputinformationsaved(seeFigure32).Ifthefolderspecifieddoesnotcontaina1Doutput
fileamessagewillbedisplayedwarningtheuser(seeFigure33).Ifthefoldercontainstheappropriatefile
thenthewindowwillexpandandtheuserwillbeabletoclickthe“Finish”buttontwocreatetheshapefile.
Dependingonthenumberofiterationsusedduringtherunitmighttakesomesecondsbeforetheshapefileis
addedand displayed intothe map. While the 1D Output is being processedamessage will be displayedon
ArcMap’s status bar ‐ at the bottom of the screen (see Figure 35). When the process ends a “Migrated
Centerlines”shapefilewillbeaddedtothemap(seeFigure36).
Figure31.Importa1DOutputfileofMigratedCenterlines.
Figure32.1DOutputuserform.
Figure33.1DOutput–Nofilefoundmessage.
Figure34.1DOutputexpandeduserform.
August29,2011
12
Figure35.1DOutput–Statusbarmessageswhileprocessing.
Figure36.1Doutput‐MigratedCenterlinesshapefileaddedintoArcMap.
3.4.6. 2DOUTPUT
The“2DOutput”command(seeFigure37)displaysawindow(seeFigure38)thatwilllettheuserspecifyin
which folder are the 2D output files saved. If the folder specified does not contain output information a
messagewillappearwarningtheuser(seeFigure39).Ifthefoldercontainsappropriateoutputfilesthenthe
windowwillexpand(seeFigure40)andlettheuserindicatewhichparameterswillbeoutputtedinArcMap
andforwhatiteration‐numberofyears(seeFigure41).Ifsomeoftheparametersarenotavailablebecause
theyweren’tsavedduringtherun,theirrespectivecheckboxeswillappeardisabled.
Figure37.Opensuserformtoimport2DOutputparameters.
Figure38.2DOutputuserform
August29,2011
Figure39.2DOutput–Nofilefoundmessage
13
Figure40.2DOutputuserform–expanded.
Figure41.Selectiteration–numberofyearstooutput.
Whentheuserclicksthe“Finish”buttontwoorthreeshapefilesarecreated.Whiletheyarebeingcreateda
messagewillbedisplayedinArcMap’sstatusbar(bottomofthescreen)lettingtheuserknowthatoutputis
being processed (see Figure 42). If the Floodplain checkbox was not checked only two shapefiles will be
created.Thefirstoneisthe2DOutputshapefile(seeFigure43)whichwillhavealltheparametersthatthe
user checked in the Attribute Table (see Figure 44) and the second one is a boundary polygon for the
corresponding iteration (see Figure 45). This boundary polygon is necessary to create a TIN or Raster to
visualize different parameters in ArcMap. Figure 46 shows a close up view of the 2D output shapefiles.
Displaypropertieswerechangedforbothlayers.Theboundaryisjustapolygonandthe2Doutputismade
upofpoints.Eachpointislocatedonagivencrosssectionandcontainsthevalueforthedifferentparameters
atthatspecificlocationinspace.FinallyiftheFloodplainoptionwascheckedashapefileofpoints(seeFigure
47)withthefloodplain’spropertiesintheAttributeTable(seeFigure48)willbecreatedandaddedintothe
map.
Figure42.2DOutput–Statusbarmessageswhileprocessing.
Figure43.2DOutputshapefileaddedintoArcMap.
August29,2011
14
Figure44.AttributeTableforthe2DOutputincludingallselectedparameters.
Figure45.2DOutputBoundaryPolygonaddedintoArcMap.
Figure46.2DOutput–Closeuptoseethedetailofthecreatedshapefiles.
August29,2011
15
Figure47.FloodplainHeterogeneityshapefileaddedintoArcMap.
Figure48.AttributeTablefortheFloodplainHeterogeneityshapefile.
InordertocreateaTINforanygivenparametertheusermustusethe“3DAnalyst”extensionofArcMap.If
notyetactivated,theusermustdosobygoingtotheToolsMenuandthenExtensions(seeFigure49).Once
it’sactivatedtheusercanaddthetoolbarinthesamewaythattheRVRMeanderToolbarwasadded.
To create a TIN for any specific parameter the user should follow these steps: Click on the “3D Analyst”
command and select “Create/Modify TIN” and then “Create TIN From Features” (see Figure 50). A new
windowappearsinwhichtheusershouldselectboththe2DOutputshapefileandtheboundarypolygon.The
exampleshownwillcreateaTINfortheparameter“TAU”(seeFigure51)usingthe“5years”iterationandthe
corresponding boundary polygon. Note that for the 2D Output file the “Height source” for the TIN is the
desiredparameter(shearstressmagnitudeinthiscase)andinthecaseoftheboundarypolygontheoption
“None”shouldbeselectedaswellasthe“SoftClip”option.UsershouldalsospecifythefoldertosavetheTIN
(seeFigure52).FailuretousetheboundarypolygoninthecreationofTINswillstillcreateaTINbutitwon’t
followtheriver’smigratedcenterline(seeFigure53).Oncetheuserclick’s“OK”theTINwillbecreatedand
displayedinArcMap(seeFigure54).
August29,2011
16
Figure49.Enablingthe3DAnalystextensionforArcMap.
Figure50.Accessingthe“CreateTinfromFeatures”windowwiththe3DAnalysttoolbar.
Figure51.RequiredparameterstoCreateaTINfromfeaturesusingthe2DOutputproducedwiththeRVR‐GUI.
Figure52.SelectfoldertoSavetheTIN.
August29,2011
17
Figure53.2DOutput–TINcreatedwithoutspecifyingtheboundarypolygon.
Figure54.TINcreatedandaddedintoArcMap.
InthecaseoftheFloodplainshapefile,theusercanuseeithertheSpatialAnalyst,the3DAnalystoreventhe
Geostatistical Analyst to create a raster to show the properties. An example is shown here using the 3D
Analyst toolbar (see Figure 55) to create a floodplain Raster using the “Inverse Distance Weighted – IDW”
algorithm (see Figure 56). The parameter used is the critical shear stress (TauC). The resulting raster is
showninFigure57.
Figure55.CreateaRasterusingtheIDWmethodfromthe3DAnalysttoolbar.
August29,2011
18
Figure56.IDWparameterdefinitionwindowfortheFloodplainraster.
Figure57.FloodplainHeterogeneityRasterusingtheCriticalShearStressTauC.
3.4.7. THECURVATUREMAPPERTOOL
The“CurvatureMapper”tool(seeFigure58)changesthemouseicontoacrosshairwithwhichtheusercan
selectapolylinefeature,saytheoriginalriverreachoranyofthe1Dmigratedcenterlines,andvisualizethe
curvatureasafunctionofstreamwisedistance(seeFigure59).
Figure58.CurvatureMapperTool
August29,2011
19
Figure59.Curvaturemapperplotfortheoriginalriverreach.
Theusercanenablethemappingtoscreenfeaturebyclickingonthecorrespondingcheckbox.Themapping
to screen functionality lets the user get a better idea of the parts of the river reach that have specific
curvaturevalues.Whileactive,thefeaturedisplaysablackcircleovertheselectedriverreachanditmovesas
theusermovesthemouseontheCurvatureMapperplot.Figure60showsthecaseforthehighestcurvature
value on the selected river reach. (X, Y) coordinates are displayed on the plot and the black dot on screen
shows where that specific point is located. The curvature mapper tool is meant to aid the user in both the
processofriverreachdigitalizationandintheanalysesofmigratedcenterlines.
Figure60.CurvatureMapperwithmappingtoscreenfutureenabled.
3.5.
EXAMPLEOFPOST‐PROCESSEDOUTPUTUSINGARCMAP’SCAPABILITIES
TheRVR‐GUIinArcMapallowsusingallthebuiltinfunctionalitieswhichisanaddedfuturefortheinterface.
Quality output can be made with some post processing effort with ArcMap’s tools. An example is shown
below(seeFigure61).
August29,2011
20
RVR Meander User Interface
Floodplain Heterogeneity
Basic Input
4
River Centerline
Valley Centerline
1D Output
Migrated
Centerlines (yrs)
0
20
5
25
10
30
15
35
Water Depth (m)
Velocity Magnitude (m/s)
2D Output
After 35 years
After 5 years
1.1 - 1.5
0.8 - 1.1
1.1 - 1.3
0.5 - 0.8
0.8 - 1.1
0.5 - 0.8
1.9 - 3.2
2.1 - 3.5
0.6 - 1.9
0.6 - 2.1
Shear Stress
Magnitude (Pa)
-0.8 - 0.6
-0.9 - 0.6
11.9 - 16.6
9.7 - 13.4
7.1 - 11.9
5.9 - 9.7
2.3 - 7.1
2.2 - 5.9
Figure61.Exampleofpost‐processedoutputusingRVR‐GUIandArcMap.
August29,2011
21