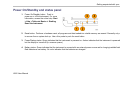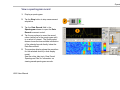
1
x
H500 Spectrum Analyzer
ZZZ
User Manual
*P071311500*
071-3115-00
xx
H500 Spectrum Analyzer
ZZZ
User Manual
www.tektronix.com
071-3115-00
Copyright © Tektronix. All rights reserved. Licensed software products are owned by Tektronix or its subsidiaries or suppliers, and are protected by
national copyright laws and international treaty provisions.
Tektronix products are covered by U.S. and foreign patents, issued and pending. Information in this publication supersedes that in all previously
published material. Specifications and price change privileges reserved.
TEKTRONIX and TEK are registered trademarks of Tektronix, Inc.
DPX is a trademark of Tektronix, Inc.
Contacting Tektronix
Tektronix, Inc.
14150 SW Karl Braun Drive
P.O. Box 500
Beaverton, OR 97077
USA
For product information, sales, service, and technical support:
In North America, call 1-800-833-9200.
Worldwide, visit www.tektronix.com to find contacts in your area.
Warranty
Tektronix warrants that this product will be free from defects in materials and workmanship for a period of one (1) year from the date of shipment. If
any such product proves defective during this warranty period, Tektronix, at its option, either will repair the defective product without charge for parts
and labor, or will provide a replacement in exchange for the defective product. Parts, modules and replacement products used by Tektronix for
warranty work may be new or reconditioned to like new performance. All replaced parts, modules and products become the property of Tektronix.
In order to obtain service under this warranty, Customer must notify Tektronix of the defect before the expiration of the warranty period and make
suitable arrangements for the performance of service. Customer shall be responsible for packaging and shipping the defective product to the service
center designated by Tektronix, with shipping charges prepaid. Tektronix shall pay for the return of the product to Customer if the shipment is to a
location within the country in which the Tektronix service center is located. Customer shall be responsible for paying all shipping charges, duties,
taxes, and any other charges for products returned to any other locations.
This warranty shall not apply to any defect, failure or damage caused by improper use or improper or inadequate maintenance and care. Tektronix
shall not be obligated to furnish service under this warranty a) to repair damage resulting from attempts by personnel other than Tektronix
representatives to install, repair or service the product; b) to repair damage resulting from improper use or connection to incompatible equipment; c) to
repair any damage or malfunction caused by the use of non-Tektronix supplies; or d) to service a product that has been modified or integrated with
other products when the effect of such modification or integration increases the time or difficulty of servicing the product.
THIS WARRANTY IS GIVEN BY TEKTRONIX WITH RESPECT TO THE PRODUCT IN LIEU OF ANY OTHER WARRANTIES, EXPRESS OR
IMPLIED. TEKTRONIX AND ITS VENDORS DISCLAIM ANY IMPLIED WARRANTIES OF MERCHANTABILITY OR FITNESS FOR A PARTICULAR
PURPOSE. TEKTRONIX' RESPONSIBILITY TO REPAIR OR REPLACE DEFECTIVE PRODUCTS IS THE SOLE AND EXCLUSIVE REMEDY
PROVIDED TO THE CUSTOMER FOR BREACH OF THIS WARRANTY. TEKTRONIX AND ITS VENDORS WILL NOT BE LIABLE FOR ANY
INDIRECT, SPECIAL, INCIDENTAL, OR CONSEQUENTIAL DAMAGES IRRESPECTIVE OF WHETHER TEKTRONIX OR THE VENDOR HAS
ADVANCE NOTICE OF THE POSSIBILITY OF SUCH DAMAGES.
[W2 – 15AUG04]
Table of Contents
Table of Contents
General safety summary . . .. . . .. . . .. . . . .. . . .. . . .. . . .. . . . .. . . .. . . .. . . .. . . . .. . . .. . . .. . . . .. . . .. . . .. . . .. . . . .. . . .. . . .. . . . .. . . .. . . .. . . .. . . . .. . . .. .
v
Compliance information . . . .. . . .. . . .. . . . .. . . .. . . .. . . .. . . . .. . . .. . . .. . . .. . . . .. . . .. . . .. . . . .. . . .. . . .. . . .. . . . .. . . .. . . .. . . . .. . . .. . . .. . . . . . . . .. . . .
EMC compliance.. . . . .. . . .. . . .. . . . .. . . .. . . .. . . .. . . . .. . . .. . . .. . . . .. . . .. . . .. . . .. . . . .. . . .. . . .. . . .. . . . .. . . .. . . .. . . . .. . . .. . . .. . . .. . . . .. . . .
Safety compliance . . . .. . . .. . . .. . . . .. . . .. . . .. . . .. . . . .. . . .. . . .. . . .. . . . .. . . .. . . .. . . . .. . . .. . . .. . . .. . . . .. . . .. . . .. . . . .. . . .. . . .. . . .. . . . . . . . ..
Environmental considerations . . . .. . . . .. . . .. . . .. . . . .. . . .. . . .. . . .. . . . .. . . .. . . .. . . . .. . . .. . . .. . . .. . . . .. . . .. . . .. . . . .. . . .. . . .. . . .. . . . .. . . ..
viii
viii
xi
xi
Preface. . . . .. . . .. . . .. . . .. . . . .. . . .. . . .. . . . .. . . .. . . .. . . .. . . . .. . . .. . . .. . . . .. . . .. . . .. . . .. . . . .. . . .. . . .. . . . .. . . .. . . .. . . .. . . . .. . . .. . . . . . . .. . . . .. . . . xiv
Key features. .. . . .. . . . .. . . .. . . .. . . . .. . . .. . . .. . . .. . . . .. . . .. . . .. . . . .. . . .. . . .. . . .. . . . .. . . .. . . .. . . .. . . . .. . . .. . . .. . . . .. . . .. . . .. . . .. . . . .. . . . xiv
Documentation . . .. . . . .. . . .. . . .. . . . .. . . .. . . .. . . .. . . . .. . . .. . . .. . . . .. . . .. . . .. . . .. . . . .. . . .. . . .. . . .. . . . .. . . .. . . .. . . . .. . . .. . . .. . . .. . . . .. . . .
xv
Instrument and PC software . .. . . . .. . . .. . . .. . . .. . . . .. . . .. . . .. . . .. . . . .. . . .. . . .. . . . .. . . .. . . .. . . .. . . . .. . . .. . . .. . . . .. . . .. . . .. . . .. . . . .. . . .
xv
Conventions used in this manual .. . . . .. . . .. . . .. . . . .. . . .. . . .. . . .. . . . .. . . .. . . .. . . . .. . . .. . . .. . . .. . . . .. . . .. . . .. . . . .. . . .. . . .. . . .. . . . .. . .
xvii
Preventing personal injury from lightning . . . . .. . . . .. . . .. . . .. . . .. . . . .. . . .. . . .. . . . .. . . .. . . .. . . .. . . . .. . . .. . . .. . . .. . . . .. . . .. . . .. . . . .. . . xviii
Installation .. . . .. . . .. . . .. . . . .. . . .. . . .. . . . .. . . .. . . .. . . .. . . . .. . . .. . . .. . . . .. . . .. . . .. . . .. . . . .. . . .. . . .. . . .. . . . .. . . .. . . .. . . . .. . . .. . . .. . . .. . . . .. . . ..
Standard accessories.. . . .. . . .. . . . .. . . .. . . .. . . .. . . . .. . . .. . . .. . . .. . . . .. . . .. . . .. . . . .. . . .. . . .. . . .. . . . .. . . .. . . .. . . . .. . . .. . . .. . . .. . . . . . . . ..
Operating considerations .. . . .. . . .. . . . .. . . .. . . .. . . . .. . . .. . . .. . . .. . . . .. . . .. . . .. . . . .. . . .. . . .. . . .. . . . .. . . .. . . .. . . . .. . . .. . . .. . . .. . . . . . . . ..
Installing batteries. . . . .. . . .. . . .. . . . .. . . .. . . .. . . .. . . . .. . . .. . . .. . . .. . . . .. . . .. . . .. . . . .. . . .. . . .. . . .. . . . .. . . .. . . .. . . . .. . . .. . . .. . . .. . . . .. . . ..
Connecting the AC adapter. . . . . . . .. . . .. . . .. . . .. . . . .. . . .. . . .. . . .. . . . .. . . .. . . .. . . . .. . . .. . . .. . . .. . . . .. . . .. . . .. . . . .. . . .. . . .. . . .. . . . .. . . ..
Charging the batteries . . . .. . . .. . . . .. . . .. . . .. . . .. . . . .. . . .. . . .. . . .. . . . .. . . .. . . .. . . . .. . . .. . . .. . . .. . . . .. . . .. . . .. . . . .. . . .. . . .. . . .. . . . . . . . ..
Battery maintenance and handling . . . .. . . .. . . .. . . . .. . . .. . . .. . . .. . . . .. . . .. . . .. . . . .. . . .. . . .. . . .. . . . .. . . .. . . .. . . . .. . . .. . . .. . . .. . . . .. . . ..
Powering on and off the instrument, and functional verification . . . .. . . .. . . .. . . .. . . . .. . . .. . . .. . . . .. . . .. . . .. . . .. . . . .. . . .. . . .. . . . .. . . .
Calibrate the touch screen. . . .. . . . .. . . .. . . .. . . .. . . . .. . . .. . . .. . . .. . . . .. . . .. . . .. . . . .. . . .. . . .. . . .. . . . .. . . .. . . .. . . . .. . . .. . . .. . . .. . . . .. . . .
Setting date and time .. . . .. . . .. . . . .. . . .. . . .. . . .. . . . .. . . .. . . .. . . . .. . . .. . . .. . . .. . . . .. . . .. . . .. . . .. . . . .. . . .. . . .. . . . .. . . .. . . .. . . .. . . . .. . . .
H500 User Manual
1
1
3
5
7
8
9
10
11
13
i
Table of Contents
ii
Starting the H500 spectrum analyzer application . .. . . . .. . . .. . . .. . . .. . . . .. . . .. . . .. . . . .. . . .. . . .. . . .. . . . .. . . .. . . .. . . .. . . . .. . . .. . . .. . . .
Setting display colors .. . . . .. . . .. . . .. . . . .. . . .. . . .. . . .. . . . .. . . .. . . .. . . .. . . . .. . . .. . . .. . . . .. . . .. . . .. . . .. . . . .. . . .. . . .. . . . .. . . .. . . .. . . .. . . .
14
15
Getting acquainted with your instrument. . . .. . . . .. . . .. . . .. . . . .. . . .. . . .. . . .. . . . .. . . .. . . .. . . . .. . . .. . . .. . . .. . . . .. . . .. . . .. . . . .. . . .. . . .. . . .. . . .
Instrument elements . .. . . . .. . . .. . . .. . . . .. . . .. . . .. . . .. . . . .. . . .. . . .. . . .. . . . .. . . .. . . .. . . . .. . . .. . . .. . . .. . . . .. . . .. . . .. . . . .. . . .. . . .. . . . . . . .
Power On/Standby and status panel . . . . . . .. . . .. . . .. . . . .. . . .. . . .. . . .. . . . .. . . .. . . .. . . . .. . . .. . . .. . . .. . . . .. . . .. . . .. . . . .. . . .. . . .. . . .. . . .
Input/Output connectors . . . . . . .. . . .. . . . .. . . .. . . .. . . .. . . . .. . . .. . . .. . . .. . . . .. . . .. . . .. . . . .. . . .. . . .. . . .. . . . .. . . .. . . .. . . . .. . . .. . . .. . . .. . . .
Signal connectors . . . . .. . . . .. . . .. . . .. . . . .. . . .. . . .. . . .. . . . .. . . .. . . .. . . .. . . . .. . . .. . . .. . . . .. . . .. . . .. . . .. . . . .. . . .. . . .. . . . .. . . .. . . .. . . .. . . .
The user interface.. . . .. . . . .. . . .. . . .. . . . .. . . .. . . .. . . .. . . . .. . . .. . . .. . . .. . . . .. . . .. . . .. . . . .. . . .. . . .. . . .. . . . .. . . .. . . .. . . . .. . . .. . . .. . . .. . . .
Getting help . . .. . . .. . . .. . . . .. . . .. . . .. . . . .. . . .. . . .. . . .. . . . .. . . .. . . .. . . . .. . . .. . . .. . . .. . . . .. . . .. . . .. . . .. . . . .. . . .. . . .. . . . .. . . .. . . .. . . .. . . .
16
16
17
18
19
20
29
Operating basics. . . .. . . .. . . .. . . . .. . . .. . . .. . . . .. . . .. . . .. . . .. . . . .. . . .. . . .. . . .. . . . .. . . .. . . .. . . . .. . . .. . . .. . . .. . . . .. . . .. . . .. . . . .. . . .. . . .. . . .. . . .
Enabling signal standards . . . . .. . . .. . . .. . . . .. . . .. . . .. . . . .. . . .. . . .. . . .. . . . .. . . .. . . .. . . . .. . . .. . . .. . . .. . . . .. . . .. . . .. . . . .. . . .. . . .. . . .. . . .
Enabling signal types . . . . . .. . . .. . . .. . . . .. . . .. . . .. . . .. . . . .. . . .. . . .. . . .. . . . .. . . .. . . .. . . . .. . . .. . . .. . . .. . . . .. . . .. . . .. . . . .. . . .. . . .. . . .. . . .
Select a measurement type . . .. . . .. . . . .. . . .. . . .. . . .. . . . .. . . .. . . .. . . .. . . . .. . . .. . . .. . . . .. . . .. . . .. . . .. . . . .. . . .. . . .. . . . .. . . .. . . .. . . .. . . .
Spectrum/Spectrogram measurements . . . .. . . .. . . .. . . . .. . . .. . . .. . . .. . . . .. . . .. . . .. . . . .. . . .. . . .. . . .. . . . .. . . .. . . .. . . . .. . . .. . . .. . . .. . . .
DPX® spectrum display . . .. . . . .. . . .. . . .. . . .. . . . .. . . .. . . .. . . . .. . . .. . . .. . . .. . . . .. . . .. . . .. . . . .. . . .. . . .. . . .. . . . .. . . .. . . .. . . . .. . . .. . . .. . . .
Amplitude vs. time measurement .. . . .. . . . .. . . .. . . .. . . . .. . . .. . . .. . . .. . . . .. . . .. . . .. . . . .. . . .. . . .. . . .. . . . .. . . .. . . .. . . . .. . . .. . . .. . . .. . . .
IF output. . .. . . .. . . .. . . .. . . . .. . . .. . . .. . . . .. . . .. . . .. . . .. . . . .. . . .. . . .. . . . .. . . .. . . .. . . .. . . . .. . . .. . . .. . . .. . . . .. . . .. . . .. . . . .. . . .. . . .. . . .. . . .
Triggering .. . . .. . . .. . . .. . . . .. . . .. . . .. . . . .. . . .. . . .. . . .. . . . .. . . .. . . .. . . . .. . . .. . . .. . . .. . . . .. . . .. . . .. . . .. . . . .. . . .. . . .. . . . .. . . .. . . .. . . .. . . .
Signal classification . . .. . . . .. . . .. . . .. . . . .. . . .. . . .. . . .. . . . .. . . .. . . .. . . .. . . . .. . . .. . . .. . . . .. . . .. . . .. . . .. . . . .. . . .. . . .. . . . .. . . .. . . .. . . .. . . .
iMap measurement mapping mode . . . .. . . .. . . .. . . .. . . . .. . . .. . . .. . . .. . . . .. . . .. . . .. . . . .. . . .. . . .. . . .. . . . .. . . .. . . .. . . . .. . . .. . . .. . . .. . . .
Measurement data logging . . . .. . . .. . . . .. . . .. . . .. . . .. . . . .. . . .. . . .. . . .. . . . .. . . .. . . .. . . . .. . . .. . . .. . . .. . . . .. . . .. . . .. . . . .. . . .. . . .. . . .. . . .
30
30
31
32
33
38
42
46
47
52
64
82
Remote instrument access .. . . . .. . . .. . . .. . . . .. . . .. . . .. . . .. . . . .. . . .. . . .. . . .. . . . .. . . .. . . .. . . . .. . . .. . . .. . . .. . . . .. . . .. . . .. . . . .. . . .. . . .. . . .. . . .
Configure the instrument network settings .. . . .. . . .. . . . .. . . .. . . .. . . .. . . . .. . . .. . . .. . . . .. . . .. . . .. . . .. . . . .. . . .. . . .. . . . .. . . .. . . .. . . .. . . .
85
85
H500 User Manual
Table of Contents
Configure the instrument ActiveSync settings . . . . .. . . .. . . .. . . .. . . . .. . . .. . . .. . . . .. . . .. . . .. . . .. . . . .. . . .. . . .. . . .. . . . .. . . .. . . .. . . . .. . . .
Configure ActiveSync on the PC .. . . . .. . . .. . . .. . . . .. . . .. . . .. . . .. . . . .. . . .. . . .. . . . .. . . .. . . .. . . .. . . . .. . . .. . . .. . . . .. . . .. . . .. . . .. . . . .. . . .
Remote control using Virtual CE .. . . . .. . . .. . . .. . . . .. . . .. . . .. . . .. . . . .. . . .. . . .. . . . .. . . .. . . .. . . .. . . . .. . . .. . . .. . . . .. . . .. . . .. . . .. . . . .. . . .
87
88
91
Specifications . .. . . .. . . .. . . . .. . . .. . . .. . . . .. . . .. . . .. . . .. . . . .. . . .. . . .. . . . .. . . .. . . .. . . .. . . . .. . . .. . . .. . . .. . . . .. . . .. . . .. . . . .. . . .. . . .. . . .. . . . .. . . .
93
Index
H500 User Manual
iii
Table of Contents
iv
H500 User Manual
General safety summary
General safety summary
Review the following safety precautions to avoid injury and prevent damage to this product or any products connected to it.
To avoid potential hazards, use this product only as specified.
Only qualified personnel should perform service procedures.
While using this product, you may need to access other parts of a larger system. Read the safety sections of the other component
manuals for warnings and cautions related to operating the system.
To avoid fire or personal injury
Use proper power cord. Use only the power cord specified for this product and certified for the country of use.
Observe all terminal ratings. To avoid fire or shock hazard, observe all ratings and markings on the product. Consult the product
manual for further ratings information before making connections to the product.
The inputs are not rated for connection to mains or Category II, III, or IV circuits.
Power disconnect. The power cord disconnects the product from the power source. Do not block the power cord; it must remain
accessible to the user at all times.
Do not operate without covers. Do not operate this product with covers or panels removed.
Do not operate with suspected failures. If you suspect that there is damage to this product, have it inspected by qualified
service personnel.
Avoid exposed circuitry. Do not touch exposed connections and components when power is present.
Replace batteries properly. Replace batteries only with the specified type and rating.
H500 User Manual
v
General safety summary
Recharge batteries properly. Recharge batteries for the recommended charge cycle only.
Use proper AC adapter. Use only the AC adapter specified for this product.
Do not operate in an explosive atmosphere.
Terms in this manual
These terms may appear in this manual:
WARNING. Warning statements identify conditions or practices that could result in injury or loss of life.
CAUTION. Caution statements identify conditions or practices that could result in damage to this product or other property.
Symbols and terms on the product
These terms may appear on the product:
DANGER indicates an injury hazard immediately accessible as you read the marking.
WARNING indicates an injury hazard not immediately accessible as you read the marking.
CAUTION indicates a hazard to property including the product.
vi
H500 User Manual
General safety summary
The following symbol(s) may appear on the product:
H500 User Manual
vii
Compliance information
Compliance information
This section lists the EMC (electromagnetic compliance), safety, and environmental standards with which the instrument complies.
EMC compliance
EC declaration of conformity – EMC
Meets intent of Directive 2004/108/EC for Electromagnetic Compatibility. Compliance was demonstrated to the following
specifications as listed in the Official Journal of the European Communities:
EN 61326-1:2006, EN 61326-2-1:2006. EMC requirements for electrical equipment for measurement, control, and laboratory
use. 1 2 3 4
CISPR 11:2003. Radiated and conducted emissions, Group 1, Class A
IEC 61000-4-2:2001. Electrostatic discharge immunity
IEC 61000-4-3:2002. RF electromagnetic field immunity 5
IEC 61000-4-4:2004. Electrical fast transient/burst immunity
IEC 61000-4-5:2001. Power line surge immunity
IEC 61000-4-6:2003. Conducted RF immunity 6
IEC 61000-4-11:2004. Voltage dips and interruptions immunity 7
EN 61000-3-2:2006. AC power line harmonic emissions
EN 61000-3-3:1995. Voltage changes, fluctuations, and flicker
viii
H500 User Manual
Compliance information
European contact.
Tektronix UK, Ltd.
Western Peninsula
Western Road
Bracknell, RG12 1RF
United Kingdom
1
This product is intended for use in nonresidential areas only. Use in residential areas may cause electromagnetic interference.
2
Emissions which exceed the levels required by this standard may occur when this equipment is connected to a test object.
3
To ensure compliance with the EMC standards listed here, high quality shielded interface cables should be used.
4
When the application of a test with transient electromagnetic phenomenon results in the product rebooting, the self-recovery time
can exceed 10 seconds. For example, at the 0% for 250 cycle Voltage Interruption test of IEC 61000-4-11.
5
Residual spurious signals can typically increase up to a level of -30 dBm with exposure to the disturbance levels of this test.
6
Residual spurious signals can typically increase up to a level of -70 dBm with exposure to the disturbance levels of this test.
7
Performance Criterion C applied at the 70%/25 cycle Voltage-Dip and the 0%/250 cycle Voltage-Interruption test levels
(IEC 61000-4-11).
Australia / New Zealand declaration of conformity – EMC
Complies with the EMC provision of the Radiocommunications Act per the following standard, in accordance with ACMA:
CISPR 11:2003. Radiated and Conducted Emissions, Group 1, Class A, in accordance with EN 61326-1:2006 and
EN 61326-2-1:2006.
Australia/New Zealand contact.
H500 User Manual
ix
Compliance information
Baker & McKenzie
Level 27, AMP Centre, 50 Bridge Street
Sydney NSW 2000, Australia
x
H500 User Manual
Compliance information
Safety compliance
ANSI/UL61010-1:2004. Electrical Equipment for Measurement, Control, and Laboratory Use
CSA C22.2 No. 61010.1:2004. Electrical Equipment for Measurement, Control, and Laboratory Use
EN 61010-1:2001. Electrical Equipment for Measurement, Control, and Laboratory Use
IEC61010-1:2001. Electrical Equipment for Measurement, Control, and Laboratory Use
ISA 82.02.01. Electrical Equipment for Measurement, Control, and Laboratory Use
Environmental considerations
This section provides information about the environmental impact of the product.
Product End-of-Life handling
Observe the following guidelines when recycling an instrument or component:
Equipment recycling. Production of this equipment required the extraction and use of natural resources. The equipment may
contain substances that could be harmful to the environment or human health if improperly handled at the product’s end of life. In
order to avoid release of such substances into the environment and to reduce the use of natural resources, we encourage you to
recycle this product in an appropriate system that will ensure that most of the materials are reused or recycled appropriately.
H500 User Manual
xi
Compliance information
This symbol indicates that this product complies with the applicable European Union requirements according to
Directives 2002/96/EC and 2006/66/EC on waste electrical and electronic equipment (WEEE) and batteries. For
information about recycling options, check the Support/Service section of the Tektronix Web site (www.tektronix.com).
Battery recycling. The Lithium-Ion rechargeable battery pack in this product must be recycled or disposed of properly.
Lithium-Ion batteries are subject to disposal and recycling regulations that vary by country and region. Always check and
follow your applicable regulations before disposing of any battery. Contact Rechargeable Battery Recycling Corporation
(www.rbrc.org) for U.S.A. and Canada, or your local battery recycling organization.
Many countries prohibit the disposal of waste electronic equipment in standard waste receptacles.
Place only discharged batteries in a battery collection container. Use electrical tape or other approved covering over the
battery connection points to prevent short circuits.
Mercury notification. This product uses an LCD backlight lamp that contains mercury. Disposal may be regulated due to
environmental considerations. Please contact your local authorities or, within the United States, refer to the E-cycling Central Web
page (www.eiae.org) for disposal or recycling information.
Perchlorate materials. This product contains one or more type CR lithium batteries. According to the state
of California, CR lithium batteries are classified as perchlorate materials and require special handling. See
www.dtsc.ca.gov/hazardouswaste/perchlorate for additional information.
Transporting Lithium-Ion batteries
The capacity of the Lithium-Ion rechargeable battery pack in this product is under 100 Wh. The lithium equivalent content has been
shown to meet the applicable requirements as defined by the UN Manual of Tests and Criteria Part III Subsection 38.3.
xii
H500 User Manual
Compliance information
Always check all applicable local, national, and international regulations before transporting a Lithium-Ion battery.
Transporting an end-of-life, damaged, or recalled battery may, in certain cases, be specifically limited or prohibited.
The battery pack must be adequately protected against short-circuit or damage during transport.
Restriction of hazardous substances
This product is classified as an industrial monitoring and control instrument, and is not required to comply with the substance
restrictions of the recast RoHS Directive 2011/65/EU until July 22, 2017.
H500 User Manual
xiii
Preface
Preface
This manual describes the features and basic operation of the H500 Spectrum Analyzer. For more detailed information on specific
fields or tasks, tap the help buttons in the application to open the online help for those items.
Key features
The H500 Spectrum Analyzer is a rugged, multi-standard spectrum analyzer, signal analysis, and interference mapping tool
optimized for field use. Key features include:
Spectrum analyzer input frequency range of 10 kHz to 6.2 GHz covers most modern signal sources
DPX™ Spectrum color bitmap display that shows signal rate-of-occurrence and trace shape changes to help highlight
short-duration signal features
Plot measurements directly onto geo-referenced maps (using GPS) or image maps for on-site analysis of interference and
coverage problems
Signal profiles for analyzing and classifying signals
Amplitude vs. Time measurement (similar to a Zero-Span measurement on a swept-IF spectrum analyzer)
Multiple signal markers, signal traces, and trace modes provide flexible measurement capabilities
Spectrogram display for detection of intermittent signals
Key RF measurements
xiv
H500 User Manual
Preface
Documentation
To read about
Use these documents
Installation and operation (overviews)
H500 Spectrum Analyzer User Manual. The user manual contains general information
about how to put your instrument into service, guides to user interface controls, and
key application examples.
Help using the application
Online Help. The online help is context sensitive, displaying information appropriate
for the active screen or the selected help button. (See page 29, Getting help.)
Instrument and PC software
The following instrument software upgrades and PC tools are available on the Tektronix Web site (www.tektronix.com). You
must have a valid software key for the instrument serial number to install instrument software. PC-based software tools do not
require an option key.
H500 Software Upgrade Archive File
The H500 upgrade archive file upgrades the H500 instrument software to
the latest version.
H500 PC Application Installation File
The H500 Spectrum Analyzer PC simulator software provides a PC simulation
of the instrument functionality. The simulator can display saved instrument
measurement results, create and edit mask test files, and so on. The only limit
to the PC simulator is that it cannot take measurements.
H500 User Manual
xv
Preface
xvi
iMap Converter PC Application Installation File
The iMap Converter PC tool lets you convert image or industry-standard
coordinate maps to GSF-format map files for use with the instrument iMap
mapping function. The iMap Converter tool also lets you add coordinate
information to image files or create coordinate map files from applications
such as Microsoft MapPoint.
Signal DB Editor PC Application Installation File
The signal database editor lets you edit the instrument signal database files to
customize signal definitions.
USB Slave Device PC Registration Utility
The USB slave device registration software enables a PC to communicate
with the instrument through a USB cable. You must run this software before
using the VirtualCE software to remotely control the instrument over a USB
connection. You do not need to run this program if you plan to use VirtualCE to
remotely control the instrument over a network or RS-232 connection.
VirtualCE PC Application Installation File
The VirtualCE PC application lets you remotely control your instrument from a
virtual interface on a PC or laptop. If you intend to use a USB cable to access
the instrument from the VirtualCE application, you must run the USB slave
device registration program before installing and using this application.
H500 User Manual
Preface
Downloading software
1. Use your Web browser to go to www.tektronix.com/software.
2. Enter the product model number (H500) in the Search by keyword field and click Go.
3. Scroll through the list and select the appropriate link for a software item to show more information or to download the software.
The instructions to install the software are on the Web download page for each software item or included with the downloaded file.
Conventions used in this manual
The following icons are used in this manual:
Sequence
Step
H500 User Manual
Front panel
power
Connect
power
xvii
Preface
Preventing personal injury from lightning
WARNING. To prevent personal injury from the effects of lightning, exercise the following precautions when using this product:
Before connecting this product to any source
Check your local weather forecast for the possibility of thunderstorms or lightning.
If weather conditions could allow thunderstorms or lightning to develop, be sure to visually check the sky and weather
conditions in your area frequently.
If you can hear thunder or if you see lightning, do not connect this product to any source which may be exposed to the
effects of lightning.
Use your own good judgement and common sense. You must protect yourself from the effects of lightning.
You must assume that hazardous voltages will be present on exposed surfaces of this product if it is connected to a source
exposed to lightning. The insulation of this product will not protect you from these hazardous voltages.
xviii
H500 User Manual
Preface
Do not connect this product to any source which might be subject to the effects of lightning
If thunderstorms or lightning are in your vicinity:
When weather conditions that could lead to lightning activity exist in your area, you could be at risk of a lightning strike
before the cloud is close enough for you to hear thunder or see lightning.
When lightning strikes a structure or facility, current travels through rebar, concrete, pipes, cables, vent stacks, and electrical
system.
Lightning can induce electric and magnetic fields into structures and portions of wiring. The length of a conductor affected by
the magnetic field of a lightning strike may exceed two miles.
Be alert and aware of the effects of lightning
When lightning strikes a conductor, which in turn introduces the current into an area some distance from the ground strike point,
equipment can be damaged and personnel injured if they become an indirect path in the completion of the ground circuit.
Conductors such as the braided shields of cables or unshielded wires will have significant transient currents flowing in them
in regions exposed to the electric field effect of lightning.
Induced voltages may cause breakdown of insulation in wiring at connectors and in electrical components or breakdown of air.
H500 User Manual
xix
Preface
xx
H500 User Manual
Installation
Installation
Carefully unpack your instrument and verify that it includes the standard accessories.
Standard accessories
Accessory
Tektronix part number
H500 Spectrum Analyzer User Manual
071-3115-xx
H500, SA2500, H600, SA2600, RF Scout, Y400 and Y350C Lithium-Ion Battery Maintenance
Instructions
071-3117-xx
AC Power Adapter
119-7288-xx
Lithium-Ion Battery
146-0151-xx
GPS Antenna
119-7424-xx
Tilt stand
348-1661-xx
Soft carry case
016-1775-xx
VHF sniffer antenna with BNC connector
119-6609-xx
N to BNC adapter connector
103-0045-xx
2-meter USB cable, A to B
174-4401-xx
Audio jack mute plug (mute all audio output from the instrument speaker)
131-8284-xx
H500 User Manual
1
Installation
Your instrument may also include optional accessories. Verify that the optional accessories you ordered are included with your
instrument. For a current list of accessories, upgrades, and options, including service options, available for your instrument,
visit the Tektronix Web site, www.tektronix.com.
2
H500 User Manual
Installation
Operating considerations
AC Adapter
Input voltage and current: 100 V - 240 V AC, 1.5 A
Input frequency: 50 Hz - 60 Hz
Output voltage and current: 24 V DC, 2.7 A
Dimensions
Height: 25.5 cm. (10.0 in)
Width: 33 cm. (13 in)
Depth: 12.5 cm. (4.8 in)
Weight
Weight: 6.0 kg (13.25 lbs) , instrument and one battery
Temperature Range
Operating: 0 °C to +50 °C (32 °F to 122 °F) specified performance, –10 °C to +50 °C
(14 °F to 122 °F) typical
Nonoperating: –40 °C to +60 °C (–40 °F to 160 °F)
Battery charging: limited to 0 °C to 45 °C (32 °F to 113 °F)
Humidity
Operating and Nonoperating: 5% to 95% relative humidity (RH) at up to +30 °C, 5% to 45% RH above
+30 °C up to +50 °C, noncondensing
Altitude
Operating: Up to 4,600 m (15,092 ft.)
Nonoperating: Up to 12,192 m (40,000 ft.)
RF Signal Input
Input frequency range: 10 kHz to 6.2 GHz
Coupling: AC
Input impedance: 50 Ω (nominal)
Maximum input power without damaging instrument: 50 W rms 10 kHz to 3.2 GHz, 15 W rms 3.2 GHz
to 6.2 GHz
H500 User Manual
3
Installation
Cleaning
Clean the exterior surfaces of the instrument with a dry lint-free cloth or a soft-bristle brush.
Use a cloth or swab moistened with deionized or distilled water, or a 75% isopropyl alcohol solution for more stubborn stains, to
clean the instrument or touch screen; use just enough moisture to dampen the cloth or swab.
Use a gentle amount of force when cleaning the touch screen.
CAUTION. Do not get moisture inside the instrument during exterior cleaning.
Do not wash the front-panel On/Standby switch. Cover the switch while washing the instrument.
Do not spray liquids directly on the instrument or touch screen.
Do not use abrasive cleaners, or chemical cleaning agents that contain benzene, toluene, xylene, acetone, or similar solvents; they
can damage the instrument or touch screen. Do not use commercial glass cleaners to clean the touch screen.
Do not scrub the touch screen with excessive force while cleaning.
4
H500 User Manual
Installation
Installing batteries
The instrument comes standard with a single battery, which is not installed when the instrument is shipped. To install the battery, do
the following:
1. Push on the battery door latch, then open
the battery door.
2. Push the metal battery retainer tab down
and towards the back of the instrument.
3. Lift the battery retainer up.
H500 User Manual
5
Installation
4. Lift battery by the tab.
5. Insert the battery, oriented as shown, into
either battery slot.
6. Close and latch the metallic battery retainer
and the battery compartment door.
7. Reverse steps 1 through 6 to remove a
battery.
You can add a second battery to increase the operating time. Replace a battery with the specified type only. To purchase a battery,
contact your Tektronix Service Center for the correct part number.
NOTE. Disconnect power supply cables from the instrument before installing or removing batteries.
New batteries, or batteries that have not been used for an extended period, must be charged before using them to power the
instrument. (See page 8, Charging the batteries.)
6
H500 User Manual
Installation
Connecting the AC adapter
1. Lift the instrument strap to expose the
power adapter connector.
2. Connect the AC power adapter to the
instrument.
3. Connect the AC adapter to a
properly-grounded AC power source
using the provided power cord.
4. Charge the batteries before using the
instrument on battery power for the first
time. (See page 8, Charging the batteries.)
H500 User Manual
7
Installation
Charging the batteries
Charge the batteries before using the instrument on battery power for the first time. Batteries are partially charged and calibrated
at the factory. A calibrated battery allows the instrument to more accurately estimate how long the application modules can
operate before the instrument automatically powers off. The front-panel BATTERIES charge status indicator turns off when
charging is complete.
See the H500 application online help topic Battery Calibration for information on calibrating batteries.
Approximate charge time 1
Number of batteries
Instrument powered on
1
10 hours
5.5 hours
2
20 hours
11 hours
1
Instrument powered off
Charge times are typical numbers for batteries that are low but not completely discharged.
Battery power management
The Power Management tool lets you determine battery charge status, obtain battery manufacture date and charge capacity
information, and set power saving modes to maximize instrument run time.
To open the Power Management tool, select Start > Settings > Control Panel, and then double-tap the Power Management icon.
You can also open the Power Management tool by double-tapping on the power icon in the Windows CE system tray. The power
icon is either a power plug or a battery, depending on the current instrument power source.
8
H500 User Manual
Installation
Battery maintenance and handling
Lithium-Ion rechargeable batteries require routine maintenance and care in their use and handling. See the Battery Maintenance
online help topics for information on battery characteristics, replacement, storage, handling precautions, transportation, and
disposal and recycling.
H500 User Manual
9
Installation
Powering on and off the instrument, and functional verification
1. Tap the On/Standby button to power on
the instrument.
The instrument WindowsCE Status bar
shows the Battery icon when the instrument
is operating on battery power and the
External Power Connected icon when the
instrument is operating with an external
adapter.
To power off the instrument, tap the
On/Standby button again.
For information on the instrument
on/standby power modes, see the online
help: Start > Help > Tektronix Basics >
Shutting Down the Instrument.
2. For functional verification, watch the
screen. Verify that the instrument does
not display any power-on diagnostic error
messages.
10
H500 User Manual
Installation
Calibrate the touch screen
Before using the instrument for the first time, calibrate the touch screen display to respond correctly to your taps. The instrument
user interface is based on touch screen technology. You tap (touch) virtual controls on the instrument screen to select and operate
instrument controls. Virtual controls behave the same way as physical controls.
1. Tap Start > Settings > Control Panel to
open the Control Panel screen.
2. Double-tap the Stylus icon on the Control
Panel screen.
3. In the Double-Tap tab, double-tap the
checkerboard grid at a comfortable speed
with your stylus or finger to set the tap rate.
4. Double-tap the test icon to verify your
settings.
H500 User Manual
11
Installation
5. Tap the Calibration tab and read the
instructions.
6. Tap the Recalibrate button to open the
Cursor Position target screen.
7. Follow the target screen instructions.
When the position target disappears, touch
anywhere on the screen to return to the
Calibration tab.
8. Tap OK to save calibration settings.
12
H500 User Manual
Installation
Setting date and time
You should set the date, time, and time zone for your location the first time you power on the instrument. You should only reset the
time when you use the instrument in a new time zone or are not using GPS to synchronize the instrument clock. You must update
the time zone setting whenever you move the instrument to a region with a different time zone. The system date and time is always
synchronized with GPS date and time, and then uses the time zone setting to set the local time.
1. Double-tap the time readout in the task bar,
or tap Start > Settings > Control Panel >
Date/Time.
2. Set the correct date, time and time zone
for your location.
3. Tap OK to accept the settings and close
the dialog box.
H500 User Manual
13
Installation
Starting the H500 spectrum analyzer application
The H500 application starts automatically when you power on the instrument for the first time. If the H500 does not start
automatically, or you have stopped the application, use either of the following methods to start the application:
Double-tap the H500 icon on the instrument
screen.
Select Start > Programs > Tektronix
Applications > H500.
The instrument opens the application. The
Microsoft WindowsCE taskbar displays a
button for each running application. To bring
the application to the front of the screen, tap
the H500 button in the taskbar.
14
H500 User Manual
Installation
Setting display colors
You can change the color scheme used in the instrument display. The color schemes optimize the display colors for use in different
environments (outdoors or indoors) and for better printing quality on black and white (monochrome) printers.
1. Select Setup > Color Preferences.
2. Tap the Color Scheme list field and select
a display color scheme.
3. Tap OK.
4. Select File > Exit to close the application.
5. Restart the application to enable the
changed color scheme.
H500 User Manual
15
Getting acquainted with your instrument
Getting acquainted with your instrument
Instrument elements
1. Battery compartment.
2. Signal Connectors. (See page 19, Signal
connectors.)
3. Input/Output ports. (See page 18,
Input/Output connectors.)
4. PCMCIA card ports.
5. Power button and Status panel. (See
page 17, Power On/Standby and status
panel.)
6. Connector for external power adapter.
(See page 7, Connecting the AC adapter.)
7. Touch screen.
16
H500 User Manual
Getting acquainted with your instrument
Power On/Standby and status panel
1. Power On/Standby button. Push to
power on or off the instrument. For more
information, access the online help: Start
> Help > Tektronix Basics > Shutting
Down the Instrument.
2. Reset button. Performs a hardware reset; all programs and data loaded into volatile memory are erased. Generally only used
to recover from a system lock-up. Use a thin probe to push the reset button.
3. Power/Display status. Green indicates that the instrument is powered on. Amber indicates that the instrument is powered on
but the display is turned off (to conserve power).
4. Battery status. Green indicates that the instrument is connected to an external power source and is charging installed batteries.
Red indicates a low battery. No color indicates that the batteries are charged.
H500 User Manual
17
Getting acquainted with your instrument
Input/Output connectors
1. Microphone input
2. Headphone jack
3. Ethernet connector (RJ-45)
4. Serial RS-232 connector
5. PS/2 keyboard connector
6. USB Host connector
7. USB Slave connector
18
H500 User Manual
Getting acquainted with your instrument
Signal connectors
1. IF OUT. A down-converted intermediate
frequency signal that you can connect
to external test equipment, such as an
oscilloscope, for further signal analysis.
(See page 46, IF output.)
2. GPS. Connects to the GPS antenna.
3. TRIGGER/TIMING IN. Connect to a TTL-level signal to trigger the instrument with an external source. (See page 47, Triggering.)
4. FREQ REF IN. Connect to an external frequency reference signal to improve measurement accuracy. See the online help topic
Input Signal Requirements for more information.
5. RF IN. Connects the RF antenna or input signal source to the instrument.
H500 User Manual
19
Getting acquainted with your instrument
The user interface
1. Command bar. (See page 21, The
command bar.)
2. Global Measurement controls. (See
page 23, The global measurement
controls.)
3. Display controls. (See page 25, Display
control buttons.)
4. Measurement drawers. (See page 24,
The measurement drawer buttons.)
5. Measurement mode buttons. (See
page 27, The measurement mode buttons.)
6. Measurement results. Shows the
waveform displays, measurement results,
and marker readouts. The appearance
of this area changes depending on
the selected measurement mode and
measurement type.
20
H500 User Manual
Getting acquainted with your instrument
The command bar
Contains the application menus, as well as buttons for running/pausing the application and setting GPS, reference signal, and
external amplifier/attenuator parameters.
Element
Description
Menus. See the online help topic Menus for information about the menu functions.
Select Measurement Display button. Opens a dialog box from which to select the instrument
measurement mode. (See page 32, Select a measurement type.)
Run/Pause button. Runs or Pauses the current measurement acquisition.
The GPS status button. Shows the GPS signal lock status of the GPS receiver (internal or
external). The color indicates the GPS receiver signal lock status. Tap this button to open the
GPS dialog box. See the online topic The GPS Dialog Box for more information.
The Measurement Reference Frequency status button. Shows the measurement frequency
reference source. Tap this button to open the Inputs dialog box.
The available measurement reference frequency sources are the internal instrument frequency
reference (F INT) an external reference (F EXT), and a GPS-derived reference (FGPS). See
the online topic The Inputs Dialog Box for more information.
H500 User Manual
21
Getting acquainted with your instrument
Element
Description
The RF Input Signal Gain/Attenuation status button. Shows the external attenuator or amplifier
status. Tap this button to open the Inputs tab where you can set the input signal amplification
or attenuation values. Use this button if you connect an attenuator or amplifier to the input
signal. See the online topic The Inputs Dialog Box for more information.
Help button. Opens the online help. Online help is context-sensitive and normally displays a
help topic related to the current measurement mode or screen. If the current screen is not
context-sensitive, the instrument opens the online help at the main help menu. Use the index,
or do a word search, to locate specific information.
22
H500 User Manual
Getting acquainted with your instrument
The global measurement controls
These controls set the display reference level (manually or automatically), the frequency span, and the measurement frequency.
Element
Description
Reference Level button and field. Shows the current RF input signal reference level.
Tap the Ref Level button to open a keypad and enter a specific level value. Tap
the Ref Level field to open an increment control to increase/decrease the current
reference level value.
AutoLevel button. Tap the button to automatically detect the maximum input signal
level across the full instrument frequency range and set the Reference Level
appropriately.
Span controls and field. Shows the frequency span of the displayed signal. Tap the
arrow buttons to increment or decrement the span value by the default span units
(1–2–5). Tap the Span field to open a keypad and enter a specific span value.
Measurement Frequency button and field. Shows the spectrum signal measurement
frequency. Tap the Freq button to open a keypad and enter a specific frequency
value. Tap the frequency field to open an increment control to increase/decrease
the current reference level value in steps.
Use the Freq/Span tab (Spectrum drawer > More) to couple or uncouple the
measurement frequency with the display center frequency.
H500 User Manual
23
Getting acquainted with your instrument
The measurement drawer buttons
Element
Description
Drawer buttons provide additional controls for setting parameters. The displayed set of drawer buttons
changes based on the selected measurement mode. The drawer buttons are always on screen to
provide fast access to the most important controls for that measurement or setting.
Tap on a drawer button to open that drawer. A down-pointing arrow indicates an open drawer.
Tap the More button to open parameter tabs with which you can set additional measurement parameters.
Tap the Help button [?] to display information on that drawer.
24
H500 User Manual
Getting acquainted with your instrument
Display control buttons
The Display Control buttons let you select the type of signal display, move the signal display area, and turn markers on and off.
Element
Description
Spectrum button. Displays the Spectrum measurement. (See page 34, Display a spectrum signal.)
When displaying a spectrum, this button is replaced with the DPX® Spectrum button.
DPX Spectrum button. Displays the DPX Spectrum measurement. (See page 39, Display a DPX spectrum signal.)
When displaying a DPX spectrum, this button is replaced with the Spectrum button.
Front Trace button. Selects which trace is in front on the display. Tap the button to cycle through all enabled
traces. The Trace field in the Spectrum drawer shows the front trace name and trace type. See the online help
topic The Trace Tab for more information.
Zoom button. Lets you zoom (expand) the waveform by changing the span. Tap and drag from left to right to zoom
in (expand) the waveform. Tap and drag from right to left to zoom out (shrink) the waveform. The zoom function
only works in the horizontal (frequency span) axis for most waveforms.
Cancel Zoom button. In Amplitude versus Time measurements, if you have zoomed in on a waveform, this button
cancels the zoom action and restores the waveform to display the entire acquisition.
Move Waveform button. Lets you move the waveform display. Tap and drag on the screen to move the waveform
in a horizontal or vertical direction (you cannot move the display diagonally). The vertical reference level scale
changes to track the movement. If you move the display such that the measurement frequency is off-screen, the
instrument sets the measurement frequency to the nearest edge of the display.
Pan Horizontal button. Lets you move the waveform display in a horizontal direction. If you move the waveform
such that the measurement frequency is off-screen, the instrument sets the measurement frequency to the nearest
edge of the display.
H500 User Manual
25
Getting acquainted with your instrument
Element
Description
Pan Vertical button. Lets you move the waveform display in a vertical direction.
Undo button. Undoes the last touch screen tap or drag action (such as a move or zoom).
Reset button. Clears the current signal data and starts a new signal acquisition.
Display Markers button. Shows or hides marker icons and readouts. Hiding markers increases the waveform
display update rate. See the online help topics Markers and The Markers Tab for more information.
The following buttons are shown only when in Signal Classification mode, and replace spectrum display control buttons.
Edit Region button. Enables the region edit mode and replaces the Spectrum Zoom and Move Waveform control
buttons with the Change Span and Move Region buttons, respectively. (See page 57, Edit a signal classification
region.)
Change Span button. Lets you change the frequency span of a region. You cannot use this function on a declared
(classified) region. (See page 57, Edit a signal classification region.)
Move Region button. Lets you move a region to a new area on the signal. You cannot use this function on a
declared (classified) region. (See page 57, Edit a signal classification region.)
26
H500 User Manual
Getting acquainted with your instrument
The measurement mode buttons
The Measurement Mode buttons select the type of measurement or operation to perform.
Element
Description
Spectrum Measurement button. Sets the instrument to display spectrum measurements. (See page 34, Display a
spectrum signal.)
Signal Classification button. Sets the instrument to define signal regions, analyze, identify, and classify signals of
interest. (See page 53, Define a signal classification region.)
iMap button. Sets the instrument to place instrument measurements on a map. Use for graphically recording
measurements to help analyze signal characteristics, locate interference, and save measurement/location
information. (See page 64, iMap measurement mapping mode.)
H500 User Manual
27
Getting acquainted with your instrument
Parameter entry controls
Tap on a parameter field or button to open the appropriate parameter entry control for that field or button.
Element
Description
The Increment control lets you use buttons to increase or decrease the value of the field in
small or large steps. The single arrow buttons make small changes. The double arrow buttons
make larger changes.
Tap a keypad button to open a keypad in which to enter a value in the selected field. The
keypad content changes to show the available entry functions for the selected item.
WindowsCE provides an Input Panel (virtual keyboard) that you can use to enter text such as
file names. In most cases, when the instrument opens a dialog box that includes fields for text
entry, the Input Panel also opens. When you close the dialog box, the Input Panel also closes.
To manually open the Input Panel, tap the WindowsCE Input Panel button (
right-most
icon in the task bar). You can open a standard keyboard or a large keyboard. Tap the Input
Panel button again and select Hide Input Panel to close the keyboard.
You can also open the Input Panel from Tools > Keyboard.
28
H500 User Manual
Getting acquainted with your instrument
Getting help
The application includes a comprehensive online help system. You access the online help using the following methods:
Online help element
Description
Help button. Located at the top right of the screen, as well as on most measurement function
drawers or tabs Tap this button to display a help topic that is relevant to the current display mode,
measurement drawer, or tab contents.
Dialog box help button. Tap this button to display an online help topic relevant to that dialog box.
H500 User Manual
29
Operating basics
Operating basics
Enabling signal standards
Enable (select) the signal standards that you expect to analyze or measure. Enabled signal standards are listed in various
fields in the instrument.
1. Select Setup > Signal Standards.
2. Tap the name of the standard in the Signal
Standards supported list that you want
to enable. Drag the stylus to select two or
more contiguous standards.
3. Tap the Add >> button to add the selected
standard(s) to the Signal Standards
selected list.
4. Tap OK. The enabled standards are now
selectable from any Standards drop-down
list.
30
H500 User Manual
Operating basics
Enabling signal types
Enable (select) the signal types that you expect to analyze or measure. Enabled signal types are listed in various fields in the
instrument. Use enabled signal types to set measurement parameters such as measurement frequency and bandwidth.
1. Select Setup > Signal Types.
2. Tap the name of the standard in the Signal
Types supported list that you want to
enable. Drag the stylus to select two or
more contiguous standards.
3. Tap the Add >> button to add the selected
standard(s) to the Signal Types selected
list.
4. Tap OK. The enabled types are now
selectable from Signal Types drop-down
lists.
H500 User Manual
31
Operating basics
Select a measurement type
1. Tap the Select Measurement Display
button.
2. Tap an item in the Category field.
3. Double-tap an item in the Measurement
field to open the selected measurement
display mode.
32
H500 User Manual
Operating basics
Spectrum/Spectrogram measurements
The Spectrum measurement displays the spectral content of a signal (power versus frequency). The Spectrum measurement
features include:
A measurement frequency range of 10 kHz to 6.2 GHz that covers most modern signal sources
The ability to detect very low level signals
Up to seven measurement markers
Intermodulation markers to quickly check for this common source of unusual signals
Two waveform traces and five trace modes
Mask testing
The Spectrogram measurement displays the spectral content (power versus frequency) of a signal over time, where the signal
amplitude is represented by a range of colors. This display is especially useful for recording intermittent signals, as you can set the
Spectrogram to acquire measurements from seconds to days apart, and automatically save the measurements to a file.
H500 User Manual
33
Operating basics
Display a spectrum signal
1. Tap the Spectrum mode button.
2. Tap the Freq button and enter a
measurement frequency.
3. Tap the Span controls to change the
displayed frequency span to show the
waveform area of interest. Or tap the Span
field and change the span value using the
Increment control or the Keypad control.
4. Tap the AutoLevel button to set the
display reference level. Or tap the Ref
Level button and enter a value with the
Reference Level keypad.
34
H500 User Manual
Operating basics
Set other spectrum parameters
1. Use the controls in the Spectrum drawer
to set resolution bandwidth (RBW), the
display vertical scale, the measurement
frequency Marker-To button actions, and
the waveform trace type.
2. Tap the More button in the Spectrum
drawer to display the spectrum parameter
tabs.
3. Tap a tab to display the parameters set by
that tab.
4. Tap the Help (question mark) button on a
tab to display online help for that tab.
5. Tap the Close (X) button on a tab to close
the tab display and return the instrument to
a full-screen display mode.
H500 User Manual
35
Operating basics
Display a spectrogram
1. Display a spectrum signal of interest.
2. Tap the Measurement Display button and
select the Spectrogram measurement.
3. Set or clear the Dual Display check
box in the Spectrogram drawer to
enable or disable a split-screen
spectrum/spectrogram display.
NOTE. If tabs are open, tap the tab Close
button (X) to close the tabs and display the
spectrogram on the lower half of the screen.
4. Tap the More button to display the
spectrogram parameter tabs.
5. Tap the Spectrum display control button to
return to a Spectrum display.
See the online spectrogram help topics for information on other spectrogram operations.
36
H500 User Manual
Operating basics
View a spectrogram record
1. Display a spectrogram.
2. Tap the Stop button to stop measurement
acquisition.
3. Tap the Data Record field in the
Spectrogram drawer to open the Data
Record increment control.
4. Tap the arrow keys to move the record
cursor (white line in the spectrogram plot)
to a record of interest. The Spectrogram
drawer shows the time and date information
of the selected record directly below the
Data Record field.
5. The spectrum display shows the waveform
for the selected record (in dual display
mode).
See the online help topic View Saved
Spectrogram Files for information on
viewing saved spectrogram records.
H500 User Manual
37
Operating basics
DPX® spectrum display
DPX Spectrum Display technology uses color shading and data persistence to show how signal characteristics change over time.
Color shading shows how consistent the shape of a trace is, where the color represents the rate-of-occurrence for signal features.
The DPX Spectrum Display works by using a two-dimensional array to represent data points on the display. Each time a trace
writes to a point on the display, the instrument increments a counter for that point. A color is assigned to each point in the display
based on the value of its counter divided by the number of acquisitions (hit percent). Thus, as acquisitions occur over time, the DPX
waveform, referred to as the Bitmap, uses color to show how frequently a display point has been written to.
Persistence sets how long a point on the display is visible, which can help show infrequent events. You can set the display
persistence to be Variable or Infinite. In variable persistence mode, the decay period determines how long a point is displayed. In
infinite persistence mode, once a point in the display has been written to, it remains visible until the measurement is restarted.
DPX display performance characteristics
The H500 DPX performance characteristics are listed in the following table:
38
Performance characteristic
H500
Spectrum processing rate
10,000 FFTs per second
Minimum signal duration for 100% probability of intercept
125 μs
H500 User Manual
Operating basics
Display a DPX spectrum signal
1. Display a spectrum signal of interest. (See
page 34, Display a spectrum signal.)
2. Tap the DPX Spectrum display control
button.
H500 User Manual
39
Operating basics
3. Tap the More button in the DPX Spectrum
drawer to display the DPX spectrum
parameter tabs.
4. Tap the Bitmap tab.
5. Tap the Intensity field and set the intensity
to control the visibility of events. A higher
intensity level enables the display of data
points from single, short events, and also
makes such an events subject to the
persistence controls. This allows you to
see the effect of the Persistence controls
on infrequent events. Intensity also affects
the colors used to display the Bitmap.
6. Tap the Dot Persistence check box to
enable Bitmap point display persistence
controls. Dot persistence sets how long a
point is displayed if it is not updated with
new data.
Variable sets the decay period for how long
a point is displayed before fading.
Infinite sets all points to remain visible
indefinitely until you restart signal
acquisition.
40
H500 User Manual
Operating basics
7. Use the Color field to set the color scheme
used for the Bitmap trace.
8. Use the Max and Min fields to set the hit
percent color range of data points. Data
points that are between the Max and Min
settings are displayed using the colors in
the order shown in the color scheme.
Max sets the hit percent required to display
a data point using the color at the top of the
color scheme. The default value is 100%.
For example, if the Max value is set to 90%,
then data points that occur 90% or more of
the time are displayed using the maximum
(top) color of the color scheme.
Min sets the minimum hit percent required
to display a data point, starting with the
color at the bottom of the color scheme.
The default value is 0%.
For example, if the Min value is set to 10%,
then data points must occur at least 10% of
the time to be displayed in the Bitmap.
H500 User Manual
41
Operating basics
Amplitude vs. time measurement
The Amplitude versus Time measurement shows the RF signal amplitude variation over a period of time within the acquisition
bandwidth (as set by the Span control). This measurement produces a similar result to the Zero-Span measurement of a swept-IF
spectrum analyzer.
The displayed oscilloscope-like signal can help you to identify a signal type. For example, GSM transmitters (both base station
and mobile units) transmit 576 μs-duration bursts in one of eight slots during a 4.61 ms frame, within an approximately 200 kHz
bandwidth. If the waveform bursts and framing meet GSM timing characteristics, then that signal is most likely a GSM signal.
42
H500 User Manual
Operating basics
Display an amplitude vs. time measurement
1. Display a spectrum signal of interest. (See
page 34, Display a spectrum signal.)
2. Tap the Select Measurement Display
button and select the Amplitude vs. Time
measurement. (See page 32, Select a
measurement type.)
3. Use the controls in the Time Domain
drawer to set the display Vertical Scale,
the Marker-To button actions, and the
active waveform trace type.
H500 User Manual
43
Operating basics
4. Tap the More button in the Time Domain
drawer to display the spectrum parameter
tabs.
5. Tap a tab to display the parameters set by
that tab.
6. Tap the Help (question mark) button on a
tab to display online help for that tab.
7. Tap the Close (X) button on a tab to close
the tab display and return the instrument to
a full-screen display mode.
44
H500 User Manual
Operating basics
8. Use the Zoom and Pan Display buttons to
display a waveform segment of interest.
9. Tap the Display Markers button and
use markers to measure time differences
between points on the waveform.
H500 User Manual
45
Operating basics
IF output
The H500 can down-convert the RF input signal to an intermediate frequency and send it to the IF OUT connector. You can then
connect the IF signal to other test equipment, such as an oscilloscope or demodulator, for further analysis.
1. Select Setup > Outputs.
2. Tap Enable IF Output.
3. Tap OK.
NOTE. Enabling the IF output signal results in the instrument measurements being uncalibrated. The instrument displays a
warning message and also displays the UNCAL button while IF output is enabled. To restore the instrument to taking calibrated
measurements, clear the Enable IF Output check box in the Outputs dialog.
See the online help topic The Outputs Dialog Box, as well as the General Performance Characteristics table in the Specifications
section, for more information. (See Table 1 on page 93.)
46
H500 User Manual
Operating basics
IF output tips
The IF output signal is only enabled when Spectrum or Amplitude vs. Time measurements are selected. The output is
disabled when other measurements are selected, even if the control setting is selected (checked). Reselecting a Spectrum or
Amplitude vs. Time measurement reenables the IF Output signal.
The IF output signal is unavailable when taking Spectrum measurements that require multiple acquisitions. Multiple acquisitions
occur when the span is greater than 20 MHz, and can occur for some combinations of manually set RBW. To ensure an IF
output signal, set the measurement span to be ≤20 MHz and set the RBW to Auto.
Enabling the IF output signal results in the instrument measurements being uncalibrated. The instrument displays a warning
message and also displays the UNCAL button while IF output is enabled. To restore the instrument to taking calibrated
measurements, clear the Enable IF Output check box in the Outputs dialog box.
The nominal IF out frequency is 140 MHz. The instrument displays the exact IF output frequency on screen when IF output is
enabled. This is the frequency to which the RF center frequency is converted.
The IF OUT connector has a nominal impedance of 50 Ω.
Triggering
You can set a number of trigger parameters including the trigger source, trigger time, signal type, signal threshold value, as well
as set a trigger delay and the position of the trigger point in the acquisition record.
H500 User Manual
47
Operating basics
1. Tap the More button in the Spectrum or
Time Domain drawer.
2. Tap the Trigger tab.
3. Tap the Source field and select the
trigger type. The External setting
requires a TTL-level trigger signal at the
Trigger/Timing connector.
To turn triggering off, select Free Run from
the Source list.
48
H500 User Manual
Operating basics
4. Set the trigger parameters. Note that
Position is only available when in Amplitude
vs. Time measurement mode.
5. Tap the Force Trigger button to force a
signal acquisition regardless of the trigger
settings.
6. To set the instrument to trigger at a
particular time and/or interval, select the
Internal Timebase trigger source, tap the
Trigger Time field, and use the Configure
Internal Time Trigger dialog box to set the
time trigger parameters.
H500 User Manual
49
Operating basics
Triggering tips
After arming, the instrument continuously acquires signal data until the trigger event. The trigger event determines when the
acquisition stops. Trigger Delay and Position settings control the position of the acquisition record relative to the trigger event,
allowing signal data capture both before and after the trigger event.
Trigger modes interact with the spectrum Run mode (Spectrum Run tab). If the Run mode is set to Continuous, the instrument
continuously rearms the trigger and reacquires signals if the trigger condition reoccurs. To obtain a single measurement
acquisition after a trigger event, set the Run mode to Single.
When using the Internal Timebase trigger with just Trigger Time mode selected, set the Trigger Time value to a time that is
after the current time. When the Trigger Time is reached, the instrument takes one measurement and then goes into the Pause
state. The Trigger Time value must then be set to a time later than the current time before the instrument can trigger for a
new measurement.
50
H500 User Manual
Operating basics
When using the Internal Timebase trigger with Repeat Interval or Both selected, the instrument trigger time depends on how
the instrument interprets the trigger time in relation to the closest 24-hour point within ±12 hours of the current instrument
time. See the Spectrum Triggering Tips Online help topic for more information on using the Internal Timebase trigger with
the Repeat Interval or Both setting.
A trigger icon, located at the top of the display graticule, is shown when the instrument is in Amplitude vs Time measurement
mode (Time Domain). The trigger icon marks the position of the trigger event on the waveform for all trigger modes except
Free Run.
In Spectrum-based measurements, IF level triggering can occur even when no part of the displayed waveform reaches the
specified trigger threshold level. This happens because trigger level detection is done on the total signal power in the span
bandwidth, while the displayed spectrum waveform shows the signal power divided into RBW intervals across the span. For
modulated signals with bandwidths wider than the RBW setting, the signal spectrum power level in any RBW interval is lower
than the total signal power detected by the trigger system.
Certain settings or combinations of settings can disable External triggering. When triggering is disabled, the instrument displays
a yellow highlighted notification message for a short period and disables the Trigger tab controls. Changing the settings to
those that allow triggering enables the Trigger tab controls. The following are the most common causes of disabled triggering:
Setting Span greater than 20 MHz
Setting any combination of Span and Resolution BW (RBW) that requires multiple signal acquisitions to take a measurement
Selecting DPX, Audio Demod, or Signal Strength measurement modes (including Signal Classification Audio Demod mode)
H500 User Manual
51
Operating basics
Signal classification
Signal Classification helps you determine the various parameters of an unidentified signal. Signal Classification lets you:
Define areas of interest as regions (center frequency and frequency span) anywhere on the signal (See page 53, Define a
signal classification region.)
Compare an unknown signal’s bandwidth and frequency to known signal standards
Assign classification labels and notes to regions (See page 60, Declare a region (Classification).)
Save all defined regions to a region survey file (See page 63, Save and load region surveys.)
52
H500 User Manual
Operating basics
Define a signal classification region
1. Tap the Signal Classification button.
2. Display a spectrum signal of interest.
3. Tap the region Add button.
H500 User Manual
53
Operating basics
4. Tap and drag horizontally on the screen to
define the span of a region. The instrument
draws a box to indicate the region span
frequency. The amplitude portion of the
signal does not need to be totally enclosed
in the region box.
54
H500 User Manual
Operating basics
5. Tap the Region Span field to enter a
precise frequency span of the region.
6. Tap the More button to display the
parameter tabs to make additional region
settings, such as setting the signal type.
NOTE. A maximum of two regions can overlap the same measurement frequency. If you define a new region that covers a
frequency range already contained within two other regions, the instrument displays a warning message and the region definition
box is drawn with a thin red line. Tap the Delete button to delete the invalid region, or use the Change Span or Move Region
buttons to change the span definition. You cannot do any more region tasks until you correct the invalid region definition. (See
page 57, Edit a signal classification region.)
H500 User Manual
55
Operating basics
NOTE. As the number or regions increase, system performance decreases. Specifically, the sweep update rate slows down and
the time required to navigate between any two regions increases. A good rule of thumb is keep the total number of regions under
100. Create and save separate surveys, each with no more than 100 regions.
56
H500 User Manual
Operating basics
Edit a signal classification region
1. Tap the Edit Region button to switch the
Zoom and Move buttons with Change
Region and Move Region buttons. This
button is only shown while in the Signal
Classification mode.
2. To change the width (frequency span) if a
region, tap the Change Span button.
3. Tap the region to change. Then press and
drag, with firm pressure, inside the region
box to change the span of the region in
the direction of the drag. Dragging from
the center to outside of the box expands
the region; dragging from the edge of the
box towards the center reduces the region.
Use a stylus to make tapping and dragging
easier.
You can only move an undeclared region
(Classification = None).
H500 User Manual
57
Operating basics
4. You can also tap the Region Span field
in the Region drawer to enter a specific
frequency span for the region.
5. To move a region, tap the Move Region
button.
6. Tap the region to move. Then press and
drag, with firm pressure, anywhere inside
the region box to move the region in the
direction of the drag. Use a stylus to make
tapping and dragging easier.
You can only move an undeclared region
(Classification = None).
58
H500 User Manual
Operating basics
7. Tap the Region Add button to define a new
region on the signal.
8. Tap the Region Delete button to delete the
current selected region.
9. Tap the Region Delete All button to delete
all defined regions from the signal.
10. Tap the Previous Region or Next Region
arrow buttons to display and select the
previous or next defined region on the
signal. The region order is based on the
region measurement frequency (from left to
right on the waveform), not in the order that
they were created. If the region is off the
screen, the instrument displays the region.
The numbers indicate the current region
(top number) and the total number of
regions (bottom number). Regions are
listed from the lowest frequency (left end
of signal) to highest frequency. As regions
are added or deleted, the number assigned
to a particular region may change.
H500 User Manual
59
Operating basics
Declare a region (Classification)
Declaring a region lets you assign a classification category to the region and add additional notes about the region or signal.
1. Select or define a region.
2. Tap the Declare button to open the Declare
Region dialog box.
3. Tap the Classification list and select an
appropriate classification. Assigning a
classification type also assigns a color to
the region box to let you quickly identify the
classification of a declared region.
60
H500 User Manual
Operating basics
4. Tap the Description field to enter a brief
description up to 14 characters long. The
default value for this field is the signal
type as set in the Region tab, but you
can change the default value if desired.
To enter characters, use the WindowsCE
Inputs Panel on-screen keyboard control
or a keyboard connected to the instrument
PS2 port. (See page 28, Parameter entry
controls.)
5. Tap the Comments/Notes field and
enter descriptive details. You can enter a
maximum of 255 characters.
6. Tap OK to close the dialog box and assign
the declaration to the region.
NOTE. Once a region is classified, you need to reclassify it to None to make any changes to that region declaration. Use the
Declare button, or the Classification field in the Region drawer, to change the region classification.
H500 User Manual
61
Operating basics
The survey summary
The Survey Summary list shows all defined (declared or undeclared) regions, and lets you quickly select and display specific regions.
1. Tap the More button in the Region drawer
to open the Region settings tabs.
2. Tap the Survey Summary tab.
3. Tap on an entry in the list to select and
display that region.
4. Tap on any of the column headings to sort
the list entries by the values in that column,
in ascending order.
62
H500 User Manual
Operating basics
Save and load region surveys
A region survey is the set of all defined regions on the current signal, as listed in the Survey Summary tab. You can save region
surveys to a file, and then load a region survey to merge with or replace your current region definitions.
File > Save Survey: saves all defined regions to a system-default file name and location. This function saves the region
definitions only.
File > Save Survey As: saves all defined regions to a specified file name and location. This function saves the region
definitions only.
File > Load Survey: loads a region survey from a file. Follow the on-screen instructions to replace or merge your current
region definitions with those from the file.
File > Load Survey from Results: loads region definitions that are part of a saved signal classification results file (File > Save
Results). Follow the on-screen instructions to replace or merge your current region definitions with those from the file.
File > Export Regions As: writes the current region definitions to a text file in tab-separated or csv file format. See the online
topic Region Import/Export File Format for information on the structure of the text-based region file.
File > Import Regions: loads regions from a tab-separated or csv format file that contains region definitions. If there are
currently defined regions in the instrument, the instrument opens the Load Survey dialog box. Use the dialog box to either
attempt to merge the saved regions with the existing regions, or delete all existing regions before importing the regions.
H500 User Manual
63
Operating basics
iMap measurement mapping mode
iMap integrates interference mapping, coverage mapping, in-building mapping, outdoor mapping, and provides an integrated
solution for field interference and coverage problems in one instrument.
Using iMap is as easy as selecting a measurement and touching the displayed map where you want the measurement to be placed.
Measurement icons are color coded to indicate if the measurements have passed or failed limit tests. You can also add an azimuth
arrow to a measurement to indicate the direction the antenna was pointing when you took a measurement.
To start the iMap tool, tap the iMap button.
When you open the iMap tool for the first time,
the screen displays the message Empty map.
Otherwise, iMap displays the last-loaded map.
You can load scanned bitmap files as maps for in-building mapping, or use GSF and MIF map file formats for outdoor maps. Using
GSF or MIF map files lets you use the built-in GPS receiver to automatically place measurements at your current location.
You can save maps and associated measurement results data to common file formats such as CSV or MapInfo. Saving maps and
measurement results lets you analyze measurement data (position, value, and direction) and prepare reports.
64
H500 User Manual
Operating basics
Map file concepts
The iMap tool uses two types of maps: Grid and Image.
Grid maps. Grid maps have geophysical latitude and longitude coordinate references embedded in the map file. The instrument
uses grid maps, along with an active GPS receiver, to place measurements on a map at your current geophysical position.
Grid maps require specialized PC software to create or can be purchased from map-creating companies. The instrument can
load both GSF- and MIF-format grid map files. You need to convert non-GSF or MIF grid maps to GSF format before you can
load them into the iMap tool.
Grid maps require an active GPS receiver to correctly link measurements to geophysical map locations. An active GPS receiver
is a receiver that is locked to four or more satellite signals and is providing the instrument with accurate GPS location data. If
you load a grid map and a GPS receiver is either not connected or does not have a good satellite signal lock, the instrument
considers the grid map as an image map.
Image maps. Image maps do not have any geophysical latitude and longitude references embedded in the map file. An image
map is a graphical image, such as a scanned building floor plan or aerial photograph, to which you can attach measurements
at the point that you tap the screen.
Converting files to maps. The iMap Converter, a program that is downloadable from the Tektronix Web site, lets you convert
and save image files (BMP, JPEG, GIF, TIFF or PNG file) into GSF format image map files, convert image maps to grid maps, and
create grid maps from applications such as Microsoft MapPoint. (See page 80, The iMap converter program.)
H500 User Manual
65
Operating basics
Loading a map
You need to load a map before you can use the iMap tool. If a map was loaded in a previous session, then that map remains
loaded until you load a new map file.
1. With iMap open, select File > Load Map.
2. Navigate to and select the map file to
load (Bitmap, GSF, MIF, or ZIP (map with
results) format).
3. Tap OK. The iMap application loads the
map on the screen.
66
H500 User Manual
Operating basics
Mapping a measurement
The following procedure requires that you have already set up the measurement. You must have also loaded a map file. (See
page 66, Loading a map.)
1. Tap the Single Measurement button.
2. Tap an iMap measurement button.
Available measurements depend on
the current signal standard. The
selected measurement is displayed in the
Measurement Thumbnail area.
H500 User Manual
67
Operating basics
3. Tap the map:
If a GPS receiver is active, and
you are using a grid map, a single
measurement is placed at the current
GPS coordinates.
If a GPS receiver is not active, or if
you are using an image map (such
as a building floor plan), a single
measurement is placed where you
tapped the map.
4. You can select a different measurement
button, and then tap the map to add a
new measurement to the map. Multiple
measurement icons at the same location
stack on top of each other.
68
H500 User Manual
Operating basics
5. To move an icon, tap the Select button
and then tap and drag the icon to a new
position. If the measurement was part
of a stack of measurements (such as
created by logging), then iMap moves the
topmost icon in the stack. If the icon is
moved to a new stack of measurements,
then the icon is placed in the stack in
time-of-measurement order.
NOTE. The number of measurements that can be placed on a map is limited to 200. When the limit is reached, iMap responds
depending on which measurement mode is active. In single measurement mode, iMap shows a message stating that the limit
has been reached, and discards any following measurements. Select File > Save Map With Results As to save the map and
measurements to a file, or select File > Clear All Measurements to clear the map and resume adding measurements to the map.
In logging measurement mode, iMap shows a message stating that the limit has been reached and files were saved, automatically
saves the map and measurements to a file at the current default save location, clears the map, and then resumes adding
measurements to the map.
NOTE. To add measurements at a new location on a grid map with an active GPS receiver, you must physically move to the
new location.
H500 User Manual
69
Operating basics
NOTE. You can move measurement icons on an image map, or on a grid map with the GPS receiver inactive. Attempting
to move an icon on a grid map with an active GPS receiver causes iMap to drag the map and its measurement icons to a new
position on the screen; the measurement icons are not moved.
When a GPS receiver is not active, you can move any measurement icon. This includes moving measurement icons that were
placed on the map while in GPS mode. iMap does not reposition moved GPS-related measurement icons back to their original
geophysical position on a map when the GPS receiver is active.
iMap measurement icons
The iMap application uses icons on the map to represent a measurement taken at that location. There are two types of
measurement icons: large and flag. The large icon displays the type of measurement that they represent. The flag icon is a simple
small flag, and is used only in logging (multiple) measurement mode to indicate measurement placement. See the online help topic
iMap Measurement Map Icon Types for more information.
You can perform various actions on measurement icons, including viewing the measurement results of an icon, moving the icon,
deleting an icon, and attaching a measurement direction arrow to an icon. See the following sections, and the online help topic
View Map Measurements, for more information.
70
H500 User Manual
Operating basics
Viewing and deleting icon measurements
To view or delete the measurement results associated with an iMap measurement icon:
1. Tap the iMap Select mode button.
2. Tap a measurement icon to open the Map
Measurements dialog box.
3. Tap the measurement of interest in the list.
4. Tap Open Measurement to open the
measurement screen for the selected
measurement. Tap the iMap button to
return to the iMap screen.
5. Tap the Delete Measurement button to
delete the selected measurement. If there
are multiple measurements to delete,
repeatedly select and tap Delete.
H500 User Manual
71
Operating basics
6. Tap Measurement to Top to move a
selected measurement to the top of the list.
7. Tap OK to close the dialog box.
NOTE. You can also double-tap on a measurement icon to open the measurement window for that measurement. If there are
multiple measurements at a location, double-tapping an icon displays the results for the measurement icon that is at the top of
the list.
To delete all the measurement icons from a map, select File > Clear All Measurements.
72
H500 User Manual
Operating basics
Draw a measurement azimuth (Direction) arrow
The iMap azimuth direction arrow function lets you draw an arrow on a mapped measurement to indicate the direction your antenna
was pointing when you took a measurement.
1. Tap the Measurement Direction button.
2. Tap and drag from the center of a
measurement icon in the direction
the antenna was pointing when the
measurement was made. iMap draws an
arrow from the measurement icon.
H500 User Manual
73
Operating basics
The iMap measurement thumbnail display
shows the direction of the arrow as you
draw it. The information shown depends on
the map type (grid or image). The example
shown is for a grid map. Use the thumbnail
readout to help set the measurement arrow
direction.
3. To change the arrow direction, draw a new
line. iMap replaces the existing arrow with
the new direction arrow.
74
H500 User Manual
Operating basics
Delete an azimuth measurement direction arrow.
1. Tap the iMap Select mode button.
2. Single-tap the measurement icon with the
direction arrow to delete. iMap opens the
Map Measurements dialog box.
3. Tap the measurement name that has the
direction arrow to delete.
4. Tap the Delete Azimuth button.
5. Tap OK. iMap closes the dialog box and
deletes the direction arrow.
H500 User Manual
75
Operating basics
Logging iMap measurements (automatic measurements)
Logging measurements lets you automatically map a single measurement at a set time interval or change in GPS position (with
active GPS receiver and a grid map).
NOTE. The iMap tool maps only completed measurement results. If the specified time interval is less than that required to take a
measurement, iMap ignores the specified time interval and maps results as soon as the measurement acquisition is done.
For example, if the instrument requires 20 seconds to take a measurement, but the time interval is set to 10 seconds, then
the instrument maps results every 20 seconds.
1. Set up the measurement parameters
(frequency, bandwidth, and so on) and
then tap the measurement to log.
76
H500 User Manual
Operating basics
2. Tap the Log Measurements button.
3. Tap a button in the Measure By area to
set the type of measurement interval (time
interval or distance between measurement
positions). Distance is only available when
the GPS is active and acquiring accurate
position data.
4. Tap a field in the Measure Every area to
set the measurement interval.
5. Tap the map to start logging measurements:
For grid maps with an active GPS
receiver, tap the map at any point. The
instrument adds measurement flags to
the map at the current GPS position.
For image maps or for grid maps
without an active GPS receiver, tap
the map at the measurement starting
location. The instrument begins taking
measurements, but does not display
them on the map until measurement
logging is done.
H500 User Manual
77
Operating basics
6. Tap the map to stop measurements:
For grid maps with an active GPS
receiver, tap the map at any position.
The instrument stops mapping
measurements.
For image maps or grid maps without
an active GPS receiver, tap the map at
the position the last measurement was
taken. Measurements are then evenly
spaced on a straight line between the
start and stop map points.
7. Tap the Single Measurement or the
Select button to exit the iMap logging
measurements mode.
78
H500 User Manual
Operating basics
NOTE. The number of measurements that can be placed on a map is limited to 200. For grid maps with an active GPS,
when the instrument reaches the measurement limit while in multiple measurement mode, a message is briefly displayed, the
measurements and map are automatically saved to the current Save Results directory, the map is cleared, and then iMap continues
adding measurements to the map.
When using an image map, or a grid map without an active GPS reference, when the instrument reaches the 200 measurement
limit, the instrument displays a message requesting you to tap the position of the last measurement. The instrument then
automatically saves the map measurements to a file and then clears the map. If the instrument is in repeat measurement mode,
new measurements are not started until you tap the new start position on the image map.
NOTE. The iMap Log measurements function automatically sets the map view measurements mode to Measurement Flags during
logging measurement acquisition. When iMap measurement logging is done, the instrument restores the map view measurements
mode to the mode it was at before the iMap measurement logging was initiated.
If you tap the Select, Measurement Direction, or Single Measurement button while logging measurements in non-GPS mode,
iMap cancels the log measurements mode and does not draw any measurement icons on the map.
Grid maps with an active GPS receiver support logging measurements by time interval or distance change interval. Image maps, or
grid maps with an inactive GPS receiver, support logging measurements by time intervals.
You cannot place a measurement icon on any area of the map that is covered by a message banner.
NOTE. When the instrument is in measurement logging mode (Setup > Logging), iMap measurements (single or repeat) are not
mapped as iMap measurement icons. Instead, an X is drawn at the measurement location. The measurement results are saved
directly to a log file and are not associated with the map file. The logging X icon is not an interactive icon; selecting it does not open
a measurement list and you cannot move the icon. The X icon does not count as part of the 200-measurement limit.
H500 User Manual
79
Operating basics
The iMap converter program
Tektronix provides a map file conversion program called iMap Converter that you can download from the Tektronix Web site.
iMap Converter lets you convert graphical image files or map files for use with the instrument iMap tool. Types of images or
files that you can convert include:
BMP, JPEG, GIF, TIFF and PNG graphical images (map images, building floor plans, aerial photographs)
Industry standard MapInfo Interchange Format (MIF), ArcInfo Shape (.shp), USGS Digital Line Graph (.opt) geophysical
coordinate maps
Other iMap Converter features include:
Easily capture images from applications such as Microsoft MapPoint to create geophysical (coordinate) map files for use
with GPS measurement mapping
Manually assign geophysical coordinates (latitude/longitude) to image files, such as building floor plans or screen capture map
images, to create a grid map for use with GPS measurement plotting
Combine multiple coordinate map files into a single large map file
To install the iMap converter program on a PC
1. Go to the Tektronix Web site (www.tektronix.com).
2. Click Software Downloads on the left side of the screen to open the Software Downloads Web page.
3. Enter imapconverter (single word) in the Search by keyword field and click Go.
4. Select the iMap Converter link to download the software. Follow the installation instructions on the download page.
80
H500 User Manual
Operating basics
5. To open the iMap Converter tool on the PC, select Start > Programs > Tektronix > iMapConverter.
6. Click the iMap Converter Help button for information on how to use the tool to convert files, add coordinates to an image
file, or create maps.
NOTE. Bitmap files that are converted to GSF-format load faster on the instrument because the instrument does not have to do the
bitmap-to-GSF conversion in the instrument. However, it is then possible to confuse image GSF maps with grid (coordinate) GSF
files. Use a file naming convention to differentiate between GSF maps created from coordinate maps and GSF maps created
from bitmap files that do not have coordinate information.
NOTE. The MIF-format files take significantly longer to load than the GSF-format files. Tektronix recommends that you use iMap
Converter to convert MIF map files to GSF map files, rather than loading MIF files directly on the instrument.
H500 User Manual
81
Operating basics
Measurement data logging
Measurement data logging enables automatically saving measurements results and GPS positions to separate files or to a network
UDP address. You can write measurements to either or both types of log files (text or a network address) at the same time.
The GPS position log file contains entries for the time (time zone adjusted), latitude, longitude, and altitude. The GPS position
is logged every second, on the second (based on the GPS time, not UTC time). The GPS position data is independent of any
measurement position data.
The measurement results log file contains measurement settings, a timestamp, GPS position values, and the measurement results
for each measurement acquisition. Each new measurement is appended to the end of the log file.
1. Select Setup > Logging to open the
Logging dialog box.
82
H500 User Manual
Operating basics
2. Tap the Measurement Results tab and
select the logging destination (Log to File
or Log to UDP). Enter the appropriate
parameters.
3. For measurement results you can also
select the output format to be either binary
or csv (comma separated values). The
binary format is more efficient than csv
format, but requires conversion to be used
or read by applications.
4. To enable GPS position logging, tap the
GPS Position tab and select the logging
destination (Log to File or Log to UDP).
Enter the appropriate parameters.
H500 User Manual
83
Operating basics
5. Tap OK to close the dialog box and start
measurement logging.
6. Tap Help for more information on the
logging function, binary file format, and
UDP for logging.
7. To stop measurement data logging, tap the
Disable Log control on both tabs.
Logging mode continues to operate when you change measurements. Changing to a new measurement causes the instrument
to complete logging the previous measurement type, change to the new measurement, and then continue logging the new
measurement in the same log file. This feature lets you record several different measurements in a single file.
Contact Tektronix Customer Support for information about the binary file structure.
84
H500 User Manual
Remote instrument access
Remote instrument access
Remote instrument access lets you:
Remotely control the instrument from a PC (directly or through a network)
Transfer data, measurement, setup, map, and other files to and from the instrument
Print measurement data and screen shots to a network printer
The two remote access methods are Ethernet and ActiveSync. An Ethernet connection is much faster than a ActiveSync connection
but the ActiveSync connection is better for instrument-to-PC file interchange. Each access method requires unique configuration
steps, which are described in the following sections.
Configure the instrument network settings
1. Work with your network administrator to determine the IP address of the H500 instrument. If the network has DHCP enabled,
the instrument will automatically obtain an IP address when powered on and connected to the network. If your network does not
support DHCP, or you need a fixed IP address for your instrument, have your system administrator provide you with an address.
2. Connect a standard Ethernet cable from the instrument to a network connector. You can do this before or after powering
on the instrument.
3. On the instrument, tap Start > Settings > Network and Dial-up Connections. The instrument network interface is listed as
ENDS4ISA1.
H500 User Manual
85
Remote instrument access
4. Double-tap the ENDS4ISA1 icon to open CSA8900 Settings dialog box:
If your instrument is using DHCP to obtain an IP address, and the Obtain an IP address via DHCP button is set, you do
not need any further network configuration. Close the dialog box.
If the instrument has already been assigned a fixed IP address, the address fields should show the address information.
If you are assigning or changing the instrument fixed IP address, tap the Specify an IP address button and enter the
appropriate address settings and then tap OK.
5. Close the Network Connections window.
6. On the instrument, tap Start > Programs > Communication > Virtual CE to open the Virtual CE application.
7. Tap Configure and select WAN/Internet or LAN from the list. If you need added security for network access from the
instrument, set the Require a password for LAN check box and enter a password.
You can now use the network functions to remotely control the instrument, access network files or print to a network printer.
Network functions
Use Virtual CE to remotely control the instrument over the network from a PC. (See page 91, Remote control using Virtual CE.)
Mount sharable network drives that the instrument can access to upload or download files. For example, double-tap the My
Device icon on the main instrument screen on the desktop. Then enter the full path to the network drive in the Address field.
You may be prompted for a user name, password, and domain name.
86
H500 User Manual
Remote instrument access
Redirect printer output to a network printer. For example, select File > Print on the instrument to print the current measurement
screen. Select PCL Laser in the Printer field, Network in the Port field, and the path to the network printer in the Net Path
field. You may be prompted for a user name, password, and domain name.
Access the Web from the instrument Web browser (Start > Programs > Internet Explorer). This is a simplified version of
Microsoft Internet Explorer, so it does not have all the capabilities of that of the PC Internet Explorer.
Configure the instrument ActiveSync settings
NOTE. An ActiveSync connection to the instrument is available on Microsoft Windows 2000 and XP. An ActiveSync connection to
the instrument is not available on Microsoft Windows Vista.
1. On the instrument, tap Start > Programs > Communication > Virtual CE to open the Virtual CE application.
2. Tap Configure. Select ActiveSync from the list and then tap OK.
3. Close the Virtual CE window.
4. Tap Start > Settings > Control Panel > PC Connection. Verify that Allow connection with desktop computer when device
is attached is selected, and that Connect using is set to USB Default. Then exit the dialog box.
You can now configure the ActiveSync settings on the PC and use the ActiveSync connection functions to remotely control the
instrument and access instrument files. (See page 88, Configure ActiveSync on the PC.)
H500 User Manual
87
Remote instrument access
ActiveSync connection functions
Use Virtual CE to remotely control the instrument over a USB cable from a PC. (See page 91, Remote control using Virtual CE.)
Use the ActiveSync Explorer button to open a Windows Explorer window. You can then use standard Windows operations
to copy or move files between the instrument and the PC. Copying files between the instrument and a PC is significantly
easier using ActiveSync than using a network connection.
Configure ActiveSync on the PC
Register the instrument USB port
The PC must register the H500 USB port as a valid slave port before you can establish an ActiveSync connection from the
instrument to the PC. You only need to register the instrument USB slave port once on each PC to use the USB port for ActiveSync
connections.
1. Use your Web browser to go to www.tektronix.com/software.
2. Enter H500 usb in the Search by keyword field.
3. Click the USB SLAVE DEVICE PC REGISTRATION UTILITY > Software Downloads link, then click on the Download File link.
4. Log in to the myTek software finder and follow on-screen instructions to register/log in and download the USB slave device
utility to a PC.
88
H500 User Manual
Remote instrument access
5. Unzip the downloaded file and double-click the RegisterUSBSlaveDevice.exe file. Follow any on-screen instructions.
6. To complete the USB port registration process, power on the H500 and install a USB cable between the PC and the instrument.
Typically, the PC opens a “Found New Hardware Wizard” dialog box. Step through the dialog boxes and, if prompted, select to
install the SW automatically. Verify that the installation process completes without error. You only need to run this step one time
after running the USB port registration tool.
Install and configure Microsoft ActiveSync
USB connectivity requires Microsoft ActiveSync (version 3.7 through 4.5). If your PC does not have the correct version of
ActiveSync installed, do the following:
H500 User Manual
89
Remote instrument access
1. Use your Web browser to go to the Microsoft Web site and locate the ActiveSync software download page.
2. Select ActiveSync version 4.5 and follow instructions on how to install the software. You may need to reboot your PC after
installing ActiveSync.
3. Right-click on the ActiveSync icon in the PC task bar and select Connection Settings. Verify the following settings before
clicking OK:
Allow USB Connections is selected
Allow connections to one of the following: is not selected (cleared)
This computer is connected to: is set to Automatic
Open ActiveSync when my device connects is selected
Establish an ActiveSync connection
1. Power on the H500 Spectrum Analyzer.
2. When the instrument startup procedure is done, connect a USB cable (Master to Slave cable type) between the PC and the
instrument. Connect to the PC first, then to the instrument. The ActiveSync program on the PC detects the USB connection
and connects to the instrument, as indicated by the ActiveSync icon in the PC taskbar.
3. To verify the ActiveSync connection, open the ActiveSync application and click Explore on the toolbar. ActiveSync opens a
Windows Explorer dialog box that shows the top level of folders on the instrument. You can use the Windows Explorer to
navigate to files on the instrument and select them for copying or moving.
4. You can now also use Virtual CE to remotely control the instrument using the ActiveSync connection. (See page 91, Remote
control using Virtual CE.)
90
H500 User Manual
Remote instrument access
Remote control using Virtual CE
Virtual CE is a program that gives you remote access to the H500 screen. You use the PC mouse to click on the virtual instrument
screen controls to operate the remote instrument or access the instrument desktop. Virtual CE is already installed on the instrument;
the following procedure is for installing Virtual CE on a PC.
Install and configure Virtual CE on a PC
NOTE. The Virtual CE program on the H500 cannot interface directly over a USB cable, as there is no USB selection in the
program's configuration list. However, the Virtual CE tool on the H500 does support an ActiveSync connection, which can use
a USB cable.
The PC version of Virtual CE supports an ActiveSync connection. However, the ActiveSync selection in Virtual CE does not
work from Microsoft Windows Vista. Therefore you can only use ActiveSync to interface with the instrument over a USB cable
from Microsoft Windows 2000 or XP.
1. Use your Web browser to go to www.tektronix.com/software.
2. Enter virtualce in the Search by keyword field.
3. Click the VIRTUALCE PC APPLICATION INSTALLATION FILE > Software Downloads link, then click on the Download
File link.
4. Follow the on-screen instructions to register/log in and download the Virtual CE utility.
5. Unzip the downloaded file and double-click the Install_VirtualCE.exe file. Follow any on-screen instructions.
H500 User Manual
91
Remote instrument access
6. Select Start > Programs > Tektronix > Virtual CE > Virtual CE to start the program.
7. Click Configure and select the applicable connection type (LAN, WAN/Internet, or ActiveSync).
Run Virtual CE on the instrument and PC
1. Make sure that you have a working Ethernet or ActiveSync/USB remote connection between the PC and the H500 instrument.
2. On the instrument, tap Start > Programs > Communication > Virtual CE. Tap the Configure button and verify that the
applicable connection type is selected (LAN, WAN/Internet, or ActiveSync).
3. On the instrument, tap the Virtual CE button in the task bar at the bottom of the screen to minimize the Virtual CE screen.
4. On the PC, click Start > Programs > Tektronix > Virtual CE > Virtual CE. Click the Configure button and verify that it is
set to the same type of connection as set in step 2. If you are using a network connection, verify that the IP address listed
above the Configure button is correct. The PC Virtual CE should establish communications with the instrument and show
the instrument screen in the Virtual CE window on the PC.
5. To use the H500 remote application control capability, on the PC start the H500 application in the Virtual CE window (if the
application is not already running). The instrument starts the application and the VirtualCE window on the PC shows the
application interface. You can now control all instrument functions from the PC by using the mouse to select and click on
instrument controls.
6. To close the remote access, exit the Virtual CE application on both the instrument and the PC, in any order. Or unplug the
Ethernet or USB cable from the instrument.
92
H500 User Manual
Specifications
Specifications
This section lists the electrical, environmental, and physical specifications for the H500 Spectrum Analyzer. All specifications are
guaranteed unless labeled “Typical.” Typical specifications are provided for your convenience and are not guaranteed.
Table 1: General performance characteristics
Characteristic
Description
RF Input
Operating Frequency
Range
10 kHz – 6.2 GHz
Operating Range for some features may be restricted. If so, the restricted range is defined with
the relevant feature.
Maximum Operating
Input Level
+20 dBm peak envelope power
This is the maximum input level at which the instrument will meet its performance specifications.
For a signal without any amplitude variation, peak envelope power = RMS.
Maximum Input Power
without Damage
50 W rms below 3.2 GHz
15 W rms between 3.2 GHz and 6.2 GHz
IF Output
Output Impedance
50 Ω
IF Center Frequency
140 MHz, non-inverted
IF 3 dB Bandwidth
24 MHz nominal
H500 User Manual
93
Specifications
Table 1: General performance characteristics (cont.)
IF Output Level
–12 dBm @ 1.0 GHz
–12 dBm @ 1.2 GHz
–10 dBm @ 1.6 GHz
–11 dBm @ 4.35 GHz
–16 dBm @ 5.0 GHz
–22 dBm @ 5.75 GHz
0 dBm CW signal applied to the input, instrument reference level set to 0 dBm, room temperature.
IF Output Level Accuracy,
Typical
± 3.5 dB for a CW input signal, 0 dBm input, 1 GHz input frequency, 0 dBm reference level, room
temperature
IF Output Flatness, Typical
± 1.5 dB up to ± 3 MHz from center frequency
± 3 dB up to ± 10 MHz from center frequency
Internal Timebase
Error, Factory Calibration
Corrected
± 0.5 PPM from 0 °C to 50 °C
± 1.0 PPM aging/year
Twenty minute warm-up period required to meet accuracy specification
Error, GPS corrected,
Typical
± 0.01 ppm
Error, after GPS Lock
Loss, Typical
± 0.03 ppm, 10 minute interval after lock loss (unit operated for > 20 minutes before lock loss and
< ± 5 °C temperature change over interval)
External Reference Input
Impedance
94
1500 Ω
H500 User Manual
Specifications
Table 1: General performance characteristics (cont.)
Frequency Range
1 MHz up to 20 MHz ± 1 PPM in 1 MHz steps
Input Level Range
–15 dBm to +15 dBm, 1 MHz to 15 MHz
–10 dBm to +15 dBm, 16 MHz to 20 MHz
dBm levels assume 50 Ω source
Triggering
Acquisition Mode
Single or Continuous, Free Run or Triggered
Trigger disabled during Audio Demod, Signal Strength, and DPX measurements
Trigger Source
IF Level, External Input, or Internal Timebase
Trigger Types
Trigger on rising edge, falling edge, above threshold level, or below threshold level
Trigger Delay
Range: 0 to 60 seconds
Resolution: 1 μs
Trigger Position
Range: 0 to 100%
Resolution: 1%
IF Level Trigger
The IF Level trigger compares the power amplitude of the digitized time-domain data-stream
against the threshold setting.
Trigger Threshold
H500 User Manual
Range: –160 dBm to +20 dBm
Resolution: 1 dB
95
Specifications
Table 1: General performance characteristics (cont.)
Trigger Bandwidth
Range
96
5 kHz to 20 MHz in 1-2-5 sequence
10 MHz < Span ≤ 20 MHz: trigger BW = 20 MHz
5 MHz < Span ≤ 10 MHz: trigger BW = 10 MHz
2 MHz < Span ≤ 5 MHz: trigger BW = 5 MHz
1 MHz < Span ≤ 2 MHz: trigger BW = 2 MHz
500 kHz < Span ≤ 1 MHz: trigger BW = 1 MHz
200 kHz < Span ≤ 500 kHz: trigger BW = 500 kHz
100 kHz < Span ≤ 200 kHz: trigger BW = 200 kHz
50 kHz < Span ≤ 100 kHz: trigger BW = 100 kHz
20 kHz < Span ≤ 50 kHz: trigger BW = 50 kHz
10 kHz < Span ≤ 20 kHz: trigger BW = 20 kHz
5 kHz < Span ≤ 10 kHz: trigger BW = 10 kHz
2.5 kHz < Span ≤ 5 kHz: trigger BW = 5 kHz
Spectrum mode only: Span ≤ 2.5 kHz: trigger BW = 2.5 kHz
Timing/Trigger
External Trigger Input
Characteristics
Impedance: 10 kΩ
Minimum High Threshold: 2.0 V
Maximum Low Threshold: 0.8 V
Minimum High Time: 10 ns
Minimum Low Time: 10 ns
Maximum Input Level without Damage: ±5 V peak continuous
Coupling: DC
Internal Timebase Trigger
The Internal Timebase Trigger generates a trigger event at a user-specified time.
H500 User Manual
Specifications
Table 1: General performance characteristics (cont.)
Trigger Time Modes
Single Trigger on Time
Repeat Trigger at Interval
Both (Trigger on Time with Repeat Interval)
Trigger Time
Units: hours, minutes, seconds, microseconds
Range: 0 to 23:59:59.999999
Resolution: 1 μs
Repeat Interval
Units: seconds, microseconds
Range: 0 to 600.999999 sec
Resolution: 1 μs
Measurement Result Timestamps
Timestamp Value
Units: years, months, days, hours, minutes, seconds, ms/ns
Resolution: 1 ms, before first GPS lock obtained, 1 ns, after first GPS lock obtained
Accuracy, GPS reference,
Typical
± 1000 ns, all measurements except DPX Spectrum
± 1 ms, DPX Spectrum
Internal GPS lock required
Accuracy, Relative, Typical
± 500 ns
Internal GPS lock required
Identical Span (AcqBW) setting required for measurement results.
GPS Position
H500 User Manual
97
Specifications
Table 1: General performance characteristics (cont.)
Position Update Rate
1 update per second
Position Units
Latitude/Longitude: degrees, minutes, seconds
Altitude: meters
Position Resulution
Latitude/Longitude: 0.001 second
Altitude: 0.01 meter
Position Accuracy
Horizontal: R < 9 meters (P=90%)
Altitude: H < 18 meters (P=90%)
Where P is the percent of reported positions that fall within R meters horizontal radius and +/-H
meters vertical distance from the exact position location
Table 2: Spectrum analyzer characteristics
Characteristic
Description
Center Frequency
Range
10 kHz to 6.2 GHz, preamp off
10 MHz to 6.2 GHz, preamp on
Setting Resolution
1 Hz
Span
98
Range
1 kHz to 6.2 GHz
Setting Resolution
1 Hz
H500 User Manual
Specifications
Table 2: Spectrum analyzer characteristics (cont.)
Resolution Bandwidth
Range
10 Hz to 3 MHz (Manual RBW)
10 Hz to 1 MHz (Auto RBW)
Setting Resolution
1 Hz
Spectral Purity
Displayed Average
Noise Level, Preamp
On
–153 dBm, 10 MHz to 2 GHz, 10 Hz RBW
–152 dBm, 2 GHz to 4 GHz, 10 Hz RBW
–151 dBm, 4 to 5 GHz, 10 Hz RBW
–145 dBm, 5 to 6.2 GHz, 10 Hz RBW
Reference Level ≤ (DANL + 90 dB)
Phase Noise
≤ –95 dBc/Hz @ 10 kHz offset
≤ –95 dBc/Hz @ 20 kHz offset
≤ –95 dBc/Hz @ 30 kHz offset
≤ –97 dBc/Hz @ 100 kHz offset
≤ –110 dBc/Hz @ 1 MHz offset
Residual Spurious,
Preamp Off
≤ –90 dBm, 0 dBm attenuator setting
Exception frequencies:
9 MHz to 19 MHz center frequency
3464 MHz center frequency
4592 MHz center frequency
5374 MHz to 5378 MHz center frequency
6160 MHz center frequency
H500 User Manual
99
Specifications
Table 2: Spectrum analyzer characteristics (cont.)
100
Residual Spurious,
Preamp On
≤ –105 dBm, 0 dBm attenuator setting
Exception frequencies:
9 MHz to 19 MHz center frequency
5374 MHz to 5378 MHz center frequency
Third Order IMD
≤ –70 dBc for two tones at or below the reference level, preamp off, all gain settings Auto-coupled
Second Harmonic
≤ –60 dBc for a single tone at or below the reference level, preamp off, all gain settings Auto-coupled
Input Related
Spurious
≤–70 dBc except for Fin = 2.282 GHz ± 20 MHz
The reference for 'dBc' for this specification is the total power of all signals present at the input of
the instrument regardless of the current span
Input Related
Spurious, exception
frequencies, Typical
≤ –55 dBc except for Fin = 2.282 GHz ± 20 MHz
The reference for “dBc” for this specification is the total power of all signals present at the input of
the instrument regardless of the current span
Third Order Intercept
≥ +7 dBm, 0 dB Input Attenuation, Preamp Off
H500 User Manual
Specifications
Table 2: Spectrum analyzer characteristics (cont.)
Spectral Display Amplitude
Reference Level
Range and Units
Range: +20 dBm to –160 dBm
Units: dBm, dBmV, dBuV, dBV, dBW, V, W
Marker Power
Accuracy
±1.75 dB, –50 dBm ≤ input ≤ +20 dBm, preamp off
±3.0 dB, –80 dBm ≤ input < –50 dBm, preamp on, above 10 MHz
±3.75 dB, –120 dBm ≤ input < –80 dBm, preamp on, above 10 MHz
Use peak detector for CW-like signals; use average detector for wideband (signal >> RBW)
Accuracy guaranteed for CW signals and span set to 20 MHz or less
Display
Display Modes
Normal - updates display with each new result
Max Hold - updates displayed point only if new point > old
Min Hold - updates displayed point only if new point < old
Max/Min Hold - displays a vertical bar between Max Hold and Min Hold
Average - displays average of N (specified by user) acquisitions
Average is calculated as follows:
Last N values are saved in memory; when a new result is available, the earliest result of the N
stored values is discarded, the new result is added to the stored values, and a new average
is calculated from the stored values
If the number of results is less than N, then all of the results are averaged together
Number of Averages
1 ≤ N ≤ 200
H500 User Manual
101
Specifications
Table 3: DPX measurement processing characteristics
102
Characteristic
Description
Spectrum Processing
Rate, Typical
10,000 per second (span independent)
Minimum Signal Duration
for 100% Probability of
Intercept, Typical
125 μs
Span Range
5 kHz to 20 MHz
RBW Settings
RBW = Span/200
H500 User Manual
Specifications
Table 4: General purpose RF measurements characteristics
Characteristic
Description
General Purpose RF Channel Power Measurement
Measurement
Bandwidth Range
1 kHz – 20 MHz
Accuracy
≤1.2 dB; +20 dBm to –60 dBm; Resolution BW < 100 kHz
+20 dBm to –40 dBm; Resolution BW ≥ 100 kHz
1 MHz to 3.2 GHz , preamp off
≤2 .4 dB; –60 dBm to –75 dBm; Resolution BW < 100 kHz
–40 dBm to –55 dBm; Resolution BW ≥ 100 kHz
10 MHz to 3.2 GHz , preamp on
≤1.8 dB; +20 dBm to –50 dBm; Resolution BW < 100 kHz
+20 dBm to –40 dBm; Resolution BW ≥ 100 kHz
3.2 GHz to 6.2 GHz , preamp off
≤3 dB; –50 dBm to –75 dBm; Resolution BW < 100 kHz
–40 dBm to –55 dBm; Resolution BW ≥ 100 kHz
3.2 GHz to 6.2 GHz , preamp on
Specifications apply for default control settings (Auto RBW, Auto Level)
Occupied Bandwidth Measurement
Percent Power
Inclusion Range
H500 User Manual
50% - 100% in 1% steps
103
Specifications
Table 4: General purpose RF measurements characteristics (cont.)
RF Field Strength
Channel Bandwidth
Range
Same as Channel Power
Accuracy
Same as Channel Power
Table 5: Amplitude vs. time characteristics
Characteristic
Description
Center Frequency
Range
Minimum center frequency = 10 kHz + Span / 2, preamp off
Minimum center frequency = 10 MHz, preamp on
Maximum center frequency = 6.2 GHz
Resolution
1 Hz
Span
Range
104
5 kHz to 20 MHz in 1-2-5 sequence
Sample rate is automatically set based on the span selection
H500 User Manual
Specifications
Characteristic
Description
Acquisition Length
Range
1024 to 1024000 samples
36 μs to 149 seconds, depending on span and number of samples
Span setting and number of samples selected determine the acquisition length
Sample rate is automatically set based on span selection
Time Display Amplitude
Reference Level Range
and Units
+20 dBm to –160 dBm
dBm, dBmV, dBuV, dBV, dBW, V, W
Marker Power Accuracy
±1.8 dB, –50 dBm ≤ input ≤ +20 dBm, preamp off
± 3.0 dB, –75 dBm ≤ input < –40 dBm, preamp on, above 10 MHz
Display
Detector Types
Average: One display point represents the average value of a group of data points
+Peak: One display point represents the maximum value of a group of data points
–Peak: One display point represents the minimum value of a group of data points
+Peak/–Peak: One vertical bar represents the maximum and minimum values of a group of data
points
Trace Types
Normal: updates display with each new result
Max Hold: updates displayed point only if new point > old
Min Hold: updates displayed point only if new point < old
Max/Min Hold: displays a vertical bar between Max Hold and Min Hold
Average: displays average of N (specified by user) acquisitions
H500 User Manual
105
Specifications
Characteristic
Description
Number of Averages
1 ≤ N ≤ 200
Export I/Q Data
I/Q data from can be exported in the following formats:
IQT: in-phase and quadrature phase data for post-processing with RSAVu
CSV: comma-separated values in ASCII format
MAT: Matlab®-compatible file format
Table 6: Signal analysis and monitoring characteristics
Characteristic
Description
AM Demodulation
Provides an audio output signal after AM demodulation of the user-selected signal
Measurement
Frequency
As previously selected
Minimum Input Signal
Level, Typical
-100 dBm
Audio Measurement
Bandwidth
8 kHz
FM Demodulation
106
Provides an audio output signal after FM demodulation of the user-selected signal
Measurement
Frequency
As previously selected
Minimum Signal
Level, Typical
-100 dBm
H500 User Manual
Specifications
Table 6: Signal analysis and monitoring characteristics (cont.)
Maximum Signal
Deviation
Up to 100 kHz
Audio Measurement
Bandwidth
8 kHz, 15 kHz, 75 kHz, or 200 kHz
Maximum Audio
Output Bandwidth
15 kHz
Signal Strength Indicator
Provides both an audio tone and a visual display that are related to the strength of the user
selected signal
Input Signal Level
-120 dBm, minimum
Measurement
Frequency
As previously selected
Measurement
Bandwidth
Up to 20 MHz, dependent upon span and RBW setting
Tone Type
Variable beep rate or variable frequency
Update Rate, Typical
10 per second
H500 User Manual
107
Specifications
Table 7: Environmental characteristics
Characteristic
Description
Temperature
Operating: 0 °C to +50 °C specified performance, –10 °C to +50 °C, typical
Nonoperating: –40 °C to +60 °C
The temperature specs above are modified with the following options installed:
Li-Ion Batteries: Charge 0 °C to +45 °C, Storage –20 °C to +60 °C
Humidity
Operating and Nonoperating: 5% to 95% relative humidity (RH) at up to +30 °C, 5% to 45% RH
above +30 °C up to +50 °C, noncondensing
Altitude
Operating: Up to 4,600 meters (15,092 feet)
Nonoperating: Up to 12,192 meters (40,000 feet)
Table 8: Physical characteristics
108
Characteristic
Description
Dimensions
Height: 25.5 cm. (10.0 in)
Width: 33 cm. (13 in)
Depth: 12.5 cm. (4.8 in)
Weight
6.0 kg (13.25 lbs): instrument and 1 battery
H500 User Manual
Specifications
Table 9: Miscellaneous characteristics
Characteristic
Description
Recommended Instrument
Calibration Interval
2 years
H500 User Manual
109
Specifications
110
H500 User Manual
Index
Index
Symbols and Numbers
? button, 29
A
AC adapter requirements, 3
AC adapter, connecting, 7
AC/DC adapter connection, 16
Accessories (standard), 1
Active GPS (definition), 65
ActiveSync
configure instrument settings, 87
establish connection, 90
PC install and configure, 89
verify supported version, 89
Adapter, AC, connecting, 7
Add signal standards to selection
lists, 30
Add signal types to selection lists, 31
Altitude specifications, 3
Amplifier setting (RF input signal), 22
ArcInfo Shape (.shp) map file, 80
Attenuator setting (RF input signal), 22
AutoLevel button, 23
H500 User Manual
Automatic iMap measurements, 76
B
Battery
charge status, 17
charge times, 8
charging, 8
compartment door location, 16
installing, 5
maintenance and handling, 9
Bitmap (DPX), 38
Bitmap file (iMap), 65
BMP, 65
Button
AutoLevel, 23, 34
change span, 25
display markers, 25
edit region, 25
F EXT, 21
F GPS, 21
F INT, 21
Freq, 34
front trace, 25
GPS status, 21
help, 29
Help, 21
iMap log measurements, 76
iMap mapping mode, 27
log measurements (iMap), 76
measurement frequency, 23
measurement mode buttons, 27
measurement reference
frequency status, 21
move display, 25
move region, 25
Pause, 21
power on/standby, 17
Ref Level, 23, 34
reset, 17
reset measurement, 25
RF input signal
gain/attenuation, 22
Run, 21
signal classification mode, 27
span, 23
spectrogram, 25
spectrum measurement
mode, 27
111
Index
undo display action, 25
zoom display, 25
C
Calibrate the touch screen, 11
Change
spectrum frequency span, 34
Change span button, 25
Changing
application screen colors for
printing, 15
numbers in fields, 28
Charging the batteries, 8
Cleaning the instrument and
touch-screen, 4
Color schemes (user interface), 15
Command bar, 20, 21
Concepts (touch screen), 11
Configure instrument network
settings, 85
Connecting the AC adapter, 7
Connectors
FREQ REF IN, 19
GPS, 19
IF OUT, 19
input & output, 18
112
RF IN, 19
signal input/output, 19
TRIGGER/TIMING IN, 19
Conventions used in this manual, xvii
Converting maps to GSF, 80
D
Declare
declare a region, 60
None, 60
Permitted, 60
Unauthorized, 60
Unknown, 60
Declare a region (signal
classification), 60
Define a signal classification
region, 53
Definition
active GPS receiver, 65
grid map, 65
image map, 65
Delete a direction arrow (iMap), 75
Delete measurement icons (iMap), 71
Dimensions, 3
Direction arrow (iMap), 73
Direction arrow, how to delete
(iMap), 75
Display a DPX spectrum, 39
Display a spectrogram, 36
Display markers button, 25
Displaying
a spectrum waveform, 34
power on/off status, 17
Documentation, xv
Dot Persistence (DPX), 40
DPX Spectrum
Bitmap, 38
Bitmap tab, 40
display control buttons, 25
Dot Persistence, 40
Hit percent, 38, 41
how to display, 39
Infinite persistence setting, 40,
41
Intensity field, 40
Max setting, 41
Min setting, 41
overview, 38
Persistence, 38
Variable persistence setting, 40
Drawer buttons, 24
H500 User Manual
Index
Drawing a measurement direction
arrow (iMap), 73
E
Edit a signal classification region, 57
Edit region button, 25
Electrical storm, preventing personal
injury, xviii
Enabling
signal standards, 30
signal types, 31
Entering numbers in fields, 28
Erase a direction arrow (iMap), 75
Ethernet connector (RJ-45), 18
External RF input signal amplifier, 22
External RF input signal attenuator
setting, 22
External timing reference signal
input, 19
F
Freq button, 23
FREQ REF IN connector, 19
Frequency span (spectrum), 34
Front trace button, 25
Functional verification, 10
H500 User Manual
G
Getting help, 29
Global Measurement controls, 23
GPS and maps, 65
GPS connector, 19
GPS status button, 21
GPS, active, definition, 65
Grid map (iMap), 65
.gsf, 65
GSF, 65
GSF, converting maps to, 80
H
Headphone jack, 18
Help
accessing online help, 29
button, 21
Hit percent (DPX), 38, 41
Humidity operation specifications, 3
I
I/O port locations, 16
IF OUT connector, 19
IF Output
enabling, 46
usage tips, 47
Image map (iMap), 65
iMap
change the direction of a direction
arrow, 73
delete a direction arrow, 75
delete measurement icons, 71
draw a measurement direction
arrow, 73
erase a direction arrow, 75
icon types, 70
loading a map file, 66
log measurements button, 76
logging measurements, 76
map conversion, 80
map file concepts, 65
mapping a measurement, 67
mapping mode button, 27
measurement icon types, 70
measurement icons, delete, 71
measurement mapping, 67
move a measurement icon, 69
overview, 64
plot a measurement on a map, 67
remove a direction arrow, 75
start iMap mode, 64
113
Index
take automatic map
measurements, 76
view measurement icon
values, 71
view measurement values of an
icon, 71
iMap Converter, 80
Increment control, 28
Indoor color scheme, 15
Infinite persistence setting (DPX), 40,
41
Input field entry controls, 28
Input signal characteristics, 3
Input voltage requirements, 3
Input/Output connectors, 18
Installing batteries, 5
Instrument cleaning, 4
Instrument connectors, 16
Instrument elements, 16
Instrument software, xv
Instrument USB port, register on
PC, 88
Instrument-to-PC file interchange, 85
Intensity field (DPX), 40
114
K
Key features, xiv
Keypad button, 28
L
Lightning, preventing personal
injury, xviii
Load a region summary (signal
classification), 63
Loading a map file (iMap), 66
Log measurements button (iMap), 76
Logging iMap measurements, 76
M
Map file concepts (iMap), 65
Map file conversion program, 80
MapInfo Interchange Format (.mif)
map file, 80
Mapping a measurement, 67
Max setting (DPX), 41
Measurement
delete a measurement direction
arrow (iMap), 75
display control buttons, 25
draw a measurement direction
arrow (iMap), 73
drawers, 20
iMap icon types, 70
mapping a measurement
(iMap), 67
mode buttons, 20, 27
reference frequency status
button, 21
results screen, 20
select measurement to
display, 32
view iMap measurement icon
values, 71
Menus, 21
Microphone input, 18
.mif, 65
MIF, 65
Min setting (DPX), 41
Move a measurement icon (iMap), 69
Move region button, 25
Move signal display button, 25
O
Off (power), 10
On (power), 10
H500 User Manual
Index
Online help, 29
Opening H500, 14
Operating basics, 30
Operating considerations, 3
Outdoor color scheme, 15
Overview (iMap), 64
P
Parameter entry controls, 28
Parts of the instrument, 16
Pause button, 21
PC software, xv
PCMCIA ports, 16
Persistence (DPX), 38
Plot measurements (iMap), 67
Power
AC adapter requirements, 3
On/Standby button, 17
powering on and off the
instrument, 10
status panel, 16
Power/Display status, 17
Preventing personal injury from
lightning, xviii
Product features, xiv
PS/2 keyboard connector, 18
H500 User Manual
R
Ref Level button, 23
Region
define a region, 53
edit a region, 57
load a survey summary, 63
save a survey summary, 63
survey summary, 62
Register instrument USB port, 88
Remote access methods, 85
Remove a direction arrow (iMap), 75
Reset button, 17
Reset measurement button, 25
RF IN connector, 19
RF input
characteristics, 3
signal gain/attenuation
button, 22
Run button, 21
Running H500, 14
S
Safety Summary, v
Save a region summary (signal
classification), 63
Screen display colors, 15
Select a measurement type, 32
Serial RS-232 connector, 18
Set other spectrum parameters, 35
Setting
display colors, 15
signal standards, 30
signal types, 31
Signal classification
declare a region, 60
define a region, 53
edit a region, 57
load a survey summary, 63
None, 60
Permitted, 60
save a survey summary, 63
survey summary, 62
Unauthorized, 60
Unknown, 60
Signal Classification mode button, 27
Signal input characteristics, 3
Signal input connectors
Reference Frequency Input, 19
RF Input, 19
TRIGGER/TIMING IN, 19
Signal standards
add signal standards to selection
lists, 30
115
Index
enabling, 30
Signal types
add signal types to selection
lists, 31
enabling, 31
Software, xv
Software upgrades, xvii
Span, 34
Span buttons, 23
Specifications, 93
Spectrogram
display spectrogram button, 25
dual spectrum/spectrogram
display, 36
how to display, 36
view a data record, 37
Spectrum
display control buttons, 25
displaying a waveform, 34
main controls, 20
measurement mode button, 27
parameter tabs, 35
set frequency span, 34
set measurement frequency, 34
set other spectrum
parameters, 35
set reference level, 34
116
Standard accessories, 1
Starting H500, 14
Status panel, 17
Survey summary (signal
classification), 62
T
Taking a spectrum measurement, 34
Temperature range operation
specifications, 3
Thunderstorms, preventing personal
injury, xviii
Touch screen
calibrate, 11
concepts, 11
on/off status, 17
Touch-screen cleaning, 4
TRIGGER/TIMING IN connector, 19
Triggering
enabling, 47
usage tips, 50
U
Undo display action button, 25
Unpack the instrument, 1
Upgrades, software, xvii
USB Host connector, 18
USB Slave connector, 18
User interface
color schemes, 15
command bar, 20, 21
measurement drawers, 20
measurement mode buttons, 20
measurement results screen, 20
menus, 21
overview, 20
spectrum analyzer controls, 20
USGS Digital Line Graph (.opt) map
file, 80
Using the touch screen, 11
V
Variable persistence setting (DPX), 40
Verifying instrument functionality, 10
View a spectrogram record, 37
View measurement icon contents
(iMap), 71
Virtual CE
download, install, configure, 91
run on PC, 92
H500 User Manual
Index
W
Z
Weight, 3
Zoom display button, 25
H500 User Manual
117